Transcript
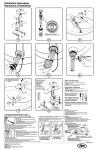
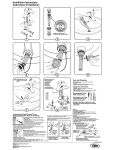
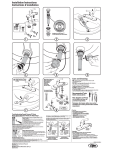
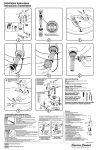
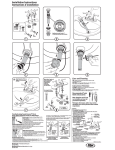
Installation Instructions
Instructions d’installation
B
A
Slot Must be in this Position
La Feate doit être dans cette Position
Off
Fermé
B
1
2
3
4
5
6
Check Operation of Pop-up
Vérifier le Fonctionnement
du Drain
Care and Cleaning:
Make Water Supply and
Waste Connections
Raccordement à
l'Alimentation
d'Eau et à
l'Evacuation
Des Eaux Usées
Do: Simply rinse the product clean with clear water, dry with
a soft cotton flannel cloth.
Do Not: Clean the product with soaps, acid, polish, abrasives,
harsh cleaners, or a cloth with a coarse surface.
Instructions d'Entretien:
À FAIRE:
Test Installed Fitting
Test du Raccordement
simplement rincer le robinet avec de l'eau propre.
sécher avec un chiffon doux en coton.
À NE PAS FAIRE: nettoyer avec des savons, de l'acide, des produits
à polir, des détergents abrasifs ou un chiffon à gros grains.
Recommended Tools
Outils nécessaires
Note: Supplies and P-Trap
not included and must be
purchased separately.
Hot
Chaud
A
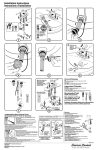
If sink does not hold water even though Stopper is in the
“down” position:
• Disconnect the Cable from the Drain by unthreading the
Cable Connector.
• Use a small screwdriver to rotate the Cam in the clockwise
direction as far as it will go.
• Push DOWN on the Lift-Knob to make sure it is fully down.
• Re-attach the Cable to the Drain Body Connection.
Si l'évier ne retient pas l'eau même lorsque la butée est en position « abaissée » :
• Détacher le câble du drain en vissant le connecteur de câble.
• Utiliser un petit tournevis pour tourner la came dans le sens horaire jusqu'à son maximum.
• Pousser sur le levier pour vérifier qu'il est bien enfoncé.
• Fixer le câble au raccordement du corps de drain.
Logo
Logo
Loop Toward
Rear of Sink
Boucle Vers
L’arrière
de L'évier
Locked Mode (Vandal Proof)
Position verrouillée
(à l'épreuve du vandalisme)
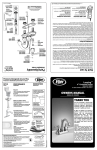
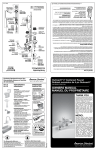
9088 SERIES
Lansing Robinet Monobloc de 4 po
9088 SÉRIE
• Turn HANDLES in OFF position.
• If spout drips, operate HANDLES several times
from OFF to ON position. Do not force-HANDLES
they turn only 90˚.
• AERATOR may accumulate dirt causing
distorted and reduced water flow.
Remove AERATOR and rinse clean.
Index Button
Bouton d'index
Handle Screw
Vis de la Poingée
To Change Handle Direction
• Remove INDEX BUTTON,
Adaptor
HANDLE SCREW and HANDLE.
Adaptateur
• Remove SPRING CLIP
• Lift and turn STOP WASHER 90˚.
• Replace SPRING CLIP
90˚
• Replace HANDLE.
Spring Clip
Rondelle de Butée
Logo
Logo
180˚
• Détacher le câble du drain en vissant le connecteur de câble. Par un des côtés, utiliser
les doigts ou un petit tournevis pour sortir le capuchon de came du drain.
• Tirer tout droit sur la came pour l'enlever en la secouant légèrement pour libérer le joint en caoutchouc.
• La butée peut être enlevée en la soulevant du drain.
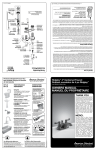
Lansing 4" Centerset Faucet
If Faucet Drips Proceed As Follows:
La butée peut être installée de deux manières, en position « verrouillée »
(la butée ne peut pas être enlevée) ou en position « déverrouillée »
(la butée peut être enlevée).
• Disconnect the Cable from the Drain by unthreading the Cable
Connector. Use fingers or small screwdriver under either side of
the Cam Cap to pry it out from the Drain.
• Remove the Cam by pulling it straight out while wiggling gently
to loosen the Rubber Seal.
• The Stopper can now be removed by lifting it out of the Drain.
™
Service
The Stopper can be installed two ways, “Locked” Mode (Stopper cannot
be removed) or “Unlock” Mode (Stopper is removable).
Stopper Removal Procedure:
Procédure de Dépose de Butée
On
Ouvert
8
7
Troubleshooting Speed Connect® Drain
Drain Speed Connect® Guide de dépannage
Remarque: des tuyaux, siphon en p ou des
arrondies (non inclus) peuvent être achetés
séparément.
Cold
Froid
Loop Toward
Front of Sink
Boucle Vers
L’avant de
L'évier
Unlocked Mode
Position déverrouillée
Entretien
Stop Washer
Sauterelle de Fixation
Valve Stem
la Tige
Si la robinetterie goutte, suivz les instructions:
• Mettre la POIGNÉE sur la position fermée.
• Si le robinet goutte, actionner les poignées à plusieurs reprises en
alternant les positions fermée et ouverte. Ne pas forcer - les poignées ne
tournent qu'a 90°.
• La poussière peut s’accumuler dans le BRISE-JET AÉRATEUR, causant
ainsi un débit d’eau réduit et inconstant. Dévisser et retirer le BRISE-JET
AÉRATEUR, et le rincer.
Pour changer la direction de poignée
• Enlevez le BOUTON D’INDEX, la VIS de la POIGNÉE et la POIGNÉE.
• Enlevez la RONDELLE de BUTÉE.
• Soulevez et tournez al SAUTERELLE de FIXATION 90˚.
• Installez à nouveau la RONDELLE de BUTÉE.
• Installez à nouveau la POIGNÉE.
M968610_FR_EZ_RÉV. 1.1