Transcript
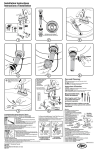
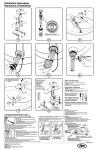
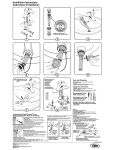
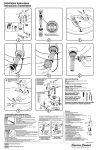
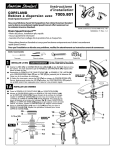
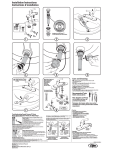
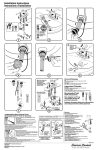
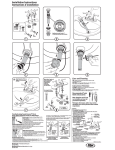
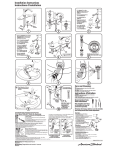
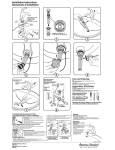
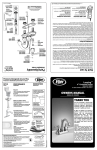
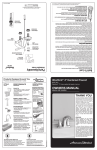
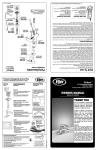
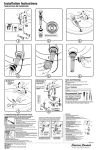
Installation Instructions
Instructions d’installation
B
A
Slot Must be in this Position
La Feate doit être dans cette Position
Off
Fermé
B
1
2
3
4
5
6
Check Operation of Pop-up
Vérifier le Fonctionnement
du Drain
Care and Cleaning:
Make Water Supply and
Waste Connections
Raccordement à
l'Alimentation
d'Eau et à
l'Evacuation
Des Eaux Usées
Do: Simply rinse the product clean with clear water, dry with
a soft cotton flannel cloth.
Do Not: Clean the product with soaps, acid, polish, abrasives,
harsh cleaners, or a cloth with a coarse surface.
Instructions d'Entretien:
À FAIRE:
simplement rincer le robinet avec de l'eau propre.
sécher avec un chiffon doux en coton.
À NE PAS FAIRE: nettoyer avec des savons, de l'acide, des produits
à polir, des détergents abrasifs ou un chiffon à gros grains.
Test Installed Fitting
Test du Raccordement
Recommended Tools
Outils nécessaires
Note: Supplies and P-Trap
not included and must be
purchased separately.
Cold
Froid
A
Hot
Chaud
7
Troubleshooting Speed Connect® Drain
Drain Speed Connect® Guide de dépannage
If sink does not hold water even though Stopper is in the
“down” position:
• Disconnect the Cable from the Drain by unthreading the
Cable Connector.
• Use a small screwdriver to rotate the Cam in the clockwise
direction as far as it will go.
• Push DOWN on the Lift-Knob to make sure it is fully down.
• Re-attach the Cable to the Drain Body Connection.
Si l'évier ne retient pas l'eau même lorsque la butée est en position « abaissée » :
• Détacher le câble du drain en vissant le connecteur de câble.
• Utiliser un petit tournevis pour tourner la came dans le sens horaire jusqu'à son maximum.
• Pousser sur le levier pour vérifier qu'il est bien enfoncé.
• Fixer le câble au raccordement du corps de drain.
Logo
Logo
9315.201 SERIES
Stratton Robinet Monobloc de 4 po
9315.201 SÉRIE
If Faucet Drips Proceed As Follows:
Logo
Logo
180˚
Loop Toward
Rear of Sink
Boucle Vers
L’arrière
de L'évier
Loop Toward
Front of Sink
Boucle Vers
L’avant de
L'évier
• Turn HANDLES in OFF position.
• If spout drips, operate HANDLES several times
from OFF to ON position. Do not force-HANDLES
they turn only 90˚.
• AERATOR may accumulate dirt causing
distorted and reduced water flow.
Remove AERATOR and rinse clean.
To Change Handle Direction
• Loosen HANDLE SCREW and
remove HANDLE.
• Lift and turn
ADAPTOR 90˚.
• Replace HANDLE.
Handle Screw
Vis de la Poingée
Adaptor
Adaptateur
90˚
Valve Stem
la Tige
Entretien
Si la robinetterie goutte, suivz les instructions:
Aerator
Aérateur
• Mettre la POIGNÉE sur la position fermée.
• Si le robinet goutte, actionner les poignées à plusieurs reprises en
alternant les positions fermée et ouverte. Ne pas forcer - les poignées ne
tournent qu'a 90°.
• La poussière peut s’accumuler dans le BRISE-JET AÉRATEUR, causant
ainsi un débit d’eau réduit et inconstant. Dévisser et retirer le BRISE-JET
AÉRATEUR, et le rincer.
Pour changer la direction de poignée
Locked Mode (Vandal Proof)
Position verrouillée
(à l'épreuve du vandalisme)
• Détacher le câble du drain en vissant le connecteur de câble. Par un des côtés, utiliser
les doigts ou un petit tournevis pour sortir le capuchon de came du drain.
• Tirer tout droit sur la came pour l'enlever en la secouant légèrement pour libérer le joint en caoutchouc.
• La butée peut être enlevée en la soulevant du drain.
Stratton 4" Centerset Faucet
Service
La butée peut être installée de deux manières, en position « verrouillée »
(la butée ne peut pas être enlevée) ou en position « déverrouillée »
(la butée peut être enlevée).
• Disconnect the Cable from the Drain by unthreading the Cable
Connector. Use fingers or small screwdriver under either side of
the Cam Cap to pry it out from the Drain.
• Remove the Cam by pulling it straight out while wiggling gently
to loosen the Rubber Seal.
• The Stopper can now be removed by lifting it out of the Drain.
™
8
The Stopper can be installed two ways, “Locked” Mode (Stopper cannot
be removed) or “Unlock” Mode (Stopper is removable).
Stopper Removal Procedure:
Procédure de Dépose de Butée
On
Ouvert
Remarque: des tuyaux, siphon en p ou des
arrondies (non inclus) peuvent être achetés
séparément.
Unlocked Mode
Position déverrouillée
• Desserrer VIS de la POIGNÉE y enlevez LA POIGNÉE.
• Soulevez et tournez l'ADAPTEUR 90˚.
• Installez à nouveau la POIGNÉE
M965007_FR_EZ_RÉV. 1.1