1
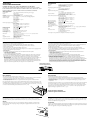
Specifications
AUDIO POWER SPECIFICATIONS
Spécifications
Circuiterie
POWER OUTPUT AND TOTAL HARMONIC DISTORTION
35 watts per channel minimum continuous average power into 4 ohms,
both channels driven from 20 Hz to 20 kHz with no more than 0.04% total
harmonic distortion per Car Audio Ad Hoc Committee standards.
Other Specifications
Circuit system
Inputs
OTL (output transformerless) circuit Pulse power supply
RCA pin jacks
High level input connector
Input level adjustment range 0.3 – 6 V (RCA pin jack), 0.6 – 12 V (High level input)
Outputs
Speaker terminals
Speaker impedance
2 – 8 Ω (stereo), 4 – 8 Ω (when used as a bridging amplifier)
Maximum output
Four speakers:
80 W × 4 (at 4 Ω)
Three speakers:
80 W × 2 + 222 W × 1 (at 4 Ω)
Two speakers:
222 W × 2 (at 4 Ω)
Rated output (supply voltage at 14.4 V)
Four speakers:
35 W × 4 (20 Hz – 20 kHz, 0.04 % THD, at 4 Ω)
40 W × 4 (20 Hz – 20 kHz, 0.1 % THD, at 2 Ω)
Two speakers:
80 W × 2 (20 Hz – 20 kHz, 0.1 % THD, at 4 Ω)
Frequency response
5 Hz – 80 kHz ( dB)
Harmonic distortion
0.005 % or less (at 1 kHz, 4 Ω, 10 W)
Low-pass filter
80 Hz, –18 dB/oct
High -pass filter
80 Hz, –12 dB/oct
Power requirements
12 V DC car battery (negative ground)
Power supply voltage
10.5 – 16 V
Current drain
at rated output: 20 A (4 Ω, 35 W × 4)
Remote input: 1.5 mA
Dimensions
Approx. 260 × 55 × 180 mm (10 1/4 × 2 1/4 × 7 1/8 in.) (w/h/d) not incl.
projecting parts and controls
Mass
Approx. 2.4 kg (5 lb 5 oz.) not incl. accessories
Supplied accessories
Mounting screws (4)
High level input cord (1)
Protection cap (1)
Circuit OTL (sortie sans transformateur)
Alimentation électrique par impulsions
Entrées
Prises à broche RCA
Connecteur d’entrée haut niveau
Plage de réglage du niveau d’entrée
0,3 à 6 V (prises à broche RCA),
0,6 à 12 V (entrée haut niveau)
Sorties
Bornes de haut-parleurs
Impédance des haut-parleurs
2 à 8 Ω (stéréo)
4 à 8 Ω (utilisé comme amplificateur en pont)
Sorties maximales
Quatre haut-parleurs : 80 W x 4 (à 4 Ω)
Trois haut-parleurs : 80 W × 2 + 222 W × 1 (à 4 Ω)
Deux haut-parleurs : 222 W × 2 (à 4 Ω)
Sortie nominale (tension d’alimentation de 14,4 V)
Quatre haut-parleurs :
35 W × 4 (20 Hz – 20 kHz, 0.04 % THD, à 4 Ω)
40 W × 4 (20 Hz – 20 kHz, 0.1 % THD, à 2 Ω)
Deux haut-parleurs :
80 W × 2 (20 Hz – 20 kHz, 0.1 % THD, à 4 Ω)
Réponse en fréquence
5 Hz à 80 kHz ( dB)
Distorsion harmonique
0,005 % ou moins (à 1 kHz, 4 Ω, 10 W)
Filtre passe-bas
80 Hz, –18 dB/oct
Filtre passe-haut
80 Hz, –12 dB/oct
Alimentation requise
Batterie de voiture, 12 V CC (masse négative)
Tension d’alimentation
10,5 à 16 V
Consommation de courant à la sortie nominale : 20 A (4 Ω, 35 W × 4)
Entrée de télécommande : 1,5 mA
Dimensions
Env. 260 × 55 × 180 mm (10 1/4 × 2 1/4 × 7 1/8 po.) (l/h/p) (parties saillantes et
commandes exclues)
Poids
Env. 2,4 kg (5 lb 5 on.), accessoires non compris
Accessoires fournis
Vis de montage (4)
Cordon d’entrée haut niveau (1)
Cache de protection (1)
La conception et les spécifications sont sujettes à modification sans préavis.
Design and specifications are subject to change without notice.
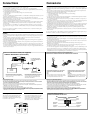
Features
Caractéristiques
•Maximum power output of 80 W per channel (at 4 Ω).
•This unit can be used as a bridging amplifier with a maximum output of 222 W.
•Built-in Low-pass filter (80Hz, –18dB/oct) and High-pass filter (80Hz, –12dB/oct).
•Built in protection circuit*.
•Pulse power supply** for stable and regulated output power.
•Direct connection can be made with the speaker output of your car audio if it is not equipped with
the line output (High level input connection).
•Puissance de sortie maximale de 80 watts par canal (à 4 Ω).
•Cet appareil peut être utilisé comme un amplificateur en pont avec une sortie maximale de 222 W.
•Filtre passe-bas (80 Hz, –18 dB/oct) et filtre passe-haut (80Hz, –12dB/oct) intégrés.
•Circuit de protection intégré*.
•Alimentation électrique par impulsions** pour une puissance de sortie stable et régulée.
•Il est possible d’établir une connexion directe avec la sortie de haut-parleur de votre autoradio si
celui-ci n’est pas équipé d’une sortie de ligne (connexion d’entrée haut niveau).
* Protection circuit
This amplifier is provided with a protection circuit that operates in the following cases:
— when the unit is overheated
— when a DC current is generated
— when the speaker terminals are short circuited.
The color of the POWER/PROTECTOR indicator will change from green to red, and the unit will shut down.
If this happens, turn off the connected equipment, take out the cassette tape or disc, and determine the
cause of the malfunction. If the amplifier has overheated, wait until the unit cools down before use.
** Pulse power supply
This unit has a built-in power regulator which converts the power supplied by the 12 V DC car battery into
high speed pulses using a semiconductor switch. These pulses are stepped up by the built-in pulse
transformer and separated into both positive and negative power supplies before being converted into
direct current again. This is to regulate fluctuating voltage from the car battery. This light weight power
supply system provides a highly efficient power supply with a low impedance output.
* Circuit de protection
Cet amplificateur est fourni avec un circuit de protection qui entre en fonction dans les cas suivants :
— lorsque l’appareil surchauffe
— lorsqu’un courant continu est généré
— lorsque les bornes de haut-parleur sont court-circuitées.
La couleur de l’indicateur POWER/PROTECTOR passe du vert au rouge et l’appareil s’éteint.
Dans ce cas, éteignez les appareils raccordés, retirez la cassette ou le disque et déterminez l’origine du
problème. Si l’amplificateur surchauffe, attendez qu’il refroidisse avant d’utiliser l’appareil.
** Alimentation électrique par impulsions
Cet appareil est équipé d’un régulateur de puissance intégré qui convertit la puissance fournie par la
batterie de voiture de 12 V CC en impulsions ultra-rapides au moyen d’un commutateur à semi-conducteur.
Ces impulsions sont amplifiées par le transformateur d’impulsions intégré et séparées en alimentation
positive et négative avant d’être reconverties en courant continu. Ce processus permet de compenser les
fluctuations de tension provenant de la batterie de la voiture. Ce système d’alimentation léger assure une
alimentation électrique très efficace pour une sortie d’impédance faible.
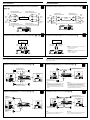
POWER/PROTECTOR indicator
Indicateur POWER/PROTECTOR
Installation
Installation
Before Installation
Avant l’installation
•Mount the unit either inside the trunk or under a seat.
•Choose the mounting location carefully so the unit will not interfere with the normal movements of
the driver and it will not be exposed to direct sunlight or hot air from the heater.
•Do not install the unit under the floor carpet, where the heat dissipation from the unit will be
considerably impaired.
•Installez l’appareil dans le coffre ou sous un siège.
•Choisissez soigneusement l’emplacement de montage afin d’éviter que l’appareil ne gêne le
conducteur dans ses mouvements et qu’il ne soit pas exposé au rayonnement direct du soleil ni aux
conduits de chauffage.
•N’installez pas l’appareil sous le tapis de sol car la dissipation thermique ne pourrait pas se faire
correctement.
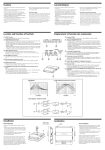
First, place the unit where you plan to install it, and mark the positions of the four screw holes on the
mounting board (not supplied). Then drill a 3 mm (1/8 in.) pilot hole at each mark and mount the unit
onto the board with the supplied mounting screws. The mounting screws are all 15 mm (19/32 in.) long,
so make sure that the mounting board is thicker than 15 mm (19/32 in.).
1
Posez d’abord l’appareil à l’endroit où vous souhaitez l’installer et tracez un repère de positionnement
pour les quatre orifices de vis sur la plaque de montage (non fournie). Percez des orifices de 3 mm
(1/8 po.) au niveau de chaque repère et fixez l’appareil sur la plaque avec les vis de montage fournies.
La longueur des vis de montage est de 15 mm (19/32 po.). Assurez-vous donc que l’épaisseur de la
plaque de montage est supérieure à 15 mm (19/32 po.).
Mount the unit as illustrated.
Installez l’appareil comme illustré.
Fuse Replacement
Remplacement du fusible
If the fuse blows, check the power connection and replace the fuse. If the fuse blows again after
replacement, there may be an internal malfunction. In such a case, consult your nearest Sony dealer.
Si le fusible fond, vérifiez les connexions de l’alimentation et remplacez le fusible. Si le fusible fond de
nouveau après avoir été remplacé, cela peut révéler une défaillance interne de l’appareil. Dans ce cas,
consultez votre détaillant Sony le plus proche.
Warning
When replacing the fuse, be sure to use one matching the amperage stated above the fuse holder.
Never use a fuse with an amperage rating exceeding the one supplied with the unit as this could
damage the unit.
Avertissement
Lorsque vous remplacez le fusible, veillez à utiliser un fusible dont la capacité en ampères correspond
à celle inscrite sur le porte-fusible. N’utilisez jamais de fusible dont la capacité dépasse celle du fusible
fourni avec l’appareil car cela pourrait endommager l’appareil.