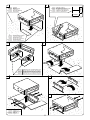
1
Installation and Wire connection manual
Manuel d’installation et de connexion
Installation- und Kabelanschluß-Anleitung
Manuale per installazione e collegamenti
Aanwijzingen voor installatie en aansluiten
Manual de instalación y de conexión de cables
English
Italiano
Contents
1.
2.
3.
4.
5.
6.
7.
8.
9.
10.
11.
12.
13.
Indice
POINTS TO OBSERVE FOR SAFE USAGE ...................... 2
BEFORE STARTING ............................................................ 3
GENERAL CAUTIONS ........................................................... 3
PACKAGE CONTENTS .......................................................... 4
CAUTIONS ON INSTALLATION ........................................... 5
INSTALLING THE NAVIGATION UNIT
Installation location ............................................................. 8
Fixing bracket adjustment ............................................... 9
Type affixed with adhesive .................................................... 10
Type affixed with clip ............................................................. 12
INSTALLING THE GPS ANTENNA ...................................... 14
INSTALLING THE REMOTE CONTROL .............................. 16
INSTALLING THE INFRARED SENSOR ............................. 18
CONNECTING TO THE SPEED SENSOR LEADS ................ 19
CAUTIONS ON WIRING ....................................................... 20
WIRE CONNECTION
Power supply lead usage ................................................... 22
Circuit Diagram ..................................................................... 23
Electro tap usage ............................................................... 23
SAMPLE SYSTEMS ................................................................ 24
1.
2.
3.
4.
5.
6.
7.
8.
9.
10.
11.
12.
13.
Nederlands
Français
Table des matières
1.
2.
3.
4.
5.
6.
7.
8.
9.
10.
11.
12.
13.
Inhoud
POINTS À OBSERVER POUR GARANTIR UNE UTILISATION EN TOUTE SÉCURITÉ .... 2
PREPARATIFS ...................................................................... 3
PRECAUTIONS GENERALES .............................................. 3
CONTENU DE L’EMBALLAGE ........................................... 4
PRECAUTIONS AU SUJET DE L’INSTALLATION ............... 5
INSTALLATION DE L’UNITÉ DE NAVIGATION
Lieu d’installation .............................................................. 8
Réglage des appliques de fixation .................................... 9
Type fixé par adhésif ........................................................ 10
Type fixé avec attache .................................................... 12
INSTALLATION DE L’ANTENNE GPS ................................ 14
INSTALLATION DE LA TÉLÉCOMMANDE ......................... 16
INSTALLATION DU CAPTEUR DE RAYONS INFRAROUGES .... 18
RACCORDEMENT DES FILS DU CAPTEUR DE VITESSE ... 19
PRECAUTIONS AU SUJET DES CONNEXIONS ................ 20
CONNEXION DES CABLES
Utilisation de la cordon d’alimentation ................................. 22
Schéma de Montage ......................................................... 23
Utilisation du dérivation électrique ....................................... 23
EXEMPLES DE SYSTEMES ................................................ 24
1.
2.
3.
4.
5.
6.
7.
8.
9.
10.
11.
12.
13.
Inhalt
7.
8.
9.
10.
11.
12.
13.
Índice
FÜR EINEN SICHEREN BETRIEB BEACHTEN ................ 2
EHE SIE MIT DEM EINBAU BEGINNEN ............................. 3
ALLGEMEINE VORSICHTSMASSNAHMEN ......................... 3
VERPACKUNGSINHALT ........................................................ 4
VORSICHTSMASSNAHMEN FÜR INSTALLATION ........... 6
EINBAU DER NAVIGATIONSEINHEIT
Installationsort ................................................................. 8
Ausrichten der Montagewinkel .......................................... 9
Befestigung mit Klebeband .............................................. 10
Befestigung mit Clips ....................................................... 12
EINBAU DER GPS-ANTENNE ............................................. 14
EINBAU DER FERNBEDIENUNG ........................................ 16
EINBAU DES INFRAROTSENSORS ...................................... 18
ANSCHLUSS AN DIE GESCHWINDIGKEITSSENSORLEITUNGEN .... 19
VORSICHTSMASSNAHMEN FÜR VERDRAHTUNG .......... 20
KABELVERBINDUNGEN
Verwendung der Netzanschlußkabel .................................. 22
Schaltbild ............................................................................ 23
Verwendung der Elektroanzapfung .................................... 23
BEISPIELSYSTEME .............................................................. 24
QRZ7651
WAAR U OP MOET LETTEN VOOR EEN VEILIG GEBRUIK ...... 2
ALVORENS TE STARTEN ................................................... 3
ALGEMENE VOORZORGEN ............................................... 3
INHOUD VAN DE VERPAKKING ........................................ 4
VOORZORGEN VOOR INSTALLEREN ............................. 7
INSTALLEREN VAN HET NAVIGATIETOESTEL
Installatieplek ................................................................. 8
Afstellen van de bevestigingsbeugel ............................... 9
Type dat met plakband wordt vastgezet ........................... 10
Type dat met klem wordt vastgezet .................................... 12
INSTALLEREN VAN DE GPS ANTENNE ............................. 14
INSTALLEREN VAN DE AFSTANDSBEDIENING ................ 16
INSTALLEREN VAN DE INFRAROOD SENSOR ................. 18
AANSLUITEN OP DE DRADEN VOOR DE SNELHEIDSSENSOR ... 19
VOORZORGEN VOOR AANSLUITEN ................................... 21
AANSLUITEN
Gebruik van het netsnoer .................................................... 22
Circuitdiagram .................................................................... 23
Gebruik van de elektro-splitter ........................................... 23
SYSTEEMVOORBEELDEN .................................................. 24
Español
Deutsch
1.
2.
3.
4.
5.
6.
PUNTI DA OSSERVARE PER UN UTILIZZO SICURO ....... 2
PRIMA DI COMINCIARE ...................................................... 3
PRECAUZIONI DI CARATTERE GENERALE ...................... 3
CONTENUTO DELL’IMBALLO ............................................ 4
PRECAUZIONI PER L’INSTALLAZIONE ............................. 6
INSTALLAZIONE DELL’UNITÀ DI NAVIGAZIONE
Posto d’installazione ........................................................ 8
Regolazione staffa di fissaggio ....................................... 9
Tipo fissato con adesivo ................................................... 10
Tipo fissato con graffa ...................................................... 12
INSTALLAZIONE DELL’ANTENNA GPS ............................... 14
INSTALLAZIONE DEL TELECOMANDO ............................... 16
INSTALLAZIONE DEL SENSORE A RAGGI INFRAROSSI ... 18
COLLEGAMENTO AI CAVETTI DEL SENSORE DI VELOCITÀ ... 19
PRECAUZIONI PER I COLLEGAMENTI ............................ 21
COLLEGAMENTI
Utilizzo della cavo di alimentazione ................................... 22
Schema circuitale .............................................................. 23
Utilizzo della presa elettrica ................................................ 23
SISTEMI TIPICI ....................................................................... 24
1.
2.
3.
4.
5.
6.
7.
8.
9.
10.
11.
12.
13.
1
NORMAS DE SEGURIDAD .................................................. 2
ANTES DE COMENZAR ..................................................... 3
PRECAUCIONES GENERALES ......................................... 3
CONTENIDO DEL PAQUETE ............................................ 4
PRECAUCIONES PARA LA INSTALACIÓN ....................... 7
INSTALACIÓN DE LA UNIDAD DE NAVEGACIÓN
Lugar de instalación ........................................................ 8
Fijación del ajuste del soporte .......................................... 9
Tipo con fijación adhesiva ............................................... 10
Tipo con fijación de clip .................................................. 12
INSTALACIÓN DE LA ANTENA GPS .................................... 14
INSTALACIÓN DEL MANDO A DISTANCIA .......................... 16
INSTALACIÓN DEL SENSOR DE INFRARROJOS ............... 18
CONEXIÓN A LOS CABLES DEL SENSOR DE VELOCIDAD ...... 19
PRECAUCIONES PARA LA CONEXIÓN DE CABLES ....... 21
CONEXIÓN DE CABLES
Uso del cable de suministro de energía ............................. 22
Diagrama del circuito ......................................................... 23
Uso del borne eléctrico ...................................................... 23
SISTEMAS DE MUESTRA .................................................. 24
March 16, 2004 (X)
1.
English
Français
Deutsch
Italiano
Nederlands
Español
POINTS TO OBSERVE FOR SAFE USAGE
POINTS À OBSERVER POUR GARANTIR UNE UTILISATION EN TOUTE SÉCURITÉ
FÜR EINEN SICHEREN BETRIEB BEACHTEN
PUNTI DA OSSERVARE PER UN UTILIZZO SICURO
WAAR U OP MOET LETTEN VOOR EEN VEILIG GEBRUIK
NORMAS DE SEGURIDAD
English
Italiano
Read this manual carefully before starting operation and use this system safely. We can
not be responsible for problems resulting from failure to observe the instructions in this
manual.
This manual uses various pictorial displays to show how to use this product safely and
to avoid harm to yourself and others and damage to your property. Here is what these
pictorial displays mean. Understanding them is important for reading this manual.
Meaning of displays
WARNING
This label is intended to alert the user to the presence of important operating instructions. Failure to heed the instructions will result in severe injury or death.
Leggere attentamente il presente manuale prima di iniziare l’installazione, e utilizzare
questo sistema in condizioni di sicurezza. Si declina qualunque responsabilità per
eventuali problemi derivanti dalla mancata osservanza delle istruzioni contenute nel
presente manuale.
Nel presente manuale si utilizzano vari simboli grafici per illustrare come utilizzare in
modo sicuro questo prodotto e per evitare di provocare danni a sé, a terzi e agli oggetti.
Nel seguito è illustrato il significato dei simboli utilizzati, la cui comprensione è essenziale per una lettura corretla del presente manuale.
Significato dei simboli
AVVERTIMENTO
Questa etichetta viene utilizzata per richiamare l’attenzione dell’utente su istruzioni di
funzionamento particolarmente importanti. La mancata osservanza di tali istruzioni può
provocare lesioni gravi o il decesso.
CAUTION
This label is intended to alert the user to the presence of important operating instructions. Failure to heed the instructions can result in injury or material damage.
PRECAUZIONE
Questa etichetta viene utilizzata per richiamare l’attenzione dell’utente su istruzioni di
funzionamento particolarmente importanti. La mancata osservanza di tali istruzioni può
provocare lesioni o danni materiali.
WARNING
DO NOT OPEN THE CASE, DISASSEMBLE OR ALTER.
There are no user serviceable parts inside. Attempts to disassemble or alter may lead to
accident, fire or electric shock.
AVVERTIMENTO
NON APRIRE, SMONTARE O MODIFICARE L’INVOLUCRO.
All’interno non sono presenti parti cui gli utenfi possono fornire assistenza tecnica. Eventuali
tentativi di smontare o modificare l’involucro possono causare incidenti, e scosse elettriche.
NOTE
If you drop anything into the unit during installation, consult your dealer or an authorized
CLARION service centre.
NOTA
Se cade qualcosa all’interno dell’unità durante il montaggio consultare il rivenditore o un
centro assistenza autorizzato CLARION.
Français
Lisez ce manuel attentivement avant de commencer à utiliser l’appareil et utilisez
l’appareil en respectant la sécurité. Nous ne saurions être responsables des problèmes
résultant du non respect des consignes de ce manuel.
Le manuel comprend divers affichages graphiques pour indiquer comment utiliser
l’appareil en toute sécurité et comment éviter de vous blesser, vous ou d’autres
personnes, et d’endommager le matériel. Il est important que vous les compreniez pour
la lecture du manuel.
Signification des affichages
AVERTISSEMENT
Cette étiquette a pour but de signaler à l’utilisateur la présence d’instructions de
fonctionnement importantes. Le non respect de ces instructions entraînera des
blessures graves ou la mort.
Nederlands
Lees deze handleiding zorgvuldig door voor u dit systeem in gebruik neemt en gebruik
het op een veilige manier. Wij kunnen geen aansprakelijkheid aanvaarden voor problemen die het resultaat zijn van het niet opvolgen van de instructies in deze handleiding.
Deze handleiding maakt gebruik van verschillende afbeeldingen die aangeven hoe u dit
product veilig kunt gebruiken en hoe u letsel voor uzelf en anderen en schade aan uw of
andermans eigendommen kunt voorkomen. Hier vindt u beschreven wat deze afbeeldingen betekenen. Het is belangrijk dat u begrijpt wat deze afbeeldingen betekenen
voor u deze handleiding gaat lezen.
Betekenis van de afbeeldingen
WAARSCHUWING
Dit label waarschuwt de gebruiker voor belangrijke instructies. Niet opvolgen van deze
instructies zal leiden tot ernstig letsel of zelfs de dood.
PRECAUTION
Cette étiquette a pour but de signaler à l’utilisateur la présence d’instructions de
fonctionnement importantes. Le non respect de ces instructions risque d’entraîner des
blessures ou des dommages du matériel.
LET OP:
Dit label waarschuwt de gebruiker voor belangrijke instructies. Niet opvolgen van deze
instructies kan leiden tot letsel of materiële schade.
AVERTISSEMENT
NE PAS OUVRIR, DEMONTER NI MODIFIER LE COFFRET.
Il n’y a pas de pièces qui soient réparables par l’utilisateur à l’intérieur. Toute tentative de
démontage ou de modification risque de provoquer un accident, un feu ou un choc
électrique.
WAARSCHUWING
OPEN DE BEHUIZING NIET, DEMONTEER OF WIJZIG HET PRODUCT NIET.
Er bevinden zich geen onderdelen binnenin die door de gebruiker zelf vervangen of gerepareerd kunnen worden. Pogingen het product te demonteren of wijzigen kan leiden tot
ongelukken, brand of elektrische schok.
REMARQUE
Si quelque chose tombait à l’intérieur de l’appareil pendant l’installation, consultez le
revendeur ou un centre de service qualifié CLARION.
OPMERKING
Raadpleeg uw handelaar of een erkend CLARION-onderhoudscentrum indien u per
ongeluk tijdens het installeren iets in het toestel heeft laten vallen.
Deutsch
Español
Vor lnbetriebnahme und für einen sicheren Betrieb dieses Systems bitte diese Anleitung
sorgfältig durchlesen. Wir übernehmen keine Verantwortung für Störungen, die durch
Nichteinhaltung der Anweisungen in dieser Anleitung verursacht werden.
In dieser Anleitung werden unterschiedliche bildliche Darstellungen verwendet, die einen sicheren Betrieb dieses Produkts beschreiben, um Sie sowie andere zu schützen
und Sachbeschädigungen zu vermeiden. Diese bildlichen Darstellungen haben folgende Bedeutungen und sie sollten zum Lesen dieser Anleitung verstanden werden.
Bedeutung der Darstellungen
WARNUNG
Macht den Benutzer auf wichtige Bedienanweisungen aufmerksam. Werden diese Anweisungen nicht eingehalten, kann es zu schweren oder tödlichen Unfällen kommen.
Lea atentamente este manual antes de empezar a utilizar la unidad y utilice este sistema de forma segura. No nos hacemos responsables de los problemas derivados del incumplimiento de las instrucciones de este manual.
En este manual se utilizan diversos símbolos gráficos que indican cómo se debe utilizar
este producto de forma segura y evitar que usted u otros sufran lesiones o se dañe su
propiedad. A continuación, le indicamos el significado de estos símbolos. Es importante que los entienda para leer este manual.
Significado de los símbolos
ADVERTENCIA
Esta etiqueta tiene por objeto avisar al usuario de la presencia de importantes instrucciones de funcionamiento. Si no se tienen en cuenta estas instrucciones, se pueden
producir lesiones graves o la muerte.
VORSICHT
Macht den Benutzer auf wichtige Bedienanweisungen aufmerksam. Werden diese Anweisungen nicht eingehalten, kann es zu Verletzungen oder Sachbeschädigungen kommen.
PRECAUTION
Esta etiqueta tiene por objeto avisar al usuario de la presencia de importantes instrucciones de funcionamiento. Si no se tienen en cuenta estas instrucciones, se pueden
producir lesiones o daños materiales.
WARNUNG
NIEMALS GEHÄUSE ÖFFNEN, ZERLEGEN ODER ÄNDERN.
Im lnnern befinden sich keine vom Benutzer wartbaren Teile. Wird versucht die Einheit zu
zerlegen oder zu ändern, könnte dies zu Unfällen, einem Feuer oder elektrischen Schlägen führen.
ADVERTENCIA
NO ABRIR LA CAJA, NI DESMONTE, NI MODIFIQUE LA CAJA.
En el interior no existe ninguna pieza que pueda reparar el usuario. Si intenta desmontar
o modificar la caja, puede provocar un accidente, fuego o una descarga eléctrica.
NOTA
Si cahe algo dentro de la unidad durante la instalación, consulte a su proveedor o a un
centro de reparaciones autorizado por CLARION.
HINWEIS
Wenn während des Einbaus ein Gegenstand in das Gerät fällt, dann wenden Sie sich bitte
an lhren Händler oder eine CLARION-Kundendienstvertretung.
2
2.
English
Français
Deutsch
Italiano
Nederlands
Español
BEFORE STARTING
PREPARATIFS
EHE SIE MIT DEM EINBAU BEGINNEN
PRIMA DI COMINCIARE
ALVORENS TE STARTEN
ANTES DE COMENZAR
English
Italiano
1. This set is exclusively for use in cars with a negative ground 12 V power supply.
1. Questa apparecchiatura è per uso esclusivo su auto con alimentazione a 12 V, e con
negativo a massa.
AVVERTIMENTO
UTILIZZARE SOLTANTO SU VETTURE A 12 V CON NEGATIVO A MASSA.
(Verificare con il concessionario in caso di dubbi.)
La mancata osservanza di questa avvertenza può causare incendi ecc.
2. Leggere con attenzione queste istruzioni.
3. Assicurarsi di aver scollegato il polo “ ” della batteria prima di cominciare. Questo per
prevenire eventuali cortocircuiti durante l’installazione. (Figura 1)
AVVERTIMENTO
PRIMA DI EFFETTUARE I COLLEGAMENTI ELETTRICI, SCOLLEGARE IL CAVO
DAL TERMINALE NEGATIVO DELLA BATTERIA.
Prima di effettuare qualsiasi collegamento elettrico, scollegare il terminale “ ” negativo
della batteria. La mancata osservanza di questa avvertenza può causare scosse elettriche o ferite dovute a condizioni di corto circuito.
WARNING
USE ONLY IN CARS WITH A 12 VOLT NEGATIVE GROUND.
(Check with your dealer if you are not sure.) Failure to do so may result in fire, etc.
2. Read these instructions carefully.
3. Be sure to disconnect the battery “ ” terminal before starting. This is to prevent short
circuits during installation. (Figure 1)
WARNING
BEFORE WIRING, DISCONNECT THE CABLE FROM THE NEGATIVE BATTERY TERMINAL.
Before doing any electrical wiring, disconnect the cable from the negative “ ” terminal of
the battery. Failure to do so may result in electric shock or injury due to electrical shorts.
Français
1. Cet appareil est conçu exclusivement pour les voitures dont l’alimentation est de 12 V à
masse négative.
AVERTISSEMENT
UTILISEZ UNIQUEMENT DANS UN VÉHICULE À MASSE NÉGATIVE DE 12 VOLTS.
Utilisez uniquement dans un véhicule à masse négative “ ” de 12 volts. (Si vous n’êtes
pas sûr, vérifiez auprès de votre concessionnaire.) Le non respect de cet avertissement
peut entraîner un feu, etc.
2. Veuillez lire attentivement ces instructions.
3. Veillez à débrancher la borne négative de la batterie “
d’éviter tout court-circuit. (Figure 1)
Nederlands
1. Dit toestel is uitsluitend voor gebruik in auto’s die een negatief geaard 12 V spanningscircuit hebben.
WAARSCHUWING
ALLEEN GEBRUIKEN IN AUTO’S MET 12 VOLT NEGATIEVE AARDING.
(Raadpleeg bij twijfel uw dealer.) Niet opvolgen van deze instructie kan leiden tot brand enz.
2. Lees deze aanwijzingen goed door.
3. Ontkoppel de negatieve “ ” pool van de accu alvorens te starten. U voorkomt zo kortsluiting tijdens het installeren. (Afb. 1)
WAARSCHUWING
VOOR U ENIGE BEDRADING AANSLUIT MOET U DE KABEL VAN DE NEGATIEVE
POOL VAN DE ACCU LOSKOPPELEN.
Voor u enige elektrische bedrading aansluit moet u de kabel van de negatieve “ ” pool
van de accu loskoppelen. Doet u dat niet, dan kan dit leiden tot elektrische schokken of
letsel als gevolg van kortsluiting.
” avant d’installer l’appareil afin
AVERTISSEMENT
AVANT D’EFFECTUER LES CONNEXIONS, DÉBRANCHEZ LE CÂBLE DE LA BORNE
NÉGATIVE DE LA BATTERIE.
Avant d’effectuer toute connexion électrique, débranchez le câble de la borne négative “ ”
de la batterie. Le non respect de cet avertissement peut entraîner un choc électrique ou des
blessures dues à un court-circuit électrique.
Deutsch
Español
1. Dieses Gerät ist ausschließlich für die Benutzung in Fahrzeugen mit einer 12-Volt-Anlage
und negative Masse vorgesehen.
WARNUNG
NUR IN FAHRZEUGEN MIT 12V NEGATIVER ERDUNG VERWENDEN.
Nur in Fahrzeugen mit einer 12 Volt negativer “ ” Erdung verwenden. (Fragen Sie lhren
Händler, wenn Sie nicht sicher sind.) Wird dies nicht beachtet, könnte es zu einem Feuer,
usw. kommen.
1. Esta unidad ha sido diseñada para utilizarse exclusivamente en automóviles con fuente
de alimentación de 12 V, y negativo a masa.
ADVERTENCIA
UTILIZAR ÚNICAMENTE EN COCHES CON UNA FUENTE DE ALIMENTACIÓN DE 12
VOLTIOS Y NEGATIVO A MASA.
(Si no está seguro, consulte a su proveedor.) En caso contrario, puede provocar fuego, etc.
2. Lea cuidadosamente estas instrucciones.
3. Antes de comenzar la instalación, cerciórese de desconectar el terminal “ ” de la batería. Esto es para evitar cortocircuitos durante la instalación. (Figura 1)
ADVERTENCIA
ANTES DE REALIZAR LAS CONEXIONES, DESCONECTE EL CABLE DEL TERMINAL
NEGATIVO DE LA BATERÍA.
Antes de realizar alguna conexión eléctrica, desconecte el cable del terminal negativo
“
” de la batería. Si no hace esto, puede provocar una descarga eléctrica o lesión
debido a cortocircuitos eléctricos.
2. Diese Anleitungen sorgfältig durchlesen.
3. Vor Einbaubeginn unbedingt den “ ” Anschluß der Batterie abtrennen. Dies soll verhindern, daß während Einbau Kurzschlüsse auftreten. (Abbildung 1)
WARNUNG
VOR VERDRAHTUNG DAS KABEL VON DER NEGATIVEN BATTERIEKLEMME ABTRENNEN.
Vor Ausführung jeglicher elektrischen Verdrahtungen, das Kabel von der negativen “ ”
Klemme der Batterie abtrennen. Wird dies nicht getan, kann es aufgrund von elektrischen
Kurzschlüssen zu elektrischen Schlägen oder Verletzungen kommen.
English
Français
Deutsch
Italiano
Nederlands
Español
3.
English
Français
Deutsch
Italiano
Nederlands
Español
Figure 1
Figure 1
Abbildung 1
Figura 1
Afb. 1
Figura 1
English
Français
Deutsch
Italiano
Nederlands
Español
Car battery
Batterie de la voiture
Fahrzeugbatterie
Batteria auto
Auto-accu
Batería del automóvil
GENERAL CAUTIONS
PRECAUTIONS GENERALES
ALLGEMEINE VORSICHTSMASSNAHMEN
PRECAUZIONI DI CARATTERE GENERALE
ALGEMENE VOORZORGEN
PRECAUCIONES GENERALES
English
Use a soft, dry cloth to clean the case. Never use a rough
cloth, thinner, benzine, or alcohol, etc. For tough dirt, apply a
little cold or warm water to a soft cloth and wipe off the dirt
gently.
Italiano
Français
Utilisez un chiffon doux pour nettoyer le boîtier. N’utilisez jamais de chiffon rugueux, de benzine, d’alcool, etc. Pour les
endroits très sales, imprégnez légèrement un chiffon d’eau
froide ou chaude et frottez doucement la saleté.
Nederlands
Deutsch
Für Reinigung des Gehäuses ein weiches, trokkenes Tuch benutzen.
Niemals ein grobes Tuch, Verdünner, Benzin, Alkohol, usw. verwenden. Bei starker Verschmutzung etwas kaltes oder warmes Wasser auf
dem weichen Tuch auftragen und den Schmutz leicht abwischen.
Español
3
Usare un panno morbido ed asciutto per pulire l’unità
all’esterno. Non usare mai panni ruvidi, solventi, benzina o alcool ecc. Per lo sporco resistente passare un panno morbido
inumidito in acqua calda o fredda e strofinare delicatamente.
Reinig de behuizing met een zachte, droge doek. Gebruik
beslist geen ruwe, schurende doeken, thinner, benzine, alcohol, etc. Verwijder hardnekkige vlekken voorzichtig met
een met weinig lauw of warm water bevochtigde doek.
Para limpiar la caja, utilice un paño suave y seco. No utilice nunca paños duros, diluidor de pintura, bencina, alcohol, etc. Si la
suciedad es difícil de limpiar, humedezca ligeramente un paño
suave en agua fría o cálida y frote suavemente la parte sucia.
4.
English PACKAGE CONTENTS
Français CONTENU DE L’EMBALLAGE
Deutsch VERPACKUNGSINHALT
English
Français
Deutsch
Italiano
Nederlands
Español
KEEP SMALL ARTICLES OUT OF THE REACH CHILDREN.
W A R N I N G Store small articles (batteries,screws,etc.) in places not accessible to children. If swallowed,consult a physician immediately.
NE PAS LAISSER LES PETITES PIECES A LA PORTEE D’ENFANTS.
AVERTISSEMENT Stockez les petites pièces (piles, vis etc.) dans des endroits auxquels les enfants n’ont pas accès. Si une pièce est avalée,
appelez un médecin immédiatement.
HALTEN SIE KLEINE GEGENSTÄNDE VON KINDERN FERN.
W A R N U N G Bewahren Sie kleine Gegenstände (Batterien, Schrauben, usw.) stets an Orten auf, an denen Sie nicht von Kindern erreicht werden
können. Sollte ein solcher Gegenstand dennoch verschluckt werden, suchen Sie sofort einen Arzt auf.
TENERE I COMPONENTI DI PICCOLE DIMENSIONI LONTANO DALLA PORTATA DEI BAMBINI.
AVVERTIMENTO Deporre gli oggetti piccoli (batterie, viti, ecc.) in luoghi non accessibili ai bambini. In caso d'ingestione, consultare immediatamente un medico.
HOUD KLEINE VOORWERPEN BUITEN HET BEREIK VAN KINDEREN.
WAARSCHUWING Bewaar kleine voorwerpen (batterijen, schroeven, enz.) buiten het bereik van kinderen. Raadpleeg onmiddellijk een arts indien
een van deze voorwerpen wordt ingeslikt.
MANTENGA LOS OBJETOS PEQUEÑOS FUERA DEL ALCANCE DE LOS NIÑOS.
A D V E R T E N C I A Guarde los objetos pequeños (baterías, tornillos, etc.) en lugares a los que no puedan acceder los niños. En caso de que se
traguen uno de estos objetos, acuda al médico inmediatamente.
English
1
2
3
4
5
6
7
8
9
10
11
12
13
14
15
16
17
18
19
20
21
22
23
24
25
26
(Figure 2)
Navigation unit ............................................ 1
Power supply lead ...................................... 1
Connection cable (MINI DIN 8P) ............... 1
Connection cable (RGB) ........................... 1
GPS Antenna ............................................. 1
Base plate for GPS Antenna ...................... 1
Infrared sensor ........................................... 1
Remote control .......................................... 1
Battery ........................................................ 2
Map DVD-ROM .......................................... 1
Programme CD-ROM ................................. 1
Bracket for Navigation unit ......................... 2
Screw (M5x8mm) ....................................... 4
Tapping screw (3x10mm) .......................... 2
Clip ............................................................. 4
Electro tap .................................................. 3
Adhesive tape for Navigation unit .............. 5
Adhesive tape for Remote control .............. 1
Adhesive tape for Infrared sensor .............. 1
Plastic Ties ............................................... 5
Velcro tape (Male) ...................................... 1
Cable clamp ............................................... 2
Caution label .............................................. 2
Owner’s manual ......................................... 1set
Installation and Wire connection manual .... 1
Warranty card ............................................. 1
Français
1
2
3
4
5
6
7
8
9
10
11
12
13
14
15
16
17
18
19
20
21
22
23
24
25
26
(Figure 2)
Unité de navigation ................................... 1
Cordon d’alimentation ................................ 1
Câble de connexion (MINI DIN 8 broches) .... 1
Câble de connexion (RVB) ....................... 1
Antenne GPS ............................................. 1
Plaque de base d’antenne GPS ................. 1
Capteur de rayons infrarouges ................... 1
Télécommande .......................................... 1
Pile ............................................................. 2
DVD-ROM cartographique ........................ 1
CD-ROM du programme ........................... 1
Applique pour unité de navigation .............. 2
Vis (M5x8mm) ............................................ 4
Vis (3x10mm) ............................................. 2
Attache ..................................................... 4
Dérivation électrique ................................... 3
Bande adhésive pour unité de navigation .. 5
Bande adhésive pour télécommande ........ 1
Bande adhésive pour capteur de rayons infrarouges ... 1
Fixation rapide ........................................... 5
Bande velcro (Mâle) ................................... 1
Collier pour câble ...................................... 2
Etiquette de précaution .............................. 2
Mode d’emploi ............................................ 1set
Manuel d’installation et de connexion ........ 1
Carte de garantie ........................................ 1
1
7
2
8
Figure 2
Figure 2
Abbildung 2
Figura 2
Afb. 2
Figura 2
Deutsch
1
2
3
4
5
6
7
8
9
10
11
12
13
14
15
16
17
18
19
20
21
22
23
24
25
26
(Abbildung 2)
Navigationseinheit ...................................... 1
Netzanschlusskabel ................................... 1
Anschlusskabel (Mini-DIN-Kabel 8 pol.) ..... 1
Anschlusskabel (RGB-Kabel) .................... 1
GPS-Antenne ............................................. 1
Grundplatte für GPS-Antenne .................... 1
Infrarotsensor ............................................. 1
Fernbedienung........................................ 1
Batterie ....................................................... 2
Karten-DVD-ROM ...................................... 1
Programm-CD-ROM ................................... 1
Montagewinkel für Navigationseinheit ..... 2
Schraube (M5x8mm) .................................. 4
Schraube (3x10mm) ................................... 2
Klemme ...................................................... 4
Elektroanzapfung ....................................... 3
Klebeband für Navigationseinheit .............. 5
Klebeband für Fernbedienung ................... 1
Klebeband für Infrarotsensor ..................... 1
Kabelbinder ................................................ 5
Klettband (männlich) ................................. 1
Kabelklammer ............................................ 2
Warnzeichen .............................................. 2
Bedienungsanleitung ................................. 1set
Installation- und Kabelanschluß-Anleitung ... 1
Garantiekarte .............................................. 1
Italiano
1
2
3
4
5
6
7
8
9
10
11
12
13
14
15
16
17
18
19
20
21
22
23
24
25
26
(Figura 2)
Unità di navigazione .................................... 1
Cavo di alimentazione ................................ 1
Cavo di collegamento (MINI DIN 8P) ......... 1
Cavo di collegamento (RGB) ...................... 1
Antenna GPS ............................................. 1
Piastrina di base dell’antenna GPS ............ 1
Sensore a raggi infrarossi .......................... 1
Telecomando .............................................. 1
Batteria ....................................................... 2
DVD-ROM delle mappe ............................. 1
CD-ROM di programmazione .................... 1
Staffa per l’unità di navigazione ................ 2
Vite (M5x8mm) ........................................... 4
Vite (3x10mm) ............................................ 2
Graffa ......................................................... 4
Presa elettrica ............................................ 3
Nastro adesivo per l’unità di navigazione ... 5
Nastro adesivo per il telecomando ............. 1
Nastro adesivo per il sensore a raggi infrarossi ... 1
Fascetta ...................................................... 5
Nastro velcro (Maschio) ............................. 1
Morsetto per cavi ........................................ 2
Etichetta per l’avviso .................................. 2
Manuale di istruzioni ................................... 1set
Manuale per installazione e collegamenti .... 1
Garanzia ..................................................... 1
3
9
17
English
Français
Deutsch
Italiano
Nederlands
Español
Italiano CONTENUTO DELL’IMBALLO
Nederlands INHOUD VAN DE VERPAKKING
Español CONTENIDO DEL PAQUETE
Nederlands
1
2
3
4
5
6
7
8
9
10
11
12
13
14
15
16
17
18
19
20
21
22
23
24
25
26
Español
1
2
3
4
5
6
7
8
9
10
11
12
13
14
15
16
17
18
19
20
21
22
23
24
25
26
11
18
19
21
5
12
20
22
4
(Figura 2)
Unidad de navegación ............................... 1
Cable de alimentación ................................ 1
Cable de conexión (MINI DIN 8P) .............. 1
Cable de conexión (RGB) .......................... 1
Antena GPS ............................................... 1
Placa base de la antena GPS .................... 1
Sensor de infrarrojos .................................. 1
Mando a distancia ...................................... 1
Pila ............................................................. 2
Mapa en DVD-ROM .................................. 1
CD-ROM del programa .............................. 1
Soporte para la unidad de navegación ....... 2
Tornillos (M5x8mm) .................................... 4
Tornillo (3x10mm) ...................................... 2
Clip ............................................................. 4
Borne eléctrico ........................................... 3
Cinta adhesiva para la unidad de navegación ... 5
Cinta adhesiva para el mando a distancia ... 1
Cinta adhesiva para el sensor de infrarrojos ... 1
Cuerda de plástico ..................................... 5
Cinta de velcro (Macho) ........................... 1
Pinza para cables ...................................... 2
Etiqueta de precaución .............................. 2
Manual de instrucciones ............................. 1set
Manual de instalación y de conexión de cables ... 1
Tarjeta de garantía ..................................... 1
4
10
(Afb. 2)
Navigatietoestel ......................................... 1
Netsnoer .................................................... 1
Aansluitingskabel (MINI DIN 8P) ............... 1
Aansluitingskabel (RGB) ........................... 1
GPS antenne .............................................. 1
Basisplaat voor GPS antenne ................... 1
Infrarood sensor ......................................... 1
Afstandsbediening ...................................... 1
Batterij ........................................................ 2
Kaart DVD-ROM ........................................ 1
Programma-CD-ROM ................................ 1
Beugel voor navigatietoestel ...................... 2
Schroef (M5x8mm) ..................................... 4
Schroef (3x10mm) ...................................... 2
Klem .......................................................... 4
Elektro-splitter ............................................ 3
Plakband voor navigatietoestel .................. 5
Plakband voor afstandsbediening .............. 1
Plakband voor infrarood sensor ................. 1
Draadbescherming ..................................... 5
Klittenband (Mannelijk) .............................. 1
Kabelklem ................................................... 2
Waarschuwingslabel .................................. 2
Gebruiksaanwijzing .................................... 1set
Aanwijzingen voor installatie en aansluiten ... 1
Garantiebewijs ............................................ 1
23
6
13
14
15
16
24
25
26
5.
English CAUTIONS ON INSTALLATION
Français PRECAUTIONS AU SUJET DE L’INSTALLATION
English
Français
WARNING
DO NOT USE NUTS OR BOLTS IN THE BRAKE SYSTEM WHEN MAKING
INSTALLATION OR GROUND CONNECTIONS.
Never use safety-related parts such as bolts or nuts in the steering or brake systems or
tanks to make wiring installations or ground connections. Using such parts could disable
control of the vehicle and cause fire etc.
CAUTION
HAVE THE WIRING AND INSTALLATION DONE BY EXPERTS.
The wiring and installation of this unit requires special technical skill and experience. To
ensure safety, always contact the dealer where you purchased this unit to have the work
done.
1. Prepare all articles necessary for installing the navigation unit before starting.
2. When installing
This unit has a high-speed microcomputer and the case become hot. Always fasten with
a screw at the installation hole shown in Figure 3 and install with the navigation unit
separated from the floor. Also, do not touch during operation or immediately after
switching off the power.
1
Navigation unit
AVERTISSEMENT
N’UTILISEZ PAS D’ÉCROUS NI DE BOULONS DANS LE CIRCUIT DE FREINAGE
LORS DE L’INSTALLATION OU DE LA CONNEXION A LA MASSE.
N’utilisez jamais de pièce de sécurité comme des boulons ou des écrous dans le circuit de direction ou de freinage ou dans les réservoirs lors de l’installation des fils ou des connexions de mise à
la masse. Ces pièces pourraient désactiver la commande du véhicule et provoquer un feu, etc.
PRECAUTION
CONFIEZ LE CÂBLAGE ET L’INSTALLATION À UN SPÉCIALISTE.
Le câble et l’installation de l’appareil exigent des compétences et une expérience technique spéciales. Pour garantir la sécurité, contactez toujours le magasin où vous avez
acheté l’appareil pour faire faire les travaux.
1. Préparez toutes les pièces nécessaires avant de procéder à l’installation d’unité de
navigation.
2. Pour l’installation
L’appareil renferme un microprocesseur à grande vitesse et le boîtier chauffe. Fixez
toujours avec une vis dans l’orifice d’installation indiqué à la Figure 3, et effectuez
l’installation en éloignant l’unité de navigation du plancher. Par ailleurs, ne le touchez
pas pendant l’utilisation ni tout de suite après la mise hors tension.
Installation holes
1
Figure 3
WARNING
DO NOT DAMAGE PIPE OR WIRING WHEN DRILLING HOLES.
When drilling holes in the chassis for installation, take precautions so as not to contact,
damage or obstruct pipes, tanks or electrical wiring. Failure to take such precautions may
result in fire.
CAUTION
USE SPECIFIED ACCESSORY PARTS AND INSTALL THEM SECURELY.
Be sure to use only the specified accessory parts. Use of other than designated parts may
damage this unit internally or may not securely install the unit in place as parts that come
loose can create hazards.
Seal the gaps around holes opened for installation with silicon adhesive or the like.
Unité de navigation
Orifices d’installation
Figure 3
AVERTISSEMENT
N’ENDOMMAGEZ PAS LES TUYAUX NI LE CÂBLAGE EN PERÇANT LES ORIFICES.
Quand vous percez les orifices dans le châssis pour l’installation, veillez à ne pas toucher,
endommager ou obstruer les tuyaux, les réservoirs ou le câblage électrique. Le non
respect de cette précaution risque de provoquer un feu.
PRECAUTION
UTILISEZ LES ACCESSOIRES SPÉCIFIÉS ET INSTALLEZ-LES SOLIDEMENT.
Veillez à utiliser uniquement les accessoires spécifiés. L’utilisation d’autres accessoires non
spécifiés risque d’endommager l’intérieur de l’appareil ou de ne pas maintenir l’appareil solidement en place car des pièces qui deviennent lâches risquent de présenter un danger.
Bouchez les interstices autour des orifices percés pour l’installation, avec de la colle au
silicone par exemple.
3. Angle et emplacement d’installation.
Ceci permettra au gyrocapteur interne de mesurer la position du véhicule avec une
plus grande précision.
Installez l’appareil avec une inclinaison inférieure à 5˚ par rapport à l’horizontale.
(Figure 4)
Installez toujours loin des éléments magnétiques.
3. Installation angle and installation position
This enables the internal gyro sensor to measure the vehicle’s position more accurately.
Install the unit within 5˚ of the horizontal plane. (Figure 4)
Install away from magnetic products.
5˚ max.
Figure 4
4. Pour l’installation utilisez exclusivement les vis fournies. Le fait d’utiliser d’autres vis
risquerait d’endommager l’appareil. (Figure 5)
Max. 5˚
Figure 4
4. Use the enclosed screws for installation. Using other screws can cause damage.
(Figure 5)
Chassis
Châssis
Chassis
Dommage
Damage
Max. 8 mm
Châssis
8 mm max.
Figure 5
AVERTISSEMENT
N’INSTALLEZ PAS DANS UN ENDROIT QUI RISQUE DE GÊNER LA CONDUITE DU VÉHICULE.
N’installez pas dans un endroit qui risque de présenter un danger pour les occupants
du véhicule ou de gêner la conduite du véhicule (par exemple près du volant ou de
l’embrayage) en obstruant la vue avant ou en gênant les mouvements, etc.
N’INSTALLEZ PAS L’APPAREIL PRES DU COUSSIN D’AIR DU PASSAGER.
Si l’appareil n’est pas installée correctement, le coussin d’air risque de ne pas fonctionner correctement et, lors du déclenchement, le coussin d’air risque de projeter
l’appareil vers le haut, provoquant un accident et des blessures.
PRECAUTION
N’INSTALLEZ PAS DANS UN ENDROIT TRÈS HUMIDE OU POUSSIÉREUX.
Evitez d’installer l’appareil dans un endroit soumis à une forte humidité ou une grande
quantité de poussière. L’humidité ou la poussière qui pénétrerait dans l’appareil pourraient
provoquer de la fumée ou un feu.
NE PAS INSTALLER DANS DES ENDROITS OU L’APPAREIL EST SUSCEPTIBLE
D’ETRE EN CONTACT AVEC DE LA PLUIE.
Ne pas installer dans des endroits où l’appareil et les connexions de couplage sont
susceptibles d’être en contact avec de la pluie. Si de la pluie pénètre dans cet appareil,
cela risquerait d’entraîner de la fumée ou un incendie.
NE PAS INSTALLER DANS DES ENDROITS OU L’APPAREIL EST SUSCEPTIBLE
D’ETRE EN CONTACT AVEC LE DEBIT D’AIR DE LA CLIMATISATION.
Dans le cas où il y ait des conduits de climatisation sous le siège passager, installez
l’appareil à un autre endroit. De l’air chaud ou froid en provenance des conduits de climatisation qui soufflerait directement en direction de l’appareil risquerait d’entraîner un
mauvais fonctionnement de ce dernier ou de le casser.
NE PAS INSTALLER DANS DES ENDROITS QUI NE SONT PAS STABLES OU DANS
DES ENDROITS SUBISSANT DE HAUTES VIBRATIONS.
Ne pas installer l’appareil dans des endroits qui ne sont pas stables ou dans des endroits
subissant de hautes vibrations. Si l’appareil se desserre et gêne votre conduite, cela
risquerait d’entraîner des accidents ou des blessures.
NE PAS INSTALLER DANS DES ENDROITS OU VOUS ETES SUSCEPTIBLE DE
MARCHER SUR L’APPAREIL, OU DE POSER UNE CHARGE SUR L’APPAREIL.
Evitez d’installer l’appareil dans des endroits où vous serez susceptible de marcher dessus
ou de poser une charge lourde sur ce dernier. Marcher sur l’appareil ou poser une charge
lourde sur ce dernier risquerait d’entraîner un mauvais fonctionnement de l’appareil.
5. Installation dans le coffre
Installez l’appareil de façon à ce qu’il ne gêne pas le retrait des objets (par exemple la
roue de secours).
Figure 5
WARNING
DO NOT INSTALL IN LOCATIONS WHICH MIGHT HINDER VEHICLE OPERATION.
Do not install in locations which might create hazards for the vehicle occupants or hinder
vehicle operation (such as the steering wheel or gear shift) by obstructing forward vision
or hampering movement etc.
DO NOT INSTALL THE UNIT NEAR THE PASSENGER SEAT AIR BAG.
If the unit is not installed correctly the air bag may not function correctly and the air bag,
when triggered may cause the unit to spring upwards causing an accident and injuries.
CAUTION
DO NOT INSTALL IN LOCATIONS WITH HIGH MOISTURE OR DUST.
Avoid installing the unit in locations with high incidence of moisture or dust. Moisture or
dust that penetrates into this unit may cause smoke or fire.
DO NOT INSTALL IN LOCATIONS WHERE THE UNIT IS EXPOSED TO RAIN.
Do not install in locations where the unit and connection couplings may be exposed to rain.
Rain that penetrates into this unit may cause smoke or a fire.
DO NOT INSTALL IN LOCATIONS WHERE THE UNIT IS EXPOSED TO THE AIR
FLOW FROM THE AIR CONDITIONER.
If there are air conditioning ducts under the passenger seat, install the unit in another
location. Warm or cold air from air conditioning ducts that blows directly on the unit may
cause the unit to malfunction or break.
DO NOT INSTALL IN UNSTABLE LOCATIONS OR WHERE STRONG VIBRATIONS
OCCUR.
Do not install the unit in locations that are unstable or where strong vibrations occur. If the
unit comes loose and obstructs your driving, it may cause an accident or injury.
DO NOT INSTALL IN LOCATIONS WHERE THE UNIT MIGHT BE STEPPED ON, OR
BE UNDERNEATH CARGO.
Avoid installing the unit in locations where it may be stepped on or be underneath heavy
cargo. Stepping on or putting heavy cargo on the unit may cause it to malfunction.
5. Installing in the trunk
Install this unit in a position where it will not interfere with removing cargo (such as the
spare tire).
5
5.
Deutsch VORSICHTSMASSNAHMEN FÜR INSTALLATION
Italiano PRECAUZIONI PER L’INSTALLAZIONE
Italiano
Deutsch
WARNUNG
FÜR DEN EINBAU ODER DIE ERDUNGSANSCHLÜSSE NIEMALS MUTTERN ODER
SCHRAUBEN DES BREMSSYSTEMS VERWENDEN.
Für die Kabelverbindungen oder Erdungsanschlüsse niemals Sicherheitsteile verwenden,
wie z.B. Schrauben oder Muttern der Steuerung, des Bremssystems oder des Kraftstofftanks. Durch Verwendung solcher Teile könnte die Kontrolle über das Fahrzeug verloren
gehen oder ein Feuer entstehen, usw.
VORSICHT
DIE VERDRAHTUNG SOWIE DER EINBAU SOLLEN VON QUALIFIZIERTEN TECHNIKERN VORGENOMMEN WERDEN.
Die Verdrahtung sowie der Einbau dieser Einheit erfordert besondere technische Qualifizierungen. Um die Sicherheit zu gewährleisten, sollten Sie sich für die Einbauarbeiten an
den Händler wenden, bei dem Sie diese Einheit erworben haben.
AVVERTIMENTO
NON UTILIZZARE I DADI O I BULLONI DEL SISTEMA FRENANTE PER L’INSTALLAZIONE
O I COLLEGAMENTIA MASSA.
Non utilizzare mai componenti associati alla sicurezza, come i bulloni o i dadi del sistema sterzante, di quello frenante o dei serbatoi, per effettuare i collegamenti elettrici o i collegamenti a
massa. L’utilizzo di tali componenti può impedire il controllo del veicolo e causare incendi, ecc.
PRECAUZIONE
INCARICARE PERSONALE ESPERTO DELL’INSTALLAZIONE E DEI COLLEGAMENTI
ELETTRICI.
L’installazione dell’unità e la realizzazione dei suoi collegamenti elettrici richiedono competenze ed esperienza tecnica specifiche. Per garantire la massima sicurezza, per far eseguire il
lavoro mettersi sempre in contatto con il rivenditore presso il quale è stata acquistata l’unità.
1. Prima di iniziare il lavoro preparare tutto quanto necessario per installare l’unità di
navigazione.
2. Durante l’installazione
La questa unità è dotato di un microprocessore ad alta velocità, e l’involucro può raggiungere temperature elevate. Fissare sempre al foro di installazione mostrato nella figura 3
mediante una vite, ed installare con l’unità principale staccata dal pavimento. Inoltre, non
toccare l’unità principale durante il funzionamento o subito dopo averla spenta.
1. Vor Einbaubeginn alle erforderlichen Teile und Werkzeuge für die Navigationseinheit
vorbereiten.
2. Bei Einbau
Dieses Gerät nutzt einen Hochgeschwindigkeits-Mikrocomputer, weshalb sich das
Gehäuse erwärmt. Deshalb immer mit einer Schraube beim in der Abbildung 3
gezeigten Montageloch befestigen und ebenfalls so einbauen, dass die Haupteinheit vom
Boden getrennt ist. Auch während des Betriebs oder sofort nach dem Ausschaltung nicht
berühren.
1 Navigationseinheit
Haupteinheit
1
Fori per l'installazione
Figura 3
AVVERTIMENTO
NEL PRATICARE FORI, NON DANNEGGIARE TUBI O CAVI ELETTRICI.
Quando si praticano nella scocca i fori scocca l’installazione, pendere le opportune precauzioni per non deformare, danneggiare o ostruire tubi, serbatoi o cavi elettrici. In caso
contrario, si potrebbero causare incendi.
PRECAUZIONE
UTILIZZARE I COMPONENTI ACCESSORI INDICATI E FISSARLI SALDAMENTE.
Accertarsi di utilizzare soltanto i componenti accessori indicati. L’uso di componenti diversi da
quelli specificati può danneggiare la componentistica interna all’unità o impedire di fissare saldamente quest’ultima, e i componenti eventualmente staccatisi possono risultare pericolosi.
Sigillare con adesivo al silicone, o con materiali simili, le fessure presenti attorno ai fori
praticati per l’installazione.
Abbildung 3
WARNUNG
KEINE ROHRLEITUNGEN ODER VERDRAHTUNGEN BEIM BOHREN VON LÖCHERN BESCHÄDIGEN.
Beim Bohren von Löchern im Chassis für den Einbau, darauf achten, daß keine Rohrleitungen, Kraftstofftanks oder elektrischen Verdrahtungen berührt, beschädigt oder blockiert werden. Wird dies nicht beachtet, könnte es zu einem Feuer kommen.
VORSICHT
NUR DIE ANGEGEBENEN ZUBEHÖRTEILE VERWENDEN UND DIESE FEST MONTIEREN.
Nur die angegebenen Zubehörteile verwenden. Werden andere Bauteile als die angegebenen verwendet, könnte diese Einheit im lnnern beschädigt oder nicht sicher eingebaut werden, da sich lösende Teile gefährlich sind.
Lücken bei den Einbaubohrungen mit Silizlum-kleber oder einem anderen Mittel abdichten.
3. Einbauwinkel und-position
Dadurch kann der interne Gyrosensor die Fahrzeugposition genauer messen.
Das Gerät innerhalb 5˚ der horizontalen Ebene einbauen. (Abbildung 4)
Nicht in Nähe von magnetischen Produkten einbauen.
3. Posizione e angolo di installazione
Ciò permette al sensore giroscopico presente all’interno di misurare con maggior
precisione la posizione del veicolo.
Installare l’apparecchio con un’inclinazione non superiore a 5˚ rispetto al piano orizzontale. (Figura 4)
Installare lontano da elementi magnetici.
Max. 5˚
Abbildung 4
4. Für den Einbau die mitgelieferten Schrauben verwenden. Die Verwendung anderer
Schrauben könnte Beschädigungen verursachen. (Abbildung 5)
Chassis
Unità di navigazione
Max. 5˚
Figura 4
4. Usare le viti in dotazione per l’installazione. L’uso di viti diverse potrebbe provocare dei
danni. (Figura 5)
Telaio
Telaio
Chassis
Beschädigung
Danneggiamento
Max. 8 mm
Abbildung 5
WARNUNG
NICHT AN STELLEN EINBAUEN, DIE DEN FAHRZEUGBETRIEB BEHINDERN.
Nicht an Stellen einbauen, die Gefahren für die Fahrzeuginsassen, verursachen oder den
Fahrzeugbetrieb behindern (z.B. das Lenkrad oder Gangschaltung), indem die Sicht oder
Bewegungsfreiheit usw. eingeschränkt wird.
DIE EINHEIT NICHT IN NÄHE DES AIRBAGS DES BEIFAHRERSITZES EINBAUEN.
Wird die Einheit nicht korrekt eingebaut, könnte der Airbag nicht einwandfrei funktionieren und bei seiner Auslösung das Gerät nach oben schleudern und einen Unfall oder
Verletzungen verursachen.
VORSICHT
NICHT AN STELLEN EINBAUEN, DIE HOHER FEUCHTIGKEIT ODER STAUB AUSGESETZT SIND.
Vermeiden, die Einheit an Stellen einzubauen, die hoher Feuchtigkeit und Staub ausgesetzt sind. Wenn Feuchtigkeit oder Staub in die Einheit eindringt, könnte es zu einer
Rauchentwicklung oder einem Feuer kommen.
NICHT AN ORTEN INSTALLIEREN, AN DENEN DAS GERÄT REGEN AUSGESETZT IST.
Stellen Sie das Gerät nicht an Orten auf, an denen das Gerät und seine Anschlussstücke
Regen ausgesetzt werden könnten. Regen, der in das Gerät vordringt, kann zu Rauchentwicklung und Brand führen.
NICHT AN ORTEN INSTALLIEREN, AN DENEN DAS GERÄT DEM LUFTSTROM
EINER KLIMAANLAGE AUSGESETZT IST.
Falls sich unter dem Beifahrersitz Klimaanlagenkanäle befinden sollten, installieren Sie das
Gerät an einem anderen Ort. Direkt auf das Gerät geblasene warme oder kalte Luft aus den
Klimaanlagenkanälen kann zu Fehlfunktionen oder zum Defekt des Gerätes führen.
NICHT AN INSTABILEN ORTEN ODER AN ORTEN MIT STARKEN VIBRATIONEN
INSTALLIEREN.
Installieren Sie das Gerät nicht an instabilen Stellen oder an Orten, die starken Vibrationen
ausgesetzt sind. Falls sich das Gerät lösen und das Führen Ihres Kraftfahrzeugs beeinträchtigen sollte, kann es zu Unfällen und Verletzungen kommen.
NICHT AN STELLEN, AN DENEN AUF DAS GERÄT GETRETEN WERDEN KANN,
UND NICHT UNTERHALB VON LADUNG INSTALLIEREN.
Vermeiden Sie, das Gerät an Stellen zu installieren, an denen es Tritten ausgesetzt ist oder
unter schwerer Ladung zu liegen kommt. Treten auf das Gerät oder das Belegen mit
schwerer Ladung kann zu Fehlfunktionen führen.
5. Einbau im Kofferraum
Diese Gerät an einer Stelle einbauen, die das Entnehmen von Gepäck und Zuladung
(z. B. Ersatzreifen) nicht behindert.
Max. 8 mm
Figura 5
AVVERTIMENTO
NON INSTALLARE IN PUNTI IN CUI SI POTREBBE OSTACOLARE IL FUNZIONAMENTO DEL VEICOLO.
Non installare in punti nei quali si possano creare pericoli per gli occupanti del veicolo
oppure ostacolare l’azionamento del veicolo (ad esempio dello sterzo o del cambio),
ostruendo il campo visivo anteriore o limitando i movimenti, ecc.
NON INSTALLARE L’UNITÀ VICINO ALL’AIRBAG DEL LATO PASSEGGERO.
Un’installazione errata dell’unità potrebbe impedire il corretto funzionamento dell’airbag, che al
momento dell’entrata in funzione potrebbe proiettare il unità verso l’alto, causando incidenti e ferite.
PRECAUZIONE
NON INSTALLARE IN PUNTI MOLTO UMIDI O POLVEROSI.
Evitare di installare l’unità in punti con un livello di umidità o di polvere elevato poiché esse,
penetrando all’interno dell’unità, possono produrre fumo o causare incendi.
EVITARE L'INSTALLAZIONE IN PUNTI IN CUI L'UNITÀ SIA ESPOSTA ALLA PIOGGIA.
Non effettuare l'installazione in punti in cui l'unità e i collegamenti siano esposti alla pioggia.
L'eventuale penetrazione della pioggia nell'unità può causare fumo o incendi.
EVITARE L'INSTALLAZIONE IN PUNTI IN CUI L'UNITÀ SIA ESPOSTA AL FLUSSO
D'ARIA EMESSO DAI CONDIZIONATORI.
Evitare di installare l'unità sotto il sedile del passeggero qualora vi siano installate le
canaline dell'aria condizionata. L'aria tiepida o calda emessa dalle canaline fluisce direttamente verso l'unità, causandone malfunzionamento o rottura.
EVITARE L'INSTALLAZIONE IN PUNTI INSTABILI O DOVE SIANO PRESENTI
NOTEVOLI VIBRAZIONI.
Non installare l'unità in punti instabili o dove siano presenti notevoli vibrazioni. Un'unità
allentata o che ostruisce la guida, può essere causa di incidenti o infortuni.
EVITARE L'INSTALLAZIONE IN PUNTI IN CUI L'UNITÀ POTREBBE ESSERE
CALPESTATA O SOTTO DEI CARICHI.
Evitare d'installare l'unità in punti in cui potrebbe essere calpestata o sotto dei carichi.
Calpestando l'unità o posizionandola sotto dei carichi, si potrebbero generare dei malfunzionamenti.
5. Installazione dell'unità nel bagagliaio
Installare l'unità in una posizione in cui non interferisca con i carichi mobili (ad esempio,
pneumatici di scorta).
6
5.
Nederlands VOORZORGEN VOOR INSTALLEREN
Español PRECAUCIONES PARA LA INSTALACIÓN
Español
Nederlands
WAARSCHUWING
GEBRUIK GEEN MOEREN OF BOUTEN VAN HET REMSYSTEEM VOOR DE
INSTALLATIE OF DE AARDING.
Gebruik nooit onderdelen van de auto die te maken hebben met uw veiligheid, zoals
bouten of moeren van het stuur- of remsysteem, of tanks wanneer u de bedrading installeert of een aarding moet maken. Gebruik van dergelijke onderdelen kan de besturing van
het voertuig onmogelijk maken en leiden tot brand enz.
ADVERTENCIA
NO UTILICE TUERCAS O TORNILLOS EN EL SISTEMA DE FRENADO MIENTRAS
REALIZA LA INSTALACIÓN O LAS CONEXIONES A TIERRA.
No utilice nunca piezas relacionadas con la seguridad, como tuercas o tornillos, en los
sistemas de dirección o frenado o en los tanques para llevar a cabo las instalaciones de
cables o las conexiones a tierra. El uso de estas piezas podría inhabilitar el control del
vehículo y provocar fuego, etc.
LET OP:
LAAT DE BEDRADING EN INSTALLATIE OVER AAN DE VAKMAN.
De bedrading en de installatie van dit toestel vereisen speciale technische vaardigheden
en ervaring. Om de veiligheid te waarborgen dient u altijd contact op te nemen met de
dealer waar u dit toestel gekocht heeft wanneer eraan gewerkt moet worden.
PRECAUTION
ENCARGUE LAS TAREAS DE CONEXIÓN E INSTALACIÓN A EXPERTOS.
La conexión e instalación de esta unidad requiere una cualificación y experiencia técnicas
especiales. Para garantizar la seguridad, póngase en contacto con el proveedor al que
compró esta unidad para que se encargue de realizar el trabajo.
1. Antes de comenzar, prepare todos los artículos necesarios para instalar la unidad de
navegación.
2. Durante la instalación
Esta unidad tiene un micro-ordenador de alta velocidad y la caja se calienta. Fíjela
siempre con un tornillo en el orificio de instalación que se muestra en la Figura 3 y
realice la instalación con la unidad de navegación separada del suelo. Asimismo, no
toque la unidad durante el funcionamiento ni inmediatamente después de desconectar
la corriente.
1. Zorg dat u alle benodigdheden voor het installeren van het navigatietoestel gereed heeft.
2. Tijdens de installatie
Dit toestel is uitgerust met een zeer snelle microcomputer en het is mogelijk dat de
behuizing heet wordt. Bevestig het toestel daarom met een schroef in het installatiegat
zoals aangegeven op afb. 3 en houd het hoofdtoestel los van de vloer. Raak het toestel niet aan terwijl het in bedrijf is of direct nadat u het heeft uitgeschakeld.
1
Navigatietoestel
Installatiegaten
1
Afb. 3
WAARSCHUWING
BESCHADIG GEEN LEIDINGEN OF BEDRADING WANNEER U GATEN BOORT.
Wanner u gaten in het chassis boort ten behoeve van de installatie, dient u ervoor te zorgen dat u geen leidingen, tanks of elektrische bedrading raakt, beschadigt of in de weg zit.
Niet nemen van dergelijke voorzorgen kan leiden tot brand.
LET OP:
GEBRUIK DE AANGEGEVEN ONDERDELEN EN BEVESTIG DEZE OP DE JUISTE MANIER.
U mag alleen de aangegeven onderdelen gebruiken. Gebruik van andere onderdelen dan die
specifiek worden aangegeven kan leiden tot interne schade aan het toestel of tot het los raken van het toestel zelf en de bewuste onderdelen, hetgeen kan leiden tot gevaarlijke situaties.
Dicht de gaten die u ten behoeve van de installatie maakt af met siliconenkit of iets
dergelijks.
3. Installatiehoek en installatiepositie
Hierdoor zal de interne gyro-sensor in staat zijn positie van het voertuig preciezer vast te stellen.
Plaats het toestel binnen een hoek van 5˚. (Afb. 4)
Installeer het toestel zo ver mogelijk weg van magnetische producten.
Unidad de navegación
Orificios de instalación
Figura 3
ADVERTENCIA
DO NOT DAMAGE PIPE OR WIRING WHEN DRILLING HOLES.
Cuando realice los orificios en el chasis para la instalación, debe tomar las precauciones
necesarias para no tocar, dañar u obstruir ningún tubo, tanque o cable eléctrico. Si no se
toman estas precauciones, se puede provocar un fuego.
PRECAUTION
UTILICE LOS ACCESORIOS ESPECIFICADOS E INSTÁLELOS DE FORMA SEGURA.
Asegúrese de usar únicamente los accesorios especificados. El uso de otras piezas que
no sean las designadas puede dañar esta unidad de forma interna o puede que la unidad
no se instale de forma segura en su sitio, ya que las piezas que queden sueltas pueden
ocasionar riesgos.
Selle los huecos que rodean los orificios abiertos para la instalación con silicona
adhesiva o un producto similar.
3. Ángulo de instalación y posición de instalación
Esto permite al sensor de giro interno medir la posición del vehículo de forma más
precisa.
Instale la unidad dentro de 5˚ del plano horizontal. (Figura 4)
Instalar lejos de productos magnéticos.
Max. 5˚
Afb. 4
4. Gebruik de bijgeleverde schroeven voor het installeren. Andere schroeven kunnen het
toestel beschadigen. (Afb. 5)
Chassis
5˚ como máx.
Figura 4
4. Para la instalación utilice los tornillos incluídos. Al user otros tornillos, se puede causar
daño.(Figura 5)
Chassis
Chasis
Chasis
Beschadiging
Daño
Max. 8 mm
Afb. 5
WAARSCHUWING
NIET INSTALLEREN OP PLEKKEN WAAR DIT HET BESTUREN VAN HET
VOERTUIG KAN HINDEREN.
Installeer het toestel niet op een plek waar het gevaar kan opleveren voor de inzittenden
of in de weg kan zitten bij het besturen van het voertuig (bijv. bij het stuur of de versnellingspook) of het uitzicht van de bestuurder of zijn of haar bewegingen kan belemmeren.
INSTALLEER HET TOESTEL NIET BIJ DE AIRBAG VOOR DE PASSAGIERSSTOEL.
Als het toestel niet correct geïnstalleerd is, is het mogelijk dat de airbag niet naar behoren kan functioneren of dat de airbag, wanneer deze afgaat, het toestel naar boven werpt
hetgeen ongelukken en letsel kan veroorzaken.
LET OP:
NIET INSTALLEREN OP ZEER VOCHTIGE OF STOFFIGE PLEKKEN.
Installeer het toestel niet op zeer vochtige of zeer stoffige plekken Vocht of stof kan het
toestel binnendringen en rook of brand veroorzaken.
NIET INSTALLEREN OP PLEKKEN WAAR HET TOESTEL AAN REGEN BLOOTGESTELD KAN WORDEN.
Installeer niet op plekken waar het toestel en de aansluitingen aan regen blootgesteld
kunnen worden. Regen kan het toestel binnendringen en rook of brand veroorzaken.
NIET INSTALLEREN OP PLEKKEN WAAR HET TOESTEL AAN DE LUCHTSTROOM
VAN DE AIRCONDITIONING BLOOTGESTELD KAN WORDEN.
Indien de airconditioning leidingen onder de passagiersstoel geplaatst zijn moet het toestel
op een andere plek geïnstalleerd worden. De warme of koude lucht uit de airconditioning
leiding die rechtstreeks op het toestel wordt geblazen kan een defect aan het toestel
veroorzaken.
NIET INSTALLEREN OP ONSTABIELE PLEKKEN OF PLEKKEN MET ZWARE
TRILLINGEN.
Installeer het toesten niet op plekken die onstabiel zijn of trillen. Als het toestel los gaat
zitten en het rijden belemmerd kan dit in ongelukken of letsel resulteren.
NIET INSTALLEREN OP PLEKKEN WAAR HET RISICO BESTAAT DAT MEN OP HET
TOESTEL KAN STAPPEN OF DAT ER ZWARE ARTIKELEN OP HET TOESTEL
KOMEN TE LIGGEN.
Installeer het toestel niet op plekken waar het risico bestaat dat men op het toestel kan
stappen of onder zware spullen kan komen te liggen. Het toestel kan defect raken wanneer men op het toestel stapt of wanneer het toestel onder andere zware spullen ligt.
5. In de kofferruimte installeren
Installeer dit toestel op een plek waar het niet in de weg zit wanneer u spullen uit de
kofferruimte wilt halen (zoals een reserveband).
8 mm como máx.
Figura 5
ADVERTENCIA
NO INSTALAR EN LUGARES QUE DIFICULTEN EL FUNCIONAMIENTO DEL VEHÍCULO.
No instale la unidad en lugares que puedan crear riesgos para los ocupantes del vehículo
o dificultar el funcionamiento del vehículo (como el volante o la palanca de cambios) al
obstruir la visión delantera o dificultar el movimiento, etc.
NO INSTALAR LA UNIDAD CERCA DEL AIRBAG DEL ASIENTO DEL PASAJERO.
Si la unidad no está instalada correctamente, puede que el airbag no funcione adecuadamente y que, cuando se active, haga que la unidad salte hacia arriba y provoque un
accidente o lesiones.
PRECAUTION
NO INSTALAR EN LUGARES CON MUCHA HUMEDAD O POLVO.
Evite instalar la unidad en lugares con alta incidencia de humedad o polvo. La humedad
o el polvo que penetra en esta unidad puede causar humo o fuego.
NO INSTALAR EN LUGARES EN LOS QUE LA UNIDAD QUEDE EXPUESTA A LA
LLUVIA.
No instale la unidad en lugares en los que ésta y las conexiones queden expuestas a la
lluvia. La lluvia que penetra en esta unidad puede causar humo o fuego.
NO INSTALAR EN LUGARES EN LOS QUE LA UNIDAD QUEDE EXPUESTA A LA
CORRIENTE DE AIRE DEL AIRE ACONDICIONADO.
En caso de que haya conductos de aire acondicionado debajo del asiento del pasajero,
instale la unidad en otro lugar. Si el aire caliente o frío del conducto de aire acondicionado
va directamente hacia la unidad, ésta puede funcionar de forma incorrecta o estropearse.
NO INSTALAR EN LUGARES INESTABLES O EN LUGARES CON MUCHA VIBRACIÓN.
No instale la unidad en lugares que sean inestables o tengan mucha vibración. Si la unidad
queda suelta y se convierte en un obstáculo para la conducción, puede provocar accidentes o lesiones.
NO INSTALAR EN LUGARES EN LOS QUE LA UNIDAD SE PUEDA PISAR O QUEDE
DEBAJO DE LA CARGA.
No instale la unidad en lugares en los que se pueda pisar o quede debajo de carga pesada. Si se pisa o se coloca carga pesada sobre ella, la unidad puede funcionar de forma incorrecta.
5. Instalación en el maletero
Instale esta unidad en una posición que no interfiera al retirar la carga (por ejemplo, la
rueda de repuesto).
7
6.
English
Français
Deutsch
Italiano
Nederlands
Español
INSTALLING THE NAVIGATION UNIT
INSTALLATION DE L’UNITÉ DE NAVIGATION
EINBAU DER NAVIGATIONSEINHEIT
INSTALLAZIONE DELL’UNITÀ DI NAVIGAZIONE
INSTALLEREN VAN HET NAVIGATIETOESTEL
INSTALACIÓN DE LA UNIDAD DE NAVEGACIÓN
English Installation location
Français Lieu d’installation
Deutsch Installationsort
Italiano Posto d’installazione
Nederlands Installatieplek
Español Lugar de instalación
English
Italiano
1. Install the navigation unit on the floor of the vehicle, such as on the front or back corner
of the floor in the back, or under the seat. (Figure 6)
2. If the navigation unit is installed under the seat and the navigation unit is exposed when
the seat is moved forward, put a warning label on the case of the unit. (Figure 7)
3. When inserting a DVD-ROM, the DVD tray is ejected approximately 130 mm. Confirm
that there are no obstacles to the DVD tray when deciding where to install it.
(Figure 8)
1. Installare l'unità di navigazione sul pavimento del veicolo, ad esempio nell'angolo
anteriore o posteriore del pavimento del vano posteriore o sotto il sedile. (Figura 6)
2. Qualora si installi l'unità di navigazione sotto il sedile e risulti quindi esposto quando si
sposta il sedile in avanti, applicare l'etichetta d'avvertenza sull'involucro dell'unità.
(Figura 7)
3. Dopo aver inserito il DVD-ROM, il cassetto del DVD fuoriuscirà di circa 130 mm. Prima
di selezionare il punto d'installazione, accertarsi di non ostruire il cassetto del DVD .
(Figura 8)
NOTE
Do not apply strong forces on the turntable from above.
NOTA
Non esercitare troppa forza dall’alto sul piatto girevole.
Français
Nederlands
1. Installez l’unité de navigation sur le sol de votre véhicule, comme par exemple sur le
coin avant ou arrière du sol du compartiment arrière, ou sous le siège. (Figure 6)
2. Dans le cas où l’unité de navigation est installé sous le siège, si l’unité de navigation est
visible quand on avance le siège, appliquez l’autocollant de mise en garde sur le boiter
de l’appareil. (Figure 7)
3. Quand vous insérez le DVD-ROM, le chargeur du DVD est éjecté sur une distance
d’environ 130mm. Veillez à ce qu’il n’y ait pas d’obstacle pour l’éjection du chargeur du
DVD quand vous décidez de l’endroit où vous allez installer l’appareil. (Figure 8)
1. Installeer het navigatietoestel op de vloer van de auto, bijv. de voorste of achterste hoek
achterin, of onder een stoel. (Afb. 6)
2. Wanneer het navigatietoestel onder een stoel wordt geïnstalleerd en men het toestel
tijdens het naar voren schuiven van de stoel kan zien, moet het waarschuwingslabel op
het toestel worden bevestigd. (Afb. 7)
3. Tijdens het plaatsen van een DVD-Rom schuift de DVD lade ca. 130mm uit. Zorg er
daarom, tijdens het bepalen van de installatieplek, voor dat het openen van de DVDlade niet door spullen e.d. wordt belemmerd. (Afb. 8)
REMARQUE
N’appuyez pas sur le chargeur de DVD-ROM.
OPMERKING
Druk niet te hard op de DVD-lade en draaischijf.
Español
Deutsch
1. Installieren Sie die Navigationseinheit am Fahrzeugboden, z. B. in der vorderen oder 1. Instale la unidad de navegación en el suelo del vehículo: por ejemplo, en la esquina
frontal o en la esquina posterior del suelo del compartimento trasero o bajo el asiento.
hinteren Ecke am Boden des Rücksitzbereiches oder unter dem Sitz. (Abbildung 6)
(Figura 6)
2. Falls die Navigationseinheit unter dem Sitz installiert werden und offen liegen sollte,
wenn der Sitz nach vorn geschoben wird, bringen Sie den Warnaufkleber am 2. En caso de que la unidad de navegación se instale debajo del asiento y quede expuesta
Gerätegehäuse an. (Abbildung 7)
cuando el asiento se desplaza hacia delante, pegue una etiqueta de precaución en la
3. Beim Einlegen der DVD-ROM wird die DVD-Schublade etwa 130 mm weit ausgefahren.
caja de la unidad. (Figura 7)
Achten Sie darauf, dass die DVD-Schublade nicht behindert wird, wenn Sie einen 3. Cuando inserte el DVD-ROM y abra la bandeja de DVD, ésta se desplaza unos 130 mm.
Installationsort wählen. (Abbildung 8)
Antes de decidir el lugar de instalación, cerciórese de que no hay ningún obstáculo para
la bandeja de DVD. (Figura 8)
HINWEIS
NOTA
Üben Sie keinen starken Druck von oben auf die Drehscheibe aus.
No ejerza ninguna presión fuerte sobre el plato giratorio.
English
Français
Deutsch
Italiano
Nederlands
Español
English
Français
Deutsch
Italiano
Nederlands
Español
Figure 6
Figure 6
Abbildung 6
Figura 6
Afb. 6
Figura 6
English
Français
Deutsch
Italiano
Nederlands
Español
1
1
1
1
1
1
Navigation unit
Unité de navigation
Navigationseinheit
Unità di navigazione
Navigatietoestel
Unidad de navegación
English
Français
Deutsch
Italiano
Nederlands
Español
23
23
23
23
23
23
Caution label
Etiquette de précaution
Warnzeichen
Etichetta per l’avviso
Waarschuwingslabel
Etiqueta de precaución
Figure 7
Figure 7
Abbildung 7
Figura 7
Afb. 7
Figura 7
English Push the DVD tray ejecting button. When the DVD
tray comes out, pull it out by hand.
(130mm)
Français Appuyez sur le bouton d’éjection du chargeur de DVDROM. Lorsque le chargeur s’ouvre, tirez-le à la main.
Deutsch Drücken Sie auf den DVD-Ausgabeknopf. Wenn das
DVD-Fach herauskommt, ziehen Sie es mit der Hand
heraus.
Italiano Premere il pulsante di espulsione del piatto DVD.
Quando il piatto fuoriesce, tirarlo con la mano.
English
Français
Deutsch
Italiano
Nederlands
Español
Figure 8
Figure 8
Abbildung 8
Figura 8
Afb. 8
Figura 8
Nederlands Druk op de uitwerpknop van de DVD-lade. Wanneer
de DVD-lade naar buiten komt, trekt u deze verder
met de hand uit.
Español Pulse el botón de expulsión de la bandeja del DVD.
Cuando la bandeja salga, tire de ella con la mano.
8
English
Français
Deutsch
Italiano
Nederlands
Español
Lens
Lentille
Linse
Lente
Lens
Lente
English
Français
Deutsch
Italiano
Nederlands
Español
Turntable
Chargeur de DVD-ROM
Drehscheibe
Piatto girevole
Draaischijf
Bandeja
English Fixing bracket adjustment
Français Réglage des appliques de fixation
Deutsch Ausrichten der Montagewinkel
Italiano Regolazione staffa di fissaggio
Nederlands Afstellen van de bevestigingsbeugel
Español Fijación del ajuste del soporte
English
Italiano
1. Fasten with screws through the installation holes. (Figure 9)
1. Fissare l'unità nei fori con le viti. (Figura 9)
NOTE
There are notches on the bracket for navigation unit which indicate the location of the
installation holes.
NOTA
Sulla staffa dell'unità di navigazione sono presenti delle tacche che indicano il punto
d'ubicazione dei fori necessari per l'installazione.
2. Install the brackets to the navigation unit with the screws (M5x8mm). (Figure 10)
2. Fissare le staffe all'unità di navigazione utilizzando delle viti (M5x8mm). (Figura 10)
Français
Nederlands
1. Attachez avec des vis au niveau des trous d’installation. (Figure 9)
1. Steek de schroeven door de installatiegaten om het toestel vast te zetten. (Afb. 9)
REMARQUE
Il y a des crans sur l’applique pour unité de navigation qui indiquent l’emplacement des
trous d’installation.
OPMERKING
De beugel voor het navigatietoestel is voorzien van uitsparingen die de locatie van de
installatiegaten aangeven.
2. Installez les appliques sur l’unité de navigation avec les vis (M5x8mm).
(Figure 10)
2. Monteer de beugels met behulp van de schroeven (M5x8mm) aan het navigatietoestel.
(Afb. 10)
Español
Deutsch
1. Mit Schrauben an den Installationsbohrungen befestigen. (Abbildung 9)
1. Fije la unidad con tornillos en los orificios de instalación. (Figura 9)
HINWEIS
Am Montagewinkel der Navigationseinheit befinden sich Kerben, die auf die Lage der
Installationsbohrungen hinweisen.
NOTA
Existen unas muescas en el soporte para la unidad de navegación que indican la
ubicación de los orificios de instalación.
2. Befestigen Sie die Bügel mit Hilfe der Schrauben (M5x8mm) an der Navigationseinheit.
(Abbildung 10)
2. Instale los soportes para la unidad de navegación con los tornillos (M5x8mm).
(Figura 10)
English
Français
Deutsch
Italiano
Nederlands
Español
English
Français
Deutsch
Italiano
Nederlands
Español
English
Français
Deutsch
Italiano
Nederlands
Español
1
1
1
1
1
1
Installation holes
Orifices d’installation
Haupteinheit
Fori per l'installazione
Installatiegaten
Orificios de instalación
English
Français
Deutsch
Italiano
Nederlands
Español
English
Français
Deutsch
Italiano
Nederlands
Español
Navigation unit
Unité de navigation
Navigationseinheit
Unità di navigazione
Navigatietoestel
Unidad de navegación
English
Français
Deutsch
Italiano
Nederlands
Español
Figure 9
Figure 9
Abbildung 9
Figura 9
Afb. 9
Figura 9
12
12
12
12
12
12
Installation holes
Orifices d’installation
Haupteinheit
Fori per l'installazione
Installatiegaten
Orificios de instalación
Bracket for Navigation unit
Applique pour unité de navigation
Montagewinkel für Navigationseinheit
Staffa per l’unità di navigazione
Beugel voor navigatietoestel
Soporte para la unidad de navegación
English
Français
Deutsch
Italiano
Nederlands
Español
English
Français
Deutsch
Italiano
Nederlands
Español
English
Français
Deutsch
Italiano
Nederlands
Español
13
13
13
13
13
13
Notches
Crans
Kerben
Tacche
Uitsparingen
Muescas
13
13
13
13
13
13
Screw (M5x8mm)
Vis (M5x8mm)
Schraube (M5x8mm)
Vite (M5x8mm)
Schroef (M5x8mm)
Tornillos (M5x8mm)
Screw (M5x8mm)
Vis (M5x8mm)
Schraube (M5x8mm)
Vite (M5x8mm)
Schroef (M5x8mm)
Tornillos (M5x8mm)
English
Français
Deutsch
Italiano
Nederlands
Español
Figure 10
Figure 10
Abbildung 10
Figura 10
Afb. 10
Figura 10
9
12
12
12
12
12
12
Bracket for Navigation unit
Applique pour unité de navigation
Montagewinkel für Navigationseinheit
Staffa per l’unità di navigazione
Beugel voor navigatietoestel
Soporte para la unidad de navegación
English Type affixed with adhesive
Français Type fixé par adhésif
Deutsch Befestigung mit Klebeband
English
Italiano Tipo fissato con adesivo
Nederlands Type dat met plakband wordt vastgezet
Español Tipo con fijación adhesiva
Italiano
(Figure 11)
This installation method is for affixing the navigation unit if there is a flat place, such as a
metal plate, etc. under the carpet to which you can securely affix it with two-sided tape.
1. Place the navigation unit with the brackets attached at the installation location on the
carpet.
2. Cut the carpet according to the dimensions shown in the Figure.
(Figura 11)
Questa modalità d'installazione prevede il fissaggio dell'unità di navigazione su superfici
piane, ad esempio una piastra metallica, ecc., sotto il tappeto dove è possibile fissarlo in
sicurezza con un nastro biadesivo.
1. Posizionare l'unità di navigazione tenendo le staffe fissate al punto d'installazione sul
tappeto.
2. Tagliare il tappeto in base alle dimensioni mostrate in figura.
3. Peel off the backing paper on one side of the adhesive tape and apply them to the
brackets.
3. Staccare la carta di protezione su un lato dei nastri adesivi, quindi applicarli sulle staffe.
4. Peel back the carpet and peel off the backing paper on the other side of adhesive tape,
and apply them to the floor.
4. Staccare il tappeto e togliere la carta di protezione sull'altro lato dei nastri adesivi,
quindi applicarli sul pavimento.
NOTES
Before attaching with the adhesive tape, clean the surfaces of the vehicle with a
synthetic detergent. Then completely wipe dry any moisture.
If there are differences in height between the surfaces where the tape will be applied, cut
remaining adhesive tape for the navigation unit in appropriate sizes and stack them on.
NOTE
Prima di incollare il nastro adhesivo, pulire la superficie del veicolo usando del
detergente sintetico. Al termine, strofinare bene per rimuovere l’umidità.
Qualora vi siano differenze d'altezza sulla superficie su cui applicare il nastro adesivo,
tagliare - a dimensione esatta - la parte restante del nastro adesivo per l'unità di
navigazione e applicarla.
5. Remove the screws and detach the navigation unit.
5. Rimuovere le viti e l'unità di navigaazione.
6. Replace the carpet you peeled back to its original position.
6. Riposizionare il tappeto come in origine.
7. Reattach the navigation unit with the screws.
Français
7. Riavvitare l'unità di navigazione.
Nederlands
(Figure 11)
Cette méthode d’installation concerne la fixation de l’unité de navigation s’il y a un emplacement plat, comme par exemple une plaque de métal, etc. sous le tapis sur lequel
vous pouvez fixer l’appareil en toute sécurité avec de la bande adhésive double face.
1. Placez l’unité de navigation avec les appliques attachées sur l’emplacement choisi pour
l’installation sur le tapis.
2. Découpez le tapis en suivant les indications de dimension fournies sur le dessin.
3. Décollez le revêtement protecteur sur un des côtés de la bande adhésive, et posez-la
sur les appliques.
4. Décollez le tapis et décollez le revêtement protecteur sur l’autre côté de la bande
adhésive, et posez-la sur le sol.
REMARQUE
Avant de coller le ruban adhésif, nettoyez la surface du véhicule avec un détergent
synthétique. Puis essuyez complètement toute trace d’humidité.
S’il y a des différences de tailles au niveau de la surface sur laquelle vous voulez poser
la bande adhésive, découpez le reste de la bande adhésive pour l’unité de navigation à
la bonne taille et collez-la dessus.
(Afb. 11)
Deze installatiemethode wordt gebruikt wanneer u het toestel op een vlak oppervlak,
zoals een metalen plaat, enz. met dubbelzijdig plakband kan bevestigen.
1. Plaats het navigatietoestel met bevestigde beugels op de installatieplek op de
vloerbedekking.
2. Snijd de vloerbedekking in de afmetingen zoals aangegeven in de afbeelding.
3. Haal het papier van de achterkant van het plakband af en plak het plakband op de
beugels.
4. Trek de vloerbedekking omhoog, haal het papier van de andere zijde van het plakband
en plaats het geheel op de vloer.
OPMERKINGEN
Reinig het te gebruiken oppervlak met een synthetisch schoonmaakmiddel voordat u
het plakband aanbrengt. Veeg vervolgens alle vocht goed weg.
In geval van hoogteverschillen in het oppervlak kunt u de rest van het plakband op de
juiste maat afknippen en verschillende laagjes plakband op elkaar plakken zodat het
navigatietoestel op de juiste hoogte bevestigd kan worden.
5. Verwijder de schroeven en het navigatietoestel.
5. Enlevez les vis et enlevez l’unité de navigation.
6. Plaats de opgetilde vloerbedekking terug.
6. Remettez le tapis décollé dans sa position d’origine.
7. Schroef het navigatietoestel met behulp van de schroeven opnieuw vast.
7. Revissez l’unité de navigation en utilisant les vis.
Deutsch
Español
(Abbildung 11)
(Figura 11)
Diese Installationsmethode dient zum Befestigen der Navigationseinheit an einer flachen
Stelle, wie z. B. an einer Metallplatte oder ähnlichem unter dem Bodenbelag, an der sie
mit doppelseitigem Klebeband sicher befestigt werden kann.
Este método de instalación permite fijar la unidad de navegación cuando existe una
superficie plana (como una placa metálica, etc.) bajo la alfombrilla a la que se puede fijar
la unidad de forma segura con cinta adhesiva de doble cara.
1. Setzen Sie die Navigationseinheit mit angebrachten Bügeln an der Installationsstelle
auf den Bodenbelag auf.
1. Coloque la unidad de navegación con los soportes en el lugar de instalación sobre la
alfombrilla.
2. Schneiden Sie den Bodenbelag zurecht, wie in der Abbildung gezeigt.
2. Corte la alfombrilla conforme al tamaño de la caja (según se indica en la Figura).
3. Entfernen Sie die Schutzfolie auf einer Seite des Klebebandes und kleben Sie dieses
auf die Bügel.
3. Despegue el papel protector de uno de los lados de la cinta adhesiva y péguela a los
soportes.
4. Schlagen Sie den Bodenbelag zurück, entfernen Sie die Schutzfolie auf der anderen
Seite des Klebebandes und drücken Sie die Klebestelle an den Boden.
4. Levante la alfombrilla y despegue el papel protector del otro lado de la cinta adhesiva y
péguela al suelo.
HINWEISE
Vor Ankleben des Klebebands die Fahrzeugoberfläche mit einem synthetischen Reinigungsmittel säubern. Anschließend vollständig trocken wischen.
Wenn ein Höhenunterschied an der Oberfläche besteht, an der das Klebeband befestigt
wird, schneiden Sie die Reste des Klebebandes für die Navigationseinheit auf die
richtigen Größen zurecht und legen sie schichtweise unter.
NOTAS
Antes de pegar la cinta adhesiva, limpie la superficie del vehículo con un detergente
sintético. Elimine completamente la humedad.
Si hay diferencias de altura en la superficie en la que va a pegar la cinta, corte el resto
de la cinta adhesiva para la unidad de navegación con el tamaño apropiado y péguelo
encima.
5. Retire los tornillos y extraiga la unidad de navegación.
5. Drehen Sie die Schrauben heraus und entfernen Sie die Navigationseinheit.
6. Bringen Sie den zurückgeschlagenen Bodenbelag wieder in die ursprüngliche Position.
7. Schrauben Sie die Navigationseinheit wieder mit Hilfe der Schrauben fest.
6. Vuelva a colocar la alfombrilla recortada en su posición original.
7. Atornille de nuevo la unidad de navegación con los tornillos.
10
English
Français
Deutsch
Italiano
Nederlands
Español
2
Carpet
Tapis
Bodenbelag
Tappetino
Vloerbedekking
Alfombrilla
English
Français
Deutsch
Italiano
Nederlands
Español
Cut the carpet
Découpez le tapis.
Bodenbelag einschneiden
Tagliare il rivestimento
Snijd de vloerbedekking in.
Corte la alfombrilla
160mm
1
178mm
English
Français
Deutsch
Italiano
Nederlands
Español
Installation location
Lieu d’installation
Installationsort
Posto d’installazione
Installatieplek
Lugar de instalación
3
4
English
Français
Deutsch
Italiano
Nederlands
Español
17
17
17
17
17
17
Adhesive tape for Navigation unit
Bande adhésive pour unité de navigation
Klebeband für Navigationseinheit
Nastro adesivo per l’unità di navigazione
Plakband voor navigatietoestel
Cinta adhesiva para la unidad de navegación
5
6
7
English
Français
Deutsch
Italiano
Nederlands
Español
Figure 11
Figure 11
Abbildung 11
Figura 11
Afb. 11
Figura 11
11
English Type affixed with clip
Français Type fixé avec attache
Deutsch Befestigung mit Clips
English
Italiano Tipo fissato con graffa
Nederlands Type dat met klem wordt vastgezet
Español Tipo con fijación de clip
Italiano
(Figure 12)
(Figura 12)
This installation method is for affixing the navigation unit if there is not a surface under the
carpet that would permit secure fixing with two-sided tape, such as if there is padding on
the floor, etc.
Questa modalità d'installazione prevede il fissaggio dell'unità di navigazione qualora,
sotto il tappeto, non vi siano superfici disponibili per il fissaggio in sicurezza dell'unità con
nastro biadesivo, ad esempio nei casi in cui il pavimento sia rivestito, ecc.
NOTE
If the carpet is not securely fixed to the floor, please install it somewhere else.
NOTA
Nel caso in cui il tappeto non sia adeguatamente fissato al pavimento, installare l'unità in
un punto diverso.
1. Place the navigation unit with the brackets attached where it is to be installed on the
carpet.
2. Mark the position for the brackets with a pen.
1. Posizionare l'unità di navigazione tenendo le staffe fissate al punto di installazione sul
tappeto.
2. Marcare con una penna, la posizione delle staffe.
3. Detach the brackets from the navigation unit.
3. Staccare le staffe dall'unità di navigazione.
4. Place the detached brackets in the marked positions.
4. Posizionare le staffe scollegate nelle posizioni precedentemente marcate.
5. Align the brackets inside the marks and mark the clip hole positions with a pen.
6. Pull up the carpet a bit from the floor and drill holes in the positions you marked.
5. Allineare le staffe all'interno dei segni e, con una penna, marcare le posizioni dei fori
delle graffe.
7. Reattach the navigation unit with the screws.
6. Tirare leggermente il tappeto verso l'alto e forare nei punti precedentemente marcati.
8. Affix the bracket with the clips.
7. Riavvitare l'unità di navigazione.
8. Fissare la staffa con le graffe.
Français
Nederlands
(Figure 12)
(Afb. 12)
Cette méthode d’installation concerne la fixation de l’unité de navigation s’il n’y a pas de
surface sous le tapis qui vous permettrez de fixer l’appareil en toute sécurité avec de la
bande adhésive double face, comme par exemple s’il y a un matelassage sur le sol etc.
Deze installatiemethode wordt gebruikt wanneer het navigatietoestel niet met behulp van
de dubbelzijdige plakband aan de vloer bevestigd kan worden, bijv. in geval van
opvullingen, enz.
REMARQUE
Si le tapis n’est pas fixé en toute sécurité sur le sol, veuillez l’installer dans un autre
emplacement
OPMERKING
Installeer het toestel op een andere plek als de vloerbedekking niet goed aan de vloer is
vastgezet.
1. Placez l’unité de navigation avec les appliques attachées sur l’emplacement choisi pour
l’installation sur le tapis.
2. Marquez la position des appliques avec un crayon.
1. Plaats het navigatietoestel met de bevestigde beugels op de installatieplek op de
vloerbedekking.
2. Markeer de positie voor de beugels met een pen.
3. Détachez les appliques de l’unité de navigation.
3. Haal de beugels van het navigatietoestel af.
4. Placez les appliques détachées sur les emplacements préalablement marqués.
4. Plaats de losgemaakte beugels op de gemarkeerde posities.
5. Alignez les appliques à l’intérieur des marques et marquez les emplacements du trou de
l’attache avec un crayon.
5. Zet de beugels op één lijn binnen de gemarkeerde posities en markeer de posities voor
de klemgaten met een pen.
6. Tirez un peu sur le tapis pour le soulever du sol et percez des trous dans les
emplacements que vous avez préalablement marqués.
6. Trek de vloerbedekking enigszins omhoog en boor gaten in de gemarkeerde posities.
7. Revissez l’unité de navigation en utilisant les vis.
7. Schroef het navigatietoestel met behulp van de schroeven opnieuw vast.
8. Fixez les appliques avec les attaches.
8. Bevestig de beugels met de klemmen.
Deutsch
Español
(Abbildung 12)
(Figura 12)
Diese Installationsmethode dient der Befestigung der Navigationseinheit, wenn sich unter
dem Bodenbelag keine Oberfläche befindet, welche die sichere Befestigung mit
doppelseitigem Klebeband zulässt, z. B. wenn sich Polster am Boden befinden.
Este método de instalación permite fijar la unidad de navegación cuando no hay una
superficie debajo de la alfombrilla que pueda permitir la fijación segura con una cinta
adhesiva de doble cara (por ejemplo, si hay un fieltro sobre el suelo, etc.).
HINWEIS
Wenn der Bodenbelag nicht stabil mit dem Boden verbunden ist, nehmen Sie die
Installation an einer anderen Stelle vor.
NOTA
Si la alfombrilla no esta bien fijada al suelo, instálela en otro lugar.
1. Setzen Sie die Navigationseinheit mit angebrachten Bügeln an der Installationsstelle
auf den Bodenbelag auf.
2. Marque la posición de los soportes con un bolígrafo.
2. Zeichnen Sie die Bügelpositionen mit einem Stift an.
3. Separe los soportes de la unidad de navegación.
3. Nehmen Sie die Bügel von der Navigationseinheit ab.
4. Coloque los soportes separados en las posiciones marcadas.
4. Setzen Sie die abgenommenen Bügel auf die angezeichneten Stellen auf.
5. Richten Sie die Bügel innerhalb der Markierungen aus und markieren Sie die Positionen
der Klemmenbohrungen mit einem Stift.
6. Heben Sie den Bodenbelag etwas vom Boden ab und bohren Sie Löcher an den
markierten Positionen.
7. Schrauben Sie die Navigationseinheit wieder mit Hilfe der Schrauben fest.
8. Befestigen Sie den Bügel mit den Klemmen.
1. Coloque la unidad de navegación con los soportes fijados en el lugar de instalación
sobre la alfombrilla.
5. Alinee los soportes con las marcas y marque las posiciones de los orificios de los clips
con un bolígrafo.
6. Levante un poco la alfombrilla del suelo y realice los orificios en las posiciones
marcadas.
7. Vuelva a atornillar la unidad de navegación con los tornillos.
8. Fije el soporte con los clips.
12