1
1 RELAY NANO RECEIVER
Installation Manual
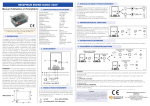
3 - LAYOUT AND CONNECTIONS
3A - Dimensions
Procedure
1) Keep pushed the button P1 for 4 sec. until the
buzzer makes one bip ( Fig. 3);
At this point it’s possible to set a release delay for the
relay different from 1 Sec. ( by default ): press P1
many times as are the seconds of the delay desired.
( max 30 Sec.).
5 sec. after the last pulse given, the buzzer makes a
bip and the procedure ends.
Bip
1 Sec.
P1
Bip
2 Sec.
Bip
5 Sec.
P1
Bip
N Sec.(max 30)
Fig. 3
P1
5 - TRANSMITTERS MEMORIZATION
38,7
32
SEL2641R433-NN
Thank you for choosing this product.
You are recommended to read carefully this manual before
installing the product.
3
50
Fig. 1
3B - Connections
1 - DESCRIPTION
4.1 Using P1
Bip
1) Keep P1 pressed down until the buzzer BUZ emits a
short bip ( Fig. 3);
2) Push the key of the transmitter to memorize and
verify the bip of the receiver;
3) At this point the receiver waits for more transmitters
: 5 seconds after the last transmitter memorized the
receiver makes a bip and the procedure ends.
Fig. 4
4.2 Without P1
P1
ANTENNA
BUZZER
RELAY K1
Superheterodyne
433,92 MHz
AM/ASK
10.7 MHz
-115 dBm
< -57 dBm
50 Ohm
12 / 24 Vac/dc
24VA
1
Pulse / Delayed
1 - 30 Sec.
C-NO
85 user codes
KeeLoq® Hopping code
264
-20°/+70°C
IP2X
50 x 32 x 20
Bip
A or B or C or D
A
Bip
With this procedure it is possible to memorize the
transmitters without accessing to P1 ( Fig. 4).
1) Push simultaneously the keys A + B of the
transmitter until the bip;
2) Release and then keep pushed the key A until the
next bip of the buzzer ( memory opening );
3) Release A and push the key of the transmitter to memorize ( A or B ) until the bip of the buzzer ( memory closing).
5 Sec.
Bip
Fig. 5
NOTE :The memorization of a new transmitter can be done only by using a transmitter already memorized.
Use the transmitter already memorized to open the memory ( step 1 and 2 ).
Complete the procedure by pressing the key of the new transmitter to memorize.
J1
Power selection
NO C
6 . Memory full
If the memory is full, when you try to memorize a new transmitter the buzzer does 3 bip.
7 . Memory erasure
+
7.1 Single transmitter
Power Input
Fig. 2
2 - TECHNICAL SPECIFICATIONS
Receiver type
Carrier frequency
Demodulation
Intermediate frequency
Input sensitivity
Local oscillator spurious emissions
Input load:
Power supply:
Max applicable power
Relay number
Operating modes
Release delay
Contacts
Memory capacity
TX security code
Max code combination number
Operating temperature
Housing protection
Overall dimensions (mm)
Bip
5 Sec.
P1
A+B
Introduction
The receiver ERONE type SEL2641R433-NN is designed to control
automatic closing systems and anti-burglar systems, thanks to its
very high security coding system (KeeLoq ® Hopping code).
The operating frequency is among the European harmonised
frequencies; the product fully complies with the EMC European
Regulations (CE). The code sent by the transmitter changes at every
activation, avoiding any scanning and copying risk.
A special algorithm allows to keep synchronized transmitter and
receiver. The receiver has 1 output relay ( with NO contacts, and
can be connected to many types of mechanics ( gate, garage door,
rolling shutters, awnings, anti-burglar appliances, lighting, etc.).
All the receivers of the range can store into the EEPROM a serial
number, a manufacturer key and a synchronism algorithm of more
transmitters.The programming can be done in self-learning mode
by means of one button.
The housing protection allows indoor installations.
The appliance full complies with the European Regulations
89/336/EEC, 73/23/EEC , EN 60950-1 and FCC Part 15.
Bip
A
7.2 Full Memory erasure
1) Push P1 until the bip of the buzzer, then release it;
2) Release P1 and push it again until the buzzer does 3 bip: at this point the memory has been completely erased.
3C - Power selection
J1 = CLOSED
12 Vac/dc
1) Push P1 until the bip of the buzzer, then release it.
2) Push the key of the transmitter to delete until the bip of the buzzer.
J1=OPEN
24 Vac/dc
4 - OPERATING MODES AND RELEASE
DELAY SETTING
The relay can operate in PULSE or DELAYED mode.
The default pulse is 1 sec.
In delayed mode the release of the relay occurs after a
programmable delay ( 1 - 30 Sec. ) see next paragraph.
During the delay time the reception of a further signal from the
transmitter releases the relay.
8. Enabling/disabling the activation bip
( Fig. 6)
It’s possible to program the receiver to make a bip at each
relay activation.
Follow the procedure below.
1) Press simultaneously the keys A+B of a transmitter already
memorised.
2) Release and press the key B of the transmitter up to the bip.
For the bip disabling repeat the above procedure
A+B
Bip
WARRANTY
The warranty period of this product receivers is 24 months, beginning from
the manufacturing date. During this period, if the product doesn’t operate
correctly, due to a defective component, the product will be repaired or
replaced at the sole discretion of the producer. The warranty does not
extend to the receiver case which can be damaged by conditions outside the
control of the producer.
B
Bip
Fig. 6