1
GB
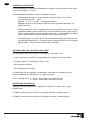
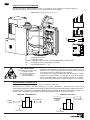
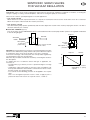
PRESSURE SWITCH ADJUSTMENT
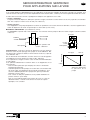
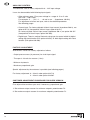
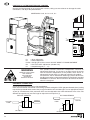
1 - Connect the Sentronic valve connector as described on page 17.
Do not apply pressure to the input port.
2 - Turn potentiometer P6 clockwise to the end (there is a "click" when the end is reached).
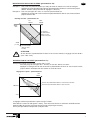
3 - Connect a LED with a 4.7 kΩ resistor between pin 7 and pin 2 or pin 7 and pin 1 depending on
the pressure switch option.
4,7 kΩ
4,7 kΩ
(+ 24V)
PNP
1
7
2
7
(0V)
(0V)
(+ 24V)
NPN
4 - Apply a setpoint according to the half window size (with no vacuum at the valve port)
Example: for a 0 to -1 bar SENTRONIC valve you need a ±50 mbar window size.
0.05: 1 = 5% of 10 volts. Apply a setpoint of 0.5 V.
5 - Turn P6 counter clockwise until the output changes (LED from on to off).
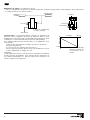
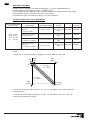
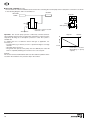
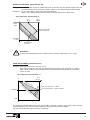
OPTION: SETPOINT - RAMP (010 610)
This transforms a setpoint bounce into a setpoint ramp. Rising or falling ramps can be adjusted
separately by means of a potentiometer.
VR1
VR2
The setpoint ramp is used to delay the valve reaction and avoid overshoot.
VR1 : Ramp time for rising setpoint 0 - 4 sec
VR2 : Ramp time for falling setpoint 0 - 4 sec
Voltage input
Current input
0 . . . 10 V : 200 kΩ input resistance
0 . . . 20 mA : 500 Ω shunt resistance
Pressure/Vacuum
VR1
VR2
Set point
The span and zero point must be adjusted as shown on page 15.
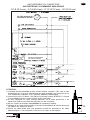
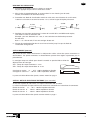
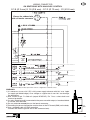
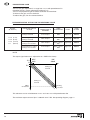
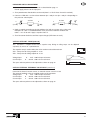
OPTION: EXTERNAL FEEDBACK VALUE INPUT (consult us)
Instead of the internal vacuum sensor, an external vacuum sensor is used.
The external feedback value is supplied to pin 6 of the connector.
Voltage input
0 . . . 10 V : 100 kΩ input resistance
Current input
0 . . . 20 mA : 500 Ω shunt resistance
Current input
4 . . . 20 mA : 500 Ω shunt resistance
The span and zero point must be adjusted as shown on page 15.
21