1
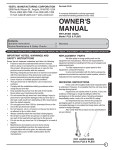
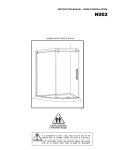
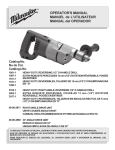
INSTRUCTION MANUAL - GUIDE D’INSTALLATION
T001
09.11
Shower door - Porte de douche
Please keep this manual and product code number for future reference and
replacement parts ordering if necessary. /
Veuillez conserver ce manuel et le code de produit pour des références futures, et au besoin, la
commande les pièces de rechange.
GENERAL INSTRUCTIONS
• Read this manual carefully and completely before proceeding.
• It is recommended that you wear safety glasses at all times during the installation.
En
INSTALLATION OVER CERAMIC TILES
• If your shower door is to be installed over ceramic tiles, the tiles should lay completely under the wall jamb.
• Silicone should be used to seal the gap where the ceramic tiles meet the fixed panel.
NOTICE
• Caulking: no sealant is required inside the shower.
• Some models are equipped with clear sealing gaskets.
CARE FOR YOUR SHOWER DOOR
• Never use scouring powder pads or sharp instruments on metal pieces or glass panels. An occasional wiping down with a mild
soap diluted in water is all that is needed to keep the panels and aluminum parts looking new.
• We recommend wiping the glass panels with a squeegee after each use.
INSTRUCTIONS GÉNÉRALES
• Lire attentivement et complètement le manuel d’installation avant de procéder.
• Il est recommandé de porter des lunettes de sécurité en tout temps lors de l’installation.
Fr
INSTALLATION SUR LES TUILES EN CÉRAMIQUE
• Si votre porte de douche doit être installée sur une bordure en céramique, le jambage doit reposé completement sur cette
dernière.
• Le calfeutrage doit être appliqué sur le côté extérieur de la douche où le panneau fixe rencontre la bordure en céramique.
NOTE
• Calfeutrage: aucun scellant n’est nécessaire à l’intérieur de la douche.
• Certains modèles sont dotés de joints d’étanchéité claire.
L’ENTRETIEN DE VOTRE DOUCHE
• Ne jamais utiliser de poudre ou de tampon à récurer, ni d’instrument tranchant sur les parties en métal ou en verre. De temps à
autre, il suffit de nettoyer la porte avec une solution d’eau et de détergent doux pour conserver l’aspect neuf des panneaux de
verre et du cadre en aluminium.
• Nous recommandons de passer une raclette de douche sur les panneaux de verre après chaque utilisation.
PRODUCT SPECIFICATIONS ARE SUBJECT TO CHANGE WITHOUT NOTICE. /
2
DES CHANGEMENTS PEUVENT ÊTRE APPORTÉS AUX PRODUITS SANS PRÉAVIS.
INSTRUCTION MANUAL - GUIDE D’INSTALLATION
TOOLS AND MATERIAL REQUIRED / OUTILS ET MATERIAUX REQUIS
LONG NOSE LOCKING PLIER
PINCE SERRE ÉTAU
DRILL
PERÇEUSE
1/4˝& 1/16˝ DRILL BITS
MÈCHE 1/4˝ & 1/16˝
SCREWDRIVERS
TOURNEVIS
SILICONE
SCELLANT
TAPE MEASURE
RUBAN À MESURER
MALLET
MAILLET
PENCIL
CRAYON
WOODEN SHIMS
CALES EN BOIS
SCISSOR
CISEAUX
LEVEL
NIVEAU
CUTTING PLIER
PINCE COUPANTE
TO INSTALL THE SHOWER DOOR ON CERAMIC TILES, USE A 1/4’’ DRILL BIT FOR CERAMIC TILES. /
POUR INSTALLER LA PORTE DE DOUCHE SUR DES TUILES EN CÉRAMIQUE, UTILISER UNE MÈCHE 1/4’’ POUR TUILE À CÉRAMIQUE.
3
INSTRUCTION MANUAL - GUIDE D’INSTALLATION
INSTALLATION OF COMPONENTS / INSTALLATION DES COMPOSANTES
Follow the installation steps require for the model / Suivre les étapes d’installation dans l’ordre selon le modèle
STEP / ÉTAPE 5
STEP / ÉTAPE 2
• Wall Jambs and expander
Installation
• Hinges position
• La position des charniéres
• Installation du jambages et de
l’extenseur
see pages / voir pages
7,10
see pages / voir pages
12 - 15
STEP / ÉTAPE 1-3
STEP / ÉTAPE 7
• Door panel installation
• Handle and aluminum
Threshold Installation
• Installation du panneau de porte
• Installation de la poignée et
du seuil en aluminium
see pages / voir pages
6 - 10
see pages / voir pages
19
STEP / ÉTAPE 4
STEP / ÉTAPE 6
• Accessories installation
• Cut the bottom gasket and
side gasket
• Installation des accessoires
see pages / voir pages
11
• Couper le joint inférieur et le
joint latérieur
see pages / voir pages
16-18
STEP / ÉTAPE 8
• Sealing
• Calfeutrage
see pages / voir pages
20
HARDWARE / QUINCAILLERIE
Handles / Poignée
1/8” 1/4”
11
4
12
A
13
14
15
16
17
18
19
B
C
D
E
INSTRUCTION MANUAL - GUIDE D’INSTALLATION
PARTS LISTING / LISTE DES PIÈCES
8
2
4
7
5
HANDLE / POIGNÉE
9
8
6
3
1
ITEM
HARDWARE / QUINCAILLERIE
QTY
1
FRONT ALUMINUM THRESHOLD / SEUIL EN ALUMINIUM DEVANT
1
2
WALL JAMB (REGULAR PUNCH) / JAMBAGE (PERÇAGE REGULIER)
1
3
EXPANDER / EXTENSEUR
1
4
SIDE PANEL GASKET HANDLE SIDE / JOINT LATÉRAL COTÉ POIGNÉE
1
5
SIDE PANEL GASKET HINGES SIDE / JOINT LATÉRAL COTÉ CHARNIÈRES
1
6
BOTTOM DOOR GASKET / JOINT INFÉRIEUR
1
7
DOOR PANEL / PANNEAU DE PORTE
1
8
WALL MOUNT HINGE / CHARNIÈRE MURALE
2
9
HANDLE BAR / POIGNÉE
1
10
CORNER PROTECTOR / PROTECTEUR DE COIN
2
11
WALL MOUNT HINGE SPACER / ESPACEUR POUR CHARNIÈRE MURALE 1/8”
1
12
WALL MOUNT HINGE SPACER / ESPACEUR POUR CHARNIÈRE MURALE 1/4”
1
13
SS WALL-MOUNT HINGE SCREW SS / VIS POUR CHARNIÈRE MURALE SS #10- 2-1/2”
6
14
WALL PLUG FOR HINGE / CHEVILLE POUR CHARNIÈRE
6
15
WALL PLUG / CHEVILLE
4
16
SCREW CAP / CAPUCHON COUVRE-VIS
4
17
BACK SCREW CAP / L’ ARRIÈRE DU CAPUCHON COUVRE-VIS
4
18
PAN SELF DRILLING SCREW / VIS PAN AUTO-PERÇANTE # 8- 3/8”
3
19
PAN SELF-DRILLING SCREW / VIS PAN AUTO-PERÇANTE # 8- 1-1/4”
3
5
INSTRUCTION MANUAL - GUIDE D’INSTALLATION
HINGES POSITION / LA POSITION DES CHARNIÈRES
Recommended door panel according to showerhead location. Choose right or left door opening.
TOP VIEW
VUE DU HAUT
Disposition recommandée de la porte selon la localisation de la pommeau de douche. Choisir
l’ouverture droite ou gauche.
INTERIOR
SHOWER SIDE
INTÉRIEUR DE
LA DOUCHE
TOP VIEW
VUE DU HAUT
STUD /
MONTANT
1 1/2”
IMPORTANT TO FASTENED
HINGES INTO STUD
IMPORTANT DE SÉCURISER
LES CHRNIÈRE DANS UN
MONTANT MURALE.
1
DETERMINE DOOR POSITION / DÉTERMINEZ LA POSITION DELA PORTE
Trace center line on threshold and run it up along the wall.
1a
Tracer une ligne de centre sur le seuil de la base et prolongé verticalement
sur le mur.
INTERIOR
SHOWER SIDE
INTÉRIEUR DE
LA DOUCHE
6
INSTRUCTION MANUAL - GUIDE D’INSTALLATION
HINGE INSTALLATION / INSTALLATION DES CHARIÈRE
2
Install the hinges on the glass door panel as illustrated.
2a
INTERIOR
SHOWER SIDE
INTÉRIEUR DE
LA DOUCHE
Installer les charnières sur le panneau de porte tel qu’illustré.
PLACE THE SIDE OF THE
GLASS FLUSH WITH THE
INTERIOR SIDE OF THE HINGE.
POUSSER VERS LE HAUT ET
FIXER POUR EMPÊCHER LA
PORTE DE GLISSER.
INTERIOR
SHOWER SIDE
INTÉRIEUR DE
LA DOUCHE
Gap
Espace
INTERIOR
SHOWER SIDE
INTÉRIEUR DE
LA DOUCHE
HINGE INSTALLATION (CONTINUED) / INSTALLATION DES CHARIÈRE (SUITE)
2
Place the door on the line marked previously on the base
2b
and wall.
Placer la porte sur la ligne marquée précédemment sur la
base et sur le mur.
USE THIS EDGE FOR REFERENCE TO
CENTER THE DOOR PANEL ON THE LINE
UTILISER CE BORD COMME RÉFÉRENCE
POUR CENTRER LE PANNEAU DE PORTE
SUR LA LIGNE
7
INSTRUCTION MANUAL - GUIDE D’INSTALLATION
HINGE INSTALLATION (CONTINUED) / INSTALLATION DES CHARIÈRE (SUITE)
2
Level the door and add spacers or shims if needed.
2c
Assurer le niveau de la porte. Ajouter des cales d’espacement ou les cales
en bois si nécessaire.
IF WALL IS OUT OF PLUMB /
SI LE MUR EST HORS D’APLOMB
IF THRESHOLD OUT OF LEVEL /
SI LE SEUL EST HORS DE NIVEAU
1/8” 1/4” 3/8” A
B
A + B
SPACERS / ESPACEUR
8
WOODEN SHIMS /
CALES EN BOIS
INSTRUCTION MANUAL - GUIDE D’INSTALLATION
2
HINGE INSTALLATION (CONTINUED) / INSTALLATION DES CHARIÈRE (SUITE)
Mark the location of the hinges holes to secure to the wall. Remove the
door panel and drill the holes Ø1/4” with drill bit intend for ceramic tiling.
2d
Insert one drop of silicone in each hole before inserting the wall plug.
Marquer l’emplacement des trous de charnières à fixer au mur. Retirer le
panneau de porte et percer les trous Ø1/4 “ avec une mèche à céramique.
Insérer une goutte de silicone dans chaque trou avant d’insérer la cheville
pour charniére murale
INTERIOR
SHOWER SIDE
INTÉRIEUR DE
LA DOUCHE
INTERIOR
SHOWER SIDE
INTÉRIEUR DE
LA DOUCHE
INTERIOR
SHOWER SIDE
INTÉRIEUR DE
LA DOUCHE
9
INSTRUCTION MANUAL - GUIDE D’INSTALLATION
2
HINGE INSTALLATION (CONTINUED) / INSTALLATION DES CHARIÈRE (SUITE)
Remove the hinge back plate and glass panel. Secure the hinge into the wall.
2e
Retirer la plaque arrière de la charnière et le panneau de verre. Fixer la charnière du mur.
INTERIOR
SHOWER SIDE
INTÉRIEUR DE
LA DOUCHE
INTERIOR
SHOWER SIDE
INTÉRIEUR DE
LA DOUCHE
DOOR PANEL INSTALLATION / INSTALLATION DE LA PORTE
3
Reinstall the glass panel and the hinge back plate. Make sure the door is level.
3a
Réinstaller le panneau de verre et la plaque arrière de la charnière. Vérifier le niveau de
la porte.
INTERIOR
SHOWER SIDE
INTÉRIEUR DE
LA DOUCHE
10
INSTRUCTION MANUAL - GUIDE D’INSTALLATION
3
DOOR PANEL INSTALLATION (CONTINUED) / INSTALLATION DE LA PORTE (SUITE)
Remove the corner protectors.
3b
Retirer les protecteur de coin.
3
3c
DOOR PANEL INSTALLATION (CONTINUED) / INSTALLATION DE LA PORTE (SUITE)
Place screw covers over the hinges screws
Placer les couvres de vis sur les vis des charnières
INTERIOR
SHOWER SIDE
INTÉRIEUR DE
LA DOUCHE
INTERIOR
SHOWER SIDE
INTÉRIEUR DE
LA DOUCHE
11
INSTRUCTION MANUAL - GUIDE D’INSTALLATION
4
4
INSTALLATION OF WALL JAMB / INSTALLATION DU JAMBAGE
Trace the three holes on to the wall as illustrated.
4a
Tracer les trois trous sur le mur tel qu’illustrés.
INTERIOR
SHOWER SIDE
INTÉRIEUR DE
LA DOUCHE
4
INSTALLATION OF WALL JAMB (CONTINUED) / INSTALLATION DU JAMBAGE (SUITE)
Drill into the wall with Ø1/4” drill bit
intended for ceramic tiling. Insert on
drop of silicone in each hole in the wall
before inserting the wall plug.
4b
12
Percer des trous avec une mèche
à céramique de Ø1/4”. Insérer une
goutte de silicone dans chaque trou
avant d’insérer les chevilles.
INSTRUCTION MANUAL - GUIDE D’INSTALLATION
INSTALLATION OF WALL JAMB (CONTINUED) / INSTALLATION DU JAMBAGE (SUITE)
4
Apply silicone at the bottom of the wall jamb on the side that goes against
4c
the wall as illustrated.
Appliquer du silicone dans le bas du jambage sur la face contre le mur tel
qu’illustré.
INTERIOR
SHOWER SIDE
INTÉRIEUR DE
LA DOUCHE
INSTALLATION OF WALL JAMB (CONTINUED) / INSTALLATION DU JAMBAGE (SUITE)
4
4
Apply silicone at the bottom on the inside of the wall jamb as illustrated.
4d
Appliquer du silicone à l’intérieur du jambage tel qu’illustré.
INTERIOR
SHOWER SIDE
INTÉRIEUR DE
LA DOUCHE
13
INSTRUCTION MANUAL - GUIDE D’INSTALLATION
5
INSTALLATION OF EXPANDER / INSTALLATION DU EXTENSEUR
Insert the side panel gasket handle side into the expander. Then
5a
insert the expander into the wall jamb.
Insérer le joint latéral coté poigée dans l’extenseur. Ensuite,
insérer l’extenseur dans le jambage.
INTERIOR
SHOWER SIDE
INTÉRIEUR DE
LA DOUCHE
INTERIOR
SHOWER SIDE
INTÉRIEUR DE
LA DOUCHE
5
INSTALLATION OF EXPANDER (CONTINUED) / INSTALLATION DU EXTENSEUR (SUITE)
Adjust the expander to make the gasket touch the door panel. Lock the position by
5b
clamping the wall jamb and expander with locking pliers.
Ajuster l’extenseur pour que le joint touche le panneau de porte. Serrer le jambage
et l’extenseur à l’aide des pinces autoblocquante.
INTERIOR
SHOWER SIDE
INTÉRIEUR DE
LA DOUCHE
INTERIOR
SHOWER SIDE
INTÉRIEUR DE
LA DOUCHE
COVER THE PLIER’S TEETH
BEFOREHAND TO
AVOID SCRATCHING
THE ALUMINUM PARTS.
14
RECOUVREZ LES DENTS
DE LA PINCE AFIN DE NE PAS
GRAFIGNER LES PIÈCES
EN ALUMINIUM.
INSTRUCTION MANUAL - GUIDE D’INSTALLATION
INSTALLATION OF EXPANDER (CONTINUED) / INSTALLATION DU EXTENSEUR (SUITE)
5
If the side gasket passes more than 1/16” over the door panel
4
5c
cut the gasket along one of it’s sims.
Couper le joint le long d’un des plis si le joint dépasses de plus
de 1/16”.
INTERIOR
SHOWER SIDE
INTÉRIEUR DE
LA DOUCHE
5
INTERIOR
SHOWER SIDE
INTÉRIEUR DE
LA DOUCHE
INSTALLATION OF EXPANDER (CONTINUED) / INSTALLATION DU EXTENSEUR (SUITE)
Secure the wall jamb and expander and place a cap
4
on the head of the apparent screws.
5d
Fixer le jambage avec l’extenseur et placer les
capuchons sur les têtes de vis apparentes.
INTERIOR
SHOWER SIDE
INTÉRIEUR DE
LA DOUCHE
15
INSTRUCTION MANUAL - GUIDE D’INSTALLATION
6
Cut the bottom door gasket with the following path using cutting pliers.
Only cut on the side of the hinges
6a
Couper le joint inférieur selon la méthode suivante à l’aide de pince
coupante. Couper sur le côté des charnières seulement.
HINGE /
CHARNIÈRES
CUT THE BOTTOM GASKET / COUPER LE JOINT INFÉRIEUR
2a
5/8”
1
5/8”
INTERIOR
SHOWER SIDE
INTÉRIEUR DE
LA DOUCHE
5/8”
2
6
INTERIOR
SHOWER SIDE
INTÉRIEUR DE
LA DOUCHE
3
7
5/8”
8
INTERIOR
SHOWER SIDE
INTÉRIEUR DE
LA DOUCHE
INTERIOR
SHOWER SIDE
INTÉRIEUR DE
LA DOUCHE
5
9
4
5/8”
INTERIOR
SHOWER SIDE
INTÉRIEUR DE
LA DOUCHE
16
INTERIOR
SHOWER SIDE
INTÉRIEUR DE
LA DOUCHE
3/8”
INTERIOR
SHOWER SIDE
INTÉRIEUR DE
LA DOUCHE
INSTRUCTION MANUAL - GUIDE D’INSTALLATION
4
CUT THE BOTTOM GASKET (CONTINUED) / COUPER LE JOINT INFÉRIEUR (SUITE)
Cut the other side of the bottom door gasket straight.
6b
Couper l’autre côté du joint inférieur droit.
HINGE /
CHARNIÈRES
6
INTERIOR
SHOWER SIDE
INTÉRIEUR DE
LA DOUCHE
6
CUT THE BOTTOM GASKET (CONTINUED) / COUPER LE JOINT INFÉRIEUR (SUITE)
Install the bottom gasket with pressure
on the bottom of the glass panel.
6c
Installer le joint inférieur avec pression
sur le bas du panneau de verre.
INTERIOR
SHOWER SIDE
INTÉRIEUR DE
LA DOUCHE
17
INSTRUCTION MANUAL - GUIDE D’INSTALLATION
CUT THE DOOR GASKETS (CONTINUED) / COUPER LES JOINTS DE PORTE (SUITE)
6
Cut the side gasket in 3 according to the
gasket lenghts in the table. Remove 7/8”
from the U part of the gasket
leaving the flexible part of the gasket.
6d
CUT / COUPER
A
7/8”
(22.23mm)
Couper le joint en 3 selon les longueurs
dans le tableau. Retirer 7/8” de la partie
en U du joint, laissant la partie flexible du
joint.
CUT PIECE A ONLY ON ONE END BUT
CUT PIECE B AND C ON BOTH ENDS
Gasket
Length /
A
Longueur
5 7/8”
du joint (149.23mm)
B
C
61 1/2”
(1562.1mm)
6 3/4”
(171.45mm)
B
COUPER LE MORCEAU A UNIQUEMENT
À UNE EXTRÉMITÉ, MAIS B ET C COUPÉ
AUX DEUX EXTRÉMITÉS
A
5 7/8”
(149.23mm)
B
61 1/2”
(1562.1mm)
C
6
CUT THE DOOR GASKETS (CONTINUED) / COUPER LES JOINTS DE PORTE (SUITE)
Install the side gasket with pressure make sure the flexible
part of the gasket is inserted between the glass and hinge.
6e
A
Insérer la partie flexible du joint entre le verre et la
charnière. Installer le joint de côte par pression.
B
C
18
C
6 3/4”
(171.45mm)
INSTRUCTION MANUAL - GUIDE D’INSTALLATION
VALVE CONTROL / VANNE DE COMMANDE
11
Self-Closing Hinge Adjustments
The oil-pressure hinges are supplied with completely closed control valves (Once the door is mounted, it may not be self-closing.
Adjustments are required).
For the hinges to operate optimally, it is necessary that they are both synchronized.
1. Open the door panel at a 90° position.
2. Adjust one of the hinges by loosening the adjustment screw by quarter turn increment.
Perform this procedure on second hinge and observe if the door closes automatically.
3. In order to obtain the desired speed, repeat step 2 by quarter turn increments.
As the hinge can be inverted, there will be situations where the valve will be positioned upwards and situations where the valve
will be positioned downwards. This will not affect the performance of the hardware.
TIPS:
Check that both hinges have been installed correctly. This is done by opening the door and making sure that neither of the
hinges makes any clicking sound. If one of the hinges makes a clicking sound, simply loosen or tighten slightly the adjustment
screw to synchronize it to the silent hinge.
ATTENTION!
DO NOT LOOSEN THE ADJUSTMENT SCREW ALL THE WAY (PRESSURIZED OIL MAY LEAK). THE WARRANTY DOES
NOT COVER ANY PROBLEMS CAUSED BY A COMPLETELY LOOSENED VALVE.
CLOCKWISE = DECREASING SPEED /
SENS HORAIRE = VITESSE DÉCROISSANTE
COUNTERCLOCKWISE = INCREASING SPEED /
SENS ANTI-HORAIRE = VITESSE CROISSANTE
Ajustement de Charnières Centrage Automatique
Les charnières à pression d’huile fournies avec des valves de contrôle complètement fermé
(Une fois que la porte est installée, il se peut que le panneau ne se ferme pas automatiquement. Les ajustements sont
nécessaires).
Pour que les charnières fonctionnent de façon optimale, il est nécessaire de les synchroniser.
1. Ouvrer le panneau de porte à un emplacement de 90 °.
2. Ajuster la soupape en desserrant la vis de réglage par incrément de quart de tour.
Poursuivre cette procédure sur la deuxième charnière et observer si la porte se ferme automatiquement.
3. Afin d’obtenir la vitesse désirée, répétez l’étape 2 par incrément de quart de tour.
Comme la charnière peut être inversée, il arrive des situations où la valve sera orientée vers le haut et les situations où la valve
sera orientée vers le bas. Ceci n’affectera pas les performances de la charnière.
CONSEILS:
Vérifier que les deux charnières ont été installées correctement. Ouvrir et relâcher la porte.
Si une des charnières font un bruit de déclic, il suffit de desserrer ou serrer légèrement la vis de réglage afin de synchroniser à
la charnière silencieuse.
ATTENTION !
NE PAS DESSERRER LA VIS DE RÉGLAGE COMPLÈTEMENT, HUILE SOUS PRESSION PEUT FUIRE. LA GARANTIE NE
COUVRE PAS LES PROBLÈMES CAUSÉS PAR UNE VALVE COMPLÈTEMENT DESSERRER.
19
INSTRUCTION MANUAL - GUIDE D’INSTALLATION
7a
HANDLE INSTALLATION / INSTALLATION DE POIGNEÉ
See sheet for installation and install the
handle as shown.
Voir la fiche d’installation et installer la
poignée tel qu’illustré.
Handles / Poignée
8
8A
ACCESSORIES INSTALLATION (CONTINUED) / INSTALLATION DES ACCESSOIRES (SUITE)
Apply a line of silicone underneath the treshold and
position on the base. Cut if needed
Coller le seuil de rétention sur la base avec du
silicone. Couper si nécessaire.
MAKE SURE THAT THE THRESHOLD TOUCHES THE WALL
AND THE EXPANDER. SLIDE UNDER THE EXPANDER
ASSUREZ-VOUS QUE LE SEUIL DE RÉTENTION EST
PLACÉ CONTRE LE MUR ET L’EXTENSEUR. GLISSER
SOUS L’EXTENSEUR.
20
HANDLE / POIGNÉE
7
INTERIOR
SHOWER SIDE
INTÉRIEUR DE
LA DOUCHE
INSTRUCTION MANUAL - GUIDE D’INSTALLATION
9
9a
SEALING / CALFEUTRAGE
Silicone the outside of the shower unit along the wall jamb and the exterior side of the aluminum threshold. Wait 24 hours before
using the shower to allow the silicon to dry.
Calfeutrer avec du silicone l’extérieur de l’unité autour du jambage et à l’extérieur du seuil en aluminium. Attendre 24 heures
avant de faire fonctionner la douche pour laisser le silicone séché.
INTERIOR
SHOWER SIDE
INTÉRIEUR DE
LA DOUCHE
INTERIOR
SHOWER SIDE
INTÉRIEUR DE
LA DOUCHE
HOURS
HEURES
21