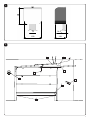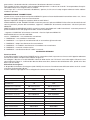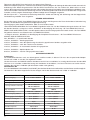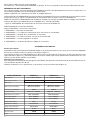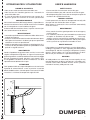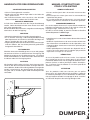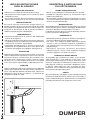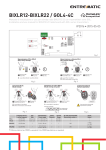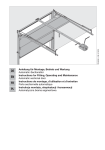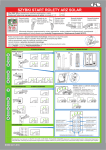
1
Manuale di installazione e d’uso per automazione per porte sezionali e basculanti
Installation and user manual for sectional and tilt-up doors
Installations- und Gebrauchsanleitung für Sektional- und Schwingtorantrieb
Manuel d’installation et d’utilisation pour portes sectionnelles et basculantes
Manual de instalación y uso para la automatización de puertas seccionales y basculantes
Instrukcja instalacji i użytkowania zestawu automatyki do bram segmentowych i uchylnych
IT
DUMPER 7 DUMPER
DUMPER 10
Manuale di installazione e manutenzione automazione
per porte sezionali e basculanti
myone S.r.l - Via T. Edison, 11 - 30035 Mirano (VE) - ITALY Tel. +39 041 412542 - Fax +39 041 412542
www.myoneautomation.com
Manuale istruzioni
Operating instructions
Betriebsanleitung
Livret d’instructions
Manual de instrucciones
Książeczka z instrukcjami
200
1
31.5
72
119
190
2
2
3
1
o
7
8
6
5
4
3
3 4. Installazione meccanica
4. Installazione meccanica
4. Installazione meccanica
=
=
=
=
=
=
=
=
=
=
=
=
=
=
=
=
=
=
=
110 mm
=
=
=
=
4
MOTOR
MOTOR
MOTOR
~ 600 mm
~~600
600mm
mm
5
-64
=
-6-6-
6
4. Installazione meccanica
4. Installazione meccanica
7
min. 10 mm
min. 10 mm
-7-
-7-
5
8
9
10
11
12
13
115 / 230 V.a.c. 50/60Hz L
6
N
14
F2= FUSE 8AT
F1= FUSE 1.6AT
F1
1.6A
ON
1
2
DIP SWITCH
3
4
5
6
7
F2
8A
8
OFF
OPEN
FOTO
STOP
COM
-24 V
LAMP
+24 V LAMP
SIG.
ANT.
LED POWER
NC
NC
Max
3W
OPEN
PROG.
MEMO RX
min.
max.
NO
15
7
16
~ 45°
~ 45°
1 cm
8
17
Fissare il braccio sul filo superiore della porta.
Fix the arm to the top edge of the door.
Arm an der oberen Kante des Tores befestigen
Fixer le bras sur l’arête supérieure de la porte.
Fijar el brazo en la arista superior de la puerta.
Przymocować ramię do górnego prętu bramy.
Rotaia.
Rail.
Schiene.
Morceau de rail.
Guía.
Szyna.
Regolare
Adjust
Regulieren
Régler
Regulación
Regulowanie.
Vite M6x35 UNI 5931
Screw M6x35 UNI 5931
Schraube M6x35 UNI 5931
Vis M6x35 UNI 5931
Tornillo M6x35 UNI 5931
Śruba M6x35 UNI 5931.
Mettere a piombo il braccio.
Level the arm.
Arm lotrecht stellen.
Mettre à plomb le bras.
Aplomar bien el brazo.
Ustawić ramię w pozycji
pionowej.
Braccio per porte a contrappesi art. AU.C25.
Overhead doors with balanceweights: special arm art. AU.C25.
Kipptor mit Gegengewichten: Sonderarm, Teil AU.C25.
Portes basculantes à contrepoids: bras spécial art. AU.C25.
Brazo para puerta de contrapesos art. AU.C25.
Ramię dla bram z przeciwwagą art. AU.C25.
A porta chiusa lasciare 2 ÷ 3 cm.
Keep a distance of 2 ÷ 3 cm when the door is closed.
Wenn die Tür geschlossen ist, lassen 2 ÷ 3 cm.
Il faut lasser 2 ÷ 3 cm quand la porte est ouvert.
Cuando la puerta ésta cerrada, hay que haber 2 ÷ 3 cm.
Podczas zamkniętej bramy pozostawić 2 ÷ 3 cm.
9
+
10
- BAT
+ BAT
-
18
Dichiarazione CE di Conformità
Dichiarazione in accordo alle Direttive 2004/108/CE(EMC); 2006/95/CE(LVD)
Fabbricante:
AUTOMATISMI CAB Srl
Indirizzo:
Via della Tecnica,10 (z.i.) - 36010 Velo d’Astico (VI) - Italia
Dichiara che il prodotto:
Automazione a traino per porte sezionali modello:
DUMPER 7 - DUMPER 10.
è conforme alle condizioni delle seguenti Direttive CE:
• DIRETTIVA 2004/108/CE DEL PARLAMENTO EUROPEO E DEL CONSIGLIO del 15 dicembre 2004 concernente il ravvicinamento delle legislazioni degli Stati membri relative alla compatibilità elettromagnetica e che abroga la direttiva 89/336/CEE, secondo le
seguenti norme armonizzate:
EN 61000-6-2:2005, EN 61000-6-3:2007.
• DIRETTIVA 2006/95/CE DEL PARLAMENTO EUROPEO E DEL CONSIGLIO del 12 dicembre 2006 concernente il ravvicinamento
delle legislazioni degli Stati membri relative al materiale elettrico destinato ad essere adoperato entro taluni limiti di tensione, secondo le
seguenti norme armonizzate:
EN 60335-1:2002 + A1:2004 + A11:2004 + A12:2006 + A2:2006 + A13:2008; EN 60335-2-103:2003.
• DIRETTIVA 2006/42/CE DEL PARLAMENTO EUROPEO E DEL CONSIGLIO del 17 maggio 2006 relativa alle macchine e che
modifica la direttiva 95/16/CE, rispettando i requisiti per le “quasi macchine”, secondo la seguente norma: EN13241-1:2003.
• AUTOMATISMI CAB Srl dichiara, inoltre, che la documentazione tecnica pertinente è stata compilata in conformità all’allegato VII
B della direttiva 2006/42/CE e che sono stati rispettati i seguenti requisiti essenziali: 1.1.1 - 1.1.2 - 1.1.3 - 1.1.5 - 1.2.1 - 1.2.3 - 1.2.6 - 1.3.1
- 1.3.2 - 1.3.3 - 1.3.4 - 1.3.7 - 1.3.9 - 1.5.1 - 1.5.2 - 1.5.4 - 1.5.5 - 1.5.6 - 1.5.7 - 1.5.8 - 1.5.10 - 1.5.11 - 1.5.13 - 1.6.1 - 1.6.2 - 1.6.4 - 1.7.2 1.7.4 - 1.7.4.1 - 1.7.4.2 - 1.7.4.3.
• Il produttore si impegna a trasmettere alle autorità nazionali, in risposta ad una motivata richiesta, le informazioni pertinenti sulla “quasi
macchina”. L’impegno comprende le modalità di trasmissione e lascia impregiudicati i diritti di proprietà intellettuale del fabbricante della
“quasi macchina”.
• Si comunica che la “quasi macchina” non deve essere messa in servizio finché la macchina finale in cui deve essere incorporata non è
stata dichiarata conforme, se del caso, alle disposizioni della direttiva 2006/42/CE.
• Inoltre il prodotto, limitatamente alle parti applicabili, risulta conforme alle seguenti norme:
EN 12445:2002, EN 12453:2002, EN 12978:2003.
Benincà Luigi, Responsabile legale.
Velo d’Astico, 02/11/2010.
AVVERTENZE
E' vietato l'utilizzo del prodotto per scopi o con modalità
non previste nel presente manuale. Usi non corretti possono essere causa di danni al prodotto e mettere in pericolo
persone e cose.
Si declina ogni responsabilità dall'inosservanza della buona
tecnica nella costruzione dei cancelli, nonché dalle deformazioni che potrebbero verificarsi durante l'uso.
Conservare questo manuale per futuri utilizzi.
L'installazione deve essere effettuata da personale qualificato nel pieno rispetto delle normative vigenti.
I materiali dell'imballaggio non devono essere lasciati alla
portata dei bambini in quanto fonte di potenziale pericolo.
Non disperdere nell'ambiente i materiali di imballo, ma separare le varie tipologie (es. cartone, polistirolo) e smaltirle
secondo le normative locali.
L’installatore deve fornire tutte le informazioni relative
al funzionamento automatico, manuale e di emergenza
dell'automazione, e consegnare all’utilizzatore dell’impianto le istruzioni d’uso.
Questo prodotto non è destinato a essere utilizzato da
persone (bambini inclusi) con capacità fisiche, sensoriali o
mentali ridotte, o con mancanza di conoscenze adeguate,
a meno che non siano sotto supervisione o abbiano ricevuto istruzioni d’uso da persone responsabili della loro
sicurezza.
Prevedere sulla rete di alimentazione un interruttore/sezionatore onnipolare con distanza
d’apertura dei contatti uguale o superiore a 3 mm.
Verificare che a monte dell’impianto elettrico vi sia un interruttore differenziale e una protezione di sovracorrente adeguati.
Alcune tipologie di installazione richiedono il collegamento
dell'anta ad un impianto di messa a terra rispondente alle
vigenti norme di sicurezza.
Durante gli interventi di installazione, manutenzione e riparazione, togliere l’alimentazione prima di accedere alle
parti elettriche.
•
Le descrizioni e le illustrazioni presenti in questo manuale
non sono impegnative. Lasciando inalterate le caratteristiche essenziali del prodotto il fabbricante si riserva il
diritto di apportare qualsiasi modifica di carattere tecnico,
costruttivo o commerciale senza impegnarsi ad aggiornare
la presente pubblicazione.
11
INTRODUZIONE
Ci congratuliamo con Voi per aver scelto il motoriduttore DUMPER.
Tutti gli articoli della vasta gamma CAB sono il frutto di una ventennale esperienza nel settore degli automatismi e di una
continua ricerca di nuovi materiali e di tecnologie all’avanguardia.
Proprio per questo, oggi siamo in grado di offrire dei prodotti estremamente affidabili che, grazie alla loro potenza, efficacia
e durata, soddisfano pienamente le esigenze dell’utente finale.
Tutti i nostri prodotti sono coperti da garanzia.
Inoltre, una polizza R. C. prodotti stipulata con primaria compagnia assicurativa copre eventuali danni a cose o persone
causati da difetti di fabbricazione.
NOTIZIE GENERALI
L’automatismo è concepito per motorizzare porte sezionali; per essere applicato su porte basculanti necessita di uno
speciale braccio di attacco (art. AU.C25).
In ogni caso dovranno essere assolte le seguenti condizioni:
- la distanza tra il punto più alto della porta ed il soffitto deve essere almeno 40mm;
- la porta deve potersi aprire e chiudere tirando e spingendo orizzontalmente sul suo bordo superiore;
- le manovre manuali devono risultare dolci e regolari.
DIMENSIONI
In figura 1 sono indicate le dimensioni espresse in millimetri
INSTALLAZIONE TIPO
In figura 2 è rappresentata una tipica installazione.
Rif. Articolo
Descrizione
1
Automazione 700N porte sezionali e basculanti
Automazione 1000N porte sezionali e basculanti
DUMPER 7
DUMPER 10
2
Guida traino 3000/4000 mm
3
DM.BT
Kit batterie di emergenza
4
PUPILLA -C
Fotocellule per montaggio a parete
5
Costa di sicurezza
6
Telecomando 2/4 CH - codifica rolling-code 433.92 MHz.
7
Sblocco di sicurezza
8
FBY
Lampeggiante LED
ATTENZIONE:.
Il collegamento alla rete deve essere eseguito su canale indipendente e separato dai dispositivi di comando e sicurezza.
INSTALLAZIONE DELL’AUTOMAZIONE
Eseguire 2 fori perfettamente centrati sulla mezzeria della porta, come indicato in figura 3.
Fissare provvisoriamente la rotaia alla parete utilizzando due tasselli con relative viti, come indicato in figura 4. La rotaia
deve essere libera di muoversi verso il soffitto.
Nel caso si stia utilizzando la rotaia suddivisa in 2 pezzi è necessario assemblarla utilizzando l’apposito giunto. Il giunto
viene fornito pre-inserito in uno dei due pezzi, è sufficiente allineare il binario e far scorrere il giunto sul binario come indicato in figura 6.
Con riferimento alla figura 5, applicare la piastrina di sostegno alla rotaia alla distanza di circa 60 cm dal motore, quindi
piegare (tenendo conto della distanza tra rotaia e parete) le due staffe per il fissaggio a soffitto e applicarle alla piastrina
di sostegno.
Sollevare la rotaia come indicato in figura 6 e facendo riferimento al disegno di figura 7 fissare le staffe a soffitto. La rotaia
deve essere perfettamente orizzontale. Fissare la rotaia alla parete e la staffa di traino al bordo superiore della porta. Tra
il profilo superiore della porta e la rotaia deve risultare una distanza minima di 10mm.
Aprire la copertura (figura 8) e rimuovere le due viti evidenziate in figura 9, quindi sfilare la piastra di blocco (figura 10).
Applicare il motore al binario (figura 11), reinserire la piastra di blocco e riavvitare le due viti (figura 12).
Portare l’anta in posizione di completa apertura e a circa 1 cm di distanza, fissare il fermo meccanico, come indicato in
Figura 16. Bloccare in modo definitivo il fermo meccanino effettuando 2 forature sul binario avvitando quindi le due viti da
3,5 mm autofilettanti.
E’ ora possibile procedere con il collegamento elettrico utilizzando il cavo precablato alla centrale di comando (figura13).
E’ obbligatorio effettuare il collegamento di terra (GND) nel rispetto delle normative vigenti.
IMPORTANTE
A porta completamente chiusa, la staffa di trascinamento deve trovarsi a circa 45° rispetto alla rotaia come indicato in
Figura 16. A tal fine è’ possibile accorciare la staffa ed utilizzare le altre forature.
12
COLLEGAMENTI ELETTRICI (FIGURA 14)
Descrizione delle morsettiere
Ingresso
Descrizione
OPEN-COM
Ingresso pulsante OPEN (N.O.) per il comando dell’automazione, configurabile tramite il DIP1
FOTO-COM
Ingresso contatto (N.C.) per dispositvi di sicurezza (Fotocellula)
STOP-COM
Ingresso contatto (N.C.) per pulsante di arresto di emergenza (STOP)
ANT-COM
Ingresso per antenna del radioricevitore incorporato con frequenza 433,92Mhz (Ant: segnale - COM:Calza)
LAMP/LAMP+24
Uscita 24V per collegamento lampeggiante di segnalazione
In figura 15 sono evidenziate le numerose predisposizioni da aprire secondo le necessità per il passaggio dei cavi di collegamento.
DESCRIZIONE DEI DIP-SWITCH DI CONFIGURAZIONE
Nota: Le modifiche alle impostazioni dei DIP-SWITCH vanno effettuate a porta completamente chiusa o, in alternativa, è
necessario togliere e ripristinare l’alimentazione di rete per rendere effettive le modifiche.
DIP1: Seleziona la modalità di funzionamento del ”Pulsante P.P.” e del trasmettitore.
ON: Funzionamento: APRE > STOP > CHIUDE > STOP >
OFF: Funzionamento: APRE > CHIUDE > APRE >
DIP2: Abilita o disabilita la chiusura automatica
ON: Richiusura automatica abilitata
OFF: Richiusura automatica disabilitata
DIP3: Selezione velocità in fase di rallentamento
ON: velocità in rallentamento bassa
OFF: velocità in rallentamento alta
DIP4: Abilita o disabilita la funzione condominiale.
On: Funzione condominiale abilitata. L’impulso P.P. o del trasmettitore non ha effetto durante la fase di apertura.
Off: Funzione condominiale disabilitata.
DIP5: Tempo inversione in chiusura per tensionamento cinghia
ON: Tempo minimo
OFF: Tempo massimo
DIP6: Inversione in chiusura per tensionamento cinghia
ON: Inversione non attiva
OFF: Inversione attiva
DIP7: Frenatura
ON: 80%
OFF: 90%
DIP8: Configurazione ingresso FOTO
ON: Ingresso FOTO attivo in apertura e chiusura
OFF: Ingresso FOTO attivo solo in chiusura
TRIMMER
Il trimmer presente sulla centrale regola la sensibilità del sensore anti schiacciamento. Ruotando in senso orario aumenta
la sensibilità, viceversa diminuisce.
Al primo intervento del sensore, la centrale riapre totalmente, successivamente (se DIP2=ON) tenta una nuova manovra di
chiusura, in caso di nuovo intervento riapre per 3s e si pone in stato di STOP.
MANOVRA MANUALE
Nel caso di interruzione dell’energia elettrica, è possibile manovrare manualmente l’anta, tirando verso il basso il cordino
con la manopola rossa come indicato in figura 16.
Al ritorno dell’alimentazione di rete, la prima manovra ripristina automaticamente lo sblocco.
AUTOAPPRENDIMENTO
La centrale elettronica è progettata per autoprogrammarsi ed essere pronta all’uso appena collegata alla tensione di rete.
ATTENZIONE: la procedura di autoapprendimento necessita il collegamento di tutte le sicurezze; qualora una o più non
fossero usate, ponticellare il relativo ingresso al morsetto COM -24 V.
Premere il pulsante PROG. (si accende la luce di cortesia), premere pulsante OPEN, automaticamente la porta eseguirà
una manovra fino a chiusura completa. Trascorsi 2 secondi, la porta eseguirà una manovra fino alla massima apertura
desiderata (premi tasto OPEN per determinare apertura desiderata).
Da questo momento, (Dip 2 ON = chiusura automatica abilitata) inizia il conteggio in secondi per la chiusura automatica,
trascorso il tempo desiderato, premere il pulsante OPEN, la porta andrà in chiusura uscendo automaticamente dalla pro13
grammazione, calcolando velocità e rallentamenti da effettuare durante la manovra.
N.B. Il tempo chiusura automatica viene conteggiato dall’operatore e va da 0 a 90 secondi. L’intera procedura di acquisizione delle battute viene eseguita a bassa velocità.
Con il Dip 2 OFF = chiusura automatica disabilitata, l’apertura, la chiusura e lo stop vengono effettuate tramite radiocomando e/o pulsante.
MEMORIZZAZIONE TRASMETTITORE
A porta chiusa, mantenere premuto il pulsante MEMO RX, premere il tasto desiderato del trasmettitore entro 5 sec., la luce
di cortesia lampeggia per avvenuta memorizzazione.
Ripetere l’operazione ad ogni trasmettitore. MAX 20 codici diversi.
ANNULLAMENTO DI UN TRASMETTITORE: mantenere premuto il pulsante MEMO RX fino all’accensione della luce di
cortesia, premere il pulsante del trasmettitore, seguono 3 “LAMPEGGI” di conferma annullamento - rilasciare il pulsante
MEMO RX
RESET SCHEDA ACQUISIZIONE CODICI: resetta la memoria annullando tutti i codici memorizzati - mantenere premuto il
pulsante MEMO RX fino allo spegnimento della “LUCE DI CORTESIA”
- seguono 9 “LAMPEGGI” di conferma reset totale - rilasciare il pulsante MEMO RX.
INDICAZIONI DELLA LUCE DI CORTESIA
nessun “LAMPEGGIO” = trasmettitore da memorizzare.
1 “LAMPEGGIO” = trasmettitore memorizzato.
2 “LAMPEGGI” = se si ripete la memorizzazione di un trasmettitore già memorizzato.
3 “LAMPEGGI” = dopo l’annullamento di un trasmettitore.
4 “LAMPEGGI” = in modalità “annullamento” trasmettitore non memorizzato.
5 “LAMPEGGI” = memoria scheda esaurita.
9 “LAMPEGGI” = annullamento di tutti i codici in memoria.
ACCESSORI OPZIONALI
Porte basculanti
E’ possibile installare l’automazione DUMPER anche su porte basculanti, in questo caso è necessario l’apposito adattatore
AU.C25 da installare sulla porta come indicato in figura 17.
Per collegare il braccio curvo del DUMPER al braccio dritto fornito con l’AU.C25 è necessario tagliare il braccio curvo
come indicato in Figura 17, e utilizzando il braccio dritto come dima, effettuare due fori diametro 6mm, quindi unire i due
bracci (viti non fornite).
Kit batterie di emergenza
E’ disponibile il kit batterie di emergenza (cod. DM.BT) che consente il funzionamento dell’automazione anche in caso di
mancanza di alimentazione di rete.
Inserire le batterie negli appositi vani e collegarle alla centrale come indicato in Figura 18.
DATI TECNICI
DUMPER 7
DUMPER 10
115 ÷ 230Vac 50/60 Hz
115 ÷ 230Vac 50/60 Hz
24Vdc
24Vdc
1A
1,5 A
1W senza accessori
3W con accessori
1W senza accessori
3W con accessori
700 N
1000 N
2700 mm - 3700 mm
2700 mm - 3700 mm
24 V =/0,5A max
24 V =/0,5A max
Velocità apertura
0,12 - 0,20 m/s
0,12 - 0,20 m/s
Velocità chiusura
0,12 - 0,20 m/s
0,12 - 0,20 m/s
Portata massima
9 mq
12 mq
Uso Intensivo
Uso Intensivo
-20°C/+50°C
-20°C/+50°C
IP 10
IP 10
Rumorosità
>60dB
>60dB
Peso
1,6 kg
1,85 kg
Alimentazione
Alimentazione motore
Assorbimento
Assorbimento in Stand-by
Forza Trazione/Spinta
Corsa massima
Alimentazione accessori
Intermittenza lavoro
Temp. funzionamento
Grado di protezione
14
EC Declaration of Conformity
Directive 2004/108/EC(EMC); 2006/95/EC (LVD)
Manufacturer:
AUTOMATISMI CAB Srl.
Address:
Via della Tecnica,10 (z.i.) - 36010 Velo d’Astico (VI) – Italy
It is hereby stated that the product
pulling automatic system for sectional doors model
DUMPER 7 - DUMPER 10.
is compliant with provisions set forth in the following EC Directives:
- DIRECTIVE 2004/108/EC OF THE EUROPEAN PARLIAMENT AND OF THE COUNCIL of 15 December 2004, on the harmonisation of the laws of Member States relating to electromagnetic compatibility and which cancels Directive 89/336/EEC, according to the following
harmonised regulations: EN 61000-6-2:2005, EN 61000-6-3:2007.
- DIRECTIVE 2006/95/EC OF THE EUROPEAN PARLIAMENT AND OF THE COUNCIL of 12 December 2006, on the harmonisation
of the laws of Member States relating to electrical equipment designed for use with certain voltage limits, according to the following harmonised
regulations: EN 60335-1:2002 + A1:2004 + A11:2004 + A12:2006 + A2:2006 + A13:2008; EN 60335-2-103:2003.
- DIRECTIVE 2006/42/EC OF THE EUROPEAN PARLIAMENT AND OF THE COUNCIL of 17 May 2006, on machinery, which amends
Directive 95/16/EC, and complies with the requisites for the “partly completed machinery (almost machinery)” set forth in the EN13241-1:2003
regulation.
• Moreover, AUTOMATISMI CAB Srl declares that the pertaining technical documentation has been drawn up in compliance with Attachment VII B of the 2006/42/ EC Directive and that the following requirements have been complied with: 1.1.1 - 1.1.2 - 1.1.3 - 1.1.5 - 1.2.1 - 1.2.3
- 1.2.6 - 1.3.1 - 1.3.2 - 1.3.3 - 1.3.4 - 1.3.7 - 1.3.9 - 1.5.1 - 1.5.2 - 1.5.4 - 1.5.5 - 1.5.6 - 1.5.7 - 1.5.8 - 1.5.10 - 1.5.11 - 1.5.13 - 1.6.1 - 1.6.2 - 1.6.4
- 1.7.2 - 1.7.4 - 1.7.4.1 - 1.7.4.2 - 1.7.4.3.
• The manufacturer undertakes that information on the “partly completed machinery” will be sent to domestic authorities. Transmission ways
are also included in the undertaking, and the Manufacturer’s intellectual property rights of the “almost machinery” are respected.
• It is highlighted that commissioning of the “partly completed machinery” shall not be provided until the final machinery, in which it should
be incorporated, is declared compliant, if applicable, with provisions set forth in the Directive 2006/42/EC on Machinery.
• Moreover, the product, as applicable, is compliant with the following regulations:
EN 12445:2002, EN 12453:2002, EN 12978:2003.
Benincà Luigi, Legal Officer.
Velo d’Astico, 22 November 2010.
WARNING
The product shall not be used for purposes or in ways
other than those for which the product is intended for and
as described in this manual. Incorrect uses can damage
the product and cause injuries and damages.
The company shall not be deemed responsible for the noncompliance with a good manufacture technique of gates as
well as for any deformation, which might occur during use.
Keep this manual for further use.
Qualified personnel, in compliance with regulations in force,
shall insta ll the system.
Packaging must be kept out of reach of children, as it can
be hazardous. For disposal, packaging must be divided
the various types of waste (e.g. carton board, polystyrene)
in compliance with regulations in force.
The installer must supply all information on the automatic,
manual and emergency operation of the automatic system
and supply the end user with instructions for use.
This product is not to be used by persons (including children) with reduced physical, sensory or mental capacity, or
who are unfamiliar with such equipment, unless under the
supervision of or following training by persons responsible
for their safety.
An omnipolar switch/section switch with remote
contact opening equal to, or higher than 3mm
must be provided on the power supply mains..
Make sure that before wiring an adequate differential
switch and an overcurrent protection is provided.
Pursuant to safety regulations in force, some types of
installation require that the gate connection be earthed.
During installation, maintenance and repair, cut off power
supply before accessing to live parts.
•
Descriptions and figures in this manual are not binding.
While leaving the essential characteristics of the product
unchanged, the manufacturer reserves the right to modify
the same under the technical, design or commercial point
of view without necessarily update this manual.
15
INTRODUCTION
Thank you for choosing our DUMPER ratiomotor.
All items in the wide CAB production range are the result of twenty-years’ experience in the automatism sector and of
continuous research for new materials and advanced technologies.
We are, therefore, in the position to offer highly reliable products that due to their power, effectiveness and useful life, fully
satisfy the final user’s requirements.
All our products are covered by warranty.
Possible injury to people or accidents caused by defects in construction are covered by a civil liability policy drawn up with
one of the major insurance companies.
GENERAL INFORMATION
The system has been studied to motorize sectional doors.
To be applied onto balancing doors, a special fitting arm is required (item AU.C25).
In any case, following conditions will have to be observed:
- the distance between the door highest point and the ceiling must be at least 40mm (fig. 2).
- it has to be possible to open and close the door by pulling and pushing horizontally its top edge (fig.2).
- manual moves must be smooth and regular.
DIMENSIONS
Figure 1 shows the dimensions, in mm
TYPICAL INSTALLATION
Figure 2 illustrates a typical installation.
Ref.
Item
Description
1
DUMPER 7
DUMPER 10
700N automation for sectional and tilt-up doors
1000N automation for sectional and tilt-up doors
2
Drive guide 3000/400 mm
3
DM.BT
Emergency battery kit
4
PUPILLA -C
Wall mounting photocell
5
Safety rail
6
2/4 CH remote control - coding: rolling-code 433.92 MHz.
7
Safety release
8
FBY
LED flasher
CAUTION:
The mains connection must be made using a separate channel, independent of the control and safety equipment.
INSTALLING THE AUTOMATION
Drill 2 holes at the exact centre of the door, as shown in figure 3.
Provisionally mount the track to the wall with two anchor bolts, as shown in figure 4. The track must be free to move towards the ceiling.
If the track divided in 2 parts is used, it is necessary assemble it by using a special joint. The joint is provided inside one of
the 2 parts of the track and it is sufficient align the track and make the joint slide on the track as shown in picture number 6.
As shown in figure 5, fit the mounting plate to the track at about 60 cm from the motor, then, in relation to the distance
between the track and wall, fold the two ceiling brackets and secure them to the mounting plate.
Raise the track as shown in figure 6 and secure the brackets to the ceiling (see figure 7). The track must be perfectly horizontal. Secure the track to the wall, and the drive bracket to the top edge of the door. There must be a gap of at least 10
mm between the top edge of the door and the track.
Open the cover (figure 8) and remove the two bolts indicated in figure 9, then extract the lock plate (figure 10). Fit the motor
to the rail (figure 11), restore the lock plate, and screw the two bolts in again (figure 12).
Bring the leaf in fully open position and fix the mechanical stop at 1 cm of distance as shown in picture number 16. Block
permanently the mechanical stop by drilling 2 holes on the track and screwing the two 3,5 mm self-threading screws.
You can now make the electrical connection; use the cable already wired to the control unit (figure 13).
The system must be grounded (GND) as required by established regulations.
IMPORTANT
When the door is fully closed, the drive bracket must be at an angle of about 45° to the track, see Figure 16. If necessary,
shorten the bracket and use the other mounting holes.
16
ELECTRICAL CONNECTIONS (FIGURE 14)
Terminal blocks
Input
Description
OPEN-COM
N.O. OPEN button input for automation control, can be set with DIP1
FOTO-COM
N.C. contact input for safety equipment (photocell)
STOP-COM
N.C. contact input for emergency stop button (STOP)
ANT-COM
Input for integrated RF receiver antenna, frequency 433.92 MHz (Ant: signal - COM: shield)
LAMP/LAMP+24
24V output for warning flasher
Figure 15 shows the holes which can be opened for routing the cables, as required.
DIPSWITCH CONFIGURATION
Note: Only change the dip switch settings with the door completely closed; alternatively, shut off/restore power to apply
the changed settings.
DIP1: Selects the operating mode of the ”Step by step button” and of the transmitter.
ON: Operation: OPEN > STOP > CLOSE > STOP >
OFF: Operation: OPEN > CLOSE > OPEN >
DIP2: Enables or disables automatic closing
ON: Auto close enabled
OFF: Auto close disabled
DIP3: Ramp down speed
ON: Low ramp down speed
OFF: High ramp down speed
DIP4: Enables or disables condominium function.
ON: condominium function enabled. The step-by-step impulse or transmitter impulse has no effect during the opening phase.
OFF: condominium function disabled.
DIP5: Reverse time when closing to tension belt
ON: Minimum time
OFF: Maximum time
DIP6: Reverse when closing to tension belt
ON: Reverse disabled
OFF: Reverse enabled
DIP7: Braking
ON: 80%
OFF: 90%
DIP8: FOTO input
ON: FOTO input enabled when opening and closing
OFF: FOTO input enabled only when closing
TRIMMER
The trimmer on the control unit adjusts the sensitivity of the anticrushing sensor.By turning it clockwise the sensitivity of
the sensor is increased and when the trimmer is turned counterclockwise the sensitivity decreases.
After the first sensor intervention the control unit fully opens the leaf ;afterwards (if DIP2=ON) the control unit attempts another
closing maneuver,in case of sensor intervention during this phase the control unit opens the leaf for 3 s and than stops it.
MANUAL CONTROL
If mains power fails, the door can be operated manually with the rope with the red handle shown in figure 16.
When power is restored, the first command automatically resets the release.
SELF TEACH
The electronic control unit is designed to program itself and be ready for use as soon as mains power is available.
CAUTION: the self teach procedure requires all safety equipment to be hooked up; if any such equipment is not installed
and hooked up, fit a jumper to the COM -24 V input terminal.
Press PROG. (the courtesy light turns on), then OPEN; the door will close completely. After 2 seconds, it will open to the
full extent desired (press OPEN to set the fully open position).
Now (with Dip 2 ON = auto close enabled) the auto close delay starts; wait for a suitable amount of time to pass, then
press OPEN, the door will close, quit programming mode, and calculate the speeds and decelerations (ramp down) used
during its cycle.
N.B.: the auto close delay is set by the operator, in a range of 0 - 90 seconds. The entire programming procedure is run
at low speed.
17
With Dip 2 OFF = auto close disabled, the open, close and stop commands are sent with the remote control or button.
MEMORIZING TRANSMITTERS
With the door closed, hold down MEMO RX and press the desired transmitter button within 5 sec.; the courtesy lamp will
flash to confirm memorization.
Repeat for each separate transmitter. Up to 20 different codes can be stored in this way.
TO DELETE A TRANSMITTER: hold down MEMO RX until the courtesy light turns on, then press the transmitter button;
the courtesy light flashes 3 times to confirm the deletion - now release the MEMO RX button.
RESETTING MEMORY: resets memory by deleting all memorized codes - hold down MEMO RX until the courtesy light
goes out
- the courtesy light flashes 9 times to confirm that the memory has been reset - now release the MEMO RX button.
COURTESY LIGHT SIGNALS
no FLASH = transmitter to memorize.
1 FLASH = transmitter memorized.
2 FLASHES = a previously memorized transmitter is being re-memorized.
3 FLASHES = a transmitter has been deleted.
4 FLASHES = in delete mode, transmitter not memorized.
5 FLASHES = memory full.
9 FLASHES = all memorized codes deleted.
OPTIONAL ACCESSORIES
Tilt-up doors
The DUMPER automation can also be installed to tilt-up doors; in this case you must install the AU.C25 adapter to the
door as shown in figure 17.
In order to join the bent arm of the DUMPER to the straight arm provided with the accessory AU.25 it is necessary to cut
the bent drive as shown in picture number 17 and using the straight arm as template, drill 2 holes of 6 mm of diameter and
so join the 2 arms (the screws are not provided).
Emergency battery kit
An emergency battery kit is available (code DM.BT) to allow the automation to work even during mains power failures.
Fit the batteries in their compartments and hook them up as shown in Figure 18.
TECHNICAL DATA
DUMPER 7
DUMPER 10
115 - 230V AC 50/60 Hz
115 - 230V AC 50/60 Hz
Motor feed
24Vdc
24Vdc
Power draw
1A
1,5 A
1W without accessories
3W with accessories
1W without accessories
3W with accessories
700 N
1000 N
Maximum stroke
2700 mm - 3700 mm
2700 mm - 3700 mm
Accessory power
24 V =/O.5A max
24 V =/O.5A max
Opening speed
0.12 - 0.20 m/s
0.12 - 0.20 m/s
Closing speed
0.12 - 0.20 m/s
0.12 - 0.20 m/s
Maximum load
9 sqm
12 sqm
Intermittency
Intensive Use
Intensive Use
Operating temperature
-20°C/+50°C
-20°C/+50°C
IP 10
IP 10
Noise level
>60dB
>60dB
Weight
1.6 kg
1.6 kg
Power
Standby power draw
Traction/thrust
Protection rating
18
EG-Konformitätserklärung
Erklärung gemäß Richtlinie 2004/108/CE(EMV); 2006/95/CE(LVD)
Hersteller:
AUTOMATISMI CAB Srl
Adresse:
Via della Tecnica,10 (z.i.) - 36010 Velo d’Astico (VI) - Italien
Erklärt, dass das Produkt:
Automatische Schleppvorrichtung für sektionale Türen:
DUMPER 7 - DUMPER 10.
folgenden EG-Richtlinien entspricht:
• RICHTLINIE 2004/108/EG DES EUROPÄISCHEN PARLAMENTS UND DES RATES vom 15. Dezember 2004 zur Angleichung
der Rechtsvorschriften der Mitgliedstaaten über die elektromagnetische Verträglichkeit und zur Aufhebung der Richtlinie 89/336/EWG, gemäß
nachstehenden Normen:
EN 61000-6-2:2005, EN 61000-6-3:2007.
• RICHTLINIE 2006/95/EG DES EUROPÄISCHEN PARLAMENTS UND DES RATES vom 12. Dezember 2006 zur Angleichung der
Rechtsvorschriften der Mitgliedstaaten betreffend elektrische Betriebsmittel zur Verwendung innerhalb bestimmter Spannungsgrenzen, gemäß
nachstehenden Normen:
EN 60335-1:2002 + A1:2004 + A11:2004 + A12:2006 + A2:2006 + A13:2008; EN 60335-2-103:2003.
• RICHTLINIE 2006/42/EG DES EUROPÄISCHEN PARLAMENTS UND DES RATES vom 17. Mai 2006 über Maschinen, zur Aufhebung der Richtlinie 95/16/EG, gemäß Anforderungen für „unvollständige Maschinen“ und nachstehender Norm: EN13241-1:2003.
• AUTOMATISMI CAB Srl erklärt, dass die technischen Unterlagen gemäß Anhang VII Teil B der Richtlinie 2006/42/EG erstellt wurden
und dass das Produkt folgenden Anforderungen entspricht: 1.1.1 - 1.1.2 - 1.1.3 - 1.1.5 - 1.2.1 - 1.2.3 - 1.2.6 - 1.3.1 - 1.3.2 - 1.3.3 - 1.3.4 - 1.3.7
- 1.3.9 - 1.5.1 - 1.5.2 - 1.5.4 - 1.5.5 - 1.5.6 - 1.5.7 - 1.5.8 - 1.5.10 - 1.5.11 - 1.5.13 - 1.6.1 - 1.6.2 - 1.6.4 - 1.7.2 - 1.7.4 - 1.7.4.1 - 1.7.4.2 - 1.7.4.3.
• Der Hersteller verpflichtet sich die Informationen zu der „unvollständigen Maschine“ einzelstaatlichen Stellen auf begründetes Verlangen zu
übermitteln. Durch die Übermittlung bleibt das intellektuelle Eigentum des Herstellers der „unvollständigen Maschine“ unberührt.
• Diese „unvollständige Maschine“ darf erst dann in Betrieb genommen werden, wenn gegebenenfalls festgestellt wurde, dass die Maschine,
in die die unvollständige Maschine eingebaut werden soll, den Bestimmungen der Maschinenrichtlinie 2006/42/EG entspricht.
• Das Produkt entspricht außerdem, falls zutreffend, folgenden Normen:
EN 12445:2002, EN 12453:2002, EN 12978:2003.
Benincà Luigi, Rechtsvertreter
Velo d’Astico, 02/11/2010.
HINWEISE
Das Produkt darf nicht für andere Zwecke oder auf andere
Weise verwendet werden, als in der vorliegenden Anleitung beschrieben. Ein ungeeigneter Gebrauch kann das
Produkt beschädigen und eine Gefahr für Personen und
Sachen darstellen.
Wir übernehmen keinerlei Haftung für Schäden, die sich aus
einer unsachgerechten Montage der Tore und aus daraus
folgenden Verformungen ergeben können.
Bewahren Sie dieses Handbuch für Nachschlagzwecke auf.
Die Installation darf nur von qualifizierten Fachleuten laut
den geltenden Vorschriften vorgenommen werden.
Das Verpackungsmaterial fern von Kindern halten, da es
eine potentielle Gefahr darstellt. Das Verpackungsmaterial
nicht ins Freie werfen, sondern je nach Sorte (z.B. Pappe,
Polystyrol) und laut den örtlich geltenden Vorschriften
entsorgen.
Der Installateur hat dem Benutzer alle Informationen über
den automatischen, manuellen Betrieb sowie den NotBetrieb der Automatik zusammen mit der Bedienungsanleitung zu liefern.
Dieses Produkt eignet sich nicht für den Gebrauch durch
Personen (einschließlich Kindern) mit eingeschränkten
körperlichen, sensorischen oder geistigen Fähigkeiten oder
ohne die nötigen Kenntnisse, es sei denn, sie werden von
für ihre Sicherheit verantwortlichen Personen beaufsichtigt oder angeleitet.
Das Stromnetz muss mit einem allpoligen Schalter bzw. Trennschalter ausgestattet sein, dessen
Kontakte einen Öffnungsabstand gleich oder
größer als 3 aufweisen. Kontrollieren, ob der elektrischen
Anlage ein geeigneter Differentialschalter und ein Überspannungsschutzschalter vorgeschaltet sind.
Einige Installationstypologien verlangen den Anschluss
des Flügels an eine Erdungsanlage laut den geltenden
Sicherheitsnormen.
Während der Installation, der Wartung und der Reparatur,
die Anlage stromlos machen bevor an den elektrischen
Teilen gearbeitet wird.
•
Die in diesem Handbuch enthaltenen Beschreibungen und
Abbildungen sind nicht verbindlich. Ausgenommen der
Haupteigenschaften des Produkts, behält sich der Hersteller das Recht vor eventuelle technische, konstruktive
oder kommerzielle Änderungen vorzunehmen ohne dass
er vorliegende Veröffentlichung auf den letzten Stand
bringen muss.
19
EINLEITUNG
Wir danken Ihnen dafür, daß Sie sich für das DUMPER Steuergehäuse entschieden haben.
Alle Produkte der umfangreichen CAB Produktion sind das Ergebnis der zwanzigjährigen Erfahrungen im Bereich der Automation und der ständigen Erforschung von neuen Materialien und fortgeschrittenen Technologien.
Aus diesem Grund sind wir heute in der Lage, zuverlässige Produkte anzubieten, die, dank ihren Stärke, Wirksamkeit und
Haltbarkeit, der Anforderungen des Endverbrauchers völlig gerecht werden.
Alle Produkte sind durch Garantie gedeckt.
Eventuelle Personen- oder Sachschäden, die durch Fertigungsfehler verursacht werden können, werden durch eine der
wichtigsten Versicherungsgesellschaften gedeckt.
ALLGEMEINE INFORMATION
Die Automatik bedient über einen Motor sektionale Türen; um an Schwenktüren installiert zu werden, muss ein spezieller
Arm angeschlossen werden (art. AU.C25).
Jedenfalls müssen folgende Bedingungen erfüllt werden:
- Der Abstand zwischen der höchsten Stelle des Tores und der Decke muß wenigstens 40mm sein (Abb. 2).
- das Tor muß zu öffnen und zu schließen sein, indem man es an seinem Oberrand zieht und schiebt (Abb. 2).
- Die Handgriffe müssen sanft und regelmäßig sein.
ABMESSUNGEN
In Abbildung 1 sind die Abmessungen in Millimetern angegeben.
TYPISCHE INSTALLATION
In Abbildung 2 ist eine typische Installation dargestellt.
Bez.
Artikel
Beschreibung
1
DUMPER 7
DUMPER 10
Automatikantrieb 700N Sektional- und Schwingtore
Automatikantrieb 1000N Sektional- und Schwingtore
2
Zugführung 3000 mm
3
DM.BT
Notfallbatterie-Kit
4
PUPILLA -C
Fotozellen zur Wandmontage
5
Sicherheitskante
6
Fernbedienung 2/4 CH - Rolling-Code-Kodierung 433.92 Mhz.
7
Sicherheitsentriegelung
8
FBY
LED-Blinkleuchte
ACHTUNG:
Der Netzanschluss muss auf einem eigenen und von den Steuer- und Sicherheitsvorrichtungen getrennten Kanal ausgeführt
werden.
INSTALLATION DES AUTOMATIKANTRIEBS
Zwei perfekt zentrierte Löcher auf der Mittellinie des Tors bohren, wie in Abbildung 3 gezeigt.
Die Schiene provisorisch mit zwei Dübeln und passenden Schrauben an der Wand befestigen, wie in Abbildung 4 gezeigt.
Die Schiene muss sich frei in Richtung Decke bewegen lassen.
Bei Verwendung der zwei teilig-geschnittenen Schiene, ist es nötig, sie mit der Kupplung zu montieren. Die Kupplung ist
in einem von den zwei Teilen schon eingesteckt worden; es ist ausreichend, die Schiene in der Reihe aufzustellen und die
Kupplung auf den Schienen laufen zu lassen, laut dem Bild Nummer 6.
Wie in Abbildung 5 die Befestigungsplatte an der Schiene mit einem Abstand von zirka 60 cm vom Motor anbringen, dann
(unter Berücksichtigung des Abstands zwischen Schiene und Wand) die beiden Bügel zur Deckenbefestigung zurechtbiegen
und an der Befestigungsplatte anbringen.
Die Schiene wie in Abbildung 6 anheben und die Bügel wie in der Zeichnung von Abb. 7 an der Decke befestigen. Die
Schiene muss perfekt horizontal sein. Die Schiene an der Wand festschrauben und den Zugbügel am oberen Rand des
Tors befestigen. Zwischen dem oberen Profil des Tors und der Schiene muss ein Mindestabstand von 10 mm bestehen.
Die Abdeckung (Abb. 8) öffnen und die zwei in der Abb. 9 markierten Schrauben entfernen, dann das Blockierblech herausziehen (Abb. 10). Den Motor an der Schiene anbringen (Abb. 11), das Blockierblech wieder einschieben und die beiden
Schrauben wieder festziehen (Abb. 12).
Den Flügel komplett öffnen und die mechanische Haltevorrichtung 1 zm. weit fixieren, laut dem Bild Nummer 16. Die
Haltevorrichtung mit 2 Reifenpannen auf der Schiene stark blockieren, und die zwei 3,5 mm Blechschrauben müssen
eingeschraubt werden.
Jetzt können die elektrischen Anschlüsse ausgeführt werden, indem das bereits mit der Steuerzentrale verbundene Kabel
verwendet wird (Abb. 13).
Es ist zwingend notwendig, den Erdanschluss (GND) gemäß den geltenden Vorschriften auszuführen.
20
WICHTIG
Bei vollständig geschlossenem Tor muss der Schleppbügel in einem Winkel von zirka 45° zu der Schiene stehen, siehe
Abb. 16. Zu diesem Zweck kann der Bügel verkürzt und andere Löcher benutzt werden.
ELEKTRISCHE ANSCHLÜSSE (ABB. 14)
Beschreibung der Klemmleisten
Eingang
Beschreibung
OPEN-COM
Eingang OPEN-Taster (NO) für die Steuerung des Automatikantriebs, konfigurierbar mittels DIP1
FOTO-COM
Eingang Kontakt (NC) für Sicherheitsvorrichtung (Fotozelle)
STOP-COM
Eingang Kontakt (NC) für Nothalt-Taster (STOP)
ANT-COM
Eingang für Antenne des eingebauten Funkempfängers mit Frequenz 433,92 Mhz (Ant: Signal - COM:Masse)
LAMP/LAMP+24
24V-Ausgang zum Blinkleuchten-Anschluss
In Abb. 15 sind die verschiedenen vorgestanzten Löcher hervorgehoben, durch die je nach Bedarf die Anschlussleitungen
verlegt werden können.
BESCHREIBUNG DER KONFIGURATIONS-DIP-SCHALTER
Hinweis: Die Änderungen an den Einstellungen der DIP-SCHALTER werden bei komplett geschlossenem Tor vorgenommen, alternativ kann der Netzstrom getrennt und wieder eingeschaltet werden, um die Änderungen zu übernehmen.
DIP1: Selektiert den Funktionsmodus ”Taste Schrittschaltung” und des Senders.
ON: Funktion: ÖFFNEN > STOPP > SCHLIESSEN > STOPP >
OFF: Funktion: ÖFFNEN > SCHLIESSEN > ÖFFNEN >
DIP2: Aktiviert oder deaktiviert das automatische Schließen
ON: Automatisches Schließen aktiviert
OFF: Automatisches Schließen deaktiviert
DIP3: Auswahl Geschwindigkeit in der Abbremsphase
ON: niedrige Abbremsgeschwindigkeit
OFF: hohe Abbremsgeschwindigkeit
DIP4: Aktiviert oder deaktiviert die Mehrbenutzerfunktion.
ON: Mehrbenutzerfunktion deaktiviert. Der Impuls „Schrittschaltung“ oder des Senders hat während des Öffnens keine
Auswirkung.
OFF: Mehrbenutzerfunktion aktiviert.
DIP5: Zeit Umkehrung beim Schließen zur Kettenspannung
ON: Mindestzeit
OFF: Maximalzeit
DIP6: Umkehrung beim Schließen zur Kettenspannung
ON: Umkehrung nicht aktiv
OFF: Umkehrung aktiv
DIP7: Bremsen
ON: 80%
OFF: 90%
DIP8: Konfiguration Eingang FOTO
ON: Eingang FOTO aktiv beim Öffnen und Schließen
OFF: Eingang FOTO nur beim Öffnen aktiv
TRIMMER
Der Trimmer in der Steuerzentrale regelt die Sensibilität des Klemmschutzsensors. Durch Drehen im Uhrzeigersinn erhöht
sich die Sensibilität, durch Drehen gegen den Uhrzeigersinn verringert sie sich.
Beim ersten Einsetzen des Sensors öffnet die Zentrale komplett, anschließend (wenn DIP2=ON) unternimmt sie einen
zweiten Schließversuch, bei einem neuen Einsatz öffnet sie wieder für 3 Sek und schaltet in den STOP-Zustand.
MANUELLE BEDIENUNG
Im Falle eines Stromausfalls kann das Tor per Hand bewegt werden, indem die Kordel mit dem roten Knauf wie in Abb.
16 nach unten gezogen wird.
Bei der Rückkehr des Netzstroms sorgt die erste Bewegung automatisch für die Entriegelung.
SELBSTLERNEN
Die elektronische Steuerzentrale ist so beschaffen, dass sie sich selbst programmiert und gebrauchsfertig ist, wenn sie an
die Netzspannung angeschlossen wird.
ACHTUNG: Für den Selbstlernprozess müssen alle Sicherheiten angeschlossen sein; falls eine oder mehr nicht verwendet
werden, den entsprechenden Eingang zur Klemme COM -24 V mit einem Jumper überbrücken.
Die Taste PROG drücken (die Hilfsbeleuchtung schaltet sich ein), die Taste OPEN drücken und das Tor führt automatisch
eine Bewegung bis zum vollständigen Schließen durch. Nach 2 Sekunden führt das Tor eine Bewegung bis zur maximalen
21
Öffnung aus (die OPEN-Taste drücken bis zur gewünschten Öffnung).
Ab diesem Zeitpunkt (Dip 2 ON = automatisches Schließen aktiviert) beginnt die Zählung der Sekunden für die automatische
Schließung. Nach Ablauf der gewünschten Zeit die OPEN-Taste drücken, das Tor schließt sich, dabei verlässt es automatisch die Programmierung und berechnet die während der Bewegung notwendige Geschwindigkeit und Abbremsung.
Hinweis Die Zeit der automatischen Schließung wird vom Installateur gezählt und reicht von 0 bis 90 Sekunden. Die gesamte
Prozedur zur Erfassung der Endstellungen wird bei niedriger Geschwindigkeit ausgeführt.
Mit dem Dip 2 OFF = „automatische Schließung deaktiviert“ werden die Öffnung, die Schließung und der Stopp mittels
Funkbedienung und/oder Taste ausgeführt.
SENDER-SPEICHERUNG
Bei geschlossenem Tor die Taste MEMO RX geschlossen halten und die gewünschte Taste des Senders 5 Sekunden lang
drücken, die Hilfsbeleuchtung blinkt bei erfolgter Speicherung.
Den Vorgang für jeden Sender wiederholen. MAX 20 verschiedene Codes.
LÖSCHUNG EINES SENDERS: Die Taste MEMO RX gedrückt halten, bis sich die Hilfsbeleuchtung einschaltet, die Taste
des Senders drücken, es folgt ein 3-faches „BLINKEN“ zur Bestätigung der Löschung - die Taste MEMO RX loslassen
RESET CODE-SPEICHERPLATINE : setzt den Speicher durch Löschen aller gespeicherten Codes zurück - die Taste MEMO
RX gedrückt halten bis zum Erlöschen der „HILFSBELEUCHTUNG“
- es folgt ein 9-faches „BLINKEN“ zur Bestätigung des kompletten Zurücksetzens - die Taste MEMO RX loslassen.
SIGNALE DER HILFSBELEUCHTUNG
kein „BLINKEN“ = zu speichernder Sender.
1-faches „BLINKEN“ = Sender gespeichert.
2-faches „BLINKEN“ = wenn die Speicherung eines bereits gespeicherten Senders ausgeführt wird.
3-faches „BLINKEN“ = nach dem Löschen eines Senders.
4-faches „BLINKEN“ = im Löschmodus Sender nicht gespeichert.
5-faches „BLINKEN“ = Speicherplatine voll.
9-faches „BLINKEN“ = Löschen aller gespeicherten Codes.
OPTIONALES ZUBEHÖR
Schwingtore
Der Automatikantrieb kann auch auf Schwingtoren installiert werden, in diesem Fall muss der entsprechende Adapter
AU.C25 wie in Abb. 17 auf dem Tor angebracht werden.
Um den Kurvenarm von DUMPER mit dem Geradearm von AU.C25 zu verbinden, ist es nötig, den Kurvenarm laut dem Bild
Nummer 17 zu schneiden, und bei Benutzung vom Geradearm als Schablone , zwei 6 mm Durchmesser Löcher machen,
und dann die zwei Arme verbinden (die Schrauben werden nicht geliefert).
Notfallbatterie-Kit
Es ist ein Notfallbatterie-Kit erhältlich (Cod. DM.BT), das den Betrieb des Automatikantriebs auch bei Stromausfall ermöglicht.
Die Batterien in die dafür vorgesehene Fächer einlegen und mit der Steuerzentrale wie in Abb. 18 verbinden.
TECHNISCHE DATEN
DUMPER 7
DUMPER 10
115 ÷ 230Vac 50/60 Hz
115 ÷ 230Vac 50/60 Hz
24Vdc
24Vdc
1A
1,5 A
1W ohne Zubehör
3W ohne Zubehör
1W ohne Zubehör
3W ohne Zubehör
Zug-/Schubkraft
700 N
1000 N
Maximaler Weg
2700 mm - 3700 mm
2700 mm - 3700 mm
24 V =/0,5A max
24 V =/0,5A max
Öffnungsgeschwindigkeit
0,12 - 0,20 m/s
0,12 - 0,20 m/s
Schließgeschwindigkeit
0,12 - 0,20 m/s
0,12 - 0,20 m/s
Maximale Tragfähigkeit
9 qm
12 qm
Intensive Nutzung
Intensive Nutzung
-20°C/+50°C
-20°C/+50°C
IP 10
IP 10
Lärm
>60dB
>60dB
Gewicht
1,6 kg
1,85 kg
Stromversorgung
Motorspeisung
Leistungsaufnahme
Leistungsaufnahme Stand-by
Stromversorgung Zubehör
Arbeitsintervall
Betriebstemperatur
Schutzklasse
22
Déclaration CE de conformité
Déclaration conforme aux Directives 2004/108/CE(EMC); 2006/95/CE(LVD)
Fabricant:
AUTOMATISMI CAB Srl
Adresse:
Via della Tecnica,10 (z.i.) - 36010 Velo d’Astico (VI) - Italie
Déclare que le produit:
Automatisme à entraînement pour portes sectionnelles:
DUMPER 7 - DUMPER 10.
est conforme aux conditions requises par les Directives CE suivantes:
• DIRECTIVE 2004/108/CE DU PARLEMENT EUROPÉEN ET DU CONSEIL du 15 décembre 2004 concernant le rapprochement des
législations des États membres relatives à la compatibilité électromagnétique et qui abroge la Directive 89/336/CEE, selon les suivantes normes
harmonisées: EN 61000-6-2:2005, EN 61000-6-3:2007.
• DIRECTIVE 2006/95/CE DU PARLEMENT EUROPÉEN ET DU CONSEIL du 12 décembre 2006 concernant le rapprochement des
législations des États membres relatives au matériel électrique destiné à être employé dans certaines limites de tension ,selon les suivantes normes
harmonisées: EN 60335-1:2002 + A1:2004 + A11:2004 + A12:2006 + A2:2006 + A13:2008; EN 60335-2-103:2003.
• DIRECTIVE 2006/42/CE DU PARLEMENT EUROPÉEN ET DU CONSEIL du 17 mai 2006 concernant les machines et qui modifie la
Directive 95/16/CE, en respectant les conditions requises pour les “quasi-machines”, selon la norme suivante: EN13241-1:2003.
• AUTOMATISMI CAB Srl déclare, en outre, que la documentation technique pertinente a été constituée conformément à l’annexe VII B de
la Directive 2006/42/CE et que les conditions requises essentielles ci de suite ont été respectées: 1.1.1 - 1.1.2 - 1.1.3 - 1.1.5 - 1.2.1 - 1.2.3 - 1.2.6
- 1.3.1 - 1.3.2 - 1.3.3 - 1.3.4 - 1.3.7 - 1.3.9 - 1.5.1 - 1.5.2 - 1.5.4 - 1.5.5 - 1.5.6 - 1.5.7 - 1.5.8 - 1.5.10 - 1.5.11 - 1.5.13 - 1.6.1 - 1.6.2 - 1.6.4 - 1.7.2
- 1.7.4 - 1.7.4.1 - 1.7.4.2 - 1.7.4.3.
• Le fabricant s’engage à transmettre aux autorités nationales, suite à une demande motivée, les informations concernant la “quasi-machine”. Cet
engagement comprend les modalités de transmission et reste sans préjudices pour les droits de propriété intellectuelle du fabricant sur la “quasi
machine”.
• On communique que la “quasi-machine” ne doit pas être mise en service avant que la machine finale, dans laquelle elle doit être incorporée,
ait été elle même déclarée conforme, le cas échéant, aux dispositions de la Directive 2006/42/CE.
• En outre le produit, exclusivement en ce qui concerne les parties applicables, résulte conforme aux normes suivantes:
EN 12445:2002, EN 12453:2002, EN 12978:2003.
Benincà Luigi, Responsable Légal.
Velo d’Astico, 02/11/2010.
REGLES DE SECURITE’
Il est interdit d’utiliser ce produit pour l’utilisation du produit ou avec des finalités ou modalités non prévues par le
présent manuel. Toute autre utilisation pourrait compromettre l’intégrité du produit et présenter un danger pour
les personnes ou pour les biens.
Le fabricant décline toute responsabilité en cas d’utilisation
impropre ou d’inobservation de la bonne technique dans la
construction des portails, ainsi que de toute déformation
qui pourrait avoir lieu lors de son utilisation.
Toujours conserver la notice pour toute autre consultation
future.
L’installation doit être faite uniquement par un personnel
qualifié dans le respect total des normes en vigueur.
Tenir à l’écart des enfants tous les matériaux d’emballage
car ils représentent une source potentielle de danger. Ne
pas disperser les matériaux d’emballage dans l’environnement, mais trier selon les différentes typologies (i.e. carton,
polystyrène) et les traiter selon les normes locales.
L’installateur doit fournir toutes les informations relatives au fonctionnement automatique, au déverrouillage
d’urgence de l’automatisme, et livrer à l’utilisateur les
modes d’emploi.
Ce produit n’est pas prévu pour être utilisé par des per-
sonnes (dont les enfants) dont les capacités physiques,
sensorielles ou mentales sont limitées, ou ne disposant pas
des connaissances adéquates, sauf sous surveillance ou
après avoir reçu les consignes des personnes responsables
de leur sécurité.
Prévoir sur le réseau de l’alimentation un interrupteur / sectionneur omnipolaire avec distance d’ouverture des contacts égale ou supérieure à 3 mm..
Vérifier la présence en amont de l’installation électrique
d’un interrupteur différentiel et d’une protection de surcourant adéquats.
Certains types d’installation requièrent le branchement du
vantail à une installation de mise à terre satisfaisant les
normes de sécurité e vigueur.
Avant toute intervention, d’installation, réparation et maintien, couper l’alimentation avant d’accéder aux parties
électriques.
•
Les descriptions et les illustrations présentées dans ce
manuel ne sont pas contraignantes. En laissant inaltérées
les caractéristiques essentielles du produit, le fabricant se
réserve le droit d’apporter toute modification à caractère
technique, de construction ou commerciale sans s’engager
à revoir la cette publication.
23
Introduction
Nous ne pouvons que féliciter d’avoir porté votre choix sur le moto-réducteur DUMPER.
Vingt années d’expérience dans le secteur des automatismes ainsi que dans le recherche de nouveaux matériaux et technologies de pointe, nous ont permis de développer tous les nombreux articles de la gamme CAB.
Pour ces raisons, nous sommes en mesure de proposer des produits extrémement fiables et qui grâce à leurs puissances,
performances et longévité, répondent aux exigences des utilisateurs.
Tous nos produits sont garantis.
En plus, une police d’assurance responsabilité civile garantie la couverture d’éventuels sinistres à personnes ou objects
causés par les défauts de fabrication.
NOTICE GÉNÉRALES
L’automatisme est conçu pour motoriser des portes sectionnelles; pour pouvoir l’appliquer sur des portes basculantes il
nécessite d’un bras de fixation spécial (art. AU.C25).
Dans tous les cas, les conditions suivantes devront être prises:
- la distance entre le point le plus haut de la porte et le plafond devra être au minimum de 40mm (fig.2)
- la porte devra pouvoir être ouverte et fermée en tirant et en poussant horizontalement sur son bord supérieur (fig.2).
- les opérations manuelles doivent résulter douces et règulières.
DIMENSIONS
La Fig. 1 présente les dimensions en millimètres.
INSTALLATION TYPE
La Fig. 2 présente une installation type.
Réf.
Article
Description
1
DUMPER 7
DUMPER 10
Automatisme 700N portes sectionnelles et basculantes
Automatisme 1000N portes sectionnelles et basculantes
2
Guide 3000/4000 mm
3
DM.BT
Kit batteries de secours
4
PUPILLA -C
Cellules murales
5
Dispositif de sécurité
6
Télécommande 2/4 CH - code variable 433.92 Mhz.
7
Déblocage de sécurité
8
FBY
Clignotant LED
ATTENTION :
le raccordement électrique doit être effectué sur un canal distinct et séparé des dispositifs de commande et de sécurité.
INSTALLATION DE L’AUTOMATISME
Percer deux trous parfaitement centrés sur la partie médiane de la porte, conformément à la Fig. 3.
Dans le cas on utilise le rail partagé en 2 pièces il est nécessaire de l’assembler en l’utilisant le joint prévu. Le joint vient
fourni pré-introduit dedans un de deux pièces ; il est suffisant d’aligner le rail et faire glisser le joint sur le rail comme
indiqué en figure 6.
Fixer provisoirement le pivot au mur à l’aide des chevilles et des vis prévues à cet effet, conformément à la Fig. 4. Le pivot
doit pouvoir se déplacer vers le plafond.
Sur la base de la Fig. 5, placer le support sur le pivot à une distance de 60 cm environ du moteur. Plier (en tenant compte
de la distance entre le pivot et le mur) les deux supports de fixation au plafond et les fixer au support.
Soulever le pivot conformément à la Fig. 6 et consulter la Fig. 7 pour fixer les supports au plafond. Le pivot doit être parfaitement horizontal. Fixer le pivot au mur et le support de rail au bord supérieur de la porte. Le profil supérieur et le pivot
doivent être séparés de 10 mm au moins.
Ouvrir le capot (Fig. 8) et enlever les deux vis indiquées dans la Fig. 9. Déposer ensuite la plaque de blocage (Fig. 10).
Placer le moteur sur le rail (Fig. 11), réinsérer la plaque de blocage et revisser les deux vis (Fig. 12).
Positionner la porte en position de complète ouverture et à environ 1 cm de distance , fixer le arrêt mécanique, comme indiqué en Figure 16. Bloquer l’arrêt mécanique en effectuant 2 trous sur le rail en vissant les deux vis de 3,5 mm autofileteuse.
Procéder à présent au raccordement électrique à l’aide du câble précâblé à la centrale de commande (Fig. 13).
Le raccordement à la terre est obligatoire (GND) conformément aux normes en vigueur.
IMPORTANT
Si la porte est totalement fermée, le support coulissant doit être incliné à 45° par rapport au pivot, conformément à la Fig.
16. Pour ce faire, la fixation peut être raccourcie ou les autres trous utilisés.
24
RACCORDEMENTS ELECTRIQUES (FIG. 14)
Description des borniers
Entrée
Description
OPEN-COM
Entrée bouton OPEN (N.O.) pour la commande de l’automatisme, à configurer à l’aide de DIP1
FOTO-COM
Entrée contact (N.F.) pour les dispositifs de sécurité (cellule)
STOP-COM
Entrée contact (N.C.) pour bouton d’arrêt d’urgence (STOP)
ANT-COM
Entrée pour antenne du récepteur radio intégré avec fréquence 433,92Mhz (Ant : signale - COM : blindage)
LAMP/LAMP+24
Sortie 24V pour raccordement du clignotant
La Fig. 15 présente les passages prévus pour les câbles de raccordement.
DESCRIPTION DES DIP-SWITCH DE CONFIGURATION
Note : les modifications apportées aux réglages des DIP-SWITCH sont effectuées lorsque la porte est complètement
fermée. Dans le cas contraire, il faudra rétablir le courant pour activer les modifications.
DIP1 : Sélectionne le mode de fonctionnement de la “Touche P.P.” et de l’émetteur
ON: Fonctionnement: OUVERTURE > STOP > FERMETURE > STOP >
OFF: Fonctionnement: OUVERTURE > FERMETURE > OUVERTURE >
DIP2 : Active ou désactive la fermeture automatique
ON : Refermeture automatique activée
OFF : Refermeture automatique désactivée
DIP3 : Sélection de la vitesse en phase de ralentissement
ON : vitesse de ralentissement faible
OFF : vitesse de ralentissement élevée
DIP4 : Active ou désactive le fonctionnement collectif
ON: fonctionnement collectif désactivé. L’impulsion P.P. ou de l’émetteur n’a pas d’effet durant la phase d’ouverture.
OFF: fonctionnement collectif activé.
DIP5 : délai d’inversion en fermeture pour tension courroie
ON : délai minimal
OFF : délai maximal
DIP6 : inversion en fermeture pour tension courroie
ON : inversion inactive
OFF : inversion active
DIP7 : freinage
ON : 80 %
OFF : 90 %
DIP8 : Configuration entrée CELLULE
ON : entrée CELLULE active en ouverture et fermeture
OFF : entrée CELLULE active uniquement en fermeture
TRIMMER
Le trimmer de la centrale règle la sensibilité du capteur anti-écrasement. Tourner dans le sens des aiguilles d’une montre
pour augmenter la sensibilité et dans le sens contraire pour la diminuer.
Lors de la première intervention du capteur, la centrale rouvre totalement. Ensuite (si DIP2=ON), elle tente une nouvelle
manœuvre de fermeture. En cas de nouvelle intervention, elle rouvre pendant 3 s et se met en mode STOP.
MANOEUVRE MANUELLE
En cas de coupure de courant, il est possible de manœuvrer le battant manuellement en tirant sur la corde au niveau de
la poignée rouge, conformément à la Fig. 16.
Une fois le courant rétabli, la première manœuvre réactive automatiquement le déblocage.
APPRENTISSAGE AUTOMATIQUE
La centrale électronique est conçue pour être programmée automatiquement et être prête à l’usage une fois raccordée
électriquement.
ATTENTION : la procédure d’apprentissage automatique nécessite un branchement de toutes les sécurités. Si au moins
une n’est pas utilisée, ponter l’entrée sur la borne COM-24V.
Appuyer sur le bouton PROG. (le témoin s’allume), appuyer sur le bouton OPEN. La porte effectue automatiquement une
manœuvre jusqu’à la fermeture complète. Après 2 secondes, la porte effectue une manœuvre jusqu’à l’ouverture maximale
désirée (appuyer sur la touche OPEN pour définir l’ouverture souhaitée).
A cet instant, (Dip 2 ON : fermeture automatique activée) le décompte en secondes s’active pour la fermeture automatique.
Au terme du temps imparti, appuyer sur le bouton OPEN. La porte se ferme et quitte automatiquement le programme pour
calculer la vitesse et le ralentissement nécessaires à la manœuvre.
N.B. Le délai de fermeture automatique est comptabilisé par l’opérateur. Il est compris entre 0 et 90 secondes. L’intégralité
25
de la procédure d’acquisition des mouvements est réalisée à faible vitesse.
Lorsque Dip 2 OFF = fermeture automatique désactivée, l’ouverture, la fermeture et l’arrêt sont effectués à l’aide de la
télécommande et/ou du bouton.
MEMORISATION DE L’EMETTEUR
Une fois la porte fermée, appuyer sur le bouton MEMO RX et appuyer sur la touche souhaitée de l’émetteur dans les 5 sec.
Le témoin clignote et indique que la mémorisation a été effectuée.
Répéter l’opération pour chaque émetteur. MAX 20 codes différents.
ANNULATION D’UN EMETTEUR : maintenir le bouton MEMO RX enfoncé jusqu’à l’allumage du témoin. Appuyer sur le
bouton de l’émetteur. Trois clignotements confirment l’annulation. Relâcher le bouton MEMO RX.
REINITIALISATION DE LA CARTE D’ACQUISITION DES CODES : réinitialise la mémoire en annulant tous les codes mémorisés. Maintenir le bouton MEMO RX enfoncé jusqu’à l’extinction du témoin.
NEUF CLIGNOTEMENTS confirment la réinitialisation complète. Relâcher le bouton MEMO RX.
INDICATIONS DU TEMOIN
aucun CLIGNOTEMENT = émetteur à mémoriser.
1 CLIGNOTEMENT = émetteur mémorisé.
2 CLIGNOTEMENTS = en cas de répétition de la mémorisation d’un émetteur déjà mémorisé.
3 CLIGNOTEMENTS = après l’annulation d’un émetteur.
4 CLIGNOTEMENTS = en mode Annulation ; émetteur non mémorisé.
5 CLIGNOTEMENTS = mémoire de la carte saturée.
9 CLIGNOTEMENTS = annulation de tous les codes en mémoire.
ACCESSOIRES EN OPTION
Portes basculantes
L’automatisme peut aussi être installé sur des portes basculantes. Le cas échéant, l’adapteur AU.C25 devra être installé
sur la porte conformément à la Fig. 17.
Pour réunir le bras courbe du DUMPER au bras droit fourni avec l’article AU.C25 est nécessaire de couper le bras courbe
comme indiqué en Figure 17, et en utilisant le bras droit comme gabarit , effectuer deux trous de diamètre de 6 mm, donc
unir les deux bras (vis non fournies).
Kit batteries de secours
Un kit de batteries de secours est disponible (réf. DM.BT). Il permet le fonctionnement de l’automatisme même en cas de
coupure de courant.
Insérer les batteries dans les emplacements prévus à cet effet et les brancher sur la centrale conformément à la Fig. 18.
DONNEES TECHNIQUES
DUMPER 7
DUMPER 10
115 ÷ 230VCC 50/60 Hz
115 ÷ 230VCC 50/60 Hz
24Vdc
24Vdc
1A
1,5 A
1W sans accessoire
3W avec accessoire
1W sans accessoire
3W avec accessoire
700 N
1000 N
2700 mm - 3700 mm
2700 mm - 3700 mm
24 V =/0,5A max
24 V =/0,5A max
Vitesse d’ouverture
0,12 - 0,20 m/s
0,12 - 0,20 m/s
Vitesse de fermeture
0,12 - 0,20 m/s
0,12 - 0,20 m/s
9m²
12m²
Usage intensif
Usage intensif
-20°C/+50°C
-20°C/+50°C
IP 10
IP 10
Niveau sonore
>60dB
>60dB
Poids
1,6 kg
1,85 kg
Alimentation
Alimentation moteur
Absorption
Absorption en veille
Force de traction/poussée
Course maximale
Alimentation accessoires
Portée maximale
Intervalle de fonctionnement
Temp. fonctionnement
Indice de protection
26
Declaración CE de conformidad
Declaración conforme a las Directivas 2004/108/CE(EMC); 2006/95/CE(LVD)
Fabricante:
AUTOMATISMI CAB Srl.
Dirección:
Via della Tecnica,10 (z.i.) - 36010 Velo d’Astico (VI) - Italia
Declara que el producto:
Automatización de arrastre para puertas plegables:
DUMPER 7 - DUMPER 10.
es conforme a las condiciones de las siguientes Directivas CE:
• DIRECTIVA 2004/108/CE DEL PARLAMENTO EUROPEO Y DEL CONSEJO del 15 de diciembre de 2004 sobre la aproximación de
las legislaciones de los Estados miembros con relación a la compatibilidad electromagnética y que abroga la Directiva 89/336(CEE, según las
siguientes normas armonizadas: EN 61000-6-2:2005, EN 61000-6-3:2007.
• DIRECTIVA 2006/95/CE DEL PARLAMENTO EUROPEO Y DEL CONSEJO del 12 de diciembre de 2006 sobre la aproximación de
las legislaciones de los Estados miembros con relación al material eléctrico destinado a ser utilizado dentro de determinados límites de tensión,
según las siguientes normas armonizadas: EN 60335-1:2002 + A1:2004 + A11:2004 + A12:2006 + A2:2006 + A13:2008; EN 60335-2-103:2003.
• DIRECTIVA 2006/42/CE DEL PARLAMENTO EUROPEO Y DEL CONSEJO del 17 de mayo de 2006 relativa a las máquinas y que
modifica la Directiva 95/16/CE, respetando los requisitos para las “cuasi máquinas”, conforme a la norma siguiente: EN13241-1:2003.
• AUTOMATISMI CAB Srl declara así mismo que la documentación técnica pertinente ha sido redactada conforme al anexo VII B de la
Directiva 2006/42/CE y que se han respetado los siguientes requisitos esenciales: 1.1.1 - 1.1.2 - 1.1.3 - 1.1.5 - 1.2.1 - 1.2.3 - 1.2.6 - 1.3.1 - 1.3.2 1.3.3 - 1.3.4 - 1.3.7 - 1.3.9 - 1.5.1 - 1.5.2 - 1.5.4 - 1.5.5 - 1.5.6 - 1.5.7 - 1.5.8 - 1.5.10 - 1.5.11 - 1.5.13 - 1.6.1 - 1.6.2 - 1.6.4 - 1.7.2 - 1.7.4 - 1.7.4.1
- 1.7.4.2 - 1.7.4.3.
• El fabricante se compromete a transmitir a las autoridades nacionales, contestando a una solicitud motivada, la información pertinente sobre
la “cuasi máquina”. El compromiso incluye las modalidades de transmisión y no afecta a los derechos de propiedad intelectual del fabricante de
la “cuasi máquina”.
• Se comunica que la “cuasi máquina” no se tiene que poner en servicio hasta que la máquina final, en la cual se tiene que incorporar, ha sido
declarada conforme si aplicable, a las disposiciones de la Directiva 2006/42/CE.
• Además, el producto, limitadamente a las partes aplicables, resulta ser conforme a las siguientes normas: EN 12445:2002, EN 12453:2002,
EN 12978:2003.
Benincà Luigi, Responsable legal.
Velo d’Astico, 02/11/2010.
ADVERTENCIAS
Está prohibido utilizar el producto para finalidades o con
modalidades no previstas en el presente manual. Usos
incorrectos pueden causar daños al producto y poner en
peligro personas y cosas.
Se rehúsa cualquier responsabilidad en caso de incumplimiento de la buena técnica en la construcción de las
cancelas, así como en cuanto a las deformaciones que
pudieran producirse durante el uso.
Guardar este manual para futuras consultas.
La instalación debe ser efectuada por personal cualificado
respetando plenamente las normas vigentes.
Los elementos del embalaje no se deben dejar al alcance
de los niños ya que son potenciales fuentes de peligro.
No tirar al medio ambiente los elementos del embalaje,
sino que se deben separar según los varios tipos (por ej.
cartón, poliestireno) y evacuarlos de conformidad con las
normas locales.
El instalador debe proporcionar todas las informaciones
relativas al funcionamiento automático, manual y de
emergencia de la automatización y entregar al usuario del
equipo las instrucciones de uso.
Este producto no está destinado al uso por parte de niños
ni de personas con capacidades físicas, sensoriales o
mentales reducidas, o carentes de los conocimientos
necesarios, salvo bajo las instrucciones y la vigilancia de
una persona que se haga responsable de su seguridad.
Prever en la red de alimentación un interruptor/
cortacircuitos omnipolar con distancia de apertura de los contactos igual o mayor que 3 mm.
Comprobar que entre el aparato y la red eléctrica
general haya un interruptor diferencial y una protección contra sobrecorriente adecuados.
Algunos tipos de instalación requieren que se conecte la
hoja con una instalación de puesta a tierra conforme a las
vigentes normas de seguridad.
Durante las operaciones de instalación, mantenimiento y
reparación, cortar la alimentación antes de acceder a las
partes eléctricas.
•
Las descripciones y las ilustraciones presentadas en este
manual no son vinculantes. Sin cambiar las características
esenciales del producto, el fabricante se reserva el derecho
de aportar cualquier modificación de carácter técnico,
constructivo o comercial sin obligación de actualizar la
presente publicación.
27
INTRODUCCIÓN
Nos congratulamos con vd. por haber elegido el motorreductor DUMPER.
Todos los artículos de la vasta gama CAB son el fruto de una veinteañal experiencia en el sector de los automatismos y
de una continua búsqueda de nuevos materiales y de tecnología de vanguardia.
Es precisamente por ello el que hoy nos encontramos en situación de ofrecer productos extremadamente fiables que,
gracias a su potencia, eficacia y duración, satisfacen plenamente las exigencias del usuario final.
Todos nuestros productos están garantizados.
Además, una póliza R.C. productos, contratada con una compañía de seguros de primera línea, cubre eventuales daños
a cosas o personas causados por defectos de fabricación.
NOTICIAS GENERALES
El automatismo está diseñado para motorizar puertas plegables; para aplicarlo en puertas basculantes requiere un brazo
especial de conexión (art. AU.C25).
En cualquier caso deberán tenerse en cuenta las condiciones siguientes:
- la distancia entre el punto más alto de la puerta y el techo debe ser de al menos 40mm. (fig.2);
- la puerta deberá poder abrir o cerrarse tirando o empujando horizontalmente sobre el borde superior (fig.2);
- las maniobras manuales deben resultar suaves y regulares.
MEDIDAS
En la figura 1 se indican las medidas en milímetros.
INSTALACIÓN TIPO
La figura 2 ilustra una instalación típica.
Ref.
Artículo
Descripción
1
DUMPER 7
DUMPER 10
Automatización 700N puertas seccionales y basculantes
Automatización 1000N puertas seccionales y basculantes
2
Guía de tracción 3000/4000 mm
3
DM.BT
Kit baterías de emergencia
4
PUPILLA -C
Fotocélulas para montaje en pared
5
Banda de seguridad
6
Telemando 2/4 CH - codificación rolling-code 433.92 Mhz.
7
Desbloqueo de seguridad
8
FBY
LED intermitente
ATENCIÓN:
La conexión a la red debe realizarse en un canal independiente y separado de los dispositivos de mando y seguridad.
INSTALACIÓN DE LA AUTOMATIZACIÓN
Realizar 2 orificios perfectamente centrados en el punto medio de la puerta como indica la figura 3.
Fijar provisionalmente el riel a la pared utilizando dos tacos con tornillos como indica la figura 4. El riel debe estar libre de
moverse hacia el techo.
Si se utiliza el carril dividido en 2 partes, hay que ensemblarlo a través de su propia junta. La junta se encuentra ya insertada en una de las dos piezas: es suficiente alinear el carril y hacer correr la junta por el carril, según indicado en figura 6.
Tomando como referencia la figura 5, aplicar la placa de sostén al riel a una distancia de aproximadamente 60 cm del motor; teniendo en cuenta la distancia entre el riel y la pared, plegar los dos soportes para la fijación en el techo y aplicarlos
a la placa de sostén.
Levantar el riel como indica la figura 6 y tomando como referencia el dibujo de la figura 7 fijar los soportes en el techo. El
riel debe estar perfectamente horizontal. Fijar el riel a la pared y el soporte de tracción al borde superior de la puerta. Entre
el perfil superior de la puerta y el riel debe haber una distancia mínima de 10mm.
Abrir la cubierta (figura 8), sacar los dos tornillos indicados en la figura 9 y extraer la placa de bloqueo (figura 10). Aplicar
el motor a la guía (figura 11), colocar la placa de bloqueo y enroscar los dos tornillos (figura 12).
Ahora es posible realizar la conexión eléctrica utilizando el cable precableado a la central de mando (figura13).
Abrir completamente la puerta y fijar el tope mecánico aproximadamente a 1 cm de distancia, según indicado en figura
16. Bloquear de manera definitiva el tope mecánico, haciendo 2 perforaciones en el carril y atornillando los dos tornillos
autorroscantes de 3,5 mm.
Es obligatorio efectuar la conexión de tierra (GND) respetando las normas vigentes.
IMPORTANTE
Con la puerta totalmente cerrada, el soporte de tracción debe encontrarse a aproximadamente 45° respecto del riel, como
indica la figura 16. Para tal fin es posible acortar el soporte y utilizar los otros orificios.
28
CONEXIONES ELÉCTRICAS (FIGURA 14)
Descripción de las regletas de bornes
Entrada
Descripción
OPEN-COM
Entrada tecla OPEN (N.O.) para el mando de la automatización, configurable mediante el DIP1
FOTO-COM
Entrada contacto (N.C.) para dispositivos de seguridad (Fotocélula)
STOP-COM
Entrada contacto (N.C.) para tecla de parada de emergencia (STOP)
ANT-COM
Entrada para la antena del radiorreceptor incorporado con frecuencia 433,92Mhz (Ant: señal - COM: precinta)
LAMP/LAMP+24
Salida 24V para conexión intermitente de señalización
En la figura 15 se muestran las numerosas predisposiciones que se pueden abrir para hacer pasar los cables de conexión
según las necesidades.
DESCRIPCIÓN DE LOS MICROINTERRUPTORES DE CONFIGURACIÓN
Nota: Los ajustes de los microinterruptores deben efectuarse con la puerta totalmente cerrada; si no, es necesario desconectar y restablecer la alimentación de red para hacer efectivos los ajustes.
DIP1: Selecciona la modalidad de funcionamiento del ”Pulsador P.P.” y del transmisor
ON: Funcionamiento: ABRE > STOP > CIERRA > STOP >
OFF: Funcionamiento: ABRE > CIERRA > ABRE >
DIP2: Habilita o deshabilita el cierre automático
ON: Cierre automático habilitado
OFF: Cierre automático inhabilitado
DIP3: Selección de la velocidad durante la ralentización
ON: velocidad en ralentización baja
OFF: velocidad en ralentización alta
DIP4: Habilita o deshabilita la función de comunidad
ON: función de comunidad habilitada. El impulso P.P. o del transmisor no tiene efecto durante la fase de apertura.
OFF: función de comunidad deshabilitada.
DIP5: Tiempo de inversión en cierre para el tensado de la correa
ON: tiempo mínimo
OFF: tiempo máximo
DIP6: Inversión en cierre para el tensado de la correa
ON: Inversión no activa
OFF: Inversión activa
DIP7: Frenado
ON: 80%
OFF: 90%
DIP8: Configuración entrada FOTO
ON: entrada FOTO activa en apertura y cierre
OFF: entrada FOTO activa sólo en cierre
TRIMMER
El trimmer de la central regula la sensibilidad del sensor antiaplastamiento. Al girarlo en sentido horario, aumenta la sensibilidad; en sentido contrario, disminuye.
A la primera intervención del sensor, la central reabre totalmente; luego (si DIP2=ON) intenta una nueva maniobra de cierre;
en caso de nueva intervención, reabre 3s y se pone en estado STOP.
MANIOBRA MANUAL
En caso de corte de suministro de energía eléctrica, es posible maniobrar la hoja manualmente tirando del cordón hacia
abajo con el dispositivo rojo como indica la figura 16.
Al regresar la alimentación de red, la primera maniobra restablece automáticamente el desbloqueo.
AUTOAPRENDIZAJE
La central electrónica está protegida para autoprogramarse y estar lista para el uso en cuanto se conecta a la tensión de red.
ATENCIÓN: el procedimiento de autoaprendizaje requiere la conexión de todas las protecciones; si una o varias no se
utilizan, hay que puentear la entrada al borne COM -24 V.
Pulsar la tecla PROG. (se enciende la luz de cortesía); pulsar la tecla OPEN; automáticamente la puerta ejecutará una
maniobra hasta el cierre completo. Transcurridos 2 segundos, la puerta ejecutará una maniobra hasta la máxima apertura
deseada (pulsar la tecla OPEN para determinar la apertura deseada).
Desde este momento (Dip 2 ON = cierre automático habilitado) comienza el recuento en segundos para el cierre automático; transcurrido el tiempo deseado, pulsar la tecla OPEN; la puerta se pondrá en cierre saliendo automáticamente de la
programación, calculando velocidades y ralentizaciones a efectuar durante la maniobra.
Nota: El tiempo de cierre automático es contado por el operador y va de 0 a 90 segundos. El procedimiento de adquisición
29
de los topes se debe ejecutar a baja velocidad.
Con Dip 2 OFF = cierre automático inhabilitado, la apertura, el cierre y la parada se efectúan por radiomando y/o tecla.
MEMORIZACIÓN DEL TRANSMISOR
Con la puerta cerrada, mantener pulsada la tecla MEMO RX, pulsar la tecla deseada del transmisor en un plazo de 5 s; la
luz de cortesía parpadea una vez efectuada la memorización.
Repetir la operación con cada transmisor. MÁX. 20 códigos diferentes.
ANULACIÓN DE UN TRANSMISOR: mantener pulsada la tecla MEMO RX hasta el encendido de la luz de cortesía y pulsar
la tecla del transmisor; siguen 3 “PARPADEOS” de confirmación de la anulación; soltar la tecla MEMO RX
RESET DE TARJETA DE ADQUISICIÓN DE CÓDIGOS: restablece la memoria anulando todos los códigos memorizados;
mantener pulsada la tecla MEMO RX hasta el apagado de la “LUZ DE CORTESÍA”
- siguen 9 “PARPADEOS” de confirmación de reset total; soltar la tecla MEMO RX.
INDICACIONES DE LA LUZ DE CORTESÍA
ningún “PARPADEO” = transmisor a memorizar.
1 “PARPADEO” = transmisor memorizado.
2 “PARPADEOS” = si se repite la memorización de un transmisor ya memorizado.
3 “PARPADEOS” = después de la anulación de un transmisor.
4 “PARPADEOS” = en modo “anulación” transmisor no memorizado.
5 “PARPADEOS” = memoria agotada en la tarjeta.
9 “PARPADEOS” = anulación de todos los códigos en la memoria.
ACCESORIOS OPCIONALES
Puertas basculantes
Es posible instalar la automatización DUMPER también en las puertas basculantes; en este caso, es necesario el adaptador
AU.C25, que se debe instalar en la puerta como indica la figura 17.
Para conectar el brazo curvo del DUMPER con el brazo recto suministrado con el AU.C25, hay que cortar el brazo curvo
según indicado en figura 17 y, utilizando el brazo recto como modelo, efectuar dos perforaciones de diámetro 6 mm. Unir
entonces los dos brazos (tornillos no incluidos).
Kit baterías de emergencia
Está disponible el kit de baterías de emergencia (cód. DM.BT), que permite el funcionamiento de la automatización aun en
caso de falta de alimentación de red.
Introducir las baterías en sus alojamientos y conectarlas a la central como indica la figura 18.
DATOS TÉCNICOS
DUMPER 7
DUMPER 10
115 ÷ 230Vca 50/60 Hz
115 ÷ 230Vca 50/60 Hz
24Vdc
24Vdc
1A
1,5 A
Absorción en stand-by
1W sin accesorios
3W con accesorios
1W sin accesorios
3W con accesorios
Fuerza tracción/empuje
700 N
1000 N
2700 mm - 3700 mm
2700 mm - 3700 mm
24 V =/0,5A máx.
24 V =/0,5A máx.
Velocidad apertura
0,12 - 0,20 m/s
0,12 - 0,20 m/s
Velocidad cierre
0,12 - 0,20 m/s
0,12 - 0,20 m/s
Capacidad máxima
9 mq
12 mq
Intermitencia trabajo
Uso intensivo
Uso intensivo
Temp. funcionamiento
-20°C/+50°C
-20°C/+50°C
IP 10
IP 10
Nivel de ruido
>60dB
>60dB
Peso
1,6 kg
1,85 kg
Alimentación
Alimentación motor
Absorción
Carrera máxima
Alimentación accesorios
Grado de protección
30
Deklaracja zgodności CE
sporządzona zgodnie z dyrektywami europejskimi 2004/108/WE (EMC) i 2006/95/WE (LVD)
Producent:
AUTOMATISMI CAB Srl
Adres:
Via della Tecnica,10 (z.i.) - 36010 Velo d’Astico (VI) - Włochy
oświadcza, że produkt:
Automatyzm do bram sekcyjnych model:
DUMPER 7 - DUMPER 10.
jest zgodny z wymogami następujących dyrektyw WE:
• DYREKTYWY 2004/108/WE RADY I PARLAMENTU EUROPEJSKIEGO z dnia 15 grudnia 2004r. w sprawie zbliżania ustawodawstwa
państw członkowskich w zakresie kompatybilności elektromagnetycznej i anulującej postanowienia dyrektywy 89/336/EWG, zgodnie z następującymi
normami zharmonizowanymi: EN 61000-6-2:2005, EN 61000-6-3:2007.
• DYREKTYWY 2006/95/WE RADY I PARLAMENTU EUROPEJSKIEGO z dnia 12 grudnia 2006r. w sprawie zbliżania ustawodawstwa
państw członkowskich w zakresie bezpieczeństwa sprzętu elektrycznego o określonych granicach napięcia, zgodnie z następującymi normami
zharmonizowanymi: EN 60335-1:2002 + A1:2004 + A11:2004 + A12:2006 + A2:2006 + A13:2008; EN 60335-2-103:2003.
• DYREKTYWY 2006/42/WE PARLAMENTU I RADY EUROPEJSKIEJ z dnia 17 maja 2006r. w sprawie maszyn zmieniającej dyrektywę
95/16/WE, z zachowaniem wymogów dotyczących “części maszyn”, wg następującej normy: EN13241-1:2003.
• Ponadto, firma AUTOMATISMI CAB Srl oświadcza, że stosowna dokumentacja techniczna została sporządzona na podstawie treści załącznika
VII B do dyrektywy 2006/42/WE i że zostały spełnione następujące zasadnicze wymagania: 1.1.1 - 1.1.2 - 1.1.3 - 1.1.5 - 1.2.1 - 1.2.3 - 1.2.6 - 1.3.1
- 1.3.2 - 1.3.3 - 1.3.4 - 1.3.7 - 1.3.9 - 1.5.1 - 1.5.2 - 1.5.4 - 1.5.5 - 1.5.6 - 1.5.7 - 1.5.8 - 1.5.10 - 1.5.11 - 1.5.13 - 1.6.1 - 1.6.2 - 1.6.4 - 1.7.2 - 1.7.4 1.7.4.1 - 1.7.4.2 - 1.7.4.3.
• Producent zobowiązuje się do przesłania informacji dotyczących “części maszyny” na uzasadniony wniosek krajowego organu władzy. Zobowiązanie
dotyczy trybu przesłania informacji i utrzymuje w mocy prawa własności intelektualnej producenta “części maszyny”.
• Powiadamia się, że “część maszyny” nie powinna być oddana do eksploatacji do chwili, gdy końcowa maszyna, do której dana część ma być
wbudowana nie otrzyma deklaracji zgodności z mającymi zastosowanie wymogami dyrektywy 2006/42/WE.
• Ponadto, w odniesieniu do części objętych postanowieniami, produkt spełnia wymagania następujących norm:
EN 12445:2002, EN 12453:2002, EN 12978:2003.
Benincà Luigi, Upoważniony przedstawiciel prawny.
Velo d’Astico, 02/11/2010.
OSTRZEŻENIA
Zabrania się używania produktu do celów i w sposób inny
niż przewidziane w niniejszym podręczniku. Nieprawidłowe
używanie może spowodować uszkodzenie produktu i
stanowić zagrożenie dla osób i rzeczy.
Nie bierze się na siebie żadnej odpowiedzialności za
nieprzestrzeganie reguł dobrej techniki budowlanej przy
realizacji bram, a także w przypadku odkształceń, które
mogłyby powstać w trakcie użytkowania.
Przechowywać niniejszy podręcznik do przyszłego użytku.
Instalacja musi być wykonana przez wykwalifikowany
personel z zachowaniem wszelkich obowiązujących przepisów prawnych.
Nie można pozostawiać opakowania w miejscach dostępnych dla dieci, ponieważ może to być niebezpieczne. Nie
pozostawiać opakowania w środowisku, tylko podzielić na
poszczególne kategorie odpadów (n.p. karton, polistyrol)
i zlikwidować je zgodnie z obowiązującymi przepisami
miejscowymi.
Instalator zobowiązany jest do udzielenia wszelkich informacji dotyczących działania w trybie automatycznym,
ręcznym i w przypadku zaistnienia stanu alarmowego automatyzacji i wręczyć użytkownikowi instalacji instrukcję
użytkowania.
Ten produkt nie jest przeznaczony do użytkowania przez
osoby (w tym dzieci) o ograniczonych zdolnościach fizycz-
nych, zmysłowych lub umysłowych, lub też nieposiadające
odpowiedniej wiedzy, z wyjątkiem sytuacji, gdy znajdują
się one pod nadzorem osób odpowiedzialnych za ich
bezpieczeństwo lub zostały przez nie poinstruowane na
temat użycia produktu.
Należy przewidzieć w sieci wyłącznik/odłącznik sekcyjny wielobiegunowy, gdzie odległość rozwarcia
między stykami będzie równa lub większa 3 mm..
Sprawdzić, czy przed instalacją elek tr yczną jest
odpowiedni wyłącznik dyferencjalny i zabezpieczenie
przed przetężeniem.
Niektóre typologie instalacji wymagają podłączenia
skrzydła do uziemienia zgodnego z obowiązującymi normami bezpieczeństwa.
Podczas prac instalacyjnych, konserwacji i naprawy, przed
przystąpieniem do prac na częściach elektrycznych należy
odciąć zasilanie.
•
Opisy i ilustracje znajdujące się w niniejszym podręczniku
podane są wyłącznie przykładowo. Pozostawiając niezmienione istotne charakterystyki techniczne produktu, producent zastrzega sobie prawo do wprowadzania każdej
zmiany o charakterze technicznym, konstrukcyjnym lub
handlowym, bez konieczności modyfikowania niniejszej
publikacji.
31
WPROWADZENIE
Gratulujemy Państwu wyboru siłownika DUMPER.
Wszystkie urządzenia naszej szerokiej gamy produktów są wynikiem dwudziestoletniego doświadczenia w sektorze
automatyzacji bram oraz stałego poszukiwania nowych rozwiązań w zakresie materiałów i awangardowej technologii.
Właśnie dzięki temu jesteśmy w stanie zaproponować Państwu produkty cieszące się wyjątkowym zaufaniem dzięki ich
mocy, skuteczności działania i trwałości – t.j. cechom, które zadowalają w pełni wymagania użytkownika.
Wszystkie nasze produkty posiadają gwarancję.
Ponadto została zawarta polisa ubezpieczeniowa z jednym ze znaczących towarzystw ubezpieczeniowych, która pokrywa
koszty ewentualnych szkód materialnych lub na rzecz osób, spowodowane błędami fabrycznymi.
INFORMACJE OGÓLNE
Automatyzm ten został opracowany z myślą o zmotoryzowaniu bram sekcyjnych; w celu zastosowania go do bram
uchylnych wymagane jest specjalne ramię zaczepowe (art. AU.C25).
W każdym razie spełnione muszą być spełnione następujące warunki:
- odległość pomiędzy najwyższym punktem bramy a sufitem musi wynosić co najmniej 40 mm (rys.2);
- brama musi się otwierać i zamykać poprzez poziome pociąganie i popychanie górnej krawędzi (rys.2);
- ręczna obsługa bramy musi przebiegać w sposób łagodny i regularny.
WYMIARY
Na rysunku 1 przedstawiono wymiary wyrażone w milimetrach
TYPOWA INSTALACJA
Na rysunku 2 przedstawiono typową instalację.
Odn.
Artykuł
Opis
1
DUMPER 7
DUMPER 10
Zestaw automatyki 700N do bram segmentowych i uchylnych
Zestaw automatyki 1000N do bram segmentowych i uchylnych
2
Prowadnica przesuwu 3000/4000 mm
3
DM.BT
Zestaw baterii awaryjnych
4
PUPILLA -C
Fotokomórki do montażu naściennego
5
Krawędziowa listwa bezpieczeństwa
6
Pilot 2/4 CH - kodowanie rolling-code 433.92 Mhz.
7
Odryglowanie awaryjne
8
FBY
Lampa ostrzegawcza diodowa
UWAGA:
Podłączenie do sieci należy przeprowadzić na niezależnym kanale, oddzielonym od urządzeń sterujących i zabezpieczających.
INSTALACJA ZESTAWU AUTOMATYKI
Wykonać 2 otwory, doskonale wyśrodkowane na linii osiowej drzwi, tak jak to przedstawiono na rysunku 3.
Jeśli stosujemy prowadnicę z dwóch części należy połączyć ją za pomocą specjalnego łącznika. Łączniki znajduje się w
jednej z dwóch części prowadnicy. Wystarczy wyrównać prowadnicę i wsunąć łącznik, jak pokazano na zdjęciu 6.
Przymocować prowizorycznie szynę do ściany, przy użyciu dwóch kołków rozporowych i śrub, tak jak to przedstawiono
na rysunku 4. Konieczne jest, aby szynę można było przesuwać w kierunku sufitu.
Wzorując się na rysunku 5, nałożyć płytkę wspornikową na szynę w odległości około 60 cm od silnika, następnie zagiąć
(biorąc pod uwagę odległość między szyną a ścianą) dwie obejmy służące do zamocowania szyny do sufitu i nałożyć
płytkę wspornikową.
Unieść szynę tak, jak to przedstawiono na rysunku 6, i wzorując się na rysunku 7, przymocować obejmy do sufitu. Szyna
musi być doskonale pozioma. Przymocować szynę do ściany, a obejmę pociągową do górnej krawędzi bramy. Minimalna
odległość między górnym profilem bramy oraz szyną musi wynosić 10 mm.
Otworzyć wieczko (rysunek 8) i wyjąć dwie śruby pokazane na rysunku 9, następnie wyjąć płytkę blokującą (rysunek 10).
Nałożyć silnik na szynę (rysunek 11), wprowadzić z powrotem płytkę blokującą i przykręcić dwie śruby (rysunek 12).
Ustaw bramę w pozycji pełnego otwarcia i umieść mechaniczny ogranicznik w odległości 1 cm, jak pokazano na rysunku
16. Zamocuj na stałe mechaniczny ogranicznik ruchu przykręcając do prowadnicy za pomocą wkrętów 3,5mm do uprzednio
nawierconych otworów w prowadnicy.
Teraz można przystąpić do wykonania połączenia elektrycznego, przy użyciu dostarczonego kabla, z centralą sterującą
(rysunek 13).
Wykonanie uziemienie (GND) jest obowiązkowe i musi ono spełniać obowiązujące przepisy.
WAŻNE
Przy całkowicie zamkniętej bramie, obejma pociągowa musi znajdować się pod kątem około 45° względem szyny, tak jak
to przedstawiono na rysunku 16. W tym celu można skrócić obejmę i użyć innych otworów.
32
POŁĄCZENIA ELEKTRYCZNE (RYSUNEK 14)
Opis zacisków
Wejście
Opis
OPEN-COM
Wejście przycisku OPEN (N.O.) do sterowania zestawem automatyki, konfigurowalne za pomocą DIP1
FOTO-COM
Wejście styku (N.C.) dla urządzeń ochronnych (Fotokomórka)
STOP-COM
Wejście styku (N.C.) dla przycisku zatrzymania awaryjnego (STOP)
ANT-COM
Wejście dla anteny wbudowanego radioodbiornika z częstotliwością 433,92Mhz (Ant: sygnał - COM:Oplot)
LAMP/LAMP+24
Wyjście 24V do przyłączenia lampy ostrzegawczej
Na rysunku 15 przedstawiono miejsca, w których można wykonać, w zależności od potrzeb, otwory do przeprowadzenia
przewodów.
OPIS KONFIGURACYJNYCH PRZEŁĄCZNIKÓW DWUSTANOWYCH (DIP-SWITCH)
Uwagi: Zmiany w ustawieniach przełączników dwustanowych należy przeprowadzać przy całkowicie zamkniętej bramie
lub, jako alternatywa, odcinając zasilanie i przyłączając je ponownie, w celu aktywacji wprowadzonych zmian.
DIP1: Wybiera sposób funkcjonowania ”Przycisku P.P.” i przekaźnika
ON: Funkcjonowanie: OTWIERA > STOP > ZAMYKA > STOP >
OFF: Funkcjonowanie: OTWIERA > ZAMYKA > OTWIERA>
DIP2: Włącza lub wyłącza samozamykanie
ON: Zamykanie automatyczne włączone
OFF: Zamykanie automatyczne wyłączone
DIP3: Wybór prędkości w fazie zwalniania
ON: niska prędkość w zwalnianiu
OFF: wysoka prędkość w zwalnianiu
DIP4: Włącza lub wyłącza funkcję zbiorczą
ON: funkcja zbiorcza włączona. Impuls P.P. lub przekaźnikowy nie ma wpływu podczas fazy otwierania.
OFF: funkcja zbiorcza wyłączona
DIP5: Czas odwrócenia kierunku w zamykaniu dla naciągnięcia pasa
ON: czas minimalny
OFF: czas maksymalny
DIP6: Odwrócenie kierunku w zamykaniu dla naciągnięcia pasa
ON: Odwrócenie kierunku nie włączone
OFF: Odwrócenie kierunku włączone
DIP7: Hamowanie
ON: 80%
OFF: 90%
DIP8: Konfiguracja wejścia FOTO
ON: wejście FOTO aktywne podczas otwierania i zamykania
OFF: wejście FOTO aktywne tylko podczas zamykania
TRYMER
Trymer centralki reguluje czułość czujnika zabezpieczającego przed zgnieceniem. Obracając go w kierunku zgodnym z
ruchem wskazówek zegara zwiększa się czułość, w kierunku przeciwnym - zmniejsza.
Przy pierwszej interwencji czujnika centrala powoduje pełne otwarcie bramy, następnie (jeśli DIP2=ON) próbuje ponownie
przeprowadzić manewr zamykania. W przypadku ponownej interwencji, otwiera bramę przez 3 sekundy i przechodzi w
stan STOPU.
MANEWR RĘCZNY
W przypadku przerwy w dostawie energii elektrycznej, można ręcznie wywołać przesuw bramy, pociągając do dołu linkę
z czerwonym pokrętłem, przedstawione na rysunku 16.
Po powrocie zasilania, pierwszy manewr powoduje automatyczne zresetowanie odryglowania.
ROZPOZNAWANIE AUTOMATYCZNE
Centralka elektroniczna została tak zaprojektowana, aby sama programowała się w sposób automatyczny i była gotowa
do użytku zaraz po podłączeniu zasilania.
UWAGA: procedura rozpoznawania automatycznego wymaga podłączenia wszystkich zabezpieczeń; jeśli któreś z nich
(lub kilka) nie jest używane, należy połączyć mostkiem jego wejście z zaciskiem COM -24 V.
Nacisnąć przycisk PROG. (zapala się światło pomocnicze), nacisnąć przycisk OPEN, brama automatycznie przeprowadzi
manewr aż do pełnego zamknięcia. Po upływie 2 sekund brama wykona manewr aż do żądanego maksymalnego otwarcia
(naciśnij przycisk OPEN, aby określić żądane otwarcie).
Od tej chwili (Dip 2 ON = zamykanie automatyczne włączone) rozpoczyna się odliczanie sekund do automatycznego zamykania; po upływie żądanego czasu, należy nacisnąć przycisk OPEN, brama rozpocznie zamykanie wychodząc automatycznie
33
z programowania i obliczając prędkość oraz zwalnianie podczas manewru.
Uwagi: Czas zamykania automatycznego jest odliczany przez operatora i wynosi od 0 do 90 sekund. Całą procedura zapamiętywania położeń jest przeprowadzana przy niskiej zachowaniu niskiej prędkości.
Przy Dip 2 OFF = zamykanie automatyczne wyłączone, otwieranie, zamykanie i zatrzymanie są przeprowadzane przy użyciu
pilota i/lub przycisku.
ZAPISYWANIE NADAJNIKA
Przy zamkniętych drzwiach, należy przytrzymać wciśnięty przycisk MEMO RX, nacisnąć żądany przycisk nadajnika w ciągu
5 sekund; światło pomocnicze będzie migać, potwierdzając, że dokonano zapisu.
Operację należy powtórzyć dla każdego nadajnika. MAX 20 różnych kodów.
ANULOWANIE NADAJNIKA: przytrzymać wciśnięty przycisk MEMO RX aż do zapalenia się światła pomocniczego, nacisnąć przycisk nadajnika; wyemitowane zostaną 3 “MIGNIĘCIA” potwierdzające anulowanie - zwolnić przycisk MEMO RX
RESET KARTY WCZYTYWANIA KODÓW: resetuje pamięć, kasując wszystkie zapisane kody - przytrzymać wciśnięty
przycisk MEMO RX aż go zgaśnięcia „ŚWIATŁA POMOCNICZEGO”
- wyemitowane zostanie 9 “MIGNIĘĆ” potwierdzających przeprowadzenie pełnego resetu - należy wówczas zwolnić przycisk MEMO RX.
SYGNALIZACJA ŚWIATŁA POMOCNICZEGO
nie miga = nadajnik do zapisania.
1 “MIGNIĘCIE” = nadajnik zapisany.
2 “MIGNIĘCIA” = jeśli powtórzone zostanie zapisywanie wcześniej zapisanego nadajnika.
3 “MIGNIĘCIA” = po anulowaniu nadajnika.
4 “MIGNIĘCIA” = w trybie „anulowania” niezapisanego nadajnika.
5 “MIGNIĘĆ” = wyczerpana pamięć karty.
9 “MIGNIĘĆ” = anulowanie wszystkich kodów w pamięci.
AKCESORIA POMOCNICZE
Bramy uchylne
Zestaw automatyki DUMPER można zainstalować również na bramach uchylnych. W takim przypadku potrzebny jest
specjalny adapter AU.C25, który należy zainstalować na bramie tak, jak to przedstawiono na rysunku 17.
W przypadku montażu ramienia wahadłowego AU.25 do siłownika DUMPER konieczne jest odciąć wygięty dysk jak na
rysunku 17 i za pomocą prostego ramienia jako szablonu, wywiercić 2 otwory 6 mm średnica i tak połączyć 2 ramiona
(śruby nie są dostarczane).
Zestaw baterii awaryjnych
W sprzedaży dostępny jest zestaw baterii awaryjnych (kod DM.BT), które umożliwiają działanie zestawu automatyki, również
w przypadku braku zasilania z sieci.
Baterie należy wprowadzić do przeznaczonych na nie komór i przyłączyć je do centralki tak, jak to przedstawiono na rysunku 18.
DANE TECHNICZNE
DUMPER 7
DUMPER 10
115 ÷ 230Vac 50/60 Hz
115 ÷ 230Vac 50/60 Hz
24Vdc
24Vdc
1A
1,5 A
Pobór w trybie czuwania
1W bez akcesoriów
3W z akcesoriami
1W bez akcesoriów
3W z akcesoriami
Siła pociągowa/nacisku
700 N
1000 N
Posuw maksymalny
2700 mm - 3700 mm
2700 mm - 3700 mm
Zasilanie akcesoriów
24 V =/0,5A max
24 V =/0,5A max
Prędkość otwierania
0,12 - 0,20 m/s
0,12 - 0,20 m/s
Prędkość zamykania
0,12 - 0,20 m/s
0,12 - 0,20 m/s
Udźwig maksymalny
9 mq
12 mq
Użytkow. intensywne
Użytkow. intensywne
-20°C/+50°C
-20°C/+50°C
IP 10
IP 10
Hałaśliwość
>60dB
>60dB
Waga
1,6 kg
1,85 kg
Zasilanie
Zasilanie silnika
Pobór
Cykliczność pracy
Temp. robocza
Stopień ochrony
34
ISTRUZIONI PER L’UTILIZZATORE
USER’S HANDBOOK
NORME DI SICUREZZA
SAFETY RULES
•Non sostare nella zona di movimento delle ante.
•Non lasciare che i bambini giochino con i comandi o in
prossimità delle ante.
•In caso di anomalie di funzionamento non tentare di riparare il guasto ma avvertire un tecnico specializzato.
•Do not stand in the movement area of the gate.
•Do not let children play with controls and near the gate.
•Should operating faults occur, do not attempt to repair the
fault but call a qualified technician.
MANOVRA MANUALE
Nel caso di interruzione dell’energia elettrica, è possibile manovrare manualmente l’anta, tirando verso il basso il cordino
con la manopola rossa come indicato in figura.
Al ritorno dell’alimentazione di rete, la prima manovra ripristina automaticamente lo sblocco.
MANUTENZIONE
•Controllare periodicamente l’efficienza dello sblocco manuale di emergenza.
•Astenersi assolutamente dal tentativo di effettuare riparazioni, potreste incorrere in incidenti; per queste operazioni
contattare un tecnico specializzato.
•Verificare periodicamente l’efficienza dei dispositivi di sicurezza e le altre parti dell’impianto che potrebbero creare
pericoli in seguito ad usura.
SMALTIMENTO
Qualora il prodotto venga posto fuori servizio, è necessario
seguire le disposizioni legislative in vigore al momento per
quanto riguarda lo smaltimento differenziato ed il riciclaggio
dei vari componenti (metalli, plastiche, cavi elettrici, ecc.);
è consigliabile contattare il vostro installatore o una ditta
specializzata ed abilitata allo scopo.
ATTENZIONE
MANUAL CONTROL
If mains power fails, the door can be operated manually with
the rope with the red handle shown in figure.
When power is restored, the first command automatically
resets the release.
MAINTENANCE
•Every month check the good operation of the emergency
manual release.
•It is mandatory not to carry out extraordinary maintenance
or repairs as accidents may be caused. These operations must be carried out by qualified personnel only.
•Periodically check safety components and any other parts
of the system that may become hazardous if worn.
WASTE DISPOSAL
If the product must be dismantled, it must be disposed according to regulations in force regarding the differentiated
waste disposal and the recycling of components (metals,
plastics, electric cables, etc..). For this operation it is advisable to call your installer or a specialised company.
WARNING
All CAB products are covered by insurance policy for any
possible damages to objects and persons caused by construction faults under condition that the entire system be
marked CE and only CAB parts be used.
Tutti i prodotti CAB sono coperti da polizza assicurativa che
risponde di eventuali danni a cose o persone causati da
difetti di fabbricazione, richiede però la marcatura CE della
”macchina” e l’utilizzo di componenti originali CAB.
DUMPER
35
HANDBUCH FÜR DEN VERBRAUCHER
MANUEL D’INSTRUCTIONS
POUR L’UTILISATEUR
SICHERHEITSVORSCHRIFTEN
ORMES DE SÉCURITÉ
•Nicht im Öffnungsbereich verweilen.
•Kinder nicht mit den Steuerungen oder in der Nähe des
Tores spielen lassen.
•Bei Funktionsausfällen nicht versuchen, den Schaden
selber zu beheben, sondern den Techniker rufen.
•Ne vous arrêtez jamais dans la zone de mouvement des
portes.
•Ne laissez pas les enfants jouer avec les commandes ou
à proximité des portes.
•En cas d’anomalies de fonctionnement, n’essayez pas de
réparer la panne mais contactez un technicien spécialisé.
MANUELLE BEDIENUNG
Im Falle eines Stromausfalls kann das Tor per Hand bewegt
werden, indem die Kordel mit dem roten Knauf wie in Abb.
nach unten gezogen wird.
Bei der Rückkehr des Netzstroms sorgt die erste Bewegung
automatisch für die Entriegelung.
WARTUNG
•Monatliche Kontrolle der manuellen Notentriegelung
•Es ist absolut untersagt, selbstständig Sonderwartung
oder Reparaturen vorzunehmen, da Unfälle die Folge sein
können; wenden Sie sich an den Techniker.
•Regelmäßig die Wirksamkeit der Sicherheitsvorrichtungen
und der anderen, bei Verschleiß potentiell gefährlichen
Anlagenteile kontrollieren.
ENTSORGUNG
Wird das Gerät außer Betrieb gesetzt, müssen die gültigen
Gesetzesvorschriften zur differenzierten Entsorgung und
Wiederverwendung der Einzelkomponenten, wie Metall,
Plastik, Elektrokabel, usw., beachtet werden. Rufen Sie Ihren
Installateur oder eine Entsorgungsfirma.
ACHTUNG
Alle Produkte CAB wurden mit einem Versicherungsschein
versehen, der alle eventuellen Schäden an Dingen oder Personen abdeckt, die durch Herstellungsdefekte hervorgerufen
wurden, vorausgesetzt, das Gerät besitzt die Kennzeichnung EU und es wurden original CAB Einzelkomponenten
verwendet.
MANOEUVRE MANUELLE
En cas de coupure de courant, il est possible de manœuvrer
le battant manuellement en tirant sur la corde au niveau de
la poignée rouge, conformément à la Fig. 16.
Une fois le courant rétabli, la première manœuvre réactive
automatiquement le déblocage.
MAINTENANCE
•Contrôler tous les mois le bon état du déverrouilleur manuel
d’urgence.
•S’abstenir impérativement de toute tentative d’effectuer
des maintenances extraordinaires ou des réparations, sous
risque d’accident. Contactez un technicien spécialisé pour
ces opérations.
•Vérifier périodiquement l’efficacité des dispositifs de sécurité et les autres parties de l’installation qui pourraient
représenter un risque en cas d’usure.
DÉMOLITION
Au cas où le produit serait mis hors service, il est impératif
de se conformer aux lois en vigueur pour ce qui concerne
l’élimination différenciée et le recyclage des différents composants (métaux, matières plastiques câbles électriques,
etc...) contactez votre installateur ou une firme spécialisée
autorisée à cet effet.
ATTENTION
Tous les produits CAB sont couverts par une police
d’assurance qui répond d’éventuels préjudices corporels
ou matériels provoqués à cause de défauts de fabrication,
mais qui requiert toutefois le marquage CE de la “machine”
et l’utilisation de pièces de rechange d’origine CAB.
DUMPER
36
LIBRO DE INSTRUCCIONES
PARA EL USUARIO
KSIĄŻECZKA Z INSTRUKCJAMI
DLA UŻYTKOWNIKA
NORMAS DE SEGURIDAD
NORMY BEZPIECZEŃSTWA
•No pararse en la zona de movimiento de las hojas.
•No dejar que los niños jueguen con los mando o en proximidad de las hojas.
•En caso de anomalías de funcionamiento no intentar reparar la avería sino que avisar a un técnico especializado.
•Starać się nie przebywać w obszarze posuwu skrzydeł.
•Niedopuścić aby dzieci bawiły się sterownikami lub w
pobliżu skrzydeł bramy.
•W przypadku niewłaściwego funkcjonowania nie starać
się samemu dokonywać naprawy a powiadomić o fakcie
technika wyspecjalizowanego.
MANIOBRA MANUAL
En caso de corte de suministro de energía eléctrica, es
posible maniobrar la hoja manualmente tirando del cordón
hacia abajo con el dispositivo rojo como indica la figura 16.
Al regresar la alimentación de red, la primera maniobra restablece automáticamente el desbloqueo.
MANTENIMIENTO
•Controlar periódicamente la eficiencia del desbloqueo
manual de emergencia.
•Abstenerse absolutamente de intentar efectuar reparaciones, podrían incurrir en accidentes; para estas operaciones
contactar con un técnico especializado.
•Comprobar periódicamente la eficiencia tanto de los
dispositivos de seguridad como de las otras partes de la
instalación, que podrían crear peligros al desgastarse.
ELIMINACIÓN
Cada vez que el producto esté fuera de servicio, es necesario
seguir las disposiciones legislativas en vigor en ese momento
en cuanto concierne a la eliminación de suciedad y al reciclaje de varios componentes (metales, plásticos, cables
eléctricos, etc.), es aconsejable contactar con su instalador
o con una empresa especializada y habilitada para tal fin.
ATENCIÓN
Todos los productos CAB están cubiertos por una póliza de
seguros que responde de eventuales daños a personas o
cosas, causados por defectos de fabricación, requiere sin
embargo la marca CE de la ”máquina” y la utilización de
componentes originales CAB.
MANEWR RĘCZNY
W przypadku przerwy w dostawie energii elektrycznej, można
ręcznie wywołać przesuw bramy, pociągając do dołu linkę z
czerwonym pokrętłem, przedstawione na rysunku.
Po powrocie zasilania, pierwszy manewr powoduje automatyczne zresetowanie odryglowania.
KONSERWACJA
•Sprawdzać okresowo sprawność działania ręcznego mechanizmu odblokowującego i bezpieczeństwa.
•Nie starać się w żadnym wypadku dokonywać napraw
samemu z racji na możliwość ulegnięcia wypadkowi, w
celu naprawy należy skontaktować się z technikiem wyspecjalizowanym.
•S p r a w d z a ć o k r e s o w o s p r a w n o ś ć p r z y r z ą d ó w
zabezpieczających i innych części urządzenia mogących
stanowić zagrożenie na skutek ich zużycia.
ELIMINACJA I DEMOLOWANIE
W przypadku gdy urządzenie nie nadaje się już do dalszego użytkowania, w celu pozbycia się go należy ściśle
przestrzegać obowiązujących w danym momencie norm
prawnych regulujących zróżnicowany rozkład na części i
odzyskiwanie niektórych elementów składowych (metale, plastyk, kable elektryczne, itp.); wskazane jest skontaktowanie się z instalatorem lub wyspecjalizowaną firmą,
autoryzowaną do tego rodzaju prac.
UWAGA
Wszystkie produkty CAB objęte są polisą ubezpieczeniową
na pokrycie szkód poniesionych przez rzeczy lub osoby w
wyniku wad produkcyjnych, pod warunkiem że urządzenia
posiadają oznakowanie CE i oryginalne części CAB.
DUMPER
37
CL8.542.530 10/2013 Rev.3
AUTOMATISMI CAB Srl - Via della Tecnica,10 (z.i.) - 36010 Velo d’Astico (VI) (Italia) - Tel. 0445 741215 - Fax 0445 742094