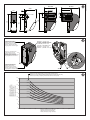
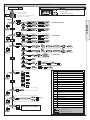
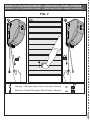
1
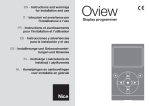
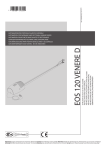
D811627 00100_02 18/02/09
027908
347060
ISTRUZIONI DI INSTALLAZIONE
INSTALLATION MANUAL
INSTRUCTIONS D’INSTALLATION
MONTAGEANLEITUNG
INSTRUCCIONES DE INSTALACION
INSTALLATIEVOORSCHRIFTEN
AUTOMAZIONI PER PORTE SEZIONALI INDUSTRIALI
OPERATORS FOR INDUSTRIAL SECTIONAL DOORS
AUTOMATISMES POUR PORTES MULTI-LAMES INDUSTRIELLES
AUTOMATISCHE ANTRIEBE FÜR INDUSTRIE-SEKTIONALTORE
AUTOMATISMOS PARA PUERTAS SECCIONALES INDUSTRIALES
AUTOMATISERINGEN VOOR INDUSTRIËLE OPDRACHTGERICHTE DEUREN
ARGO
ARGO
8
Attenzione! Leggere attentamente le “Avvertenze” all’interno! Caution! Read “Warnings” inside carefully! Attention! Veuillez lire attentivement les Avertissements qui se trouvent à l’intérieur! Achtung! Bitte lesen Sie
aufmerksam die „Hinweise“ im Inneren! ¡Atención¡ Leer atentamente las “Advertencias” en el interior! Let op! Lees de “Waarschuwingen” aan de binnenkant zorgvuldig!
D811627 00100_02
ITALIANO
INSTALLAZIONE VELOCE-QUICK INSTALLATION-INSTALLATION RAPIDE
SCHNELLINSTALLATION-INSTALACIÓN RÁPIDA - SNELLE INSTALLATIE
A
2
SMONTAGGIO CARTER
REMOVING THE COVER
DÉMONTAGE DU CARTER
ABBAU DER VERKLEIDUNG
DESMONTAJE DE CÁRTERES
DEMONTAGE CARTER
V1
5 mm
10 mm
V2 (Fig. C4)
20 mm
ENGLISH
1
10 mm
V1
C
B
M
FRANÇAIS
1
230Volt
PHOT
PREDISPOSIZIONE TUBI, TUBE ARRANGEMENT,
INSTALLATION DES TUBES, VORBEREITUNG DER LEITUNGEN,
DISPOSICIÓN DE TUBOS, VOORINSTELLING BUIZEN
V2
DEUTSCH
3
4
2
ESPAÑOL
7
5
8
ARGO -
3
NEDERLANDS
6
REGOLAZIONE FINECORSA, ADJUSTING THE LIMIT SWITCHES
RÉGLAGE DE LA FIN DE COURSE, EINSTELLUNG DER ENDSCHALTER
REGULACIÓN DE LOS FINALES DE CARRERA,REGELING EINDAANSLAGEN
Fusibile,
Fuse,
Fusible,
Schmelzsicherung,
Fusible,
Zekering.
1,6 AT
Led presenza alimentazione,
Power ON LED,
Voyant LED présence d'alimentation,
Led Vorhandensein Stromversorgung,
Led Presencia de Alimentación,
Led Aanwezigheid voeding
Display + tasti programmazione
Display plus programming keys
Afficheur et touches de programmation
Display und Programmierungstasten
Pantalla más botones de programación
Display meerdere toetsen programmeur
16 17
Luce di cortesia,
Courtesy lamp,
Lampe de courtoisie,
Hilfsbeleuchtung,
Luz interior,
Hulplicht.
11
9 10
7 8
5 6
3 4
2
1
14 15
1 2 3 4 5 6 7 8 9 10 11 12 13 14 15
PARZ./CLOSE
OUT PROG 1 (NO)
24VSafe MAX 180mA
Connettore scheda opzionale
Optional board connector
Connecteur carte facultative
Steckverbinder Zusatzkarte
Conector de la tarjeta opcional
Connector optionele kaart.
24V MAX 180mA
24V MAX 25W
BAR
START / OPEN
SHIELD
ANT
Connettore programmatore palmare,
Palmtop programmer connector,
Connecteur programmateur de poche,
Steckverbinder Palmtop-Programmierer,
Conector del programador de bolsillo,
Connector programmeerbare palmtop.
12 13
16 17
SCA / 2CH (NO)
OUT PROG 2 (NO)
FAULT BAR
FAULT PHOT
Modulo opzionale SCS-I0, Optional SCS-IO module
Module en option SCS-IO, Optional module SCS-IO
Módulo opcional SCS-IO, Zusatzmodul SCS-IO
1 2 3 4 5 6 7
4-
ARGO
DGLCCLBDGL
E
D811627 00100_02
D
D811627 00100_02
F
AUTOSET COPPIA APERTURA-CHIUSURA
OPENING-CLOSING TORQUE AUTOSETTING
RÉGLAGE AUTOMATIQUE COUPLE OUVERTURE-FERMETURE
AUTOSET DREHMOMENT ÖFFNUNG-SCHLIESSUNG
AJUSTE AUTOMATICO DEL PAR EN FASE DE APERTURA-CIERRE
AUTOSET DRAAIMOMENT OPENING - SLUITING.
G
MEMORIZZAZIONE RADIOCOMANDO
MEMORIZING REMOTE CONTROLS
MÉMORISATION DE LA RADIOCOMMANDE
ABSPEICHERUNG DER FERNBEDIENUNG
MEMORIZACIÓN DEL RADIOMANDO
MEMORISEREN AFSTANDSBEDIENING
+
A
OK
OK
x2
B
.P+
JMEGA
C
OK
P?BGM
D
OK
%%1202?BHMSRCPQR?PR
XSDSCEQR?PR?L?BQR?PR
R?QRML?QAMQRMFGBBCL@SRRML
RMSAFCA?AFCCTCPQRR?QRC
PGJ?QAG?PCJC?QC
PCJ?AFCJMQJ?QQCL
QSCJRC
R?QRMBCQGBCP?RM
BCQGBCPCB@SRRMLRMSAFCBCQGPCC
ECTSCR?QRCRCAJ?BCQC?B?
x2
M
CLB
ARGO -
5
65.5 min.
86
86
378
77
59
351
292
I
Ingresso cavi dall'alto,
Cable entry from above,
Entrée câbles du haut,
Kabeleingang von oben,
Entraa cables desde arriba,
Ingang kabels van de hoogte
APERTURA (GLTKMR=OFF)
TO OPEN (AF?LECKMR=OFF)
OUVERTURE (GLTKMR=OFF)
ÖFFNUNG (KMRR?SQAF=OFF)
APERTURA (GLTKMR=OFF)
OPENING (AF?LECKMR=OFF)
Ingresso cavi dalla parete,
Cable entry from wall,
Entrée câbles du réseau,
Kabeleingang von Wand,
Entrada cables desde la pared,
Ingang kabels van de wand
Ingresso cavi dal basso,
Cable entry from below,
Entrée câbles du bas,
Kabeleingang von unten,
Entrada cables desde abajo,
Ingang kabels van beneden
230V
24V
Diametro medio puleggia [mm], Average pulley diameter [mm],
Diamètre moyen poulie [mm], Mittlerer Durchmesser Riemenscheibe [mm],
Diámetro promedio polea[mm], Gemiddelde diameter katrol [mm]
J
400
ø 250
350
[Numero manovre / giorno]
[Number of operations/day]
[Nombre manœuvres / jour]
[Anzahl Manöver / Tag]
[Número maniobras / día]
[Aantal manoeuvres / dag]
ø 225
300
ø 200
ø 175
250
ø 150
200
ø 125
150
ø 100
100
50
0
1
1,5
2
2,5
3
3,5
4
Altezza porta [m], Door height [m]
Hauteur porte [m], Höhe Tür [m]
Altura puerta [m], Hoogte deur [m]
6-
ARGO
4,5
5
5,5
6
D811627 00100_02
180 max
22
115
H
341 max
226.5 min
226.5
Reeds gememoriseerde afstandsbediening
Reeds gememoriseerde afstandsbediening
K
Te memoriseren afstandsbediening
Te memoriseren afstandsbediening
1 2 3 4 5 6 7 8 9 10 11 12 13 14 15
16 17
1 2 3 4 5 6 7 8 9 10 11 12 13 14 15
PHOT
16 17
BAR
1
1
1
TX1
2
L
24V~
24V~
BAR
COM
24V~
24V~
COM
PHOT
Collegamento di 1 dispositivo non verificato, Connection of 1 untested device, Branchement de 1 dispositif non vérifié, Anschluss einer Vorrichtung ohne
Überprüfung, Conexión de 1 dispositivo no controlado, Verbinding van 1 niet geverifieerde inrichting
RX1
1
TX1
2
2
RX1
2
3
3
4
4
5
5
1 2 3 4 5 6 7 8 9 10 11 12 13 14 15
16 17
TX1
M
V SAFE +
V SAFE -
1 2 3 4 5 6 7 8 9 10 11 12 13 14 15
PHOT
16 17
BAR
1
2
24V~
24V~
BAR
COM
V SAFE +
V SAFE -
24V~
24V~
COM
PHOT
Collegamento di 1 dispositivo verificato, Connection of 1 tested device, Branchement de 1 dispositif vérifié, Anschluss einer Vorrichtung mit Überprüfung,
Conexión de 1 dispositivo controlado, Verbinding van 1 geverifieerde inrichting
RX1
1
1
2
2
1
TX1
RX1
2
3
3
4
4
5
5
Collegamento di 2 dispositivi verificati, Connection of 2 tested devices, Branchement de 2 dispositifs, Anschluss von zwei Vorrichtungen mit Überprüfungvérifiés,
Conexión de 2 dispositivos controlados, Verbinding van 2 geverifieerde inrichtingen
1 2 3 4 5 6 7 8 9 10 11 12 13 14 15
16 17
1 2 3 4 5 6 7
PHOT
1
2
TX1
RX1
1
2
TX2
RX2
24V~
24V~
V SAFE +
V SAFE -
BAR
1 2 3 4 5 6 7 8 9 10 11 12 13 14 15
1
1
2
2
16 17
1 2 3 4 5 6 7
BAR
TX1
1
RX1
2
3
3
4
4
5
5
1
1
2
2
N
FAULT BAR
SCS - IO
COM
FAULT PHOT
24V~
24V~
V SAFE +
V SAFE -
PHOT
SCS - IO
COM
D811627 00100_02
PROGRAMMAZIONE TRASMETTITORI REMOTA, REMOTE TRANSMITTER PROGRAMMING,
PROGRAMMATION ÉMETTEURS A DISTANCE, FERNPROGRAMMIERUNG DER SENDER,
PROGRAMACION DE TRANSMISORES REMOTA, REMOTE PROGRAMMERING TRANSMITTERS
1
TX2
RX2
2
3
3
4
4
5
5
Connessione Seriale Mediante Scheda Scs1 , Serial Connection Via Scs1 Card, Connexion Série À Travers La Carte Scs1, Serielle Verbindung Mit Karte Scs1,
Conexión Serial Mediante Tarjeta Scs1, Seriële Verbinding Middels Kaart Scs1
O
ARGO -
7
D811627 00100_02
ACCESS TO MENUS
Press the OK key
Scroll up
Scroll down
Control unit software version
N. total manoeuvres (in tens)
Cancel/return to main menu
Confirm/Switch on display
N. manoeuvres since latest maintenance (in tens)
N. radio control devices memorised
N?P?K
See PARAMETERS MENU
ENGLISH
N?P?K
CLB
N?P?K
JMEGA
JMEGA
See LOGIC MENU
JMEGA
CLB
JMEGA
P?BGM
?BBQR?PR
FGBBCL@SRRML
PCJC?QC
BCQGPCB@SRRML
M
BBAF
FGBBCL@SRRML
PCJC?QC
BCQGPCB@SRRML
M
CLB
R
See RADIO MENU
PC?B
.0%
CP?QC
+/!-"06
!
OK
$"
OK
OK
T
JGLES?
'2
OK
- +
$0
OK
- +
CLB
"#3
OK
- +
#,%
OK
- +
CQN
BCD?SJR
OK
.0%
CLB
(Fig. F)
?SRMQCR
CLB
JQU?BH
LIMIT SWITCH ADJUSTMENT
Logic
Description
.#"
120C
12-.
.&-2
0
!*-1
-.#,
1SM
1SA
.
partial opening input activated
1CR
autoset function is running
WARNING! Obstacle detection function is not active
#0
#0
#0
#0
#0
#0
#0
photocell test error
START input activated
STOP input activated
PHOT input activated
SAFETY EDGE input activated
CLOSE input activated
OPEN input activated
opening limit switch activated
closing limit switch activated
reverse due to obstacle
safety edge test error
mosfet test error
shunt test error
encoder test error
thermal cutout error
optional module communication error
35.40
Set torque threshold %
CLB
Maximum motor torque %
ARGO -
13
WARNING! Important safety instructions. Carefully read and comply with the
Warnings booklet and Instruction booklet that come with the product as incorrect
installation can cause injury to people and animals and damage to property. They
contain important information regarding safety, installation, use and maintenance.
Keep hold of instructions so that you can attach them to the technical file and
keep them handy for future reference.
1) GENERAL SAFETY
- The units making up the machine and its installation must meet the requirements of the following European Directives: 2004/108/EEC, 2006/95/EEC,
98/37/EEC, 89/106/EEC and later amendments. For all countries outside the
EEC, it is advisable to comply with the above-mentioned standards, in addition to any national standards in force, to achieve a good level of safety.
- The Firm disclaims all responsibility resulting from improper use or any use
other than that for which the product has been designed, as indicated herein, as well as for failure to apply Good Practice in the construction of entry
systems (doors, gates, etc.) and for deformation that could occur during use.
- Make sure the stated temperature range is compatible with the site in which
the automated system is due to be installed.
- Do not install the product in an explosive atmosphere.
- Disconnect the electricity supply before performing any work on the system.
Also disconnect buffer batteries, if any are connected.
- Have the automated system’s mains power supply fitted with a switch or omnipolar thermal-magnetic circuit breaker with a contact separation of at least
3.0 mm.
- Make sure that upline from the mains power supply there is a residual current
circuit breaker that trips at 0.03A.
- Make sure the earth system has been installed correctly: earth all the metal
parts belonging to the entry system (doors, gates, etc.) and all parts of the
system featuring an earth terminal.
- Installation must be carried out using safety devices and controls that meet
standard EN 12978.
- Apply all safety devices (photocells, safety edges, etc.) required to keep the
area free of crushing, dragging and shearing hazards.
- The motor cannot be installed on panels incorporating doors (unless the motor can be activated when the door is open)
- If the automated device is installed at a height of less than 2.5 m or is accessible, the electrical and mechanical parts must be suitably protected.
- Any fixed controls must be installed within sight of the door but away from
moving parts. Unless the control is key operated, it must be installed at a
height of at least 1.5 m and in a place where it cannot be reached by the
public
- Apply at least one warning light (flashing light) in a visible position, and also
attach a Warning sign to the structure.
- If there are no instructions already, attach a label near the operating device,
in a permanent fashion, with information on how to operate the manual release.
- Make sure that nothing can be crushed between the guided part and surrounding fixed parts during the door’s operation
- Once installation is complete, make sure the motor has the right settings and
that the safety and release systems are working properly.
- Only use original spare parts for any maintenance or repair work. The Firm
disclaims all responsibility for the correct operation and safety of the automated system if parts from other manufacturers are used.
- Do not make any modifications to the automated system’s components unless explicitly authorized by the Firm.
- Dispose of packaging materials (plastic, cardboard, polystyrene, etc.) in accordance with the provisions of the laws in force. Keep nylon bags and polystyrene out of reach of children.
Warning! For connection to the mains power supply, use a multicore cable
with a cross-section of at least 4x1.5mm2 of the kind provided for by the
regulations mentioned above (by way of example, type H05 VV-F cable can
be used with a cross-section of 4x1.5mm2). To connect auxiliary equipment,
use wires with a cross-section of at least 1 mm2.
Have an omnipolar circuit breaker installed with a contact separation of
at least 3 mm and featuring overload protection, suitable for cutting the
automated device off from the mains.
Only use pushbuttons with a capacity of 10A-250V or more.
The cables must be held in position using an extra fixing device in the proximity of the terminals, e.g. with cable clamps.
Also add more clips to the limit device wires, to the transformer primary or
secondary wires, and to the wires connected to the printed circuit.
During installation, the power supply cable must be stripped in order for the
earthing wire to be connected to the appropriate terminal, but the active
wires must be left as short as possible. The earthing wire must be the last to
stretch in the case where the cable fixing device becomes loose.
WARNING: extremely low safety voltage cables must be phisically
separated from low voltage cables.
Access to the electrical compartment or to limit switches must be allowed
to skilled personnel only.
Compliance with current safety rules with regard to people, animals and property
must be assured at all times and, more specifically, measures must be taken to avoid
risks of injury due to crushing, in the area where the pinion and rack mesh, and
14 -
ARGO
any other mechanical hazards. All critical points must be protected by safety
devices in accordance with the provisions of the regulations in force.
D811627 00100_02
INSTALLATION MANUAL
CHECKING THE AUTOMATED DEVICE
Before the automated device is finally put into operation, perform the following
checks meticulously:
t .BLFTVSFBMMDPNQPOFOUTBSFGBTUFOFETFDVSFMZ
t Check the correct functioning of all safety devices (limit microswitches, photocells, sensitive edges etc.).
t .BLFTVSFUIBUUIFBOUJDSVTITZTUFNTUPQTUIFEPPSXJUIJOUIFMJNJUTQSPWJEFE
for by the standards in force.
t $IFDLUIFFNFSHFODZPQFSBUJPODPOUSPMEFWJDF
t Check the opening and closing operations with the control devices in use.
t $IFDLUIFTUBOEBSEBOEDVTUPNJTFEFMFDUSPOJDGVODUJPOJOHMPHJD.
USE OF THE AUTOMATED DEVICE
Since the automated device can be remote controlled via a remote control or
start button, hence with the door out of sight, it is vital that all safety devices be
checked frequently to ensure they are in perfect working order. If there is any
malfunction, take prompt action, calling in qualified personnel to do the job.
You are strongly advised to keep children well out of range of the automated
system. Depending on the type of control applied, the automated device must
be used in compliance with the installer’s instructions in order to operate without
endangering people, animals or property.
CONTROL
The purpose of using the automated device is to enable motorized door opening and closing. There are various options when it comes to the control system
(manual, remote control, access control with magnetic badge etc.) depending
on the installation’s needs and characteristics. See the relevant instructions for
the various control system options.
People due to use the automated device must be instructed how to control
and use it.
MAINTENANCE
When performing maintenance of any kind, cut off power to the system.
t $IFDLUIFESJWFTZTUFNBUSFHVMBSJOUFSWBMT
t $IFDLBMMTBGFUZEFWJDFTJOTUBMMFEGPSUIFEPPSBOEESJWF.
t In the event of any anomalous functioning which cannot be resolved, disconnect the power supply and contact a specialised technician (installer). Whilst
the automation is out of order, activate the manual release to allow manual
opening and closing.
SCRAPPING
WARNING! Employ the services of qualified personnel only. Materials must be
disposed of in accordance with the regulations in force. There are no particular
hazards or risks involved in scrapping the automated system. For the purpose
of recycling, it is best to separate dismantled parts into like materials (electrical
parts - copper - aluminium - plastic - etc.).
DISMANTLING
WARNING! Employ the services of qualified personnel only.
If the automated system is being dismantled in order to be reassembled at another
site, you are required to:
t $VUPòUIFQPXFSBOEEJTDPOOFDUUIFXIPMFFYUFSOBMFMFDUSJDBMTZTUFN
t 4FFUPUIFSFQMBDFNFOUPGBOZDPNQPOFOUTUIBUDBOOPUCFSFNPWFEPSIBQQFO
to be damaged.
D811627 00100_02
INSTALLATION MANUAL
2) GENERAL INFORMATION
Actuator for motorizing residential and industrial sectional doors.
Its compact design and mounting versatility mean the drive can be applied in
different ways.
3) TECHNICAL SPECIFICATIONS
Power supply:
230V ±10%, 50/60Hz (*)
Max. power input:
70W
Limit switch:
Electronic ENCODER model
Output shaft MAX. 18 rpm
Courtesy light:
24V bulb ~ max. 25W, E14
Operating temperature range:
-15°C / +55°C
Max. door size:
20 m2
Max. torque:
55 Nm
Lubrication:
Lifetime greased
Knob-operated mechanical release
Protection rating:
IP 40
Noise level:
<70dBA
Operator weight:
10 kg
Dimensions:
See Fig. H
Accessories power supply:
24V~ (180 mA)
24V max 25W
Fuses:
See Fig. D
Built-in Rolling-Code radio-receiver:
frequency 433.92MHz
8) ADJUSTMENTS
RECOMMENDED ADJUSTMENT SEQUENCE:
Adjusting the limit switches (Fig. E)
Autoset (Fig. F)
Programming remote controls (Fig. G)
Setting of parameters/logic, where necessary
8.1) PARAMETERS MENU (N?P?K)
(TABLE “A” PARAMETERS)
Manual operation:
Flashing light connection:
7.1) SAFETY DEVICES
Note: only use receiving safety devices with free changeover contact.
Fig. L:
Connection of 1 untested device (photocell or safety edge).
Fig. M: Connection of 1 tested device (photocell or safety edge).
Fig. N: Connection of 2 tested devices (photocells or safety edges). This connection is made possible via the SCS-IO optional module only.
8.2) LOGIC MENU (JMEGA)
(TABLE “B” LOGIC)
8.3) RADIO MENU (0"'-)
Logic
?BBQR?PR
Add 2ch Key
associates the desired key with the 2nd radio channel command
PC?B
Read
Checks a key of a receiver and, if memorized, returns the
number of the receiver in the memory location (from 01 to
64) and number of the key (T1-T2-T3 or T4).
CP?QC
Erase List
WARNING! Erases all memorized remote controls from
the receiver’s memory.
AMB06
Read receiver code
Displays receiver code required for cloning remote controls.
SI
ON = Enables remote programming of cards via a previously memorizedW LINK transmitter. It remains enabled for 3 minutes
from the time the W LINK remote control is last pressed.
OFF=W LINK programming disabled.
.
4) REMOVING THE COVER Fig. A
5) TUBE ARRANGEMENT Fig. B
6) INSTALLING THE OPERATOR Fig. C
5) CABLE ENTRY FIG. I
6) MANUAL RELEASE (See USER GUIDE -FIG. Y-).
---------------------------------------------------------7) WIRING
TERMINAL
DESCRIPTION
JP2
Transformer wiring
JP10
Motor wiring
1-2
Antenna input for built-in radio-receiver board (1:BRAIDING 2:
SIGNAL)
3-4
START/OPEN INPUT (N.O.)
3-5
STOP input (N.C.) If not used, leave jumper inserted
3-6
PHOTOCELL input (N.C.) If not used, leave jumper inserted
3-7
SAFETY EDGE input (N.C.) If not used, leave jumper inserted
8-9
24 V~ output for flashing light (max. 25 W)
10-11
24V~ max. 180mA output - power supply to photocells or other devices.
12-13
24V~ Vsafe max. 180mA output - power supply to transmitters
photocells with test.
14-15
(NO contact) / Output 1 height programmable
16-17
PARTIAL OPENING/CLOSE input (N.O.)
1-2 (SCS-IO)
PHOT-FAULT input (NO). Input for photocells equipped with NO
test contact.
1-3 (SCS-IO)
BAR-FAULT input (NO). Input for safety edges equipped with NO
test contact.
4-5 (SCS-IO)
(NO contact) / Output 2 Height programmable
6-7 (SCS-IO)
Gate open light/2nd radio channel output (NO contact)
Add Start Key
associates the desired key with the Start command
?BBAF
(*) Special supply voltages to order.
Usable transmitter versions:
All ROLLING CODE transmitters compatible with
Description
-
IMPORTANT NOTE: THE FIRST TRANSMITTER MEMORIZED MUST BE
IDENTIFIED BY ATTACHING THE KEY LABEL (MASTER).
In the event of manual programming, the first transmitter assigns the RECEIVER’S
KEY CODE: this code is required to subsequently clone the radio transmitters.
The Clonix built-in on-board receiver also has a number of important advanced
features:
t $MPOJOHPGNBTUFSUSBOTNJUUFSSPMMJOHDPEFPSöYFEDPEF
t $MPOJOHUPSFQMBDFUSBOTNJUUFSTBMSFBEZFOUFSFEJOSFDFJWFS
t 5SBOTNJUUFSEBUBCBTFNBOBHFNFOU
t 3FDFJWFSDPNNVOJUZNBOBHFNFOU
To use these advanced features, refer to the universal handheld programmer’s
instructions and to the CLONIX Programming Guide, which come with the universal handheld programmer device.
8.4) LANGUAGE MENU (J?LES?EC)
Used to set the programmer’s language on the display.
8.5) DEFAULT MENU (BCD?SJR)
Restores the controller’s default factory settings.
8.6) AUTOSET MENU (SRMQCR) (Fig. F)
t .PWFUIFEPPSUPUIFDMPTFEQPTJUJPO
t -BVODIBOBVUPTFUPQFSBUJPOCZHPJOHUPUIFSFMFWBOUNFOVPOUIF7&/&3&
D panel.
t "TTPPOBTZPVQSFTTUIF0,CVUUPOUIFiwNFTTBHFJTEJTQMBZFEBOE
the control unit commands the door to perform a full cycle (opening followed
by closing), during which the minimum torque value required for the door to
move is set automatically.
During this stage, it is important to avoid breaking the photocells’ beams and
not to use the START and STOP commands or the display.
Once this operation is complete, the control unit will have automatically set
the optimum torque values. Check them and, where necessary, edit them as
described in the programming section.
WARNING: Check that the force of impact measured at the points
provided for by standard EN 12445 is lower than the value laid down
by standard EN 12453.
ARGO -
15
Warning!! While the autoset function is running, the obstacle detection
function is not active. Consequently, the installer must monitor the
automated system’s movements and keep people and property out of range
of the automated system.
8.7) LIMIT SWITCH ADJUSTMENT MENU (*15"() (Fig . E)
Limit switch adjustment procedure:
1) Go to L.SW ADJ and confirm with OK.
2) The display reads CLOSE. Use the UP and DOWN keys to move the door to the
closing limit switch position. Confirm with OK. The display reads PRG.
3) If prompted by the display, turn the adjustment ring: anticlockwise if the display
reads UP; clockwise if the display reads DOWN. Once you have reached the
correct position, the display reads OK. Confirm with the OK key. The display
reads PRG.
4) The display reads OPEN. Use the UP and DOWN keys to move the door to the
opening limit switch position. Confirm with OK. The display reads PRG.
If the display reads KO, it means adjustment was not successful.
This may be caused by:
- the ESC key being pressed before adjustment was completed
- stored travel being too short
9) SCS OPTIONAL MODULES
9.1) SERIAL CONNECTION VIA SCS1 CARD (Fig. O)
The VENERE D control panel’s special serial inputs and outputs (SCS1) make the
centralized connection of a number of automated devices possible. That way,
all the automated devices connected can be opened or closed with a single
command.
Connect all VENERE D control panels using twisted pair cabling only, proceeding
as shown in the diagram in Fig. O.
When using a telephone cable with more than one pair, it is essential to use wires
from the same pair.
The length of the telephone cable between one unit and the next must not
be greater than 250 m.
At this point, each VENERE D control panel needs to be configured appropriately,
starting by entering a MASTER control panel that will have control over all the
others, which therefore have to be set as SLAVE units (see logic menu).
Also set the Zone number (see parameters menu) in the range 0 to 127.
The zone number allows you to create groups of automated devices, each of which
answers to the Zone Master. Each zone can have only one Master: the Master of
zone 0 also controls the Slaves of the other zones.
9.2) Interface with WIEGAND systems via SCS-WIE module.
Refer to the SCS-WIE module’s instructions.
9.3) Expanding inputs and outputs via the SCS-IO optional module.
The SCS-IO optional module can be used to add 2 inputs and 2 outputs to the
VENERE-D board (Fig. D).
To activate the connection between SCS-IO and VENERE-D, you need to plug the
SCS-IO module into the relevant connector and then set the ZONE parameter
to 129.
At this point, the 2 boards are synchronized and the SCS-IO board’s inputs/outputs
are managed by the VENERE-D board.
TABLE “A” - PARAMETERS MENU - (.0+)
Logic
RA?
MNRQJMT
AJQRQJMT
MNQNCCB
min.
max.
default
0
120
40
1
1
10
99
99
99
75
75
99
Definition
Description
Automatic Closing Time
Automatic closing time [s]
Opening motor torque
Opening torque [%]
Sets sensitivity to obstacles during opening (1=max., 99=min.) The autoset feature sets this parameter automatically to a value of 10%. The user
can edit this parameter based on how sensitive the door needs to be to
obstacles.
Closing motor torque
Closing torque [%]
Sets sensitivity to obstacles during closing (1=max., 99=min.) The autoset feature sets this parameter automatically to a value of 10%. The user
can edit this parameter based on how sensitive the door needs to be to
obstacles.
Speed during opening
Running speed during opening [%]
Sets the running speed that the door must reach during opening, as a
percentage of the maximum speed the actuator can reach. Should this
parameter be edited, it will be followed by a complete opening/closing
cycle for setting purposes (reported by the message “SET” appearing on
the display), during which obstacle detection is not enabled.
AJQNCCB
10
99
99
Speed during closing
Running speed during closing [%]
Sets the running speed that the door must reach during closing, as a
percentage of the maximum speed the actuator can reach. Should this
parameter be edited, it will be followed by a complete opening/closing
cycle for setting purposes (reported by the message “SET” appearing on
the display), during which obstacle detection is not enabled.
BGQRQJMSB
5
99
10
Slow-down distance
Slow-down distance [%]
Sets the approach distance to reach the travel limit. This distance is travelled at low speed.
N?PRG?JMNCLGLE
10
99
40
Partial opening
Partial opening [%]
Adjusts partial opening percentage compared to total opening in “Partial open” mode.
XMLC
0
129
0
Zone
Zone []
Sets the zone number of the door included in the serial connection for
commands via central controllers. Zona=128 not used.
Zone=129 Use of optional SCS -I0 module.
MSRNPME
1
99
50
MSRNPME
1
99
50
16 -
ARGO
Output 1 height programmable
Output 2 height programmable
The output between terminals 14-15 is activated when the door exceeds
the opening percentage set with this parameter (1% = door closed, 99%
= door open).
The output between terminals 4-5 on the SCS-IO optional module is
activated when the door exceeds the opening percentage set with this
parameter (1% = door closed, 99% = door open).
D811627 00100_02
INSTALLATION MANUAL
D811627 00100_02
INSTALLATION MANUAL
TABLE “B” - LOGIC MENU - (JMEGA)
Logic
min.
max.
default
Definition
RA?
---
---
OFF
Automatic
Closing Time
ON
OFF
Switches automatic closing on
Switches automatic closing off
G@JMNCL
---
---
OFF
Block Pulses
ON
OFF
The start pulse has no effect during opening.
The start pulse has effect during opening.
ON
Switches to 3-step logic. A start pulse has the following effects:
door closed: opens
during opening: stops and switches on TCA (if configured).
door open: closes
during closing: stops and opens again
Switches to 4-step logic. A start pulse has the following effects:
door closed: opens
during opening: stops and switches on TCA (if configured)
door open: closes
during closing: stops and does not switch on tca (stop)
QRCN
---
---
OFF
3 Step
NPC?J?P
---
---
OFF
Pre-alarm
FMJBRMPSL
---
---
OFF
Deadman
Description
OFF
ON
OFF
The flashing light comes on approx. 3 seconds before the motors start.
The flashing light comes on at the same time as the motors start
ON
Deadman mode during closing: opening operation performed in automatic mode;
closing operation continues as long as the control key is held down. (CLOSE).
Pulse operation (standard)
OFF
ON:
NFMRMAMNCL
---
---
OFF
Photocells
during opening
RCQRNFMR
---
---
OFF
Photocell test
RCQR@?P
?QRCP
DGVCBAMBC
P?BGMNPME
When beam is broken, operation of the photocell is switched off during opening. During
closing, movement is reversed immediately.
OFF: When beam is broken, photocells are active during both opening and closing. When
beam is broken during closing, movement is reversed only once the photocell is cleared.
ON
OFF
Switches photocell testing on
Switches photocell testing off
If disabled (OFF), it inhibits the photocell testing function, enabling connection of
devices not equipped with supplementary test contacts.
ON
OFF
Switches safety edge testing on
Switches safety edge testing off
If disabled (OFF), it inhibits the safety edge testing function, enabling connection of
devices not equipped with supplementary test contacts
---
---
OFF
Safety edge
testing
---
---
OFF
Master/Slave
ON
OFF
Control panel is set up as the Master unit in a centralized connection system.
Control panel is set up as a Slave unit in a centralized connection system.
---
---
OFF
Fixed code
ON
OFF
Receiver is configured for operation in fixed-code mode.
Receiver is configured for operation in rolling-code mode.
ON
Enables wireless memorizing of transmitters: (Fig. K)
1- Press in sequence the hidden key (P1) and normal key (T1-T2-T3-T4) of a transmitter
that has already been memorized in standard mode via the radio menu.
2- Press within 10 sec. the hidden key (P1) and normal key (T1-T2-T3-T4) of a transmitter
to be memorized.
The receiver exits programming mode after 10 sec.: you can use this time to enter other
new transmitters.
This mode does not require access to the control panel.
Disables wireless memorizing of transmitters.
Transmitters are memorized only using the relevant Radio menu.
---
---
ON
Remote control
programming
OFF
ON
The output between terminals 6-7 on the optional SCS-10 module is set as Gate
open light: in this case, the 2nd radio channel controls pedestrian opening.
The output between terminals 6-7 on the optional SCS-10 module is set as 2nd radio
channel
QA?AF
---
---
OFF
Gate open light or
2nd radio channel
OFF
QR?PRMNCL
---
---
OFF
Selection
START - OPEN
ON
OFF
Input between terminals 3-4 works as OPEN.
Input between terminals 3-4 works as START
NCBAJMQC
---
---
OFF
Selection
PEDESTRIAN CLOSE
ON
OFF
Input between terminals 16-17 works as CLOSE.
Input between terminals 16-17 works as PEDESTRIAN
AF?LEC MR
---
---
OFF
Reversing motion
ON
OFF
Reverses motion of standard rotation (See Fig.I).
Standard rotation (See Fig.I).
ARGO -
17
FIG. Y
A
B
Verde - Green-Vert-Grün-Verde-Groen
Rosso-Red-Rouge-Rot-Rojo-Rood
38 -
ARGO
C
D811627 00100_02
MANUALE D’USO: MANOVRA MANUALE - USER’S MANUAL: MANUAL OPERATIONMANUEL D’UTILISATION: MANŒUVRE MANUELLE - BEDIENUNGSANLEITUNG: MANUELLES MANÖVERMANUAL DE USO: ACCIONAMIENTO MANUAL - GEBRUIKSHANDLEIDING: MANUEEL MANOEUVRE