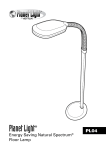
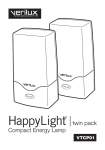
1
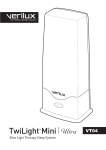
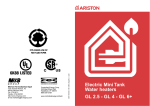
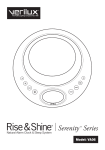
Sound
Display
Radio
Sleep
Set
Alarm
Off
VA05F
Dear Customer,
Thank you for purchasing the Verilux Rise & Shine® Natural WakeUp Light. You have received an innovative and quality manufactured
product, backed by a one-year limited warranty.
Many other healthy lighting products are available through our catalog
and online. To request a free copy of our catalog, call our toll-free
number 1-800-786-6850. You may also visit us on the web at
www.verilux.com to learn more about all our quality Verilux products.
As a Verilux customer, your satisfaction means everything to us. We
look forward to serving you now and in the future.
Have a bright day!
Nicholas Harmon
President, Verilux, Inc.
2
Table of Contents
Important Safety Instructions . . . . . . . . . . . . . . . . . . . . . . . . . . . . . . . . . . . . . . . . 4
General Precautions . . . . . . . . . . . . . . . . . . . . . . . . . . . . . . . . . . . . . . . . . . . . . . . 5
FCC Compliance . . . . . . . . . . . . . . . . . . . . . . . . . . . . . . . . . . . . . . . . . . . . . . . . . . 6
Features. . . . . . . . . . . . . . . . . . . . . . . . . . . . . . . . . . . . . . . . . . . . . . . . . . . . . . . . . 6
Set-up Instructions
Unpacking . . . . . . . . . . . . . . . . . . . . . . . . . . . . . . . . . . . . . . . . . . . . . . . . . . 7
Selecting a Location . . . . . . . . . . . . . . . . . . . . . . . . . . . . . . . . . . . . . . . . . . 7
Display and Controls . . . . . . . . . . . . . . . . . . . . . . . . . . . . . . . . . . . . . . . . . . . . . . . 8
Operating Instructions
Turning on the Lamp . . . . . . . . . . . . . . . . . . . . . . . . . . . . . . . . . . . . . . . . . 11
Turning off the Lamp . . . . . . . . . . . . . . . . . . . . . . . . . . . . . . . . . . . . . . . . . 11
Playing Natural Soundscapes . . . . . . . . . . . . . . . . . . . . . . . . . . . . . . . . . . 11
Setting the Clock . . . . . . . . . . . . . . . . . . . . . . . . . . . . . . . . . . . . . . . . . . . . 11
Listening to the Radio . . . . . . . . . . . . . . . . . . . . . . . . . . . . . . . . . . . . . . . . 11
Connecting the External FM Antenna . . . . . . . . . . . . . . . . . . . . . . . . . . . . 12
Setting the Alarm and Sleep Cycle Brightness . . . . . . . . . . . . . . . . . . . . . 12
Displaying Alarm Settings . . . . . . . . . . . . . . . . . . . . . . . . . . . . . . . . . . . . . 13
Snooze . . . . . . . . . . . . . . . . . . . . . . . . . . . . . . . . . . . . . . . . . . . . . . . . . . . . 13
Sunrise Simulator . . . . . . . . . . . . . . . . . . . . . . . . . . . . . . . . . . . . . . . . . . . 13
Starting a Sleep Cycle . . . . . . . . . . . . . . . . . . . . . . . . . . . . . . . . . . . . . . . . 13
Display Dimmer . . . . . . . . . . . . . . . . . . . . . . . . . . . . . . . . . . . . . . . . . . . . . 13
Replacing the Bulb . . . . . . . . . . . . . . . . . . . . . . . . . . . . . . . . . . . . . . . . . . . . . . . 14
Troubleshooting
Resetting the Rise & Shine®. . . . . . . . . . . . . . . . . . . . . . . . . . . . . . . . . . . . 14
Care and Maintenance
Cleaning . . . . . . . . . . . . . . . . . . . . . . . . . . . . . . . . . . . . . . . . . . . . . . . . . . . 15
Technical Specifications . . . . . . . . . . . . . . . . . . . . . . . . . . . . . . . . . . . . . . . . . . . 15
Warranty . . . . . . . . . . . . . . . . . . . . . . . . . . . . . . . . . . . . . . . . . . . . . . . . . . . . . . . 16
3
Important Safety Instructions
CAUTION:
THIS DEVICE MUST BE CONNECTED TO A MAINS SOCKET OUTLET WITH A
PROTECTIVE EARTHING CONNECTION.
TO REDUCE THE RISK OF ELECTRIC SHOCK, DO NOT REMOVE ANY
COMPONENTS. THERE ARE NO SERVICEABLE PARTS INSIDE.
TO REDUCE THE RISK OF FIRE OR ELECTRIC SHOCK, DO NOT EXPOSE THIS
UNIT TO RAIN OR MOISTURE.
The lightning flash with arrowhead symbol, within an equilateral
triangle, is intended to alert the user to the presence of uninsulated
dangerous voltage within the system enclosure that may be of
sufficient magnitude to constitute a risk of electric shock.
The exclamation point within an equilateral triangle, as marked on
the system, is intended to alert the user to the presence of important
operating and maintenance instructions in this installation guide.
WARNING: TO REDUCE THE RISK OF FIRE, ELECTRIC SHOCK OR PERSONAL
INJURY:
•
Read these instructions before using this lamp.
•
Keep these instructions for future reference.
•
Heed all warnings.
•
Follow all instructions.
•
Do not use this appliance near water.
•
Refer all servicing to qualified service personnel.
•
Servicing is required when the apparatus has been damaged in any way, such
as power-supply cord or plug is damaged, liquid has been spilled or objects
have fallen into the apparatus, the apparatus has been exposed to rain or
moisture, does not operate normally, or has been dropped.
•
The mains plug is used as the disconnecting device, which shall remain
readily operable.
•
Turn off/unplug and allow to cool before replacing bulb, cleaning or other
maintenance.
•
Light bulbs get HOT quickly! Do not touch the bulb while the lamp is on.
•
Do not look directly at the lighted bulb.
•
Do not operate the lamp in close proximity to flammable or combustible
vapors, such as aerosol (spray) products or where oxygen is being
administered.
•
Use only the type of bulb and maximum wattage indicated by the
manufacturer.
4
Important Safety Instructions — continued
•
Never cover the bulb when it is in operation.
•
Do not use this lamp in damp/humid or wet locations.
•
For indoor use only.
•
Clean only with dry cloth. Do not use any chemical solvents or detergents.
•
Do not block any ventilation openings. Install in accordance with the
manufacturer’s instructions.
•
Do not place near any heat sources such as radiators, heat registers, stoves
or other apparatus (including amplifiers) that produce heat.
•
Do not defeat the safety purpose of the polarized or grounding-type plug. A
polarized plug has two blades with one wider than the other. A grounding plug
has two blades and a third grounding prong. The wider blade or third prong
is provided for your safety. If the provided plug does not fit in your outlet,
consult an electrician for replacement of the obsolete outlet.
•
Protect the power cord from being walked on or pinched, particularly at plugs,
convenience receptacles and the point where they exit from the lamp.
•
Only use attachments/accessories specified by the manufacturer.
•
Unplug this lamp during lightning storms or when unused for long periods.
•
Only use a bulb rated 120 VAC, 60 Watts.
•
If the lamp has been damaged in any way, such as the power cord or plug
is damaged, liquid has been spilled or objects have fallen into the lamp, the
lamp has been exposed to rain or moisture, does not operate normally, or has
been dropped, it should not be operated.
•
Modifications not authorized by the manufacturer will void the warranty and
may result in personal injury.
SAVE THESE INSTRUCTIONS
General Precautions
•
Avoid placing this lamp in areas that are exposed to direct sunlight or close to
heat-radiating products, such as heaters. Do not place the lamp on the top of
appliances that radiate heat.
•
Avoid placing the lamp in areas that are dusty, humid/moist, lack ventilation or
are subject to constant vibration.
•
Not for use with light dimmers, timers, motion detectors or extension cords.
•
Do not use any lubricating agent in the bulb assembly.
•
Close supervision is necessary when this appliance is used by or near
children or disabled persons.
5
General Precautions — continued
WARNING: This lamp is supplied with a shade designed specifically
for use with this product. Use of any other shade other than the one
supplied by the manufacturer may pose a SAFETY HAZARD.
CAUTION: If outer glass of the bulb breaks, avoid touching any metal
components due to potential shock. The bulb may continue to light,
however, immediately discontinue use, turn power off and remove the
bulb. Let bulb cool before removal to avoid potential burn.
FCC Compliance
This device complies with part 15 of the FCC Rules. Operation is subject to
the following two conditions: (1) this device may not cause harmful interference, and (2) this device must accept any interference received, including
interference that may cause undesired operation.
This equipment has been tested and found to comply with the limits for a Class
B digital device, pursuant to part 15 of the FCC Rules. These limits are designed
to provide reasonable protection against harmful interference in a residential
installation. This equipment generates, uses and can radiate radio frequency
energy and if not installed and used in accordance with the instructions, may
cause harmful interference to radio communications. However, there is no
guarantee that interference will not occur in a particular installation.
If this equipment does cause harmful interference to radio or television reception,
which can be determined by turning the equipment off and on, the user is
encouraged to try to correct the interference by one or more of the following
measures:
•
Reorient or relocate the receiving antenna.
•
Increase the separation between the equipment and receiver.
•
Connect the equipment into an outlet on a circuit different from that to which
the receiver is connected.
•
Consult the dealer or an experienced radio/TV technician for help.
Features
The Verilux® Rise & Shine® Natural Wake-Up Light aligns the body’s circadian
rhythms that regulate normal sleeping and waking patterns. Synchronized sleep
and wake programs provide the body with cues to fall asleep naturally, sleep
soundly and wake refreshed and revitalized. The harmonious blend of light and
sound therapy naturally directs the body to energized waking and healthy sleep
patterns.
6
Features — continued
•
Light and sound gradually increase to wake you gently, feeling refreshed and
re-energized
•
Wake to your choice of four natural soundscapes or your favorite FM radio
station
•
Select from 20 levels of light intensity
•
Sleep mode feature gradually dims the light over a 5, 15, 30 or 60 minute
period of time
•
Dual alarms with snooze feature
Set-up Instructions
Unpacking
Please check the shipping carton for the following items:
•
Verilux Rise & Shine® Natural Wake-Up Light
•
External FM Antenna
•
Instruction Manual
•
A19 120V 60W E26 Clear Bulb (located inside lamp shade)
Note: With the unit not plugged into a power outlet, open the lamp shade by
depressing the button on rear of lamp and gently lifting the shade off the base.
Install bulb by screwing securely into socket. Replace the shade by aligning it
with the base and pressing down until the shade clicks into place.
Selecting a Location
•
Place your Rise & Shine on a table or other flat surface near your bedside.
•
For best performance, place your Rise & Shine within two feet of a wall and
avoid placing directly in a corner.
Note: Avoid placing your Rise & Shine on a metal surface, which could interfere
with FM reception.
Note: Avoid placing this lamp in areas that are exposed to direct sunlight or close
to heat-radiating products, such as heaters. Do not place the lamp on the top of
appliances that radiate heat.
7
Display and Controls
1. Light Brightness Buttons
2. Volume Buttons
3.
Sound
Button
4.
Radio
Button
5. Back
Buttons
and Forward
6.
Set
Button
7.
Sleep
Button
8.
9.
10.
Display Button
(Off / Normal / Bright)
Off
Button
Alarm
Button
11. LCD Display
Note: External antenna jack
and button to release shade
are located on the rear
panel of the Rise & Shine®.
Sound
Display
Radio
Sleep
Set
Off
Alarm
11
2
3
4
1
Sound
Display
8
Radio
Sleep
7
6
Set
Alarm
5
10
8
Off
9
Display and Controls — continued
1. Light Brightness Buttons
The Up and Down light brightness buttons
are used
to set the highest final brightness of the Wake Cycle or
the initial (highest) brightness of the Sleep Cycle. The
brightness can be set to any one of 20 levels.
The brightness buttons are also used to adjust the
brightness when you use the Rise & Shine® as a lamp.
2. Volume Buttons
are used to set
The Up and Down volume buttons
the highest final volume of the Wake Cycle or the initial
volume of the Sleep Cycle. The volume can be set to
any one of 20 levels.
3. Sound Button
When used with other Alarm settings, the Sound button
Sound lets you choose one of four natural soundscapes
by pressing the button repeatedly to select a particular
sound. If pressed when not setting an alarm, the Sound
button begins playing the last selected sound. You can
select a particular sound by pressing the Back
and
Forward
buttons.
Pressing the Sound button again, or pressing the Off
button Off turns off the soundscape.
4. Radio Button
The Radio button
Radio
turns the FM radio on or off.
5. The Back and Forward Buttons
The Back
button and the Forward
button
are used to set the time of day, the alarm time or to
advance between options.
9
Display and Controls — continued
6. Sleep Button
Pushing the Sleep button Sleep begins a Sleep Cycle
with a default time of 5 minutes. Pressing the Sleep
button repeatedly allows you to select a Sleep Cycle
length of 0 (off), 5, 15, 30 or 60 minutes. The Sleep
Cycle you’ve chosen begins about two seconds after
your final button press.
7. Display Button (Off / Normal / Bright)
The Display button Display controls the brightness
of the Rise & Shine® LCD display backlight. Press
repeatedly to choose between Off, Normal and Bright.
If the backlight is off, pressing any other button will
momentarily set the backlight to normal.
8. Off Button
The Off button Off turns the FM radio, natural
soundscapes and the light off. The Off button can also
be used to stop a Sleep or Wake Cycle.
9. Alarm Button
Pressing the Alarm button
Alarm
cycles the display between:
•
Alarm 1 Displayed (AL1)
•
Alarm 2 Displayed (AL2)
•
Alarm 1 and Alarm 2 Displayed (AL1 and AL2)
10. LCD Display
Audio
Light
Alarm 1 Icon
Alarm 2 Icon
Real Time Clock
Sleep Delay
Time Icons
FM Frequency
Natural Soundscape Icons
10
Operating Instructions
Press to
turn on
Turning On the Lamp
To turn on the lamp:
•
Press the top of the Rise & Shine® lamp shade on the “Light/
Snooze” label.
You may now adjust the brightness using the up and down
brightness buttons located to the right of the display.
Note: Any change you make to the lamp’s brightness becomes
the new “default” brightness.
Turning Off the Lamp
To turn off the lamp:
•
Press the top of the Rise & Shine lamp shade on the “Light/Snooze” label.
Playing a Natural Soundscape
Press the Sound button to play one of four nature
sounds. Press the Back
or the Forward
button
repeatedly to cycle between the four available sounds. If
the Sound button is pressed when not setting an alarm, the
button begins to play the last selected sound. Pressing
the Sound button again or pressing the Off button turns off
the nature sound.
Setting the Clock
1. Press and hold the Set button for 3 seconds to enter
the clock setting mode. The clock digits will blink.
2. Press and hold the Back
button or the Forward
button to adjust the time. After your last button
press, the display will continue to blink for a few
seconds, then display the newly set time.
Listening to the Radio
To listen to the FM radio:
1. Press the
Radio
button to turn on the radio.
2. Use the Back
button or the Forward
button
to select a frequency. If you press and hold the
Back
button or the Forward
button, the radio will stop on the next
strongest frequency.
3. Use the Up and Down volume buttons to adjust the volume.
4. To turn the radio off, press the
Radio
button or press the
11
Off
button.
Operating Instructions — continued
To improve FM reception, you may wish to use the included external FM antenna.
Connecting the External FM Antenna:
1. Plug the 3.5 mm (1/8") plug of the FM antenna into the EXTERNAL ANTENNA
jack on the rear panel.
2. Straighten the antenna and position to establish optimum reception.
Setting the Alarm
Note: It is helpful to read through the entire section on
setting the alarm before you begin.
1. Press and hold the Set button for 3 seconds to enter
the clock setting mode. Press Set again to enter the
alarm setting mode.
•
The alarm icons and sleep icon will flash on the left of the display. They
are, from top down: AL1 (Alarm 1), AL2 (Alarm 2) and Sleep . You may
set two alarms, each with a specific alarm time. You may also choose a
brightness level for the start of the sleep cycle.
2. Select AL1 or AL2 or by pressing the Back
button or the Forward
button repeatedly. Press the Set button to confirm the desired selection. The
chosen icon will flash.
3. If AL1 or AL2 is chosen, press the Back
button or the Forward
button repeatedly to adjust the alarm’s time. Press Set to confirm.
4. Press the Back
button or the Forward
button to select between FM
radio mode or natural soundcape mode and press the Set button to confirm.
•
When the FM radio mode is selected, press the Back
button or the
Forward
button repeatedly to search for the desired radio station.
Then press “set” to the selected radio station.
•
When the natural soundcape mode is selected, press the Back
button or the Forward
button repeatedly to select bird, frog, river or
wave. Then press Set to confirm the desired soundcape.
5. The Audio icon will flash and the FM Radio or selected natural soundcape
will play. Press the Back
button or the Forward
button repeatedly to
adjust the alarm volume from 0 to 20. Press Set to confirm.
6. The light brightness icon will flash and the light will turn on. Press the Back
button or the Forward
button on the right side repeatedly to adjust
the light brightness and press Set to confirm and exit.
Setting Sleep Cycle Brightness
1. Press and hold the Set button for 3 seconds to enter the clock setting mode.
Press Set again to enter the alarm setting mode.
12
Operating Instructions — continued
2. Select by pressing the Back
button or the Forward
button
repeatedly. Press the Set button to confirm the desired selection. The chosen
icon will flash.
3. When the Sleep icon is chosen, the lamp brightness will increase to the last
level set. Use the Back
button or the Forward
button to set a new
final brightness level for the Sleep Cycle.
•
Press the
Set
button to confirm.
Displaying Alarm Settings
Press the
•
•
•
Alarm
button repeatedly to cycle between displaying:
AL1 – Alarm 1 Setting
AL2 – Alarm 2 Setting
Both Alarms
Press to
Snooze
Snooze
When the alarm sounds, you may press down on the top of the
Rise & Shine® – as you would a button – to Snooze.
Sunrise Simulator
Beginning 15 minutes before the alarm set time, the light will
gradually increase in intensity to simulate sunrise. There are 20
possible light levels. The final brightness level, which may be any
level between 1 and 20, is set as described on page 12 under Setting the Alarm
and Sleep Cycle Brightness.
Starting a Sleep Cycle
A sleep cycle simulates diminishing sunset lighting by beginning with the lamp on
maximum brightness, or the highest brightness you previously set, with the light
progressively dimming for the duration of the cycle until the lamp is off at the end
of the cycle.
You may start a sleep cycle whenever you wish:
button to begin a sleep cycle.
•
Press the
•
The minutes remaining in the sleep cycle are shown on the display.
•
Press the
•
To manually end the Sleep cycle, press the Off Button, or press the Sleep button
repeatedly until you reach “00”. You will need to manually turn the lamp and/or
radio on, if you wish to do so.
Sleep
Sleep
button repeatedly to choose 0, 5, 15, 30 or 60 minutes.
Display Dimmer
To adjust the LCD display brightness to Off, Normal or Bright setting, press the
Display button repeatedly for the desired brightness.
13
Replacing the Bulb
Your Rise & Shine® uses a standard 60 Watt incandescent bulb. To
replace the bulb:
1. Make sure the lamp is unplugged and enough time has passed
to allow the bulb to cool.
2. Press the release button at the rear of the lamp shade and gently
pull the shade up to remove.
3. Unscrew the bulb and replace with a standard 60 Watt
incandescent bulb.
4. Align the shade and press down until the rear of the shade clicks
into place.
Note: Do not use a bulb rated higher than 60 watts.
Troubleshooting
Resetting the Rise & Shine
Problem
The device is not working
correctly.
Unplug from power, wait 30 seconds, then
plug in again.
No light.
• Press the
buttons.
• Replace the bulb if needed.
• Verify that the lamp icon is shown on the
display. If it is not shown, press down on
the lamp shade to turn on the lamp.
No radio or no sound.
• If the Radio icon
display, press Radio .
is not shown on the
• Increase volume.
• Attach the external antenna and vary the
antenna location for best reception.
Alarm doesn’t function.
• Verify the correct AM/PM setting.
• Verify that the alarm is activated (an alarm
is activated if both the alarm, AL1 or AL2,
and the time are shown).
14
Care and Maintenance
Cleaning
Disconnect the Rise & Shine® from the power outlet. Use only a dry, soft coth to
clean. Do not use any chemical solvents or detergents.
Technical Specifications
Rise & Shine Natural Wake-Up Light
Overall Dimensions
Weight 2.4 lbs
Dimensions 8.75" x 10.25" x 6.75"
LCD Display
Dimensions 2.75" x 1.75"
Environment
Operating Temperature: 15°C to 35°C; 56°F to 95°F
Storage Temperature: 0°C to 40°C; 32°F to 104°F
Relative Humidity: 5% to 95% non-condensing
Bulb
Maximum 60 Watt Incandescent
Power
Input Power: 120 VAC, 60Hz
ETL Listed
Cord/Plug
Plug Type: Polarized/USA two prong
Cord Length: 72" (6 Feet)
Intellectual Property
Patent: 6,236,622 and D553,777
Trademark: Rise & Shine®
Safety
ETL Listed
Warranty
1–Year Limited
15
One Year Limited Warranty
ATTENTION! ONCE OPENED, PLEASE DO NOT RETURN THIS PRODUCT TO THE STORE
WHERE IT WAS PURCHASED FOR REPAIR OR REPLACEMENT!
Many questions may be answered by visiting www.verilux.com, or you may call our Customer
Service Department at 800-786-6850 during normal business hours.
This limited warranty is provided by: Verilux, Inc., 340 Mad River Park, Waitsfield, VT 05673
Verilux warrants this product to be free from defects in material and workmanship for a period
of one year from the date of the original retail purchase from Verilux or an authorized Verilux
distributor. Proof of purchase is required for all warranty claims. During the limited warranty
period, Verilux, Inc. will, at its option, repair or replace defective parts of this product, at no
charge to the customer, subject to the following limitations: This limited warranty does not
include any postage, freight, handling, insurance or delivery fees. This warranty does not cover
damage, defect or failure caused by or resulting from accident, external destruction, alteration,
modification, abuse, misuse or misapplication of this product.
This warranty does not cover damage to the product resulting from return shipping or handling.
The use of shipping insurance is recommended to help protect your product.
Return Authorization is required for all returns. To obtain a Return Authorization, please
contact the Verilux Customer Service Department at 800-786-6850.
If, during the first year of ownership, this product fails to operate properly, it should be returned
as specified at www.verilux.com/warrantyreplacement or as instructed by a Verilux customer
service representative at 800-786-6850.
Note: Verilux recommends using a quality surge suppressor on all electronics equipment.
Voltage variations and spikes can damage electronic components in any system. A quality
suppressor can eliminate the vast majority of failures attributed to surges and may be
purchased at electronics stores.
Due to ongoing improvements, actual product may have slight variations from the product described in this manual.
Please visit our web site at www.verilux.com or call our Customer Service Department at
1-800-786-6850
Representatives are available 8 a.m. – 10 p.m. M – S, 9 a.m. – 8 p.m. Sunday EST
340 Mad River Park, Waitsfield, VT 05673
VA05F-MAN-Rev11
Printed in China for Verilux, Inc.
© Copyright 2010 Verilux, Inc. All rights reserved.
Sound
Display
Radio
Sleep
Set
Alarm
Off
VA05F
Chère cliente/Cher client,
Merci d’avoir acheté la lampe de réveil naturel Rise & Shine® de
Verilux. Vous avez reçu un produit innovant de qualité, couvert par une
garantie limitée d’un an.
Beaucoup d’autres produits d’éclairage sains sont disponibles sur
notre catalogue et en ligne. Pour obtenir un exemplaire gratuit de
notre catalogue, veuillez composer le numéro gratuit 1-800-786-6850.
Vous pouvez également visiter notre site Web à www.verilux.com pour
en apprendre davantage sur tous nos produits de qualité Verilux.
En tant que client Verilux, nous accordons beaucoup d’importance à
votre satisfaction. Nous sommes fiers de pouvoir être à votre service
aujourd’hui et demain.
Bonne journée lumineuse!
Nicholas Harmon
Président, Verilux, Inc.
2
Table des matières
Directives importantes de sécurité . . . . . . . . . . . . . . . . . . . . . . . . . . . . . . . . . . . . 4
Précautions générales . . . . . . . . . . . . . . . . . . . . . . . . . . . . . . . . . . . . . . . . . . . . . . 5
Conformité à la FCC . . . . . . . . . . . . . . . . . . . . . . . . . . . . . . . . . . . . . . . . . . . . . . . 6
Caractéristiques . . . . . . . . . . . . . . . . . . . . . . . . . . . . . . . . . . . . . . . . . . . . . . . . . . 6
Instructions pour la mise en marche
Déballage . . . . . . . . . . . . . . . . . . . . . . . . . . . . . . . . . . . . . . . . . . . . . . . . . . . 7
Choisir un emplacement . . . . . . . . . . . . . . . . . . . . . . . . . . . . . . . . . . . . . . . 7
Affichage et commandes . . . . . . . . . . . . . . . . . . . . . . . . . . . . . . . . . . . . . . . . . . . 8
Mode d’emploi
Allumer la lampe . . . . . . . . . . . . . . . . . . . . . . . . . . . . . . . . . . . . . . . . . . . . 11
Éteindre la lampe . . . . . . . . . . . . . . . . . . . . . . . . . . . . . . . . . . . . . . . . . . . . 11
Écouter un son de la nature. . . . . . . . . . . . . . . . . . . . . . . . . . . . . . . . . . . . 11
Réglage de l’horloge . . . . . . . . . . . . . . . . . . . . . . . . . . . . . . . . . . . . . . . . . 11
Écouter la radio . . . . . . . . . . . . . . . . . . . . . . . . . . . . . . . . . . . . . . . . . . . . . 11
Branchement de l’antenne FM externe . . . . . . . . . . . . . . . . . . . . . . . . . . . 12
Réglage du réveil et de la luminosité pendant le cycle d’endormissement 12
Affichage des réglages de l’alarme . . . . . . . . . . . . . . . . . . . . . . . . . . . . . . 13
Rappel d’alarme . . . . . . . . . . . . . . . . . . . . . . . . . . . . . . . . . . . . . . . . . . . . 13
Simulation du lever du soleil . . . . . . . . . . . . . . . . . . . . . . . . . . . . . . . . . . . 13
Lancement d’un cycle de sommeil . . . . . . . . . . . . . . . . . . . . . . . . . . . . . . 13
Variation de la luminosité de l’affichage . . . . . . . . . . . . . . . . . . . . . . . . . . 13
Remplacement de l’ampoule . . . . . . . . . . . . . . . . . . . . . . . . . . . . . . . . . . . . . . . 14
Dépannage
Nouveau réglage de la lampe Rise & Shine® . . . . . . . . . . . . . . . . . . . . . . . 14
Soins et entretien
Nettoyage . . . . . . . . . . . . . . . . . . . . . . . . . . . . . . . . . . . . . . . . . . . . . . . . . 15
Caractéristiques techniques . . . . . . . . . . . . . . . . . . . . . . . . . . . . . . . . . . . . . . . . 15
Garantie . . . . . . . . . . . . . . . . . . . . . . . . . . . . . . . . . . . . . . . . . . . . . . . . . . . . . . . . 16
3
Instructions importantes de sécurité
AVERTISSEMENT :
CET APPAREIL DOIT ÊTRE BRANCHÉ À UNE PRISE DE COURANT ÉQUIPÉE
D’UNE MASSE.
POUR RÉDUIRE LES RISQUES D’ÉLECTROCUTION, NE DÉMONTEZ PAS LES
DIFFÉRENTS COMPOSANTS. IL N’EXISTE AUCUNE PIÈCE RÉPARABLE PAR
L’UTILISATEUR À L’INTÉRIEUR DE L’APPAREIL.
POUR RÉDUIRE LES RISQUES D’INCENDIE OU D’ÉLECTROCUTION,
N’EXPOSEZ PAS EXPOSER L’APPAREIL À LA PLUIE OU L’HUMIDITÉ.
Le symbole de l’éclair dans un triangle équilatéral alerte l’utilisateur
de la présence de tensions dangereuses dans le boîtier de l’appareil
suffisamment élevées pour provoquer une électrocution.
Le point d’exclamation dans un triangle équilatéral, tel qu’affiché sur
l’appareil, attire l’attention de l’utilisateur sur la présence d’instructions
importantes de fonctionnement et d’entretien dans ce manuel
d’installation.
AVERTISSEMENT : AFIN DE RÉDUIRE LE RISQUE D’INCENDIE,
D’ÉLECTROCUTION OU DE BLESSURE :
•
•
•
•
•
•
•
•
•
•
•
•
•
•
Lisez ces instructions avant d’utiliser la lampe.
Conservez ces instructions pour vous y référer ultérieurement.
Tenez compte de tous les avertissements.
Suivez toutes les instructions.
Ne pas utiliser cet appareil près de l’eau
Confier toute réparation à un personnel qualifié.
Un entretien est requis lorsque l’appareil a été endommagé de quelque
façon que ce cordon d’alimentation ou la fiche est endommagé, liquide a été
renversé ou des objets sont tombés dans l’appareil, l’appareil a été exposé à
la pluie ou à l’humidité, ne fonctionne pas normalement , Ou s’il est tombé.
La prise secteur est utilisée comme dispositif de déconnexion, qui doit rester
facilement accessible.
Éteignez, débranchez et laissez refroidir l’appareil avant de remplacer
l’ampoule, de le nettoyer ou d’en effectuer l’entretien.
Les ampoules S’ÉCHAUFFENT rapidement. Ne touchez pas l’ampoule
lorsque la lampe est allumée.
Ne regardez pas directement l’ampoule allumée.
N’utilisez pas la lampe à proximité de vapeurs ou de gaz inflammables,
comme les aérosols (vaporisateurs), ni à proximité d’une bouteille d’oxygène.
Utilisez uniquement le type d’ampoule et la puissance maximale indiqués par
le fabricant.
Ne couvrez jamais l’ampoule lorsqu’elle est allumée.
4
Instructions importantes de sécurité (suite)
•
•
•
•
•
•
•
•
•
•
•
•
N’utilisez pas cette lampe dans les endroits humides ou mouillés.
Lampe à usage intérieur uniquement.
Nettoyez au moyen d’un linge sec uniquement. N’utilisez pas de solvants
chimiques ou de détergents.
Évitez de bloquer les bouches de ventilation. Installez l’appareil
conformément aux instructions du fabricant.
Ne placez pas cette lampe près d’une source de chaleur, tels que radiateurs,
grilles de distribution de chauffage, cuisinières ou autres appareils (y compris
amplificateurs de chaleur) qui génèrent de la chaleur.
N’endommagez pas le système de protection des fiches polarisées ou des
fiches à prise de terre. Une fiche polarisée a deux lames dont une est plus large
que l’autre. Une fiche à prise de terre a deux lames et une troisième broche qui
relie la fiche à la terre. La lame plus large ou la troisième broche sont prévues
pour assurer votre sécurité. Si la fiche fournie ne s’insère pas dans votre prise
de courant, consultez un électricien pour qu’il remplace la prise.
Protégez le cordon d’alimentation contre le piétinement ou le pincement, en
particulier près de la prise de courant et de la partie où le cordon sort de la
lampe.
Utilisez uniquement les attaches et accessoires recommandés par le fabricant.
Débranchez cette lampe pendant les orages ou lorsqu’elle reste longtemps
inutilisée.
Utilisez uniquement des ampoules de 120 Vca, 60 W.
Si la lampe a été abîmée (exemples : cordon d’alimentation ou fiche
endommagée, liquide renversé ou objet tombé dans la lampe, lampe exposée
à la pluie ou à l’humidité, lampe ne fonctionnant pas normalement ou chute
de la lampe) ne l’utilisez pas.
Les modifications non autorisées par le fabricant annulent la garantie et
peuvent causer des blessures corporelles.
CONSERVEZ CES INSTRUCTIONS
Précautions générales
•
•
•
•
•
Évitez d’exposer la lampe directement aux rayons du soleil ou à une source
de chaleur, un appareil de chauffage par exemple. Ne placez pas la lampe audessus d’un appareil dégageant de la chaleur.
Évitez de mettre la lampe dans des endroits poussiéreux, humides, manquant
d’aération ou qui sont soumis à des vibrations permanentes.
N’utilisez pas de variateur de lumière, minuterie, détecteur de mouvement ou
de rallonge électrique.
N’utilisez pas d’agent lubrifiant pour mettre en place l’ampoule.
Restez vigilant quand la lampe est utilisée par ou à proximité d’enfants ou par
des personnes handicapées.
5
Précautions générales (suite)
AVERTISSEMENT : Cette lampe est fournie avec l’abat-jour
spécialement conçu pour être utilisé avec elle. L’utilisation d’un autre
abat-jour que celui fourni par le fabricant constitue un DANGER.
ATTENTION : Si le globe extérieur de l’ampoule se brise, ne touchez
pas aux composants métalliques sous peine d’être électrocuté.
L’ampoule peut continuer à fonctionner. Cependant, cessez
immédiatement de l’utiliser, éteignez-la et retirez l’ampoule. Laissez
l’ampoule refroidir avant de la retirer pour éviter les brûlures.
Conformité à la FCC
Cet appareil est conforme à la partie 15 de la réglementation FCC. Son
utilisation est soumise à deux conditions : (1) l’appareil ne doit pas générer
d’interférences et (2) l’appareil doit capter toutes les interférences, y compris celles provoquant son dysfonctionnement.
Cet appareil a été testé et certifié conforme aux restrictions applicables
à un appareil numérique de Classe B, conformément à la partie 15 de la
réglementation FCC. Ces restrictions assurent la protection suffisante contre les
interférences dans une installation domestique. Cet équipement génère, utilise et
peut émettre des fréquences susceptibles de provoquer des interférences radio
s’il n’est pas installé et utilisé conformément aux instructions. Cependant, il n’y a
aucune garantie que ces interférences ne se produiront pas dans une installation
donnée.
Si cet équipement provoque des interférences radio ou pour la télévision, qui se
repèrent lors de la mise sous tension de l’appareil, l’utilisateur doit essayer de
corriger les interférences par une ou plusieurs mesures suivantes :
•
Réorientez ou déplacez l’antenne de réception.
•
Augmentez la distance entre l’appareil et le récepteur.
•
Connectez l’équipement à une prise reliée à un circuit différent de celui
alimentant le récepteur.
•
Demandez conseil à votre revendeur ou un technicien radio/TV expérimenté.
Caractéristiques
La lampe de réveil naturel Rise & Shine® de Verilux® aligne les rythmes circadiens
qui régulent les patrons de sommeil et de réveil normaux. Les programmes de
sommeil et de réveil synchronisés offrent au corps les repères nécessaires pour
un endormissement naturel, un sommeil profond et un réveil qui vous procure
vigueur et vitalité. Le mélange harmonieux de thérapie lumineuse et musicale
conduit naturellement l’organisme vers un réveil vivifiant et une structure de
sommeil saine.
6
Caractéristiques (suite)
•
La lumière et la musique augmentent progressivement pour un réveil en
douceur et une sensation revigorante et vivifiante
•
Choisissez le réveil de votre choix parmi les quatre ambiances sonores
typiques des stations thermales ou votre station de radio FM préférée
•
Choisissez l’un des 20 niveaux de luminosité
•
Le mode Sleep (sommeil) abaisse progressivement la luminosité sur une
période de 5, 15, 30 ou 60 minutes
•
Alarme double avec Snooze (rappel d’alarme)
Instructions pour la mise en marche
Déballage
Vérifiez que l’emballage contient les articles suivants :
•
Lampe de réveil naturel Rise & Shine® de Verilux
•
Antenne FM externe
•
Manuel d’instructions
•
Ampoule transparente A19 120V 60W E26 (située à l’intérieur de l’abat-jour)
Remarque : Avant de brancher la lampe au secteur, ouvrez l’abat-jour en
appuyant sur le bouton à l’arrière de la lampe et enlevez doucement l’abat-jour
de son support. Vissez l’ampoule dans la douille. Remettez l’abat-jour en face de
son support et appuyez vers le bas jusqu’à ce qu’il s’emboîte.
Choisissez un emplacement
•
Placez la lampe Rise & Shine sur une table ou une surface plane près du lit.
•
Pour de meilleurs résultats, placez la lampe Rise & Shine à moins de 60 cm (2
pi) du mur et ne la placez pas dans un coin.
Remarque : Évitez de placer la lampe Rise & Shine sur une surface métallique qui
brouillerait la réception FM.
Remarque : Évitez d’exposer la lampe aux rayons du soleil ou à une source de
chaleur, tel qu’un appareil de chauffage. Ne placez pas la lampe au-dessus d’un
appareil dégageant de la chaleur.
7
Affichage et commandes
1. Touches de réglage de la
luminosité
2. Touches de réglage du volume
3.
Sound
Touche (son)
4.
Radio
Touche (radio)
5. Touches Précédent
Suivant
6.
Set
7.
Sleep
8.
9.
10.
et
Touche (régler)
Touche (sommeil)
Touche (affichage)
Arrêt/Normal/Brillant
Display
Off
Alarm
Touche (arrêt)
Touche (alarme)
11. Écran à cristaux liquides
Remarque : La fiche d’antenne
externe et le bouton pour libérer
l’abat-jour sont situés sur l’arrière
de la Rise & Shine®.
Sound
Display
Radio
Sleep
Set
Off
Alarm
11
2
3
4
1
Sound
Display
8
Radio
Sleep
7
6
Set
Alarm
5
10
8
Off
9
Affichage et commandes (suite)
1. Touches de réglage de la luminosité
Les touches de réglage de la luminosité sont utilisées
pour régler la luminosité maximale à la fin du cycle
de réveil ou l’intensité minimale de la fin du cycle
endormissement. Il existe 20 niveaux de luminosité.
Les touches de réglage de la luminosité servent aussi à
régler la luminosité de la Rise & Shine® utilisée comme
simple lampe.
2. Touches de réglage du volume
Les touches de réglage du volume
sont utilisées
pour régler le volume maximal à la fin du cycle de réveil
ou le volume du cycle endormissement. Il existe 20
niveaux de volume.
3. Touche Sound (son)
Lorsqu’elle est utilisée pour le réglage de l’alarme,
la touche Sound Sound vous permet de choisir parmi
quatre sons de la nature en appuyant plusieurs fois
sur la touche jusqu’à atteindre le son désiré. Si elle
n’est pas utilisé pour le réglage de l’alarme, la touche
Sound diffuse le dernier son sélectionné. Vous pouvez
changer de son en appuyant sur Précédent
et
Suivant
.
En réappuyant sur Sound ou sur Off
nature s’arrête.
Off
, le son de la
4. Touche Radio
La touche Radio
Radio
allume ou éteint la radio FM.
5. Touches Précédent et Suivant
Les touches Précédent
et Suivant
permettent
le réglage de l’heure, de l’alarme et de passer d’une
option à l’autre.
9
Affichage et commandes (suite)
6. Touche Sleep (sommeil)
Appuyez sur la touche Sleep Sleep lance le cycle Sleep
qui par défaut dure 5 minutes. Appuyez plusieurs fois
sur Sleep vous permet de choisir parmi un cycle Sleep
de 0 (arrêt), 5, 15, 30 ou 60 minutes. Le cycle Sleep
que vous avez choisi débute environ deux secondes
après avoir appuyé sur la touche.
7. Touche Display (affichage) (Arrêt/Normal/Brillant)
La touche Display Display règle la luminosité de l’écran à
cristaux liquides de la lampe Rise & Shine®. Appuyez
pour choisir entre Off (Arrêt), Normal et Bright (Brillant).
Si l’écran est éteint, appuyer sur n’importe quelle autre
touche réglera la luminosité sur Normal pour un instant.
8. Touche Off (arrêt)
La touche Off Off éteint la radio FM, les sons de
la nature et la lumière. La touche Off peut aussi
interrompre le cycle Sleep ou le cycle de réveil.
9. Touche Alarm (alarme)
Appuyer sur la touche Alarm
l’affichage suivant :
Alarm
•
Alarme 1 (AL1)
•
Alarme 2 (AL2)
•
Alarmes 1 et 2 (AL1 et AL2)
passe en boucle
10. Écran à cristaux liquides
Son
Éclairage
Icône de l’alarme 1
Icône de l’alarme 2
Heure de
l’horloge
Icônes du
cycle Sleep
Fréquence FM
Icônes des sons de la nature
10
Mode d’emploi
Appuyer pour
mettre en marche
Allumer la lampe
Pour allumer la lampe :
•
Appuyez sur le haut de la lampe Rise & Shine® sur l’inscription
Light/Snooze.
Vous pouvez régler la luminosité avec les boutons de réglage
situés à droite de l’écran.
Remarque : Tout changement de luminosité devient le niveau de
luminosité par défaut.
Éteindre la lampe
Pour éteindre la lampe :
•
Appuyez sur le haut de la lampe Rise & Shine sur l’inscription Light/Snooze.
Écouter un son de la nature
Appuyez sur Sound Sound pour écouter l’un des quatre
sons de la nature. Appuyez plusieurs fois sur Précédent
ou Suivant
pour passer d’un son à l’autre parmi
les quatre. Si vous appuyez sur la touche Sound hors
réglage de l’alarme, le dernier son sélectionné sera joué.
Si vous appuyez sur Sound Sound ou sur Off Off , le son
de la nature s’arrête.
Réglage de l’horloge
1. Appuyez sur la touche Set Set pendant 3 secondes
pour passer au mode de réglage de l’horloge.
L’horloge clignote.
2. Maintenez Précédent et Suivant enfoncés pour le
réglage de l’horloge. L’horloge continuera à clignoter
quelques secondes puis affichera la nouvelle heure.
Écouter la radio
Pour écouter la radio FM :
1. Appuyez sur la touche Radio
Radio
pour l’allumer.
2. Utilisez les touches Précédent
ou Suivant
pour choisir une fréquence. Si vous maintenez
Précédent
ou Suivant
enfoncés, la radio passe directement d’une
fréquence à l’autre.
3. Utilisez les touches de réglages du volume.
4. Pour éteindre la radio, appuyez sur Radio
11
Radio
ou Off
Off
.
Mode d’emploi (suite)
Pour améliorer la réception, vous pouvez utiliser l’antenne FM externe incluse.
Branchement de l’antenne FM externe :
1. Branchez la prise de 3,5 mm (1/8 po) de l’antenne FM sur EXTERNAL
ANTENNA (ANTENNE EXTERNE), fiche située à l’arrière de l’appareil.
2. Déroulez l’antenne et placez-la pour obtenir une réception optimale.
Réglage de l’alarme
Remarque : Avant de régler l’alarme, il est recommandé
de lire cette partie.
1. Gardez le bouton Set Set appuyé pendant 3
secondes pour passer au mode réglage de l`horloge.
Rappuyez une fois sur Set Set pour passer au mode
réglage de l’alarme.
• Les icônes de l’alarme et du sommeil clignotent à gauche de l’écran.
Elles sont, de haut en bas : AL1 (Alarme 1), AL2 (Alarme 2) et cycle Sleep.
Vous pouvez régler deux alarmes, chacune à une heure différente. Vous
pouvez aussi régler la luminosité pour le début du cycle Sleep.
2. Sélectionnez AL1 ou AL2 ou Sleep en appuyant plusieurs fois sur
Précédent
ou Suivant
. Appuyez sur Set Set pour confirmer votre
sélection. L’icône sélectionnée clignotera.
3. Si AL1 ou AL2 est sélectionnée, appuyez plusieurs fois sur Précédent
ou
Suivant
pour régler l’heure de l’alarme. Appuyez sur Set Set pour confirmer.
4. Appuyez sur Précédent
ou Suivant
pour choisir entre mode radio FM
ou mode sons de la nature, puis appuyez sur Set Set pour confirmer.
• Lorsque le mode radio FM est sélectionné, appuyez plusieurs fois sur
Précédent
ou Suivant
pour rechercher une station. Puis appuyez
sur Set Set pour confirmer votre choix.
• Lorsque le mode sons de la nature est sélectionné, appuyez plusieurs
fois sur Précédent
ou Suivant
pour choisir un type de son parmi
chant d’oiseaux, grenouilles, cours d’eau ou vagues. Puis appuyez sur
Set Set pour confirmer votre choix.
5. L’icône Audio clignote et la radio FM ou le son de la nature choisi est diffusé.
Appuyez plusieurs fois sur Précédent
ou Suivant
pour régler le
volume de l’alarme de 0 à 20. Appuyez sur Set Set pour confirmer.
6. L’icône de la luminosité clignote et la lumière s’allume. Appuyez plusieurs fois
sur Précédent
ou Suivant
pour régler la luminosité et appuyez sur
Set Set pour confirmer et quitter.
Réglage de la luminosité du cycle d’endormissement
1. Gardez le bouton Set Set enfoncé 3 secondes pour passer au mode de
réglage de l’horloge. Rappuyez une fois sur Set Set pour passer au mode de
réglage de l’alarme.
12
Mode d’emploi (suite)
2. Sélectionnez en appuyant sur Précédent
ou Suivant
. Appuyez sur
Set Set pour confirmer votre choix. L’icône sélectionnée clignote.
3. Si l’icône Sleep est sélectionnée, la luminosité de la lampe augmente jusqu’au
niveau maximal. Utilisez les touches Précédent
pour
ou Suivant
régler le niveau de luminosité de la fin du cycle d’endormissement.
•
Appuyez sur Set
Set
pour confirmer.
Affichage du réglage des alarmes
Appuyez sur Alarm
•
•
•
Alarm
plusieurs fois pour faire défiler :
Appuyez
pour le rappel
d’alarme
AL1 – réglage de l’alarme 1
AL2 – réglage de l’alarme 2
Les deux alarmes
Snooze (rappel d’alarme)
Lorsque l’alarme retentit, vous pouvez appuyer sur le haut de la
lampe Rise & Shine® (comme sur un bouton) pour passer au mode
Snooze.
Simulation du lever du soleil
15 minutes avant l’alarme, la lampe augmente progressivement sa luminosité
et simule le lever du soleil. Il existe 20 niveaux de luminosité. Le niveau de
luminosité à la fin de la simulation, compris entre 1 et 20, se règle comme décrit
page 12, aux rubrique Réglage de l’alarme et Réglage de la luminosité du cycle
Sleep.
Lancement d’un cycle d’endormissement
Un cycle d’endormissement simule la baisse de luminosité du soleil couchant à
partir de la luminosité maximale de la lampe ou de celle que vous avez réglée,
puis la luminosité baisse progressivement pendant le cycle jusqu’à ce que la
lampe s’éteigne.
Vous pouvez lancer un cycle d’endormissement quand vous le souhaitez :
•
Appuyez sur le bouton Sleep
•
Les minutes non écoulées du cycle s’affichent à l’écran.
•
Appuyez plusieurs fois sur Sleep
30 ou 60 minutes.
•
Pour interrompre un cycle avant la fin, appuyez sur Off Off ou sur Sleep Sleep
plusieurs fois jusqu’à ce que la valeur « 00 » s’affiche. Vous devez allumer
manuellement la lampe et/ou la radio si vous le souhaitez.
Sleep
pour lancer un cycle.
Sleep
pour choisir entre une durée de 5, 15,
Variation de la luminosité de l’écran
Pour régler la luminosité sur Arrêt (Off), Normal ou Brillant (Bright), appuyez
plusieurs fois sur Display Display jusqu’à obtenir la luminosité voulue.
13
Changer l’ampoule
Votre lampe Rise & Shine® utilise une ampoule incandescente
ordinaire de 60 watts. Pour la remplacer :
1. Assurez-vous que la lampe n’est pas branchée et que l’ampoule
a eu le temps de refroidir.
2. Appuyez sur le bouton à l’arrière de la lampe pour libérer l’abatjour et retirez-le doucement.
3. Dévissez l’ampoule et remplacez-la par une ampoule
incandescente ordinaire de 60 watts.
4. Remettez l’abat-jour bien en place sur son support en appuyant
jusqu’à ce qu’il s’emboîte.
Remarque : N’utilisez pas d’ampoule dont la puissance excède 60
watts.
Dépannage
Nouveau réglage de la lampe Rise & Shine
Problème
L’appareil ne fonctionne pas
correctement.
Débranchez l’appareil, attendez 30 secondes
et rebranchez-le de nouveau.
Pas de lumière.
•
Appuyez sur les touches
la luminosité.
•
Remplacez l’ampoule si besoin.
•
Vérifiez que l’icône d’éclairage est affichée
à l’écran. Sinon, appuyez sur le haut de
l’abat-jour pour allumer la lampe.
•
n’est pas
Si l’icône de la radio
affichée à l’écran, appuyez sur Radio
Pas de radio ou pas de son.
L’alarme ne fonctionne pas.
de réglage de
Radio
.
•
Augmentez le volume.
•
Branchez l’antenne externe et positionnezla pour obtenir une réception optimale.
•
Vérifiez que le réglage AM/PM est correct.
•
Vérifiez que l’alarme est activée (une
alarme est activée lorsque les deux icônes
AL1 ou AL2 et l’heure sont affichées).
14
Soins et entretien
Nettoyage
Débranchez la lampe Rise & Shine® de la prise de courant. Utilisez uniquement
un linge doux légèrement humide pour le nettoyage. N’utilisez pas de solvants
chimiques ou de détergents.
Données techniques
Lampe-réveil à lumière naturelle Rise & Shine
Dimensions générales
Poids : 1,1 kg (2,4 lb)
Dimensions : 22,2 x 26 x 17,1 cm (8,75 x 10,25 x 6,75 po)
Affichage ACL
Dimensions : 7 x 4,4 cm (2,75 x 1,75 po)
Environnement de la lampe
Température de fonctionnement : 15 °C à 35 °C (59 °F à 95 °F)
Température d’entreposage : 0 °C à 40 °C (32 °F à 104 °F)
Humidité relative : 5 % à 95 %, sans condensation
Ampoule
À incandescence et de puissance maximale 60 watts
Alimentation électrique
Puissance d’entrée : 120 Vca, 60 Hz
Homologué ETL
Cordon/prise
Type de prise : polarisée/deux lames/É.-U.
Longueur du cordon : 183 cm (72 po)
Propriété intellectuelle
Brevet : 6,236,622 et D553,777
Marque de commerce : Rise & Shine®
Sécurité
Homologué ETL
Garantie
1 an
15
Garantie limitée d’un an
ATTENTION! UNE FOIS L’EMBALLAGE OUVERT, SI UNE RÉPARATION OU UN
REMPLACEMENT EST NÉCESSAIRE, NE PAS RETOURNER CE PRODUIT AU MAGASIN OÙ
VOUS L’AVEZ ACHETÉ.
Vous trouverez de nombreuses réponses à vos questions sur le site www.verilux.com ou
contactez notre service clientèle au 800-786-6850 aux heures habituelles de bureau.
Cette garantie limitée est fournie par : Verilux Inc., 340 Mad River Park, Waitsfield, VT 05673
Verilux garantit que ce produit ne comporte aucun défaut matériel ou de fabrication pendant
un an à compter de la date d’achat auprès de Verilux ou d’un revendeur Verilux agréé.
Un justificatif d’achat vous sera demandé pour tout recours à la garantie. Au cours
de la période de garantie, Verilux Inc., à sa discrétion, réparera ou remplacera les pièces
défectueuses de ce produit, sans aucun frais pour le client et sous réserve des conditions
suivantes : la garantie ne couvre pas les frais postaux, le transport, la manutention, l’assurance
ou les frais de livraison. Cette garantie ne couvre aucun dommage, défectuosité ou défaut
causé par ou résultant d’un accident, destruction externe, changement, modification, abus,
mauvaise utilisation ou mauvaise application de ce produit.
La garantie ne couvre pas les dommages causés pendant l’expédition ou la manutention
du produit. Il est recommandé de souscrire une assurance expédition afin de protéger votre
produit.
Une autorisation de renvoi est requise avant tout retour de produit. Afin d’obtenir cette
autorisation, prière de contacter le service clientèle Verilux au 800-786-6850.
Si, dans l’année qui suit votre achat, le produit ne fonctionne pas correctement, celui-ci doit
être retourné suivant les instructions du site www.verilux.com/warrantyreplacement ou selon la
procédure communiquée par notre service clientèle Verilux au 800-786-6850.
Remarque : Verilux recommande d’utiliser un parasurtenseur de qualité sur tous les
équipements électroniques. Les variations et les crêtes de voltage peuvent endommager
des composants électroniques dans un système. Un parasurtenseur de qualité peut éliminer
la grande majorité des défaillances attribuées aux montées subites de tension et peut être
acheté dans les magasins d’articles électroniques.
En raison de constantes améliorations, le produit acheté peut présenter certaines petites différences avec l’appareil décrit dans ce
manuel.
Veuillez consulter notre site Web www.verilux.com ou contacter notre service
à la clientèle par téléphone au
1-800-786-6850
Nos agents sont disponibles de 8h à 22h, du lundi au samedi et de 9h à 20h le dimanche,
heure normale de l’Est
340 Mad River Park, Waitsfield, VT 05673
VA05F-MAN-Rev11
Printed in China for Verilux, Inc.
© Copyright 2010 Verilux, Inc. All rights reserved.