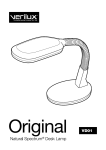
1
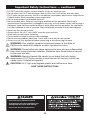
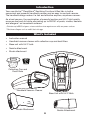
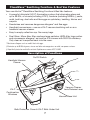
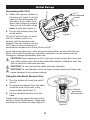
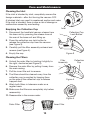
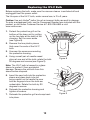
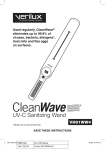
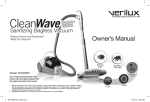
VH07 Dear Customer, Thank you for purchasing the Verilux CleanWave® Sanitizing Furniture & Bed Vac. You have received an innovative and quality manufactured product, backed by a one-year limited warranty. Many other healthy lighting products are available through our catalog and online. Visit us on the web at www.verilux.com to request a free catalog and learn more about all our quality Verilux products, or call our toll-free number 1-800-454-4408. As a Verilux customer, your satisfaction means everything to us. We look forward to serving you now and in the future. Have a bright day! Nicholas Harmon President, Verilux, Inc. 2 Table of Contents Important Safety Instructions . . . . . . . . . . . . . . . . . . . . . . . . . . . . . . . . . . . . . . . . . 4 Introduction. . . . . . . . . . . . . . . . . . . . . . . . . . . . . . . . . . . . . . . . . . . . . . . . . . . . . . . 6 What’s Included. . . . . . . . . . . . . . . . . . . . . . . . . . . . . . . . . . . . . . . . . . . . . . . . . . . . 6 CleanWave® Sanitizing Furniture & Bed Vac Features . . . . . . . . . . . . . . . . . . . . . . 7 Description of Functions. . . . . . . . . . . . . . . . . . . . . . . . . . . . . . . . . . . . . . . . . . . . . 7 Initial Set-up . . . . . . . . . . . . . . . . . . . . . . . . . . . . . . . . . . . . . . . . . . . . . . . . . . . . . . 8 Vacuuming with UV-C. . . . . . . . . . . . . . . . . . . . . . . . . . . . . . . . . . . . . . . . . . 8 Using the Handheld Vacuum Only. . . . . . . . . . . . . . . . . . . . . . . . . . . . . . . . . 8 Mattress / Bedding Cleaning Guidelines. . . . . . . . . . . . . . . . . . . . . . . . . . . . . . . . . 9 Care and Maintenance . . . . . . . . . . . . . . . . . . . . . . . . . . . . . . . . . . . . . . . . . . . . . 10 Cleaning the UV-C Bulb. . . . . . . . . . . . . . . . . . . . . . . . . . . . . . . . . . . . . . . . 11 Replacing the UV-C Bulb . . . . . . . . . . . . . . . . . . . . . . . . . . . . . . . . . . . . . . . . . . . 12 Troubleshooting. . . . . . . . . . . . . . . . . . . . . . . . . . . . . . . . . . . . . . . . . . . . . . . . . . . 13 Safety Switches. . . . . . . . . . . . . . . . . . . . . . . . . . . . . . . . . . . . . . . . . . . . . . 13 Technical Specifications . . . . . . . . . . . . . . . . . . . . . . . . . . . . . . . . . . . . . . . . . . . . 14 Warranty . . . . . . . . . . . . . . . . . . . . . . . . . . . . . . . . . . . . . . . . . . . . . . . . . . . . . . . . 15 3 Important Safety Instructions READ ALL INSTRUCTIONS BEFORE USING YOUR CLEANWAVE® SANITIZING FURNITURE & BED VAC When using an electrical appliance, the following basic safety precautions should always be observed. WARNING: To reduce the risk of fire, electric shock or injury: • Do not leave appliance when plugged in. Unplug from outlet when not in use and before servicing. • Do not use outdoors or on wet surfaces. • Do not allow to be used as a toy. Close attention is needed when used by or near children. • Use only as described in this manual. Use only with manufacturer’s recommended attachments. • Do not use with damaged cord or plug. Do not use vacuum if it has been dropped, damaged, left outdoors or dropped in water. • Do not pull or carry cord, use cord as a handle, close a door on cord or pull cord around sharp edges or corners. • Do not run vacuum over cord. Keep cord away from heated surfaces. • Do not unplug by pulling on cord. To unplug, grasp the plug, not the cord. • Do not handle plug or appliance with wet hands. • Do not put any object into openings. Do not use with any openings blocked; keep free of dust, lint, hair and anything that may reduce air flow. • Keep hair, loose clothing, fingers and all body parts away from openings and moving parts. • Do not vacuum anything that is burning or smoking, such as cigarettes, matches or hot ashes. • Turn off vacuum before unplugging. • Use extra care when cleaning on stairs. • Do not use to vacuum flammable or combustible liquids such as gasoline or use in areas where they may be present. • Follow all labels and instructions. • Keep all openings away from your face and body. • Do not use the vacuum cleaner without dust filter in place. • Store the vacuum cleaner indoors. Put the vacuum cleaner away after use to prevent tripping accidentally. • Using improper voltage may result in damage to the motor and possible injury to the user. The correct voltage is listed on the rating label. • Use on dry, indoor surfaces. • Do not use for any purpose other than described in this manual. • Always turn off this appliance before connecting or disconnecting the UV-C base unit. • All repairs must be carried out by a qualified service technician. • There are a number of safety switches on the underside of the unit. These switches prevent the UV-C bulb from activating when the product is removed from the cleaning surface. The UV-C bulb will re-activate when placed back on a cleaning surface. • For your safety, DO NOT attempt to manually over-ride the safety switch. 4 Important Safety Instructions — continued • DO NOT point the vacuum cleaner directly at your or anyone’s face. • Do not touch the UV-C bulb during or directly after use; it will be hot and may burn. • UV-C bulbs contain mercury, which is considered a hazardous waste and is subjected to Federal and/or State hazardous waste regulations. • Do not leave product unattended while on. • No serviceable parts. Refer all servicing to qualified service personnel. Servicing is required when the apparatus is damaged in any way, such as power supply cord or plug is damaged, liquid has been spilled or objects have fallen into the apparatus, the apparatus has been exposed to rain or moisture, does not operate normally or has been dropped. • Never use this device on pets. • Always direct the UV-C rays AWAY from the eyes and skin. • Allow bulb to cool before replacing. • Care should be taken to prevent bulb breakage. • Do not use this product more than 1 hour total in one day for one person. • Always turn off this appliance before connecting or disconnecting the base. WARNING: This product contains a chemical known to the state of California to cause birth defects or other reproductive harm. ARNING: These bulbs can cause serious skin burn and eye inflammation W from short wave ultraviolet radiation. Radiation from these bulbs is harmful to the eyes and skin. ARNING: Mercury Hazard. Be careful to not break the bulb during W replacement. UV-C bulbs contain a small amount of mercury, which can cause injury if inhaled or ingested. CAUTION: UV-C light may degrade plastic and rubber over time. SAVE THESE INSTRUCTIONS Ultraviolet (UV-C) Radiation Hazard Overexposure will cause significant eye damage and may cause skin damage. Do not look into UV-C light source. 5 Introduction Your new Verilux® CleanWave® Sanitizing Furniture & Bed Vac is both a convenient and powerful handheld vacuum and an easy to use bed vacuum. The handheld design makes it a fast and effective anytime, anywhere vacuum. As a bed vacuum, the combination of powerful suction and UV-C light quickly removes dust and dirt while eliminating up to 99.9%† of pests, viruses, bacteria and allergens* on household surfaces. † Eliminates up to 99.9% of germs, viruses and other micro-organisms on solid, non-porous surfaces. * E ffective on allergens such as mold & dust mite eggs What’s Included • Instruction manual • Handheld vacuum cleaner with collection cup and dual filters • Base unit with UV-C bulb • Nozzle attachment • Brush attachment Collection Cup and Dual Filters Handheld Vacuum Cleaner Base Unit with UV-C Bulb Brush Attachment 6 Nozzle Attachment CleanWave® Sanitizing Furniture & Bed Vac Features Your new Verilux® CleanWave Sanitizing Furniture & Bed Vac features: • A powerful ultraviolet (UV-C) illumination system that eliminates odors and up to 99.9%† of viruses (including H1N1), bacteria (including MRSA††), pests, mold, bed bug, dust mite and flea eggs on upholstery, bedding, fabrics and carpets. • Deodorizes and removes dangerous allergens* and flea eggs. • Handheld convenience – use as a UV-C vacuum/sanitizing unit or as a handheld vacuum cleaner. • Easy to empty collection cup. No messy bags. • Dual filters: Micro-fiber filter captures large particles; HEPA filter traps pollen and microscopic allergens* as small as 0.3 microns with 99.97% efficiency. Only clean air is expelled back into the room. * Effective on allergens such as mold & dust mite eggs. † Eliminates up to 99.9% of germs, viruses and other micro-organisms on solid, non-porous surfaces. †† Specifically tested on methicillin resistant Staphlococcus aureus ATCC 33592. Description of Functions On/Off Switch Handheld Vacuum Cleaner Vacuum Cleaner Lock/Release Lever UV-C Confirmation Windows Vacuum Base Unit Bulb Protection Cover & UV-C Bulb Under Unit 7 Initial Set-up Vacuuming with UV-C A 1. Attach the vacuum cleaner to the base unit. Insert it into the base unit and then press the rear down firmly. Press lever down when docking vacuum. Then pull up until lever clicks twice to lock (see Figure 1). Lock/Release Lever 2. Turn on the cleaner using the on/off switch. The UV-C bulb will turn on when the UV-C safety switch is in contact with the surface to be cleaned. You can confirm that the UV-C light is on by checking the confirmation windows on the top of the unit (A). Figure 1 A Avoid vacuuming fine dust, such as cement and plaster, as this will block the filters. If fine dust is picked up, the filters, collection cup and tools must be thoroughly cleaned immediately after use. AUTION: Direct exposure to UV-C light can cause serious skin burn and C eye inflammation from short wave ultraviolet radiation. Radiation from this bulb is harmful to the eyes and skin. CAUTION: Do not override the safety switches manually. CAUTION: Do not attempt to pick up large or sharp objects as these may cause damage to the vacuum cleaner. Using the Handheld Vacuum Only 1. Turn the cleaner off using the on/off switch. 2. To remove the cleaner from the base, press the lever at the rear of the vacuum base (see Figure 1). Nozzle and brush attachments 3. Lift the handheld vacuum from the base. Certain tasks may require the use of the nozzle or brush attachments. These tools are stored in the base unit (see Figure 2). 8 Figure 2 Mattress / Bedding Cleaning Guidelines In order for the UV-C light to be fully effective against bacteria and other pathogens, the area to be cleaned must be exposed for a sufficient time. We suggest the following guidelines: • Start in one corner of the bed. • Keep the vacuum flat against the mattress. • Move the vacuum in a smooth and steady motion. • To make sure that every part of the mattress is exposed, follow a predetermined pattern. • With double (or larger) beds, clean one side of the bed at a time. • If possible, clean both sides of the mattress. • With a used mattress, clean on a daily basis for seven days, then as much as once a week, at least once a month. With a new mattress, once a month cleaning is usually sufficient. • If cleaning carpets using the UV-C head, follow a similar method. 9 Care and Maintenance Cleaning the Inlet If the inlet is blocked by dust, completely remove the foreign materials – after first turning the vacuum OFF. A blocked inlet may result in weakened suction and noise. If the inlet is blocked, there is also a risk of damage or malfunction caused by overheating. Inlet Emptying the Collection Cup Collection Cup Lock Button 1. Disconnect the handheld vacuum cleaner from the base unit by pressing the release lever at the rear of the base unit and lifting up. 2. Press the collection cup lock button to release the collection cup from the vacuum (see Figure 3). 3. Carefully pull the filter assembly outward and remove (see Figure 4). 4. Empty the cup. Figure 3 Cleaning the Filters 5. Unlock the outer filter by twisting it slightly to the right, clockwise (see Figure 5). Filter Assembly 6. Remove the outer filter by pulling it away from the main casing. 7. Pull the inner filter out to remove. 8. The filters should be cleaned every time the collection cup is emptied by tapping them on the side of the collection cup to release trapped dust. Figure 4 9. Wash both filters in lukewarm water on a regular basis. 10.Make sure the filters are completely dry before reassembly. 11.Reassemble in the reverse order. Figure 5 Outer Filter Inner Filter 10 Collection Cup Care and Maintenance — continued Avoiding Exposure to Dust When emptying any vacuum cleaner, it is difficult to avoid exposure to dust. If you are an allergy sufferer or sensitive to dust, you can minimize this risk. 1. Place the collection cup in a large bag, and close the bag as tightly as possible around the cup before emptying it. 2. Remove the collection cup, close the bag tightly and dispose of immediately. You might also consider wearing disposable gloves and a facemask while emptying the collection cup. Or, ask a non-allergy sufferer to empty the cup when required. It is important to empty the collection cup and clean the filters regularly. If this is not done, the cleaner will lose its effectiveness. We recommend that you empty and clean the vacuum after each use. Cleaning the UV-C Bulb During use, dust may collect on the protective cover and the UV-C bulb, which will reduce the effectiveness of the UV-C light. For maximum UV-C exposure, clean the bulb periodically. 1. Vacuum should be turned off prior to cleaning the bulb. Detach the protective grill on the bottom of the base unit by gently pulling up on the two tabs at the back of the covering (see Figure 6). Set the cover aside and wait for bulb to cool. 2. Using a soft lint-free cloth, carefully remove any dust from the protective cover and the UV-C bulb (see Figure 7). 3. Replace the protective cover by aligning it, pressing on the rear tabs to snap them into position and finally pressing down the front of the cover, which will click into place. UV-C Bulb Figure 6 Figure 7 11 Replacing the UV-C Bulb Before replacing the bulb, make sure the vacuum cleaner is switched off and unplugged from the power outlet. The life span of the UV-C bulb, under normal use, is 2 to 3 years. Caution: Use only Verilux® bulbs. Use of an incorrect bulb can result in damage. To order a replacement bulb, use the Component Reorder form included with this product, or call Verilux Customer Service at 1-800-786-6850 or visit www.verilux.com. 1. Detach the protective grill on the bottom of the base unit by pulling up the two tabs at the back of the covering. Set the cover aside (see Figure 8). 2. Remove the two plastic pieces that cover the ends of the UV-C bulb. 3. Unscrew the screws surrounding the protective housing. 4. Using a small pair of needle nosed pliers at one end of the bulb, rotate the bulb 90 degrees and remove (see Figure 9). Figure 8 Note: The UV-C bulb is housed in a glass sleeve to protect it from accidental damage. Remove the old bulb from this sleeve before disposal. 5. Insert the new bulb into the protective sleeve and place back into unit being careful not to handle the new bulb as fingerprints on the bulb are undesirable. Rotate the bulb by 90 degrees to secure. 6. Relocate the protective housing and tighten all screws. 7. Relocate the protective grill and snap back into place. 12 Figure 9 Troubleshooting Poor Suction The filter may be blocked. • Remove and clean the filter. The collection cup may be full. • Empty collection cup. UV-C Light is Not Illuminated Vacuum cleaner may not be fitted to base unit correctly. • Ensure the cleaner is securely locked into position. Safety switch may not be depressed or sensors not covered. •Sensor switches only operate when the base is level and in contact with the surface being cleaned. Safety Switches The UV-C light will only turn on when the vacuum cleaner is facing downward and in contact with the surface being cleaned. On the bottom of the base unit, there is a pressure sensitive wheel. The wheel is activated when it contacts a cleaning surface. Three additional sensors must also be covered for the UV-C bulb to work. Do not manually override the pressure sensitive wheel or cover the sensors. 13 Technical Specifications Environment Operating Temperature: 10–40°C (50–104°F) Storage Temperature: 0–60°C (32–140°F) Relative Humidity: 10–90% non-condensing UV-C Bulb 8 Watt UV-C bulb (replace with Verilux Model Number VH07RB1 only) UV-C Peak Wavelength 254 nanometers Power Input Power: 120 VAC, 60 Hz, 400 Watts Weight 5 lbs. This device complies with the appliance efficiency regulations established by the California Energy Commission. Warning: This product contains a chemical known to the state of California to cause birth defects or other reproductive harm. 14 One Year Limited Warranty ATTENTION! ONCE OPENED, PLEASE DO NOT RETURN THIS PRODUCT TO THE STORE WHERE IT WAS PURCHASED FOR REPAIR OR REPLACEMENT! Many questions may be answered by visiting www.verilux.com, or you may call our Customer Service Department at 800-786-6850 during normal business hours. This limited warranty is provided by: Verilux, Inc., 340 Mad River Park, Waitsfield, VT 05673 Verilux warrants this product to be free from defects in material and workmanship for a period of one year from the date of the original retail purchase from Verilux or an authorized Verilux distributor. Proof of purchase is required for all warranty claims. During the limited warranty period, Verilux, Inc. will, at its option, repair or replace defective parts of this product, at no charge to the customer, subject to the following limitations: This limited warranty does not include any postage, freight, handling, insurance or delivery fees. This warranty does not cover damage, defect or failure caused by or resulting from accident, external destruction, alteration, modification, abuse, misuse or misapplication of this product. This warranty does not cover damage to the product resulting from return shipping or handling. The use of shipping insurance is recommended to help protect your product. Return Authorization is required for all returns. To obtain a Return Authorization, please contact the Verilux Customer Service Department at 800-786-6850. If, during the first year of ownership, this product fails to operate properly, it should be returned as specified at www.verilux.com/warrantyreplacement or as instructed by a Verilux customer service representative at 800-786-6850. Note: Verilux recommends using a quality surge suppressor on all electronics equipment. Voltage variations and spikes can damage electronic components in any system. A quality suppressor can eliminate the vast majority of failures attributed to surges and may be purchased at electronics stores. Due to ongoing improvements, actual product may have slight variations from the product described in this manual. Please visit our web site at: www.verilux.com or call 1-800-786-6850 Representatives are available Monday — Friday, 9am — 5pm EST 340 Mad River Park, Waitsfield, VT 05673 15 VH07-MAN-Rev16 Printed in China for Verilux, Inc. © Copyright 2010 Verilux, Inc. All rights reserved.