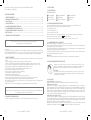
1
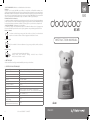
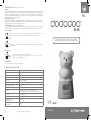
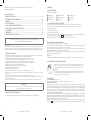
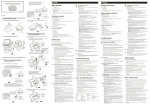
Bear
Distribué par / Distributed by
www.visiomed-lab.com
Visiomed SAS France
Service clients / Customers service
8, avenue Kléber
75116 Paris - France
Tel : +33 8 92 350 334
Fax : +33 1 44 17 93 10
[email protected]
Made in P. R. C.
Nexmed Technology Co., LTD.
nd
2 Floor of N°.1 building, Jia An
Technological Industrial Park
67 District, Bao An
518101 Shenzhen - China
VM-D31
Visiomed- VM-D31 - 042015
4
6
FR
5
MODE
7
MAX/MIN
UP/LIGHT
Bear
MANUEL D’UTILISATION
8
MODE
1
MAX/MIN
UP/LIGHT
2
3
9
LEXIQUE DES SYMBOLES / SAFETY PRECAUTIONS
Marquage CE / CE marking
Garder au sec / Keep dry
Voir le manuel d’instructions. / Refer to instructions manual.
Avis sur l’équipement “Suivre les instructions d’utilisation”. /
Note on the equipment “Follow instructions for use”.
Le dispositif, ses accessoires et son emballage doivent être recyclés de la façon
appropriée au terme de leur utilisation. Veuillez respecter les règlements et
règles locaux. /
The device, accessories and the packaging have to be disposed correctly at the
end of the usage. Please follow local ordinances or regulations for disposal.
Attention / Caution
Fabricant / Manufacturer
SN
Numéro de série / Serial number
SN Serial number
SN :
Year
2
Month
Day
Serial number
Visiomed- VM-D31 - 042015
VM-D31
Visiomed- VM-D31 - 042015
Ce produit est conforme aux normes Reach (RoHS), LVD EN60598, EN71.
Il ne contient pas de phtalates.
TABLE DES MATIÈRES
1. AVERTISSEMENTS......................................................................................................... 4
2. PRINCIPAUX COMPOSANTS........................................................................................ 4
3. UTILISATION.................................................................................................................. 5
3-1. DESCRIPTION............................................................................................................. 5
3-2. MISE EN MARCHE DE L’ÉCRAN................................................................................. 5
3-3. CHARGEMENT DE LA VEILLEUSE............................................................................. 5
3-4. MISE EN MARCHE DE LA VEILLEUSE........................................................................ 5
4. NETTOYAGE................................................................................................................... 6
5. SPÉCIFICATIONS TECHNIQUES................................................................................... 6
Le fabricant se réserve le droit de modifier sans aucun avis préalable
les caractéristiques techniques du produit.
Cher client,
Vous venez d’acquérir une veilleuse 5 fonctions (veilleuse, thermomètre, hygromètre, réveil, horloge
12/24h) VM-D31 DODODOO® et nous vous en remercions. Nous espérons qu’elle vous donnera
entière satisfaction et nous vous recommandons de lire attentivement ce manuel d’utilisation.
1. AVERTISSEMENTS
- Utiliser cet appareil uniquement pour l’usage auquel il est destiné tel que décrit dans cette
notice.
- Cet appareil peut être utilisé pour un usage personnel à domicile.
- Utiliser cet appareil dans une plage de température ambiante comprise entre 0 et 50°C.
- Ne pas exposer cet appareil à des conditions de températures extrêmes >60°C ou <-20°C.
- Ne pas utiliser cet appareil à une humidité relative supérieure à 85%.
- Cet appareil doit toujours être placé dans un endroit propre et sec.
- Ne pas exposer cet appareil au soleil, ni à l’eau.
- Ne pas exposer cet appareil aux chocs électriques.
- Ne pas utiliser cet appareil en extérieur.
- Ne jamais laisser tomber l’appareil.
- Suivre les instructions d’entretien stipulées dans cette notice.
- Ne pas essayer d’ouvrir l’appareil. En cas de problème, contactez votre revendeur.
- Cessez d’utiliser l’appareil en cas d’anomalie ou de dysfonctionnement.
- Ne pas utiliser de pile autre que les piles citées, ne pas recharger des piles non rechargeables,
ne pas les jeter au feu.
- Retirer les piles en cas de non utilisation de l’appareil durant une longue période.
Important
Veuillez respecter la polarité des piles. Une erreur de polarité peut provoquer l’endommagement
et compromettre la garantie de votre appareil.
2. PRINCIPAUX COMPOSANTS
1 veilleuse, 1 adaptateur 5V/500mAh, 1 câble USB, 2 piles AAA LR03 1.5V, 1 manuel.
4
Visiomed- VM-D31 - 042015
3. UTILISATION
3-1. DESCRIPTION
VOIR SCHÉMAS PAGE 2
1 Bouton MODE
4 Zone ON/OFF
7 Heure ou alarme
2 Bouton MAX/MIN
3 BoutonUP/LIGHT
5 Température
8 LED de chargement
6 Hygrométrie
9 Port USB
3-2. MISE EN MARCHE DE L’ÉCRAN
Ouvrez le compartiment à piles situé sous l’appareil, puis insérez 2 piles AAA LR03 1.5V.
Une fois les piles mises en place, l’écran s’allume et indique :
- la température (en °C)
- le taux d’humidité (en %)
- l’heure (format 12h ou 24h)
L’écran s’éclaire lorsque vous appuyez sur les boutons, et lorsque la veilleuse est en marche.
Remplacez les piles lorque le symbole
apparaît à l’écran.
La température ambiante d’une chambre de bébé doit être située entre 18 et 20°C.
3-3. CHARGEMENT DE LA VEILLEUSE
Branchez l’appareil grâce à l’adaptateur secteur ou au câble USB.
Si vous utilisez le câble USB, branchez celui-ci sur le port USB de votre ordinateur, puis branchez
l’autre partie au port USB de l’appareil.
Si vous utilisez l’adaptateur secteur, branchez celui-ci sur l’alimentation secteur appropriée, puis
branchez l’autre partie au port USB de l’appareil.
La LED de chargement s’allume en rouge lorsque l’appareil est branché, puis s’éteint automatiquement quand l’appareil est rechargé.
Attention!
Il est conseillé aux utilisateurs de charger la veilleuse avant la première acquisition.
3-4. MISE EN MARCHE DE LA VEILLEUSE
Appuyez sur la tête de l’ourson, entre les oreilles (zone ON/OFF), pour
allumer ou éteindre la veilleuse. Vous pouvez aussi allumer la veilleuse en
appuyant sur le bouton UP/LIGHT (si l’écran est en affichage normal).
Attention!
La veilleuse peut s’activer/se désactiver toute seule si elle est placée dans
un environnement soumis à des interférences (proche d’un ordinateur, d’un
mobile, d’un routeur Wifi...).
3-5. BOUTONS
• BOUTON MODE : Heure ou alarme
Appuyez sur le bouton MODE pour afficher soit l’heure, soit l’heure de l’alarme.
Configuration de l’heure
Lorsque l’heure est affichée, appuyez longuement sur le bouton MODE jusqu’à ce que l’heure
clignote. Appuyez sur le bouton UP/LIGHT pour modifier, et sur le bouton MODE pour confirmer.
Après confirmation de l’heure, les minutes clignotent. Appuyez sur le bouton UP/LIGHT pour
modifier, et sur le bouton MODE pour confirmer. Après confirmation des minutes, le format de
l’heure clignote. Appuyez sur le bouton UP/LIGHT pour choisir entre un format 12 heures ou 24
heures, puis sur le bouton MODE pour confirmer.
Configuration de l’alarme (réveil)
Lorsque l’alarme est affichée, appuyez longuement sur le bouton MODE jusqu’à ce que l’heure de
l’alarme clignote. Appuyez sur le bouton UP/LIGHT pour modifier l’heure, et sur le bouton MODE
pour confirmer. Après confirmation de l’heure, les minutes clignotent. Appuyez sur le bouton UP/
LIGHT pour modifier, et sur le bouton MODE pour confirmer.
Lorsque l’heure de l’alarme est affichée à l’écran, appuyez sur le bouton UP/LIGHT pour faire
apparaître ou disparaître le symbole
. Cela indique si l’alarme est activée ou non.
Visiomed- VM-D31 - 042015
5
• BOUTON MAX/MIN : Mémoire ou réinitialisation de la mémoire
Mémoire
Appuyez sur le bouton MAX/MIN pour afficher la température et l’humidité maximum enregistrées par l’appareil. “MAX” apparaît au-dessus de la température. Appuyez de nouveau sur le bouton
MAX/MIN pour afficher la température et l’humidité minimum enregistrées par l’appareil. “MIN” apparaît au-dessus de la température. Appuyez de nouveau sur le bouton MAX/MIN pour revenir aux indications de température et d’humidité en temps réel. “MAX” ou “MIN” n’apparaissent plus.
Réinitialisation de la mémoire
La mémoire maximum est réinitialisée automatiquement à 08h00 (08.00am), et la mémoire minimum
à 20h00 (08:00pm). Pour le faire manuellement, appuyez longuement sur le bouton MAX/MIN (lorsque
la mémoire maximum ou minimum est affichée à l’écran) jusqu’à ce que les données disparaissent.
• BOUTON UP/LIGHT : Configuration de la veilleuse
La veilleuse a 3 modes de fonctionnement. Après avoir allumé la veilleuse (voir 3-4), appuyez sur
le bouton UP/LIGHT pour choisir le mode. Le pictogramme correspondant apparaît sur l’écran.
Mode 1 : Manuel
UK
Bear
7 couleurs au choix (rouge, orange, vert, bleu, violet, rose, blanc). La couleur choisie
reste fixe. Le choix des couleurs se fait en appuyant sur la tête de l’ourson.
INSTRUCTION MANUAL
Mode 2 : Cycle
Cycle continu de 7 couleurs en alternance (rouge, orange, vert, bleu, violet, rose, blanc).
Mode 3 : Temp
TEMP
6 couleurs selon la température de la pièce.
Rouge : ≥30°C - Rose : 26-29.9°C - Orange : 21-25.9°C - Vert : 17-20.9°C Violet : 10-16.9°C - Blanc : ≤9.9°C.
4. NETTOYAGE
Utilisez un chiffon doux légèrement humidifié pour nettoyer la veilleuse.
5. SPÉCIFICATIONS TECHNIQUES
Couleurs LED
Rouge, orange, vert, bleu, violet, rose, blanc
Spécificités LED
Basse tension - Ne chauffe pas
Dimensions
203 x 107 x 86 mm
Poids
265 g
Matériau
PVC / ABS / PMMA
Batterie veilleuse
1 batterie rechargeable 5V/500mAh
Autonomie veilleuse
8 heures
Piles
2 piles AAA pour l’écran
Précision
±1°C de 5 à 45°C - ±2°C en-dehors de cette plage
±5% d’humidité de 40 à 80% - ±8% en-dehors de cette plage
Résolution
0.1°C - Humidité : 1%
Voltage
5V
Température de fonctionnement 0-50°C
et de stockage
Taux d’humidité de
fonctionnement et de stockage
6
20-85%
Visiomed- VM-D31 - 042015
VM-D31
Visiomed- VM-D31 - 042015
7
This product conforms to REACH (RoHS) standards, LVD EN60598, EN71.
It does not contain phthalates.
TABLE OF CONTENTS
1. WARNING......................................................................................................................8
2. MAIN COMPONENTS...................................................................................................8
3. HOW TO USE.................................................................................................................9
3-1. DESCRIPTION............................................................................................................9
3-2. TURNING ON THE SCREEN.......................................................................................9
3-3. CHARGING THE NIGHT-LIGHT.................................................................................9
3-4. TURNING ON THE NIGHT-LIGHT.............................................................................9
3-5. BUTTONS...................................................................................................................9
4. CLEANING.....................................................................................................................10
5. TECHNICAL SPECIFICATIONS.....................................................................................10
The manufacturer reserves the right to modify
the technical characteristics of the product without prior notice.
Dear customer,
Thank you for buying this 5-mode night-light (night-light, thermometer, humidity sensor, alarm
clock, 12-hour and 24-hour clock) VM-D31 DODODOO®. We hope it will give you satisfaction, and
we recommend reading this instruction manual carefully.
1. WARNING
- This product must only be used in the way described in this manual.
- The device is for personal use at home.
- The device must be used within a temperature range of between 0 and 50°C.
- Do not expose the device to extreme temperatures > 60°C or < –20°C.
- Do not use the device in humidity levels above 85%.
- This device must always be placed in a clean and dry place.
- Do not expose to sunlight or water.
- Do not expose to electric shocks.
- Do not use outside.
- Never drop the device.
- Follow the maintenance instructions given in this manual.
-Do not try to open the device. In case of problems, please contact your dealer.
- Stop using the device in the event of a malfunction.
- Do not use other kinds of battery than those recommended, do not recharge non-rechargeable
batteries, do not throw used batteries into fire.
- Remove the batteries if the device will not be used for a long period.
Important
Respect polarity when inserting batteries.
An error in polarity can cause damage to your device and annul the warranty.
2. MAIN COMPONENTS
1 night-light, 1 5V/500mAh adapter, 1 USB cable, 2 AAA LR03,1.5V batteries, 1 instruction manual.
8
Visiomed- VM-D31 - 042015
3. HOW TO USE
3-1. DESCRIPTION
SEE DIAGRAMMES ON PAGE 2
1 MODE button
4 ON/OFF zone
2 MAX/MIN button
5 Temperature
7 Time or alarm
8 LED charging light
3 UP/LIGHT button
6 Humidity
9 USB Port
3-2. TURNING ON THE SCREEN
Open the battery compartment located under the device, and insert two AAA LR03 1.5V batteries.
Once the batteries are inserted, the screen turns on and shows :
- the temperature (in °C)
- the humidity level (in %)
- the time (12 or 24 hour format)
The screen turns on when the buttons are pressed and when the night-light is on.
Replace batteries when the
symbol appears on the screen.
The temperature in a baby’s room should be between 18 and 20°C.
3-3. CHARGING THE NIGHT-LIGHT
Plug in the device using the mains adapter or the USB cable.
If you use the USB cable, insert it into the USB port of your computer and insert the other end into
the USB port of the device.
If you use the mains adapter, plug it into a suitable mains socket, and insert the other end into
the USB port of the device.
The red LED charging light comes on when the device is plugged in, and automatically turns off
when the device is charged.
Warning!
It is recommended to charge the night-light before the first use.
3-4. TURNING ON THE NIGHT-LIGHT
Press down on the bear’s head between the ears (ON/OFF zone), to turn the
night-light on or off. You can also turn on the night-light by pressing the UP/
LIGHT button (if the screen is in regular display mode).
Warning!
The night-light may turn itself on and off if placed in an environment where
there is interference (near a computer, mobile phone or wifi router, etc.).
3-5. BUTTONS
• MODE BUTTON : Time or alarm
Press the MODE button to show either the time or the time set for the alarm.
Setting the time
When the time is displayed, long press the MODE button until the hour flashes. Press on the UP/
LIGHT button to change the hour, and on the MODE button to confirm. After confirming the hour,
the minutes will flash. Press on the UP/LIGHT to change the minutes, and on the MODE button to
confirm. After confirming the minutes, the time format flashes. Press on the UP/LIGHT button to
choose between a 12-hour and 24-hour format, then on the MODE button to confirm.
Setting the alarm (alarm clock)
When the alarm is displayed, long press on the MODE button until the time set for the alarm
flashes. Press on the UP/LIGHT button to change the hour, and on the MODE button to confirm.
After confirming the hour, the minutes will flash. Press on the UP/LIGHT to change the minutes,
and on the MODE button to confirm.
When the time set for the alarm is displayed on the screen, press on the UP/LIGHT button to show
or hide the
symbol. This indicates whether the alarm is activated or not.
Visiomed- VM-D31 - 042015
9
• MAX/MIN BUTTON : Memory or reset memory
Mémoire
Press the MAX/MIN button to show the maximum temperature and humidity level recorded by
the device. “MAX” appears above the temperature. Press the MAX/MIN button again to display the
minimum temperature and humidity recorded by the device. “MIN” appears above the temperature. Press the MAX/MIN button again to display the present temperature and humidity level.
“MAX” or “MIN” are no longer displayed.
Resetting the memory
The maximum memory is automatically reset at 8 a.m. and the minimum memory at 8 p.m. To
reset manually, long press on the MAX/MIN button (when the maximum or minimum memory is
displayed on the screen) until the figures disappear.
• UP/LIGHT BUTTON : Setting the night-light
The night-light has three working modes. After turning on the night-light (see 3-4), press the
UP/LIGHT button to choose the mode. The corresponding icon will be displayed on the screen.
Mode 1 : Manual
NL
Bear
A choice of seven colours (red, orange, green, blue, purple, pink, white). The colour
chosen does not change. Colours are chosen by pressing on the bear’s head.
GEBRUIKSHANDLEIDING
Mode 2 : Cycle
A non-stop cycle of seven alternating colours (red, orange, green, blue, purple,
pink, white).
Mode 3 : Temp
TEMP
6 colours corresponding to room temperature.
Red : ≥30°C - Pink : 26-29.9°C - Orange : 21-25.9°C - Green : 17-20.9°C Purple : 10-16.9°C - White : ≤9.9°C.
4. CLEANING
Use a damp soft cloth to clean the night-light.
5. TECHNICAL SPECIFICATIONS
LED Colours
Red, orange, green, blue, purple, pink, white
LED Details
Low tension – Does not heat up
Dimensions
203 x 107 x 86 mm
Weight
265 g
Materials
PVC / ABS / PMMA
Night-light battery
1 rechargeable 5V/500mAh battery
Night-light autonomy
8 hours
Batteries
2 AAA batteries for the screen
Precision
±1°C from 5 to 45°C - ±2°C outside this range
±5% humidity from 40 to 80% - ±8% outside this range
Resolution
0.1° - Humidity : 1%
Voltage
5V
Working and
storage temperature
0-50°C
Working and storage
humidity level
20-85%
10
Visiomed- VM-D31 - 042015
VM-D31
Visiomed- VM-D31 - 042015
11
Dit product voldoet aan de Reach-richtlijnen (BGS), LVD EN60598, EN71.
Het bevat geen ftalaten.
INHOUDSOPGAVE
1. WAARSCHUWINGEN....................................................................................................12
2. BELANGRIJKSTE ONDERDELEN..................................................................................12
3. GEBRUIK........................................................................................................................12
3-1. BESCHRIJVING..........................................................................................................12
3-3. OPLADEN VAN DE NACHTLAMP.............................................................................13
3-4. INSCHAKELEN VAN DE NACHTLAMP.....................................................................13
3-5. KNOPPEN...................................................................................................................13
4. REINIGING.....................................................................................................................14
5. TECHNISCHE SPECIFICATIES......................................................................................14
De fabrikant behoudt zich het recht voor om de specificaties van het product
zonder voorafgaande kennisgeving te wijzigen.
Geachte klant,
U hebt zonet een VM-D31 DODODOO® nachtlamp met 5 functies (nachtlamp, thermometer,
hygrometer, wekker, 12/24u klok) verworven en wij danken u daarvoor. Wij hopen dat u er het
beste uit zult halen en raden u aan om deze bedieningshandleiding aandachtig door te nemen.
1. WAARSCHUWINGEN
-Gebruik dit apparaat uitsluitend voor het beoogde doel zoals beschreven in deze handleiding.
- Dit apparaat mag worden gebruikt voor persoonlijk gebruik thuis.
- Gebruik dit apparaat in een omgevingstemperatuur tussen 0 en 50°C.
-Stel dit apparaat niet bloot aan extreme temperaturen > 60°C en < -20 °C.
-Gebruik dit apparaat niet bij een relatieve vochtigheid van meer dan 85 %.
-Dit apparaat moet altijd in een schone en droge plaats worden geplaatst.
- Stel dit apparaat niet bloot aan zonlicht of water.
- Stel dit apparaat niet bloot aan elektrische schokken.
- Gebruik dit apparaat niet buitenshuis.
- Laat het apparaat nooit vallen.
- Volg de onderhoudsinstructies die in deze handleiding staan vermeld.
- Probeer niet om het apparaat te openen. In geval van problemen, neem contact op met uw
leverancier.
-Stop het gebruik van het apparaat in geval van afwijkingen of storingen.
- Gebruik geen andere dan de genoemde batterijen, laad geen niet-oplaadbare batterijen op,
gooi ze niet in het vuur.
-Verwijder de batterijen wanneer het apparaat niet gebruikt wordt voor een lange periode.
Belangrijk
Respecteer de polariteit van de batterijen. Een foute polariteit kan schade veroorzaken en afbreuk
doen aan de garantie van uw apparaat.
2. BELANGRIJKSTE ONDERDELEN
1 nachtlamp, 1 adapter van 5V/500mAh, 1 USB-kabel, 2 AAA-batterijen, 1 handleiding.
12
Visiomed- VM-D31 - 042015
3. GEBRUIK
3-1. BESCHRIJVING
ZIE SCHEMA’S OP PAGINA 2
1 MODUS-knop
4 AAN/UIT-zone
7 Tijd of alarm
2 MAX/MIN-knop
5 Temperatuur
8 Laad-LED
3 UP/LIGHT-knop
6 Vochtigheid
9 USB-poort
3-2. INSCHAKELEN VAN HET SCHERM
Open het batterijcompartiment onder het apparaat en plaats 2 AAA LR03 1.5V batterijen.
Zodra de batterijen op hun plaats zitten zal het scherm oplichten met de vermelding van :
- de temperatuur (in °C)
- de vochtigheidsgraad (in %)
- de tijd (12u of 24u-formaat)
Het scherm licht op wanneer u op de knoppen drukt, en wanneer de nachtlamp brandt.Vervang
de batterijen wanneer het symbool
verschijnt op het scherm.
De omgevingstemperatuur van een babykamer moet tussen 18 en 20°C zijn.
3-3. OPLADEN VAN DE NACHTLAMP
Sluit het apparaat aan op de AC-adapter of USB-kabel.
Als u de USB-kabel gebruikt, sluit deze aan op de USB-poort van uw computer, sluit vervolgens
het andere uiteinde aan op de USB-poort van het apparaat.
Als u de AC-adapter gebruikt, sluit deze aan op de gepaste netvoeding, sluit vervolgens het
andere uiteinde aan op de USB-poort van het apparaat.
De laad-LED licht rood op wanneer het apparaat is aangesloten, en schakelt zich automatisch uit
wanneer het apparaat opgeladen is.
Opgelet!
Gebruikers wordt geadviseerd om de nachtlamp volledig op te laden vóór het eerste gebruik.
3-4. INSCHAKELEN VAN DE NACHTLAMP
Druk op het hoofd van de beer, tussen de oren (AAN/UIT-zone), om de nachtlamp in- of uit te schakelen. U kunt ook de nachtlamp inschakelen door op
de UP/LIGHT-knop te drukken (als het scherm in de normale weergave is).
Opgelet!
De nachtlamp zich zelfstandig activeren/deactiveren als ze geplaatst is in een
omgeving onderhevig aan interferentie (in de buurt van een computer, een
mobiele telefoon, een draadloze router...).
3-5. KNOPPEN
• BOUTON MODE : Tijd of alarm
Druk op de MODUS-knop om de tijd of de alarmtijd weer te geven.
Configuratie van de tijd
Wanneer de tijd wordt weergegeven, houd de MODUS-knop ingedrukt totdat het uur knippert. Druk
op de UP/LIGHT-knop om te wijzigen, en op de MODUS-knop om te bevestigen. Na bevestiging van het
uur zullen de minuten knipperen. Druk op de UP/LIGHT-knop om te wijzigen, en op de MODUS-knop
om te bevestigen. Na bevestiging van de minuten zal de tijdsindeling knipperen. Druk op de UP/LIGHTknop om te kiezen tussen een 12u of 24u-formaat, en vervolgens op de MODUS-knop om te bevestigen.
Configuratie van het alarm (wekker)
Wanneer het alarm wordt weergegeven, houd de MODUS-knop ingedrukt totdat de alarmtijd
knippert. Druk op de UP/LIGHT-knop om het uur te wijzigen, en op de MODUS-knop om te bevestigen. Na bevestiging van het uur zullen de minuten knipperen. Druk op de UP/LIGHT-knop om te
wijzigen, en op de MODUS-knop om te bevestigen.
Wanneer het alarm wordt weergegeven op het scherm, drukt u op de UP/ LIGHT-knop om het
symbool
te doen verschijnen of verdwijnen. Dit geeft aan of het alarm geactiveerd is of niet.
Visiomed- VM-D31 - 042015
13
7 kleuren om uit te kiezen (rood, oranje, groen, blauw, paars, roze, wit). De geselecteerde kleur wordt bevestigd. De keuze van de kleuren wordt gedaan door op het hoofd
van de beer te drukken.
Modus 2 : Cyclus
Doorlopende cyclus van 7 afwisselende kleuren (rood, oranje, groen, blauw, paars,
roze, wit).
Modus 3 : Temp
TEMP
6 kleuren volgens de kamertemperatuur.
Rood : ≥30°C - Roze : 26-29.9°C - Oranje : 21-25.9°C - Groen : 17-20.9°C Paars : 10-16.9°C - Wit : ≤9.9°C.
4. REINIGING
Gebruik een vochtige doek om de nachtlamp te reinigen.
5. TECHNISCHE SPECIFICATIES
LED-kleuren
Rood, oranje, groen, blauw, paars, roze, wit
LED-specificaties
Laagspanning – Warmt niet op
Afmetingen
203 x 107 x 86 mm
Gewicht
265 g
Materiaal
PVC / ABS / PMMA
Batterij van de nachtlamp
1 herlaadbare batterij van 5V/500mAh
Autonomie van de nachtlamp
8 uren
Batterijen
2 AAA-batterijen voor het scherm
Precisie
±1°C van 5 tot 45°C - ±2°C buiten dit bereik
±5% vochtgehalte van 40 à 80% - ±8% % buiten dit bereik
Resolutie
0.1°C - Vochtigheid : 1%
Voltage
5V
Bedrijfstemperatuur en
opslagtemperatuur
0-50°C
Bedrijfsvochtigheidsgraad en
opslagvochtigheidsgraad
20-85%
14
Visiomed- VM-D31 - 042015
WA R R A N T Y
• MAX/MIN-KNOP : Geheugen of resetten van geheugen
Geheugen
Druk op de MAX/MIN-knop om de maximum temperatuur en vochtigheid die zijn ingesteld op
het apparaat weer te geven. “MAX” verschijnt boven de temperatuur. Druk nogmaals op de MAX/
MIN-knop om de minimum temperatuur en vochtigheid die zijn ingesteld op het apparaat weer
te geven. “MIN” verschijnt boven de temperatuur. Druk nogmaals op de MAX/MIN-knop om terug
te keren naar de realtime temperatuur- en vochtigheidsinformatie. “MAX” en “MIN” verschijnen
niet meer.
Resetten van het geheugen
Het maximale geheugen wordt automatisch gereset om 08u00 (08:00), en het minimale
geheugen om 20u00 (8u00 pm). Om dit handmatig te doen, houd de MAX/MIN-knop ingedrukt
(wanneer het maximale of minimale geheugen wordt weergegeven op het scherm) tot de gegevens verdwijnen.
• UP/LIGHT-KNOP : Configuratie van de nachtlamp
De nachtlamp heeft drie werkingsmodi. Na het inschakelen van de nachtlamp (zie 3-4), druk op
de UP/LIGHT-knop om de modus te kiezen. Het bijbehorende pictogram verschijnt op het scherm.
Modus 1 : Handleiding
Visiomed- VM-D31 - 042015
15
CARTE DE GARANTIE - GUARANTEE CARD
Date d’achat / Purchase date
Date :.......... / .......... / ..........
N° de série / Serial number
SN: ...................................................
Cachet de revendeur / Retailer’s seal
Cachet / Stamp:
FR: Visiomed® réparera ou remplacera selon les conditions mentionnées ci-dessous ce produit
gratuitement dans le cas d’un défaut de pièces ou défaut de fabrication, comme suit:
DURÉE : 12 MOIS EN RETOUR ATELIER
LIMITES ET EXCLUSIONS: Cette garantie ne concerne que l’acheteur final original. Une facture
d’achat, ou autre preuve d’achat, ainsi que cette carte de garantie seront demandées pour obtenir un service après-vente, conformément à cette garantie. Cette carte de garantie ne sera pas
étendue à une autre personne que l’acheteur final original. Cette garantie devient inefficace
dès lors que les numéros de série sur le produit sont modifiés, remplacés, illisibles, absents, ou
si une réparation a été effectuée sans résultat par tout service non agréé, incluant l’utilisateur.
Cette garantie couvre uniquement les défauts de matériel ou de pièces, survenant lors d’une
utilisation normale du produit. Elle ne couvre pas les dommages causés lors de l’expédition ou
du transport de l’appareil, causés par des réparations effectuées par un distributeur, par des modifications apportées, par la connexion d’équipements non agréés par Visiomed®, ou causés par
l’usage contraire aux instructions du mode d’emploi. En outre, la présente garantie ne couvre
pas les dommages liés à des chutes, des mauvaises manipulations, une mauvaise installation, les
dommages liés au feu, à une inondation, à la foudre, ou tout autre désastre naturel. Cette garantie ne couvre pas l’emballage du matériel, les accessoires, les défauts d’aspect dus à l’exposition
commerciale du produit, show room, espace de vente, démonstration etc.… L’entretien normal,
le nettoyage et le remplacement de pièces dont l’usure est normale, ne sont pas couverts par les
termes de cette garantie.
Visiomed® et ses représentants et agents ne seront en aucun cas tenus pour responsables des dommages divers et des préjudices consécutifs à l’utilisation du produit ou à l’incapacité d’utilisation
de ce produit. Cette garantie est la seule valable auprès de Visiomed®, toute autre garantie incluant
16
Visiomed- VM-D31 - 042015
celle-ci (garantie commerciale) ne sera prise en compte.
IMPORTANT: Si lors de la période de garantie, vous n’obtenez pas satisfaction des réparations de
ce produit, veuillez contacter le service clients Visiomed®.
EN: Visiomed® will repair or replace this product free of charge in the case of defective parts or
manufacturing defects, in accordance with the conditions mentioned below as follows:
DURATION: 12 MONTHS RETURN TO WORKSHOP
LIMITS AND EXCLUSIONS: This guarantee concerns only the original final purchaser. A purchase
invoice, or another proof of purchase, with this guarantee card will be required to obtain an after-sales service, in accordance with this guarantee. This guarantee card will not be extended
to another person only the original final purchaser. This guarantee becomes void if the serial
numbers on the product are modified, replaced, illegible, absent, or if repair has been carried out
by a service not approved, including the user.
This guarantee covers only the defects of the material or parts, occurring during normal use
of the pro-duct. It does not cover the damage caused during the transport of the apparatus,
causes due to repairs being carried out by the distributor, by any modifications undertaken, any
connection of equipment not approved by Visiomed®, or causes contrary to those written in the
user manual or notice. Moreover, the present guarantee does not cover damage due to falls, bad
handling, bad installations, damage by fire, floods, lightning, or any other natural disaster. This
guarantee does not cover the packing of the material, the accessories, the defects caused by
commercial exposure of the product, show room, sale space, demonstration etc... Normal maintenance, cleaning and the replacement of parts where wear is normal, are not covered by the
terms of this guarantee. Visiomed® and its representatives and agents will not in any case be held
responsible for any damage and consecutive damages due to the mishandling of this product.
This guarantee is the only valid one at Visiomed®, any other guarantee (commercial guarantee)
except this one will not be taken into account.
IMPORTANT: During the guarantee period if you are dissatisfied with the repairs of this product,
please contact the Visiomed® customer service.
NL: Visiomed® zal, volgens de hieronder vermelde voorwaarden, gratis dit product repareren of
vervangen in geval van defecte onderdelen of een fabricatiefout en wel als volgt:
TIJDSDUUR: 12 MAANDEN MET TERUGZENDING NAAR DE WERKPLAATS
BEPERKINGEN EN UITSLUITINGEN: Deze garantie heeft uitsluitend betrekking op de uiteindelijke koper. De koopbon, of een ander bewijs van aankoop, plus deze garantie bon moeten overhandigd kunnen worden voor het verkrijgen van een servicedienst in overeenstemming met deze garantie. Deze
garantie bon zal niet overgedragen kunnen worden aan een ander persoon dan de oorspronkelijke uiteindelijke koper. Deze garantie vervalt zodra de serienummers van het product gewijzigd, vervangen, onleesbaar gemaakt of verwijderd worden of als men een vruchteloze reparatie heeft laten verrichten door een niet erkende servicedienst, met inbegrip van de gebruiker.
Deze garantie dekt uitsluitend materiaal gebreken of defecte onderdelen die zich openbaar
maken tijdens een normaal gebruik van het product. De garantie dekt niet schade veroorzaakt
tijdens de verzending of het transport van het apparaat, veroorzaakt door reparaties verricht
door een distributeur, door aangebrachte wijzigingen, door het aansluiten van uitrustingen die
niet door Visiomed® zijn goedgekeurd of door een gebruik dat tegen de instructies gegeven in
de gebruiksaanwijzing ingaat. Bovendien dekt deze garantie niet de schade voortvloeiende uit
vallen, onjuiste hanteringen, onjuiste installatie, schade in verband met brand, overstroming,
blikseminslag of enige andere natuurramp. Deze garantie dekt niet de verpakking van het materiaal, de toebehoren, de uitwendige foutjes te wijten aan een commerciële tentoonstelling van
het product, showroom, verkoopruimte, demonstraties enzovoort. Het normale onderhoud, het
schoonmaken en de vervanging van aan slijtage onderhevige onderdelen, worden niet gedekt
volgens de bewoordingen van deze garantie. Visiomed® en zijn vertegenwoordigers en agentVisiomed- VM-D31 - 042015
17
en zullen in geen geval aansprakelijk gesteld kunnen worden voor diverse schadeposten en de
schade voortvloeiende uit het gebruik van het product of de onmogelijkheid om dit product te
gebruiken. Deze garantie is als enige rechtsgeldig bij Visiomed®, iedere andere garantie die deze
garantie omvat (commerciële garantie) zal opzij geschoven worden.
BELANGRIJK: Indien u tijdens de garantieperiode niet tevreden mocht zijn over de reparaties verricht op dit product, verzoeken wij u contact op te nemen met de Klantendienst van Visiomed®.
FR: Évacuation des équipements usagés par les utilisateurs dans les foyers privés au sein
de l’Union Européenne.
La présence de ce symbole sur le produit ou sur son emballage indique que vous ne
pouvez pas vous débarrasser de ce produit de la même façon que vos déchets courants.
Au contraire, vous êtes responsable de l’évacuation de vos équipements usagés et, à cet effet,
vous êtes tenu de les remettre à un point de collecte agréé pour le recyclage des équipements
électriques et électroniques usagés. Le tri, l’évacuation et le recyclage séparés de vos équipements usagés permettent de préserver les ressources naturelles et de s’assurer que ces équipements sont recyclés dans le respect de la santé humaine et de l’environnement. Pour plus
d’informations sur les lieux de collecte des équipements usagés, veuillez contacter votre mairie
ou votre service de traitement des déchets ménagers.
EN: Disposal of Waste Equipment by Users in Private Households in the European Union.
The symbol on the product or on its packaging indicates that this product must not be disposed
of with your other household waste. Instead, it is your responsibility to dispose of your waste
equipment by handing it over to a designated collection point for the recycling of waste electrical
and electronic equipment. The separate collection and recycling of your waste equipment at
the time of disposal will help to conserve natural resources and ensure that it is recycled in a
manner that protects human health and the environment. For more information about where
you can drop off your waste equipment for recycling, please contact your local city office or your
household waste disposal service.
NL: Afvoer van afgedankte apparatuur door gebruikers in particuliere huishoudens in de Europese
Unie.
Dit symbool op het product of de verpakking geeft aan dat dit product niet mag worden
weggegooid met ander huishoudelijk afval. Het is uw verantwoordelijkheid uw afgedankte
apparatuur af te leveren op een aangewezen inzamelpunt voor de verwerking van afgedankte
elektrische en elektronische apparatuur. De gescheiden inzameling en verwerking van uw
afgedankte apparatuur draagt bij tot het sparen van natuurlijke bronnen en tot het hergebruik
van materiaal op een manier die de volksgezondheid en het milieu beschermt. Voor meer informatie over waar u uw afgedankte apparatuur kunt inleveren voor recycling, kunt u contact
opnemen met het gemeentehuis in uw woonplaats of de reinigingsdienst.
© 04/2015 VM-D31
FR: Dododoo® est une marque déposée par Visiomed Group SA. Le constructeur se réserve le droit de
modifier les photos et caractéristiques sans avis préalable. Modèle déposé. Les logos et marques sont
la propriété respective de leurs auteurs.
EN: Dododoo® is a brand registred by Visiomed Group SA. The constructor keeps the right to modify
the photographs and characteristics without previous notice. Registred design. The logos and trademarks are the property of their respective owners.
NL: Dododoo® is een merk van de Visiomed Group SA. De fabrikant behoudt zich het recht voor
om foto›s en eigenschappen zonder voorafgaande kennisgeving te veranderen. Gedeponeerd
handelsmerk.
18
Visiomed- VM-D31 - 042015
Visiomed- VM-D31 - 042015
19