1
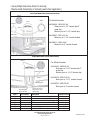
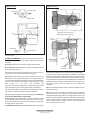
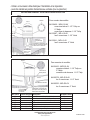
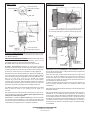
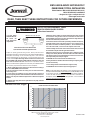
POOL WINTERIZING
In areas where freezing temperatures occur, it is usual to close an
outdoor pool for the winter. This is known as winterizing, and should
be taken into account during the design of the pool. In general,
winterizing involves:
A). Emptying the piping system of all water above the frost line;
B). Closing the pool openings against the entry of rain, snow, surface water, and debris;
C).Removal or protection of mechanical equipment to prevent
damage by vandalism and exposure to the elements.
Winterizing practices vary with the type of pool construction, the
locality, and the severity of the climate. The best guide to them is
the experience of local pool builders and service companies. In
addition, read the winterizing information contained in the manuals supplied with the various pieces of pool equipment.
1a). SAND FILTER: Backwash for at least 30 minutes to clean the
filter bed thoroughly:
1b). DIATOMACEOUS EARTH FILTER: Backwash until the waste
water runs clear.
1c). CARTRIDGE FILTER: Remove and clean the cartridges for
storage in a dry place.
2a). Drain or pump the pool water level below the inlet fittings. Drain
the water from the filter tank and all vulnerable piping. Note that it
is NOT sufficient to set the dial valve of a filter to WINTERIZE without checking that drainage actually occurs. Setting the dial valve
to WINTERIZE speeds the draining of the filter by allowing air to
enter the tank IF the drain plugs are already removed, and IF the
drain holes are not blocked. Should the water not drain readily from
the tank, either use a screwdriver to dislodge any sand blocking the
drain hole, or blow out the obstruction by running the pump for a
short period. Refer to the instruction manual for the location of the
drain plugs, and for other information about the winterizing of the filter.
2b). Remove any pressure or vacuum gauges. Store them indoors
where they will not be mislaid. Use a wrench on the square metal
shanks of the gauges - do not apply force to their cases.
3a). SAND FILTER: Open the filter tank and inspect the condition of
the sand.
3b). DIATOMACEOUS EARTH FILTER: Dismantle the filter, and scrub
the elements with a detergent solution; if the elements are encrusted with lime, wash them in a dilute solution of muriatic acid,
and rinse them thoroughly; replace elements which have defects in
the cloth. Protect the filters from the elements and extreme temperatures.
4). Drain the FILTER PUMP (refer to the instruction manual): Store
the pump and motor indoors, or protect them from the elements and
extreme temperatures. Have any repairs made during the off-season when the best service is available - do not leave them until next
season. If the electric motor requires service or repairs, take or
send it to the motor manufacturer’s local service station, as listed
in the information supplied with the motor. Competition pool accessories Inc. (“Competition”) does not undertake the service or
repair of motors.
5). Remove the covers and empty the HAIR AND LINT STRAINER
TO BE LEFT WITH OWNER
and CHEMICAL FEED POTS.
6). Remove the orifice plates or directional balls from the INLET
FITTINGS, and use pipe plugs or rubber expansion plugs to make
these wall openings watertight.
7). SKIMMERS: Do not pour antifreeze into the skimmer.
ABOVE-GROUND POOLS:
Refer to the instructions supplied with the pool.
SERIES WFL-U ONLY:
DRAINING (Figure 1): This applies to a skimmer connected to main
drains. Remove the cover and basket. Set the trimmer to MAX SKIM
and replace the basket with the vacuum plate on top of it. Take the
plug from its holder on the vacuum plate and use it to seal the
center opening. For skimmers in a multiple installation, use the
vacuum plate and plug to close off the skimmer as outlined above.
WINTERIZING (Figure 2): The water level in a prefabricated pool
must be maintained at least 3 inches (75 mm) below the skimmer
throat throughout the winter. Surplus water must be removed by
pumping or draining so that it does not enter the skimmer. In addition, the WINTERIZING KIT (Product No. 9411-9807) must be used.
“Competition” will not accept any claims, in warranty or otherwise, unless the winterizing kit has been installed in accordance
with the following instructions.
The winterizing kit is made from foam material, and its purposes are:
1). To absorb the expansion of any ice that forms if water enters the
skimmer;
2). To protect the skimmer from the vertical and lateral expansion
of ice formed in the pool.
The kit consists of:
A). ONE piece, 1" dia. x 19" long (25 mm dia. x 48 cm long) extrusion;
B). TWO blocks (foam);
C).ONE block (foam);
D). ONE block (foam);
E). ONE dowel.
Remove the cover and basket. Store the basket in a safe place.
Lower the water level in the pool to at least 3" (75 mm) below the
skimmer opening. Insert piece A through the connections in the bottom of the skimmer as shown.
Place blocks B in the body of the skimmer on each side of A. It may
be necessary to cut blocks B to suit. Insert block C (with the step on
the bottom) through the skimmer throat until it is flush with the face
flange. Push dowel E through block C to secure it on the inside of the
skimmer body as shown. Fit block D over the projection of block C.
Replace the cover and seal the deck opening against rain and snow
by taping plastic sheet or waterproof building paper over it. DO NOT
PUT ANY ANTIFREEZE INTO THE SKIMMER OR ITS PIPING. ANTIFREEZE MAY DAMAGE THE PIPING AND THE SKIMMER.
TO REPLACE THE WEIR: The hinges of the weir are spring-loaded.
They register with recesses in the side wall of the skimmer throat
TO REMOVE THE OLD WEIR: Use a small screwdriver (with a blade
about 1/8" wide), to lever one end of the hinge from its recess. Withdraw the weir.