1
MAINTAINING YOUR VACUUM MANTENER LA ASPIRADORA
ENTRETIEN DE L’ASPIRATEUR
POST THIS INFORMATION FOR REFERENCE NEAR THE LOCATION YOU STORE THE VACUUM.
COLOQUE ESTA INFORMACIÓN DE REFERENCIA CERCA DE LA UBICACIÓN DONDE GUARDA LA ASPIRADORA.
AFFICHER CES INDICATIONS BIEN EN VUE À PROXIMITÉ DE L’ESPACE DE RANGEMENT DE L’ASPIRATEUR.
WEARING THE VACUUM:
HARNESS HEIGHT ADJUSTMENT
USO DE LA ASPIRADORA:
HARNESS HEIGHT ADJUSTMENT
MISE EN PLACE DE L’ASPIRATEUR DORSAL:
Upper
Harness
Buckle
HARNESS HEIGHT ADJUSTMENT
Upper Harness
1
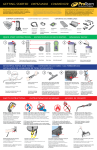
Upper harness should sit between shoulder blades for most comfortable fit. The
unit was shipped with the upper harness
in the middle position. If you are a tall
user, you will need to move the position
up. If you are a shorter user, you will need
to move the position down (See side view
Adjustable
of vacuum and harness to the left).
Harness
Locations El arnés superior debe apoyar entre los
omóplatos para tener un calce más confortable. La unidad fue despachada con el
arnés superior en la posición media. Si usted
es alto, tendrá que mover la posición hacia
arriba. Si no es tan alto, tendrá que mover
la posición hacia abajo (Ver vista lateral de
aspiradora y arnés.)
Pour un confort optimal, le harnais supérieur devrait reposer entre les omoplates. Sur
cet appareil, le harnais est présentement à
la position médiane. Si vous êtes une personne de grande taille, remontez le harnais.
Si vous êtes une personne de plus petite
taille, baissez le harnais (voir l’aspirateur et
le harnais vus de côté.)
2
4
3
Harness Height Adjustments
Tensioning Straps
Pivoting Bar
To move the upper harness, loosen the tensioning straps. Then using a #3 Phillips
screwdriver, unthread the screw from the unit. It is located in center of upper harness. The upper pad should be secured by screwing it all the way in.
Para mover el arnés superior, aflojar las correas tensoras. Luego, utilizando un destornillador Phillips # 3, desenroscar el tornillo de la unidad. Se encuentra en el centro de
arnés superior. La plataforma superior debe ser garantizado por atornillarlo todo hacia
adentro.
Pour déplacer le faisceau supérieur, desserrer les sangles de tension. Puis à l’aide d’un
tournevis cruciforme n ° 3, dévisser la vis de l’appareil. Il est situé dans le centre de
harnais supérieure. Le pavé supérieur doit être fixé par vissage tout le chemin po.
6
5
Loosen the shoulder straps and the waist belt.
Lift the vacuum and slide your arms through the
straps. The upper harness can also be adjusted by
tightening or loosening the upper harness buckles
for a custom fit.
Connect the waist strap.
Afloje las correas de los hombros y las correas de la
cintura. Levante la aspiradora y meta los brazos entre
las correas. El arnés superior también puede ajustarse
ajustando o aflojando sus hebillas para tener un calce
personalizado.
Conecte las correas de la
cintura.
Desserrer les courroies d’épaule et de taille. Soulever
l’aspirateur et glisser les bras dans les courroies pour
placer l’aspirateur sur le dos. Pour un ajustement
sur mesure, resserrez ou desserrez les boucles sur le
harnais.
Attacher la courroie de taille.
7
8
Tighten the waist belt by grabbing the ends of the straps and pulling them toward each
other and then directly outward from the center of the body. It is very important that the
weight of the unit be concentrated on your hips rather than your shoulders.
Adjust the shoulder straps so that the unit fits
comfortably, with the weight concentrated on
your hips.
Connect the sternum strap and slide the
strap up or down on the sewn-in wire support for the best fit.
Thread the extension cord through cord
holder on the waistbelt.
Ajuste la correa de cintura tomando los extremos de las correas y tirando de cada extremo hacia el
otro y luego directamente hacia afuera desde el centro del cuerpo. Es muy importante que el peso de
la unidad se concentre en sus caderas y no en sus hombros.
Ajuste las correas de los hombros para que la
unidad se acomode bien, pero con el peso siempre
concentrado en las caderas.
Enrolle el cable de extensión a través
portacable en la correa de la cintura.
Resserrez la ceinture en agrippant les extrémités des courroies et en les tirant l’une vers l’autre, puis
vers l’extérieur. Il est très important que le poids de l’appareil repose sur vos hanches plutôt que vos
épaules.
Ajuster les courroies d’épaule de sorte que l’appareil
repose en tout confort, tout en s’assurant que le
poids soit concentré sur les hanches.
Enganche la hebilla de la correa del esternón
y deslice la correa hacia arriba o abajo sobre
el soporte de alambre cosido para obtener el
mejor calce.
FILTER MAINTENANCE:
MANTENIMIENTO DEL FILTRO:
USE ONLY GENUINE PROTEAM FILTERS TO ENSURE
OPTIMAL PERFORMANCE, IMPROVED INDOOR AIR
QUALITY AND MAINTAIN A VALID VACUUM WARRANTY.
1
INTERCEPT MICRO FILTER
ENTRETIEN DES FILTRES:
USE SÓLO FILTROS DE REPUESTO PROTEAM GENUINOS
PARA GARANTIZAR UN RENDIMIENTO ÓPTIMO, OBTENER
UNA MEJOR CALIDAD DE AIRE EN EL INTERIOR Y MANTENER
VÁLIDA LA GARANTÍA DE LA ASPIRADORA.
INTERCEPT MICRO FILTER
MICROFILTRE INTERCEPT
EMPTY and INSPECT the Intercept Micro Filter every time
you start and finish vacuuming. Replace the filter if necessary. A clogged and dirty filter restricts airflow and results in
overheating and reduced suction.
To replace the Intercept Micro Filter, slide filter into
Cloth Filter and secure into vacuum body.
VACÍE e INSPECCIONE el filtro Intercept Micro Filter cada vez
que comience y termine de aspirar; cambie el filtro si fuese
necesario. Un filtro obstruido y sucio restringe el flujo de aire y
provoca sobrecalentamiento y menor succión.
Para cambiar el filtro Intercept Micro
Filter, colóquelo en el filtro de tela y fíjelo
al cuerpo de la aspiradora.
VIDER et INSPECTER le microfiltre Intercept chaque fois avant
de commencer à passer l’aspirateur et après l’avoir passé.
Remplacer le filtre si nécessaire. Un filtre obstrué ou souillé
restreint le débit d’air et provoque la surchauffe de l’appareil
et diminue la qualité d’aspiration.
Pour remettre le microfiltre Intercept
en place, glisser ce dernier dans le filtre
à tissus et le fixer solidement dans le corps
de l’aspirateur.
Enfiler la rallonge dans la boucle de fixation
de la courroie de taille.
Pour un ajustement optimal, fermez la boucle
de la courroie de sternum et glissez la courroie
ers le haut ou le bas sur le support tallique.
N’UTILISER QUE LES FILTRES PROTEAM AUTHENTIQUES AFIN
D’ASSURER LE RENDEMENT APPROPRIÉ DE L’ASPIRATEUR,
D’AMÉLIORER LA QUALITÉ DE L’AIR INTÉRIEURE ET DE
MAINTENIR LA GARANTIE DE L’ASPIRATEUR EN VIGUEUR.
2
CLOTH FILTER
Filtro de tela
FILTRE À TISSUS
Once a month, or as necessary, hand or machine wash
the cloth filter and let it AIR dry. DO NOT PUT IT IN THE
DRYER.
G E N UIN E / AUTÉ N TIC A / V É RITAB L E
I N T E R CE P T MI CR O ®
Replacement Filters / Filtros de repuesto / Filtres de rechange
GENUINE / AUTÉNTICA / VÉRITABLE
698
4503
sq. in.
pulgadas cuadradas
po2
sq. cm
cuadrados cm
cm2
Super Coach Pro®
Una vez al mes, o según sea necesario, lave a mano o a
máquina el filtro de tela y déjelo secar al aire. NO LO COLOQUE EN LA SECADORA.
The American Lung Association does not endorse products.
NO COMBUSTIBLES!
¡NINGUNOS COMBUSTIBLES!
AUCUN COMBUSTIBLE !
NO LIQUIDS!
¡NINGUNOS LIQUIDOS!
AUCUNS LIQUIDES !
ProTeam, Intercept Micro, Super CoachVac, CoachVac, and MegaVac
are trademarks and registered trademarks of ProTeam, Inc. © 2006-2011 ProTeam, Inc.
All Rights Reserved. ProTeam, Intercept Micro, Super CoachVac, CoachVac, y MegaVac
son marcas comerciales y marcas registradas de ProTeam, Inc. © 2006-2011
ProTeam, Inc. Todos los derechos reservados. ProTeam, Intercept Micro,
Super CoachVac, CoachVac, et MegaVac sont des marques commerciales et
marques déposéesde ProTeam, Inc © 2006-2011 ProTeam, Inc Tous droits réservés.
#100331
866.888.2168
I NT E RC E P T M I C RO ®
Replacement Filters / Filtros de repuesto / Filtres de rechange
698
4503
sq. in.
pulgadas cuadradas
po2
sq. cm
cuadrados cm
cm2
Super Coach Pro®
The American Lung Association does not endorse products.
NO COMBUSTIBLES!
¡NINGUNOS COMBUSTIBLES!
AUCUN COMBUSTIBLE !
NO LIQUIDS!
¡NINGUNOS LIQUIDOS!
AUCUNS LIQUIDES !
ProTeam, Intercept Micro, Super CoachVac, CoachVac, and MegaVac
are trademarks and registered trademarks of ProTeam, Inc. © 2006-2011 ProTeam, Inc.
All Rights Reserved. ProTeam, Intercept Micro, Super CoachVac, CoachVac, y MegaVac
son marcas comerciales y marcas registradas de ProTeam, Inc. © 2006-2011
ProTeam, Inc. Todos los derechos reservados. ProTeam, Intercept Micro,
Super CoachVac, CoachVac, et MegaVac sont des marques commerciales et
marques déposéesde ProTeam, Inc © 2006-2011 ProTeam, Inc Tous droits réservés.
#100331
3
866.888.2168
DOME FILTER
FILTRO DE DOMO
Une fois par mois, ou lorsque c’est nécessaire, laver à la main
ou à la machine le filtre à tissus et le laisser sécher à l’air libre.
NE PAS LE METTRE À LA SÉCHEUSE.
4
DÔME FILTRANT
HEPA EXHAUST FILTERS
FILTRO DE ESCAPE HEPA
FILTRE HEPA
A
B
Once a week, or as necessary, clean or replace the Dome Filter.
First, remove the Intercept Micro Filter and Cloth Filter. Reach
into the vacuum body and twist dome filter from motor.
Pull the top piece of the Dome Filter off and remove
the foam media. Shake it out, rinse it, and let it air dry
thoroughly.
To inspect or replace the HEPA filter, depress the raised portion of tab on filter
door (A). Then pivot the door away from the vacuum body. Grasp the plastic
housing on the HEPA filter and remove from vacuum (B). To replace the filter
door, align the 2 tabs to the housing and press in place, then push upward. Be
sure to snap the locking tabs of spring finger behind tab on housing. You should
hear an audible “click” if connected correctly.
Una vez a la semana, o según sea necesario, limpie o cambie el
filtro de domo. Primero, retire el filtro Intercept Micro Filter y el filtro
de tela. Meta la mano en el cuerpo de la aspiradora y gire el filtro
de domo para sacarlo del motor.
Saque la pieza superior del filtro de domo y saque el medio
de espuma. Sacúdalo, enjuáguelo y déjelo secar al aire por
completo.
Une fois par semaine, ou lorsque c’est nécessaire, nettoyer ou
remplacer le dôme filtrant. Retirer d’abord le microfiltre Intercept
et le filtre à tissus. Insérer ensuite la main à l’intérieur du corps de
l’aspirateur, saisir le filtre et le tourner pour le séparer du moteur
et l’extraire.
Séparer la partie supérieure du dôme filtrant et retirer le filtre
en mousse. Secouer et rincer ce dernier, puis le laisser sécher
entièrement.
Para revisar o reemplazar el filtro HEPA, presione la parte elevada de la lengüeta que
está en la puerta del filtro (A). Luego, haga girar la puerta alejándola del cuerpo de
la aspiradora. Tome el alojamiento de plástico sobre el filtro HEPA y retírela de la aspiradora (B). Para volver a colocar la puerta del filtro, alinee las 2 engüetas con el alojamiento y presione en su lugar, luego rote hacia arriba. Asegúrese de cerrar bien las
lengüetas de seguridad del dedo del resorte detrás de la lengüeta sobre el alojamiento.
Debería escuchar un “clic” audible si están correctamente instaladas.
www.pro-team.com
[email protected]
866.888.2168
Pour vérifier ou remplacer le filtre HEPA, appuyez sur la languette située sur la porte du filtre
(A). Puis faites pivoter la porte. Agrippez le compartiment en plastique du filtre et retirez
le filtre (B). Pour remplacer la porte du filtre, alignez et appuyez sur les 2 languettes, puis
faites pivoter vers le haut. Assurezvous que les languettes de verrouillage du doigt ressort
sont bien enclenchées. Vous entendrez un « clic » si elles sont bien enclenchées.
The American Lung Association
does not endorse products.
SP6859-1 9/13