1
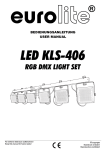
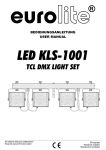
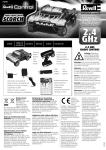
RC CAR LED control System
# 81236
GB
F
Manual
Manuel d’instructions
Thanks for purchasing this product which is easy to install and operate. This
system is controlled by the receiver and each channel warns by respective LED’s
the driving functions. We recommend to carefully read this manual before any
operation in order to obtain the right functions. We believe your car will be a
very beautiful appearance on the racing track with this lightning set.
Nous vous félicitons pour l’achat de ce produit dont l’installation est aisé. Le
boîtier de contrôle permets de faire fonctionner les signaux lumineux de votre
voiture respectivement suivant les commandes du récepteur. Veuillez lire attentivement les instructions pour obtenir les connections correctes.
Votre voiture produira un effet spectaculaire sur le circuit.
Contents
1. Twin LEDs, white 5mm (Front Parking lights)
2. Twin LEDs, white 5mm (Front Head lights)
3. Twin LEDs, red 5mm (Rear brake lights)
4. Twin LEDs, white 3mm LEDs (Reverse lights)
5. Twin LEDs, white 3mm (Rear lights)
6. Twin LEDs, orange 3mm (Signal L & R lights)
7. Y-cables from Control box to receiver : 2pcs
8. Main control box
9. Accessories + LED holders
Contenu
1. Paire de LEDs blancs, 5mm (Feux de position, avant)
2. Paire de LEDs blancs, 5mm (Feux de route, avant)
3. Paire de LEDs rouges, 5mm (Feus de frein, arrière)
4. Paire de LEDs blancs, 3mm (Feux de marche, arrière)
5. Paire de LEDs blancs, 3mm (Feux de position, arrière)
6. Paire de LEDs oranges, 3mm (Feux de direction gauche et droite)
7. Câble Y pour raccordement du boîtier de contrôle au récepteur : 2 pcs
8. Boîtier de contrôle
9. Accessoires et supports des LEDs
Installation
1. Choose a suitable car body
2. Drill 5mm for the 3mmLED holders and 7mm for the 5mm LED holders on a suitable
positions of the car body.
3. Stick the control box on a suitable place under the top of the car body.
4. Connect the respective LED leads to the corresponding connectors of the control box
5. Connect the Y-cable (CH1) long end to the main control box CH1 and the 2 short ends,
one end to the steering servo and the other end to the receiver « Channel 1 »
6. Connect the Y-cable (CH2) long end to the main control box CH2 and the 2 short ends,
one end to the throttle servo or ESC and the other end to the receiver « Channel 2 »
7. Fix (or stick) the LEDs in the holes on the car body.
8. Fix with self adhesive tape (accessories) the LED cables & Y-cables inside the body of
the car and keep enough clearance from the wheels.
9. Check that all cables are correctly installed.
Installation
1. Choisissez une carrosserie.
2. Forez des trous de 5mm pour les supports des LEDs de 3mm et des trous de 7mm pour
les supports des LEDs de 5mm, dans la carrosserie.
3. Collez le boîtier de contrôle sous le toit de la carrosserie.
4. Connectez le cordons des LEDs respectifs aux fiches correspondantes du boîtier de
contrôle.
5. Connectez un câble (coté long) au boîtier de contrôle « fiche CH1 » et les deux cotés
courts: l’un au servo de direction et l’autre au récepteur « fiche CH1 »
6. Connectez un câble (coté long) au boîtier de contrôle « fiche CH2 » et les deux cotés
courts: l’un au servo de gaz (ou contrôleur de vitesse) et l’autre au récepteur « fiche CH2 »
7. Fixez ou collez les LEDs dans les trous que vous avez foré dans la carrosserie.
8. Fixez également les cordons à l’aide de bande adhésive et des accessoires à l’intérieur
de la carrosserie en prenant soin de garder suffisamment de distance envers les roues.
9. Contrôlez que les cordons et les connexions sont correctement installés.
Connections
Socket 1 : Front Parking lights
Socket 2 : Front Head lights
Socket 3 : Left signal light
Socket 4 : Right signal light
Socket 5 : Reverse lights
Socket 6 : Brake lights
Socket 7 : Free socket for LED (option) Switch ON = LED functioning simultaneously
with Socket 2. Switch OFF= LED burning continuously
Socket 8 : Free socket for LED (option) Switch ON = LED functioning simultaneously
with Socket 6. Switch OFF= LED burning continuously
Connexions
Socket 1 : Feux de position avant
Socket 2 : Feux de route avant
Socket 3 : Feu de direction gauche
Socket 4 : Feu de direction droite
Socket 5 : Feux de marche arrière
Socket 6 : Feux de freinage
Socket 7 : Fiche libre pour LED (option). Interrupteur ON= Fonctionne simultanément avec
le socket 2 Interrupteur OFF= Alimentation en continu
Socket 8 : Fiche libre pour LED (option). Interrupteur ON= Fonctionne simultanément
avec le socket 6 Interrupteur OFF= Alimentation en continu
Channel 1 : Connectez le câble Y pour raccorder le servo de direction au boîtier de
contrôle.
Channel 2 : Connectez le câble Y pour raccorder le servo du gaz (ESC) au boîtier de
contrôle.
Channel 1 socket : Use Y-cable to connect the steering servo and receiver to control box
Channel 2 socket : Use Y-cable to connect the ESC or throttle servo and receiver to control
box
Socket
2
Moving Forward
Braking
Turn right
Socket
3
Socket
4
Socket
5
x
x
x
x
x
x
x
x
x
x
x
Socket
6
Turn off
Socket 7
No
Off
Socket 8
No
x
x
x
x
x
x
x
x
x
Off
Off
On
Off
Socket 1
On
Socket 2 Socket 3 Socket 4
Led System main Control
Socket 5 Socket 6
On
Off
Socket 7
On
Socket 8
Off
Receiver
Y-Cable
Y-Cable
Turn left
Flashing
― + S
Socket
1
50% Brightness
Channel 2
Channel 1
100% Brightness
Servo
copyright © 2010 BMI
# 81236 RC CAR LED Control System
RC CAR LED control System
# 81236
D
NL Handleiding
Bedienungsanleitung
Vielen Dank dass Sie sich entschieden haben für dieses BMI-Produkt, das sehr leicht einzustellen und einzubauen ist. Das Car System wird über den Empfänger kontrolliert. Jedes
Kanal steuert mehrere LED-Funktionen an. Wir empfehlen Ihnen die Bedienungsanleitung
sehr aufmerksam durchzulesen. Ihr Auto wird sicherlich auffallen auf der Rennstrecke.
Bedankt voor de aankoop van dit product, dat zeer eenvoudig te installeren en gebruiken
is. Vier verschillende knippermodi kunnen worden geïnstalleerd en wij raden u aan deze
handleiding zorgvuldig door te lezen, teneinde het gepaste lichteffect te bereiken. Deze
lichtset geeft uw modelauto een speciaal effect op de piste.
Lieferumfang
1. 2x LED Weiß (Standlicht) – 5mm
2. 2x LED Weiß (Abblendlicht) – 5mm
3. 2x LED Rot (Bremsleuchten) – 5mm
4. 2x LED Weiß, (Rückwärtsgangbeleuchtung)-3mm
5. 2x LED Rot (Heckbeleuchtung) - 3mm
6. 4xLED Orange (Blinker) – 3mm
7. 2x Y-Kabel für die Ansteuerung
8. Steuereinheit : 1 St.
9. Zubehör + Halterungen LEDs
Inhoud
1. 2x LEDs, wit (parkeerlichten vooraan) – 5mm
2. 2x LED, wit (Hoofdlichten) – 5mm
3. 2X LED rood (Remlichten) – 5mm
4. 2X LED wit (Achteruitrijdlicht) – 3mm)
5. 2x LEDs, white 3mm (Achterlichten)-3mm
6. 4X LED LEDs, oranje 3mm (richtingaanwijzers L & R )
7. Y-kabel voor de aansluiting van stuureenheid naar de ontvanger : 2pcs
8. Stuureenheid : 1St.
9. Accessoires + LED houders
Bauinstruktionen
1. Suchen Sie sich eine schöne Karosserie aus.
2. Bohren Sie 5mm Löcher für die 3mm LED-Halter und 7mm Löcher für die 5mm LEDHalter an der Innenseite der Karosserie
3. Bauen Sie die Steuereinheit mit doppelseitigem Klebeband ein.
4. Verbinden Sie jeden LED mit seinem Anschluss an der Steuereinheit.
5. Verbinden Sie einen Y-Kabel mit der Steuereinheit (CH1-Ausgang), Empfänger (CH1Eingang) und mit dem CH1-Servo
6. Verbinden Sie den 2. Y-Kabel mit der Steuereinheit (CH2-Ausgang), Empfänger (CH2Eingang) und mit dem CH2-Servo/Regler
7. Schieben Sie die LEDs in die Halter
8. Legen Sie die Kabel ordentlich und beachten Sie dass die Räder frei drehen können und
es genügend Spiel zwischen Räder und Kabel gibt.
9. Die Kabel mit Tesafilm an der Innenseite der Karosserie festkleben und kontrollieren die
diese ordnungsgemäß installiert sind.
Montage
1. Kies een geschikt koetswerk
2. Boor 5mm gaten voor de 3mm LED-houders en 7mm gaten voor de 5mm LED- houders
aan de binnenzijde van het koetswerk.
3. Maak de stuureenheid vast aan het chassis met dubbelzijdige tape.
4. Leg de kabels van de LEDs over de binnenzijde van het koetswerk. Zorg ervoor er
voldoende speling is tussen wielen en kabels
5. Verbind het lange einde van de eerste Y-kabel met de ingang CH1 van de stuureenheid,
De kortere uiteinden respectievelijk in de ontvanger (CH1) en aan de stuurservo.
6. Verbind het lange einde van de eerste Y-kabel met de ingang CH2 van de stuureenheid,
De kortere uiteinden respectievelijk in de ontvanger (CH2) en aan de gasservo of
elektronische regelaar
7. Plaats de LEDs in hun houders
8. Leg de kabels van de LEDs over de binnenzijde van het koetswerk. Zorg ervoor er
voldoende speling is tussen wielen en kabels
9. Maak de kabels uiteindelijk vast met kleefband en controleer of deze goed aangesloten zijn.
Anschlüsse
Anschluss 1: Standlicht
Anschluss 2: Abblendlicht
Anschluss 3: Blinker Links
Anschluss 4: Blinker Rechts
Anschluss 5: Rückwärtsgangbeleuchtung
Anschluss 6: Bremslicht
Anschluss 7: Frei (optional) : Schalter(ein) = LED funktioniert zusammen mit Anschluss 2
Schalter(aus)= LED brennt dauerhaft
Anschluss 8: Frei (optional) : Schalter(ein) = LED funktioniert zusammen mit Anschluss 6
Schalter(aus)= LED brennt dauerhaft
CH1-Anschluss: verwenden Sie den Y-Kabel um Lenkservo und Empfänger mit der Steuereinheit zu verbinden.
CH2-Anschluss: verwenden Sie den Y-Kabel um Gasservo/Regler mit der Steuereinheit zu
verbinden
Socket
2
Moving Forward
Braking
Turn right
Socket
3
Socket
4
Socket
5
x
x
x
x
x
x
x
x
x
x
x
Socket
6
Turn off
Socket 7
No
Off
Socket 8
No
x
x
x
x
x
x
x
x
x
Off
Off
On
Off
Socket 1
On
Socket 2 Socket 3 Socket 4
Led System main Control
Socket 5 Socket 6
On
Off
Socket 7
On
Socket 8
Off
Receiver
Y-Cable
Y-Cable
Turn left
Flashing
― + S
Socket
1
50% Brightness
Channel 2
Channel 1
100% Brightness
Aansluitingen
Aansluiting 1: parkeerlichten vooraan
Aansluiting 2: Hoofdverlichting vooraan
Aansluiting 3: Richtingaanwijzer links
Aansluiting 4: Richtingaanwijzer rechts
Aansluiting 5: Achteruitrijdverlichting achteraan
Aansluiting 6: Remlichten achteraan
Aansluiting 7: vrije uitgang voor LED (optioneel) ON:De LED werkt samen met aansluiting 2
OFF: LED brandt constant
aansluiting 8: Vrije uitgang voor LED (optioneel) ON: De LED werkt samen met aansluiting 6
OFF: De Led brandt constant.
Servo
copyright © 2010 BMI
# 81236 RC CAR LED Control System