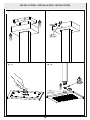
1
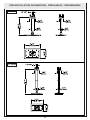
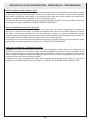
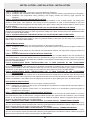
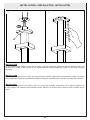
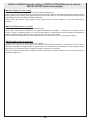
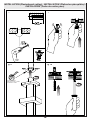
BATH MIXING PROGRAM
PROGRAMME DU MITIGEUR POUR LA SALLE DE BAIN
PROGRAMA MEZCLADORES BAÑO
RETTANGOLO
Art. 26651
Art. 26652
Gessi SpA - Parco Gessi
13037 Serravalle Sesia (Vercelli) - Italy
Phone +39 0163 454111 - Facsimile +39 0163 459273
www.gessi.com - [email protected]
CAUTION - WARNING
1-W
ARNING!! PLEASE TAKE NOTICE THAT the suggested maximum pressure and/or temperature
MUST NEVER BE EXCEEDED, as it may damage and/or cause ruptures and/or leakages and/or
even break the product, and present a potential hazard and danger to safety, health and/or property.
Following are the technical data with respect to the installation of Gessi plumbing products.
►Working pressure should not be lower than 0,5 bar (7,25 psi) and not be higher than 5 bar (72 Psi). In
case of higher working pressure use a pressure reducer valve.
►Maximum test installation pressure: 8 bar (116 psi).
►Avoid major pressure differences between hot and cold water supply. Differences in pressure, water
with high mineral content, and soapy substances can corrode the internal and external parts of the
hoses and slowly weaken the materials thereby causing leakage.
►Maximum working temperature for Gessi products is 70°C (158 °F).
2-W
ARNING!! PLEASE TAKE NOTICE THAT the product should never be used as a tool, hammer or for
any purposes other than the one it has been designed for.
3-W
ARNING!! PLEASE TAKE NOTICE THAT the product should always be installed and tested by a
professional plumber.
4-W
ARNING!! For product installation, please refer to the LOCAL PLUMBING CODE.
5-W
ARNING!! PLEASE TAKE NOTICE THAT electric cables should never be attached to the product as
they may present a health and safety hazard.
6-W
ARNING!! PLEASE TAKE NOTICE THAT heavy objects should never be placed on or dropped
on the product as they may damage the same and cause splinters, which may present a health and
safety hazard.
7-W
ARNING!! PLEASE TAKE NOTICE THAT the instructions manual should carefully read before
installation and the installation procedure provided therein must be properly followed and complied
with.
8-W
ARNING!! PLEASE TAKE NOTICE THAT during installation the use of excessive force should be
avoided in order to prevent damage to the product and/or its components and pieces. NEVER force a
component or piece into another. NEVER force screws or over tighten screws.
9 -WARNING!! No one uses aluminum FITTINGS for water connections.
2
ATTENTION - AVERTISSEMENT
1-A
TTENTION!! NOUS VOUS PRIONS DE TENIR COMPTE QUE la pression et/ou la température
maximum suggérée NE DOIT JAMAIS ETRE DEPASSEE, car elle pourrait abîmer et/ou provoquer
des ruptures et/ou des fuites et/ou des pannes du produit et, donc, représenter un risque et danger
potentiel pour la sécurité, la santé et/ou les choses. Ci-dessous nous indiquons les données
techniques concernant l’installation des produits sanitaires Gessi.
►La pression de service ne doit pas être inférieure à 0,5 bar (7,25 psi) et supérieure à 5 bar (72 Psi). En
cas de pressions de service plus hautes utiliser une soupape de réduction de la pression.
►Pression maximum d’essai à l’installation: 8 bar (116 psi).
►Eviter des différences de pression importantes entre l’alimentation de l’eau chaude et celle de l’eau
froide. Les différences de pression, l’eau avec une haute teneur minérale et les substances savonnées
peuvent corroder les parties internes et externes des flexibles et, lentement, affaiblir les matières en
provoquant des fuites.
►La température maximum de service pour les produits Gessi est 70°C (158 °F).
2-A
TTENTION!! NOUS VOUS PRIONS DE TENIR COMPTE QUE le produit ne doit jamais être utilisé
comme outil, marteau ou pour tout autre but, autre que celui pour lequel il a été conçu.
3 - ATTENTION!! NOUS VOUS PRIONS DE TENIR COMPTE QUE le produit doit être toujours installé
et testé par un plombier professionnel.
4 - ATTENTION!! Pour l’installation du produit, référez-vous au LOCAL PLUMBING CODE, s.v.p.
5-A
TTENTION!! NOUS VOUS PRIONS DE TENIR COMPTE QUE les câbles électriques ne doivent
jamais être reliés au produit car ils pourraient représenter un danger pour la sécurité et la santé.
6-A
TTENTION!! NOUS VOUS PRIONS DE TENIR COMPTE QUE les objets lourds ne doivent jamais
être posés ou fait tomber sur le produit, car il peuvent provoquer la projection d’éclats et représenter
un danger pour la sécurité et la santé.
7-A
TTENTION!! NOUS VOUS PRIONS DE TENIR COMPTE QUE le manuel d’instructions doit être
lu attentivement avant l’installation et que les procédures d’installation prévues ici doivent être
adéquatement suivies et respectées.
8-A
TTENTION!! NOUS VOUS PRIONS DE TENIR COMPTE QUE, pendant l’installation, il faut éviter
l’emploi d’une force excessive de sorte à éviter des dommages au produit et/ou à ses composants et
pièces. NE JAMAIS forcer un composant ou une pièce à l’intérieur d’une autre. NE JAMAIS forcer les
vis et ne pas les serrer excessivement.
9-A
TTENTION!! Ne pas utiliser raccords de aluminium pour les connexions de l’eau.
3
CUIDADO - ADVERTENCIA
1 - ¡ CUIDADO!! LES ROGAMOS QUE TENGAN EN CUENTA QUE NUNCA la presión y/o la temperatura
máxima aconsejada NO TIENE QUE SER SUPERADA, ya que podría dañar y/o causar rupturas y/o
pérdidas y/o averías del producto y, por lo tanto, representar un riesgo y un peligro potencial para
la seguridad, la saludad y/o la propiedad. A continuación Les proporcionamos los datos técnicos
relativos a la instalación de los productos de grifería Gessi.
►La presión de ejercicio no tiene que ser inferior a 0,5 bar (7,25 psi) y superior a 5 bar (72 Psi). En caso
de presiones de ejercicio mayores, utilicen una válvula de reducción de la presión.
►Presión máxima de ensayo durante la instalación: 8 bar (116 psi).
►Eviten grandes diferencias de presión entre la alimentación del agua fría y aquella del agua caliente.
Las diferencias de presión, el agua con una lato contenido mineral y las sustancias jabonosas pueden
corroer las partes interiores y exteriores de los flexos y, lentamente, e, lentamente, debilitar los
materiales causando pérdidas.
►La temperatura máxima de ejercicio para los productos Gessi es 70°C (158 °F).
2 - ¡ CUIDADO!! LES ROGAMOS QUE TENGAN EN CUENTA QUE nunca el producto no tiene que ser
utilizado como en lugar de herramienta, martillos o para finalidades diferentes de aquellas para las
cuales ha sido diseñado.
3 - ¡ CUIDADO!! LES ROGAMOS QUE TENGAN EN CUENTA QUE el producto tiene que ser instalado y
ensayado siempre por un fontanero profesional.
4 - ¡ CUIDADO!! Para la instalación del producto Les rogamos que contacten con el LOCAL PLUMBING
CODE.
5 - ¡ CUIDADO!! LES ROGAMOS QUE TENGAN EN CUENTA QUE nunca los cables eléctricos no tiene
que ser conectado al producto ya que podrían representar un peligro para la seguridad y la salud.
6 - ¡ CUIDADO!! LES ROGAMOS QUE TENGAN EN CUENTA QUE nunca objetos pesados no tienen
que ser apoyados o dejados caer sobre el producto ya que podrían causar la proyección de astillas y
representar un peligro para la seguridad y la salud.
7 - ¡ CUIDADO!! LES ROGAMOS QUE TENGAN EN CUENTA QUE el manual de instrucción tiene
que ser leído con cuidado antes de la instalación y que hay que cumplir adecuadamente con los
procedimientos de instalación proporcionados.
8 - ¡ CUIDADO!! LES ROGAMOS QUE TENGAN EN CUENTA QUE, durante la instalación, hay que evitar
el uso de una fuerza excesiva de manera que se puedan evitar daños del producto y/o componentes y
piezas. NO fuercen NUNCA un componente o una pieza, la una dentro de la otra. NO fuercen NUNCA
los tornillos y no los cierren excesivamente.
9 - ¡ CUIDADO!! No utilicen ACCESORIOS de aluminio para las conexiones del agua.
4
PRE-INSTALLATION INFORMATION - PRÉALABLES - PRELIMINARES
Art. 26651
Art. 26652
5
PRE-INSTALLATION INFORMATION - PRÉALABLES - PRELIMINARES
Before installation and setting to work
Attention! The feeding pipes have to be rinsed thoroughly before the installation of the product, so that
no shavings, welding or hemp residual or other dirt can be found in the pipes. Foreign bodies can enter
the product through the rinsed pipes or the general water plant and could damage the washers/ring
washers. So filters should be installed also on the general system.
The warranty does not cover the claim on this product resulting from filters not being installed in the main
water system. See the “MANUFACTURER’S LIMITED WARRANTY”.
Avant l’installation et la mise en fonction.
Attention! Les tubes d’alimentation doivent être rincés avec soin avant l’installation du produit, de
façon qu’il ne reste pas de riblons, de restes de soudure ou de chanvre, ou d’autres saletés à l’intérieur
des tubes. A travers les tuyauteries qui ne sont pas bien rincées ou à travers l’installation hydrique
générale, des corps étrangers peuvent entrer dans le produit et abîmer les joints/les joints à anneau. On
recommande ainsi d’installer des filtres également sur le système général.
La garantie ne couvre pas les mauvais fonctionnements de ce produit dans le cas où les filtres ne soient
pas installés au réseau hydraulique central. Voir “Limitation de garantie”.
Antes de la instalación y la puesta en función
¡Cuidado! Los tubos de alimentación tienen que ser enjuagados a fondo antes de la instalación del
producto de manera que no queden virutas, residuos de soldadura o cáñamo u otras impurezas en los
tubos. A través de tubería no bien enjuagada o de la red hídrica en general, en el producto pueden entrar
cuerpos extraños capaces de dañar los empaques/anillos de cierre. Les recomendamos por lo tanto que
instalen los filtros en la planta general también.
La garantía no cubre reclamaciones sobre este producto que procedan de los filtros, el cual no se
instalaron en el sistema hídrico principal. Mirar los “ LIMITES DE GARANTIA DEL PRODUCTOR”.
6
PRE-INSTALLATION INFORMATION - PRÉALABLES - PRELIMINARES
2
3
Package content:
1 - Shower head
2 - Shower head support
3 - Fastening set
1
Contenu de l’emballage:
1 - Pomme
2 - Support pomme
3 - Set de fixage
Contenido del embalaje:
1 - Pomo de ducha
2 - Soporte pomo de ducha
3 - Juego de fijación
Tools for installation - Outils nécessaires pour l’installation
- Herramienta necesaria para la instalación
1/8”
[2,5 mm]
7
7/8”
[22 mm]
INSTALLATION - INSTALLATION - INSTALACIÓN
TYPE 1
1
3=
3
2
5=
6
TYPE 2
LEGEND:
1 - Concrete ceiling/pre-perforated brick
2 - Supply pipe
3 - Fastening dowels for concrete ceiling
4 - Rigid supports for supply pipe anchorage (not
equipped)
5-F
astening dowels for plasterboard ceiling
6 - Art. 26651/26652
7 - False ceiling
8 - Ring supports for non-embedded pipes (not equipped with supply)
1
4
2
5
7
6
TYPE 3
LÉGENDE:
1 - Plafond en ciment/briques pré perforées
2 - Tube d’alimentation
3 - Set de fixage pour plafond en ciment
4 - Support raides pour l’ancrage des tuyau
d’aliméntation (non fournis en dotation)
5 - Set de fixage pour plafond en placoplâtre
6 - Art. 26651/26652
7 - Faux plafond
8 - Support at anneau pour le fixage des tuyaux
externes au plafond (non fournis en dotation)
1
4
2
LEYENDA:
1 - Techo de hormigón/ladrillo perforado
2 - Tubo de alimentación
3 - Juego de fijación para techo de hormigón
4 - Soportes rigidos por la fijación de los tubos de
alimentación (no incluidas en el suministro)
5 - Juego de fijación para techo de cartón-yeso
6 - Art. 26651/26652
7 - Falso techo
8 - Soportes á anillo por la fijación de la tuberia
externa al techo (no incluidas en el suministro)
5
8
7
6
8
INSTALLATION - INSTALLATION - INSTALACIÓN
TYPES OF INSTALLATION:
TYPE 1 - Installation with ceiling concrete or pre-perforated brick fastening.
TYPE 2 - Installation with suspended ceiling fastening with supply inside the masonry (rigid supports not supplied).
TYPE 3 - Installation with suspended ceiling fastening with supply outside the masonry (rigid supports not
supplied).
TYPE 1 - INSTRUCTIONS FOR CEILING INSTALLATION
In order to guarantee the solidity of the plant after the ceiling installation of the art.26651/26652, the feeding tube
should be fixed tightly. Take particular care during the boring operations in order to avoid damages to the tube.
This would damage both the tightness and the solidity of the plant. Use the fixing kit for brick walls in order to fix the
art.26651/26652.
TYPE 2 - INSTRUCTIONS FOR THE INSTALLATION with FALSE CEILING AND BUILT-IN PIPING
In case of a false ceiling with built-in piping on the ceiling, the tube should be fixed as shown in the figure with rigid
supports (not equipped with supply) in order to guarantee solidity to the plant. Use the fixing kit for plasterboard walls
in order to fix the art.26651/26652.
TYPE 3 - INSTRUCTIONS FOR THE INSTALLATION with FALSE CEILING AND OUTER PIPING
In case of a false ceiling with outer piping and next to the ceiling, the tube should be fixed as shown in the figure with
ring supports (not equipped with supply) in order to guarantee solidity to the plant. Use the fixing kit for plasterboard
walls in order to fix the art.26651/26652.
TYPES D’INSTALLATION:
TYPE 1 - Installation avec fixation sur plafond de béton ou de briques pré perforées.
TYPE 2 - Installation avec fixation sur faux plafond avec alimentation interne à la maçonnerie (supports raides non
fournis).
TYPE 3 - Installation avec fixation sur faux plafond avec alimentation externe à la maçonnerie (supports raides non
fournis).
TYPE 1 - INSTRUCTIONS POUR L’INSTALLATION A SOUFFLET
Pour garantir la solidité de l’installation après l’installation à soufflet de l’art.26651/26652 il faut fixer solidement le
tuyau d’alimentation. Il faut faire attention dans les opérations de forage en évitant d’abîmer le tuyau. Ceci pourrait
compromettre soit la tenue que la solidité de l’installation. Il faut utiliser le kit de fixage pour les parois en maçonnerie
pour fixer l’art.26651/26652.
TYPE 2 - INSTRUCTIONS POUR L’INSTALLATION avec le FAUX PLAFOND ET LES TUYAUTERIES
ENCAISSÉES
Si l’on ne dispose pas de faux plafond avec la tuyauterie encaissée au plafond il faut ancrer le tuyau comme il est
montré dans l’illustration avec des supports raides (qui ne sont pas fournis en dotation) pour garantir la solidité à
l’installation. Il faut utiliser le kit de fixage pour les parois en placo plâtre pour fixer l’art.26651/26652.
TYPE 3 - INSTRUCTIONS POUR L’INSTALLATION avec le FAUX PLAFOND ET LES TUYAUTERIES
EXTÉRIEURES
Si l’on ne dispose pas de faux plafond avec la tuyauterie extérieure et adjacente au plafond, il faut ancrer le tuyau
comme il est montré dans la figure avec des supports at anneau (qui ne sont pas fournis en dotation) pour garantir la
solidité à l’installation. Il faut utiliser le kit de fixage pour les parois en placo plâtre pour fixer l’art.26651/26652.
TIPOLOGÍAS DE INSTALACIÓN:
TIPO 1 - Instalación con fijación al techo de hormigón o ladrillo perforado.
TIPO 2 - Instalación con fijación al falso techo con alimentación empotrada en la mampostería (soportes rigidos no
incluidas en el suministro).
TIPO 3 - Instalación con fijación al falso techo con alimentación exterior a la mampostería (soportes rigidos no
incluidas en el suministro).
TIPO 1 - INSTRUCCIONES PARA LA INSTALACIÓN DE TECHO
Para garantizar la solidez de la planta tras haber efectuado la instalación de techo de l’art.26651/26652 es necesario
fijar fuertemente el tubo de alimentación. Pongan cuidado durante las operaciones de horadación para no dañar
el tubo, lo cual perjudicaría tanto la estanqueidad como la solidez de la planta. Utilicen el juego de fijación para las
paredes de mampostería para fijar l’art.26651/26652.
TIPO 2 - INSTRUCCIONES PARA LA INSTALACIÓN con FALSO TECHO Y TUBERÍAS EMPOTRADAS
En caso de falso techo con tubería empotrada en el mismo techo es preciso anclar el tubo, como indicado en la pag.
ura, con unos soportes rígidos (excluidos del suministro) para garantizar la solidez de la planta. Utilicen el juego de
fijación para las paredes de cartón-yeso para fijar l’art.26651/26652.
TIPO 3 - INSTRUCCIONES PARA LA INSTALACIÓN con FALSO TECHO Y TUBERÍAS EXTERNAS
En caso de falso techo con tubería externa y adyacente al techo es preciso anclar el tubo, como indicado en la pag.
ura, con unos soportes rígidos (excluidos del suministro) para garantizar la solidez de la planta. Utilicen el juego de
fijación para las paredes de cartón-yeso para fijar l’art.26651/26652.
9
INSTALLATION - INSTALLATION - INSTALACIÓN
Tiled surface
Surface carrelée
Superficie con baldosas
OK!
WARNING
Position the supply pipe so that it does not protrude from the tiled wall.
ATTENTION
Positionner le tuyau d’alimentation de sorte qu’il ne soit pas en saillie du mur carrelé.
CUIDADO
Posicionen el tubo de alimentación de manera que no salga de la pared con baldosas.
10
INSTALLATION - INSTALLATION - INSTALACIÓN
Fig. 1
Fig. 2
A
INSTALLATION
Screw shower head support to the pipe to which it will be connected, approach with the fastening plate (A)
as much as possible to the surface of the ceiling/suspended ceiling. Mark the position of the holes for plugs
fastening.
INSTALLATION
Visser le support pomme sur le tube sur lequel elle sera montée, rapprocher la plaquette de fixation (A) autant
que possible de la surface du plafond/faux plafond. Marquer la position des trous pour l’ancrage des chevilles.
INSTALACIÓN
Atornillen el soporte pomo de ducha al tubo a la cual será acoplada, acérquense con el plato de fijación (A)
lo más posible a la superficie del techo/falso techo. Marquen la posición de los huecos para el anclaje de los
tacos.
11
INSTALLATION (Concrete ceiling) - INSTALLATION (Plafond en ciment) INSTALACIÓN (Techo de hormigón)
Fig. 3
Fig. 4
Fig. 5
Fig. 6
Use hemp or teflon
Employer chanvre ou teflon
Usar cáñamo o teflon
12
INSTALLATION (Concrete ceiling) - INSTALLATION (Plafond en ciment) INSTALACIÓN (Techo de hormigón)
INSTALLATION (Concrete ceiling)
Remove the shower head support from the pipe without damaging it.
Pierce with a 5/16”D.[8mm] bit in the previously indicated points. Introduce plugs as indicated. Screw the shower
head support to the supply pipe approaching as much as possible to the ceiling/suspended ceiling with the
fastening plate and make holes coincide with plugs.
Fasten firmly the shower head support to the ceiling with the screws supplied so that the anchorage is
effective.
INSTALLATION (Plafond en ciment)
Retirer le support pomme du tube sans l’endommager.
Percer avec une pointe 5/16”D.[8mm] aux points précédemment repérés. Y introduire les chevilles comme
indiqué. Visser le support pomme sur le tube d’alimentation en rapprochant le plus possible la plaquette de
fixation du plafond/faux plafond et faire coïncider ses trous avec les chevilles.
Fixer avec force le support pomme sur le plafond avec les vis fournies afin que l’ancrage fonctionne .
INSTALACIÓN (Techo de hormigón)
Quiten el soporte pomo de ducha del tubo sin dañarlo.
Horaden con una broca 5/16”D.[8mm] los puntos anteriormente marcados. Introduzcan los tacos como
indicados. Atornillen el soporte pomo de ducha al tubo de alimentación acercándose lo más posible al techo/
falso techo con el plato de fijación y hagan coincidir los huecos con los tacos.
Fijen con fuerza el soporte pomo de ducha al techo utilizando los tornillos incluidos en el suministro para que
el anclaje tenga éxito.
13
INSTALLATION (Plasterboard ceiling) - INSTALLATION (Plafond en placoplâtre) INSTALACIÓN (Techo de cartón-yeso)
Fig. 7
Fig. 8
Fig. 9
Fig. 10
Use hemp or teflon
Employer chanvre ou teflon
Usar cáñamo o teflon
14
INSTALLATION (Plasterboard ceiling) - INSTALLATION (Plafond en placoplâtre) INSTALACIÓN (Techo de cartón-yeso)
INSTALLATION (Plasterboard ceiling)
Remove the shower head support from the pipe without damaging it.
Pierce with a 1/2”D.[12mm] bit in the previously indicated points. Introduce plugs as indicated. Screw the shower
head support to the supply pipe approaching as much as possible to the ceiling/suspended ceiling with the
fastening plate and make holes coincide with plugs.
Fasten firmly the shower head support to the ceiling with the screws supplied so that the special anchorage is
effective.
INSTALLATION (Plafond en placoplâtre)
Retirer le support pomme du tube sans l’endommager.
Percer avec une pointe 1/2”D.[12mm] aux points précédemment repérés. Y introduire les chevilles comme
indiqué. Visser le support pomme sur le tube d’alimentation en rapprochant le plus possible la plaquette de
fixation du plafond/faux plafond et faire coïncider ses trous avec les chevilles.
Fixer avec force le support pomme sur le plafond avec les vis fournies afin que l’ancrage spécial fonctionne.
INSTALACIÓN (Techo de cartón-yeso)
Quiten el soporte pomo de ducha del tubo sin dañarlo.
Horaden con una broca 1/2”D.[12mm] los puntos anteriormente marcados. Introduzcan los tacos como
indicados. Atornillen el soporte pomo de ducha al tubo de alimentación acercándose lo más posible al techo/
falso techo con el plato de fijación y hagan coincidir los huecos con los tacos.
Fijen con fuerza el soporte pomo de ducha al techo utilizando los tornillos incluidos en el suministro para que
el anclaje tenga éxito.
15
INSTALLATION - INSTALLATION - INSTALACIÓN
Fig. 11
Fig. 12
1/8”
[2,5 mm]
Fig. 13
Fig. 14
7/8”
[22 mm]
16
INSTALLATION - INSTALLATION - INSTALACIÓN
END OF INSTALLATION
Let the finish rosette slide up to the ceiling. Fasten it with the special screw and insert the finish plug to complete
the installation. Remove the adhesive strip that protects the gasket inserted in the top connection of the shower
head and fasten it on its support tightening the ring nut firmly (for this operation use a 7/8” [22mm] wrench).
FIN DE L’INSTALLATION
Faire coulisser la rosace de finition jusqu’au plafond. La fixer avec la vis prévue à cet effet et insérer le bouchon
de finition pour compléter l’installation. Enlever le ruban adhésif qui protège la gaine insérée à l’intérieur du
raccord supérieur de la pomme et le fixer à son support vissant avec force la virole (en s’aidant dans cette
opération avec une clé de 7/8” [22mm]).
FINALIZACIÓN DE LA INSTALACIÓN
Hagan deslizar el florón de acabado hasta el techo. Fíjenlo con el correspondiente tornillo e introduzcan el
tapón de acabado para acabar la instalación. Quiten la tira adhesiva que protege la junta introducida al interior
del racor superior del pomo de ducha y aseguren el mismo a su soporte atornillando con fuerza la virola (con la
ayuda de una llave de 7/8” [22mm]).
17
MAINTENANCE - ENTRETIEN - MANUTENCIÓN
PRODUCT cleaning
Water contains limestone in different qualities, which remains kept on the surfaces of the product, leaving
deposits after the water has been evaporated. It is possible to prevent the forming of limestone deposits
and to keep your product clean by drying it always with a soft cloth immediately after use. DETERGENTS,
SOLVENTS, CHEMICAL AGENTS, ABRASIVE SPONGES, WIRE WOOL, ALCOHOL, ETC. SHOULD
NOT BE USED as these could irreparably damage products’ surfaces compromising their aesthetics,
brightness and satinizing. CLEAN EXCLUSIVELY WITH WATER AND SOAP DRYING THEM WITH A
SOFT CLOTH.
NETTOYAGE DU PRODUIT
L’eau contenant du calcaire en quantité variable, celui-ci après évaporation se retrouve en dépôt sur le
matériau de finition. Il est possible d’éviter un tel dépôt, en essuyant la surface avec un chiffon doux,
après utilisation. L’UTILISATION DE DETERGENTS, SOLVANTS, AGENTS CHIMIQUES, EPONGES
ABRASIVES, PAILLE METALLIQUE, ALCOOL, ETC. SONT INTERDITS au risque de détériorer
irrémédiablement la finition du produit, en compromettant l’esthétique, la brillance et le satinage.
NETTOYAGE EXCLUSIF A L’EAU ET AU SAVON, EN ESSUYANT AVEC UN CHIFFON DOUX.
LIMPIEZA DEL PRODUCTO
El agua contiene cal en cantidades variables, el cual queda en la superficie del producto, dejando unos
sedimentos después de la evaporación del agua. Es posible prevenir las formaciones de sedimentos
de cal y mantener el producto limpio, secándolo, inmediatamente después del uso, con un trapo. NO
TIENEN QUE SER UTILIZADOS DETERGENTES, DISOLVENTES, AGENTES QUÍMICOS, ESPONJAS
ABRASIVAS O METÁLICAS, ALCOHOL, ETC. que perjudicarían irremediablemente las superficies del
productos, comprometiendo su estética, su brillo y el satinado. LIMPIEN EXCLUSIVAMENTE CON
AGUA Y JABÓN SECANDO CON UN TRAPO SUAVE.
18
ET 39728 - R1