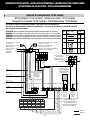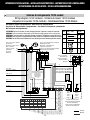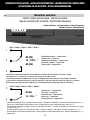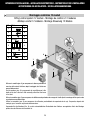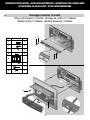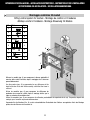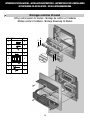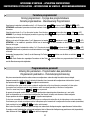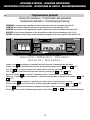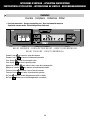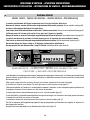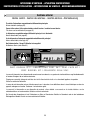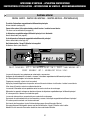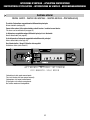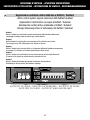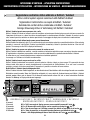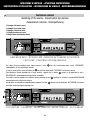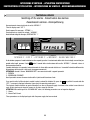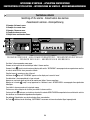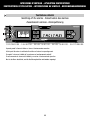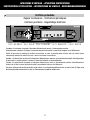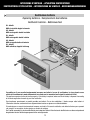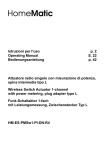
1
Centralini GEWISS ACTIVO
GEWISS ACTIVO control systems
Centraux GEWISS ACTIVO
Centrales GEWISS ACTIVO
Steuerungen GEWISS ACTIVO
12 mod.
24 mod.
GW 40 251
GW 40 261
GW 40 271
GW 40 256
GW 40 266
GW 40 276
Attenzione - Importante
Ci congratuliamo con Lei per la scelta di prodotti Gewiss. I prodotti Gewiss sono costruiti con attente cure dei dettagli impiegando
solo materiali di qualità elevata. I prodotti Gewiss le garantiranno nel tempo prestazioni ottimali.
Leggere attentamente le seguenti istruzioni in quanto forniscono importanti informazioni sulle modalità di installazione e di
funzionamento.
L'installatore è pregato di consegnarle all'utilizzatore finale invitandolo e prendere conoscenza di quanto contenuto.
In caso di guasto e/o cattivo funzionamento rivolgersi ad un tecnico autorizzato oppure contattare il SAT servizio assistenza
tecnica GEWISS.
GEWISS si riserva il diritto di apportare (in ogni momento e senza l’obbligo di preavviso) tutte le modifiche che, a proprio
insindacabile giudizio, ritenesse opportune per migliorare la funzionalità e le prestazioni dei prodotti, nonché per rispondere a
proprie esigenze tecnologiche e produttive.
Avvertenze per l’impiego
1. Il centralino activo è un dispositivo che verifica lo stato degli interruttori automatici/differenziali ad esso collegati e fornisce
segnalazioni di eventuali anomalie dell’impianto o di consumo di energia superiore al livello desiderato.
Il centralino activo non interviene attivamente a garantire la sicurezza dell’impianto che è affidata esclusivamente dagli
interruttori automatici/differenziali in esso installati.
Un avaria del modulo elettronico e/o un suo cattivo funzionamento non pregiudicano la sicurezza dell’impianto.
2. Il centralino activo non è uno strumento di misura certificato e quindi non è adattato per rilievi professionali dei parametri
elettrici indicati.
3. Togliere tensione di rete a monte del centralino prima di rimuovere il modulo elettronico e comunque prima di effettuare
qualsiasi manutenzione al centralino activo. L’operazione deve essere svolta da un tecnico qualificato.
4. Per applicazioni in reti fase–fase, contattare preventivamente il servizio di assistenza tecnica.
5. Una buona gestione degli allarmi è garantita soltanto da una corretta programmazione del centralino activo.
Se si desidera una segnalazione di allarme prima dell’intervento degli interruttori automatici differenziali ad esso collegati, è
necessario che i valori di programmazione impostati siano più bassi dei parametri dell’impianto.
Esempio:
TIPO DI ALLARME
VALORE IMPIANTO
VALORE DA IMPOSTARE
POTENZA MAX SUPERATA
3KW
2,5KW
CORRENTE DI DISPERSIONE MAX SUPERATA
30mA
15mA
2
Attention - Important
Congratulations for having chosen a Gewiss product. Gewiss products are constructed with careful attention to detail, using only
high quality materials.
Gewiss products will guarantee optimal performance over time.
Read these instructions carefully.
They contain important information on how to install and operate the system.
The installers should hand them over to the end users and ask them to read them carefully as well.
In case of a breakdown or malfunctioning, please contact an authorized technician or GEWISS' SAT helpdesk.
GEWISS reserves the right, in its sole discretion, (at all times and without prior notice), to make any changes to its products that
it deems necessary for technological or manufacturing purposes, or as an improvement in use or performance.
Instructions for use
1. The activo control system is a device that tests the status of the circuit breakers and residual current devices connected to it
and indicates any faults in the installation or excessive current consumption.
The activo control system itself does not protect the installation. Protection is provided only by the circuit breakers and residual
current devices connected to it.
A failure and / or malfunctioning of the elecronic module do not affect the safety of the installation.
2. The activo control system is not an approved measuring device and is therefore not suitable for professional measuring of the
electrical parameters indicated.
3. Disconnect from the power supply upstream of the control system before removing the electronic module and at all times
before servicing the activo control system. This work shall be carried out only by skilled technical staff.
4. For phase to phase network applications, contact the technical service beforehand.
5. Proper control of the alarms can be assured only by suitably programming the activo control system.
If one requires an alarm signal to be sent out before the connected circuit breakers and residual current devices trip, the
settings entered must be lower than the installation parameters.
Example:
TYPE OF ALARM
INSTALLATION SETTING
SETTING TO BE ENTERED
MAX CAPACITY EXCEEDED
3KW
2,5KW
MAX LEAKAGE EXCEEDED
30mA
15mA
3
Attention - Important
Nous vous félicitons d’avoir choisi les produits Gewiss. Les produits Gewiss sont fabriqués avec un soin minutieux des détails, en
employant uniquement des matériaux de qualité supérieure. Les produits Gewiss vous garantiront des performances optimales
pendant très longtemps.
Veuillez lire attentivement les instructions suivantes, car elles fournissent des informations importantes sur les modalités
d'installation et de fonctionnement.
L’installateur est prié de donner ce manuel d’instructions à l’utilisateur final, en l’invitant à prendre connaissance de son contenu.
En cas de panne et/ou de mauvais fonctionnement, veuillez vous adresser à un technicien agréé, ou bien contacter le SAT, le
Service d’assistance technique de GEWISS.
La Société GEWISS se réserve le droit de faire (à tout moment, et sans aucune obligation de préavis) toutes les modifications que,
à son propre avis incontestable, elle jugera opportunes en vue d'améliorer la fonctionnalité et les performances de ses produits,
ainsi que pour répondre à ses propres exigences de technologie et de production.
Avertissements pour l’emploi
1. Le central Activo est un dispositif qui vérifie l’état des disjoncteurs automatiques/différentiels qui lui sont connectés, et qui
fournit des informations sur les anomalies éventuelles de l’installation ou sur des écarts de consommation d’énergie par
rapport au niveau désiré.
Le central Activo n’intervient pas activement pour garantir la sécurité de l’installation ; cette dernière est confiée
exclusivement aux disjoncteurs automatiques/différentiels de l’installation.
Une avarie et/ou un mauvais fonctionnement du module électronique ne portent pas atteinte à la sécurité de l'installation.
2. Le central Activo n’est pas un instrument de mesure certifié, il n’est donc pas adapté pour faire des relevés professionnels
sur les paramètres électriques indiqués.
3. Il faut couper le courant de secteur en amont du central avant d’enlever le module électronique et en tout cas avant
d’effectuer toute opération d’entretien sur le central Activo. Cette opération doit être effectuée par un technicien qualifié.
4. Pour des applications dans des réseaux phase - phase, contacter au préalable le Service d’assistance technique.
5. La seule garantie d’une bonne gestion des alarmes est la programmation correcte du central Activo.
Si vous désirez une signalisation d’alarme avant l’intervention des disjoncteurs automatiques/différentiels connectés, il vous
faut prévoir que les valeurs de programmation définies soient plus basses que les paramètres de l’installation.
Exemple :
TYPE D’ALARME
VALEUR DE L’INSTALLATION
VALEUR À PROGRAMMER
PUISSANCE MAX DÉPASSÉE
3KW
2,5KW
COURANT DE FUITE MAX DÉPASSÉ
30mA
15mA
4
Atención - Importante
Le agradecemos que haya elegido productos Gewiss. Los productos Gewiss están construidos con especial atención en los detalles
empleando solo materiales de calidad elevada. Los productos Gewiss le garantizan óptimas prestaciones a lo largo del tiempo.
Lea atentamente las siguientes instrucciones pues ofrecen importantes informaciones sobre la modalidad de instalación y de
funcionamiento.
El instalador deberá entregarlas al usuario final informándole de tomar conciencia del contenido. En caso de avería y/o mal
funcionamiento diríjase a un técnico autorizado o contactar el SAT servicio de asistencia técnica GEWISS.
GEWISS se reserva el derecho de aportar (en cada momento y sin la obligación de previo aviso) todos los cambios que, a juicio
incensurable, retenga oportunos para mejorar la funcionalidad y las prestaciones de los productos, y para responder a propias
exigencias tecnológicas y productivas.
Advertencias para el empleo
1. La central activa es un dispositivo que controla el estado de los interruptores automáticos/diferenciales a él conectados y
suministra señalizaciones de eventuales anomalías de la instalación o de consumo de energía superior al nivel deseado.
La central activa no interviene activamente para garantizar la seguridad de la instalación, encargada exclusivamente a los
interruptores automáticos/diferenciales instalados en la central.
Una avería del módulo electrónico y/o un mal funcionamiento no perjudican la seguridad de la instalación.
2. La central activa no es un instrumento de medida certificado y por lo tanto no es apropiado para relieves profesionales de los
parámetros eléctricos indicados.
3. Eliminar tensión de red en entrada de la central antes de extraer el módulo electrónico y antes de efectuar cualquier
mantenimiento a la central activa. La operación debe realizarla un técnico cualificado.
4. Para aplicaciones en redes fase-fase, contactar preventivamente al servicio de asistencia técnica.
5. Una buena gestión de las alarmas se garantiza sólo por una correcta programación de la central activa.
Si se desease una señalización de alarma antes de la intervención de los interruptores automáticos diferenciales a este
conectados, es necesario que los valores de programación ajustados sean más bajos que los parámetros de la instalación.
Por ejemplo:
TIPO DE ALARMA
VALOR INSTALACIÓN
VALOR A PROGRAMAR
POTENCIA MÁX SUPERADA
3KW
2,5KW
CORRIENTE DE DISPERSIÓN MÁX SUPERADA
30mA
15mA
5
Achtung - Wichtig
Wir möchten Ihnen zur Wahl der Produkte Gewiss gratulieren. Die Produkte Gewiss wurden aufmerksam mit Liebe zum Detail und
der ausschließlichen Verwendung hochwertiger Materialien hergestellt. Die Produkte Gewiss garantieren Ihnen optimale
Leistungen für lange Zeit.
Lesen Sie die folgenden Anleitungen aufmerksam durch, da diese wichtige Informationen zur Installation und Betrieb vermitteln.
Der Installateur wird gebeten, diese Anleitung dem Endkunden zu übergeben, und ihn zu bitten, sich mit dem Inhalt vertraut zu machen.
Wenden Sie sich bei einem Defekt bzw. fehlerhaften Betrieb an einen autorisierten Techniker, oder setzen Sie sich mit SAT, dem
technischen Kundendienst von GEWISS in Verbindung.
GEWISS behält sich das Recht vor (jederzeit und ohne Vorankündigung), jegliche Änderungen durchzuführen, die nach ihrem
unanfechtbaren Urteil für erforderlich gehalten werden, um die Funktion und die Leistungen des Produkts zu verbessern, und um
ihren technischen und produktionstechnischen Anforderungen zu entsprechen.
Hinweise zur Verwendung
1. Die Steuerung Activo ist ein Gerät, das den Status der angeschlossenen Schutzschalter / Fi-Schalter prüft, und Meldungen über
eventuelle Anlagenfehler oder Energieverbrauch über der gewünschten Höhe liefert.
Die Steuerung Activo greift nicht aktiv ein um die Anlagensicherheit zu gewährleisten, diese unterliegt ausschließlich den in dieser
installierten Schutzschalter / Fi-Schalter.
Ein Fehler des Elektronikmoduls bzw. dessen Fehlfunktion beeinträchtigt nicht die Anlagensicherheit.
2. Die Steuerung Activo ist kein zertifiziertes Messgerät, und ist daher für professionelle Messungen der angegebenen elektrischen
Parameter nicht geeignet.
3. Trennen Sie die Stromversorgung vor der Steuerung, bevor Sie das elektronische Modul ausbauen, bzw. vor jeglicher Wartung an
der Steuerung Activo. Dieser Arbeitsschritt muss durch einen qualifizierten Elektriker ausgeführt werden.
4. Für Anwendungen in Netzen Phase-Phase muss im Vorfeld der technische Kundendienst kontaktiert werden.
5. Eine korrekte Alarmüberwachung kann nur bei einer korrekten Programmierung der Steuerung Activo garantiert werden.
Falls eine Alarmmeldung vor dem Ansprechen der angeschlossenen automatischen FI-Schalter gewünscht ist, müssen die
eingestellten Programmierungsparameter niedriger als die Anlagenparameter sein.
Beispiel:
ALARMART
ANLAGENWERT
EINSTELLWERT
MAX. LEISTUNG ÜBERSCHRITTEN
3KW
2,5KW
MAX. FEHLERSTROM ÜBERSCHRITTEN
30mA
15mA
6
INDICE - INDEX - TABLE DES MATIÈRES
ÍNDICE - INHALTSVERZEICHNIS
GENERALITÀ PRODOTTO - GENERAL PRODUCT DESCRIPTION - GÉNÉRALITÉS SUR LE PRODUIT
GENERALIDADES DEL PRODUCTO - ALLGEMEINE PRODUKTÜBERSICHT
pag./ page / page / pág./ Seite
- Funzioni - Functions - Fonctions - Funciones - Funktionen . . . . . . . . . . . . . . . . . . . . . . . . . . . . . . . . . . . . . . . . . . . . . . 8
ISTRUZIONE D’INSTALLAZIONE - INSTALLATION INSTRUCTIONS - INSTRUCTIONS POUR L’INSTALLATION ISTRUCCIONES DE INSTALACIÓN - INSTALLATIONSANWEISUNG
- Schemi di collegamento - Wiring diagrams - Schémas de branchement
Esquemas de conexión - Anschlussschemata . . . . . . . . . . . . . . . . . . . . . . . . . . . . . . . . . . . . . . . . . . . . . . . . . . . . . . . 13
- Morsettiera centralino - Control system terminal block - Bornier du central
Caja de conexiones de la central - Klemmleiste Steuerung . . . . . . . . . . . . . . . . . . . . . . . . . . . . . . . . . . . . . . . . . . . . . 19
- Montaggio - Fitting - Montage - Montaje - Einbau . . . . . . . . . . . . . . . . . . . . . . . . . . . . . . . . . . . . . . . . . . . . . . . . . . . 20
- Smontaggio - Disassembly - Démontage - Desmontaje - Ausbau . . . . . . . . . . . . . . . . . . . . . . . . . . . . . . . . . . . . . . . . 25
ISTRUZIONI D’IMPIEGO - OPERATING INSTRUCTIONS - INSTRUCTIONS D'UTILISATION
ISTRUCCIONES DE EMPLEO - BEDIENUNGSANWEISUNG
- Descrizione comandi - Description of the controls - Description des commandes
Descripción mandos - Steuerungsbeschreibung . . . . . . . . . . . . . . . . . . . . . . . . . . . . . . . . . . . . . . . . . . . . . . . . . . . . . 26
- Visualizzazione dei parametri dell’impianto - Display of system parameters - Affichage des paramètres de l’installation
Visualización de los parámetros de la instalación - Anzeige der Anlagenparameter . . . . . . . . . . . . . . . . . . . . . . . . . . . 28
- Forzatura programmatori - Forcing programmers - Forçage des programmations
Forzado programadores - Übersteuerung Programmierer. . . . . . . . . . . . . . . . . . . . . . . . . . . . . . . . . . . . . . . . . . . . . . . 32
- Programmazione parametri - Entering the parameters - Programmation des paramètres
Programación parámetros - Parameterprogrammierung . . . . . . . . . . . . . . . . . . . . . . . . . . . . . . . . . . . . . . . . . . . . . . . 32
- Abilitazione/disabilitazione combinatore telefonico - Enable/disable telephone dial
Activation/désactivation du combinateur téléphonique - Habilitación/deshabilitación combinador telefónico Aktivierung/Deaktivierung Telefonschalter . . . . . . . . . . . . . . . . . . . . . . . . . . . . . . . . . . . . . . . . . . . . . . . . . . . . . . . . . . 45
- Contatori - Counters - Compteurs - Contadores - Zähler . . . . . . . . . . . . . . . . . . . . . . . . . . . . . . . . . . . . . . . . . . . . . . . 47
- Gestione allarmi - Alarms control - Gestion des alarmes - Gestión alarmas - Alarmsteuerung . . . . . . . . . . . . . . . . . . 49
- Segnalazione Centralino Activo abbinato a ReStart / Autotest
Activo control system signals combined with ReStart / Autotest
Signalisation Central Activo accouplé à ReStart / Autotest
Señalización Central Activa combinada a ReStart / Autotest
Anzeige Steuerung Activo in Verbindung mit ReStart / Autotest . . . . . . . . . . . . . . . . . . . . . . . . . . . . . . . . . . . . . . . . . . 59
- Tacitazione allarmi - Switching off the alarms - Désactivation des alarmes
Desactivación alarmas - Alarmquittierung . . . . . . . . . . . . . . . . . . . . . . . . . . . . . . . . . . . . . . . . . . . . . . . . . . . . . . . . . . 65
- Verifiche periodiche - Regular maintenance - Vérifications périodiques
Controles periódicos - Regelmäßige Kontrollen . . . . . . . . . . . . . . . . . . . . . . . . . . . . . . . . . . . . . . . . . . . . . . . . . . . . . . 70
- Sostituzione batterie - Replacing batteries - Remplacement des batteries - Sustitución baterías - Batteriewechsel . . 72
- Dimensionale - Dimensions - Dimensions - Dimensional - Abmessungen . . . . . . . . . . . . . . . . . . . . . . . . . . . . . . . . . . 73
7
GENERALITÀ PRODOTTO - GENERAL PRODUCT DESCRIPTION - GÉNÉRALITÉS SUR LE PRODUIT
GENERALIDADES DEL PRODUCTO - ALLGEMEINE PRODUKTÜBERSICHT
Funzioni
Functions - Fonctions - Funciones - Funktionen
SICUREZZA PREVENTIVA
• Segnala attraverso indicazioni luminose, acustiche ed il display le anomalie di funzionamento dell’impianto elettrico.
• Previene le interruzioni dell’alimentazione segnalando il superamento della soglia preimpostata di energia e,
predisposta/programmata, interrompendo l’alimentazione al carico collegato alla linea non prioritaria.
• Combinatore telefonico: agisce inviando un comando al dispositivo.
• Programmatore elettronico giornaliero.
CARATTERISTICHE TECNICO-PRESTAZIONALI
• Visualizzazione a display dei seguenti parametri:
– orologio (ora - minuti)
– potenza istantanea (0 ÷ 7 kW ±100W)
– potenza media (kW)
– corrente di dispersione istantanea (4 ÷ 35 mA ±1mA)
– stato uscite
• Visualizzazione, attraverso i segnalatori di allarme preposti, delle anomalie dell’impianto:
– avvenuto intervento delle apparecchiature di protezione
– superamento soglia preimpostata della potenza
– superamento della soglia di dispersione di corrente verso terra
– mancata erogazione di energia dell’ente distributore.
• Configurazione degli interruttori automatici.
Il centralino riconosce automaticamente fino a 3 interruttori più interruttore generale per la versione a 12 mod.e 9
interruttori più interruttore generale per la versione a 24 mod.
• Possibilità di visualizzare i messaggi in italiano o in inglese.
• Visualizzazione dei messaggi sul display a scorrimento orizzontale.
• Visualizzazione sul display degli stati di funzionamento di ReStart / Autotest (se presente, vedi pag. 16).
8
GENERALITÀ PRODOTTO - GENERAL PRODUCT DESCRIPTION - GÉNÉRALITÉS SUR LE PRODUIT
GENERALIDADES DEL PRODUCTO - ALLGEMEINE PRODUKTÜBERSICHT
Funzioni
Functions - Fonctions - Funciones - Funktionen
PREVENTIVE SAFETY
• Indicates functional faults of the electrical system through luminous and sound signals and a display.
• Prevents power failures by warning that the preset power threshold has been passed and if equipped/programmed,
cuts off the power supply to the load connected to the non-priority line.
• Telephone dial: works by sending a command to the device.
• 1 -channel daily electronic programmer.
SPECIFICATIONS AND PERFORMANCE
• The following parameters are shown on the display unit:
- clock (hour - minutes)
- instantaneous power (0 ÷ 7 kW ±100W)
- average power (kW)
- instantaneous leakage current (4 ÷ 35 mA ±1mA)
- output status
• Warning of the following fault conditions is provided via alarm indicators:
- a protective device has tripped
- the preset power threshold has been passed
- the earth leakage current has exceeded the limit value
- power failure.
• Configuration of the circuit breakers.
The control system automatically recognizes up to 3 circuit breakers plus the main circuit breaker for version 12 mod.
and 9 circuit breakers plus the main circuit breaker for version 24 mod.
• The messages may be displayed in either Italian or English.
• The messages scroll horizontally.
• Displaying the ReStart / Autotest operating statuses (if available, see page 16).
9
GENERALITÀ PRODOTTO - GENERAL PRODUCT DESCRIPTION - GÉNÉRALITÉS SUR LE PRODUIT
GENERALIDADES DEL PRODUCTO - ALLGEMEINE PRODUKTÜBERSICHT
Funzioni
Functions - Fonctions - Funciones - Funktionen
SÉCURITÉ DE PRÉVENTION
• Le produit signale, par des indications lumineuses, acoustiques, et par l’afficheur, les anomalies de fonctionnement de
l’installation électrique.
• Il prévient les interruptions de l’alimentation, en signalant quand le seuil d’énergie préprogrammé a été dépassé et, s’il
est prédisposé/programmé pour cela, en interrompant l’alimentation de la charge reliée à la ligne non prioritaire.
• Combinateur téléphonique : il agit en envoyant une commande au dispositif.
• Programmateur électronique journalier.
CARACTÉRISTIQUES TECHNIQUES ET PERFORMANCES
• Visualisation sur l'afficheur des paramètres suivants :
- horloge (heures - minutes)
- puissance instantanée (0 ÷ 7 kW ±100W)
- puissance moyenne (kW)
- courant de fuite instantané (4 ÷ 35 mA ±1 mA)
- état des sorties
• Affichage, grâce aux avertisseurs d’alarme prévus, des anomalies de l’installation :
- signale que les appareillages de protection sont intervenus
- signale que le seuil de puissance préprogrammé a été dépassé
- signale que le seuil de fuite du courant à la terre a été dépassé
- signale que l’Opérateur distributeur de l’énergie n’en fournit pas en ce moment.
• Configuration des disjoncteurs automatiques.
Le central reconnaît automatiquement jusqu’à 3 disjoncteurs plus le disjoncteur général dans la version à 12 mod., et
9 disjoncteurs plus le disjoncteur général dans la version à 24 mod.
• Possibilité d’afficher les messages en italien ou en anglais.
• Visualisation des messages sur l’afficheur avec défilement horizontal.
• Visualisation sur l’afficheur des états de fonctionnement du ReStart / Autotest (si présent, voir page 16).
10
GENERALITÀ PRODOTTO - GENERAL PRODUCT DESCRIPTION - GÉNÉRALITÉS SUR LE PRODUIT
GENERALIDADES DEL PRODUCTO - ALLGEMEINE PRODUKTÜBERSICHT
Funzioni
Functions - Fonctions - Funciones - Funktionen
SEGURIDAD PREVENTIVA
• Señala mediante indicaciones luminosas, acústicas y la pantalla las anomalías de funcionamiento de la instalación
eléctrica. Previene las interrupciones de la alimentación señalando la superación del umbral preprogramada de energía
y, predispuesta /programada, interrumpiendo la alimentación a la carga conectado a la línea no prioritaria.
• Combinador telefónico: actúa enviando una orden al dispositivo.
• Programador electrónico diario.
CARACTERÍSTICAS TÉCNICO-PRESTACIONALES
• Visualización en pantalla de los siguientes parámetros:
- reloj (hora - minutos)
- potencia instantánea (0 ÷ 7 kW ±100W)
- potencia media (kW)
- corriente de dispersión instantánea (4 ÷ 35 mA ±1 mA)
- estado salidas
• Visualización, mediante los señaladores de alarma, de las anomalías de la instalación:
- efectuada intervención de los equipos de protección
- superación umbral preprogramada de la potencia
- superación del umbral de dispersión de corriente hacia tierra
- falta erogación de energía del ente distribuidor.
• Configuración de los interruptores automáticos.
La central reconoce automáticamente hasta 3 interruptores más interruptor general para la versión de 12 mod y 9
interruptores más interruptor general para la versión de 24 mod.
• Posibilidad de visualizar los mensajes en italiano o en inglés.
• Visualización de lo mensajes en la pantalla de desplazamiento horizontal.
• Visualización en la pantalla de los estados de funcionamiento de ReStart / Autotest (si estuviera presente, véase pág. 11).
11
GENERALITÀ PRODOTTO - GENERAL PRODUCT DESCRIPTION - GÉNÉRALITÉS SUR LE PRODUIT
GENERALIDADES DEL PRODUCTO - ALLGEMEINE PRODUKTÜBERSICHT
Funzioni
Functions - Fonctions - Funciones - Funktionen
VORBEUGENDE SICHERHEIT
• Signal über optische, akustische Anzeigen und das Display der Funktionsstörungen der Elektroanlage.
• Beugt der Versorgungsunterbrechung durch Anzeige der Überschreitung der voreingestellten Energieschwelle an, durch
Unterbrechung der Versorgung der an das Netz angeschlossenen Nebenlast, falls voreingestellt/programmiert.
• Telefonschalter: Funktioniert durch Weiterleiten eines Befehls an das Gerät.
• Elektronische Tagesschaltuhr.
TECHNISCHE EIGENSCHAFTEN / LEISTUNGEN
• Anzeige der folgenden Parameter am Display:
- Uhr (Stunden - Minuten)
- Momentanleistung (0 ÷ 7 kW ±100W)
- mittlere Leistung (kW)
- Momentaner Fehlerstrom (4 ÷ 35 mA ±1 mA)
- Status der Ausgänge
• Anzeige der Anlagenfehler mittels der voreingestellten Alarmanzeigen:
- erfolgtes Ansprechen der Schutzeinrichtungen
- Überschreiten der voreingestellten Leistungsschwelle
- Überschreiten der Fehlerstromschwelle zur Erde
- Fehlende Stromversorgung durch das EVU.
• Konfigurierung der Fi-Schalter.
Die Steuerung erkennt automatisch bis zu 3 FI-Schalter und dem Hauptschalter bei der Version mit 12 Modulen, und 9
FI-Schalter und dem Hauptschalter bei der Version mit 24 Modulen.
• Möglichkeit zur Anzeige der Meldungen in Italienisch oder Englisch.
• Anzeige der Meldungen auf dem Display mit waagerechtem Blättern.
• Anzeige des Funktionsstatus für ReStart / Autotest (falls vorhanden, siehe Seite 11).
12
ISTRUZIONE D’INSTALLAZIONE - INSTALLATION INSTRUCTIONS - INSTRUCTIONS POUR L’INSTALLATION
ISTRUCCIONES DE INSTALACIÓN - INSTALLATIONSANWEISUNG
Schema di collegamento 12/24 moduli-Base
Wiring diagram 12/24 modules-standard - Schéma de liaison 12/24 modules - Base
Esquema de conexión 12/24 módulos-Base - Anschlussschema 12/24 Module-Basis
ATTENZIONE: prima di accedere al vano cablaggi sezionare l’impianto a monte del centralino.
WARNING: before accessing the wiring, always cut off the power supply upstream of the control system.
ATTENTION : avant d’accéder au siège des câblages, sectionner l’installation en amont du central.
ATENCIÓN: antes de acceder a la compartimento de cables seccionar la instalación en entrada de la central.
ACHTUNG: Vor dem Öffnen des Kabelbereichs, muss die Anlage vor der Steuerung getrennt werden.
Sensore di corrente in dotazione
Current sensor
Détecteur de courant compris
dans la fourniture
Sensor de corriente N
230 V ~
suministrado
L
Stromsensor
mitgeliefert
4
Sensore di corrente differenziale in dotazione
Residual current sensor
Détecteur de courant différentiel compris
dans la fourniture
Sensor de corriente diferencial suministrado
Differenzstromsensor mitgeliefert
3
POS.
1
Cavi - Cables
Câbles - Cables
Kabel
320 mm
Q.tà - Q.ty - Q.té
Cant. - Anz.
12 m
24 m
5
11
2
2
3
1
1
4
1
1
nero-black-noir-negro-schwarz
250 mm
2
blu-blue-bleu-azul-blau
1
1
1
nero - black
noir - negro - schwarz
verde - green
vert - verde - grün
F4
F5
F6
F7
F8
F9
F1
F2
F3
NT
FT
nero - black
noir - negro - schwarz
2 1
N
F
blu - blue
bleu - azul - blau
Agli interruttori magnetotermici
To the miniature circuit breakers
Aux interrupteurs
magnétothermiques
A los interruptores
magnetotérmicos
Zu
Thermomagnetschaltern
OUT
COM
COM
OUT
+5
rosso - red
rouge - rojo - rot
Relè 1
Relay 1
Relais 1
Relé 1
Relais 1
Relè 2
Relay 2
Relais 2
Relé 2
Relais 2
1 2 3
4 5
Morsettiera Centralino Activo
Activo control system terminal board
Bornier du Central Activo
Caja de conexiones Central Activa
Klemmleiste Steuerung Activo
2
1
1
1
1
1
1
1
12 mod.
24 mod.
13
ISTRUZIONE D’INSTALLAZIONE - INSTALLATION INSTRUCTIONS - INSTRUCTIONS POUR L’INSTALLATION
ISTRUCCIONES DE INSTALACIÓN - INSTALLATIONSANWEISUNG
Schema di collegamento 12/24 moduli
Wiring diagram 12/24 modules - Schéma de liaison 12/24 modules
Esquema de conexión 12/24 módulos - Anschlussschema 12/24 Module
Con bobina di sgancio e combinatore telefonico - With release coil and telephone dial
Avec bobine de déclenchement et combinateur téléphonique - Con bobina de desenganche y combinador telefónico
Mit Trennspule und Telefonschalter
ATTENZIONE: prima di accedere al vano cablaggi sezionare l’impianto a monte del centralino.
WARNING: before accessing the wiring, always cut off the power supply upstream of the control system.
ATTENTION : avant d’accéder au siège des câblages, sectionner l’installation en amont du central.
ATENCIÓN: antes de acceder al compartimento de cables seccionar la instalación en entrada de la central.
ACHTUNG: Vor dem Öffnen des Kabelbereichs muss die Anlage vor der Steuerung getrennt werden.
Cavi - Cables
Câbles - Cables
Kabel
320 mm
POS.
1
Q.tà-Q.ty- Q.té
Cant.-Anz.
12 m 24 m
5
11
2
2
3
1
1
4
1
1
nero-black-noir-negro-schwarz
250 mm
2
blu-blue-bleu-azul-blau
Sensore di corrente in dotazione
Current sensor
Détecteur de courant compris
dans la fourniture
Sensor de corriente N
230 V ~
suministrado
L
Stromsensor
mitgeliefert
4
Sensore di corrente differenziale in dotazione
Residual current sensor
Détecteur de courant différentiel
compris dans la fourniture
Sensor de corriente diferencial suministrado
Differenzstromsensor mitgeliefert
3
Carico non prioritario
Non-priority load
Charge non prioritaire
Carga no prioritaria A
Nebenlast
1
B
1
1
Agli interruttori magnetotermici
To the miniature circuit breakers
Aux interrupteurs
magnétothermiques
A los interruptores
magnetotérmicos
Zu
Thermomagnetschaltern
rosso - red
rouge - rojo - rot
F4
F5
F6
F7
F8
F9
F1
F2
F3
OUT
HAL
+5
OUT
DIFF
COM
COM
blu - blue
bleu - azul - blau
2 1
NT
FT
verde - green
vert - verde - grün
Combinatore telefonico
Telephone dial
Combinateur téléphonique
Combinador telefónico
Telefonschalter
N
F
nero - black
noir - negro - schwarz
nero - black
noir - negro - schwarz
2
1
1 2 3
4 5
Relè 1
Relay 1
Relais 1
Relé 1
Relais 1
Relè 2
Relay 2
Relais 2
Relé 2
Relais 2
Morsettiera Centralino Activo
Activo control system terminal board
Bornier du Central Activo
Caja de conexiones Central Activa
Klemmleiste Steuerung Activo
1
1
1
1
1
1
12 mod.
24 mod.
14
ISTRUZIONE D’INSTALLAZIONE - INSTALLATION INSTRUCTIONS - INSTRUCTIONS POUR L’INSTALLATION
ISTRUCCIONES DE INSTALACIÓN - INSTALLATIONSANWEISUNG
Schema di collegamento 12/24 moduli
Wiring diagram 12/24 modules - Schéma de liaison 12/24 modules
Esquema de conexión 12/24 módulos - Anschlussschema 12/24 Module
Con bobina di sgancio e programmatore - With release coil and programmer
Avec bobine de déclenchement et programmateur - Con bobina de desenganche y programador
Mit Trennspule und Programmierer
ATTENZIONE: prima di accedere al vano cablaggi sezionare l’impianto a monte del centralino.
WARNING: before accessing the wiring, always cut off the power supply upstream of the control system.
ATTENTION : avant d’accéder au siège des câblages, sectionner l’installation en amont du central.
ATENCIÓN: antes de acceder al compartimento de cables seccionar la instalación en entrada de la central.
ACHTUNG: Vor dem Öffnen des Kabelbereichs muss die Anlage vor der Steuerung getrennt werden.
POS.
1
Q.tà-Q.ty- Q.té
Cant.-Anz.
12 m 24 m
Cavi - Cables
Câbles - Cables
Kabel
320 mm
5
11
2
2
3
1
1
4
1
1
nero-black-noir-negro-schwarz
250 mm
2
blu-blue-bleu-azul-blau
Sensore di corrente in dotazione
Current sensor
Détecteur de courant compris
dans la fourniture
N
Sensor de corriente
230 V ~
suministrado
L
Stromsensor
mitgeliefert
4
Sensore di corrente differenziale in dotazione
Residual current sensor
Détecteur de courant différentiel
compris dans la fourniture
Sensor de corriente diferencial suministrado
Differenzstromsensor mitgeliefert
3
1
Carico non prioritario
Non-priority load
Charge non prioritaire
Carga no prioritaria A
Nebenlast
1
B
1
Relé monostabile 240V (GW96701 es.)
240V monostable relay (e.g. GW96701)
Relais monostable 240V (GW96701 ex.)
Relé monoestable 240V (GW96701 ej.)
Monostabiles Relais 240V (z.B. GW96701)
nero - black
noir - negro - schwarz
F4
F5
F6
F7
F8
F9
F1
F2
F3
NT
FT
N
F
OUT
DIFF
blu - blue
bleu - azul - blau
OUT
HAL
2 1
+5
rosso - red
rouge - rojo - rot
Agli interruttori magnetotermici
To the miniature circuit breakers
Aux interrupteurs
magnétothermiques
A los interruptores
magnetotérmicos
Zu
Thermomagnetschaltern
COM
COM
verde - green
vert - verde - grün
nero - black
noir - negro - schwarz
2
1
1 2 3
4 5
Relè 1
Relay 1
Relais 1
Relé 1
Relais 1
Relè 2
Relay 2
Relais 2
Relé 2
Relais 2
Morsettiera Centralino Activo
Activo control system terminal board
Bornier du Central Activo
Caja de conexiones Central Activa
Klemmleiste Steuerung Activo
1
1
1
1
1
1
12 mod.
24 mod.
15
ISTRUZIONE D’INSTALLAZIONE - INSTALLATION INSTRUCTIONS - INSTRUCTIONS POUR L’INSTALLATION
ISTRUCCIONES DE INSTALACIÓN - INSTALLATIONSANWEISUNG
Schema di collegamento 12/24 moduli
Wiring diagram 12/24 modules - Schéma de liaison 12/24 modules
Esquema de conexión 12/24 módulos - Anschlussschema 12/24 Module
Con bobina di sgancio e differenziale ReStart / Autotest - With release coil and ReStart / Autotest residual current device
Avec bobine de déclenchement et différentiel ReStart / Autotest - Con bonina de desenganche y diferencial ReStart / Autotest
Mit Trennspule und Schutzschalter Restart / Autotest
Q.tà-Q.ty- Q.té
Cavi - Cables
POS.
ATTENZIONE: prima di accedere al vano cablaggi sezionare l’impianto a monte del centralino.
WARNING: before accessing the wiring, always cut off the power supply upstream of the control system.
ATTENTION : avant d’accéder au siège des câblages, sectionner l’installation en amont du central.
ATENCIÓN: antes de acceder al compartimento de cables seccionar la instalación en entrada de la central.
ACHTUNG: Vor dem Öffnen der Kabelbereichs muss die Anlage vor der Steuerung getrennt werden.
Sensore di corrente
differenziale
in dotazione
Residual current
230 V~ N
sensor
F
Détecteur de courant
compris dans la
fourniture
Sensor de corriente
suministrado
Stromsensor
mitgeliefert
1
Cant.-Anz.
12 m 24 m
Câbles - Cables
Kabel
320 mm
5
11
2
2
3
1
1
4
1
1
nero-black-noir-negro-schwarz
250 mm
2
blu-blue-bleu-azul-blau
Sensore di corrente differenziale in dotazione
Residual current sensor
Détecteur de courant différentiel compris dans la fourniture
Sensor de corriente diferencial suministrado
Differenzstromsensor mitgeliefert
F1 N1
GW 90 901/2
Carico non prioritario
Non-priority load
Charge non prioritaire
Carga no prioritaria
Nebenlast
rosso - red
rouge - rojo - rot
verde - green
vert - verde - grün
N1
A
F1
B
nero - black
noir - negro - schwarz
F
blu - blue
bleu - azul - blau
F
NT
FT
F1
F2
F3
F9
N
F6
+5V
F8
OUT
HAL
F7
COM COM
F4
OUT
OFF
F5
nero - black
noir - negro - schwarz
Morsettiera Centralino Activo - Activo control system terminal board
Bornier du Central Activo - Caja de conexiones Central Activa
Klemmleiste Steuerung Activo
1
2
3
4
5
Relè 1 - Relay 1 Relè 2 - Relay 2
Relais 1 - Relé 1 Relais 2 - Relé 2
Relais 1
Relais 2
Sul retro dell’unità di controllo
On the back of the control unit
Au dos de l’unité de contrôle
Detrás de la unidad de control
Auf der Rückseite der Steuereinheit
1
1
1
1
1
1
12 mod.
24 mod.
16
ISTRUZIONE D’INSTALLAZIONE - INSTALLATION INSTRUCTIONS - INSTRUCTIONS POUR L’INSTALLATION
ISTRUCCIONES DE INSTALACIÓN - INSTALLATIONSANWEISUNG
Schema di collegamento 12/24 moduli
Wiring diagram 12/24 modules - Schéma de liaison 12/24 modules
Esquema de conexión 12/24 módulos - Anschlussschema 12/24 Module
LEGENDA - LEGENDA - LÉGENDE - LEYENDA - LEGENDE
A: Bobina di sgancio - (es. cod. GW 96 012 - si attiva con il superamento della soglia di prelievo programmata).
B: Interruttore per carico non prioritario (es. cod. GW 90 047).
A: Release coil - (e.g. code GW 96 012 - it activates when the program tapping threshold is exceeded).
B: Switch for non-priority load (e.g. code GW 90 047).
A: Bobine de déclenchement – (ex. code GW 96 012 – s’active lorsque le seuil de prise de courant programmé est dépassé).
B: Interrupteur pour charge non prioritaire (ex. code GW 90 047).
A: Bobina de desenganche - (ej. cód. GW 96 012 - se activa con la superación del umbral de extracción programado).
B: Interruptor para carga no prioritario (ej. cód GW 90 047)
A: Trennspule - (z.B. Code GW 96 012 - aktiviert sich beim Überschreiten der programmierten Auslöseschwelle).
B: Trennschalter für Nebenlasten (z.B. Code GW 90 047).
Morsettiera centralino attivo - Activo control system terminal block - Bornier du central Activo
Caja de conexiones central activa - Klemmleiste Steuerung Activo
NT
FT
Alimentazione dell’unità di monitoraggio
Supply of monitoring unit
Alimentation de l’unité de monitorage
Alimentación de la unidad de monitoraje
Stromversorgung der Überwachungseinheit
F1
F2
F3 *
Monitoraggio tensione
Monitoring voltage
Monitorage de la tension
Monitoraje tensión
Spannungsüberwachung
N
F
COM
OUT HALL
+5
OUT DIFF
COM
12 mod.
24 mod.
F4
÷
F9 *
Monitoraggio corrente
Monitoring current
Monitorage du courant
Monitoraje corriente
Stromüberwachung
1
2
3
Monitoraggio corrente differenziale
Monitoring residual current
Monitorage du courant différentiel
Monitoraje corriente diferencial
Differenzstromüberwachung
4
5
* Da utilizzare in caso di installazione del differenziale ReStart / Autotest.
To be used in case of Autotest / ReStart residual current device installation.
À utiliser en cas d’installation du différentiel ReStart / Autotest.
A utilizar en caso de instalación del diferencial ReStart / Autotest.
Zur Verwendung bei Installation des Schutzschalters ReStart / Autotest.
17
24 mod.
Monitoraggio dei singoli circuiti in uscita
(a valle degli interruttori divisionali)
Monitoring single output circuits (downstream from
the divisional switches)
Monitorage des circuits en sortie (en aval des
interrupteurs secondaires)
Monitoraje de los circuitos individuales en salida
(en salida de los interruptores divisionales)
Überwachung der einzelnen Ausgangskreise
(unterhalb den Trennschaltern)
Relè n. 1 - RELAY 1 - Relais n. 1 - Relé n. 1 - Relais Nr. 1
Contatto di uscita in scambio.
Change-over output contact.
Contact de sortie en échange.
Contacto de salida en intercambio.
Ausgangskontakt im Wechsel
Relè n. 2 - RELAY 2 - Relais n. 2 - Relé n. 2 - Relais Nr. 1
Contatto di uscita normalmente aperto.
Normally open output contact.
Contact de sortie normalement ouvert.
Contacto de salida normalmente abierto.
Ausgangskontakt normal offen.
ISTRUZIONE D’INSTALLAZIONE - INSTALLATION INSTRUCTIONS - INSTRUCTIONS POUR L’INSTALLATION
ISTRUCCIONES DE INSTALACIÓN - INSTALLATIONSANWEISUNG
Schema di collegamento 12/24 moduli
Wiring diagram 12/24 modules - Schéma de liaison 12/24 modules
Esquema de conexión 12/24 módulos - Anschlussschema 12/24 Module
Esempi applicativi delle uscite relè - Application examples of the relay outputs - Exemples d’application des sorties relais
Ejemplos aplicativos de las salidas relé - Anwendungsbeispiele der Relaisausgänge
Combinazione 1
Combination 1
Combinaison 1
Combinación 1
Kombination 1
Combinazione 2
Combination 2
Combinaison 2
Combinación 2
Kombination 2
Combinazione 3
Combination 3
Combinaison 3
Combinación 3
Kombination 3
Combinazione 4
Combination 4
Combinaison 4
Combinación 4
Kombination 4
Relè n. 1
RELAY 1
Relais n. 1
Relé n. 1
Relais Nr. 1
Combinatore
Combinatore
Programmatore
Programmatore
telefonico
giornaliero
telefonico
giornaliero
Telephone dial
Telephone dial
Daily programmer
Daily programmer
Programmateur journalier Programmateur journalier Combinateur téléphonique Combinateur téléphonique
Combinador telefónico
Combinador telefónico
Programador diario
Programador diario
Telefonschalter
Telefonschalter
Tagesschaltuhr
Tagesschaltuhr
Relè n. 2
RELAY 2
Relais n. 2
Relé n. 2
Relais Nr. 2
Programmatore
giornaliero
Daily programmer
Programmateur journalier
Programador diario
Tagesschaltuhr
Comando linea
Line control
Commande ligne
Mando línea
Leitungssteuerung
18
Programmatore
giornaliero
Daily programmer
Programmateur journalier
Programador diario
Tagesschaltuhr
Comando linea
Line control
Commande ligne
Mando línea
Leitungssteuerung
ISTRUZIONE D’INSTALLAZIONE - INSTALLATION INSTRUCTIONS - INSTRUCTIONS POUR L’INSTALLATION
ISTRUCCIONES DE INSTALACIÓN - INSTALLATIONSANWEISUNG
Morsettiera centralino
Control system terminal block - Bornier du central
Caja de conexiones de la central - Klemmleiste Steuerung
modulo elettronico - electronic module - module électronique
módulo electrónico - Elektronikmodul
1 2 3 4 5
Relé 1 - Relay 1 - Relais 1 - Relé 1 - Relais 1
1
NC (NC)
2
1A - 125V~ *
NA (NO)
Combinatore telefonico - Programmatore
Telephone dial - Programmer
Combinateur téléphonique - Programmateur
Combinador telefónico - Programador
Telefonschalter - Programmierer
3
L’attivazione del combinatore telefonico avviene mediante il cambio di stato del contatto in uscita per 4 secondi.
The telephone dial is actuated by a 4-second status change of the output contact.
L’activation du combinateur téléphonique se fait par le changement d’état du contact en sortie pendant 4 secondes.
La activación del combinador telefónico se efectúa mediante el cambio de estado del contacto en salida por 4 segundos.
Die Aktivierung des Telefonschalters erfolgt über die Zustandsänderung des Ausgangskontakts für 4 Sekunden.
Relé 2 - Relay 2 - Relais 2 - Relé 2 - Relais 2
4
NA (NO)
1A - 125V~ *
5
Comando linea - Programmatore
Line control - Programmer
Commande ligne - Programmateur
Mando línea - Programador
Leitungssteuerung - Programmierer
* È possibile comandare apparecchi con tensione nominale di 230 V~ limitandone l’assorbimento a circa 100 mA con (fattore di potenza) cos ϕ = 1
Devices can be controlled with a nominal voltage of 230 V~, limiting absorption to approx. 100 mA with (power factor) cos ϕ =1
Il est possible de commander des appareils ayant une tension nominale de 230 V~ en en limitant l'absorption à environ 100 mA avec (facteur
de puissance) cos ϕ = 1
Es posible controlar aparatos con tensión nominal de 230 V ~ limitando la absorción a unos 100 mA con (factor de potencia) cos ϕ = 1
Es können Geräte mit einer Nennspannung von 230 V~ gesteuert werden, in dem die Stromaufnahme auf ca. 100 mA (Leistungsfaktor) cos ϕ = 1
begrenzt wird.
19
ISTRUZIONE D’INSTALLAZIONE - INSTALLATION INSTRUCTIONS - INSTRUCTIONS POUR L’INSTALLATION
ISTRUCCIONES DE INSTALACIÓN - INSTALLATIONSANWEISUNG
Montaggio centralino 12 moduli
Fitting control system 12 module - Montage du central à 12 modules
Montaje central 12 módulos - Montage Steuerung 12 Module
POS. KIT A
1
2
3
4
TC 4x32
TC 3,5x16
ø 10x1,5
TC 2,9x14
5
6
Q.tà
2
2
2
2
1
ø 10x1
8
4
7
1
8
1
7
6
1
1
6
Utilizzare le rondelle (pos. 6) per compensare le diverse profondità di
muratura della scatola. Verificare, dopo il montaggio, che il telaio non
presenti deformazioni.
Use the washers (pos. 6) to compensate for any differences in the
depth of the box in the wall. After assembly, check that the frame
is not bent.
Utiliser les rondelles (pos. 6) pour compenser les différences de profondeur du murage de la boîte. Après le montage vérifier que le cadre
ne présente aucune déformation.
Utilizar las arandelas (pos. 6) para compensar las diferentes profundidades de empotrado de la caja. Comprobar, después del
montaje, que el armazón no presente deformaciones.
Verwenden Sie die Scheiben (Pos. 6) um die unterschiedlichen Einbautiefen der Gehäuse auszugleichen. Nach der Montage
prüfen, dass der Rahmen nicht verformt ist.
20
ISTRUZIONE D’INSTALLAZIONE - INSTALLATION INSTRUCTIONS - INSTRUCTIONS POUR L’INSTALLATION
ISTRUCCIONES DE INSTALACIÓN - INSTALLATIONSANWEISUNG
Montaggio centralino 12 moduli
Fitting control system 12 module - Montage du central à 12 modules
Montaje central 12 módulos - Montage Steuerung 12 Module
POS. KIT A
1
2
3
4
Q.tà
TC 4x32
3
2
TC 3,5x16
2
ø 10x1,5
2
TC 2,9x14
2
1
5
6
2
ø 10x1
2
4
7
1
8
1
4
4
21
3
ISTRUZIONE D’INSTALLAZIONE - INSTALLATION INSTRUCTIONS - INSTRUCTIONS POUR L’INSTALLATION
ISTRUCCIONES DE INSTALACIÓN - INSTALLATIONSANWEISUNG
Montaggio centralino 24 moduli
Fitting control system 24 module - Montage du central à 24 modules
Montaje central 24 módulos - Montage Steuerung 24 Module
POS. KIT A
1
2
3
4
TC 4x32
TC 3,5x16
ø 10x1,5
TC 2,9x14
5
6
Q.tà
4
2
2
4
1
ø 10x1
8
6
7
8
7
1
8
1
6
6
1
1
6
Utilizzare le rondelle (pos. 6) per compensare le diverse profondità di
muratura della scatola. Verificare, dopo il montaggio, che il telaio non
presenti deformazioni.
Use the washers (pos. 6) to compensate for any differences in the
depth of the box in the wall. After assembly, check that the frame is
not bent.
Utiliser les rondelles (pos. 6) pour compenser les différences de
profondeur du murage de la boîte. Après le montage vérifier que le
cadre ne présente aucune déformation.
Utilizar las arandelas (pos. 6) para compensar las diferentes profundidades de empotrado de la caja. Comprobar, después del
montaje, que el armazón no presente deformaciones.
Verwenden Sie die Scheiben (Pos. 6) um die unterschiedlichen Einbautiefen der Gehäuse auszugleichen. Nach der Montage
prüfen, dass der Rahmen nicht verformt ist.
22
ISTRUZIONE D’INSTALLAZIONE - INSTALLATION INSTRUCTIONS - INSTRUCTIONS POUR L’INSTALLATION
ISTRUCCIONES DE INSTALACIÓN - INSTALLATIONSANWEISUNG
Montaggio centralino 24 moduli
Fitting control system 24 module - Montage du central à 24 modules
Montaje central 24 módulos - Montage Steuerung 24 Module
POS. KIT A
1
2
3
4
TC 4x32
TC 3,5x16
ø 10x1,5
TC 2,9x14
2
4
3
2
2
4
1
5
6
Q.tà
ø 10x1
2 3
8
7
1
8
1
4
4
4
23
ISTRUZIONE D’INSTALLAZIONE - INSTALLATION INSTRUCTIONS - INSTRUCTIONS POUR L’INSTALLATION
ISTRUCCIONES DE INSTALACIÓN - INSTALLATIONSANWEISUNG
Montaggio centralino 12-24 moduli
Fitting control system 12-24 module - Montage du central à 12-24 modules
Montaje central 12-24 módulos - Montage Steuerung 12-24 Module
È possibile aprire la portella tramite il tasto
.
Open the flap by pressing the key
.
Il est possible d’ouvrir la porte en appuyant sur la touche
Es posible abrir la puerta mediante la tecla
.
Die Klappe kann mit der Taste
geöffnet werden.
.
24
ISTRUZIONE D’INSTALLAZIONE - INSTALLATION INSTRUCTIONS - INSTRUCTIONS POUR L’INSTALLATION
ISTRUCCIONES DE INSTALACIÓN - INSTALLATIONSANWEISUNG
Smontaggio centralino 12-24 moduli
Disassembly control system 12-24 module - Démontage du central 12-24 modules
Desmontaje central 12-24 módulos - Ausbau Steuerung 12-24 Module
25
ISTRUZIONE D’IMPIEGO - OPERATING INSTRUCTIONS
INSTRUCTIONS D'UTILISATION - ISTRUCCIONES DE EMPLEO - BEDIENUNGSANWEISUNG
Descrizione comandi
Description of the controls - Description des commandes
Descripción mandos - Steuerungsbeschreibung
D
I
A
B
C
H
E
L
G
F
A Allarme luminoso - Segnala la mancata erogazione di energia dell’ente distributore (pag. 49).
B Allarme luminoso - Segnala l’intervento della soglia di corrente di dispersione max superata.
C Allarme luminoso - Segnala l’avvenuto intervento delle apparecchiature modulari di protezione: Interruttori automatici (pag.
51) - Superamento della potenza programmata (pag. 54) - Esecuzione test differenziale (pag. 70) - Allarmi di ReStart / Autotest
(se presenti, vedi pag. 59).
D Tasto PROG . Permette di entrare in programmazione dei parametri di intervento del centralino.
E Tasto TEL. . Abilita/disabilita il contatto per un combinatore telefonico esterno.
F Tasto MODE . Permette di visualizzare i diversi parametri del centralino.
G Tasto
. Questi tasti permettono di modificare i parametri di intervento del centralino in fase di programmazione.
H Tasto
. Il pulsante permette di aprire la portella.
I Ronzatore - Segnala acusticamente alcune delle anomalie dell’impianto.
L Display LCD a scorrimento orizzontale.
A Warning light - Indicates Power failure condition (page 49).
B Warning light - Indicates cutting in of the max. leakage current exceeded threshold.
C Warning light - Indicates cut-in of the modular protection equipment: Automatic switches (page 51) - Exceeding of preset
power value (page 54) - Test on the residual current device (page 70) - ReStart/ Autotest Alarms (if available, see page 59).
D Key PROG . Enables input of the control system’s operating parameters.
E Key TEL. . Enables/disables the contact for an external telephone sequence switch.
F Key MODE . Enables the display of the control system ’s parameters.
G Key
. These keys enable changing the control system's operating parameters during programming.
H Key
. This key allows to open the flap.
I Buzzer - Warns of any malfunctioning in the control system.
L LCD screen with horizontally scrolled messages.
26
ISTRUZIONE D’IMPIEGO - OPERATING INSTRUCTIONS
INSTRUCTIONS D'UTILISATION - ISTRUCCIONES DE EMPLEO - BEDIENUNGSANWEISUNG
Descrizione comandi
Description of the controls - Description des commandes
Descripción mandos - Steuerungsbeschreibung
A Alarme lumineuse - Signale que l’Opérateur distributeur de l’énergie ne fournit pas d’énergie en ce moment (page 49).
B Alarme lumineuse – Signale que le seuil de courant de fuite max a été dépassé.
C Alarme lumineuse - Signale que les appareillages modulaires de protection sont intervenus. Disjoncteurs automatiques (page
51) – La puissance programmée a été dépassée (page 54) – Exécution du test différentiel (page 70) – Alarmes de ReStart /
Autotest (si présents, voir page 59).
D Touche PROG . Permet d’entrer dans la programmation des paramètres d’intervention du central.
E Touche TEL. . Active/désactive le contact pour un combinateur téléphonique extérieur.
F Touche MODE . Permet d’afficher les différents paramètres du central.
G Touches
. Ces touches permettent, en phase de programmation, de modifier les paramètres d’intervention du central.
H Touche
. Le poussoir permet d’ouvrir la porte.
I Ronfleur – Signale acoustiquement certaines anomalies de l’installation.
L Afficheur LCD à défilement horizontal.
A Alarme luminosa – Señala la falta de erogación de energía de lente distribuidor (pág. 49).
B Alarma luminosa – Señala la intervención del umbral de corriente de dispersión máx superada.
C Alarma luminosa – Señala la intervención efectuada de los equipos modulares de protección: Interruptores automáticos (pág.
51) – Superación de la potencia programada (pág. 54) – Ejecución test diferencial (pág. 70) – Alarmas de ReStart / Autotest
(si estuvieran presentes, véase pág. 59).
D Tecla PROG . Permitir la entrada en programación de los parámetros de intervención de la central.
E Tecla TEL. . Habilita/deshabilita el contacto para un combinador telefónico externo.
F Tecla MODE . Permite visualizar los diferentes parámetros de la central.
G Tecla
. Estas teclas permiten modificar los parámetros de intervención de la central en fase de programación.
H Tecla
. El pulsador permite abrir la puerta.
I Timbre trepidante – Señala acústicamente algunas anomalías de la instalación.
L Pantalla LCD de desplazamiento horizontal.
A Optischer Alarm - Zeigt die fehlende Stromversorgung durch das EVU an (Seite 49).
B Optischer Alarm - Zeigt das Ansprechen beim Überschreiten der max. Fehlerstromschwelle an.
C Optischer Alarm - Zeigt das erfolgte Ansprechen der modularen Schutzeinrichtungen an: Automatische Schutzschalter (Seite
51) - Überschreiten der programmierten Leistung (Seite 54) - Ausführung Fehlerstromtest (Seite 70) - Alarme von ReStart /
Autotest (falls vorhanden, siehe Seite 59).
D Taste PROG . Ermöglicht den Zugriff auf die Programmierung der Eingriffsparameter der Steuerung.
E Taste TEL. . Aktiviert/Deaktiviert den Kontakt für einen externen Telefonschalter.
F Taste MODE . Ermöglicht die Anzeige der verschiedenen Parameter der Steuerung.
G Taste
. Mit diesen Tasten können die Eingriffsparameter der Steuerung während der Programmierung geändert werden.
H Taste
. Mit dieser Taste kann die Klappe geöffnet werden.
I Summer - Zeigt einige Anlagenfehler akustisch an.
L LCD Display mit waagerechtem Blättern.
27
ISTRUZIONE D’IMPIEGO - OPERATING INSTRUCTIONS
INSTRUCTIONS D'UTILISATION - ISTRUCCIONES DE EMPLEO - BEDIENUNGSANWEISUNG
Visualizzazione dei parametri dell’impianto
Display of the system parameters - Affichage des paramètres de l’installation
Visualización de los parámetros de la instalación - Anzeige der Anlagenparameter
Stato iniziale: orologio
Starting mode: clock - État initial : horloge - Estado inicial: reloj - Ausgangsstatus: Uhr
Premere il tasto MODE per visualizzare il parametro succesivo.
Press the MODE key to display the next parameter.
Appuyer sur la touche MODE pour afficher le paramètre suivant.
Presione la tecla MODE para visualizar el parámetro sucesivo.
Die Taste MODE drücken, um den nächsten Parameter anzuzeigen.
Potenza
Power - Puissance - Potencia - Leistung
POTENZA - POWER - PUISSANCE - POTENCIA - LEISTUNG
Premere il tasto MODE per visualizzare il parametro succesivo.
Press the MODE key to display the next parameter.
Appuyer sur la touche MODE pour afficher le paramètre suivant.
Presione la tecla MODE para visualizar el parámetro sucesivo.
Die Taste MODE drücken, um den nächsten Parameter anzuzeigen.
28
ISTRUZIONE D’IMPIEGO - OPERATING INSTRUCTIONS
INSTRUCTIONS D'UTILISATION - ISTRUCCIONES DE EMPLEO - BEDIENUNGSANWEISUNG
Visualizzazione dei parametri dell’impianto
Display of the system parameters - Affichage des paramètres de l’installation
Visualización de los parámetros de la instalación - Anzeige der Anlagenparameter
Potenza media
Average power - Puissance moyenne - Potencia media - mittlere Leistung
POTENZA MEDIA - AVERAGE POWER - PUISSANCE MOYENNE
POTENCIA MEDIA -MITTLERE LEISTUNG
Premere il tasto MODE per visualizzare il parametro succesivo.
Press the MODE key to display the next parameter.
Appuyer sur la touche MODE pour afficher le paramètre suivant.
Presione la tecla MODE para visualizar el parámetro sucesivo.
Die Taste MODE drücken, um den nächsten Parameter anzuzeigen.
Corrente differenziale Id
Residual current Id - Courant différentiel ld - Corriente diferencial ld - Differenzstrom Id
DISPERSIONE CORRENTE - GROUND FAULT CURRENT - FUITE DE COURANT
DISPERSIÓN CORRIENTE - FEHLERSTROM
Premere il tasto MODE per visualizzare il parametro succesivo.
Press the MODE key to display the next parameter.
Appuyer sur la touche MODE pour afficher le paramètre suivant.
Presione la tecla MODE para visualizar el parámetro sucesivo.
Die Taste MODE drücken, um den nächsten Parameter anzuzeigen.
29
ISTRUZIONE D’IMPIEGO - OPERATING INSTRUCTIONS
INSTRUCTIONS D'UTILISATION - ISTRUCCIONES DE EMPLEO - BEDIENUNGSANWEISUNG
Visualizzazione dei parametri dell’impianto
Display of the system parameters - Affichage des paramètres de l’installation
Visualización de los parámetros de la instalación - Anzeige der Anlagenparameter
Stato uscita 1
Output 1 status - État de la sortie 1 - Estado salida 1 - Status Ausgang 1
USCITA 1-OFF/ON - OUT 1-OFF/ON - SORTIE 1-OFF/ON
SALIDA 1-OFF/ON - AUSGANG 1-OFF/ON
Se all’uscita 1 è stata assegnata la programmazione oraria sarà possibile modificare lo stato dei relé. (pag. 32).
Premere il tasto MODE per visualizzare lo stato uscita 2.
If the time programming is assigned to output 1, the relay status can be modified (page 32).
Press the key MODE to view output 2 status.
Si la programmation de l’horloge a été assignée à la sortie 1, il sera possible de modifier l’état des relais. (pag. 32).
Appuyer sur la touche MODE pour afficher l’état de la sortie 2.
Si a la salida 1 se ha asignado la programación horaria será posible modificar el estado de los relés. (pág. 32).
Presionar la tecla MODE para visualizar el estado salida 2.
Wenn dem Ausgang 1 die Programmierung der Uhrzeit zugeordnet wurde, kann der Relaisstatus geändert werden (Seite 32).
Die Taste MODE drücken, um den Status Ausgang 2 anzuzeigen.
30
ISTRUZIONE D’IMPIEGO - OPERATING INSTRUCTIONS
INSTRUCTIONS D'UTILISATION - ISTRUCCIONES DE EMPLEO - BEDIENUNGSANWEISUNG
Visualizzazione dei parametri dell’impianto
Display of the system parameters - Affichage des paramètres de l’installation
Visualización de los parámetros de la instalación - Anzeige der Anlagenparameter
Stato uscita 2
Output 2 status - État de la sortie 2 - Estado salida 2 - Status Ausgang 2
USCITA 2-OFF/ON - OUT 2-OFF/ON - SORTIE 2-OFF/ON
SALIDA 2-OFF/ON - AUSGANG 2-OFF/ON
Se all’uscita 2 è stata assegnata la programmazione oraria sarà possibile modificare lo stato dei relé. (pag. 32).
Premere il tasto MODE per tornare alla visualizzazione iniziale (ora).
If the time programming is assigned to output 2, the relay status can be modified (page 32).
Press the key MODE to return to the initial display (time).
Si la programmation de l’horloge a été assignée à la sortie 2, il sera possible de modifier l’état des relais. (pag. 32).
Appuyer sur la touche MODE pour retourner à l’affichage initial (heure).
Si a la salida 2 se ha asignado la programación horaria será posible modificar el estado de los relés. (pág. 32).
Presionar la tecla MODE para volver a la visualización inicial (hora).
Wenn dem Ausgang 2 die Programmierung der Uhrzeit zugeordnet wurde, kann der Relaisstatus geändert werden (Seite 32).
Die Taste MODE drücken, um zur Ausgangsanzeige zurück zu kehren (Uhr).
31
ISTRUZIONE D’IMPIEGO - OPERATING INSTRUCTIONS
INSTRUCTIONS D'UTILISATION - ISTRUCCIONES DE EMPLEO - BEDIENUNGSANWEISUNG
Forzatura programmatori
Forcing programmers - Forçage des programmateurs
Forzado programadores - Übersteuerung Programmierer
Visualizzare sul centralino lo stato delle uscite (1 o 2). Premere i tasti
ATTENZIONE: modificando il parametro visualizzato mediante il tasto
la forzatura.
MODE
View the output status (1 or 2) on the control system. Press the keys
WARNING: if you change the displayed parameter by pressing the key
eliminating the forced change.
per forzare il relè (
= ON
= OFF).
il relè ritornerà al funzionamento programmato eliminando
MODE
to force the relay (
= ON
= OFF).
, the relay will return to its programmed operation,
Afficher sur le central l’état des sorties (1 ou 2). Appuyer sur les touches
pour forcer le relais (
= ON
= OFF).
ATTENTION : si l’on modifie le paramètre affiché avec la touche MODE , le relais reviendra au fonctionnement programmé en
éliminant le forçage.
P
Visualizar en la central el estado de las salidas (1 o 2). Presionar las teclas
para forzar el relé (
= ON
= OFF).
ATENCIÓN: Modificando el parámetro visualizado mediante la tecla MODE el relé volverá al funcionamiento programado eliminando
el forzado.
Anzeige der Ausgangsstatus (1 oder 2) an der Steuerung. Die Tasten
= OFF).
ACHTUNG: Durch Ändern des angezeigten Parameters mit der Taste
und die Übersteuerung wird aufgehoben.
drücken, um die Relais zu schalten (
MODE
= ON
kehrt das Relais zur programmierten Funktion zurück,
Programmazione parametri
Entering the parameters - Programmation des paramètres
Programación parámetros - Parameterprogrammierung
Alla prima accensione del centralino activo avviene una configurazione automatica degli interruttori ad esso collegati.
Vengono riconosciuti e quindi configurati soltanto gli interruttori che al momento della configurazione risultano chiusi (accesi).
Ogni pressione dei tasti PROG MODE TEL. viene segnalata acusticamente.
On switching on the activo control system, automatic configuration of the circuit breakers connected to it takes place.
It recognizes and configures only the circuit breakers which are closed (operative) at the time of configuration.
There is a sound every time the PROG MODE TEL. keys are pressed.
Au premier allumage du central Activo, il se fait une configuration automatique des disjoncteurs qui y sont reliés.
Seuls les disjoncteurs qui au moment de la configuration sont fermés (allumés) sont reconnus et donc configurés.
Chaque pression des touches PROG MODE TEL. est signalée acoustiquement.
En el primer encendido de la central activa tiene lugar una configuración automática de los interruptores a esta conectados.
Se reconocen y por lo tanto se configuran solo los interruptores que al momento de la configuración resultan cerrados (encendidos).
Cada presión de las teclas PROG MODE TEL. se indica acústicamente.
Beim ersten Einschalten der Steuerung Activo erfolgt eine automatische Konfigurierung der angeschlossenen Schutzschalter.
Es werden nur die Schutzschalter erkannt und konfiguriert, die im Moment der Konfigurierung geschlossen sind (eingeschaltet).
Jedes Drücken der Tasten PROG MODE TEL. wird akustisch angezeigt.
32
ISTRUZIONE D’IMPIEGO - OPERATING INSTRUCTIONS
INSTRUCTIONS D'UTILISATION - ISTRUCCIONES DE EMPLEO - BEDIENUNGSANWEISUNG
Programmazione parametri
Entering the parameters - Programmation des paramètres
Programación parámetros - Parameterprogrammierung
Premere il tasto PROG per 5 secondi.
Press the PROG key and hold it for 5 seconds.
Appuyer sur la touche PROG pendant 5 secondes.
Presionar la tecla PROG durante 5 segundos.
Die Taste PROG für 5 Sekunden drücken.
ORA - TIME - HEURE - HORA - UHRZEIT
Premere il tasto MODE per passare alla regolazione dell’ora.
Regolare l’ora con i tasti
.
Premere il tasto MODE per confermare l’ora e passare alla regolazione dei minuti.
Regolare i minuti con i tasti
.
Press the MODE key for proceeding to setting the time.
Set the time using the
keys.
Press the MODE key to store the time and proceed to setting the minutes.
Set the minutes using the
keys.
Appuyer sur la touche MODE pour passer au réglage de l’heure.
Régler l’heure avec les touches
.
Appuyer sur la touche MODE pour confirmer l’heure et pour passer au réglage des minutes.
Régler les minutes avec les touches
.
Presionar la tecla MODE para volver a al regulación de la hora.
Regular la hora con las teclas
.
Presionar la tecla MODE para confirmar la hora y pasar a la regulación de los minutos.
Regular los minutos con las teclas
.
Die Taste MODE drücken, um zur Stundeneinstellung zu wechseln.
Die Stunde mit den Tasten
einstellen.
Die Taste MODE drücken, um die Stunde zu bestätigen, und zur Minuteneinstellung zu wechseln.
Die Minuten mit den Tasten
einstellen.
33
ISTRUZIONE D’IMPIEGO - OPERATING INSTRUCTIONS
INSTRUCTIONS D'UTILISATION - ISTRUCCIONES DE EMPLEO - BEDIENUNGSANWEISUNG
Programmazione parametri
Entering the parameters - Programmation des paramètres
Programación parámetros - Parameterprogrammierung
Premere il tasto PROG per confermare l’ora e passare alla regolazione della potenza.
Press the PROG key to store the time and proceed to setting the power.
Appuyer sur la touche PROG pour confirmer l’heure et pour passer au réglage de la puissance.
Presionar la tecla PROG para confirmar la hora y pasar a la regulación de la potencia.
Die Taste PROG drücken, um die Uhrzeit zu bestätigen, und zur Leistungseinstellung zu wechseln.
POTENZA-SOGLIA - POWER-THRESHOLD - PUISSANCE SEUIL
POTENCIA-UMBRAL - LEISTUNG-SCHWELLE
Premere il tasto MODE per accedere all’impostazione della potenza soglia.
Impostare il valore della potenza (0,5 ÷ 6,5 kW) agendo sui tasti
.
Il valore preimpostato nel centralino è di 3 kW.
ATTENZIONE : l’impostazione di questo valore deve essere coerente con il tipo di impianto.
Press the MODE key for proceeding to setting the power threshold.
Enter the power setting (0,5 ÷ 6,5 kW) using the keys
.
The control system is factory-preset at 3 kW.
ATTENTION: this setting must be consistent with the type of installation.
Appuyer sur la touche MODE pour accéder à la programmation de la puissance seuil.
Programmer la valeur de la puissance (0,5 ÷ 6,5 kW) en agissant sur les touches
.
La valeur préprogrammée dans le central est de 3 kW.
ATTENTION : la programmation de cette valeur doit être cohérente avec le type d’installation.
Presionar la tecla MODE para acceder a la programación de la potencia umbral.
Programar el valor de la potencia (0,5 ÷ 6,5 kW) actuando en las teclas
.
El valor preprogramado en la central es de 3 kW.
ATENCIÓN: La programación de este valor debe ser coherente con el tipo de instalación.
Die Taste MODE drücken, um zur Einstellung der Leistungsschwelle zu wechseln.
Den Leistungswert (0,5 ÷ 6,5 kW) mit den Tasten
einstellen.
Der voreingestellte Wert der Steuerung beträgt 3 kW.
ACHTUNG: Die Einstellung dieses Werts muss an die Anlagenart angepasst werden.
34
ISTRUZIONE D’IMPIEGO - OPERATING INSTRUCTIONS
INSTRUCTIONS D'UTILISATION - ISTRUCCIONES DE EMPLEO - BEDIENUNGSANWEISUNG
Programmazione parametri
Entering the parameters - Programmation des paramètres
Programación parámetros - Parameterprogrammierung
Premere il tasto PROG per confermare il valore della potenza e passare alla programmazione della soglia di dispersione.
Press the PROG key to store the power setting and proceed to setting the leakage current threshold.
Appuyer sur la touche PROG pour confirmer la valeur de la puissance et pour passer à la programmation du seuil de fuite.
Presionar la tecla PROG para confirmar el valor de la potencia y pasar a la programación del umbral de dispersión.
Die Taste PROG drücken, um den Leistungswert zu bestätigen, und zur Programmierung der Fehlerstromschwelle zu wechseln.
DISPERSIONE-SOGLIA - LEAKAGE CURRENT-THRESHOLD - FUITE-SEUIL
DISPERSIÓN UMBRAL - FEHLERSTROM-SCHWELLE
Premere il tasto MODE per impostare il valore della soglia di dispersione.
Impostare il valore della corrente di dispersione (4 ÷ 30 mA) agendo sui tasti
.
Il valore di corrente di dispersione preimpostato è di 15 mA.
ATTENZIONE: l’impostazione di questo valore deve essere coerente con il tipo di impianto.
Press the key MODE to set the leakage current threshold.
Enter the leakage current setting (4 ÷ 30 mA) using the
keys.
The leakage current is factory-preset at 15 mA.
ATTENTION: this setting must be consistent with the type of installation.
Appuyer sur la touche MODE pour programmer la valeur du seuil de fuite.
Programmer la valeur du courant de fuite (4 ÷ 30 mA) en agissant sur les touches
.
La valeur du courant de fuite préprogrammée est de 15 mA.
ATTENTION : la programmation de cette valeur doit être cohérente avec le type d’installation.
Presionar la tecla MODE para programar el valor del umbral de dispersión.
Programar el valor de la corriente de dispersión (4 ÷ 30 kW) actuando en las teclas
El valor de corriente de dispersión preprogramado es de 15 mA.
ATENCIÓN: La programación de este valor debe ser coherente con el tipo de instalación.
Die Taste MODE drücken, um den Schwellenwert des Fehlerstroms einzustellen.
Den Fehlerstromwert (4 ÷ 30 mA) mit den Tasten
einstellen.
Der voreingestellte Fehlerstromwert beträgt 15 mA.
ACHTUNG: Die Einstellung dieses Werts muss an die Anlagenart angepasst werden.
35
.
ISTRUZIONE D’IMPIEGO - OPERATING INSTRUCTIONS
INSTRUCTIONS D'UTILISATION - ISTRUCCIONES DE EMPLEO - BEDIENUNGSANWEISUNG
Programmazione parametri
Entering the parameters - Programmation des paramètres
Programación parámetros - Parameterprogrammierung
Premere il tasto PROG per confermare il valore della dispersione soglia e passare alla programmazione della configurazione
magnetotermici.
Press the PROG key to confirm the leakage current threshold, then configure the miniature circuit breakers.
Appuyer sur la touche PROG pour confirmer la valeur de la fuite seuil et pour passer à la programmation de la configuration
des magnétothermiques.
Presionar la tecla PROG para confirmar el valor de la dispersión umbral y pasar a la programación de la configuración
magnetotérmicos.
Die Taste PROG drücken, um den Schwellenwert des Fehlerstroms zu bestätigen, und zur Programmierung der Schutzschalter
zu wechseln.
CONFIG. MAGNETOTERMICI - MINIATURE CIRCUIT BREAKERS CONFIGURATION
CONFIG. DES MAGNÉTOTHERMIQUES -CONFIG. MAGNETOTÉRMICOS
KONFIG. SCHUTZSCHALTER
Premere il tasto MODE per configurare gli interruttori automatici ad esso collegati.
Vengono riconosciuti e quindi configurati soltanto gli interruttori che al momento della configurazione risultano chiusi (accesi).
Press the MODE key to configure the miniature circuit breakers connected to it.
It recognizes and configures only the circuit breakers which are closed (operative) at the time of configuration.
Appuyer sur la touche MODE pour configurer les disjoncteurs automatiques qui sont reliés. Seuls les disjoncteurs qui au moment
de la configuration sont fermés (allumés) sont reconnus et donc configurés.
Presionar la tecla MODE para configurar los interruptores automáticos a esta conectados. Se reconocen y por lo tanto configurados
solo los interruptores que al momento de la configuración resultan cerrados (encendidos).
Die Taste MODE drücken, um die angeschlossenen Schutzschalter zu konfigurieren. Es werden nur die Schutzschalter erkannt und
konfiguriert, die im Moment der Konfigurierung geschlossen sind (eingeschaltet).
36
ISTRUZIONE D’IMPIEGO - OPERATING INSTRUCTIONS
INSTRUCTIONS D'UTILISATION - ISTRUCCIONES DE EMPLEO - BEDIENUNGSANWEISUNG
Programmazione parametri
Entering the parameters - Programmation des paramètres
Programación parámetros - Parameterprogrammierung
Premere il tasto PROG per confermare la configurazione e passare alla programmazione della lingua.
Press the PROG key to store the configuration and proceed to selecting the language.
Appuyer sur la touche PROG pour confirmer la configuration et pour passer à la programmation de la langue.
Presionar la tecla PROG para confirmar la configuración y pasar a la programación del idioma.
Die Taste PROG drücken, um die Konfiguration zu bestätigen, und zur Einstellung der Sprache zu wechseln.
LINGUA - LANGUAGE - LANGUE - IDIOMA - SPRACHE
Premere il tasto
Premere i tasti
Press the key
Press the
MODE
MODE
per programmare la lingua.
per selezionare la lingua desiderata (
to select the language.
keys to select the required language (
= Italiano
= Italian
Pour programmer la langue appuyer sur la touche MODE .
Appuyer sur les touches
pour sélectionner la langue désirée (
Presionar la tecla MODE para programar el idioma.
Presionar las teclas
para seleccionar el idioma deseado (
MODE
Die Taste
Die Tasten
drücken, um die Sprache einzustellen.
drücken, um die gewünschte Sprache einzustellen (
37
= Inglese).
= English).
= Italien
= Italiano
= Anglais).
= Inglés).
= Italienisch
= Englisch).
ISTRUZIONE D’IMPIEGO - OPERATING INSTRUCTIONS
INSTRUCTIONS D'UTILISATION - ISTRUCCIONES DE EMPLEO - BEDIENUNGSANWEISUNG
Programmazione parametri
Entering the parameters - Programmation des paramètres
Programación parámetros - Parameterprogrammierung
Premere il tasto PROG per confermare la lingua e passare alla assegnazione uscite.
Press the key PROG to confirm the language, then assign the outputs.
Appuyer sur la touche PROG pour confirmer la langue et pour passer à l’assignation des sorties.
Presionar la tecla PROG para confirmar el idioma y pasar a la asignación salidas.
Die Taste PROG drücken, um die Sprache zu bestätigen, und zur Zuordnung der Ausgänge zu wechseln.
ASSEGNAZIONE USCITE - ASSIGNING OUTPUTS - ASSIGNATION DES SORTIES
ASIGNACIÓN SALIDAS - ZUORDNUNG AUSGÄNGE
Premere il tasto MODE per procedere alle assegnazioni dell’uscita 1.
Premere i tasti
per selezionare il programmatore orario oppure il combinatore telefonico.
(
= programmatore orario
= combinatore).
Press the key MODE to assign output 1.
Press the keys
to select the time programmer or telephone dial.
(
time programmer
= dial).
Appuyer sur la touche MODE pour procéder à l’assignation de la sortie 1.
Appuyer sur les touches
pour sélectionner le programmateur horaire ou bien le combinateur téléphonique.
(
= programmateur horaire
= combinateur).
Presionar la tecla MODE para proceder a las asignaciones de la salida 1.
Presionar las teclas
para seleccionar el programador horario o el combinador telefónico.
(
= programador horario
= combinador).
Die Taste MODE drücken, um mit der Zuordnung des Ausgangs 1 fort zu fahren.
Die Tasten
drücken, um die Zeitschaltuhr oder den Telefonschalter zu wählen.
(
= Zeitschaltuhr
= Programmierer)
38
ISTRUZIONE D’IMPIEGO - OPERATING INSTRUCTIONS
INSTRUCTIONS D'UTILISATION - ISTRUCCIONES DE EMPLEO - BEDIENUNGSANWEISUNG
Programmazione parametri
Entering the parameters - Programmation des paramètres
Programación parámetros - Parameterprogrammierung
Premere il tasto MODE per confermare l’assegnazione dell’uscita 1 e passare all’assegnazione dell’uscita 2.
Press the key MODE to confirm the assignment of output 1 and now assign output 2.
Appuyer sur la touche MODE pour confirmer l’assignation de la sortie 1 et pour passer à l’assignation de la sortie 2.
Presionar la tecla MODE para confirmar la asignación de la salida 1 y pasar a la asignación de la salida 2.
Die Taste MODE drücken, um die Zuordnung des Ausgangs 1 zu bestätigen, und zur Zuordnung des Ausgangs 2 zu wechseln.
USCITA 2 - OUTPUT 2 - SORTIE 2 - SALIDA 2 - AUSGANG 2
Premere i tasti
per selezionare il comando linea oppure il programmatore orario.
(
= programmatore orario
= comando linea).
Premere il tasto MODE per ritornare all’assegnazione dell’uscita 1 oppure premere PROG per confermare l’assegnazione dell’uscita
2 e passare alla programmazione delle uscite.
Press the keys
to select the line control or time programmer.
(
= time programmer
= line control).
Press the key MODE to go back to assigning output 1, or press PROG to confirm the assignment of output 2 and start programming
the outputs.
Appuyer sur les touches
pour sélectionner la commande ligne ou bien le programmateur horaire.
(
= programmateur horaire
= commande ligne).
Appuyer sur la touche MODE pour retourner à l’assignation de la sortie 1 ou bien appuyer sur PROG pour confirmer l’assignation de
la sortie 2 et pour passer à la programmation des sorties.
Presionar las teclas
para seleccionar el mando línea o el programador horario.
(
= programador horario
= mando línea).
Presionar la tecla MODE para volver a la asignación de la salida 1 o presionar PROG para confirmar la asignación de la salida 2 y
pasar a la programación de las salidas.
Die Tasten
drücken, um die Leitungssteuerung oder den Zeitschaltuhr zu wählen.
(
= Zeitschaltuhr
= Leitungssteuerung)
Die Taste MODE drücken, um zur Zuordnung des Ausgangs 1 zurück zu kehren, oder PROG drücken, um die Zuordnung des
Ausgangs 2 zu bestätigen, und zur Programmierung der Ausgänge wechseln.
39
ISTRUZIONE D’IMPIEGO - OPERATING INSTRUCTIONS
INSTRUCTIONS D'UTILISATION - ISTRUCCIONES DE EMPLEO - BEDIENUNGSANWEISUNG
Programmazione parametri
Entering the parameters - Programmation des paramètres
Programación parámetros - Parameterprogrammierung
ATTENZIONE: i passaggi successivi dipendono dal tipo di assegnazione uscite fatte in precedenza (pag. 38-39)
ATTENTION: the next phases depend on what type of output assignment you have made (page 38-39).
ATTENTION : les passages suivants dépendent du type de l’assignation des sorties faite précédemment (page 38-39).
ATENCIÓN: Los pasos sucesivos dependen del tipo de asignación de salidas hechas precedentemente (pág. 38-39).
ACHTUNG: Die folgenden Schritte hängen von der Zuordnung der Ausgänge ab, die zuvor ausgeführt wurde (Seiten 38-39).
PROG USCITA 1 - PROG OUTPUT 1 - PROG SORTIE 1
PROG SALIDA 1 - PROG AUSGANG 1
Premere il tasto
Premere il tasto
Press the
Press the
PROG
MODE
per confermare l’assegnazione delle uscite e passare alla programmazione delle stesse.
per attivare/disattivare la funzione di programmatore agendo sui tasti (
= ON
= OFF).
key to confirm assignment of the outputs and move on to their programming.
key to enable/disable the programmer function by pressing keys (
= ON
PROG
MODE
= OFF).
Appuyer sur la touche PROG pour confirmer l’assignation des sorties 1 et pour passer à leur programmation.
Appuyer sur la touche MODE pour activer/désactiver la fonction de programmateur en agissant sur les touches (
= OFF).
Presionar la tecla
Presionar la tecla
PROG
MODE
para confirmar la asignación de las salidas y pasar a la programación de las mismas.
para activar/desactivar la función de programador actuando en las teclas (
= ON
= ON
= OFF).
Die Taste PROG drücken, um die Zuordnung der Ausgänge zu bestätigen, und zur Programmierung dieser zu wechseln.
Die Taste MODE drücken, um die Funktion des Programmierers mit den Tasten (
= ON
= OFF) zu aktivieren/deaktivieren.
40
ISTRUZIONE D’IMPIEGO - OPERATING INSTRUCTIONS
INSTRUCTIONS D'UTILISATION - ISTRUCCIONES DE EMPLEO - BEDIENUNGSANWEISUNG
Programmazione parametri
Entering the parameters - Programmation des paramètres
Programación parámetros - Parameterprogrammierung
Solo in caso di funzione attivata “ON”.
Only when “ON” is activated.
Seulement en cas de fonction activée « ON ».
Solo en caso de función activada “ON”
Nur bei aktiver Funktion „ON“
Premere il tasto MODE per confermare la funzione e passare alla regolazione delle 3 fasce orarie.
Press the key MODE to confirm the function and set the 3 time periods.
Appuyer sur la touche MODE pour confirmer la fonction et pour passer au réglage des 3 tranches horaires.
Presionar la tecla MODE para confirmar la función y pasar a la regulación de las 3 franjas horarias.
Die Taste MODE drücken, um die Funktion zu bestätigen, und zur Einstellung der 3 Zeitabschnitte zu wechseln.
1ON1 08:00
Premere i tasti
per impostare l’ora di attivazione della prima fascia oraria. Premere il tasto
e passare alla regolazione dei minuti. Regolare i minuti con i tasti
.
Press the keys
minutes with the keys
to set the activation time of the first time period. Press the key
.
MODE
MODE
per confermare l’ora
P
to confirm the time and set the
Appuyer sur les touches
pour programmer l’heure d’activation de la première tranche horaire. Appuyer sur la touche
MODE
pour confirmer l’heure et pour passer au réglage des minutes. Régler les minutes avec les touches
.
Presionar las teclas
para programar la hora de activación de la primera franja horaria. Presionar la tecla
confirmar la hora y pasar a la regulación de los minutos. Regular los minutos con las teclas
.
MODE
para
P
Die Tasten
drücken, um die Einschaltuhrzeit des ersten Zeitabschnitts einzustellen. Die Taste MODE drücken, um die
Stunde zu bestätigen, und zur Minuteneinstellung zu wechseln. Die Minuten mit den Tasten
einstellen.
P
Esempi di programmazione - Programming examples - Exemples de programmation - Ejemplos de programación - Programmierbeispiel
Illuminazione notturna del giardino ore 20.30÷06.30
Garden lighting at night times 8.30 pm ÷ 06.30 am
Éclairage nocturne du jardin de 20.30 à 06.30
Iluminación nocturna del jardín horas 20.30÷06.30
Nachtbeleuchtung des Gartens von 20:30÷6:30
T1
T2
T3
ON
00.00
20.30
/
OFF
06.30
23.59
/
Irrigazione automatica del giardino ore 10.30÷11.30 - 13.30÷14.30 - 16.30÷17.30
Automatic garden watering times 10.30 am ÷ 11.30 am - 1.30 pm ÷ 2.30 pm 4.30 pm ÷ 5.30 pm
Irrigation automatique du jardin de 10.30 à 11.30 - de 13.30 à 14.30 - de 16.30 à 17.30.
Irrigación automática del jardín horas 10.30÷11.30 - 13.30÷14.30 -16.30÷17.30
Automatische Gartensprengung von 10:30÷11:30; 13:30÷14:30; 16:30÷17:30
T1
T2
T3
ON
10.30
13.30
16.30
OFF
11.30
14.30
17.30
41
ISTRUZIONE D’IMPIEGO - OPERATING INSTRUCTIONS
INSTRUCTIONS D'UTILISATION - ISTRUCCIONES DE EMPLEO - BEDIENUNGSANWEISUNG
Programmazione parametri
Entering the parameters - Programmation des paramètres
Programación parámetros - Parameterprogrammierung
Premere il tasto MODE per 5 secondi per confermare l’orario di attivazione e passare all’impostazione di disattivazione della prima
fascia oraria.
Premere i tasti
per regolare l’ora di disattivazione della prima fascia oraria.
Premere il tasto MODE per confermare l’ora e passare alla regolazione dei minuti.
Regolare i minuti con i tasti
.
ATTENZIONE: la disattivazione del canale avviene al termine del minuto impostato e non allo scattare dello stesso.
Press the key MODE for 5 seconds to confirm the activation time, then set the deactivation of the first time period.
Press the keys
to set the time of deactivation of the first time period.
Press the key MODE to confirm the time and then set the minutes.
Set the minutes with the keys
.
WARNING : the channel is disabled at the end of the preset minute and not when it trips.
Appuyer sur la touche MODE pendant 5 secondes pour confirmer l’horaire d’activation et pour passer à la programmation de
désactivation de la première tranche horaire.
Appuyer sur les touches
pour régler l’heure de désactivation de la première tranche horaire.
Appuyer sur la touche MODE pour confirmer l’heure et pour passer au réglage des minutes.
Régler les minutes avec les touches
.
ATTENTION : la désactivation du canal s’effectue à la fin de la minute programmée et non pas au début de ladite minute.
Presionar la tecla MODE durante 5 segundos para confirmar el horario de activación y pasar a la programación de desactivación
de la primera franja horaria.
Presionar las teclas
para regular la hora de desactivación de la primera franja horaria.
Presionar la tecla MODE para confirmar la hora y pasar a la regulación de los minutos.
Regular los minutos con las teclas
.
ATENCIÓN: La desactivación del canal se efectúa al final del minuto programado y no cuando se dispara el mismo.
Die Taste MODE für 5 Sekunden drücken, um Einschaltuhrzeit zu bestätigen, und zur Einstellung der Ausschaltuhrzeit des ersten
Zeitabschnitts zu wechseln.
Die Tasten
drücken, um die Ausschaltuhrzeit des ersten Zeitabschnitts einzustellen.
Die Taste MODE drücken, um die Stunde zu bestätigen, und zur Minuteneinstellung zu wechseln.
Die Minuten mit den Tasten
einstellen.
ACHTUNG: Die Deaktivierung des Kanals erfolgt am Ende der eingestellten Minute, und nicht mit Beginn dieser.
1OFF 1 10:00
42
ISTRUZIONE D’IMPIEGO - OPERATING INSTRUCTIONS
INSTRUCTIONS D'UTILISATION - ISTRUCCIONES DE EMPLEO - BEDIENUNGSANWEISUNG
Programmazione parametri
Entering the parameters - Programmation des paramètres
Programación parámetros - Parameterprogrammierung
Premere il tasto MODE per 5 secondi per confermare l’orario della disattivazione della prima fascia oraria e passare alla regolazione
della successiva fascia oraria. Procedere come da pag. 41.
ATTENZIONE: se non si vogliono attivare le successive fascie orarie premere il tasto TEL. .
Terminata l’impostazione di disattivazione della terza fascia oraria premere MODE se si vuole ritornare alla regolazione della prima
fascia oraria, oppure premere PROG per proseguire e passare alla programmazione successiva.
ATTENZIONE: se l’uscita 2 é stata configurata come programmatore orario procedere come da pag. 40, altrimenti procedere con
l’abilitazione/disabilitazione comando linea.
Press the key MODE for 5 seconds to confirm the disabling time of the first time period and then set the next time period. Proceed
as on page 41.
WARNING: if you do not wish to activate the next time periods, press the key TEL. .
Once the disabling of the third time period is set, press MODE to go back to setting the first time period or press PROG to continue
and program the next setting.
WARNING : if output 2 has been configured as the time programmer, proceed as on page 40, otherwise enable/disable line control.
Appuyer sur la touche MODE pendant 5 secondes pour confirmer l’horaire de la désactivation de la première tranche horaire et pour
passer au réglage de la tranche horaire suivante. Procéder comme décrit à la page 41.
ATTENTION : si l’on ne veut pas activer les tranches horaires suivantes, appuyer sur la touche TEL. .
Quand on a terminé la programmation de désactivation de la troisième tranche horaire, appuyer sur MODE si l’on désire
retourner au réglage de la première tranche horaire, ou bien appuyer sur PROG si l’on désire poursuivre et passer à la
P
programmation suivante.
ATTENTION : si la sortie 2 a été configurée comme programmateur horaire, procéder comme indiqué à la page 40, sinon procéder
à l’activation/désactivation de la commande de ligne.
Presionar la tecla MODE durante 5 segundos para confirmar el horario de la desactivación de la primera franja horaria y pasar a la
regulación de la sucesiva franja horaria. Proceder como en la pág. 41.
ATENCIÓN: si no se desean activar las sucesivas franjas horarias presionar la tecla TEL. .
Terminada la programación de desactivación de la tercera franja horario presione MODE si se desea volver a la regulación de la
primera franja horaria, o presionar PROG para seguir y pasar a la programación sucesiva.
ATENCIÓN: si la salida 2 se ha configurado como programador horario proceder como en la pág. 40, de lo contrario proceder con
la habilitación/deshabilitación mando línea.
Die Taste MODE für 5 Sekunden drücken, um Ausschaltuhrzeit des ersten Zeitabschnitts zu bestätigen, und zur Einstellung des
nächsten Zeitabschnitts zu wechseln. Wie auf Seite 41 beschrieben vorgehen.
ACHTUNG: Wenn die folgenden Zeitabschnitt nicht aktiviert werden sollen ist die Taste TEL. zu drücken.
Nach Einstellung der Ausschaltuhrzeit des dritten Zeitabschnitts MODE drücken, um zur Einstellung des ersten Zeitabschnitts zurück
zu kehren, oder PROG drücken, um zur nächsten Programmierung zu wechseln.
ACHTUNG: Wenn der Ausgang 2 als Zeitschaltuhr programmiert wurde gemäß Seite 40 fortfahren, andernfalls mit der
Aktivierung/Deaktivierung der Leitungssteuerung fortfahren.
43
ISTRUZIONE D’IMPIEGO - OPERATING INSTRUCTIONS
INSTRUCTIONS D'UTILISATION - ISTRUCCIONES DE EMPLEO - BEDIENUNGSANWEISUNG
Programmazione parametri
Entering the parameters - Programmation des paramètres
Programación parámetros - Parameterprogrammierung
Abilitazione / disabilitazione del comando linea.
Enabling / disabling line control.
Activation / désactivation de la commande de ligne.
Habilitación/Deshabilitación del mando línea.
Aktivierung/Deaktivierung der Leitungssteuerung.
COMANDO LINEA - LINE CONTROL - COMMANDE DE LIGNE
MANDO LÍNEA - LEITUNGSSTEUERUNG
Premere il tasto MODE per abilitare le funzioni comando linea.
Premere i tasti
per attivare/disattivare (
= ON
= OFF).
Premere il tasto PROG per confermare e passare al funzionamento esecutivo. Se durante la programmazione non viene premuto
alcun tasto per 5 minuti si torna al funzionamento esecutivo ed i dati inseriti vengono memorizzati.
Press the key MODE to enable the line control functions.
Press the keys
to enable/disable (
= ON
= OFF).
Press the key PROG to confirm it, then go to operating mode. If no key is pressed for 5 minutes during programming, it returns to
operating mode and the data entered is memorized.
Appuyer sur la touche MODE pour activer les fonctions de commande de ligne.
Appuyer sur les touches
pour activer/désactiver (
= ON
= OFF).
Appuyer sur la touche PROG pour confirmer et pour passer au fonctionnement exécutif. Si, pendant la programmation, on n’appuie
sur aucune touche pendant 5 minutes, on retourne au fonctionnement exécutif et les données entrées sont mises en mémoire.
Presionar la tecla MODE para habilitar las funciones mando línea.
Presionar las teclas
para activar/desactivar (
= ON
= OFF).
Presionar la tecla PROG para confirmar y pasar al funcionamiento ejecutivo. Si durante la programación no se presiona ninguna
tecla durante 5 minutos se vuelve al funcionamiento ejecutivo y los datos introducidos se memorizan.
Die Taste MODE drücken, um die Funktionen der Leitungssteuerung zu aktivieren.
Die Tasten
zum Aktivieren/Deaktivieren drücken (
= ON
= OFF).
Die Taste PROG zum Bestätigen drücken, und zur Ausführungsfunktion wechseln. Wenn während der Programmierung keine
Taste für 5 Minuten gedrückt wird erfolgt automatisch der Wechsel zur Ausführungsfunktion und die eingegebenen Daten
werden gespeichert.
44
ISTRUZIONE D’IMPIEGO - OPERATING INSTRUCTIONS
INSTRUCTIONS D'UTILISATION - ISTRUCCIONES DE EMPLEO - BEDIENUNGSANWEISUNG
Abilitazione/disabilitazione combinatore telefonico
Enable/disable telephone dial - Activation/désactivation du combinateur téléphonique
Habilitación/deshabilitación combinador telefónico - Aktivierung/Deaktivierung Telefonschalter
Funzione disponibile solo se assegnata in fase di programmazione (vedi pag. 38).
Function available only if assigned during programming (see page 38).
Cette fonction n’est disponible que si elle est assignée en phase de programmation (voir page 38).
Función disponible solo si se asigna en fase de programación (véase pág. 38).
Die Funktion steht nur zur Verfügung, wenn diese während der Programmierung zugeordnet wurde (siehe Seite 38).
Agendo sul tasto TEL. si abilita il combinatore telefonico, tale azione viene segnalata sul display dall’accensione della scritta TEL.
Per disabilitare il combinatore telefonico premere il tasto TEL. .
ATTENZIONE: durante la programmazione dei parametri non é possibile abilitare il combinatore telefonico.
• Il combinatore telefonico è attivabile con i seguenti allarmi:
– Mancanza Rete
– Prot. Dispers. Int. 1
– Prot. Sovracc. Int. 1
– Int. 1 aperto
– Protezione Int. 2........ 3 12 moduli
– Protezione Int. 2........ 9 24 moduli
The telephone dial is enabled by pressing the TEL. key, which causes TEL to appear on the display.
To disable the dial, press TEL. again.
ATTENTION: the telephone dial cannot be enabled while inputting the parameters.
• The telephone dial can be actuated by the following alarms:
- No Main Line
- Ground. Fault Prot. SW.1
- Overload Prot. SW. 1
- SW.1 Open
- Protection SW. 2........3 12 modules
- Protection SW. 2........9 24 modules
45
ISTRUZIONE D’IMPIEGO - OPERATING INSTRUCTIONS
INSTRUCTIONS D'UTILISATION - ISTRUCCIONES DE EMPLEO - BEDIENUNGSANWEISUNG
Abilitazione/disabilitazione combinatore telefonico
Enable/disable telephone dial - Activation/désactivation du combinateur téléphonique
Habilitación/deshabilitación combinador telefónico - Aktivierung/Deaktivierung Telefonschalter
En agissant sur la touche TEL. on active le combinateur téléphonique ; l’afficheur signale cette action en allumant le mot TEL.
Pour désactiver le combinateur téléphonique, appuyer sur la touche TEL. .
ATTENTION : pendant la programmation des paramètres il n’est pas possible d’activer le combinateur téléphonique.
• Le combinateur téléphonique peut être activé avec les alarmes suivantes :
- Absence de courant de secteur
- Prot. Fuite Int. 1
- Prot. Surcharge Int. 1
- Int. 1 ouvert
- Protection Int. 2........3 12 modules
- Protection Int. 2........9 24 modules
Actuando en la tecla TEL. se habilita el combinador telefónico, dicha acción se señala en la pantalla por el encendido de la entrada
TEL. Para deshabilitar el combinador telefónico presionar la tecla TEL. .
ATENCIÓN: durante la programación de los parámetros no es posible habilitar el combinador telefónico
• El combinador telefónico se activa con las siguientes alarmas:
- Falta Red
- Prot. Dispers. Int. 1
- Prot. Dispers. Int. 1
- Int. 1 abierto
- Protección Int. 2........3 12 módulos
- Protección Int. 2.......0,9 24 módulos
Durch Drücken der Taste TEL. wird der Telefonschalter aktiviert, dieser Schritt wird im Display durch Anzeige des Schriftzugs
TEL signalisiert.
Zum Deaktivieren des Telefonschalters die Taste TEL. drücken.
ACHTUNG: Während der Parameterprogrammierung kann der Telefonschalter nicht aktiviert werden.
• Der Telefonschalter kann mit den folgenden Alarmen aktiviert werden:
- Fehlende Netzversorgung
- FI-Schutz Sch. 1
- Übersp. Schutz Sch. 1
- Sch. 1 offen
- Schutz Sch. 2........3 12 Module
- Schutz Sch. 2.......9 24 Module
46
ISTRUZIONE D’IMPIEGO - OPERATING INSTRUCTIONS
INSTRUCTIONS D'UTILISATION - ISTRUCCIONES DE EMPLEO - BEDIENUNGSANWEISUNG
Contatori
Counters - Compteurs - Contadores - Zähler
Visualizzazione - Reset - Affichage - Visualización - Anzeige
• Assenza rete - No power supply - Absence de courant secteur - Ausencia red - Fehlende Netzversorgung
ASSENZA RETE (HH:MM) - NO POWER SUPPLY (HH:MM)
ABSENCE DE COURANT SECTEUR (HH:MM) - AUSENCIA RED (HH:MM)
FEHLENDE NETZVERS. (HH:MM))
Dallo stato operativo premere due volte il tasto PROG per visualizzare per quanto tempo è mancata la tensione di alimentazione.
Premere il tasto MODE per azzerare il contatore assenza rete.
L’azzeramento viene confermato acusticamente.
Premere il tasto PROG per passare alla visualizzazione del consumo medio dall’ultimo azzeramento.
From operating mode, press the key PROG twice to view how long the power supply has not been present.
Press the key MODE to reset the power supply counter.
The reset is confirmed by a sound warning.
Press the key PROG to view the average consumption since the last reset.
Dans l’état opérationnel, appuyer deux fois sur la touche PROG pour afficher pendant combien de temps il n’y a pas eu de tension
d’alimentation.
Appuyer sur la touche MODE pour mettre à zéro le compteur d’absence de courant secteur.
La mise à zéro est confirmée acoustiquement.
Appuyer sur la touche PROG pour passer à l’affichage de la consommation moyenne à partir de la dernière mise à zéro.
Desde el estado operativo presionar dos veces la tecla PROG para visualizar durante cuánto tiempo falta la tensión de alimentación.
Presionar la tecla MODE para poner a cero el contador ausencia red.
La puesta a cero se confirma acústicamente.
Presionar la tecla PROG para pasar a la visualización del consumo medio desde la última puesta a cero.
Im Betriebsstatus zwei Mal die Taste PROG drücken, um anzuzeigen wie lange die Versorgungsspannung ausgefallen ist.
Die Taste MODE drücken, um den Zähler für fehlende Netzversorgung zurück zu stellen.
Das Rückstellen wird akustisch bestätigt.
Die Taste PROG drücken, um zur Anzeige des mittleren Verbrauchs seit der letzten Rückstellung zu wechseln.
47
ISTRUZIONE D’IMPIEGO - OPERATING INSTRUCTIONS
INSTRUCTIONS D'UTILISATION - ISTRUCCIONES DE EMPLEO - BEDIENUNGSANWEISUNG
Contatori
Counters - Compteurs - Contadores - Zähler
• Reset consumo medio - Average consumption reset - Reset consommation moyenne
Regulación consumo medio - Rückstellung mittlerer Verbrauch
RESET CONSUMO - CONSUMPTION RESET - RESET CONSOMMATION
RESET CONSUMO - RESET VERBRAUCH
Premere il tasto
Premere il tasto
Press the key
Press the key
MODE
MODE
per azzerare il valore del consumo.
per tornare al funzionamento esecutivo
PROG
to reset the consumption value.
to return to operating mode.
PROG
Appuyer sur la touche
Appuyer sur la touche
Presionar la tecla
Presionar la tecla
Die Taste
Die Taste
MODE
PROG
MODE
PROG
MODE
PROG
pour mettre à zéro la valeur de la consommation.
pour retourner au fonctionnement exécutif.
para poner a cero el valor del consumo.
para volver al funcionamiento ejecutivo
drücken, um den Verbrauchswert zurück zu stellen.
drücken, um zur Ausführungsfunktion zu wechseln
48
ISTRUZIONE D’IMPIEGO - OPERATING INSTRUCTIONS
INSTRUCTIONS D'UTILISATION - ISTRUCCIONES DE EMPLEO - BEDIENUNGSANWEISUNG
Gestione allarmi
Alarms control - Gestion des alarmes - Gestión alarmas - Alarmsteuerung
La corretta visualizzazione dell’allarme avviene dopo circa 15 sec dal verificarsi dello stesso.
Mancanza di tensione a monte dell’interruttore magnetotermico/differenziale principale. Allarme tacitabile (vedi pag. 65).
An alarm is fully displayed with about 15 seconds delay.
Power failure ahead of the main miniature circuit breaker / residual current device. This alarm can be switched off (see page 65).
L’affichage correct de l’alarme se fait environ 15 sec après que l’alarme s’est produite.
Manque de tension en amont de l’interrupteur magnétothermique/différentiel principal. Alarme désactivable (voir page 65).
La correcta visualización de la alarma se efectúa después de casi 15 seg desde que se ha verificado la misma.
Falta tensión en entrada del interruptor magnetotérmico/diferencial principal. Alarma desactivable (véase. pág. 65).
Die korrekte Anzeige des Alarms erfolgt ca. 15 Sekunden nachdem dieser aufgetreten ist.
Spannungsausfall vor dem Schutzschalter / Haupt-FI-Schalter. Quittierbarer Alarm (siehe Seite 65).
MANCANZA RETE - NO MAIN LINE - ABSENCE DE COURANT SECTEUR
FALTA RED - FEHLENDE NETZVERSORGUNG
L’ente distributore ha momentaneamente sospeso l’erogazione di energia oppure è intervenuto l’interruttore generale posizionato
presso il contatore. In quest’ultimo caso riarmare l’interruttore. La segnalazione luminosa di allarme rimane fino all’azzeramento
del contatore (pag. 47).
Either a power supply failure has occurred or the main circuit breaker situated next to the meter has tripped.
In the latter case, reset the circuit breaker. The alarm light stays on until the counter is reset (page 47).
L’Opérateur distributeur de l’énergie en a momentanément suspendu la fourniture, ou bien le disjoncteur général positionné sur
le compteur est intervenu. Dans ce dernier cas il faut réarmer le disjoncteur.
La signalisation d’alarme lumineuse demeure jusqu’à la mise à zéro du compteur (page 47).
El ente distribuidor ha suspendido momentáneamente la erogación de energía o ha intervenido el interruptor general colocado en
el contador. En este último caso rearmar el interruptor.
La señalización luminosa de alarma permanece hasta la puesta a cero del contador (pág. 47).
Das EVU hat momentan die Energielieferung eingestellt, oder der Hauptschalter am Stromzähler hat ausgelöst. Im letzteren Fall
den Hauptschalter schließen.
Die optischer Alarmanzeige bleibt bis zum Rücksetzen des Zählers aktiv (Seite 47).
49
ISTRUZIONE D’IMPIEGO - OPERATING INSTRUCTIONS
INSTRUCTIONS D'UTILISATION - ISTRUCCIONES DE EMPLEO - BEDIENUNGSANWEISUNG
Gestione allarmi
Alarms control - Gestion des alarmes - Gestión alarmas - Alarmsteuerung
É scattato l’interruttore magnetotermico/differenziale principale
Allarme tacitabile (vedi pag. 65).
Power failure ahead of the main miniature circuit breaker / residual current device.
This alarm can be switched off (see page 65).
Le disjoncteur magnétothermique/différentiel principal s’est déclenché.
Alarme désactivable (voir page 65).
Se ha disparado el interruptor magnetotérmico/diferencial principal.
Alarma desactivable (véase pág. 65).
Der Schutzschalter / Haupt-FI-Schalter hat ausgelöst.
Quittierbarer Alarm (siehe Seite 65).
PROT. DISPERS. INT.1 - GROUND FAULT PROT. SW.1 - PROT. FUITE INT.1
PROT. DISPERS. INT.1 -FEHLERSTR. SCHU. SCH1
La causa di intervento è una dispersione di corrente verso terra dovuta a un guasto nel circuito elettrico o negli elettrodomestici
in funzione. Rivolgersi ad un tecnico autorizzato.
Tripping was caused by leakage to earth due to a fault in the electrical circuit or in a household appliance in operation.
Contact an authorized technician.
La cause de cet intervention est une fuite de courant vers la terre due à une défaillance dans le circuit électrique ou dans les
appareils ménagers en fonction. S’adresser à un technicien agréé.
La causa de la intervención es una dispersión de corriente a tierra debida a una avería en el circuito eléctrico o en los
electrodomésticos en funcionamiento. Contacte un técnico autorizado.
Die Ursache des Ansprechens ist ein Fehlerstrom zur Erde auf Grund eines Defekts im Stromkreis oder in den betriebenen
Elektrogeräten. Wenden Sie sich an einen autorisierten Elektriker.
50
ISTRUZIONE D’IMPIEGO - OPERATING INSTRUCTIONS
INSTRUCTIONS D'UTILISATION - ISTRUCCIONES DE EMPLEO - BEDIENUNGSANWEISUNG
Gestione allarmi
Alarms control - Gestion des alarmes - Gestión alarmas - Alarmsteuerung
É scattato l’interruttore magnetotermico/differenziale principale
Allarme tacitabile (vedi pag. 65).
Power failure ahead of the main miniature circuit breaker / residual current device.
This alarm can be switched off (see page 65).
Le disjoncteur magnétothermique/différentiel principal s’est déclenché.
Alarme désactivable (voir page 65).
Se ha disparado el interruptor magnetotérmico/diferencial principal.
Alarma desactivable (véase pág. 65).
Der Schutzschalter / Haupt-FI-Schalter hat ausgelöst.
Quittierbarer Alarm (siehe Seite 65).
PROT. SOVRACC. INT.1 - OVERLOAD PROT. SW.1 - PROT. SURCHARGE INT.1
PROT. SOBREC. INT.1 - ÜBERLAST SCHU. SCH1
La causa di intervento è una protezione per cortocircuito o sovraccarico.
Scollegare gli elettrodomestici in funzione e riarmare l’interruttore magnetotermico/differenziale principale.
Se l’allarme persiste rivolgersi ad un tecnico autorizzato.
Tripping was caused by a short-circuit or overload.
Unplug any household appliances in operation and reset the main miniature circuit breaker / residual current device.
If the alarm still persists, contact an authorized technician.
La cause de l’intervention est une protection contre les courts-circuits ou les surcharges.
Débrancher les appareils ménagers en fonction et réarmer le disjoncteur magnétothermique / différentiel principal.
Si l’alarme persiste, s’adresser à un technicien agréé.
La causa de intervención es una protección para cortocircuito o sobrecarga.
Desconectar los electrodomésticos en funcionamiento y rearmar el interruptor magnetotérmico/diferencial principal.
Si la alarma persiste contacte a un técnico autorizado.
Die Ursache des Ansprechens ist eine Schutzmaßnahme gegen Kurzschlüsse oder Überlast.
Die angeschlossenen Elektrogeräte trennen und den Schutzschalter / Haupt-FI-Schalter zurück stellen.
Wenden Sie sich wenn der Alarm weiter besteht an einen autorisierten Elektriker.
51
ISTRUZIONE D’IMPIEGO - OPERATING INSTRUCTIONS
INSTRUCTIONS D'UTILISATION - ISTRUCCIONES DE EMPLEO - BEDIENUNGSANWEISUNG
Gestione allarmi
Alarms control - Gestion des alarmes - Gestión alarmas - Alarmsteuerung
É scattato l’interruttore magnetotermico/differenziale principale
Allarme tacitabile (vedi pag. 65).
Power failure ahead of the main miniature circuit breaker / residual current device.
This alarm can be switched off (see page 65).
Le disjoncteur magnétothermique/différentiel principal s’est déclenché.
Alarme désactivable (voir page 65).
Se ha disparado el interruptor magnetotérmico/diferencial principal.
Alarma desactivable (véase pág. 65).
Der Schutzschalter / Haupt-FI-Schalter hat ausgelöst.
Quittierbarer Alarm (siehe Seite 65).
INT.1 APERTO - SW.1 OPEN - INT.1 OUVERT
INT.1 ABIERTO - SCH.1 OFFEN
L’interruttore è stato aperto manualmente.
The circuit breaker has been opened manually.
L’interrupteur a été ouvert manuellement.
El interruptor se ha abierto manualmente.
Der Schalter wurde von Hand geöffnet.
52
ISTRUZIONE D’IMPIEGO - OPERATING INSTRUCTIONS
INSTRUCTIONS D'UTILISATION - ISTRUCCIONES DE EMPLEO - BEDIENUNGSANWEISUNG
Gestione allarmi
Alarms control - Gestion des alarmes - Gestión alarmas - Alarmsteuerung
È scattato il magnetotermico n° ........
Allarme tacitabile (vedi pag. 68).
Miniature circuit breaker no.........has tripped.
This alarm can be switched off (see page 68).
Le magnétothermique n°........ s’est déclenché.
Alarme désactivable (voir page 68).
Se ha disparado el magnetotérmico n°……..
Alarma desactivable (véase pág. 68).
Der Schutzschalter Nr. ……… hat ausgelöst
Quittierbarer Alarm (siehe Seite 68).
ALLARME INT. 02 - ALARM SW. 02 - ALARME DISJ. 02
ALARMA INT. 02 - ALARM SCH. 02
La corrente assorbita dai carichi accesi (elettrodomestici, lampade, ecc.) ha superato il valore nominale dell’interruttore di
protezione oppure è avvenuto un corto circuito. Riarmare l’interruttore scattato e prestare attenzione al numero di carichi accesi
contemporaneamente. Se l’interruttore scatta nuovamente rivolgersi ad un tecnico autorizzato.
The power consumed by the connected loads (household appliances, lamps, etc.) has exceeded the rated value of the protective
device, or else a short-circuit has occurred. Reset the tripped circuit breaker and check the number of loads connected at the
same time. If the breaker trips again, contact an authorized technician.
Le courant absorbé par les charges allumées (appareils ménagers, lampes, etc.) a dépassé la valeur nominale du disjoncteur de
protection, ou bien il s’est produit un court-circuit. Réarmer le disjoncteur qui s’est déclenché, et faire attention au nombre de
charges qui sont allumées en même temps. Si le disjoncteur se déclenche à nouveau, s’adresser à un technicien agréé.
La corriente absorbida por las cargas encendidas (electrodomésticos, lámparas, etc.) ha superado el valor nominal del interruptor
de protección o se ha efectuado un cortocircuito. Rearmar el interruptor disparado y prestar atención al número de cargas
encendidas contemporáneamente. Si la alarma se disparase de nuevo contacte con un técnico autorizado.
Der von den eingeschalteten Lasten (Elektrogeräte, Lampen, usw.) aufgenommene Strom hat den Nennwert des
Schutzschalters überschritten, oder es ist ein Kurzschluss aufgetreten. Den ausgelösten Schutzschalter zurückstellen, und auf
die Anzahl der gleichzeitig eingeschalteten Lasten achten. Wenden Sie sich wenn der Schutzschalter wieder auslöst an einen
autorisierten Elektriker.
53
ISTRUZIONE D’IMPIEGO - OPERATING INSTRUCTIONS
INSTRUCTIONS D'UTILISATION - ISTRUCCIONES DE EMPLEO - BEDIENUNGSANWEISUNG
Gestione allarmi
Alarms control - Gestion des alarmes - Gestión alarmas - Alarmsteuerung
Potenza MAX superata.
Allarme tacitabile (vedi pag. 68).
Max. capacity exceeded.
This alarm can be switched off (see page 68).
Puissance MAX dépassée.
Alarme désactivable (voir page 68).
Potencia MÁX superada.
Alarma desactivable (véase pág. 68).
MAX. Leistung überschritten
Quittierbarer Alarm (siehe Seite 68).
CONSUMO ECCESSIVO - HIGH POWER LEAKAGE - CONSOMMATION EXCESSIVE
CONSUMO EXCESIVO - ÜBERMÄSSIGER VERBRAUCH
Ridurre il numero di carichi (elettrodomestici, lampade, ecc.) accesi contemporaneamente oppure reimpostare la soglia di allarme
se vi è ancora margine.
Reduce the number of simultaneously connected loads (household appliances, lamps, etc.) or reset the alarm threshold if there
is a margin for it.
Réduire le nombre de charges qui sont allumées en même temps (appareils ménagers, lampes, etc.), ou bien, s’il y a encore de
la marge, reprogrammer le seuil d’alarme.
Reducir el número de cargas (electrodomésticos, lámparas, etc.) encendidas contemporáneamente o volver a programar el
umbral de alarma si todavía hay margen.
Verringern Sie die Anzahl der gleichzeitig eingeschalteten Lasten (Elektrogeräte, Lampen, usw.), oder stellen Sie die
Alarmschwelle neu ein, falls es noch Spielraum gibt.
54
ISTRUZIONE D’IMPIEGO - OPERATING INSTRUCTIONS
INSTRUCTIONS D'UTILISATION - ISTRUCCIONES DE EMPLEO - BEDIENUNGSANWEISUNG
Gestione allarmi
Alarms control - Gestion des alarmes - Gestión alarmas - Alarmsteuerung
Corrente di dispersione MAX superata
Allarme tacitabile (vedi pag. 68).
High leakage setting exceeded
This alarm can be switched off (see page 68).
Courant de fuite MAX dépassé
Alarme désactivable (voir page 68).
Corriente de dispersión MÁX superada.
Alarma desactivable (véase pág. 68).
MAX. Fehlerstrom überschritten
Quittierbarer Alarm (siehe Seite 68).
PERICOLO DISPERSIONE - HIGH POWER LEAKAGE - DANGER DE FUITE
PELIGRO DISPERSIÓN - GEFAHR FEHLERSTROM
È in corso un guasto nel circuito elettrico o negli elettrodomestici in funzione.
Rivolgersi ad un tecnico autorizzato.
There is a fault in the electrical circuit or in a household appliance in operation.
Consult an authorized technician.
Il y a une défaillance dans le circuit électrique ou dans les appareils ménagers en fonction.
S’adresser à un technicien agréé.
Está en curso una avería en el circuito eléctrico o en los electrodomésticos en funcionamiento.
Diríjase a un técnico autorizado.
Es liegt ein Defekt im Stromkreis oder in den eingeschalteten Elektrogeräten vor.
Wenden Sie sich an einen autorisierten Elektriker.
55
ISTRUZIONE D’IMPIEGO - OPERATING INSTRUCTIONS
INSTRUCTIONS D'UTILISATION - ISTRUCCIONES DE EMPLEO - BEDIENUNGSANWEISUNG
Gestione allarmi
Alarms control - Gestion des alarmes - Gestión alarmas - Alarmsteuerung
Batteria scarica
Low battery
Batterie déchargée
Batería descargada
Batterie entladen
BATTERIA SCARICA - LOW BATTERY - BATTERIE DÉCHARGÉE
BATERÍA DESCARGADA - BATTERIE ENTLADEN
Le batterie del modulo elettronico si stanno esaurendo a causa di una prolungata sospensione di erogazione di energia da parte
dell’ente distributore. Le batterie si ricaricano automaticamente con il ritorno dell’energia. I dati inseriti rimangono comunque
memorizzati ad esclusione dell’orario.
The batteries of the electronic module are low owing to a prolonged power failure.
The batteries recharge automatically as soon as the power is restored. All data stored in memory are preserved in any case,
except for the time.
Les batteries du module électronique sont en train de s’épuiser, car l’Opérateur distributeur d’énergie en a suspendu la fourniture
pendant une période prolongée Au retour de l’énergie les batteries se rechargent automatiquement. De toute façon les données
entrées restent stockées, sauf l’horaire.
Las baterías del módulo electrónico se están agotando a causa de una prolongada suspensión de erogación de energía por parte
del ente distribuidor. Las baterías se recargan automáticamente con el retorno de la energía. Los datos introducidos permanecen
memorizados excluyendo el horario.
Die Batterien des elektronischen Moduls sind wegen einer länger anhaltenden Unterbrechung der Stromversorgung durch das
EVU nahezu entladen. Die Batterien laden sich bei Rückkehr der Stromversorgung selbstständig auf. Die eingegebenen Daten
verbleiben mit Ausnahme der Uhrzeit gespeichert.
56
ISTRUZIONE D’IMPIEGO - OPERATING INSTRUCTIONS
INSTRUCTIONS D'UTILISATION - ISTRUCCIONES DE EMPLEO - BEDIENUNGSANWEISUNG
Gestione allarmi
Alarms control - Gestion des alarmes - Gestión alarmas - Alarmsteuerung
A causa dei seguenti allarmi:
a) Mancanza rete
b) Interruttore 1 aperto
le batterie garantiscono comunque le funzionalità del modulo elettronico.
L’autonomia della batteria che alimenta il centralino è di circa 6 ore dopo almeno 36 ore di ricarica, trascorse le quali viene attivata
una procedura automatica di “Spengo” (pag. 66).
Owing to the following alarm conditions:
a) No Main Line
b) SW. 1 Open
the batteries guarantee that the electronic module always operates.
The life of the control system's stand-by battery lasts around 6 hours, after at least 36 hours recharging. After this time an
automatic switch-off procedure is activated (page 66).
À cause des alarmes suivantes :
a) Absence de courant de secteur
b) Disjoncteur 1 ouvert
de toute façon les batteries garantissent la fonctionnalité du module électronique.
L’autonomie de la batterie qui alimente le central est d’environ 6 heures après au moins 36 heures de recharge ; après quoi une
procédure d’ « Extinction » s’active automatiquement (page 66).
A causa de las siguientes alarmas:
a) Falta red
b) Interruptor 1 abierto
las baterías garantizan las funcionalidades del módulo electrónico.
La autonomía de la batería que alimenta la central es de unas 6 horas después de al menos 36 horas de recarga, transcurridas
las cuales se activa un procedimiento automático de "Apagado" (pág. 66).
Wegen der folgenden Alarme
a) fehlende Netzversorgung
b) Schalter 1 offen
garantieren die Batterien trotzdem die Funktion des elektronischen Moduls.
Die Autonomie der Batterie, die die Steuerung versorgt beträgt nach einer Ladezeit von mindestens 36 Stunden ca. 6 Stunden,
nach denen automatisch eine „Ausschaltprozedur" aktiviert wird (Seite 66).
57
ISTRUZIONE D’IMPIEGO - OPERATING INSTRUCTIONS
INSTRUCTIONS D'UTILISATION - ISTRUCCIONES DE EMPLEO - BEDIENUNGSANWEISUNG
Gestione allarmi
Alarms control - Gestion des alarmes - Gestión alarmas - Alarmsteuerung
Avaria
Mancata ricarica batterie modulo elettronico.
Breakdown
The batteries in the electronic module do not recharge.
Avarie
Non recharge des batteries du module électronique.
Avería
Falta recarga baterías módulo electrónico.
Störung
Kein Laden der Batterie im Elektronikmodul.
BATTERIA IN AVARIA - BATTERY FAULT - BATTERIE EN AVARIE
BATERÍA EN AVERÍA - BATTERIESTÖRUNG
È in corso un guasto nel circuito elettronico del centralino.
Rivolgersi ad un tecnico autorizzato, per la sostituzione della batteria (pag. 72).
A breakdown has occurred in the electronic circuit of the control system.
Contact an authorized technician, to replace the battery (page 72).
Il y a une défaillance dans le circuit électronique du central.
S’adresser à un technicien agréé pour faire remplacer la batterie (page 72).
Hay en curso una avería en el circuito electrónico de la central.
Contacte a un técnico autorizado, para la sustitución de la batería (pág. 72).
Es liegt ein Defekt im Elektronikkreis der Steuerung vor.
Wenden Sie sich für den Austausch der Batterie an einen autorisierten Elektriker (Seite 72).
58
ISTRUZIONE D’IMPIEGO - OPERATING INSTRUCTIONS
INSTRUCTIONS D'UTILISATION - ISTRUCCIONES DE EMPLEO - BEDIENUNGSANWEISUNG
Segnalazione centralino Activo abbinato a ReStart / Autotest
Activo control system signals combined with ReStart/ Autotest
Signalisation Central Activo accouplé à ReStart / Autotest
Señalización central Activa combinada a ReStart / Autotest
Anzeige Steuerung Activo in Verbindung mit ReStart / Autotest
ReStart / Autotest disabilitato.
Le funzioni automatiche di ReStart / Autotest sono disabilitate. Il messaggio sul display viene visualizzato in modo continuo.
ReStart / Autotest disabled.
The automatic ReStart / Autotest functions are disabled. The message on the VDU is displayed continuously.
ReStart / Autotest désactivé.
Les fonctions automatiques de ReStart / Autotest sont désactivées. Le message sur l’afficheur est visualisé en mode continu.
ReStart / Autotest deshabilitado.
Las funciones automáticas de ReStart/Autotest están deshabilitadas. El mensaje en la pantalla se visualiza de manera continua.
ReStart / Autotest deaktiviert
Die automatischen Funktionen von ReStart / Autotest sind deaktiviert. Die Meldung im Display wird dauernd angezeigt.
RESTART AUTOTEST ESCLUSO - RESTART AUTOTEST OFF
RESTART AUTOTEST DÉBRANCHÉ - RESTART AUTOTEST EXCLUIDO
RESTART AUTOTEST DEAKTIVIERT
59
ISTRUZIONE D’IMPIEGO - OPERATING INSTRUCTIONS
INSTRUCTIONS D'UTILISATION - ISTRUCCIONES DE EMPLEO - BEDIENUNGSANWEISUNG
Segnalazione centralino Activo abbinato a ReStart / Autotest
Activo control system signals combined with ReStart/ Autotest
Signalisation Central Activo accouplé à ReStart / Autotest
Señalización central Activa combinada a ReStart / Autotest
Anzeige Steuerung Activo in Verbindung mit ReStart / Autotest
Scatto dell’interruttore differenziale
ReStart / Autotest esegue il test dell’impianto a seguito di uno sgancio dell’interruttore differenziale. La durata del test è di circa
1 minuto. Il messaggio sul display viene visualizzato per la durata del test.
Residual current circuit-breaker tripped
ReStart/ Autotest makes the system test following tripping of the residual current switch. The test lasts about 1 minute.
The message on the VDU is displayed for the duration of the test.
Déclenchement du disjoncteur différentiel.
ReStart / Autotest exécute le test de l’installation à la suite d’un déclenchement du disjoncteur différentiel. La durée du test est
d’environ 1 minute. Le message sur l’afficheur est visualisé pendant toute la durée du test.
Disparo del interruptor diferencial
ReStart / Autotest efectúa el test de la instalación después de un desenganche del interruptor diferencial. La duración del test es
de casi 1 minuto. El mensaje en la pantalla se visualiza durante la duración del test.
Auslösung des FI-Schutzschalters
ReStart / Autotest führt den Anlagentest nach einem Auslösen des FI-Schutzschalters aus. Die Testdauer beträgt ca. 1 Minute.
Die Meldung im Display wird für die Testdauer angezeigt.
Durata test
Test duration
Durée du test
Duración test
Testdauer
TEST IMPIANTO - PLANT TEST - TEST DE L’INSTALLATION
TEST INSTALACIÓN - ANLAGENTEST
60
ISTRUZIONE D’IMPIEGO - OPERATING INSTRUCTIONS
INSTRUCTIONS D'UTILISATION - ISTRUCCIONES DE EMPLEO - BEDIENUNGSANWEISUNG
Segnalazione centralino Activo abbinato a ReStart / Autotest
Activo control system signals combined with ReStart/ Autotest
Signalisation Central Activo accouplé à ReStart / Autotest
Señalización central Activa combinada a ReStart / Autotest
Anzeige Steuerung Activo in Verbindung mit ReStart / Autotest
Blocco per guasto impianto
ReStart / Autotest ha rilevato un possibile guasto all’impianto, prima di contattare un tecnico specializzato tentare una sola
richiusura manuale. Il messaggio sul display viene visualizzato fino al riarmo manuale del differenziale.
Lock due to a system breakdown
ReStart / Autotest has detected a possible system breakdown. Only attempt one manual reclosing before contacting a specialised
technician. The message on the VDU is displayed until the residual current switch is reset manually.
Blocage à cause d’une défaillance dans l’installation
ReStart / Autotest a détecté une défaillance possible dans l’installation ; avant de contacter un technicien spécialisé essayer une
seule re-fermeture manuelle. Le message sur l’afficheur est visualisé jusqu’au réarmement manuel du différentiel.
Bloqueo por avería instalación
ReStart / Autotest ha detectado una posible avería en la instalación, antes de contactar al técnico, intente un cierre manual. El
mensaje en la pantalla se visualiza hasta el rearme manual del diferencial.
Blockierung wegen Anlagendefekt
ReStart / Autotest hat einen möglichen Anlagendefekt festgestellt, vor dem Anrufen eines Fachelektrikers sollte ein einziger
Versuch zum manuellen Rückstellen versucht werden. Die Meldung im Display wird bis zur manuellen Rückstellung des
Schutzschalters angezeigt.
30 secondi
30 seconds
30 secondes
30 segundos
30 Sekunden
GUASTO IMPIANTO - SYSTEM BREAKDOWN
DÉFAILLANCE DANS L’INSTALLATION
AVERÍA INSTALACIÓN - ANLAGENDEFEKT
61
ISTRUZIONE D’IMPIEGO - OPERATING INSTRUCTIONS
INSTRUCTIONS D'UTILISATION - ISTRUCCIONES DE EMPLEO - BEDIENUNGSANWEISUNG
Segnalazione centralino Activo abbinato a ReStart / Autotest
Activo control system signals combined with ReStart/ Autotest
Signalisation Central Activo accouplé à ReStart / Autotest
Señalización central Activa combinada a ReStart / Autotest
Anzeige Steuerung Activo in Verbindung mit ReStart / Autotest
Autotest
ReStart / Autotest sta verificando il corretto funzionamento dell’interruttore differenziale.
Il messaggio sul display viene visualizzato per la durata del test.
Autotest
ReStart/ Autotest is checking the correct operation of the residual current switch.
The message on the VDU is displayed for the duration of the test.
Autotest
ReStart / Autotest est en train de vérifier si le disjoncteur différentiel fonctionne correctement.
Le message sur l’afficheur est visualisé pendant toute la durée du test.
Autotest
ReStart / Autotest está verificando el correcto funcionamiento del interruptor diferencial.
El mensaje en la pantalla se visualiza durante la duración del test.
Autotest
ReStart / Autotest kontrollieren die korrekte Funktion des Schutzschalters.
Die Meldung im Display wird für die Testdauer angezeigt.
AUTOTEST IN CORSO - AUTOTEST IN PROGRESS - AUTOTEST EN COURS
AUTOTEST EN CURSO - AUTOTEST WIRD AUSGEFÜHRT
62
ISTRUZIONE D’IMPIEGO - OPERATING INSTRUCTIONS
INSTRUCTIONS D'UTILISATION - ISTRUCCIONES DE EMPLEO - BEDIENUNGSANWEISUNG
Segnalazione centralino Activo abbinato a ReStart / Autotest
Activo control system signals combined with ReStart/ Autotest
Signalisation Central Activo accouplé à ReStart / Autotest
Señalización central Activa combinada a ReStart / Autotest
Anzeige Steuerung Activo in Verbindung mit ReStart / Autotest
ReStart / Autotest guasto con presenza rete a valle
É presente un guasto su ReStart / Autotest. Contattare un tecnico specializzato il prima possibile.
Il messaggio sul display viene visualizzato in modo continuo.
ReStart / Autotest breakdown with mains power present downstream
There is a breakdown in ReStart / Autotest. Contact a specialised technician as soon as possible.
The message on the VDU is displayed continuously.
ReStart / Autotest en panne avec présence du courant secteur en aval
Il y a une défaillance sur ReStart / Autotest Contacter un technicien spécialisé le plus tôt possible.
Le message sur l’afficheur est visualisé en mode continu.
ReStart / Autotest avería con presencia red en salida
Hay una avería en ReStart / Autotest. Contactar un técnico especializado lo antes posible.
El mensaje en la pantalla se visualiza de forma continua.
Defekt ReStart / Autotest mit nachfolgendem Netz
Es liegt ein Defekt bei ReStart / Autotest vor. Setzen Sie sich so schnell wie möglich mit einem Fachelektriker in Verbindung.
Die Meldung im Display wird dauernd angezeigt.
GUASTO AUTOTEST - AUTOTEST BREAKDOWN - DÉFAILLANCE DE L’AUTOTEST
AVERÍA AUTOTEST - DEFEKT AUTOTEST
30 secondi
30 seconds
30 secondes
30 segundos
30 Sekunden
63
ISTRUZIONE D’IMPIEGO - OPERATING INSTRUCTIONS
INSTRUCTIONS D'UTILISATION - ISTRUCCIONES DE EMPLEO - BEDIENUNGSANWEISUNG
Segnalazione centralino Activo abbinato a ReStart / Autotest
Activo control system signals combined with ReStart/ Autotest
Signalisation Central Activo accouplé à ReStart / Autotest
Señalización central Activa combinada a ReStart / Autotest
Anzeige Steuerung Activo in Verbindung mit ReStart / Autotest
ReStart / Autotest guasto senza presenza rete a valle
ReStart / Autotest ha rilevato un’anomalia, prima di contattare un tecnico specializzato tentare una sola richiusura manuale. Se
l’operazione di richiusura va a buon fine avviare immediatamente la sincronizzazione di ReStart / Autotest. Se anche in questo
caso l’anomalia persiste, contattare un tecnico specializzato. Il messaggio sul display viene visualizzato in modo continuo.
ReStart / Autotest fault without mains power present downstream
ReStart/ Autotest has detected a fault. Try a manual reclosing only once before contacting a specialised technician. If the reclosing
operation is successful, start ReStart / Autotest synchronisation immediately. Contact a specialised technician if the fault still
persists. The message on the VDU is displayed continuously.
ReStart / Autotest en panne sans présence de courant de secteur en aval
ReStart / Autotest a détecté une anomalie ; avant de contacter un technicien spécialisé essayer une seule re-fermeture manuelle.
Si l’opération de re-fermeture se passe bien, mettre en marche immédiatement la synchronisation de ReStart / Autotest.
Si même dans ce cas l’anomalie persiste encore, contacter un technicien spécialisé.
Le message sur l’afficheur est visualisé en mode continu.
ReStart / Autotest avería con presencia red en salida
ReStart / Autotest ha detectado una anomalía, antes de contactar al técnico, intente un cierre manual. Si la operación de cierre
hubiese tenido éxito poner en marcha inmediatamente la sincronización de ReStart/Autotest. Si en este caso la anomalía
persistiera, contacte un técnico especializado. El mensaje en la pantalla se visualiza de forma continua.
Defekt ReStart / Autotest ohne nachfolgendem Netz
ReStart / Autotest hat einen Defekt festgestellt, vor dem Anrufen eines Fachelektrikers sollte ein einziger Versuch zum manuellen
Rückstellen versucht werden. Wenn das Rückstellen erfolgreich ist, muss sofort die Synchronisierung von ReStart / Autotest
gestartet werden. Wenn auch in diesem Fall die Anomalie weiter besteht müssen Sie sich an einen autorisierten Elektriker
wenden. Die Meldung im Display wird dauernd angezeigt.
ANOMALIA AUTOTEST - AUTOTEST FAULT - ANOMALIE DE L’AUTOTEST
ANOMALÍA AUTOTEST - ANOMALIE AUTOTEST
30 secondi
30 seconds
30 secondes
30 segundos
30 Sekunden
N.B. = Tutti i messaggi sul display possono essere annullati premendo il tasto MODE .
N.B. = All the messages on the display can be erased by pressing the MODE key.
N.B. = Tous les messages sur l’afficheur peuvent être annulés en appuyant sur Pla touche MODE .
N.B. = Todos los mensajes en la pantalla pueden eliminarse presionando la tecla MODE .
Hinweis = Alle Displaymeldungen können durch Drücken der Taste MODE annulliert werden.P
64
ISTRUZIONE D’IMPIEGO - OPERATING INSTRUCTIONS
INSTRUCTIONS D'UTILISATION - ISTRUCCIONES DE EMPLEO - BEDIENUNGSANWEISUNG
Tacitazione allarmi
Switching off the alarms - Désactivation des alarmes
Desactivación alarmas - Alarmquittierung
1. Esempio di allarme in corso
1. Example of a current alarm
1. Exemple d’alarme en cours
1. Ejemplo de alarma en curso
1. Beispiel eines anstehenden Alarms
MANCANZA RETE - NO MAIN LINE - ABSENCE DE COURANT DE SECTEUR
FALTA RED - FEHLENDE NETZVERSORGUNG
Per inibire l’allarme procedere come segue: premere il tasto
accompagnata da una segnalazione acustica.
In order to switch off the alarm, hold down the
MODE
MODE
fino alla visualizzazione della scritta “TACITAZIONE”
P
key until the display reads "SILENCING" and a buzzer sounds.
Pour désactiver l’alarme, procéder de la façon suivante : appuyer sur la touche
DÉSACTIVATION » accompagné d’une signalisation acoustique.
Para inhibir la alarma proceder de la siguiente manera presionar la tecla
acompañada de una señalización acústica.
Um den Alarm zu unterbrechen folgendermaßen vorgehen: Die Taste
mit einem akustischen Signal angezeigt wird.
MODE
MODE
MODE
jusqu’à ce qu’apparaisse le mot «
P
hasta que se visualice la entrada DESACTIVACIÓN
drücken, bis der Schriftzug „QUITTIERUNG” zusammen
TACITAZIONE - SILENCING - DÉSACTIVATION - DESACTIVACIÓN - QUITTIERUNG
65
ISTRUZIONE D’IMPIEGO - OPERATING INSTRUCTIONS
INSTRUCTIONS D'UTILISATION - ISTRUCCIONES DE EMPLEO - BEDIENUNGSANWEISUNG
Tacitazione allarmi
Switching off the alarms - Désactivation des alarmes
Desactivación alarmas - Alarmquittierung
Successivamente viene visualizzata la scritta “SPENGO ?”
Then the display reads "OFF ?"
Ensuite apparaît le message « J’ÉTEINS ? ».
Sucesivamente se visualiza la entrada ¿"APAGAR?"
Anschließend erfolgt die Anzeige „AUSSCHALTEN” ?"
SPENGO ? - OFF ? - J’ÉTEINS ? - ¿APAGO? - AUSSCHALTEN ?
Se di desidera spegnere il modulo elettronico allo scopo di garantire il mantenimento dello stato di carica degli accumulatori per
periodi molto lunghi, premere il tasto
entro 5 secondi dalla visualizzazione della scritta “SPENGO ?” altrimenti si torna al
funzionamento esecutivo.
Il modulo elettronico si riaccenderà automaticamente al ritorno della corrente elettrica o al riarmo dell’interruttore differenziale.
Ad esclusione dell’orario tutti i dati inseriti rimangono memorizzati.
ATTENZIONE: durante l’allarme “MANCANZA RETE” non sono visualizzabili i seguenti parametri:
1 - POTENZA
2 - DISPERSIONE CORRENTE
Questi parametri saranno di nuovo visualizzabili al ripristino della tensione di rete.
If you want to switch off the electronic module in order to extend the batteries life, press the
key within 5 seconds after the
"OFF ?" message is displayed, otherwise it goes back into operating mode again.
The electronic module switches on again automatically as soon as the power supply is restored or the residual current device is
reset. All data input remain stored in memory in all cases, except for the time.
ATTENTION: After switching off the "NO MAIN LINE" alarm, the following parameters can no longer be displayed:
1 - Power
2 - Ground Fault Current
These parameters can be displayed again after the power supply has been restored.
66
ISTRUZIONE D’IMPIEGO - OPERATING INSTRUCTIONS
INSTRUCTIONS D'UTILISATION - ISTRUCCIONES DE EMPLEO - BEDIENUNGSANWEISUNG
Tacitazione allarmi
Switching off the alarms - Désactivation des alarmes
Desactivación alarmas - Alarmquittierung
Si vous désirez éteindre le module électronique dans le but de garantir le maintien de l’état de charge des accumulateurs pendant
des périodes très longues, appuyez sur la touche
dans les 5 secondes qui suivent l’affichage du mot « J’ÉTEINS ? » ; sinon
on retourne au fonctionnement exécutif.
Au retour du courant électrique ou bien au réarmement du disjoncteur différentiel, le module électronique se rallumera
automatiquement.
Toutes les données entrées sauf l’horaire restent stockées.
ATTENTION : pendant l’alarme « ABSENCE DE COURANT DE SECTEUR », les paramètres suivants ne sont pas affichables :
1 - PUISSANCE
2 - FUITE DE COURANT
Ces paramètres seront de nouveau affichables au rétablissement de la tension de secteur.
Si se desease apagar el módulo electrónico con el fin de garantizar el mantenimiento del estado de carga de los acumuladores
durante periodos muy largos, presionar la tecla
antes de 5 segundos desde la visualización de la entrada APAGAR, de lo
contrario se vuelve al funcionamiento ejecutivo.
El módulo electrónico se volverá a encender automáticamente cuando vuelva la corriente eléctrica o el rearme del interruptor
diferencial.
A excepción del horario todos los datos permanecerán memorizados.
ATENCIÓN: durante la alarma “FALTA RED” no se visualizan los siguientes parámetros.
1 - POTENCIA
2 - DISPERSIÓN CORRIENTE
Estos parámetros se visualizarán de nuevo al reajuste de la tensión de red.
Wenn das Elektronikmodul ausgeschaltet werden soll, um den Ladezustand der Akkus für längere Zeit aufrecht zu erhalten, muss
die Taste
innerhalb von 5 Sekunden nach der Anzeige „AUSSCHALTEN ?” gedrückt werden, sonst kehrt das Gerät in die
Ausführungsfunktion zurück.
Das Elektronikmodul schaltet sich automatisch bei Wiederherstellung der Stromversorgung oder Rückstellung des FISchutzschalters wieder ein.
Die eingegebenen Daten verbleiben mit Ausnahme der Uhrzeit gespeichert.
ACHTUNG: Während des Alarms „FEHLENDE NETZVERSORGUNG” werden die folgenden Parameter nicht angezeigt:
1 - LEISTUNG
2 - FEHLERSTROM
Diese Parameter werden nach dem Wiederherstellen der Netzversorgung wieder angezeigt.
67
ISTRUZIONE D’IMPIEGO - OPERATING INSTRUCTIONS
INSTRUCTIONS D'UTILISATION - ISTRUCCIONES DE EMPLEO - BEDIENUNGSANWEISUNG
Tacitazione allarmi
Switching off the alarms - Désactivation des alarmes
Desactivación alarmas - Alarmquittierung
2. Esempio di allarme in corso
2. Example of a current alarm
2. Exemple d’alarme en cours
2. Ejemplo de alarma en curso
2. Beispiel eines anstehenden Alarms
CONSUMO ECCESSIVO - HIGH POWER CONSUMPTION - CONSOMMATION EXCESSIVE
CONSUMO EXCESIVO - ÜBERMÄSSIGER VERBRAUCH
Per inibire l’allarme procedere come segue:
Premere un tasto qualsiasi del centralino per inibire l’allarme acustico.
Premere il tasto MODE fino alla visualizzazione sul display della scritta “TACITAZIONE” accompagnata da una segnalazione acustica.
In order to switch off this alarm, proceed as follows:
Stop the buzzer by pressing any key of the unit.
Hold down the MODE key until "SILENCING" appears on the display and a sound is heard.
Pour désactiver l’alarme procéder de la façon suivante :
Appuyer sur une touche quelle qu’elle soit du central pour inhiber l'alarme acoustique.
Appuyer sur la touche MODE jusqu’à ce qu’apparaisse sur l’afficheur le mot « DÉSACTIVATION » accompagné d’une signalisation
acoustique.
Para inhibir la alarma proceder de la siguiente manera
Presionar una tecla cualquiera de la central para inhibir la alarma acústica.
Presionar la tecla MODE hasta que se visualice en la pantalla la entrada DESACTIVACIÓN acompañada de una señalización acústica.
Um den Alarm zu unterbrechen folgendermaßen vorgehen:
Eine beliebige Taste drücken, um den akustischen Alarm auszuschalten.
Die Taste MODE drücken, bis der Schriftzug „QUITTIERUNG” zusammen mit einem akustischen Signal angezeigt wird.
68
ISTRUZIONE D’IMPIEGO - OPERATING INSTRUCTIONS
INSTRUCTIONS D'UTILISATION - ISTRUCCIONES DE EMPLEO - BEDIENUNGSANWEISUNG
Tacitazione allarmi
Switching off the alarms - Désactivation des alarmes
Desactivación alarmas - Alarmquittierung
TACITAZIONE - SILENCING - DÉSACTIVATION - DESACTIVACIÓN - QUITTIERUNG
A questo punto l’allarme è inibito e si torna al funzionamento esecutivo.
At this point the alarm is switched off and the unit returns to operating mode.
À ce point l’alarme est inhibée et l’on retourne au fonctionnement exécutif.
En este momento la alarma está inhibida y se vuelve al funcionamiento ejecutivo.
Nun ist der Alarm deaktiviert, und die Ausführungsfunktion wird wieder angezeigt.
69
ISTRUZIONE D’IMPIEGO - OPERATING INSTRUCTIONS
INSTRUCTIONS D'UTILISATION - ISTRUCCIONES DE EMPLEO - BEDIENUNGSANWEISUNG
Verifiche periodiche
Regular maintenance - Vérifications périodiques
Controles periódicos - Regelmäßige Kontrollen
Test mensile:
Ogni 30 giorni il centralino segnala la necessità di eseguire il test differenziale.
Nel caso sia installato il differenziale Autotest, il messaggio non viene visualizzato.
Monthly test:
Monthly test: The control system indicates the need to carry out a test on the residual current device every
30 days. The message is not displayed if the Autotest residual current switch is installed.
Test mensuel :
Tous les 30 jours le central signale qu’il est nécessaire d’exécuter le test différentiel.
Au cas où le différentiel Autotest est installé, ce message ne sera pas affiché.
Test mensual:
Cada 30 días la central señala la necesidad de efectuar el test diferencial.
En el caso que se haya instalado el diferencial Autotest, el mensaje no se visualizará.
Monatlicher Test: Alle 30 Tage zeigt die Steuerung an, dass der Fehlerstromtest ausgeführt werden muss.
Falls der Schutzschalter Autotest installiert ist, wird die Meldung nicht angezeigt.
TEST DIFFERENZIALE - RESIDUAL CURRENT DEVICE TEST - TEST DIFFÉRENTIEL
TEST DIFFERENCIAL - FEHLERSTROMTEST
Per eseguire il test differenziale procedere come segue:
Premere il tasto
per aprire la portella del centralino.
Premere il tasto TEST dell’interruttore differenziale. Il centralino segnala l’allarme “INT. 1 APERTO”.
In order to carry out this test, proceed as follows:
Press the
key to raise the flap covering the control system.
Press the TEST key of the residual current device. The unit indicates the alarm "SW.1 OPEN".
Pour exécuter le test différentiel, procéder de la façon suivante :
Appuyer sur la touche
pour ouvrir la porte du central.
Appuyer sur la touche TEST du disjoncteur différentiel. Le central signale l’alarme « DSJ. 1 OUVERT ».
Para efectuar el test diferencial proceder de la siguiente manera
Presionar la tecla
para abrir la puerta de la central.
Presionar la tecla TEST del interruptor diferencial. La central señala la alarma INT. 1 ABIERTO".
Um den Fehlerstromtest auszuführen folgendermaßen vorgehen:
Die Taste
drücken, um die Klappe der Steuerung zu öffnen.
Die Taste TEST des FI-Schutzschalters drücken. Die Steuerung zeigt den Alarm „SCH. 1 OFFEN”.
70
ISTRUZIONE D’IMPIEGO - OPERATING INSTRUCTIONS
INSTRUCTIONS D'UTILISATION - ISTRUCCIONES DE EMPLEO - BEDIENUNGSANWEISUNG
Verifiche periodiche
Regular maintenance - Vérifications périodiques
Controles periódicos - Regelmäßige Kontrollen
INT.1 APERTO - SW.1 OPEN - DSJ.1 OUVERT - INT.1 ABIERTO - SCH.1 OFFEN
Procedere alla tacitazione riarmando l’interruttore differenziale per tornare al funzionamento esecutivo.
Automaticamente a distanza di 30 giorni il centralino segnalerà nuovamente la necessità di eseguire un test differenziale.
Switch off the alarm by resetting the residual current device to return to operating mode. 30 days later, the control system
automatically indicates the need to carry out a test on the residual current device.
Procéder à la désactivation en réarmant le disjoncteur différentiel pour retourner au fonctionnement exécutif. Automatiquement,
30 jours après, le central signalera à nouveau la nécessité d’exécuter un test du différentiel.
Proceder a la desactivación rearmando el interruptor diferencial para volver al funcionamiento ejecutivo. Automáticamente a
distancia de 30 días la central señalará de nuevo la necesidad de realizar un test diferencial.
Den Alarm quittieren und den Schutzschalter zurück setzen, um zur Ausführungsfunktion zurück zu kehren. Nach 30 Tagen zeigt
die Steuerung wieder automatisch an, dass ein Fehlerstromtest ausgeführt werden muss.
71
ISTRUZIONE D’IMPIEGO - OPERATING INSTRUCTIONS
INSTRUCTIONS D'UTILISATION - ISTRUCCIONES DE EMPLEO - BEDIENUNGSANWEISUNG
Sostituzione batterie
Replacing batteries - Remplacement des batteries
Sustitución baterías - Batteriewechsel
6V - 80mAh
NiMh ricaricabile doppio isolamento
6V - 80mAh
NiMh rechargeable double insulation
6V - 80mAh
NiMh rechargeable double isolation
6V - 80mAh
NiMh recargable doble aislamiento
6V - 80mAh
NiMh aufladbar, doppelte Isolierung
Il prodotto per il suo corretto funzionamento incorpora una batteria. In caso di sostituzione, la stessa dovrà essere
avviata allo smaltimento in modo differenziato in accordo con le normative locali vigenti in materia di rifiuti.
This appliance requires a battery to function properly. If the battery is replaced, make sure the old battery is disposed of according
to the waste regulations foreseen by your local authorities.
Pour fonctionner correctement ce produit possède une batterie. En cas de substitution, il faudra envoyer cette batterie à
l’élimination sélective, conformément aux réglementations locales en vigueur en matière de déchets.
El producto para su correcto funcionamiento incorpora una batería. En caso de sustitución, esta deberá eliminarse por separado
con arreglo a las normativas locales vigentes en materia de residuos.
Das Produkt verwendet für den korrekten Betrieb eine integrierte Batterie. Beim Austausch der Batterie muss diese entsprechend
der geltenden lokalen Abfallentsorgungsvorschriften entsorgt werden.
72
Dimensionale
Dimensions - Dimensions - Dimensional - Abmessungen
12 mod.
24 mod.
73
Compilare a cura dell’installatore
To be filled out by the installer - À remplir par l’installateur :
Compilar a cargo del instalador - Durch den Installateur auszufüllen
Codice Articolo
Item code - Code Article - Código Artículo - Artikelcode
......................................................................................................................................................................................
Data di fabbricazione (stampata sul lato del prodotto)
Date of manufacture (see side of product) - Date de fabrication (imprimée sur le côté du produit)
Fecha de fabricación (imprimida en el lado del producto) - Herstellungsdatum (auf der Seite des Produkts aufgedruckt)
......................................................................................................................................................................................
Data di installazione
Date of installation - Date d’installation - Fecha de instalación - Installationsdatum
......................................................................................................................................................................................
Data di sostituzione
Date of replacement - Date de substitution - Fecha de sustitución - Austauschdatum
......................................................................................................................................................................................
Locale di installazione
Room of installation - Local d’installation - Local d’installation - Installationsraum
......................................................................................................................................................................................
Timbro e firma dell'installatore
Installer's stamp and signature - Timbre et signature de l’installateur
Sello y firma del instalador - Stempel und Unterschrift des Installateurs
......................................................................................................................................................................................
74
NOTE - NOTES - REMARQUES - REMARQUES - HINWEISE
75
COD. 7.50.2.716.9
+39 035 946 111
8.30 - 12.30 / 14.00 - 18.00
lunedì ÷ venerdì - monday ÷ friday
24h
+39 035 946 260
[email protected]
www.gewiss.com
ULTIMA REVISIONE 06/2011
Ai sensi dell’articolo R2 comma 6 della Decisione 768/2008/EC si informa che responsabile dell’immissione del prodotto sul mercato Comunitario è:
According to article R2 paragraph 6 of the Decision 768/2008/EC, the responsible for placing the apparatus on the Community market is:
GEWISS S.p.A Via A. Volta, 1 - 24069 Cenate Sotto (BG) Italy Tel: +39 035 946 111 Fax: +39 035 945 270 E-mail: [email protected]