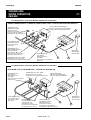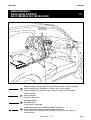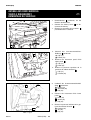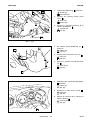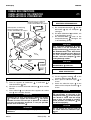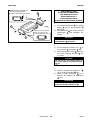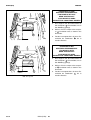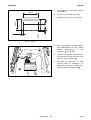
1
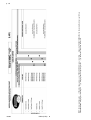
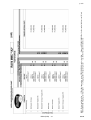
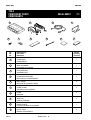
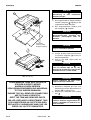
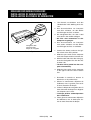
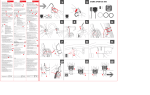
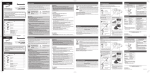
TOYOTA
N AV I G AT I O N
SYSTEM
RAV4 (LHD)
EINBAUANLEITUNG
INSTALLATION INSTRUCTIONS
INSTRUCTIONS D’INSTALLATION
FÜR - FOR - POUR
**A2*L (Production date 08/03)
TEILENUMMER - PART NUMBER - NUMERO DE PIECE
NAVIGATIONSSATZ
NAVIGATION KIT
KIT DE NAVIGATION
Manual ref. n° 2N3LA2/W-0-1
08545-52801
TOYOTA MOTOR CORPORATION
RAV4 (A2)
TNS300
VORSICHTSMASSREGELN
PRECAUTIONS
PRECAUTIONS
LESEN SIE BITTE DIESE VORSICHTSMAßREGELN FÜR DEN EINBAU SORGFÄLTIG DURCH
PLEASE READ THOROUGHLY THESE PRECAUTIONS BEFORE THE INSTALLATION
PRECAUTIONS A LIRE ATTENTIVEMENT AVANT L’INSTALLATION
• Darauf achten, das negative (-) Kabel von
Batterieanschlüssen abzunehmen.
• Überprüfen, daß Beleuchtungsanlage, Sirene/ Signalhorn, Scheibenwischer und andere Ausrüstungen normal funktionieren.
• Be sure to disconnect the negative (-)
lead from the battery terminals.
• Confirm that lamps, horn, wiper and
other car accessories operate normally.
• N’oubliez pas de débrancher le fil négatif
(-) des bornes de la batterie.
• Vérifiez le bon fonctionnement des feux, de l’avertisseur,
desessuie-glaces et des autres accessoires du véhicule.
• Die hintere Verkabelung oder den
Kabelstrang des angezogenen Teils nicht
verdrehen.
• Das Fahrzeug mit Kotflügelabdeckungen, Sitzschonbezügen usw. schützen.
• Do not pinch the rear wiring or harness
in the tightened part.
• Protect your car with fender covers,
seat and so on.
• Ne pincez pas la partie serrée du faisceau
ou du câblage arrière.
• Protégez votre véhicule par des housses de siège, des housses d’aile, etc.
• Beim Verlegen der Kabel durch das Instrumentenbrett oder
andere Verkleidungen eine Durchführungsdichtung verwenden,
damit das System wasserdicht bleibt.
Ist wasserdicht - OK!!
waterproof - O.K. !!
• Beim Führen eines Kabels durch eine
Etanchéité à l’eau - OK!!
Öffnung das Kabel mit Klebeband
schützen.
• When passing the wires through the
dashboard or other panels, use a
grommet to ensure waterproofing.
• Protect the wiring with tape when it is
passed through a hole.
Durchführungstülle
Grommet
Passe-fil
• Use the correct tool when tightening
bolts or nuts.
• Serrez les boulons et les écrous avec
l’outil adéquat.
• Vor dem Bohren eines Lochs überprüfen,
daß die Rückwand frei ist.
Umwickeln
Taping
Taraudage
• Lorsque vous glissez les fils à travers le tableau de bord ou
d’autres panneaux, protégez-les contre l’humidité à l’aide d’un
passe-fil en caoutchouc.
• Protégez le cablâge avec de l’adhésif là où il traverse un orifice.
• Beim Abnehmen der Anschlüsse die Stecker anfassen. Nie an
der Verkabelung ziehen.
Nein!
• When disconnecting the connectors, be sure to grip the connector
body. Do not tug on the wiring.
• Beim Anziehen von Schrauben oder
Muttern die vorgeschriebenen Werkzeuge verwenden.
Stop it !
Arrêtez!
• Before drilling a hole, check that the rear of
the mounting wall is clear.
• Avant de percer un trou, vérifiez s’il y a un
espace libre suffisant à l’arriére de la paroi de
fixation.
• Sorgfältig auf das richtige Anziehen
von Steckverbindern und Anschlüssen achten.
Vollständig einstecken
Insert completely
Insérez à fond
• Be sure to firmly tighten connectors
and terminals.
• N’oubliez pas de serrer correctement
les connecteurs et des bornes.
• Saisissez le connecteur proprement
dit lorsque vous le débranchez. Ne
tirez pas sur le câblage.
• Vor dem Anschluß der Kabel an die
Batterie die Kabelverbindungen, Kabelstrang usw. prüfen und darauf achten,
daß sie richtig gesichert sind.
• Niemals mit Kraft an Verkabelung im Fahrzeug ziehen. Ein festes Ziehen kann dazu führen, daß Steckverbinder auseinandergezogen werden oder daß ein Kabel oder ein Kabelstrang
reißen.
• Do not forcibly pull any car wiring harness. Rough tugging may result in opened connections, or a broken wire or
harness.
• Ne tirez pas exagérément sur les faisceaux de câbles. Vous pourriez débrancher des connexions,
voire même briser le faisceau ou un de ses fils.
• Before connecting the power wiring to
the battery, check the wiring connections, harness, etc. to see that they are properly secured.
• Avant de raccorder le fil d’alimentation à la batterie, vérifiez si
les connexions des câblages, le faisceau de câbles, etc. sont
correctement fixés.
• Karosserie und Verkleidungen in der Nähe des Einbauortes
prüfen, damit kein Schmutz oder Kratzer von den Einbauarbeiten zurückbleiben.
• Check body and trim near area of installation to be certain no
dirt or scratches resulted from the installation.
• Vérifiez l’emplacement de l’installation ainsi que la surface
avoisinante en vérifiant qu’il ne reste ni salissures ni éraflures.
08-04
RAV4 (LHD) - 2
RAV4 (A2)
TNS300
INHALTSVERZEICHNIS
TABLE OF CONTENTS
TABLE DES MATIERES
Vorsichtsmaßregeln
Precautions
Précautions ...................................................................................................................................................................
2
Verwendungstabelle
Application Chart
Tableau des Applications ................................................................................................................................................
4
Teile
Component Parts
Composants ..................................................................................................................................................................
6
Benötigte Teile
Required Parts
Pièces ............................................................................................................................................................................
7
Verkabelung
Wiring Connection
Cablâge ...........................................................................................................................................................................
8
Einbauübersicht
Installation Overview
Vue d’ensemble de l’installation ....................................................................................................................................
9
Ausbau aus dem Fahrzeug
Vehicle Disassembly
Démontage du véhicule ..................................................................................................................................................
10
Einbau der GPS-Antenne
Installation of the GPS-Antenna
Installation de l’antenne GPS .........................................................................................................................................
14
Einbau des Hauptkabelstrangs
Wire Harness Installation
Installation du faisceau de câbles ...................................................................................................................................
17
Einbau des Computers
Installation of the Computer
Installation de l’ordinateur .............................................................................................................................................
24
Einlegen der Navigations-Disc
Installation of Navigation Disc
Installation du disque de navigation ..............................................................................................................................
29
Inspektion nach dem Einbau
Post-Installation Inspection
Verification de l’installation ............................................................................................................................................
30
Wiedereinbau
Reassembling
Repose ..........................................................................................................................................................................
31
RAV4 (LHD) - 3
08-04
MOP: Factory installed option - (*): Outside temperature sensor PZ432-R0310-00 can be retro-fitted. - Subwoofer PZ08691-00834: On the floor under the driver seat (if free)
F/K 08695-00803: Hanging seat mounting kit - (1): Hanging under the passenger seat - (2): On the floor under the driver seat
p. 1/2
08-04
RAV4 (LHD) - 4
MOP: Factory installed option - (*): Outside temperature sensor PZ432-R0310-00 can be retro-fitted. - Subwoofer PZ08691-00834: On the floor under the driver seat (if free)
F/K 08695-00803: Hanging seat mounting kit - (1): Hanging under the passenger seat - (2): On the floor under the driver seat
p. 2/2
RAV4 (LHD) - 5
08-04
RAV4 (A2)
TNS300
TEILE
COMPONENT PARTS
COMPOSANTS
1
Nr.
No.
No.
1
2
3
5
6
7
8
9
10
11
08-04
3
2
7
6
08545-00801
8
9
Bezeichnung
Part name
Référence
5
10
11
Menge
Quantity
Quantité
COMPUTER
COMPUTER
ORDINATEUR
KABELSTRANG
WIRE HARNESS
FAISCEAU DE CABLES
GPS-ANTENNE
GPS-ANTENNA
ANTENNE GPS
COMPUTERHALTERUNG
COMPUTER BRACKET
SUPPORT DE L'ORDINATEUR
SCHRAUBE (M5x8)
BOLT (M5x8)
BOULON DE FIXATION (M5x8)
KABELKLEMME
CORD CLAMP
AGRAFE POUR CORDON
SCHAUMSTOFFKLEBEBAND
FOAM
MOUSSE
KABELBINDER
WIRE TIE
LIEN DE CABLES
MASSEBLECH
EARTH PLATE
PLAQUE DE MISE A LA MASSE
BUTYL-KLEBEBAND
BUTYL TAPE
RUBAN D’ISOLEMENT
RAV4 (LHD) - 6
1
1
1
2
4
2
2
5
1
4
RAV4 (A2)
TNS300
BENÖTIGTE TEILE
REQUIRED PARTS
PIECES
NAVIGATION-DISC
NAVIGATION DISC
DISQUE DE NAVIGATION
Separat zu bestellen.
Wir verweisen auf die Liste der erhältlichen Discs für Navigationssysteme (Zubehör).
To be ordered separately.
Please refer to the list of available discs for turn by turn Navigation Systems (Access to accessories).
A commander séparément.
Reportez-vous à la liste des disques disponibles pour les systèmes de navigation directionnelle
(Accès aux accessoires).
BEDIENUNGSANLEITUNG
OWNER’S MANUAL
MODE D’EMPLOI
Separat zu bestellen.
To be ordered separately.
A commander séparément.
RAV4 (LHD) - 7
08-04
RAV4 (A2)
TNS300
VERKABELUNG
WIRING CONNECTION
CABLAGE
Anschlußverfahren / Connection Method / Méthode de raccordement :
KASSETTENSPIELERTYP / CASSETTE TAPE PLAYER TYPE / TYPE DE LECTEUR DE CASSETTE
Kassettendeck mit Multi-Display
Cassette tape player with multi display
Cassette avec affichage multifonction
Verbindungsstecker
(Rückfahrsensorkabel)
Splicing Connector
(Reverse Sensor Wire)
Connecteur de raccordement
(fil du détecteur de marche arrière)
1
10P
8P
18P
12P
Fahrzeugkabelstrang
Vehicle Wire harness
Faisceau de câbles
du véhicule
1P
8P
13P
Verbindungsstecker
(Geschwindigkeitssensor)
Splicing Connector
(Speed Sensor Wire)
Connecteur de raccordement
(fil du détecteur de vitesse)
Verbindungsstecker (TX+ -Kabel)
Splicing Connector (TX+ Wire)
Connecteur de raccordement (fil du TX+)
Verbindungsstecker
(TX- -Kabel)
Splicing Connector
(TX- Wire)
Connecteur de raccordement
(fil du TX-)
GPS-Antenne
GPS Antenna
Antenne GPS
2
3
Anschlußverfahren / Connection Method / Méthode de raccordement :
CD-PLAYER- TYP / CD PLAYER TYPE / TYPE DE LECTEUR DE CD
Verbindungsstecker
(TX+ -Kabel)
Splicing Connector
(TX+ Wire)
Connecteur de raccordement
(fil du TX+)
Verbindungsstecker (TX- -Kabel)
Splicing Connector (TX- Wire)
Connecteur de raccordement (fil du TX-)
CD mit Multi-Display
CD player with multi display
CD avec affichage multifonction
1
12P
10P
18P
8P
1P
8P
Fahrzeugkabelstrang
Vehicle Wire harness
Faisceau de câbles
du véhicule
08-04
Verbindungsstecker
(Geschwindigkeitssensor)
Splicing Connector
(Speed Sensor Wire)
Connecteur de raccordement
(fil du détecteur de vitesse)
Verbindungsstecker
(Rückfahrsensorkabel)
Splicing Connector
(Reverse Sensor Wire)
Connecteur de raccordement
(fil du détecteur de marche arrière)
RAV4 (LHD) - 8
13P
GPS-Antenne
GPS Antenna
Antenne GPS
2
3
RAV4 (A2)
TNS300
EINBAUÜBERSICHT
INSTALLATION OVERVIEW
VUE D'ENSEMBLE DE L'INSTALLATION
GPS-Antenne
GPS-Antenna
Antenne GPS
TX+ -Kabel
TX+ Wire
Fil du TX+
13
12
2
TX- -Kabel
TX- Wire
Fil du TX-
1
3
12
KABELSTRANG-UNTERBAUGRUPPE-GESCHWINDIGKEIT (VIOLETT/WEISS)
WIRE HARNESS SUB-ASSEMBLY - SPEED LINE (VIOLET/WHITE)
SOUS-ENSEMBLE DU FAISCEAU DE CABLES-VITESSE (VIOLET/BLANC)
2
KABELSTRANG
WIRE HARNESS
FAISCEAU DE CABLE
3
ANTENNENKABEL
ANTENNA WIRE
CORDON DE L’ANTENNE
13
KABELSTRANG RÜCKFAHRSENSORKABEL (ROT/BLAU)
WIRE HARNESS REVERSE SENSOR WIRE (RED/BLUE)
FIL DU DETECTEUR DE MARCHE ARRIERE DU FAISCEAU DE CABLES
(ROUGE/BLEU)
RAV4 (LHD) - 9
08-04
RAV4 (A2)
TNS300
AUSBAU AUS DEM FAHRZEUG
VEHICLE DISASSEMBLY
DEMONTAGE DU VEHICULE
1.
1.
1.
Batteriedeckel 1 entfernen, um die
Batterie abzuklemmen.
Remove the battery cover 1 to disconnect the battery.
Enlevez le couvercle de la batterie 1
pour débrancher la batterie.
1
Abb. 1 - Fig. 1
2.
Oberteil der Instrumententafelverkleidung 5 abnehmen.
: Clip (1x)
: Haken (4x)
2.
Remove the instrument panel finish
upper panel 5 .
: Clip (1x)
: Hook (4x)
2.
Enlevez le panneau supérieur de la
garniture du tableau de bord 5 .
: Clip (1x)
: Crochet (4x)
3.
Underteil der Instrumententafelverkleidung 6 abnehmen.
: Haken (2x)
103 : Schraube (3x)
: Clip (3x)
3.
Remove the instrument finish lower
panel 6 .
: Hook (2x)
103 : Screw (3x)
: Clip (3x)
3.
Enlevez le panneau inférieur de la garniture du tableau de bord 6 .
: Crochet (2x)
103 : Vis (3x)
: Clip (3x)
5
Abb. 2 - Fig. 2
103
6
103
Abb. 3 - Fig. 3
08-04
RAV4 (LHD) - 10
RAV4 (A2)
TNS300
104
7
4.
Lenksäulen-Abdeckung 16 ausbauen.
: Haken (4x)
109 : Schraube (3x)
4.
Remove the steering column lower
cover 16 .
: Hook (4x)
109 : Screw (3x)
4.
Enlevez la garniture inférieure de la
colonne de direction 16 .
: Crochet (4x)
109 : Vis (3x)
5.
Die mittlere untere Abdeckung (L) 8
entfernen.
: Haken (2x)
105 : Clip (1x)
5.
Remove the centre lower cover (L) 8 .
: Hook (2x)
105 : Clip (1x)
5.
Enlevez la garniture centrale inférieure
(G) 8 .
: Crochet (2x)
105 : Clip (1x)
6.
Abdeckung der Instrumentenbaugruppe
9 entfernen.
: Haken (4x)
: Clip (3x)
6.
Remove the meter cluster panel 9 .
: Hook (4x)
: Clip (3x)
6.
Enlevez le panneau de la console du
tableau de bord 9 .
: Crochet (4x)
: Clip (3x)
104
Abb. 4 - Fig. 4
105
8
Abb. 5 - Fig. 5
9
Abb. 6 - Fig. 6
RAV4 (LHD) - 11
08-04
RAV4 (A2)
TNS300
10
11
7.
Die Abdeckungen 10 und 11 entfernen.
: Clip (6x)
7.
Remove the covers 10 and 11 .
: Clip (6x)
7.
Enlevez les couvercles 10 et 11 .
: Clip (6x)
8.
Mittelkonsolenabdeckung entfernen
12 .
: Clip (3x)
: Haken (2x)
106 : Schraube (2x)
8.
Remove the centre cluster panel 12 .
: Clip (3x)
: Hook (2x)
106 : Screw (2x)
8.
Enlevez le panneau de la console centrale 12 .
: Clip (3x)
: Crochet (2x)
106 : Vis (2x)
9.
Den CD-Tuner (Kassettendeck) mit
Multi-Display 13 ausbauen.
107 : Bolzen (4x)
9.
Remove the CD (Cassette) tuner with
multi display 13 .
107 : Bolt (4x)
9.
Enlevez la radio (cassette) avec lecteur CD et affichage multifonction 13 .
107 : Boulon (4x)
Abb. 7 - Fig. 7
12
106
Abb. 8 - Fig. 8
13
107
107
Abb. 9 - Fig. 9
08-04
RAV4 (LHD) - 12
RAV4 (A2)
TNS300
10. Den Fahrersitz 4 ausbauen.
109 : Bolzen (4x)
110 : Abdeckung (2x)
16
110
VORSICHT
Die Schraube beim Zusammenbau mit
dem vorgeschriebenen Anzugsmoment
(25 Nm) anziehen.
VORSICHT
Den Airbag-Stecker vorsichtig lösen.
109
109
10. Remove the driver’s seat 4 .
109 : Bolt (4x)
110 : Cover (2x)
CAUTION
Fasten the bolt with specified torque
wrench (25 N.m) when reassembling.
Abb. 10 - Fig. 10
CAUTION
Carefully disconnect the airbag connector.
10. Enlevez le siège du conducteur 4 .
109 : Boulon (4x)
110 : Couvercle (x)
ATTENTION
Serrez le boulon à l'aide de la clé dynamométrique spécifiée (25 N.m) lors du
remontage.
ATTENTION
Débranchez délicatement le connecteur
du coussin de sécurité.
RAV4 (LHD) - 13
08-04
RAV4 (A2)
TNS300
EINBAU DER GPS-ANTENNE
INSTALLATION OF THE GPS-ANTENNA
INSTALLATION DE L'ANTENNE GPS
1.
Das Schaumstoffklebeband 8 in 2
große und 14 kleine Stücke schneiden,
wie in der Abbildung gezeigt.
8 -a: Schaumstoffklebeband (2x)
8 -b: Schaumstoffklebeband (14x)
1.
Cut the foam tape 8 into 2 large
pieces and 14 small pieces as shown in
the illustration.
8 -a: Foam tape (2x)
8 -b: Foam tape (14x)
1.
Découpez la bande de mousse 8 en
2 grands morceaux et 14 petits morceaux, de la manière illustrée.
8 -a: Bande de mousse (2x)
8 -b: Bande de mousse (14x)
2.
Das Klebeband 11 in 2 gleich große
Stücke schneiden.
2.
Cut the tape
pieces.
2.
Coupez la bande adhésive
parts égales.
8
8
8
x2
-a
-b
x 14
Abb. 11 - Fig. 11
11
Abb. 12 - Fig. 12
08-04
RAV4 (LHD) - 14
11
into 2 equal sized
11
en 2
RAV4 (A2)
TNS300
3.
a)
10
b)
3.
a)
b)
11
3.
a)
Abb. 13 - Fig. 13
b)
4.
a)
3
10
Das Schutzpapier von der Masseplatte
10 entfernen und das Klebeband 11
anbringen, wie in der Abbildung
gezeigt.
Die Klebebandstücke 11 an der Klebeseite der Masseplatte 10 anbringen.
Remove the release paper of the earth
plate 10 and attach the tape 11 as
shown.
Apply the tapes 11 to the adhesive
side of the earth plate 10 .
Retirez le support en papier de la
plaque de mise à la masse 10 et fixez
le ruban d’isolement 11 de la manière
illustrée.
Fixez les bandes 11 au côté adhésif
de la plaque de mise à la masse 10 .
Die Masseplatte 10 am Instrumentenbaugruppe 9 anbringen, wie in der
Abbildung gezeigt, und die GPSAntenne 3 an der Masseplatte 10
anbringen.
ACHTUNG
Vor Anbringen der Masseplatte
Einbaustelle reinigen.
b)
8
-b
4.
a)
9
3
10
die
Das Antennenkabel 3 mit Schaumstoffklebeband 8 -b (2x) befestigen.
Attach the earth plate 10 to the meter cluster panel 9 as shown and mount the
GPS-antenna 3 to the earth plate 10 .
CAUTION
Clean the installation position surface
before attaching the earth plate 10 .
b)
10
4.
a)
9
Mitte - Centre - Centre
Abb. 14 - Fig. 14
Fixez la plaque de mise à la masse 10 au
panneau de la console du tableau de
bord 9 de la manière illustrée, puis fixez
l'antenne GPS 3 à la plaque de mise à
la masse 10 .
ATTENTION
Nettoyez la surface d'installation avant
de fixer la plaque de mise à la masse 10 .
b)
RAV4 (LHD) - 15
Attach the antenna cord using foam
8 -b (2x).
Fixez le cordon de l'antenne
la mousse 8 -b (2x).
3
avec de
08-04
RAV4 (A2)
TNS300
5.
a)
9
b)
3
Das Antennenkabel 3 verlegen, wie in
der Abbildung gezeigt.
Gemäß Abbildung A die untere Lenksäulenverkleidung 7 herunterdrücken
und die Instrumentengruppe 9 wieder
in ihre ursprüngliche Position bringen,
ohne dass das GPS-Antennenkabel 3
an der Instrumententafel 18 reibt.
VORSICHT
Darauf achten, dass die GPS-Antenne
3
nicht von der Masseplatte 10
geschoben wird.
5.
a)
b)
A
18
9
Route the antenna cord 3 as shown in
the illustration.
According to the illustration A , push
down the lower steering column cover
7 , and return the meter cluster 9 to its
original position, without rubbing the
GPS-antenna 3 against the instrument
panel 18 .
CAUTION
Be careful not to slip away the GPSantenna 3 from the earth plate 10 .
5.
a)
b)
Nach unten
Down
Abaisser
7
Abb. 15 - Fig. 15
Acheminez le cordon de l’antenne 3 de
la manière illustrée.
En vous reportant à l’illustration A ,
abaissez la garniture inférieure de la
colonne de direction 7 et replacez la
console centrale 9 sur sa position
d’origine en veillant à ce que l’antenne
GPS 3 ne frotte pas contre le tableau
de bord 18 .
ATTENTION
Veillez à ce que l’antenne GPS 3 ne
glisse pas et ne se détache pas de la
plaque de mise à la masse 10 .
08-04
RAV4 (LHD) - 16
RAV4 (A2)
TNS300
EINBAU DES HAUPTKABELSTRANGS
WIRE HARNESS INSTALLATION
INSTALLATION DU FAISCEAU DE CABLES
3
1.
Den Kabelstrang 2 und das GPSAntennenkabel 3 entlang der Mittelkonsole zur Position des ECU verlegen.
1.
Route the wire harness 2 and GPSantenna 3 along the midconsole area
to the ECU location.
1.
Acheminez le faisceau de câbles 2 et
le cordon de l’antenne GPS 3 le long
de la console centrale jusqu’à l’emplacement occupé par l’ECU.
2.
Die in der Abbildung gezeigten Steckverbinder (18P und 12P) sind die fahrzeugseitigen Stecker, die zu verbinden
sind.
2.
The connectors (18P and 12P) shown
in the illustration are the vehicle side
connectors to be spliced.
2.
Les connecteurs illustrés (18P et 12P)
sont ceux à raccorder du côté du véhicule.
2
Abb. 16 - Fig. 16
18P
12P
Abb. 17 - Fig. 17
RAV4 (LHD) - 17
08-04
RAV4 (A2)
TNS300
22
27
● ANLEITUNG FÜR KABEL VERBINDUNGSSTECKER
● WIRE SPLICING CONNECTOR
INSTRUCTIONS
● INSTRUCTIONS D’UTILISATION DU
CONNECTEUR DE RACCORDEMENT
3.
a)
b)
17
c)
Abb. 18 - Fig. 18
3.
a)
b)
c)
3.
a)
b)
c)
08-04
RAV4 (LHD) - 18
Die entsprechende Menge Klebeband
vom Fahrzeugkabelstrang, der angeschlossen werden soll, entfernen.
Den Fahrzeugkabelstrang 17 , der
angeschlossen werden soll, fest in den
Führungsschlitz legen.
Nach Einlegen des Fahrzeugkabelstrangs in den Führungsschlitz den
Steckverbinder 21 schließen und fest
mit einer Zange 27 zusammendrücken, bis er einrastet.
Remove appropriate amount of tape
wrapping the vehicle side harness to
be connected.
Insert the vehicle harness 17 to be
connected securely into the guide slit.
After inserting the vehicle side harness
into the guide slit, fix the splicing connector 22 , and lock it securely using a
plier 27 until the connector clicks.
Retirez la longueur de bande voulue
autour du faisceau de câbles du véhicule à raccorder.
Insérez solidement dans la fente de
guidage le faisceau de câbles 17 à
raccorder.
Après avoir inséré le faisceau de
câbles du véhicule dans la fente de
guidage, fixez le connecteur de raccordement 22 et serrez-le fermement à
l'aide d'une pince 27 jusqu'à ce qu'il
émette un déclic.
RAV4 (A2)
12P
TNS300
● ANSCHLIESSEN DES TX-KABELS
● TX WIRE CONNECTION
● RACCORDEMENT DU FIL DU TX
Erhöhung
Tab
Onglet
4.
a)
TX+ TXANSICHT KABELSEITE
WIRE SIDE VIEW
VUE COTE FILS
b)
c)
2
2
TX+(Gelb)
TX+(yellow)
TX+(jaune)
TX-(Gelb/Schwarz)
TX-(yellow/black)
TX-(jaune/noir)
Abb. 19 - Fig. 19
4.
a) Tournez le connecteur de façon à ce que les fils soient dirigés vers le haut.
b) Raccordez le fil TX(+) (jaune) du faisceau de câbles 2 au
fil de la troisième alvéole de la rangée inférieure en partant
de la gauche.
c) Raccordez le fil TX(-) (jaune/noir) du faisceau de câbles 2
au fil de la quatrième alvéole de la rangée inférieure en partant de la gauche.
4.
a)
b)
c)
18P
ANSICHT KABELSEITE
WIRE SIDE VIEW
VUE COTE FILS
5.
a)
b)
5.
a)
12
Abb. 20- Fig. 20
b)
Turn the connector so that the wires
face you and the tab is on top.
Connect the TX(+) (yellow) wire of the
wire harness 2 to the wire of the third
position from the left side of the bottom
row.
Connect the TX(-) wire (yellow/black) of
the wire harness 2 to the wire of the
fourth position from the left side of the
bottom row.
● ANSCHLIESSEN DES GESCHWINDIGKEITSSENSORS
● SPEED SENSOR CONNECTION
● RACCORDEMENT DU DETECTEUR
DE VITESSE
Erhöhung
Tab
Onglet
5.
a)
Den Stecker so drehen, daß die Kabel
auf Sie Weisen und die Erhöhung sich
oben befindet.
Das TX(+)-Kabel (gelb) der Kabelstrang 2 an dem Kabel in der dritte
Position von links in der unteren Reihe
anschließen.
Das TX(-)-Kabel (gelb-schwarz) der
Kabelstrang 2 an dem Kabel in der
vierte Position von links in der unteren
Reihe anschließen.
b)
Tournez le connecteur de façon à ce que les fils soient dirigés vers le haut.
Raccordez le fil du détecteur de vitesse 12 (violet/blanc) du
faisceau de câbles au fil de la troisième alvéole de la rangée inférieure en partant de la gauche.
RAV4 (LHD) - 19
Den Stecker so drehen, daß die Kabel
auf Sie Weisen und die Erhöhung sich
oben befindet.
Das Geschwindigkeitssensorkabel 12
(violett/weiß) der Kabelstrang an dem
Kabel in der dritte Position von links in
die untere Reihe anschließen.
Turn the connector so that the wires
face you and the tab is on top.
Connect the speed sensor wire 12 (violet/white) of the wire harness to the wire
of the third position from the left side of
the bottom row.
08-04
RAV4 (A2)
TNS300
● ANSCHLIESSEN DES
RÜCKFAHRSENSORS
● REVERSE SENSOR CONNECTION
● RACCORDEMENT DU DETECTEUR
DE MARCHE ARRIERE
13
6.
Das Rückfahrsensorkabel 13 (Rot/Blau)
wie in der Abbildung gezeigt verlegen
und sie mit Schaumstoffklebeband 8 -b
(3x) befestigen.
6.
Route the reverse sensor wire 13
(red/blue) as shown in the illustration,
and attach the reverse sensor wire 13
using the foam 8 -b (3x).
6.
Acheminez le fil du détecteur de marche arrière 13 (rouge/bleu) de la
manière illustrée, puis fixez-le avec de
la mousse 8 -b (3x).
8 -b
28P
Abb. 21 - Fig. 21
7.
28P
ANSICHT KABELSEITE
WIRE SIDE VIEW
VUE COTE FILS
a) Den Stecker so drehen, daß die Kabel
auf Sie Weisen und die Lasche sich
links befindet.
13
b) Das
Rückfahrsensorkabel
(Rot/Blau) der Kabelstrang 2 an dem
Kabel in der zweiten Position von links
in der unteren Reihe anschließen.
c) Den 28-Stift-Stecker wieder an den
Schaltkasten auf der Fahrerseite
anschließen.
7.
Lasche
Tab
Onglet
13
Abb. 22 - Fig. 22
7.
a)
b)
c)
Tournez le connecteur de façon à diriger les fils vers vous
et l’onglet vers le gauche.
Raccordez le fil du détecteur de marche arrière 13
(rouge/bleu) du faisceau de câbles 2 au fil de la seconde
alvéole de la rangée inférieure en partant de la gauche.
Rebranchez le connecteur à 28 pôles au boîtier de raccordement du côté conducteur.
08-04
RAV4 (LHD) - 20
a) Turn the connector so that the wires
face you and the tab is to the left.
b) Connect the reverse sensor wire 13
(red/blue) of the wire harness 2 to the
wire of the second position from the
left side of the bottom row.
c) Reconnect the 28P connector to the
driver’s side J/B.
RAV4 (A2)
TNS300
MIT LENKUNGSSCHALTER
WITH STEERING SWITCH
AVEC COMMUTATEUR AU VOLANT
2
8 -b
8.
Den 8-Stift-Stecker (Weiß) des
Kabelstrangs 2 mit dem fahrzeugseitigen 8-Stift-Stecker verbinden.
8.
Connect the wire harness 2 8P connector (white) to the vehicle side 8P connector.
8.
Raccordez le connecteur à 8 pôles
(blanc) du faisceau de câbles 2 au
connecteur à 8 pôles du véhicule.
9
10P
8P
ALLE MODELLE
ALL MODELS
TOUS LES MODELES
Abb. 23 - Fig. 23
9.
a)
b)
c)
9.
a)
b)
c)
Connect the wire harness 2 10P connector (white) to the vehicle side 10P connector.
Attach the wire harness 2 to the vehicle wire harness using a
wire tie 9 (1x).
Bundle up and attach the excess part of the wire harness 2
(speed sensor wire and reverse sensor wire) using foam 8 -b
(2x) as shown in the illustration.
Raccordez le connecteur à 10 pôles (blanc) du faisceau de
câbles 2 au connecteur à 10 pôles du côté du véhicule.
Fixez le faisceau de câbles au faisceau de câbles 2 du
véhicule à l’aide du lien pour câble 9 (1x).
Ramassez la longueur excédentaire du faisceau de cäbles
2 (le fil du détecteur de vitesse et le fil du détecteur de
marche arrière) et fixe-le à l’aide de mousse 8 -b (2x), de
la manière illustrée.
9.
a)
b)
c)
Den 10-Stift-Stecker (Weiß) des
Kabelstrangs 2 an den fahrzeugseitigen
10-Stift-Stecker anschließen.
2
Den Kabelstrang
mit dem
Kabelbinder 9 (1x) am Fahzeugkabelstrang befestigen.
Den
überschüssigen
Teil
des
Kabelstrangs 2 (Geschwindigkeitssensorkabel und Rückfahrsensorkabel)
bündeln und mit Schaumstoff 8 -b (2x)
befestigen, wie in der Abbildung gezeigt.
10. Den CD-Tuner (Kassettendeck) mit
Multi-Display 13 wieder einbauen.
107 : Bolzen (4x)
13
10. Refit the CD (Cassette) tuner with multi
display 13 .
107 : Bolt (4x)
10. Replacez l'autoradio (cassette) avec
lecteur CD et affichage multifonction
13 .
107 : Boulon (4x)
107
107
Abb. 24 - Fig. 24
RAV4 (LHD) - 21
08-04
Yaris (A2)
RAV4
TNS
TNS300
200
Verstärkung
Reinforcement
Renforcement
9
;;;;
;;;;
;;;;
;;;;
;
;;;;;
2
3
8 -a
Abb. 25 - Fig. 25
08-04
RAV4 (LHD) - 22
11. Den Kabelstrang 2 und Antennenkabel
3
mit Kabelbindern 9 (3x) und
Schaumstoffklebeband 8 -a (2x) am
Verstärkung 7 befestigen.
11. Attach the wire harness 2 and antenna cord 3 to the reinforcement using
the wire ties 9 (3x) and foam tape
8 -a (2x).
11. Fixez le faisceau de câbles 2 et le
cordon de l’antenne au renforcement
7 à l'aide des liens pour câbles et de
la mousse adhésive 8 -a (2x).
RAV4 (A2)
TNS300
yy
;;
;;
yy
;;;
;;;
;;;
;;;
8 -a
;;
;;
;;
;;
yy
;;
yy
;;
yy
;;y;y; ;;
yy
yy
;;yy
yy
;;;;
;;;
yyy
;;
yy
;;;
yyy
;;
yy
;;
yy
;;;
;; yyy
yy
;;;
yyy
;;
yy
;;
yy
8 -b
3
2
Einbaubereich des Computers
Computer installation area
Zone d’installation de l’ordinateur
;;;
; ;;
;;;
;
;;
19
;; ;;
;;;;;;;;;;;;;;;;;;;;;;
;;;;;;;;;;;;
;
;;; ;;;; ;;
;;;;;;;;;;;;;;;;;;;;;;
Refit
Abb. 26 - Fig. 26
RAV4 (LHD) - 23
12.
a) Kabelstrang 2 und Antennenkabel
3
in den Einbaubereich des
Computers 1 verlegen und mit
Schaumstoff 8 -b (6x) befestigen.
b) Überschlüssigen Kabelbaum 2 und
Antennekabel 3 mit Schaumstoff
8 -a (2x) befestigen wie in der
Abbildung gezeigt.
c) Découpez l'isolant 19 sous la
moquette, de la manière illustrée.
(Jetez la partie ombrée)
d) Insérez l'isolant 19 entre la moquette
et le panneau de caisse, dans sa position d'origine.
12.
a) Route the wire harness 2 and antenna cord 3 to the computer 1 installation area and attach them using foam
tapes 8 -b (6x).
b) Attach the extra length of the wire harness 2 and antenna cord 3 as
shown in the illustration using the foam
tapes 8 -a (2x).
c) Cut the insulator 19 under the carpet
as shown in the illustration.
(Dispose shaded portion)
d) Insert the insulator 19 between the
carpet and under body panel to its
original position.
12.
a) Acheminez le faisceau de câbles 2 et
le cordon de l’antenne 3 jusqu’à la
zone d’installation de l’ordinateur 1 et
fixez-les à l’aide de la mousse 8 -b
(6x).
b) Fixez la longueur excédentaire du faisceau de câbles 2 et du cordon de
l’antenne 3 de la manière illustrée,
en utilisant de la mousse 8 -a (2x).
c) Die Isoliermatte 19 unter dem Teppich
abschneiden, wie in der Abbildung
gezeigt.
(Schraffierten Teil entsorgen)
d) Die Isoliermatte 19 zwischen Teppich
und Bodenblech an der ursprünglichen
Stelle wieder einfügen.
08-04
RAV4 (A2)
TNS300
EINBAU DES COMPUTERS
INSTALLATION OF THE COMPUTER
INSTALLATION DE L’ORDINATEUR
Einbauposition für Halterung
Bracket installing position
Position d'installation du support
FÜR MODELLE MIT
HINTEREM HEIZUNGSKANAL
1.
a)
Einbauposition für Halterung
Bracket installing position
Position d'installation du support
b)
1
c)
11
6
5
11
Rollen
Roll
Rouleau
Die Computerhalterungen 5 mit den
Schrauben 6 (4x) am Computer 1
anbringen.
Ein Stück Klebeband 11 aufrollen, wie
in der Abbildung gezeigt.
Die Klebebandrolle 11 unten an der
Computerhalterung 5 anbringen, wie
in der Abbildung gezeigt.
ACHTUNG
Das aufgerollte Klebeband 11 unbedingt etwa so auf der Rückseite der
Computerhalterung 5 anbringen, dass
die Klebebandrolle einen Stoß durch
den Boden absorbieren kann. Wenn sie
an einer falschen Stelle angebracht
werden, kann der Computer 1 nicht
richtig befestigt werden.
ACHTUNG
Außen
Outside
Extérieur
Die Schutzfolie noch nicht van der
Klebebändern 11 entfernen.
FOR MODELS WITH
REAR HEATER DUCT
1.
a)
Abb. 27 - Fig. 27
POUR MODELES AVEC CONDUITE DE CHAUFFAGE ARRIERE
1.
a)
b)
c)
Fixez les supports de l'ordinateur 5 à l'ordinateur 1 à
l'aide de boulons 6 (4x).
Déroulez un morceau de bande adhésive 11 , de la manière
illustrée.
Fixez l'adhésif 11 sur le dessous des supports de l'ordinateur 5 , de la manière illustrée.
ATTENTION
N'oubliez pas de fixer correctement l'adhésif en rouleau
11 à l'arrière du support de l'ordinateur 5 afin qu'elle
absorbe les chocs transmis par le plancher. Si l'adhésif
n'est pas correctement positionné, il n'est pas possible
de bien fixer l'ordinateur 1 .
b)
c)
Fit the computer brackets 5 to
computer 1 using bolts 6 (4x).
Roll a piece of adhesive tapes 11
shown.
Attach the adhesive tapes 11 to
bottom of the computer brackets 5
shown.
the
as
the
as
CAUTION
Be sure to put the rolled adhesive tape
11 appropriately on the back of the
computer bracket 5 so that the tapes
can absorb a shock from the rough
floor. If they are located to unappropriate positions, the computer 1 can
not be fixed properly.
CAUTION
ATTENTION
Ne retirez pas encore le support en papier des bandes
adhésives.
08-04
RAV4 (LHD) - 24
Do not remove the release paper on
the under side of the adhesive tapes
11 yet.
RAV4 (A2)
TNS300
Einbauposition für Halterung
Bracket installing position
Position d'installation du support
FÜR MODELLE OHNE
HINTEREM HEIZUNGSKANAL
FOR MODELS WITHOUT
REAR HEATER DUCT
POUR MODELES SANS
CONDUITE DE CHAUFFAGE ARRIERE
0mm
5
1.
a)
6
Einbauposition für Halterung
Bracket installing position
Position d'installation du support
b)
11
Die Computerhalterung 5 (2x) mittels
Bolzen 6 (4x) an den Computer 1
befestigen.
Das Klebeband 11 am unteren Teil der
Halterungen 5 (2x) anbringen, wie
gezeigt.
ACHTUNG
Die Schutzfolie noch nicht van der
Klebebändern 11 entfernen.
Abb. 28 - Fig. 28
1.
a)
b)
Fit the computer brackets (2x) 5 to
the computer 1 using bolts 6 (4x).
Attach the adhesive tapes 11 to the bottom of the computer brackets 5 (2x)
as shown.
CAUTION
Do not remove the release paper on
the under side of the adhesive tapes
11 yet.
1.
a)
b)
Fixez les supports de l’ordinateur 5
(2x) à l’aide des boulons 6 (4x).
Fixez le ruban d’isolement 11 sur le
dessous des supports de l’ordinateur
5 (2x).
ATTENTION
Ne retirez pas encore le support en
papier des bandes adhésives 11 .
RAV4 (LHD) - 25
08-04
RAV4 (A2)
TNS300
FÜR MODELLE OHNE
HINTEREM HEIZUNGSKANAL
FOR MODELS WITHOUT
REAR HEATER DUCT
POUR MODELES SANS
CONDUITE DE CHAUFFAGE ARRIERE
170mm
Schlitz
Slit
Découpe
3.
Den Teppich and der Einbaustelle für
den Computer 1 einschneiden, wie in
der Abbildung gezeigt.
3.
Make a slit in the carpet at the computer 1 installation area as shown in the
illustration.
3.
Fendez la moquette dans la zone d’installation de l’ordinateur 1 , de la
manière illustrée.
1
80mm
FÜR MODELLE MIT
HINTEREM HEIZUNGSKANAL
FOR MODELS WITH
REAR HEATER DUCT
POUR MODELES AVEC
CONDUITE DE CHAUFFAGE ARRIERE
50mm
Schlitz
Slit
Découpe
1
80mm
Abb. 29 - Fig. 29
08-04
RAV4 (LHD) - 26
3.
Den Teppich and der Einbaustelle für
den Computer 1 einschneiden, wie in
der Abbildung gezeigt.
3.
Make a slit in the carpet at the computer 1 installation area as shown in the
illustration.
3.
Fendez la moquette dans la zone d’installation de l’ordinateur 1 , de la
manière illustrée.
RAV4 (A2)
TNS300
4.
Die Isoliermatte unter dem Teppich
abschneiden.
4.
Cut the insulator under the carpet.
4.
Découpez l'isolant sous la moquette.
5.
Den 1-Stift-Stecker (GPS-Antenne),
den 8-Stift-Stecker und den 13-StiftStecker
(Kabelstrang)
an
den
Computer 1 anschließen.
5.
Connect 1P connector (GPS antenna),
8P connector and 13P connector (wire
harness) to the computer 1 .
5.
Raccordez le connecteur à 1 pôle
(antenne GPS), le connecteur à 8
pôles et le connecteur à 13 pôles (faisceau de câbles) à l’ordinateur 1 .
20mm
150mm
Einbaubereich des Computers
Computer installation area
Zone d’installation de l’ordinateur
75mm
210mm
20mm
Abb. 30 - Fig. 30
8P
13P
1P
1
Abb. 31 - Fig. 31
RAV4 (LHD) - 27
08-04
RAV4 (A2)
TNS300
ACHTUNG
1
Den
Computer
nach
der
Einstellung in eine horizontale
Position bringen.
1
6.
a)
b)
Den eingeschnittenen Teppich abziehen
und den Computer 1 sorgfältig an der
vorgesehenen Stelle einbauen.
Den eingeschnittenen Teppich unter
den Computer 1 schieben.
6.
ACHTUNG
Vor Anbringen des Computers 1 die
Befestigungsstelle sorgfältig von
Schmutz, Feuchtigkeit oder Öl
befreien.
Schutzfolie
Release paper
Support en papier
CAUTION
Install the computer 1 , after adjusting it in a horizontal position.
6.
a)
1
b)
Pull the slit floor carpet off and carefully install the computer 1 on the predetermined position.
Push in the slited carpet under the
computer 1 .
CAUTION
When affixing the computer 1 , make
sure to carefully wipe off any dirt,
moisture or oil from the surface of the
location where it is to be affixed.
Abb. 32 - Fig. 32
VERGEWISSERN, DASS ALLE GELÖSTEN
STECKER KORREKT WIEDER
ANGESCHLOSSEN WERDEN.
VERKLEIDUNG EINPASSEN UND AUSGEBAUTE TEILE WIEDER EINBAUEN.
ENSURE THAT ALL REMOVED CONNECTORS
ARE PUT BACK CORRECTLY.
REFIT THE TRIM AND REMOVED PARTS.
VEILLEZ A REPLACER CORRECTEMENT TOUS
LES CONNECTEURS QUI ONT ETE ENLEVES.
REPLACEZ LE GARNISSAGE AINSI QUE LES
PIECES QUI ONT ETE DEMONTEES.
08-04
RAV4 (LHD) - 28
ATTENTION
Placez l'ordinateur 1 après l'avoir
réglé en position horizontale.
6.
a)
b)
Détachez la moquette que vous avez
découpée et installez délicatement l'ordinateur 1 à l'endroit prévu.
Repoussez la moquette sous l’ordinateur 1 .
ATTENTION
Lorsque vous fixez l’ordinateur 1 ,
veillez à éliminez soigneusement les
saletés, l’humidité ou l’huile de la surface le fixation.
EINLEGEN DER NAVIGATIONS-DISC
INSTALLATION OF NAVIGATION DISC
INSTALLATION DU DISQUE DE NAVIGATION
1.
Die Batterie anschließen und den
Zündschalter in die Stellung ACC drehen.
2. Den Auswurfschalter am Computer
nach links schieben, um den Schlitz
zum Einlegen der Disc zu öffnen.
3. Die Navigations-Disc mit dem Label
nach oben in den Schlitz einlegen.
* Die Disc wird automatisch in den
Computer eingezogen.
4. Den Auswurfschalter am Computer
nach rechts schieben, um den Schlitz
zum Einlegen der Disc zu schließen.
Navigations-Disc
Navigation Disc
Disque de navigation
1. Connect the battery and turn the ignition switch to the ACC position.
Abb. 33 - Fig. 33
2. Slide the eject switch on the computer
to the left to open the disc insertion slot.
3. With the label side of the disc facing up,
insert the Navigation Disc into the disc
insertion slot.
* The disc will be pulled into the computer automatically.
4. Slide the eject switch on the computer
to the right to close the disc insertion
slot.
1. Raccordez la batterie et tournez le
démarreur sur la position ACC.
2. Glissez le commutateur d'éjection de
l'ordinateur vers la gauche pour ouvrir
la fente d'insertion du disque.
3. Insérez le Disque de navigation dans la
fente d'insertion du disque en dirigeant
son étiquette vers le haut.
* Le disque pénètre automatiquement
dans l'ordinateur.
4. Faites glisser le commutateur d'éjection
de l'ordinateur vers la droite pour fermer la fente d'insertion du disque.
RAV4 (LHD) - 29
08-04
INSPEKTION NACH DEM EINBAU
POST-INSTALLATION INSPECTION
VERIFICATION DE L'INSTALLATION
Einbaukontrolle
1. Verkabelung und Installation auf Fehler überprüfen.
2. Besonders auf Stellen achten, an denen der Fahrzeugkabelstrang, der Kabelstrang oder der Abzweigkabelstrang übermäßig
gedrückt, gezogen oder gequetscht werden. Außerdem erneut überprüfen, ob Klemmen und Bänder verrutscht sind, und ob alle
Teile richtig befestigt sind.
Funktionsüberprüfung
1. Die Minusklemme der Batterie anschließen und den Schlüssel in den Stellung ACC oder ON drehen, oder den Motor anlassen.
2. Den NAVI-Schalter drücken und überprüfen, ob der Navigationsbildschirm erscheint.
3. Die Lautstärke gemäß dem Abschnitt "Einstellen der Lautstärke der Sprachführung" in der TNS300 Bedienungsanleitung einstellen und überprüfen, ob sich die Lautstärke der Wiedergabe aus den Lautsprechern ändert.
4. Das "Autokompensationsverfahren" gemäß dem Abschnitt "Wenn Reifen gewechselt wurden" in der TNS300 Bedienungsanleitung
durchführen.
Wenn Störungen vermutet werden, anhand des "Wartungshandbuchs für das Toyota Original Navigationssystem" eine Fehlerbehebung durchführen.
Installation Check
1. Inspect the wiring and installation for abnormalities.
2. Check particularly closely for any locations where the vehicle harness, wire harness or divergency harness is being pushed, pulled
or pinched with excessive force. Also check again that clamps and bands have not shifted out of position and that all parts have
been tightened.
Operation Check
1. Attach the (-) terminal of the battery and turn the key to the ACC or ON position or start the engine.
2. Press the NAVI switch and confirm that the navigation screen is displayed.
3. Adjust the volume by following the section on ”Adjusting the Volume of the Guide Voice” in the TNS300 Owner’s Manual, and confirm that the sound from the speakers changes.
4. Perform the “auto-compensation” procedure by following the section on “When Tires are Replaced” in the TNS300 Owner’s
Manual.
When an abnormality is suspected, perform troubleshooting based on the “Toyota Genuine Navigation System Service Manual”.
Contrôle de l'installation
1. Recherchez toute anomalie de câblage et d'installation.
2. Examinez plus particulièrement les endroits où le faisceau de câbles du véhicule, le faisceau de câbles ou les faisceaux en général sont enfoncés, tendus ou coincés de manière excessive. Assurez-vous aussi que les liens et les fixations n'ont pas été déplacés et que toutes les pièces ont été serrées.
Contrôle du fonctionnement
1. Raccordez la borne (-) de la batterie et tournez le démarreur sur la position ACC ou ON, ou démarrez le moteur.
2. Appuyez sur la touche NAVI et assurez-vous que l'écran de navigation s'affiche.
3. Réglez le volume de la manière indiquée à la section "Réglage du volume du guidage vocal" du Mode d'emploi du TNS300 et vérifiez que cela modifie bien le niveau du volume reproduit par les haut-parleurs.
4. Exécutez la procédure de "correction automatique" de la manière décrite à la section "Après un changement de pneu" du Mode
d'emploi du TNS300.
Si vous détectez une anomalie, suivez la procédure de dépannage que vous trouverez dans le "Manuel de service du système de
navigation routière Toyota".
08-04
RAV4 (LHD) - 30
WIEDEREINBAU
REASSEMBLING
REPOSE
Alle ausgebauten Fahrzeugteile wieder an den ursprünglichen Stellen einbauen. Besonders Verkleidungen und andere
Materialien im Innenraum so befestigen, daß sie die Funktion des Fahrzeugs nicht beeinträchtigen. Beim Wiedereinbau von
Teilen darauf achten, daß kein Kabel eingeklemmt wird und daß alle Schrauben richtig angezogen werden.
Return all vehicle parts that have been removed to their original locations. Especially make sure to attach trim and other interior materials properly so that they do not have a detrimental effect on the function of the vehicle. During restoration, make
sure that wires are not pinched and all bolts and screws are tightened.
Reposez, à leur emplacement d'origine, toutes les pièces qui ont été déposées. Veillez tout à particulièrement à fixer correctement les garnitures et les éléments de l'habitacle afin de rendre au véhicule son aspect d'origine. Pendant la repose, vérifiez
si aucun fil n'est coincé et si l'ensemble des boulons et des vis sont serrés.
RAV4 (LHD) - 31
08-04
RAV4 (A2)
TNS300
NOTIZEN
NOTES
NOTES
......................................................................................................................................................................................................................................................................................................
......................................................................................................................................................................................................................................................................................................
......................................................................................................................................................................................................................................................................................................
......................................................................................................................................................................................................................................................................................................
......................................................................................................................................................................................................................................................................................................
......................................................................................................................................................................................................................................................................................................
......................................................................................................................................................................................................................................................................................................
......................................................................................................................................................................................................................................................................................................
......................................................................................................................................................................................................................................................................................................
......................................................................................................................................................................................................................................................................................................
......................................................................................................................................................................................................................................................................................................
......................................................................................................................................................................................................................................................................................................
......................................................................................................................................................................................................................................................................................................
......................................................................................................................................................................................................................................................................................................
......................................................................................................................................................................................................................................................................................................
......................................................................................................................................................................................................................................................................................................
......................................................................................................................................................................................................................................................................................................
......................................................................................................................................................................................................................................................................................................
......................................................................................................................................................................................................................................................................................................
......................................................................................................................................................................................................................................................................................................
......................................................................................................................................................................................................................................................................................................
......................................................................................................................................................................................................................................................................................................
......................................................................................................................................................................................................................................................................................................
......................................................................................................................................................................................................................................................................................................
......................................................................................................................................................................................................................................................................................................
08-04
RAV4 (LHD) - 32
RAV4 (A2)
TNS300
NOTIZEN
NOTES
NOTES
......................................................................................................................................................................................................................................................................................................
......................................................................................................................................................................................................................................................................................................
......................................................................................................................................................................................................................................................................................................
......................................................................................................................................................................................................................................................................................................
......................................................................................................................................................................................................................................................................................................
......................................................................................................................................................................................................................................................................................................
......................................................................................................................................................................................................................................................................................................
......................................................................................................................................................................................................................................................................................................
......................................................................................................................................................................................................................................................................................................
......................................................................................................................................................................................................................................................................................................
......................................................................................................................................................................................................................................................................................................
......................................................................................................................................................................................................................................................................................................
......................................................................................................................................................................................................................................................................................................
......................................................................................................................................................................................................................................................................................................
......................................................................................................................................................................................................................................................................................................
......................................................................................................................................................................................................................................................................................................
......................................................................................................................................................................................................................................................................................................
......................................................................................................................................................................................................................................................................................................
......................................................................................................................................................................................................................................................................................................
......................................................................................................................................................................................................................................................................................................
......................................................................................................................................................................................................................................................................................................
......................................................................................................................................................................................................................................................................................................
......................................................................................................................................................................................................................................................................................................
......................................................................................................................................................................................................................................................................................................
......................................................................................................................................................................................................................................................................................................
RAV4 (LHD) - 33
08-04
GENUINE PARTS