1
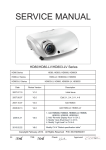
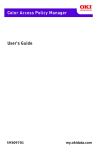
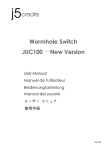
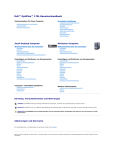
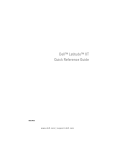
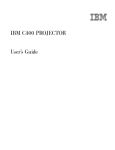
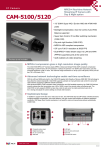
0707-dell5100-EMEA1-5.qxp
2005/07/09
02:54 PM
Page 1
Dell™ 5100MP Projector Setup Guide
CAUTION:
ATTENTION:
Follow all safety instructions in your Respectez toutes les consignes de
sécurité de votre Guide
Product Information Guide before
d'information du produit avant
using the projector.
d’utiliser le projecteur.
ACHTUNG:
AVVISO:
PRECAUCIÓN:
Lesen Sie sich erst alle
Sicherheitsanweisungen im
Produktinformationshandbuch durch,
bevor Sie den Projektor verwenden.
Attenersi a tutte le istruzioni di
sicurezza fornite nella guida
informativa del prodotto prima di
utilizzare il proiettore.
Siga todas las instrucciones de
seguridad en su Guía de
información del producto antes de
usar el proyector.
1
4
NOTE: It may take several seconds for your image to
appear.
REMARQUE: L'image peut mettre plusieurs secondes à
apparaître.
HINWEIS: Es kann einige Sekunden dauern, bis das Bild
erscheint.
NOTA: potrebbero essere necessari alcuni secondi per
visualizzare l'immagine.
NOTA: Puede que la imagen tarde unos segundos en
aparecer.
2
5
NOTE: Turn on your
computer after you turn on
the projector.
REMARQUE: Allumez
votre ordinateur après
avoir allumé le projecteur.
3
HINWEIS: Schalten Sie
erst den Projektor und
dann den Computer ein.
NOTA: accendere il
computer dopo aver
acceso il proiettore.
NOTA: Encienda el
ordenador tras encender
el proyector.
6
Zoom Adjust
Réglage du zoom
Zoom-Einstellung
Regolazione zoom
Ajuste del zoom
Focus Adjust
Réglage de la mise
au point
Bildschärfe-Einstellung
Regolazione
messa a fuoco
Ajuste del enfoque
0707-dell5100-EMEA1-5.qxp
2005/07/09
02:54 PM
Page 2
Dell™ 5100MP Projector Setup Guide
7
NOTE: The USB cable or the dongle must be connected
to use Next Page and Previous Page on the remote
control. For more information about your projector, see
your Owner's Manual.
REMARQUE: Pour pouvoir utiliser les boutons Page
suivante et Page précédente de la télécommande, le
câble USB ou la clé matérielle (dongle) doit être
connecté. Pour plus d'informations sur votre projecteur,
voir votre Manuel d'utilisateur.
HINWEIS: Das USB-Kabel oder der Dongle muss
verbunden sein, um die Tasten „Next Page“ und
„Previous Page“ der Fernbedienung verwenden zu
Information in this document is subject to change without notice.©
© 2005 Dell Inc. All rights reserved.
Reproduction in any manner whatsoever without the written permission
of Dell Inc. is strictly forbidden.
Dell and the DELL logo are trademarks of Dell Inc.; Microsoft and
Windows are registered trademarks of Microsoft Corporation.
Dell disclaims any proprietary interest in the marks and names of
others.
July 2005
Printed in Taiwan
Les informations contenues dans le présent document peuvent
être modifiées sans préavis.
© 2005 Dell Inc. Tous droits réservés.
Toute reproduction sans la permission écrite de Dell Inc. est strictement
interdite.
Dell et le logo DELL sont des marques commerciales de Dell Inc.;
Microsoft et Windows sont des marques commerciales déposées de
Microsoft Corporation.
können. Weitere Informationen zum Projektor finden Sie
im Benutzerhandbuch.
NOTA: Il cavo USB o il dongle devono essere collegati
per poter utilizzare Pagina Successiva e Pagina
Precedente sul telecomando. Per ulteriori informazioni sul
proiettore, vedere il manuale dell'utente.giù sul
telecomando.
NOTA: El cable USB o el dongle deben estar conectados
para usar las funciones Página siguiente y Página
anterior en el control remoto. Para más información sobre
el proyector, consulte su Manual del propietario.
Windows sind eingetragene Warenzeichen der Microsoft Corporation.
Dell hat kein Interesse am Eigentum an den Warenzeichen und Namen
anderer.
Juli 2005
In Taiwan gedruckt.
Le informazioni contenute nel presente documento sono soggette
a modifica senza preavviso.
© 2005 Dell Inc. Tutti i diritti riservati.
È assolutamente vietata la riproduzione con qualsiasi mezzo e maniera
di qualunque contenuto senza previa autorizzazione scritta di Dell Inc.
Dell e il logo DELL sono marchi di fabbrica di Dell Inc.; Microsoft e
Windows sono marchi registrati di Microsoft Corporation.
Dell nega qualsiasi interesse proprietario su marchi e nomi di altri.
luglio 2005
Stampato in Taiwan
Dell rejette tout intérêt de propriété dans les marques et noms autres
que les siens propres.
La información en este documento está sujeta a cambios sin
previo aviso.
© 2005 Dell Inc. Todos los derechos reservados.
Juillet 2005
Imprimé à Taïwan
Queda estrictamente prohibida la reproducción de cualquier forma sin el
permiso por escrito de Dell Inc.
Dell y el logotipo DELL son marcas de Dell Inc.; Microsoftand Windows
son marcas registradas de Microsoft Corporation.
Änderungen der Informationen in diesem Dokument bleiben vorbehalten
und bedürfen keiner Ankündigung.
© 2005 Dell Inc. Alle Rechte vorbehalten.
Dell niega cualquier interés de propiedad sobre las marcas y nombres
de otros.
Reproduktionen jeglicher Art sind ohne die schriftliche Zustimmung der
Dell Inc. strengstens untersagt.
Julio del 2005
Impreso en Taiwán
Dell und das DELL-Logo sind Warenzeichen der Dell Inc.; Microsoft und
1. Power button
2. Up/Down button
3. Laser
4. Mute
5. Volume +/6. Mouse Right/Left Key
7. Video mode
8. Auto adjust
9. Blank screen
10. Auto keystone
11. LED light
12. Enter button
13. OSD setting 13.
13. adjustment button
14. Menu
15. Page Up/Down
16. PC/Mouse control
17. Source
18. Keystone Correction
19. PIP
20. PIP Swap
21. Prgm button
22. Dongle
1. Bouton Marche
2. Bouton Haut/Bas
3. Laser
4. Mute
5. Volume +/6. Bouton droit/gauche de la souris
7. Mode Vidéo
8. Réglage auto
9. Ecran vide
10. Trapèze Auto
11. Voyant LED
12. Bouton Entrée
13. Bouton de réglage des 13.
13. paramètres OSD
14. Menu
15. Page Précédente/Suivante
16. Commande PC/Souris
17. Source
18. Correction trapézoïdale
19. PIP
20. Activer/Désactiver mode PIP
21. Bouton Prgm
22. Clé matérielle (dongle)
1. Power (Netztaste)
2. Auf/Ab-Taste
3. Laser
4. Stumm
5. Lautstärke +/6. Rechte/Linke Maustaste
7. Videomodus
8. Automatische Einstellung
9. Leerer Bildschirm
10. Automatische Trapezkorrektur
11.LED-Anzeige
12. Enter-Taste
13. Taste für Einstellungen im OSD-Menü
14. Menü
15. Seite Auf/Ab
16. Maussteuerung des PC
17. Quelle
18. Trapezkorrektur
19. PIP
20. PIP Swap-Taste
21. Prgm-Taste
22. Dongle
1. Tasto di Accensione
2. Pulsante Su/Giù
3. Laser
4. Disattiva audio (funzione Mute)
5. Aumenta/diminuisce il volume
6. Tasto destro/sinistro del mouse
7. Modalità video
8. Regolazione automatica
9. Schermo vuoto
10. Regolazione automatica
10. della distorsione trapezoidale
11. Spia LED
12. Pulsante di invio
13. Pulsante di regolazione
10. impostazioni del menu a schermo
14. Menu
15. Pagina Su/Giù
16. Controllo PC/Mouse
17. Origine
18. Correzione distorsione
10. trapezoidale
19. PIP
20. PIP Swap
21. Pulsante Prgm
22. Dongle
1. Botón Alimentación
2. Botón arriba/abajo
3. Láser
4. Silenciar
5. Volumen +/6. Tecla derecha/izquierda del mouse
7. Modo de video
8. Ajuste automático
9. Pantalla en blanco
10. Auto keystone
11. Luz de LED
12. Botón ENTER
13. Botón de ajuste de
13. configuración de menú en pantalla
14. Menú
15. Av/Reg página
16. Control de PC/Mouse
17. Fuente
18. Corrección de clave
19. PIP
20. Intercambio PIP
21. Botón Prgm
22. Dongle