1
Gigaset SL 1 / deutsch / A31008-L001-B002-1-6Z19 / cover_Innen.fm / 14.11.2003
s
DEUTSCH
Be inspired
Gigaset SL 1 / deutsch / A31008-L001-B002-1-6Z19 / covers_I-II.fm / 14.11.2003
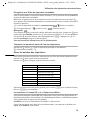
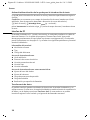
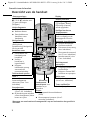
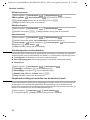
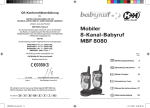
Kurzübersicht
Kurzübersicht
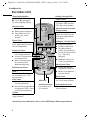
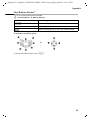
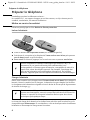
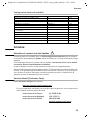
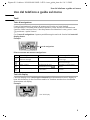
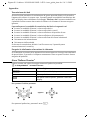
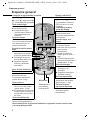
Empfangsfeldstärke
Ð 100 % i 75 %
Ñ 50 % Ò geringer E.
| kein Empfang (blinkt)
Abheben-Taste
◆ Gespräch annehmen
◆ Wahlvorgang einleiten
◆ Umschalten von Freisprech- auf „Hörerbetrieb“
Steuer-Taste
Öffnet das Menü, Telefonbuch, Sprachwahl. Navigation im Eingabefeld
Display (Anzeigefeld)
Ladezustand
= leer
U voll
= blinkt: Akku fast leer
bzw. Akku wird geladen
Ð
V
INT 1
20.05.03
•
09:45
§§§§§§§SMS§§§§§§
Freisprech-Taste
◆ Umschalten von „Hörer“auf Freisprechbetrieb
◆ Leuchtet: Freisprechen
ist eingeschaltet
◆ Blinkt: ankommender
Ruf, automatische
Wahlwiederholung
Auflegen-, Ein-/Aus-Taste
◆ Gespräch beenden
◆ Funktion abbrechen
◆ Eine Menüebene
zurück (kurz drücken)
◆ Zurück in Ruhezustand
(ca. 1 Sek. lang
drücken)
◆ Mobilteil ein/aus (ca.
2 Sek. lang drücken)
Nachrichten-Taste
◆ Zugriff auf Anruferund Nachrichtenliste
◆ Blinkt: neue Nachrichten und Anrufe
Telefonbuch öffnen
Taste 1
T-NetBox/Anrufbeantworter auswählen (ca. 2 Sek.
lang drücken)
Stern-Taste
◆ Klingeltöne ein/aus (ca. 2
Sek. lang drücken)
◆ Bei der Texteingabe Wechsel zwischen Groß-, Kleinund Ziffernschreibung
Aktuelle Funktionen und
Display-Tasten
Mit den Display-Tasten
haben Sie Zugriff auf die
im Display dargestellten
Funktionen.
Mikrofon
Raute-Taste
Tastensperre ein/aus
(ca. 1 Sek. lang drücken)
Anschlussbuchse
für Headset und
PC-Interface
Kurzwahllisten-Taste
Kurzwahlliste öffnen
(kurz drücken)
R-Taste
Wahlpause eingeben
(lang drücken)
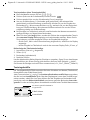
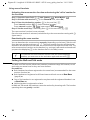
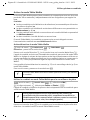
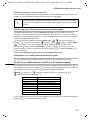
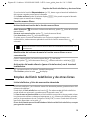
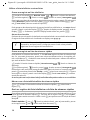
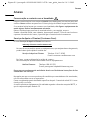
Darstellung eines Mobilteils, das an einer SMS-fähigen Basis angemeldet ist.
2
Gigaset SL 1 / deutsch / A31008-L001-B002-1-6Z19 / SL_1IVZ.fm / 14.11.2003
Inhaltsverzeichnis
Inhaltsverzeichnis
Kurzübersicht . . . . . . . . . . . . . . . . . . . . . . . . . . . . . . . 2
Sicherheitshinweise . . . . . . . . . . . . . . . . . . . . . . . . . 5
Telefon in Betrieb nehmen . . . . . . . . . . . . . . . . . . . . 6
Mobilteil in Betrieb nehmen . . . . . . . . . . . . . . . . . . . . . . . . . . . . . . . . . . . . . . . . . . . . .
Anmeldung . . . . . . . . . . . . . . . . . . . . . . . . . . . . . . . . . . . . . . . . . . . . . . . . . . . . . . . . . . .
Display-Sprache ändern . . . . . . . . . . . . . . . . . . . . . . . . . . . . . . . . . . . . . . . . . . . . . . . . .
Basis wechseln . . . . . . . . . . . . . . . . . . . . . . . . . . . . . . . . . . . . . . . . . . . . . . . . . . . . . . . .
Gürtelclip befestigen . . . . . . . . . . . . . . . . . . . . . . . . . . . . . . . . . . . . . . . . . . . . . . . . . . .
Mobilteil ein-/ausschalten . . . . . . . . . . . . . . . . . . . . . . . . . . . . . . . . . . . . . . . . . . . . . . .
Tastensperre ein-/ausschalten . . . . . . . . . . . . . . . . . . . . . . . . . . . . . . . . . . . . . . . . . . . .
6
7
7
8
8
8
8
Bedienen des Telefons und Menü-Führung . . . . . . 9
Tasten . . . . . . . . . . . . . . . . . . . . . . . . . . . . . . . . . . . . . . . . . . . . . . . . . . . . . . . . . . . . . . . 9
Hauptmenü . . . . . . . . . . . . . . . . . . . . . . . . . . . . . . . . . . . . . . . . . . . . . . . . . . . . . . . . . 10
Zeitfunktionen . . . . . . . . . . . . . . . . . . . . . . . . . . . . . 11
Datum und Uhrzeit einstellen . . . . . . . . . . . . . . . . . . . . . . . . . . . . . . . . . . . . . . . . . . . 11
Wecker einstellen . . . . . . . . . . . . . . . . . . . . . . . . . . . . . . . . . . . . . . . . . . . . . . . . . . . . . 11
Termin einstellen . . . . . . . . . . . . . . . . . . . . . . . . . . . . . . . . . . . . . . . . . . . . . . . . . . . . . 11
Telefonieren . . . . . . . . . . . . . . . . . . . . . . . . . . . . . . . 12
Extern anrufen und Gespräch beenden . . . . . . . . . . . . . . . . . . . . . . . . . . . . . . . . . . . .
Intern anrufen und Gespräch beenden . . . . . . . . . . . . . . . . . . . . . . . . . . . . . . . . . . . .
Anruf annehmen . . . . . . . . . . . . . . . . . . . . . . . . . . . . . . . . . . . . . . . . . . . . . . . . . . . . .
Freisprechen . . . . . . . . . . . . . . . . . . . . . . . . . . . . . . . . . . . . . . . . . . . . . . . . . . . . . . . . .
Mobilteil stummschalten . . . . . . . . . . . . . . . . . . . . . . . . . . . . . . . . . . . . . . . . . . . . . . .
12
12
13
13
13
Telefonbuch und weitere Listen nutzen . . . . . . . . 14
Telefonbuch und Kurzwahlliste . . . . . . . . . . . . . . . . . . . . . . . . . . . . . . . . . . . . . . . . . .
Telefonbuch- bzw. Kurzwahllisten-Einträge verwalten . . . . . . . . . . . . . . . . . . . . . . . .
Sprachwahl . . . . . . . . . . . . . . . . . . . . . . . . . . . . . . . . . . . . . . . . . . . . . . . . . . . . . . . . . .
Verketten einer Call-by-Call-Nummer mit einer Rufnummer . . . . . . . . . . . . . . . . . . .
Wahlwiederholungsliste . . . . . . . . . . . . . . . . . . . . . . . . . . . . . . . . . . . . . . . . . . . . . . . .
E-Mail-Verzeichnis . . . . . . . . . . . . . . . . . . . . . . . . . . . . . . . . . . . . . . . . . . . . . . . . . . . .
Freien Speicherplatz anzeigen . . . . . . . . . . . . . . . . . . . . . . . . . . . . . . . . . . . . . . . . . . .
14
15
16
17
17
18
18
Mehrere Mobilteile nutzen . . . . . . . . . . . . . . . . . . . 19
Intern rückfragen . . . . . . . . . . . . . . . . . . . . . . . . . . . . . . . . . . . . . . . . . . . . . . . . . . . . .
Anklopfen beim internen Gespräch annehmen/abweisen . . . . . . . . . . . . . . . . . . . . .
Mobilteil als Babyfon nutzen . . . . . . . . . . . . . . . . . . . . . . . . . . . . . . . . . . . . . . . . . . . .
Walkie-Talkie-Modus einstellen . . . . . . . . . . . . . . . . . . . . . . . . . . . . . . . . . . . . . . . . . .
19
19
19
20
3
Gigaset SL 1 / deutsch / A31008-L001-B002-1-6Z19 / SL_1IVZ.fm / 14.11.2003
Inhaltsverzeichnis
Mobilteil einstellen . . . . . . . . . . . . . . . . . . . . . . . . . 22
Automatische Rufannahme aus-/einschalten . . . . . . . . . . . . . . . . . . . . . . . . . . . . . . .
Sprachlautstärke ändern . . . . . . . . . . . . . . . . . . . . . . . . . . . . . . . . . . . . . . . . . . . . . . .
Klingeltöne ändern . . . . . . . . . . . . . . . . . . . . . . . . . . . . . . . . . . . . . . . . . . . . . . . . . . . .
Sound Manager . . . . . . . . . . . . . . . . . . . . . . . . . . . . . . . . . . . . . . . . . . . . . . . . . . . . . .
Hinweistöne ein-/ausschalten . . . . . . . . . . . . . . . . . . . . . . . . . . . . . . . . . . . . . . . . . . .
Mobilteil in den Lieferzustand zurücksetzen . . . . . . . . . . . . . . . . . . . . . . . . . . . . . . . .
22
22
22
23
24
24
Anhang . . . . . . . . . . . . . . . . . . . . . . . . . . . . . . . . . . . 25
Pflege und Kontakt mit Flüssigkeit . . . . . . . . . . . . . . . . . . . . . . . . . . . . . . . . . . . . . . .
Kundenservice (Customer Care) . . . . . . . . . . . . . . . . . . . . . . . . . . . . . . . . . . . . . . . . .
Technische Daten . . . . . . . . . . . . . . . . . . . . . . . . . . . . . . . . . . . . . . . . . . . . . . . . . . . . .
Zeichensatztabelle . . . . . . . . . . . . . . . . . . . . . . . . . . . . . . . . . . . . . . . . . . . . . . . . . . . .
Texteingabehilfe . . . . . . . . . . . . . . . . . . . . . . . . . . . . . . . . . . . . . . . . . . . . . . . . . . . . . .
PC Interface . . . . . . . . . . . . . . . . . . . . . . . . . . . . . . . . . . . . . . . . . . . . . . . . . . . . . . . . .
Spiel „Balloon Shooter“ . . . . . . . . . . . . . . . . . . . . . . . . . . . . . . . . . . . . . . . . . . . . . . . . .
Garantie-Schein Belgien . . . . . . . . . . . . . . . . . . . . . . . . . . . . . . . . . . . . . . . . . . . . . . . .
Garantie Schweiz . . . . . . . . . . . . . . . . . . . . . . . . . . . . . . . . . . . . . . . . . . . . . . . . . . . . .
25
25
26
26
27
28
29
30
30
Stichwortverzeichnis . . . . . . . . . . . . . . . . . . . . . . . . 31
4
Gigaset SL 1 / deutsch / A31008-L001-B002-1-6Z19 / start_guide_time.fm / 14.11.2003
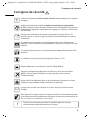
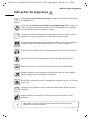
Sicherheitshinweise
Sicherheitshinweise
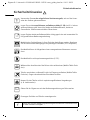
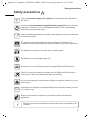
$
!
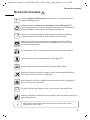
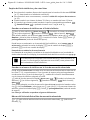
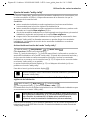
Verwenden Sie nur das mitgelieferte Steckernetzgerät, wie auf der Unterseite des Gerätes gekennzeichnet.
Legen Sie nur den empfohlenen, aufladbaren Akku (S. 26) ein! D. h. keinen
anderen Akkutyp oder eine nicht wieder aufladbare Batterie, da das zu
Gesundheits- und Personenschäden führen kann.
‹
Œ
Legen Sie den wieder aufladbaren Akku richtig gepolt ein und verwenden Sie
ihn gemäß dieser Bedienungsanleitung.
Medizinische Geräte können in ihrer Funktion beeinflusst werden. Beachten
Sie die technischen Bedingungen des jeweiligen Umfeldes (z. B. Arztpraxis).
Das Mobilteil kann in Hörgeräten einen unangenehmen Brummton verursachen.
Das Mobilteil ist nicht spritzwassergeschützt (S. 25).
Während der Autofahrt darf der Fahrer nicht telefonieren (Walkie-Talkie-Funktion).
Telefon ausschalten, während Sie sich im Flugzeug aufhalten (Walkie-TalkieFunktion). Gegen versehentliches Einschalten sichern.
Nutzen Sie das Telefon nicht in explosionsgefährdeten Umgebungen
(z. B. Lackierereien).
ƒ
Geben Sie Ihr Gigaset nur mit der Bedienungsanleitung an Dritte weiter.
Entsorgen Sie Akku und Telefon umweltgerecht.
i
Nicht alle in dieser Bedienungsanleitung beschriebenen Funktionen sind
in allen Ländern verfügbar.
5
Gigaset SL 1 / deutsch / A31008-L001-B002-1-6Z19 / start_guide_time.fm / 14.11.2003
Telefon in Betrieb nehmen
Telefon in Betrieb nehmen
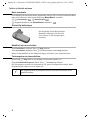
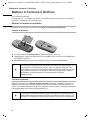
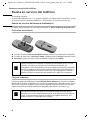
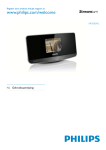
Die Verpackung enthält:
ein Mobilteil SL 1, eine Ladeschale mit Steckernetzgerät, einen Gürtelclip für das
Mobilteil, einen Akku, eine Bedienungsanleitung.
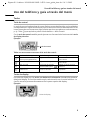
Mobilteil in Betrieb nehmen
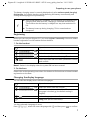
Das Display ist durch eine Folie geschützt. Bitte die Schutzfolie abziehen!
Akku einlegen
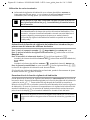
◆ Akku richtig einlegen (siehe linke Abbildung),
◆ Deckel etwa 3 mm nach unten versetzt auflegen und nach oben schieben, bis er
einrastet,
◆ zum Öffnen des Deckels auf die Vertiefung drücken und nach unten schieben.
W
Verwenden Sie nur den von Siemens auf S. 26 empfohlenen aufladbaren
Akku! D. h. auf keinen Fall eine herkömmliche (nicht wieder aufladbare)
Batterie oder einen anderen Akkutyp, da erhebliche Gesundheits- und
Sachschäden nicht auszuschließen sind. Es könnte z. B. der Mantel der
Batterie bzw. des Akkus zerstört werden (gefährlich). Ebenfalls könnten
Funktionsstörungen bzw. Beschädigungen des Gerätes auftreten.
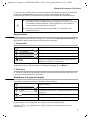
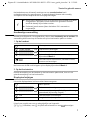
Akku laden
Stellen Sie das Mobilteil mit dem Display nach vorn in die Ladeschale. Lassen Sie das
Mobilteil zum Laden des Akkus in der Ladeschale stehen, denn der Akku ist im Lieferzustand nicht geladen. Das Aufladen des Akkus wird im Display oben rechts durch Blinken
des Akkusymbols = angezeigt.
W
6
Beim ersten Laden empfehlen wir eine ununterbrochene Ladezeit von
fünf Stunden – unabhängig von der Ladezustandsanzeige! Die Ladekapazität des Akkus reduziert sich technisch bedingt nach einiger Zeit.
Gigaset SL 1 / deutsch / A31008-L001-B002-1-6Z19 / start_guide_time.fm / 14.11.2003
Telefon in Betrieb nehmen
Der Ladezustand des Akkus wird nur nach einem ununterbrochenen Lade-/Entladevorgang richtig angezeigt. Sie sollten daher den Akku nicht unnötig entfernen und den
Ladevorgang nicht vorzeitig beenden.
◆ Nach dem ersten Ladevorgang können Sie Ihr Mobilteil nach jedem
Gespräch in die Ladeschale zurückstellen. Das Laden wird
elektronisch gesteuert. Dadurch wird der Akku schonend geladen.
◆ Der Akku erwärmt sich während des Aufladens; das ist normal und
ungefährlich.
i
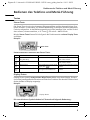
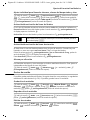
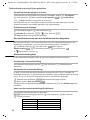
Anmeldung
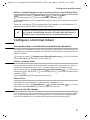
Bevor Sie Ihr Gigaset SL 1 nutzen können, müssen Sie es manuell anmelden. Die
Anmeldung müssen Sie am Mobilteil und an der Basis einleiten.
1. Am Mobilteil
v
s
s
s
Menü öffnen.
[______________________________________________]
OK
Einstellungen
Auswählen und bestätigen.
OK
[______________________________________________]
MT anmelden
Auswählen und bestätigen.
[______________________________________________]
OK
Basis 1
Basis (1–4) auswählen und bestätigen, z. B. Basis 1.
OK
System-PIN der Basis (Lieferzustand: 0000) eingeben
und bestätigen.
Nach Eingabe der System-PIN blinkt im Display z. B. Basis 1.
2. An der Basis
Wie Sie die Anmeldung des Mobilteils an der Basis einleiten, lesen Sie bitte in der Bedienungsanleitung der Basis nach.
Display-Sprache ändern
Sie können sich die Display-Texte in verschiedenen Sprachen anzeigen lassen.
v
s
s
s
a
Menü öffnen.
[______________________________________________]
OK
Einstellungen
Auswählen und bestätigen.
[______________________________________________]
OK
Sprache
Auswählen und bestätigen. Die aktuelle Sprache ist
mit ‰ markiert (Lieferzustand: Englisch).
OK
Sprache auswählen und bestätigen.
Lang drücken (zurück in den Ruhezustand).
Sie haben aus Versehen eine für Sie unverständliche Sprache eingestellt:
v M 2 drücken, mit s die richtige Sprache auswählen und mit OK bestätigen.
7
Gigaset SL 1 / deutsch / A31008-L001-B002-1-6Z19 / start_guide_time.fm / 14.11.2003
Telefon in Betrieb nehmen
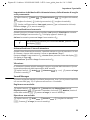
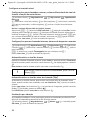
Basis wechseln
Ist Ihr Mobilteil an mehreren Basen angemeldet, können Sie es auf eine bestimmte Basis
oder auf die Basis mit dem besten Empfang (Beste Basis) einstellen.
v; s Einstellungen OK ; s Basisauswahl OK ;
s (Angemeldete Basis oder Beste Basis auswählen) OK .
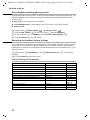
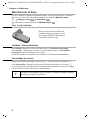
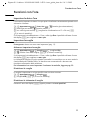
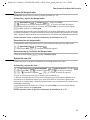
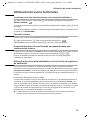
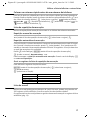
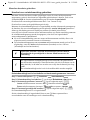
Gürtelclip befestigen
Den Gürtelclip auf der Rückseite des
Mobilteils andrücken, bis die seitlichen „Nasen“ in die Aussparungen
einrasten.
Mobilteil ein-/ausschalten
Zum Einschalten: Auflegen-Taste a lang drücken.
Zum Ausschalten: Auflegen-Taste a im Ruhezustand erneut lang drücken.
Wenn Sie das Mobilteil in die Ladeschale legen, schaltet es sich automatisch ein.
Tastensperre ein-/ausschalten
Raute-Taste R lang drücken (im Display erscheint das Symbol Ø).
Zum Ausschalten/Entsperren: Raute-Taste R erneut lang drücken.
Die Tastensperre schaltet sich automatisch aus, wenn Sie angerufen werden. Nach
Gesprächsende schaltet sie sich wieder ein.
i
8
Bei eingeschalteter Tastensperre können auch Notrufnummern nicht
gewählt werden.
Gigaset SL 1 / deutsch / A31008-L001-B002-1-6Z19 / start_guide_time.fm / 14.11.2003
Bedienen des Telefons und Menü-Führung
Bedienen des Telefons und Menü-Führung
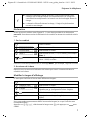
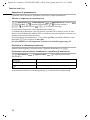
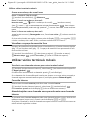
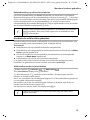
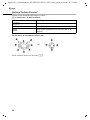
Tasten
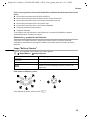
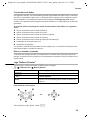
Steuer-Taste
Die Steuer-Taste ist mit vier schwarzen Richtungspfeilen und den dazugehörigen Symbolen versehen. Je nachdem, auf welche Markierung Sie drücken wird eine bestimmte
Funktion aufgerufen. In der Bedienungsanleitung ist die jeweilige Seite, auf die Sie drücken müssen, schwarz markiert, z. B.: Taste v für rechts = Menü öffnen.
Mit der Steuer-Taste können Sie häufig auch die Funktionen der rechten Display-Taste
ausführen.
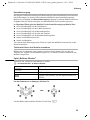
Beispiel:
Steuer-Taste
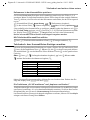
Unterschiedliche Funktionen der Steuer-Taste:
t
s
v
u
Im Ruhezustand
Sprachwahl einleiten
(lang drücken)
Telefonbuch öffnen
Menü öffnen
Liste der Mobilteile öffnen
In Listen und Menüs
Nach oben blättern
In einem Eingabefeld
Die Schreibmarke eine Zeile
nach oben setzen
Nach unten blättern
Die Schreibmarke eine Zeile
nach unten setzen
Ausgewählten Eintrag bestä- Die Schreibmarke nach rechts
tigen (wie OK )
setzen
Eine Menü-Ebene zurück
Die Schreibmarke nach links
springen bzw. abbrechen
setzen
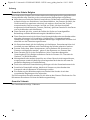
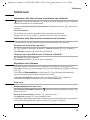
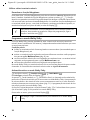
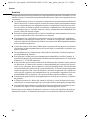
Display-Tasten
Display-Tasten sind die waagrechten Wipp-Tasten direkt unter dem Display. Entsprechend der jeweiligen Bediensituation wechselt ihre Funktion. Die aktuelle Funktion wird
direkt darüber im Display angezeigt.
Beispiel:
•
§§§§§§§SMS§§§§§§
Display-Tasten
Die verschiedenen Symbole haben bei Tastendruck folgende Bedeutung:
Þ
OK
Wahlwiederholungs-Taste: Die Liste der letzten 10 Rufnummern öffnen.
OK-Taste: Menüfunktion bestätigen bzw. Eingabe durch Bestätigung speichern.
9
Gigaset SL 1 / deutsch / A31008-L001-B002-1-6Z19 / start_guide_time.fm / 14.11.2003
Bedienen des Telefons und Menü-Führung
à
f
C
Ý
ä
Menü-Taste: Im Ruhezustand das Hauptmenü öffnen.
Beim Telefonieren ein zustandsabhängiges Menü öffnen.
Lösch-Taste: Eingabe zeichenweise von rechts nach links löschen.
Escape-Taste: Eine Menüebene zurück bzw. Vorgang abbrechen.
E-Mail-Verzeichnis öffnen.
Von einer beliebigen Stelle im Menü in den Ruhezustand zurückkehren
Auflegen-Taste a ca. 1 Sek. lang drücken oder keine Taste drücken.
Nach 2 Min. wechselt das Display automatisch in den Ruhezustand. Änderungen, die
Sie nicht durch Drücken von OK , Ja, Sichern, Senden oder mit Speichern OK bestätigt
bzw. gespeichert haben, werden verworfen.
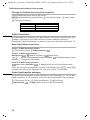
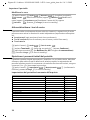
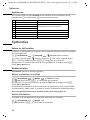
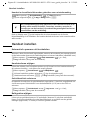
Hauptmenü
Zum Öffnen drücken Sie im Ruhezustand des Telefons die rechte Seite der Steuer-Taste
v und blättern mit s zum gewünschten Eintrag.
1
2
3
4
5
6
7
8
9
10
SMS
T-Net-LM
Familie/Freizeit
Zeitfunktionen
Audio
Kosten
Einstellungen
Basis einstellen
Anrufbeantw.
Das Angebot der Menüeinträge hängt
von Ihrer Basis ab.
Gigaset SL 1 / deutsch / A31008-L001-B002-1-6Z19 / start_guide_time.fm / 14.11.2003
Zeitfunktionen
Zeitfunktionen
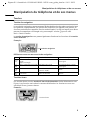
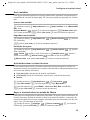
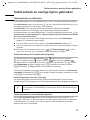
Datum und Uhrzeit einstellen
Die Datums- und Uhrzeiteinstellung ist notwendig, damit korrekt angezeigt werden
kann, wann Anrufe eingegangen sind.
v; s Zeitfunktionen OK ; s Datum/Uhrzeit OK ; ~ (Tag/Monat/Jahr eingeben);
s (in die nächste Zeile) ~ (Std./Min. eingeben);
s (ggf. in die nächste Zeile) r (12- oder 24-Stunden-Anzeige wählen); Sichern ,
a (zurück in den Ruhezustand).
Bei eingestellter 12-Stunden-Anzeige können Sie in der Zeile Zeit: mit der Display-Taste
am/pm zwischen am und pm wechseln.
Wecker einstellen
Voraussetzung: Datum und Uhrzeit sind eingestellt (S. 11).
Wecker einschalten und einstellen
v; s Zeitfunktionen OK ; s Wecker OK ; r (Ein auswählen);
s ~ (Weckzeit eingeben); Sichern; a (zurück in den Ruhezustand).
Bei eingestellter 12-Stunden-Anzeige können Sie in der Zeile Zeit: mit der Display-Taste
am/pm zwischen am und pm wechseln.
Ein Weckruf erfolgt nur im Ruhezustand des Mobilteils, nicht bei eingeschaltetem Babyfon, Walkie-Talkie, im Gespräch oder während einer automatischen Wahlwiederholung.
Wie Sie Lautstärke und Melodie einstellen, lesen Sie auf S. 22.
Wecker ausschalten
Der Wecker ist auf eine bestimmte Uhrzeit eingestellt, er soll aber nicht klingeln.
v; s Zeitfunktionen OK ; s Wecker OK .
r (Aus auswählen); Sichern; a (zurück in den Ruhezustand).
Weckruf ausschalten
Display-Taste Ruf aus oder eine beliebige Taste drücken.
Termin einstellen
Sie können sich von Ihrem Mobilteil an bis zu fünf Termine erinnern lassen.
Termin einschalten und einstellen
v; s Zeitfunktionen OK ; Termine OK ; s Termin 2 (Beispiel) OK .
r (Ein auswählen); s ~ (Tag/Monat eingeben); s ~ (Std./Min. eingeben);
s Ändern; ~ (Namen eingeben) OK ; Sichern; a (zurück in den Ruhezustand).
Ein eingestellter Termin wird mit dem Symbol ¼ angezeigt.
11
Gigaset SL 1 / deutsch / A31008-L001-B002-1-6Z19 / start_guide_time.fm / 14.11.2003
Telefonieren
Der Terminruf erfolgt nur im Ruhezustand des Mobilteils, nicht bei eingeschaltetem
Babyfon, Walkie-Talkie, im Gespräch oder während einer automatischen Wahlwiederholung.
Bei eingestellter 12-Stunden-Anzeige können Sie in der Zeile Zeit: mit der Display-Taste
am/pm zwischen am und pm wechseln.
Wie Sie Lautstärke und Melodie einstellen, lesen Sie auf S. 22.
Terminruf ausschalten
Wenn Ihnen ein Termin signalisiert wird, können Sie ihn mit Ruf aus ausschalten.
Nicht angenommene Termine, Jahrestage anzeigen und löschen
v; s Zeitfunktionen OK ; s Ereignisse OK ; s Termin/Jahrestag auswählen).
[RRRRRRRRRRRRRRRRRRRRRR]
Löschen
Display-Taste drücken.
... weiter mit
a
Lang drücken (zurück in den Ruhezustand).
Ein abgelaufener Termin ist mit ¼, ein abgelaufener Jahrestag mit ‚ markiert.
Telefonieren
Extern anrufen und Gespräch beenden
~ (Rufnummer eingeben), c (Abheben-Taste) drücken (Reihenfolge unerheblich).
Gespräch beenden/Wählvorgang abbrechen: a (Auflegen-Taste) drücken.
Wahlpause
Sie können zwischen der Vorwahl und der Rufnummer eine Wahlpause einfügen.
Drücken Sie dazu ca. 2 Sek. die Taste S. Anschließend geben Sie die Rufnummer ein.
Intern anrufen und Gespräch beenden
Gespräche mit anderen, an derselben Basis angemeldeten Mobilteilen sind kostenlos.
Ein bestimmtes Mobilteil anrufen
u; s (Mobilteil auswählen); c drücken. Oder: u 2 (Beispiel) drücken.
Zum Beenden: a (Auflegen-Taste) drücken.
Alle Mobilteile gleichzeitig anrufen („Sammelruf“)
u; P (Stern-Taste) drücken.
Zum Beenden: a (Auflegen-Taste) drücken.
12
Gigaset SL 1 / deutsch / A31008-L001-B002-1-6Z19 / start_guide_time.fm / 14.11.2003
Telefonieren
Anruf annehmen
Ihr Mobilteil klingelt, der Anruf wird im Display angezeigt und die Freisprech-Taste d
blinkt. c (Abheben-Taste) drücken (oder Display-Taste Abheben oder Freisprech-Taste
d).
Ist die Funktion Aut.Rufannahme eingeschaltet (S. 22), müssen Sie das Mobilteil nur
aus der Ladeschale nehmen, um den Anruf anzunehmen.
Wenn der Klingelton stört, drücken Sie die Display-Taste Ruf aus. Den Anruf können Sie
noch so lange annehmen, wie er im Display angezeigt wird.
Freisprechen
Freisprechen ein-/ausschalten
Vor dem Wählen: ~ (Rufnummer eingeben); d (Freisprech-Taste) drücken.
Während eines Gesprächs: d (Freisprech-Taste) drücken.
Zum Ausschalten: c (Abheben-Taste) drücken.
Möchten Sie das Mobilteil während eines Gesprächs in die Ladeschale stellen, müssen
Sie die Freisprech-Taste d beim Hineinstellen gedrückt halten.
i
Bevor Sie die Funktion Freisprechen nutzen, sollten Sie dies Ihrem
Gesprächspartner sagen.
Lautstärke während des Freisprechens im Gespräch ändern
Sie führen ein Gespräch, das Freisprechen d ist eingeschaltet.
d (Freisprech-Taste) erneut drücken; r Lautstärke leiser oder lauter; Sichern.
Mobilteil stummschalten
u. Das Gespräch wird „gehalten“ (Wartemelodie).
Zum Beenden: Display-Taste Ý drücken.
13
Gigaset SL 1 / deutsch / A31008-L001-B002-1-6Z19 / start_guide_time.fm / 14.11.2003
Telefonbuch und weitere Listen nutzen
Telefonbuch und weitere Listen nutzen
Telefonbuch und Kurzwahlliste
Im Telefonbuch und in der Kurzwahlliste können Sie bis zu 200 Rufnummern speichern.
Das Telefonbuch rufen Sie mit der Taste s auf. Zu jedem Telefonbucheintrag können
Sie einen Jahrestag hinterlegen und den Eintrag als „VIP“ markieren.
Die Kurzwahlliste ist ein spezielles Telefonbuch, in dem Sie besonders wichtige Rufnummern ablegen können, z. B. private Telefonnummern, Vorwahlen von Netzanbietern („Call-by-Call-Nummern“) o. Ä. Sie rufen die Kurzwahlliste mit der Taste C auf.
Die Bedienung der Kurzwahlliste ist, abgesehen vom Speichern von Einträgen, mit
der Bedienung des Telefonbuchs identisch.
◆ Bei der Eingabe von Namen unterstützt Sie die Texteingabehilfe EATONI (S. 27, im
Lieferzustand ausgeschaltet).
◆ Wie Sie Text korrekt eingeben, entnehmen Sie bitte der Zeichensatztabelle (S. 26).
◆ Sie können für eine Nummer bis zu 32 Ziffern und für einen Namen bis zu 16 Buchstaben eingeben.
◆ Bei Eingabe einer Nummer können Sie über à , s Pause einfügen OK bzw.
über etwa 2 Sek. langes Drücken der Taste S die entsprechende Pause einfügen.
Rufnummer im Telefonbuch speichern
s (Telefonbuch öffnen); Neuer Eintrag OK ; ~ (Rufnummer eingeben);
s (in die nächste Zeile); ~ (Namen eingeben); à (Menü öffnen), Speichern OK .
(Um zusätzlich einen Jahrestag einzugeben, nach Eingabe des Namens: mit s in die
Zeile Jahrestag: springen, Display-Taste Ändern drücken und Datum eingeben. Sichern
drücken.); a lang drücken (zurück in den Ruhezustand).
Einen Jahrestag löschen Sie, indem Sie im Telefonbuch-Eintrag im Feld für den Jahrestag die Display-Tasten Ändern , nach dem Display-Wechsel Löschen und nach einem weiteren Display-Wechsel Sichern drücken.
Erinnerungsruf an einen Jahrestag
Ein Erinnerungsruf wird mit der ausgewählten Klingeltomelodie am Mobilteil signalisiert. Im Display wird der Telefonbucheintrag mit ‚ ‚ ‚ angezeigt.
i
14
Ist Ihr Telefon an eine Telefonanlage angeschlossen, müssen Sie ggf. die
Vorwahlziffer (Amtskennziffer AKZ) als erste Ziffer Ihres Telefonbucheintrags eingeben.
Gigaset SL 1 / deutsch / A31008-L001-B002-1-6Z19 / start_guide_time.fm / 14.11.2003
Telefonbuch und weitere Listen nutzen
Rufnummer in der Kurzwahlliste speichern
Sie können bis zu neun Einträgen der Kurzwahlliste jeweils eine der Ziffern 0, 2–9
zuordnen. Wenn Sie im Ruhezustand eine dieser Ziffern lang drücken und die AbhebenTaste c drücken, sind Sie sofort mit der Rufnummer verbunden, die der Ziffer zugeordnet ist.
C (Kurzwahlliste öffnen); Neuer Eintrag OK ; ~ (Rufnummer eingeben);
s (in die nächste Zeile), ~ (Namen eingeben); à (Menü öffnen); Speichern OK .
(Um zusätzlich eine Kurzwahlziffer zu speichern, nach Eingabe des Namens: mit s in
die Zeile Auf Taste: springen, mit r eine Ziffer [0, 2–9] für diese Rufnummer auswählen, Display-Taste Sichern drücken.) a lang drücken (zurück in den Ruhezustand).
Bereits verwendete Ziffern können nicht doppelt vergeben werden.
Mit Telefonbuch/Kurzwahlliste wählen
s bzw. C (Telefonbuch/Kurzwahlliste öffnen); s (Eintrag auswählen); c.
Telefonbuch- bzw. Kurzwahllisten-Einträge verwalten
Um eine der folgenden Menüfunktionen zu nutzen, drücken Sie die Telefonbuch-Taste
s bzw. die Kurzwahllisten-Taste C. Blättern Sie mit s zu dem Eintrag und drücken
Sie anschließend v, um das Menü zu öffnen. Blättern Sie mit s zu der gewünschten
Funktion.
Oder: s bzw. C; ~ (Anfangsbuchstaben eingeben); ggf. mit s blättern oder
~ weitere Buchstaben des Namens eingeben; c.
Nr. verwenden
Eintrag ändern
Eintrag löschen
Eintrag als VIP
Kopier. u. ändern
Eintrag senden
Liste löschen
Liste senden
Speicherplatz
Gilt nur für das Telefonbuch (s)
Gilt nur für das Telefonbuch (s)
Haben Sie einen Eintrag ausgewählt, drücken Sie zum Ansehen bzw. Ändern des Eintrags die Display-Taste Ansehen und dann Ändern.
Die Funktionen „Als VIP markieren“ und „kopieren und ändern“
Telefonbucheinträge von besonders wichtigen Anrufern können Sie als VIP (Very Important Person) markieren, d. h. eine bestimmte Melodie zuweisen. Sie hören dann an der
Klingelmelodie, wer Sie anruft. Voraussetzung: Rufnummernübermittlung.
Um einen ähnlichen Eintrag nicht doppelt eingeben zu müssen, können Sie eine Kopie
anlegen und diesen Eintrag dann ändern.
15
Gigaset SL 1 / deutsch / A31008-L001-B002-1-6Z19 / start_guide_time.fm / 14.11.2003
Telefonbuch und weitere Listen nutzen
Einzelnen Eintrag bzw. komplette Liste an ein Mobilteil senden
Sie können einzelne Einträge oder die komplette Liste an ein anderes, an derselben
Basis angemeldetes SL 1-, S1-, C2-Mobilteil oder Comfort-Mobilteile der Serie Gigaset
4000, 3000 und 2000 übertragen. Hinterlegte Sprachmuster und Kurzwahlziffern werden nicht übertragen. Die Einstellungen VIP wird mobilteilabhängig übertragen
s bzw. C (Telefonbuch/Kurzwahlliste öffnen); s (Eintrag auswählen);
v (Menü öffnen); s Eintrag senden OK oder s Liste senden OK );
~ (Interne Nummer des Empfänger-Mobilteil eingeben); OK .
Solange Sie nach Senden eines Eintrags mit der Display-Taste Ja bestätigen, können Sie
weitere Einträge auswählen. Mit der Display-Taste Nein beenden Sie den Sendevorgang.
Sprachwahl
Mit der Sprachwahl wählen Sie, indem Sie den Namen des Gesprächspartners sprechen.
Dazu müssen Sie ein Sprachmuster hinterlegen, d. h. der von Ihnen gesprochene Name
wird im Mobilteil gespeichert.
Bis zu vier Benutzer können pro Eintrag ein Sprachmuster hinterlegen/aufnehmen. Vor
der Aufnahme muss sich der Benutzer „identifizieren“, z. B. als Benutzer 2.
Es können insgesamt 23 Sprachmuster für Telefonbuch-Einträge gespeichert werden.
Ein mit einem Sprachmuster hinterlegter Eintrag ist im Sprach-Telefonbuch mit ´ markiert.
Sprachmuster für einen vorhandenen Telefonbuch-Eintrag aufnehmen
Sprechen Sie Ihr Sprachmuster in einer leisen Umgebung (Abstand ca. 25 cm) auf.
Schritt 1: Telefonbuch für die Sprachwahl öffnen:
s (Telefonbuch öffnen); s(Eintrag auswählen); Sprache; s Benutzer 2 (Bsp.) OK .
Schritt 2: Aufnahme starten:
Aufn. ; OK (Display-Aufforderung bestätigen). Sprechen Sie nach der entsprechenden
Aufforderung im Display den Namen. Wiederholen Sie den Namen nach der erneuten
Aufforderung im Display. Die Aufnahme wird automatisch gespeichert
a lang drücken (zurück in den Ruhezustand).
Ist Ihr Sprachmuster dem eines anderen Benutzers zu ähnlich, werden Sie mit einer
Meldung darauf aufmerksam gemacht. Beenden Sie diese Meldung mit Ý , kehren
Sie zum Anfang der Sprachaufnahme zurück und wiederholen Sie die Aufnahme.
Mit Sprachwahl wählen: Taste t lang drücken und den Namen sprechen.
Ansage des Namens bei einem Anruf
Bei einem ankommenden externen Anruf können Sie sich zusätzlich zum Klingelton einmal den Namen des Anrufers ansagen lassen.
Voraussetzungen: Rufnummernübermittlung. Ein Sprachmuster ist hinterlegt (S. 16).
Ansage des Namens ein-/ausschalten
v (Menü öffnen); s Audio OK ; s Klingeltöne OK ; Für ext. Anrufe OK ;
2x s (in die übernächste Zeile), r (Name ansag.:) ein-/ausschalten; Sichern;
a lang drücken (zurück in den Ruhezustand).
16
Gigaset SL 1 / deutsch / A31008-L001-B002-1-6Z19 / start_guide_time.fm / 14.11.2003
Telefonbuch und weitere Listen nutzen
Sprachmuster anhören
Telefonbuch für die Sprachwahl öffnen (s. Schritt 1, S. 16). Danach:
s (Eintrag auswählen); Anhören; a lang drücken (zurück in den Ruhezustand).
Sprachmuster ändern oder löschen
Telefonbuch für die Sprachwahl öffnen (s. Schritt 1, S. 16). Danach:
s (Eintrag auswählen); v (Menü öffnen); Muster aufn. OK oder s Muster löschen
OK ; a lang drücken (zurück in den Ruhezustand).
Nach dem Löschen eines Eintrags, bleiben Rufnummer und Name erhalten. Auch die
Sprachmuster von anderen Benutzern sind noch vorhanden.
Benutzername ändern
s (Telefonbuch öffnen); s (Eintrag auswählen); Sprache;
s Benutzer 2 (Bsp.) ; Ändern; ~ (Namen eingeben) Sichern;
a lang drücken (zurück in den Ruhezustand).
Verketten einer Call-by-Call-Nummer mit einer Rufnummer
Mit dieser Funktion kann eine Vorwahl eines Netzanbieters, die in der Kurzwahlliste
gespeichert ist, der Rufnummer vorangestellt werden („Verketten“).
C (Kurzwahlliste öffnen); s (Eintrag auswählen); à (Menü öffnen);
Nr. verwenden OK ; s (Telefonbuch öffnen); s (Eintrag auswählen) OK ; oder ~
die Nummer eingeben; c.
Wahlwiederholungsliste
In der Wahlwiederholungsliste stehen die zehn zuletzt gewählten Rufnummern.
Manuelle Wahlwiederholung
Þ (Wahlwiederholungsliste öffnen); s (Eintrag auswählen); c.
Automatische Wahlwiederholung
Bei dieser Funktion wird die Rufnummer automatisch alle 20 Sek. gewählt. Der Teilnehmer meldet sich: c (Abheben-Taste), drücken. Bei Nichtmelden bricht der Ruf nach ca.
30 Sek. ab. Die Funktion schaltet sich nach zehn erfolglosen Versuchen aus.
a (Auflegen-Taste) drücken; • (Wahlwiederholungsliste öffnen);
v (Menü öffnen); Aut. Wahlwiederh. OK .
Wahlwiederholung abbrechen: Display-Taste Aus oder beliebige Taste drücken.
17
Gigaset SL 1 / deutsch / A31008-L001-B002-1-6Z19 / start_guide_time.fm / 14.11.2003
Telefonbuch und weitere Listen nutzen
Einträge der Wahlwiederholungsliste verwalten
Folgende Menüfunktionen können Sie nutzen:
• (Wahlwiederholungsliste öffnen); s (Eintrag auswählen); v (Menü öffnen);
s (Funktion auswählen).
Aut. Wahlwiederh.
Nr. verwenden
Nr. ins Tel.buch
Eintrag löschen
Liste löschen
E-Mail-Verzeichnis
Im E-Mail-Verzeichnis speichern Sie E-Mail-Adressen. Sie können insgesamt max. 200
Einträge in Telefonbuch und E-Mail-Verzeichnis und Kurzwahlliste speichern.
Einträge des E-Mail-Verzeichnisses verwalten Sie wie einen Telefonbuch-Eintrag S. 15.
Neue E-Mail-Adresse speichern
Schritt 1: E-Mail-Verzeichnis öffnen:
s (Telefonbuch öffnen) s E-Mail-Verzeichnis OK .
Schritt 2: E-Mail-Eintrag anlegen:
Neuer Eintrag OK ; ~ (Adresse eingeben); à (Menü öffnen);
( ggf. s, „.“, „@“ oder Texteingabehilfe-Funktion auswählen OK ). Bei eingeschalteter Texteingabehilfe R 1x lang und 1x kurz drücken.
Schritt 3: E-Mail-Eintrag speichern:
à (Menü öffnen); Speichern OK ; a lang drücken (zurück in den Ruhezustand).
Haben Sie einen Eintrag ausgewählt, drücken Sie die Display-Taste Ansehen , dann Ändern
und geben die Adresse ein. Speichern Sie, wie unter „Schritt 3“ beschrieben.
Freien Speicherplatz anzeigen
Der Speicherplatz wird zwischen dem Telefonbuch, der Kurzwahlliste (S. 14) und dem
E-Mail-Verzeichnis (S. 18) aufgeteilt. Es wird der Speicherplatz aller Listen angezeigt.
s (Telefonbuch öffnen); s (Eintrag auswählen); v (Menü öffnen);
s Speicherplatz OK ; a lang drücken (zurück in den Ruhezustand).
18
Gigaset SL 1 / deutsch / A31008-L001-B002-1-6Z19 / start_guide_time.fm / 14.11.2003
Mehrere Mobilteile nutzen
Mehrere Mobilteile nutzen
Externes Gespräch an ein anderes Mobilteil weitergeben
u (Intern-Liste öffnen); s (bestimmtes Mobilteil oder An alle) auswählen; OK .
Der interne Teilnehmer meldet sich: a (Auflegen-Taste) drücken.
Meldet er sich nicht oder ist besetzt, kommt der Anruf automatisch an Sie zurück (im
Display steht Wiederanruf).
Intern rückfragen
Während eines externen Gesprächs können Sie intern anrufen.
u (Intern-Liste öffnen); s (Mobilteil auswählen), OK .
Zum Beenden: Display-Taste Beenden drücken (zurück zu externem Teilnehmer).
Anklopfen beim internen Gespräch annehmen/abweisen
Wenn Sie während eines internen Gesprächs einen externen Anruf erhalten, hören Sie
den Anklopfton (kurzer Ton). Display-Taste Abheben oder Abweis. drücken.
Der abgewiesene Anklopfton ist an weiteren angemeldeten Mobilteilen noch zu hören.
Mobilteil als Babyfon nutzen
Mit dieser Funktion wird eine vorher gespeicherte interne oder externe Rufnummer
angerufen, sobald im Raum der eingestellte Geräuschpegel erreicht ist. Auch nach dem
Auflegen bleibt das Babyfon am Mobilteil eingeschaltet.
Der Abstand zwischen Mobilteil und Baby sollte zwischen 1 und 2 Meter betragen.
Das Mikrofon muss zum Baby zeigen.
Wenn die Babyfonfunktion eingeschaltet ist, werden ankommende Anrufe an dem
Mobilteil, das sich in der Nähe des Babys befindet, ohne Klingelton signalisiert und
lediglich am Display angezeigt. Display und Tastatur sind dabei nicht beleuchtet.
Achten Sie bei Eingabe einer externen Rufnummer darauf, dass der Anschluss, an den
der Babyfonruf weitergeleitet wird, nicht durch einen eingeschalteten Anrufbeantworter blockiert ist.
◆ Wenn Sie Ihr Babyfon auf eine externe Rufnummer umleiten, sollten Sie den Besitzer
dieser Nummer darüber informieren.
◆ Der Babyfon-Ruf zu einer externen Rufnummer bricht nach ca. 90 Sek., zu einer
internen Rufnummer (Mobilteil) nach ca. 180 Sek. ab (basisabhängig).
W
Bevor Sie weggehen, sollten Sie unbedingt die Einstellung des
Babyfons, z. B. Empfindlichkeit und Verbindungsaufbau, prüfen.
i
Die eingeschaltete Babyfonfunktion verringert die Betriebszeit des
Mobilteils erheblich. Stellen Sie das Mobilteil, das sich in der Nähe des
Babys befindet, ggf. in die Ladeschale, um sicherzustellen, dass sich der
Akku nicht leert.
Die Babyfonfunktion ist auch im Walkie-Talkie-Modus möglich.
19
Gigaset SL 1 / deutsch / A31008-L001-B002-1-6Z19 / start_guide_time.fm / 14.11.2003
Mehrere Mobilteile nutzen
Babyfonfunktion aktivieren und Zielrufnummer erstmalig eingeben
Schritt 1: Eingabefeld öffnen: v; s Familie/Freizeit OK ; Babyfon OK .
Schritt 2: Babyfon aktivieren: r (in der Zeile Aktivierung: Ein wählen);
Schritt 3: Zielrufnummer eingeben: s (in die nächste Zeile); Ändern;
Interne Rufnummer eingeben: INT s (Mobilteil auswählen) OK ; oder:
Externe Rufnummer eingeben: ~; à (Menü öffnen); Speichern OK ;
Schritt 4: Empfindlichkeit einstellen: Ggf. s (in die nächste Zeile); r; Sichern;
Die Babyfonfunktion ist jetzt eingeschaltet.
Ist das Babyfon eingeschaltet, wechseln Sie mit v (Menü öffnen) direkt in die Babyfoneinstellung.
Babyfon deaktivieren
Sie können das Babyfon von Extern (basisabhängig) ausschalten. Nehmen Sie den
durch die Babyfonfunktion ausgelösten Anruf an und geben Sie die Tasten O R ein.
Etwa 90 Sek. nach Beenden der Verbindung ist die Funktion deaktiviert. Es erfolgt kein
erneuter Babyfonruf mehr. Die übrigen Babyfonfunktionen am Mobilteil (z. B. kein Klingelton) bleiben noch so lange eingeschaltet, bis Sie am Mobilteil, das sich beim Baby
befindet, die Display-Taste Aus drücken.
i
Zum erneuten Aktivieren der Babyfonfunktion mit derselben Rufnummer
müssen Sie die Aktivierung wieder einschalten und mit Sichern speichern.
Walkie-Talkie-Modus einstellen
Die Walkie-Talkie-Funktion ermöglicht ein Gespräch zwischen zwei Mobilteilen (max.
300 m Reichweite), unabhängig davon, wie weit diese von der Basis entfernt sind.
Voraussetzung:
◆ Beide Mobilteile sind an derselben Basis angemeldet worden (für Babyfonfunktion
empfohlen) oder
◆ beide Mobilteile sind an verschiedenen Basen angemeldet und beide sind auf Beste
Basis eingestellt (S. 8) oder
◆ eines der Mobilteile ist an keiner Basis angemeldet und das angemeldete Mobilteil
ist auf Beste Basis eingestellt oder
◆ beide Mobilteile sind an keiner Basis angemeldet.
Im Walkie-Talkie-Modus sind die Mobilteile für kommende Anrufe nicht mehr erreichbar.
Die Betriebszeiten der Mobilteile verringern sich erheblich.
20
Gigaset SL 1 / deutsch / A31008-L001-B002-1-6Z19 / start_guide_time.fm / 14.11.2003
Mehrere Mobilteile nutzen
Walkie-Talkie-Modus ein-/ausschalten
v (Menü öffnen); s Familie/Freizeit OK ; s Walkie-Talkie OK .
Zum Ausschalten: Display-Taste Aus drücken.
c (Abheben-Taste) oder d (Freisprech-Taste) drücken. Der Ruf geht an alle Mobilteile
im Walkie-Talkie-Modus. Das Einstellen der Sprachlautstärke und der Hinweistöne
erfolgt genau so, als wenn Ihre Mobilteile Kontakt mit der Basis hätten (S. 22). Das Einstellen der Klingeltöne ist im Walkie-Talkie-Modus nicht möglich.
Das Ein-/Ausschalten des Klingeltons (S. 23) bzw. der Tastensperre (S. 8) ist im WalkieTalkie-Modus möglich.
Um das Menü zu öffnen, drücken Sie die Display-Taste ©.
i
Auch wenn Sie Ihr Mobilteil aus- und wieder einschalten, bleibt der Walkie-Talkie-Modus erhalten.
Mobilteil im Walkie-Talkie-Modus als Babyfon nutzen
à (Menü öffnen); s Babyfon OK ; r (Ein wählen);
s (in die nächste Zeile); r (Niedrig oder Hoch wählen); Sichern.
Der Babyfonruf geht nur an Mobilteilen, die sich im Walkie-Talkie-Modus befinden.
W
Bevor Sie weggehen, sollten Sie unbedingt die Einstellung des
Babyfons, z. B. Empfindlichkeit und Verbindungsaufbau, prüfen.
Danach sollte die Distanz zwischen den Mobilteilen nicht mehr
verändert werden (Reichweite).
Drücken Sie die Display-Taste Aus am Babyfon-Mobilteil, um das Babyfon auszuschalten.
Das Mobilteil kehrt in den normalen Walkie-Talkie-Modus zurück.
21
Gigaset SL 1 / deutsch / A31008-L001-B002-1-6Z19 / start_guide_time.fm / 14.11.2003
Mobilteil einstellen
Mobilteil einstellen
Automatische Rufannahme aus-/einschalten
Wenn Sie diese Funktion eingeschaltet haben, nehmen Sie das Mobilteil bei einem
Anruf einfach aus der Ladeschale, ohne dafür die Abheben-Taste drücken zu müssen
(Lieferzustand: Ein).
v (Menü öffnen); s Einstellungen OK ; Aut.Rufannahme OK (‰ = Ein);
a lang drücken (zurück in den Ruhezustand).
Sprachlautstärke ändern
Sie können die Lautstärke für das Freisprechen in fünf Stufen, die Hörerlautstärke in drei
Stufen einstellen – auch während eines externen Gesprächs.
v (Menü öffnen); s Audio OK ; Sprachlautst. OK ; r (Freisprechlautstärke auswählen); s (in die nächste Zeile) r (Hörerlautstärke auswählen); Sichern;
a lang drücken (zurück in Ruhezustand).
Klangbetonung
Sie können die Klangqualität der langen Klingelmelodien (4-10) erhöhen.
v (Menü öffnen); s Audio OK ; s Klangbetonung OK (‰ = Ein); a lang drücken
(zurück in den Ruhezustand).
Klingeltöne ändern
Sie können zwischen sechs Lautstärken und 26 Melodien (davon 16 polyphonen Melodien) wählen. Polyphone Melodien sind nur verfügbar, wenn Sie vorher mit dem Sound
Manager aufgezeichnet oder über das PC-Interface geladen worden sind.
Einstellungen für externe Anrufe, Zeitsteuerung und Namensansage
v (Menü öffnen); s Audio OK ; s Klingeltöne OK ; Für ext. Anrufe OK ;
r (Lautstärke auswählen); s (in die nächste Zeile) r (Melodie auswählen);
s (ggf. in die nächste Zeile) r (Namensansage einschalten, S. 16);
Zeitsteuerung aktivieren
Zeitstrg auswählen; r (Aktivierung: Ein auswählen.); s in die Zeile Von: springen (4stellige Eingabe des Zeitraumes); s in die Zeile Bis: springen (4-stellige Eingabe des
Zeitraumes); s r (Eingabe der Klingeltonlautstärke); Sichern (Zeitsteuerung speichern); nochmals Sichern (Einstellung speichern); a lang drücken (zurück in den Ruhezustand).
Individuelle Einstellung für interne Anrufe, Weckruf und Termine
v (Menü öffnen); s Audio OK ; s Klingeltöne OK ; s (Funktion auswählen) OK ;
r (Lautstärke auswählen); s (in die nächste Zeile) r (Melodie auswählen);
Sichern. (Zusätzlich bei der Einstellung Für alle gleich mit Ja Abfrage bestätigen.)
a lang drücken (zurück in den Ruhezustand).
22
Gigaset SL 1 / deutsch / A31008-L001-B002-1-6Z19 / start_guide_time.fm / 14.11.2003
Mobilteil einstellen
Klingelton aus-/einschalten
Bei ankommenden externen Anrufen klingeln alle Mobilteile. Klingelton ausschalten:
Stern-Taste P lang drücken. Im Display erscheint das Symbol Ú.
Klingelton einschalten: Stern-Taste P lang drücken.
i
Um den Klingelton für den aktuellen Anruf auszuschalten, drücken
Sie die Display-Taste Ruf aus.
Aufmerksamkeitston ein-/ausschalten
Beim Ausschalten des Klingeltons können Sie einen Aufmerksamkeitston einschalten.
Bei einem Anruf ertönt dann ein kurzer Ton („Beep“) anstelle des Klingeltons.
Stern-Taste P lang drücken und innerhalb von 3 Sek. die Display-Taste Beep drücken.
Im Display steht º.
Zum Ausschalten: Stern-Taste P lang drücken
Vibrationsalarm
Eingehende Anrufe und andere Meldungen werden durch Vibration angezeigt. Diese
Einstellung ist unabhängig von den Klingeltoneinstellungen.
v (Menü öffnen); s Audio OK ; s Vibration OK (‰ = Ein); a lang drücken
(zurück in den Ruhezustand).
Sound Manager
Sie können polyphone Melodien aufnehmen (max. Länge 4 Sek.) oder mittels eines
Datenkabels überspielen (S. 28). Maximal 16 Melodien können gespeichert werden.
Melodie aufnehmen
v (Menü öffnen); s Audio OK ; s Sound Manager OK ; <Neuer Sound> OK ;
Sound aufnehmen? OK ; Beenden drücken oder 4 Sec. warten; Sichern; Eintrag ändern
(Name der Melodie eingeben) Sichern; a lang drücken (zurück in den Ruhezustand).
Melodie abspielen
v (Menü öffnen); s Audio OK ; s Sound Manager OK ; s (Melodie auswählen);
Anhören; a lang drücken (zurück in den Ruhezustand).
Eintrag bearbeiten
v (Menü öffnen); s Audio OK ; s Sound Manager OK ; s (Melodie auswählen);
à ; Lautstärke OK (Lautstärke ändern) oder s Eintrag ändern OK (Namen
ändern) oder s Eintrag ansehen OK (Dateinamen anzeigen) oder
s Eintrag löschen OK ;a lang drücken (zurück in den Ruhezustand).
23
Gigaset SL 1 / deutsch / A31008-L001-B002-1-6Z19 / start_guide_time.fm / 14.11.2003
Mobilteil einstellen
Hinweistöne ein-/ausschalten
Ihr Mobilteil weist Sie akustisch auf verschiedene Tätigkeiten und Zustände hin. Folgende Hinweistöne können Sie unabhängig voneinander ein- oder ausschalten (Lieferzustand: Ein).
◆ Tastenklick (jeder Tastendruck wird bestätigt),
◆ Quittungstöne (Bestätigungston, Fehlerton, Menüendeton),
◆ Akkuton.
v (Menü öffnen); s Audio OK ; s Hinweistöne OK ;
r (Tastenklick: einschalten); s (in die nächste Zeile) r (Quittung: einschalten);
s (in die nächste Zeile) r (für Akkuton: Ein, Aus bzw. in Verb. wählen);
Sichern; a lang drücken (zurück in den Ruhezustand).
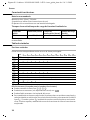
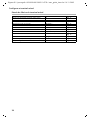
Mobilteil in den Lieferzustand zurücksetzen
Sie können individuelle Einstellungen und Änderungen zurücksetzen. Einträge des Telefonbuchs, der Anruferliste, des E-Mail-Verzeichnisses und der Kurzwahlliste, die Anmeldung des Mobilteils an der Basis sowie Screensaver und Melodien, die Sie geladen
haben, bleiben erhalten. Mit a brechen Sie das Zurücksetzen ab.
v (Menü öffnen); s Einstellungen OK ; s Mobilteil-Reset OK ; Ja (Abfrage bestätigen); a lang drücken (zurück in den Ruhezustand)
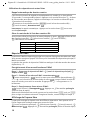
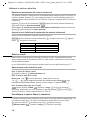
Lieferzustand des Mobilteils
Hörerlautstärke
Lautstärke für Freisprechen
Klingeltonlautstärke
Zeitsteuerung für Klingelton
Klingeltonmelodie
Namensansage
Automatische Rufannahme
Akkuton/Tastenklick/Quittungston
Display-Sprache
Wecker/Termin
Terminname
Wahlwiederholungsliste
Babyfon/Babyfon-Empfindlichkeit
24
1
3
5
ausgeschaltet
Melodie 1
ausgeschaltet
eingeschaltet
eingeschaltet
länderspezifisch
ausgeschaltet
gelöscht
leer
ausgeschaltet/hoch
S. 22
S. 22
S. 22
S. 22
S. 22
S. 16
S. 22
S. 24
S. 7
S. 11/S. 11
S. 11
S. 17
S. 20
Gigaset SL 1 / deutsch / A31008-L001-B002-1-6Z19 / start_guide_time.fm / 14.11.2003
Anhang
Anhang
Pflege und Kontakt mit Flüssigkeit
!
Wischen Sie das Mobilteil mit einem feuchten Tuch (keine Lösungsmittel) oder einem
Antistatiktuch ab. Benutzen Sie nie ein trockenes Tuch. Es besteht die Gefahr der statischen Aufladung.
Sollte das Mobilteil mit Flüssigkeit in Kontakt gekommen sein, auf keinen Fall das
Gerät einschalten. Sofort den Akku entnehmen.
Lassen Sie die Flüssigkeit aus dem Gerät abtropfen und tupfen Sie anschließend alle
Teile trocken.
Lagern Sie das Mobilteil ohne Akku mindestens 72 Stunden an einem trockenen, warmen Ort. Danach ist in vielen Fällen die Inbetriebnahme wieder möglich.
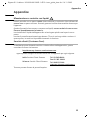
Kundenservice (Customer Care)
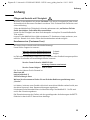
Wir bieten Ihnen schnelle und individuelle Beratung!
Unser Online-Support im Internet:
www.my-siemens.de/kundenservice
Schweiz
www.my-siemens.de/kundenservice
Belgien
Im Falle einer notwendigen Reparatur, evtl. Garantie- oder Gewährleistungsansprüche
erhalten Sie schnelle und zuverlässige Hilfe bei unserem
Service-Center Schweiz 0848 212 000
www.my-siemens.com/contact
Service-Center Belgien
078 15 22 21
Die Service-Adresse für die Schweiz ist:
Omnicom AG
Industrie Neuhof 9
3422 Kirchberg b. Bern
Weitere Servicenummern finden Sie am Ende der Bedienungsanleitung unter
„Service“.
In Ländern, in denen unser Produkt nicht durch autorisierte Händler verkauft wird, werden keine Austausch- bzw. Reparaturleistungen angeboten.
Länderspezifische Besonderheiten sind berücksichtigt. Das Mobilteil SL 1 ist EU-weit
und in der Schweiz zugelassen.
Die Übereinstimmung des Gerätes mit den grundlegenden Anforderungen der R&TTEDirektive ist durch das CE-Kennzeichen bestätigt.
25
Gigaset SL 1 / deutsch / A31008-L001-B002-1-6Z19 / start_guide_time.fm / 14.11.2003
Anhang
Auszug aus der Originalerklärung:
„We, Siemens AG, declare, that the above mentioned product is manufactured according to our Full
Quality Assurance System certified by CETECOM ICT Services GmbH in compliance with ANNEX V
of the R&TTE-Directive 99/5/EC. The presumption of conformity with the essential requirements
regarding Council Directive 99/5/EC is ensured.“
Senior Approvals Manager“
The Declaration of Conformity (DoC) has been signed. In case of need a copy of the original DoC
can be made available via the company hotline.
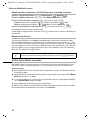
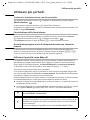
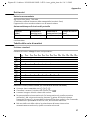
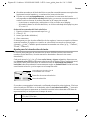
Technische Daten
Empfohlene Akku
Lithium-Ionen (LiIon), 700 mAh
(Stand bei Drucklegung der Bedienungsanleitung)
Das Gerät wird nur mit zugelassenem Akku ausgeliefert.
Betriebszeiten/Ladezeit des Mobilteils
Kapazität
(mAh)
Bereitschaftszeit
(Stunden)
Gesprächszeit
(Stunden)
700
etwa 250 (10 Tage) etwa 15
Ladezeit
(Stunden)
etwa 2,5
Die genannten Betriebs- und Ladezeiten gelten nur bei Verwendung des empfohlenen
Akkus.
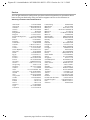
Zeichensatztabelle
Standardschrift
Entsprechende Taste mehrmals bzw. lang drücken:
1
2
I
4
5
L
M
N
O
Q
P
R
26
1x
Leerzeichen
2x
1
3x
4x
£
5x
$
6x
¥
7x
¤
8x 9x
10 x 11 x 12 x 13 x 14 x
ã
ç
ô
õ
â
a
b
c
2
ä
á
à
â
d
e
f
3
ë
é
è
ê
g
h
i
4
ï
í
ì
î
j
k
l
5
m
n
o
6
ö
ñ
ó
ò
p
q
r
s
7
ß
û
t
u
v
8
ü
ú
ù
w
x
y
z
9
ÿ
ý
æ
ø
å
.
,
?
!
0
+
-
:
¿
¡
Abc--> 123
123 --> abc
(
)
<
=
>
%
#
@
*
/
&
§
\
“
‘
;
_
Gigaset SL 1 / deutsch / A31008-L001-B002-1-6Z19 / start_guide_time.fm / 14.11.2003
Anhang
Text bearbeiten (ohne Texteingabehilfe)
Die Schreibmarke steuern Sie mit u v t s.
Zeichen (links von der Schreibmarke) löschen Sie mit fC .
Zeichen werden links von der Schreibmarke (Cursor) angefügt.
Um von Großschreibung (1. Buchstabe groß geschrieben, alle weiteren klein
geschrieben) zur Kleinschreibung zu wechseln, drücken Sie vor der Eingabe des
Buchstabens P. Bei erneutem Drücken von P wechseln Sie von der Kleinschreibung zur Ziffernschreibung. Bei weiterem Drücken wechseln Sie von der Ziffernschreibung wieder zur Großschreibung.
◆ Bei Einträgen ins Telefonbuch wird der erste Buchstabe des Namens automatisch
groß geschrieben, es folgen kleine Buchstaben.
◆ Wenn Sie eine Taste lang drücken, werden die Zeichen der entsprechenden Taste in
der untersten Display-Zeile angezeigt und nacheinander markiert. Wenn Sie die
Taste loslassen, wird das markierte Zeichen im Eingabefeld eingefügt.
– Ob die Groß-, Klein- oder Ziffernschreibung eingestellt ist, wird Ihnen im Display
angezeigt:
– bei der Eingabe ins Telefonbuch steht in der untersten Display-Zeile „A“ bzw. „a“.
◆
◆
◆
◆
Reihenfolge der Telefonbucheinträge
1. Leerzeichen (hier mit s dargestellt)
2. Ziffern (0–9)
3. Buchstaben (alphabetisch)
4. Restliche Zeichen
Um die alphabetische Reihenfolge der Einträge zu umgehen, fügen Sie vor dem Namen
ein Leerzeichen ein. Dieser Eintrag rückt dann an die erste Stelle (Beispiel: „sKarla“).
Sie können die Einträge auch mit Ziffern nummerieren (z. B. „1Ute“, „2Karla“, „3Albert“).
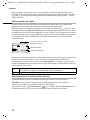
Texteingabehilfe
Die Texteingabehilfe EATONI unterstützt Sie beim Schreiben von Namen (Telefonbuch,
Kurzwahlliste oder E-Mail-Verzeichnis).
Jeder Taste zwischen Q und O sind mehrere Buchstaben und Zeichen zugeordnet,
die alle in einer Auswahlzeile direkt über den Displaytaste (unter dem Textfeld) angeordnet werden, sobald Sie eine Taste drücken. Bei der Eingabe von Buchstaben wird
jeweils der nach der Wahrscheinlichkeit am ehesten gesuchte Buchstabe invers dargestellt. Er steht am Anfang dieser Auswahlzeile und wird in das Textfeld übernommen.
53 ________Ç_____abc
Peter K
KLJ5
W
Die Texteingabehilfe EATONI ist
eingeschaltet.
E-Mail Adresse
¨
Auswahlzeile
27
Gigaset SL 1 / deutsch / A31008-L001-B002-1-6Z19 / start_guide_time.fm / 14.11.2003
Anhang
Entspricht dieser Buchstabe dem gewünschten, bestätigen Sie ihn, indem Sie die
nächste Taste drücken. Entspricht der von EATONI gewählte Buchstabe nicht Ihrem
Wunsch, drücken Sie so oft die Raute-Taste R, bis der gesuchte Buchstabe invers dargestellt in der Darstellungszeile erscheint und damit in das Textfeld übernommen wird.
P
R
Stern-Taste kurz drücken: Wechselt vom Modus abc zu Abc, von Abc zu 123
und von 123 zu abc .
Springt in der Auswahlzeile zum nächsten Buchstaben.
Texteingabehilfe aus-/einschalten
Die Texteingabehilfe wird funktionsspezifisch ein- bzw. ausgeschaltet.
Voraussetzung: Sie befinden sich in einem Texteingabefeld (Name im Telefonbuch,
Kurzwahlliste oder E-Mail-Verzeichnis).
v (Menü öffnen); s Txt.eingabehilfe OK (‰ = Ein);
a Auflegen-Taste kurz drücken (zurück in das Textfeld). Geben Sie jetzt den Text ein.
PC Interface
Das Mobilteil SL 1 kann über ein Siemens Datenkabel mit Ihrem Rechner verbunden
werden. Ihr Rechner kann dann mit Hilfe des Programmes „Siemens Data Suite“ (kostenloser download unter http:\\www.my-siemens.com\gigaset-sds) mit Ihrem SL 1 kommunizieren und auf folgende Parameter und Listen des Mobilteils zugreifen:
Auslesen von Parametern
◆ SW-Version
◆ Typ
◆ Herstellercode
Lese-/Schreibzugriff auf
das Telefonbuch
das E-Mail-Verzeichnis
die Netzanbieterliste
die Liste der Termine
die Wahlwiederholungsliste
◆
◆
◆
◆
◆
Lese-/Schreibzugriff auf andere Parameter
Klingeltoneinstellungen
Lautstärkeeinstellungen
Laden von Bildschirmschonern
Laden von Melodien
Telefonate führen und Anrufe annehmen
◆
◆
◆
◆
◆
28
Gigaset SL 1 / deutsch / A31008-L001-B002-1-6Z19 / start_guide_time.fm / 14.11.2003
Anhang
Datenübertragung
Bei einigen Funktionen werden große Datenmengen zwischen Mobilteil und externem
Gerät übertragen. In diesem Fall schaltet das Mobilteil in den DatenübertragungsModus um, im Display wird Datenübertragung angezeigt. In diesem Modus sind keine
Eingaben über die Tastatur möglich und ankommende Anrufe werden ignoriert.
In folgenden Fällen geht das Mobilteil in den Datenübertragungs-Modus über:
◆ Lese-/Schreibzugriff auf das Telefonbuch
◆ Lese-/Schreibzugriff auf das E-Mail-Verzeichnis
◆ Lese-/Schreibzugriff auf die Netzanbieterliste
◆ Lese-/Schreibzugriff auf die Liste der Termine
◆ Lese-/Schreibzugriff auf die Wahlwiederholungsliste
◆ Laden von Bildschirmschonern
◆ Laden von Melodien
Tritt während der Übertragung ein Fehler auf, geht das Mobilteil automatisch in den
Ruhezustand über.
Telefonate führen und Anrufe annehmen
Wählen Sie eine Nummer vom externen Gerät aus oder nehmen Sie von dort ein
Gespräch an, verhält sich das Mobilteil genau so, als hätten Sie diese Funktionen am
Mobilteil ausgeführt.
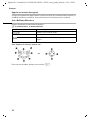
Spiel „Balloon Shooter“
Versuchen Sie, möglichst viele Ballons zu treffen.
v ¢ Familie/Freizeit
¢ Balloon Shooter
entweder ...
Spiel starten:
Display-Taste drücken.
[RRRRRRRRRRRRRRRRRRRR]
Starten
oder ...
Weitere Optionen:
à
Display-Taste drücken, um das Optionen-Menü zu
öffnen.
oder
¢
¢
¢
¢
p¢
¢
¢
¢
12I
4
L
MNO
¢
¢
¢
¢
Um das Fadenkreuz zu bewegen drücken Sie:
Um den Ballon abzuschießen drücken Sie die Taste 5.
29
Gigaset SL 1 / deutsch / A31008-L001-B002-1-6Z19 / start_guide_time.fm / 14.11.2003
Anhang
Garantie-Schein Belgien
Dem Verbraucher (Kunden) wird unbeschadet seiner Mängelansprüche gegenüber dem
Vertragshändler eine Garantie zu den nachstehenden Bedingungen eingeräumt:
◆ Wenn das neue Gerät oder Zubehör innerhalb von 24 Monaten nach Ankauf Defekte
aufweist infolge von Produktions- bzw. Materialfehlern, hat Siemens die Wahl, das
Gerät kostenlos zu reparieren oder durch ein anderes, dem Stand der Technik
entsprechendes Gerät zu ersetzen. Im Falle von Teilen, die dem Verschleiß
ausgesetzt sind (wie Batterien, Tastatur, Gehäuse), gilt diese Garantie für eine Dauer
von sechs Monaten nach Kaufdatum.
◆ Diese Garantie gilt nicht, soweit der Defekt der Geräte auf unsachgemäßer
Behandlung und/oder Nichtbeachtung der Handbücher beruht.
◆ Diese Garantie erstreckt sich nicht auf vom Vertragshändler oder vom Kunden selbst
erbrachte Leistungen (z.B. Installation, Konfiguration, Softwaredownloads).
Handbücher und ggf. auf einem separaten Datenträger mitgelieferte Software sind
ebenfalls von der Garantie ausgeschlossen.
◆ Als Garantienachweis gilt der Kaufbeleg, mit Kaufdatum. Garantieansprüche sind
innerhalb von zwei Monaten nach Feststellung des Defekts geltend zu machen.
◆ Ersetzte Geräte bzw. deren Komponenten, die im Rahmen des Austauschs an
Siemens zurückgeliefert werden, gehen in das Eigentum von Siemens über.
◆ Diese Garantie gilt für in der Europäischen Union erworbene Neugeräte.
Garantiegeberin für in Belgien erworbene Geräte ist Siemens S.A. Chaussée de
Charleroi 116,B1060 Bruxelles
◆ Weitergehende oder andere Ansprüche aus dieser Garantie sind ausgeschlossen,
ausgenommen soweit die Haftung auf zwingendem Recht beruht wie etwa die
gesetzliche Regelung zur Produkthaftung.
◆ Durch eine erbrachte Garantieleistung verlängert sich der Garantiezeitraum nicht.
◆ Soweit kein Garantiefall vorliegt, behält sich Siemens vor, dem Kunden den
Austausch oder die Reparatur in Rechnung zu stellen.
◆ Eine Änderung der Beweislastregeln zum Nachteil des Kunden ist mit den
vorstehenden Regelungen nicht verbunden.
Zur Einlösung dieser Garantie wenden Sie sich bitte an den Siemens Telefonservice. Die
Rufnummer entnehmen Sie bitte der Bedienungsanleitung.
Garantie Schweiz
Die Garantiedauer beträgt 12 Monate.
30
Gigaset SL 1 / deutsch / A31008-L001-B002-1-6Z19 / SL_1SIX.fm / 14.11.2003
Stichwortverzeichnis
Stichwortverzeichnis
A
D
Abbrechen (Vorgang) . . . . . . . . . . . . 10
Abheben . . . . . . . . . . . . . . . . . . . . . . 2
Abschalten s. Ausschalten . . . . . . . . . 11
Akku
Anzeige . . . . . . . . . . . . . . . . . . . . . . 6
einlegen . . . . . . . . . . . . . . . . . . . . . 6
empfohlener Akku . . . . . . . . . . . . . 26
laden . . . . . . . . . . . . . . . . . . . . . . . 6
Akkuton . . . . . . . . . . . . . . . . . . . . . . 24
Anhören (Sprachmuster) . . . . . . . . . . 17
Anklopfen (internes Gespräch) . . . . . 19
Anrufen
extern . . . . . . . . . . . . . . . . . . . . . . 12
intern . . . . . . . . . . . . . . . . . . . . . . 12
Anzeige
12-/24-Stunden-Anzeige . . . . . 11, 12
Speicherplatz . . . . . . . . . . . . . . . . . 18
Aufmerksamkeitston . . . . . . . . . . . . . 23
Ausschalten
Klingelton (am Mobilteil) . . . . . . . . 23
Mobilteil . . . . . . . . . . . . . . . . . . . . . 8
Tastensperre . . . . . . . . . . . . . . . . . . 8
Terminruf . . . . . . . . . . . . . . . . . . . 12
Weckruf. . . . . . . . . . . . . . . . . . . . . 11
Auswählen (Menüeintrag) . . . . . . . . . . 9
Automatische Rufannahme . . . . . . . . 22
Datum einstellen . . . . . . . . . . . . . . . . 11
Display
Sprache ändern . . . . . . . . . . . . . . . . 7
Tasten . . . . . . . . . . . . . . . . . . . . . . . 9
B
Babyfon . . . . . . . . . . . . . . . . . . . . . . 19
Balloon Shooter . . . . . . . . . . . . . . . . 29
Basis wechseln . . . . . . . . . . . . . . . . . . 8
Bestätigungston . . . . . . . . . . . . . . . . 24
Beste Basis . . . . . . . . . . . . . . . . . . . . . 8
Betrieb (Telefon in Betrieb nehmen) . . . 6
Betriebszeit
des Babyfons . . . . . . . . . . . . . . . . . 19
des Mobilteils . . . . . . . . . . . . . . . . 26
im Walkie-Talkie-Modus . . . . . . . . . 20
C
Call-by-Call-Nummern . . . . . . . . . . . . 14
Cursor (Schreibmarke) . . . . . . . . . . . . . 9
Customer Care (Service) . . . . . . . . . . 25
E
EATONI s. Texteingabehilfe
Eingeben
Geburtstag/Jahrestag . . . . . . . . . . . 11
Termin . . . . . . . . . . . . . . . . . . . . . . 11
Weckzeit . . . . . . . . . . . . . . . . . . . . 11
Einschalten
Mobilteil. . . . . . . . . . . . . . . . . . . . . . 8
Tastensperre . . . . . . . . . . . . . . . . . . . 8
Termin . . . . . . . . . . . . . . . . . . . . . . 11
Walkie-Talkie . . . . . . . . . . . . . . . . . 21
Wecker . . . . . . . . . . . . . . . . . . . . . . 11
Einstellen
Datum . . . . . . . . . . . . . . . . . . . . . . 11
Display-Sprache . . . . . . . . . . . . . . . . 7
Hörerlautstärke. . . . . . . . . . . . . . . . 22
Klingeltonlautstärke . . . . . . . . . . . . 22
Lautsprecherlautstärke . . . . . . . . . . 22
Termin . . . . . . . . . . . . . . . . . . . . . . 11
Uhrzeit . . . . . . . . . . . . . . . . . . . . . . 11
Wecker . . . . . . . . . . . . . . . . . . . . . . 11
Eintrag (Menü) auswählen . . . . . . . . . . 9
E-Mail-Verzeichnis . . . . . . . . . . . . . . . 18
Empfangsfeldstärke . . . . . . . . . . . . . . . 2
Erinnerungsruf . . . . . . . . . . . . . . . . . 14
Escape-Taste . . . . . . . . . . . . . . . . . . . 10
F
Fehler/Fehlerton . . . . . . . . . . . . . . . . 24
Freisprechen . . . . . . . . . . . . . . . . . . . 13
G
Garantie . . . . . . . . . . . . . . . . . . . . . . 30
Geburtstag (als Termin) eingeben . . . . 11
Gespräch beenden . . . . . . . . . . . . . . . 12
Gespräch weitergeben . . . . . . . . . . . . 19
Gürtelclip . . . . . . . . . . . . . . . . . . . . . . 8
31
Gigaset SL 1 / deutsch / A31008-L001-B002-1-6Z19 / SL_1SIX.fm / 14.11.2003
Stichwortverzeichnis
H
Betriebs- und Ladezeiten . . . . . . . . . 26
ein-/ausschalten . . . . . . . . . . . . . . . . 8
Gürtelclip . . . . . . . . . . . . . . . . . . . . . 8
in Betrieb nehmen . . . . . . . . . . . . . . 6
in Lieferzustand zurücksetzen . . . . . 24
Liste . . . . . . . . . . . . . . . . . . . . . . . . . 9
stummschalten . . . . . . . . . . . . . . . . 13
Wechsel zu bestem Empfang . . . . . . . 8
Wechsel zu einer anderen Basis . . . . . 8
Hinweistöne . . . . . . . . . . . . . . . . . . . 24
Hörerbetrieb . . . . . . . . . . . . . . . . . . . . 2
Hörerlautstärke . . . . . . . . . . . . . . . . . 22
Hörgeräte . . . . . . . . . . . . . . . . . . . . . . 5
I
In Betrieb nehmen (Telefon) . . . . . . . . 6
Intern
anrufen . . . . . . . . . . . . . . . . . . . . . 12
rückfragen . . . . . . . . . . . . . . . . . . . 19
J
Jahrestag . . . . . . . . . . . . . . . . . . 11, 12
K
Klangbetonung . . . . . . . . . . . . . . . . .
Klingelton . . . . . . . . . . . . . . . . . . . . .
Kundenservice . . . . . . . . . . . . . . . . .
Kurzwahlliste . . . . . . . . . . . . . . . . . .
Nummer speichern . . . . . . . . . . . .
Kurzwahl-Taste . . . . . . . . . . . . . . . . .
22
22
25
14
15
14
L
Ladezeit des Mobilteils. . . . . . . . . . . . 26
Ladezustandsanzeige . . . . . . . . . . . . . 6
Lautstärke . . . . . . . . . . . . . . . . . . . . . 22
Lieferzustand des Mobilteils . . . . . . . . 24
Liste
E-Mail-Verzeichnis . . . . . . . . . . . . . 18
Mobilteile . . . . . . . . . . . . . . . . . . . . 9
Löschen (Sprachmuster) . . . . . . . . . . 17
Lösch-Taste . . . . . . . . . . . . . . . . . . . . 10
M
Medizinische Geräte . . . . . . . . . . . . . . 5
Melodie
Polyphone . . . . . . . . . . . . . . . . . . . 23
Menü
eine Menüebene zurück . . . . . . . . . 10
Endeton. . . . . . . . . . . . . . . . . . . . . 24
Führung durch das Menü . . . . . . . . . 9
öffnen . . . . . . . . . . . . . . . . . . . . . . . 9
Taste . . . . . . . . . . . . . . . . . . . . . . . 10
Mikrofon . . . . . . . . . . . . . . . . . . . . . . . 2
Mobilteil
als Babyfon benutzen . . . . . . . . . . . 19
anmelden an weiterer Basis . . . . . . . 8
32
N
Netzanbieter (Nummernliste) . . . . . . . 14
Nicht angenommen
Jahrestag . . . . . . . . . . . . . . . . . . . . 12
Termin . . . . . . . . . . . . . . . . . . . . . . 12
Nummer s. a. Rufnummer o. Eintrag . . 14
O
Öffnen
Menü . . . . . . . . . . . . . . . . . . . . . . . . 9
Telefonbuch . . . . . . . . . . . . . . . . . . . 9
Online-Support . . . . . . . . . . . . . . . . . 25
P
PC Interface . . . . . . . . . . . . . . . . . . . . 28
Pflege des Telefons . . . . . . . . . . . . . . . 25
Polyphone Melodien. . . . . . . . . . . . . . 23
Q
Quittungstöne . . . . . . . . . . . . . . . . . . 24
R
Raute-Taste . . . . . . . . . . . . . . . . . . . . . 8
Reihenfolge im Telefonbuch . . . . . . . . 27
Rückfrage (intern) . . . . . . . . . . . . . . . 19
Rufnummer
aus dem Telefonbuch übernehmen . 15
speichern (Telefonbuch) . . . . . . . . . 14
S
Sammelruf . . . . . . . . . . . . . . . . . . . . . 12
Schreibmarke . . . . . . . . . . . . . . . . . . . . 9
Schutzfolie . . . . . . . . . . . . . . . . . . . . . . 6
Senden eines Telefonbucheintrags . . . 16
Service . . . . . . . . . . . . . . . . . . . . . . . 25
Sicherheitshinweise . . . . . . . . . . . . . . . 5
Signalton s. Hinweistöne . . . . . . . . . . 24
Sound Manager . . . . . . . . . . . . . . . . . 23
Gigaset SL 1 / deutsch / A31008-L001-B002-1-6Z19 / SL_1SIX.fm / 14.11.2003
Stichwortverzeichnis
Speichern
Kurzwahllisteneintrag . . . . . . . . . . 15
Telefonbucheintrag . . . . . . . . . . . . 14
Speicherplatz . . . . . . . . . . . . . . . . . . 18
Sperre
Tastensperre . . . . . . . . . . . . . . . . . . 8
Sprache s. Display
Sprachlautstärke . . . . . . . . . . . . . . . . 22
Sprachmuster . . . . . . . . . . . . . . . . . . 17
Sprachwahl. . . . . . . . . . . . . . . . . . 9, 16
Steckernetzgerät . . . . . . . . . . . . . . . . . 5
Steuer-Taste . . . . . . . . . . . . . . . . . . . . 9
Stummschalten (Mobilteil) . . . . . . . . 13
W
Wahlpause. . . . . . . . . . . . . . . . . . . . . 12
Wahlwiederholung. . . . . . . . . . . . . . . 17
Wahlwiederholungsliste . . . . . . . . . . . 17
Walkie-Talkie . . . . . . . . . . . . . . . . 20, 21
Warnton s. Hinweistöne . . . . . . . . . . . 24
Wartemelodie . . . . . . . . . . . . . . . . . . 13
Wecker . . . . . . . . . . . . . . . . . . . . . . . 11
Weckruf . . . . . . . . . . . . . . . . . . . . . . . 11
Z
Zeichensatztabelle . . . . . . . . . . . . . . . 26
Zeitfunktionen . . . . . . . . . . . . . . . . . . 11
T
Taste 1 (Schnellwahl) . . . . . . . . . . . . . 2
Tasten
Abbrechen. . . . . . . . . . . . . . . . . . . 10
Display-Tasten . . . . . . . . . . . . . . . . . 9
Escape/Menü/Löschen/OK . . . . . . . 10
Steuer-Taste . . . . . . . . . . . . . . . . . . . 9
Tastendruck (Bestätigungston) . . . . 24
Tastenklick. . . . . . . . . . . . . . . . . . . 24
Tastensperre . . . . . . . . . . . . . . . . . . 8
Wahlwiederholungs-Taste . . . . . . . . 9
Technische Daten . . . . . . . . . . . . . . . 26
Telefonbuch . . . . . . . . . . . . . . . . . . . 14
Eintrag senden an Mobilteil . . . . . . 16
öffnen . . . . . . . . . . . . . . . . . . . . . . . 9
Reihenfolge der Einträge . . . . . . . . 27
Rufnummer speichern . . . . . . . . . . 14
Telefonieren . . . . . . . . . . . . . . . . . . . 13
Anruf annehmen . . . . . . . . . . . . . . 13
extern . . . . . . . . . . . . . . . . . . . . . . 12
Termin . . . . . . . . . . . . . . . . . . . . . . . 12
Texteingabehilfe . . . . . . . . . . . . . . . . 27
Ton
Fehlerton . . . . . . . . . . . . . . . . . . . 24
Ton (Bestätigung/Fehler/Akku/
Menüende) . . . . . . . . . . 24
U
Uhrzeit einstellen . . . . . . . . . . . . . . . 11
V
Verpackungsinhalt . . . . . . . . . . . . . . . 6
Vibrationsalarm . . . . . . . . . . . . . . . . 23
VIP (Telefonbuch-Eintrag) . . . . . . . . . 15
33
Gigaset SL1 / englisch / A31008-L001-B002-1-6Z19 / cover_Innen.fm / 14.11.2003
s
ENGLISH
Be inspired
Gigaset SL1 / englisch / A31008-L001-B002-1-6Z19 / covers_I-II.fm / 14.11.2003
Brief overview
Brief overview
Signal strength
Ð 100 % i 75 %
Ñ 50 % Ò poor signal
| no signal (flashes)
Display (display screen)
Charge status
= flat U fully charged
= flashes: battery is
almost flat or is charging
Talk key
◆ Answer a call
◆ Initiate dialling
◆ Switch from handsfree
to "earpiece" mode
Control key
Opens the menu,
directory, voice dialling.
Navigation in the input
field
Ð
V
End call key, On/Off key
INT 1
20.05.03
•
09:45
§§§§§§§SMS§§§§§§
◆ End call
◆ Cancel function
◆ One menu level back
(short press)
Handsfree key
◆ Switch from "earpiece"
to handsfree mode
◆ Lights up: Handsfree
is activated
◆ Flashes: incoming call,
automatic last number
redial
◆ Back to idle status
(press for approx. 1
second)
◆ Handset on/off (press
for approx. 2 seconds)
Message key
◆ Access to calls and
messages list
◆ Flashes: new
messages and calls
Open directory
Key 1
Select network mailbox/
answering machine (press
for approx. 2 sec.)
Star key
◆ Ringer on/off (press for
approx. 2 seconds)
◆ Toggles between upper/
lower case and digits for
text input
Current functions and
display keys
The display keys give you
access to the functions
shown in the display.
Microphone
Socket for headset
and PC interface
Hash key
Keypad lock on/off (press
for approx. 1 second)
Speed dial list key
Open the speed dial list
(short press)
Recall key
Insert a dial pause (hold
key down)
Illustration of a handset that is registered to a base with SMS functionality.
2
Gigaset SL1 / englisch / A31008-L001-B002-1-6Z19 / SL_1IVZ.fm / 14.11.2003
Contents
Contents
Brief overview . . . . . . . . . . . . . . . . . . . . . . . . . . . . . . 2
Safety precautions . . . . . . . . . . . . . . . . . . . . . . . . . . 5
Preparing to use your phone . . . . . . . . . . . . . . . . . . 6
Preparing to use the handset . . . . . . . . . . . . . . . . . . . . . . . . . . . . . . . . . . . . . . . . . . . . .
Registering . . . . . . . . . . . . . . . . . . . . . . . . . . . . . . . . . . . . . . . . . . . . . . . . . . . . . . . . . . .
Changing the display language . . . . . . . . . . . . . . . . . . . . . . . . . . . . . . . . . . . . . . . . . . .
Changing the base . . . . . . . . . . . . . . . . . . . . . . . . . . . . . . . . . . . . . . . . . . . . . . . . . . . . .
Attaching the belt clip . . . . . . . . . . . . . . . . . . . . . . . . . . . . . . . . . . . . . . . . . . . . . . . . . .
Activating/deactivating the handset . . . . . . . . . . . . . . . . . . . . . . . . . . . . . . . . . . . . . . .
Activating/deactivating the keypad lock . . . . . . . . . . . . . . . . . . . . . . . . . . . . . . . . . . . .
6
7
7
8
8
8
8
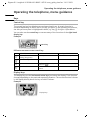
Operating the telephone, menu guidance . . . . . . . 9
Keys . . . . . . . . . . . . . . . . . . . . . . . . . . . . . . . . . . . . . . . . . . . . . . . . . . . . . . . . . . . . . . . . 9
Main menu . . . . . . . . . . . . . . . . . . . . . . . . . . . . . . . . . . . . . . . . . . . . . . . . . . . . . . . . . . 10
Date and Time . . . . . . . . . . . . . . . . . . . . . . . . . . . . . 11
Setting the date and the time . . . . . . . . . . . . . . . . . . . . . . . . . . . . . . . . . . . . . . . . . . . 11
Setting the alarm clock . . . . . . . . . . . . . . . . . . . . . . . . . . . . . . . . . . . . . . . . . . . . . . . . 11
Setting an appointment . . . . . . . . . . . . . . . . . . . . . . . . . . . . . . . . . . . . . . . . . . . . . . . . 12
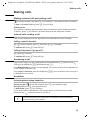
Making calls . . . . . . . . . . . . . . . . . . . . . . . . . . . . . . . 13
Making external calls and ending a call . . . . . . . . . . . . . . . . . . . . . . . . . . . . . . . . . . . .
Internal calls, ending a call . . . . . . . . . . . . . . . . . . . . . . . . . . . . . . . . . . . . . . . . . . . . .
Answering a call . . . . . . . . . . . . . . . . . . . . . . . . . . . . . . . . . . . . . . . . . . . . . . . . . . . . . .
Handsfree . . . . . . . . . . . . . . . . . . . . . . . . . . . . . . . . . . . . . . . . . . . . . . . . . . . . . . . . . . .
Muting the handset . . . . . . . . . . . . . . . . . . . . . . . . . . . . . . . . . . . . . . . . . . . . . . . . . . .
13
13
13
13
14
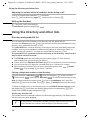
Using the directory and other lists . . . . . . . . . . . . 14
Directory and speed dial list . . . . . . . . . . . . . . . . . . . . . . . . . . . . . . . . . . . . . . . . . . . . .
Managing entries in the directory and speed dial list . . . . . . . . . . . . . . . . . . . . . . . . .
Voice-activated dialling . . . . . . . . . . . . . . . . . . . . . . . . . . . . . . . . . . . . . . . . . . . . . . . .
Linking a call-by-call number with a phone number . . . . . . . . . . . . . . . . . . . . . . . . . .
Last number redial list . . . . . . . . . . . . . . . . . . . . . . . . . . . . . . . . . . . . . . . . . . . . . . . . .
Email directory . . . . . . . . . . . . . . . . . . . . . . . . . . . . . . . . . . . . . . . . . . . . . . . . . . . . . . .
Display available memory . . . . . . . . . . . . . . . . . . . . . . . . . . . . . . . . . . . . . . . . . . . . . .
14
15
16
17
17
18
18
Using several handsets . . . . . . . . . . . . . . . . . . . . . . 19
Internal consultation calls . . . . . . . . . . . . . . . . . . . . . . . . . . . . . . . . . . . . . . . . . . . . . .
Accepting/rejecting call waiting during an internal call . . . . . . . . . . . . . . . . . . . . . . .
Using a handset as a room monitor . . . . . . . . . . . . . . . . . . . . . . . . . . . . . . . . . . . . . . .
Setting the Walk and Talk mode . . . . . . . . . . . . . . . . . . . . . . . . . . . . . . . . . . . . . . . . .
19
19
19
20
3
Gigaset SL1 / englisch / A31008-L001-B002-1-6Z19 / SL_1IVZ.fm / 14.11.2003
Contents
Handset settings . . . . . . . . . . . . . . . . . . . . . . . . . . . 22
Activating/deactivating Auto Answer . . . . . . . . . . . . . . . . . . . . . . . . . . . . . . . . . . . . .
Adjusting the loudspeaker volume . . . . . . . . . . . . . . . . . . . . . . . . . . . . . . . . . . . . . . .
Changing the ringer tone . . . . . . . . . . . . . . . . . . . . . . . . . . . . . . . . . . . . . . . . . . . . . . .
Sound Manager . . . . . . . . . . . . . . . . . . . . . . . . . . . . . . . . . . . . . . . . . . . . . . . . . . . . . .
Activating/deactivating advisory tones . . . . . . . . . . . . . . . . . . . . . . . . . . . . . . . . . . . .
Restoring the handset factory settings . . . . . . . . . . . . . . . . . . . . . . . . . . . . . . . . . . . .
22
22
22
23
24
24
Appendix . . . . . . . . . . . . . . . . . . . . . . . . . . . . . . . . . 25
Care and contact with liquid . . . . . . . . . . . . . . . . . . . . . . . . . . . . . . . . . . . . . . . . . . . .
Customer Care . . . . . . . . . . . . . . . . . . . . . . . . . . . . . . . . . . . . . . . . . . . . . . . . . . . . . . .
Specifications . . . . . . . . . . . . . . . . . . . . . . . . . . . . . . . . . . . . . . . . . . . . . . . . . . . . . . . .
Character set chart . . . . . . . . . . . . . . . . . . . . . . . . . . . . . . . . . . . . . . . . . . . . . . . . . . . .
Predictive text . . . . . . . . . . . . . . . . . . . . . . . . . . . . . . . . . . . . . . . . . . . . . . . . . . . . . . . .
PC Interface . . . . . . . . . . . . . . . . . . . . . . . . . . . . . . . . . . . . . . . . . . . . . . . . . . . . . . . . .
Play "Balloon Shooter" . . . . . . . . . . . . . . . . . . . . . . . . . . . . . . . . . . . . . . . . . . . . . . . . .
Warranty Certificate Ireland . . . . . . . . . . . . . . . . . . . . . . . . . . . . . . . . . . . . . . . . . . . . .
25
25
26
26
27
28
29
30
Index . . . . . . . . . . . . . . . . . . . . . . . . . . . . . . . . . . . . . 31
4
Gigaset SL1 / englisch / A31008-L001-B002-1-6Z19 / start_guide_time.fm / 14.11.2003
Safety precautions
Safety precautions
$
!
Only use the power supply unit supplied, as indicated on the underside of
the device.
Fit only the recommended rechargeable battery (page 26)! Do not use any
other type of battery or a non-rechargeable battery, as this could damage
health and cause personal injury.
‹
Œ
Insert the rechargeable battery ensuring correct polarity, and use it as directed
in these instructions.
The operation of medical appliances may be affected. Be aware of the
technical conditions within the particular environment (e.g. doctor's practice).
The handset may cause an intrusive 'hum' in hearing aids.
The handset is not watertight (page 25).
Drivers must not use their phones while driving (Walk and Talk function).
Switch off your phone while on board an aircraft (Walk and Talk function).
Ensure that it cannot be switched on again accidentally.
Do not use the phone in environments subject to explosion hazard (e.g. auto
paint shops).
ƒ
Ensure that your Gigaset is accompanied by these instructions when you give
it to others to use.
Dispose of the battery and phone in accordance with environmental
regulations.
i
Not all of the functions described in these instructions are available in all
countries.
5
Gigaset SL1 / englisch / A31008-L001-B002-1-6Z19 / start_guide_time.fm / 14.11.2003
Preparing to use your phone
Preparing to use your phone
The pack contains:
one SL 1 handset, one charger with power supply unit, one belt clip for the handset, one
battery, one set of operating instructions.
Preparing to use the handset
The display is protected by a plastic film. Remove the protective plastic film!
Inserting the battery
◆ Insert the battery ensuring correct polarity – see figure on left.
◆ Position the battery cover so that it is open by around 3 mm, then slide up until it
closes with a click,
◆ To open the battery cover, press on the recessed area and slide down.
W
Use only the rechargeable battery recommended by Siemens on page 26!
Never use a conventional battery (non-rechargeable) or other battery
type as this may cause significant damage to health and property. For
example, the jacket of the battery could be destroyed (hazardous). The
phone could also malfunction or be damaged.
Charging the battery
Place the handset in the charger with the display facing the front. Now leave the
handset in the charger for the battery to charge – the battery is supplied uncharged.
Battery charging is indicated in the top right of the display by the flashing battery
icon =.
W
6
For the initial charge we recommend a continuous, uninterrupted
charging period of five hours, whatever charge status is indicated. After
a while the charge capacity of the battery will decrease for technical
reasons.
Gigaset SL1 / englisch / A31008-L001-B002-1-6Z19 / start_guide_time.fm / 14.11.2003
Preparing to use your phone
The battery charging status is correctly displayed only after uninterrupted charging/
discharging. You should therefore avoid removing the battery unnecessarily and
ending the charging process prematurely.
◆ Once initial charging is complete, you can replace your handset in the
charging shell after each call. Charging is controlled electronically.
This ensures that the battery is charged in a way that maximises its
life.
◆ The battery heats up during charging. This is normal and not
dangerous.
i
Registering
Before you can use your Gigaset SL 1 you must register it manually. You must initiate
handset registration on the handset and on the base.
1. On the handset
v
s
s
s
Open the menu.
OK
[______________________________________________]
H/Set Settings
Select the menu item and confirm.
[______________________________________________]
OK
Register H/Set
Select the menu item and confirm.
[______________________________________________]
OK
Base 1
Select base (1–4) and confirm, e.g. Base 1.
OK
Enter the system PIN of the base (the default is 0000)
and confirm.
Base 1 flashes in the display when the system PIN has been entered.
2. On the base
Please refer to the operating instructions for the base to find out how to initiate handset
registration on the base.
Changing the display language
You can view the display texts in different languages.
v
s
s
OK
[______________________________________________]
H/Set Settings
Select the menu item and confirm.
[______________________________________________]
OK
Language
s
Select the menu item and confirm. The current
language is checked ‰ (the default setting is
English).
OK
Select a language and confirm.
a
Open the menu.
Long press (back to idle status).
You have selected a language in error:
Press v M 2, select the correct language with s and then press OK to confirm.
7
Gigaset SL1 / englisch / A31008-L001-B002-1-6Z19 / start_guide_time.fm / 14.11.2003
Preparing to use your phone
Changing the base
If your handset is registered to more than one base, you can set it to a particular base or
to the base that has the best reception (Best Base).
v; s H/Set Settings OK ; s Select Base OK ;
s (select registered base or Best Base) OK .
Attaching the belt clip
Push the belt clip onto the back of
the handset until the lugs click into
the recesses on either side of the
handset.
Activating/deactivating the handset
To activate: press the 'end call' key a and hold.
To deactivate: press the 'end call' key a again in the idle status and hold.
The handset activates automatically when placed in the charger.
Activating/deactivating the keypad lock
Press the hash key R and hold (the Ø icon appears in the display).
To deactivate/unlock: press the hash key R again and hold.
The keypad lock deactivates automatically when you receive a call. It re-activates when
the call is finished.
i
8
When the keypad lock is active, you cannot even call emergency
numbers.
Gigaset SL1 / englisch / A31008-L001-B002-1-6Z19 / start_guide_time.fm / 14.11.2003
Operating the telephone, menu guidance
Operating the telephone, menu guidance
Keys
Control key
The control key has four black arrows and associated icons. A certain function is
activated depending on which side of the key you press. In the operating instructions,
the side you must press is highlighted in black, e.g. key v for right = Open Menu.
You can also use the control key to execute many of the functions of the right-hand
display key.
Example:
Control key
Different functions of the control key:
t
s
v
u
In the idle status
Initiate voice-activated
dialling (long press)
Open directory
In lists and menus
Scroll up
In an input field
Move the cursor up a line
Scroll down
Move the cursor down a line
Open the menu
Confirm the selected option Move the cursor to the right
(same as OK )
Go back one menu level, or Move the cursor to the left
cancel
Open list of handsets
Display keys
The display keys are the horizontal rocker keys just below the display. Their function
changes depending on the particular operating situation. The current function is shown
in the display directly above the key to which it relates.
Example:
•
§§§§§§§SMS§§§§§§
Display keys
9
Gigaset SL1 / englisch / A31008-L001-B002-1-6Z19 / start_guide_time.fm / 14.11.2003
Operating the telephone, menu guidance
The various icons have the following meanings when the keys are pressed:
Þ
Last number redial key: Open the list of the last 10 numbers you dialled.
à
Menu key: Open the main menu when in idle status
Open a status-dependent menu while making a call.
Delete key: Delete input from right to left one character at a time.
OK
f
C
Ý
ä
OK key: Confirm menu function or confirm an input and store.
Escape key: Go back one menu level, or cancel the operation.
Open email directory.
Reverting to idle status from anywhere in the menu
Press the 'end call' key a for around 1 second, or do not press any key.
The display automatically reverts to the idle status after 2 minutes. Changes which you
have not confirmed or saved by pressing OK , Yes, Save, Send or with Save Entry OK
will be lost.
Main menu
To open the main menu, press the right side of the control key v with the phone in the
idle status and scroll to the required option with s.
1
2
3
4
5
6
7
8
9
10
SMS
Select Services
Add. Features
Calendar/Clock
Audio Settings
Call Charges
H/Set Settings
Base Settings
Answer Machine
The menu options that are available will
depend on your base.
Gigaset SL1 / englisch / A31008-L001-B002-1-6Z19 / start_guide_time.fm / 14.11.2003
Date and Time
Date and Time
Setting the date and the time
Correct date and time settings are essential if you want to know exactly when calls were
received.
v; s Calendar/Clock OK ; s Date/Time OK ; ~ (enter day/month/year);
s (to the next line); ~ (enter hours/minutes); s (to the next line if necessary);
r (select the 12 or 24 hour clock display); Save, a (back to idle status).
If you have selected the 12 hour display, on the Time: line you can use the display key
am/pm to toggle between am and pm.
Setting the alarm clock
Precondition: The date and time have already been set (page 11).
Activating and setting the alarm clock
v; s Calendar/Clock OK ; s Alarm Clock OK ; r (select On);
s ~ (enter the wake-up time); Save; a (return to idle status).
If you have selected the 12 hour display, on the Time: line you can use the display key
am/pm to toggle between am and pm.
A wake-up call will only work when the handset is in the idle status, it will not work
when the Room Monitor or Walk and Talk functions are activated, or during a call or an
automatic redial.
To find out how to set the volume and melody, turn to page 22.
Deactivating the alarm clock
The alarm clock is set to a particular time but you do not want it to ring.
v; s Calendar/Clock OK ; s Alarm Clock OK .
r (select Off); Save; a (return to idle status).
Deactivating the wake-up call
Press the display key Silence or any key.
11
Gigaset SL1 / englisch / A31008-L001-B002-1-6Z19 / start_guide_time.fm / 14.11.2003
Date and Time
Setting an appointment
You can use your handset to remind yourself of up to five appointments.
Activating and setting an appointment
v; s Calendar/Clock OK ; Set Appoints. OK ; s Appoint. 2 (example) OK .
r (select On); s ~ (enter day/month); s ~ (enter hours/minutes);
s Edit; ~ (enter name) OK ; Save; a (back to idle status).
Once set, an appointment is displayed with the ¼ icon.
An appointment call will only work when the handset is in the idle status, it will not work
when the Room Monitor or Walk and Talk functions are activated, or during a call or an
automatic redial.
If you have selected the 12 hour display, on the Time: line you can use the display key
am/pm to toggle between am and pm.
To find out how to set the volume and melody, turn to page 22.
Deactivating an appointment call
When the appointment calls sounds, you can deactivate it with Silence.
Viewing and deleting missed appointments, anniversaries etc.
v; s Calendar/Clock OK ; s Missed Dates OK ; s select appointment/
anniversary).
[RRRRRRRRRRRRRRRRRRRRRR]
Delete
Press the display key.
... then
a
Long press (back to idle status).
A missed appointment is indicated by ¼, a missed anniversary by ‚.
12
Gigaset SL1 / englisch / A31008-L001-B002-1-6Z19 / start_guide_time.fm / 14.11.2003
Making calls
Making calls
Making external calls and ending a call
~ (enter the number) and press c (the 'talk' key) – the sequence does not matter.
To end a call/cancel dialling: press a ('end call' key).
Dialling pause
You can insert a dialling pause between the prefix and the actual telephone number.
To do this, press S for around 2 seconds. Now enter the telephone number.
Internal calls, ending a call
Calls to other handsets that are registered to the same base are free of charge.
Calling a specific handset
u; s (select handset); press c. Or: Press u 2 (example).
To end the call: press a ('end call' key).
Calling all handsets ("group call")
u; press P (star key).
To end the call: press a ('end call' key).
Answering a call
Your handset rings, the call is displayed and the handsfree key d flashes. Press c
(Talk key) (or display key Accept or handsfree key d).
If the Auto Answer function is activated (page 22) you just need to lift the handset out
of the charger to take the call.
If the ringer is intrusive, press the display key Silence. You can take the call so long as it
is displayed on the screen.
Handsfree
Activating/deactivating handsfree
Before you dial: ~ (enter the number); press d (the handsfree key).
During a call: press d (the handsfree key).
To deactivate: press c (the Talk key).
If you wish to place the handset in the charger during a call you must press the
handsfree key d and hold it down as you do so.
i
You should inform your caller that you intend to use the handsfree
function before you activate it.
13
Gigaset SL1 / englisch / A31008-L001-B002-1-6Z19 / start_guide_time.fm / 14.11.2003
Using the directory and other lists
Adjusting the volume while in handsfree mode during a call
A call is in progress and handsfree d is activated.
Press d (the handsfree key) again; r volume softer or louder; Save.
Muting the handset
u. The call is "held" (wait melody).
To end the call: press the display key Ý .
Using the directory and other lists
Directory and speed dial list
You can store up to 200 numbers in the directory and the speed dial list.
You open the directory with the s key. You can store an anniversary/birthday for every
directory entry and mark the entry as "VIP".
The speed dial list is a special directory in which you can store particularly important
numbers such as private telephone numbers and prefixes of network providers (socalled "call-by-call numbers"). You open the speed dial list with the C key.
The speed dial list is operated in just the same way as the directory, except for the
way in which entries are stored.
◆ The EATONI predictive text helps you input names (page 27), this feature is
deactivated when you purchase your phone).
◆ Please refer to the Character Set Chart (page 26) to see how to enter text correctly.
◆ You can enter up to 32 digits for a number and up to 16 letters for a name.
◆ When entering a number you can insert the required pause with à , s Insert
Pause OK or by pressing S for about 2 seconds.
Storing a telephone number in the directory
s (open directory); New Entry OK ; ~ (enter the number); s (to the next line);
~ (enter name); à (open menu); Save Entry OK ; (To enter an anniversary as well,
after you have entered the name: press s to go to the Annivers.: line, press the
display key Edit and enter the date. Press Save.); press a and hold (return to idle status).
To delete an anniversary, in the directory entry in the field for the anniversary, press
the display key Edit, then when the display changes press the display key Delete and
finally after another display change press Save.
Anniversary reminder call
The handset sounds a reminder call with the selected ringer melody. The display shows
the directory entry with ‚ ‚ ‚.
i
14
If your phone is connected to a PABX you may have to enter the access
code (outside line code) as the first digit of your directory entry.
Gigaset SL1 / englisch / A31008-L001-B002-1-6Z19 / start_guide_time.fm / 14.11.2003
Using the directory and other lists
Storing a telephone number in the speed dial list
You can assign one of the digits 0, 2–9 to up to nine entries on your speed dial list.
When you press and hold one of these digits with the handset in the idle status, then
press the Talk key c, you are immediately connected to the telephone number that is
assigned to that digit.
C (open speed dial list); New Entry OK ; ~ (enter the number); s (to the next line);
~ (enter name); à (open menu); Save Entry OK
(To enter a speed dial digit as well, after you have entered the name: press s to go to
the Enter key: line, press r to select a digit [0, 2–9] for this number, then press the
display key Save); press a and hold (back to idle status).
Speed dial digits cannot be assigned more than once at a time.
Dialling with the directory/speed dial list
s or C (open directory/speed dial list); s (select entry); c.
Managing entries in the directory and speed dial list
To use one of the following menu functions, press the directory key s or the speed dial
list key C. Scroll to the entry with s and then press v to open the menu. Use the s
key to scroll to the function you require.
Or: s or C; ~ (enter first letter); if necessary scroll with s or
~ enter more letters of the name; c.
Display Number
Edit Entry
Delete Entry
VIP Entry
Copy and Edit
Copy Entry
Delete List
Copy List
Available Memory
For the directory only (s)
For the directory only (s)
Once you have selected an entry, press the display key View and then Edit to view / edit it.
The "Mark as VIP" and "copy and edit" functions
You can mark the directory entries of particularly important callers as VIP (Very
Important Person); this links a particular melody to them. You can then tell who is
calling you from the ringer melody. Precondition: Calling Line Identification.
So that you do not have to enter a similar entry twice, you can create a copy and then
edit that entry.
15
Gigaset SL1 / englisch / A31008-L001-B002-1-6Z19 / start_guide_time.fm / 14.11.2003
Using the directory and other lists
Sending a single entry or complete list to a handset
You can send individual entries or the entire list to another SL 1, S1 or C2 handset or a
Comfort handset in the Gigaset 4000, 3000 or 2000 series that is registered to the same
base. Stored voice patterns and speed dial numbers are not sent. The VIP settings are
sent depending on the handset.
s or C (open directory/speed dial list); s (select entry);
v (open menu); s Copy Entry OK or s Copy List OK );
~ (enter the internal number of the receiving handset); OK .
You can select further entries provided you confirm with the display key Yes after you
have sent an entry. Select No to stop sending.
Voice-activated dialling
With voice-activated dialling, you dial simply by speaking the name of the person you
wish to call. To do this, you must first store a voice pattern, i.e. the name which you
speak will be stored in the handset.
Up to four users can store/record a voice pattern per entry. Before he records a voice
pattern, the user must "identify" himself, e.g. as User 2.
A maximum of 23 voice patterns can be stored for directory entries. An entry stored
with a voice pattern is indicated by ´ in the voice directory.
Recording a voice pattern for an existing directory entry
Record your voice pattern in quiet surroundings (holding the handset about 25 cm
away).
Step 1: Open the directory for voice-activated dialling:
s (open directory); s(select entry); View; s User 2 (example) OK .
Step 2: Begin recording:
record; OK (Confirm the display prompt). Speak the name when prompted to do so by
the display. Repeat the name when prompted again to do so. Your recording is stored
automatically.
Press a and hold (return to idle status).
A message tells you if your speech pattern is too much like another user's. Close this
message with Ý , go back to the start of the voice pattern recording sequence and
repeat the recording.
Using voice-activated dialling: Press t and hold and speak the name.
Phone announces the caller's name
When you receive an external call, you hear the ringer and the telephone announces the
caller's name.
Preconditions: Calling Line Identification. A voice pattern is stored (page 16).
Activating/deactivating the name announcement
v (open menu); s Audio Settings OK ; s Ringer Settings OK ; Ext. Calls OK ;
2x s (to the next-but-one line); activate/deactivate r (Announce); Save;
press a and hold (return to idle status).
16
Gigaset SL1 / englisch / A31008-L001-B002-1-6Z19 / start_guide_time.fm / 14.11.2003
Using the directory and other lists
Play the voice pattern
Open the directory for voice-activated dialling (see Step 1, page 16). Now:
s (select an entry); Play; press a and hold (back to idle status).
Changing or deleting voice patterns
Open the directory for voice-activated dialling (see Step 1, page 16). Now:
s (select an entry); v (open menu); Record Name OK or s Delete Name OK ;
press a and hold (return to idle status).
Deleting a voice pattern does not affect the telephone number or name. The voice
patterns of other users are also unaffected.
Changing a user name
s (open directory); s (select an entry); View;
s User 2 (example) ; Edit; ~ (enter name) Save;
press a and hold (return to idle status).
Linking a call-by-call number with a phone number
This function can be used to put a network provider's prefix (which is stored in the speed
dial list) in front of the telephone number ("linking").
C (open the speed dial list); s (select an entry); à (open menu);
Display Number OK ; s (open directory); s (select an entry) OK ;
or ~ enter the number; c.
Last number redial list
The last number redial list contains the ten last dialled numbers.
Manual last number redial
Þ (open last number redial list); s (select an entry); c.
Automatic redial
With this function the number is automatically dialled every 20 seconds. When the
other party answers the call, press c (the Talk key). If the call is not answered, ringing
stops after about 30 seconds. The function is cancelled after ten failed attempts.
Press a (the 'end call' key); • (open last number redial list); v (open menu);
Automatic Redial OK .
To cancel the redial: press the display key Off or any key.
17
Gigaset SL1 / englisch / A31008-L001-B002-1-6Z19 / start_guide_time.fm / 14.11.2003
Using the directory and other lists
Managing entries in the last number redial list
You can use the following menu functions:
• (open the redial list); s (select an entry); v (open menu);
s (select function).
Automatic Redial
Display Number
Copy to Directory
Delete Entry
Delete List
Email directory
You store email addresses in the email directory. You can store a maximum of
200 entries in the directory, email directory and speed dial list together.
Email directory entries are managed in the same way as normal phone directory entries
(page 15).
Storing a new email address
Step 1: Open the email directory:
s (open directory) s E-mail Directory OK .
Step 2: Create an email entry:
New Entry OK ; ~ (enter address); à (open menu);
(select s, ".", "@" or the predictive text function as required OK ). With the predictive
text activated, press R once long and once short.
Step 3: Save an email entry:
à (open menu); Save Entry OK ; press a and hold (return to idle status).
When you have selected an entry, press the display key View, then Edit and enter the
address. Save as described.
Display available memory
The memory space is divided up between the directory, the speed dial list (page 14) and
the email directory (page 18). The available memory of all these lists is displayed.
s (open directory); s (select entry); v (open menu); s Available Memory OK ;
press a and hold (return to idle status).
18
Gigaset SL1 / englisch / A31008-L001-B002-1-6Z19 / start_guide_time.fm / 14.11.2003
Using several handsets
Using several handsets
Transferring a call to another handset
u (open internal list); select s (a particular handset or Call All); OK .
The internal user answers: press a ('end call' key).
If he does not answer or is busy, the call will come back to you automatically (Recall
appears in the display).
Internal consultation calls
You can make an internal call while an external call is in progress.
u (open internal list); s (select handset), OK .
To end the call: press the display key End (back to outside caller).
Accepting/rejecting call waiting during an internal call
If you get an external call while conducting an internal call, you will hear the call
waiting tone (short tone). Press the display key Accept or Reject.
The rejected call waiting tone can still be heard at other registered handsets.
Using a handset as a room monitor
With this function, a previously stored internal or external number is called when a set
noise level in the room is reached. The room monitor remains activated on the handset
even after you hang up.
The handset should be between 1 and 2 metres away from the baby.
The microphone must be directed towards the baby.
When the room monitor is activated, incoming calls to the handset which is near the
baby are indicated without a ring tone, they are just shown on the display. The display
and the key pad are not illuminated.
When entering an external phone number, make sure that the line to which you want
the room monitor to be transferred is not blocked by an activated answering machine.
◆ If you redirect your room monitor to an external number, then you should tell that
number's owner.
◆ The room monitor's call to an external phone number stops after about 90 seconds,
to an internal number (handset) it stops after about 180 seconds (depending on the
base).
W
Always check the settings of the room monitor before you leave
home, e.g. sensitivity and phone line.
i
The room monitor function severely curtails the handset's operating time.
If necessary you should place the handset which is near the baby in the
charger to ensure that the battery does not run down.
The room monitor function can also be used in Walk and Talk mode.
19
Gigaset SL1 / englisch / A31008-L001-B002-1-6Z19 / start_guide_time.fm / 14.11.2003
Using several handsets
Activating the room monitor function and entering the 'call to' number for
the first time
Step 1: Open the input field: v; s Add. Features OK ; Room Monitor OK .
Step 2: Activate room monitor: r (in the Room M.: line, select On)
Step 3: Enter the destination number: s (to the next line); Edit
Enter internal number: INT s (select handset) OK or:
Enter external number: ~; à (open menu); Save Entry OK
Step 4: Set the sensitivity: if necessary press s (to the next line); r; Save
The room monitor function is now activated.
Once the room monitor is activated, switch directly to the room monitor setting with v
(open menu).
Deactivating the room monitor
You can deactivate the room monitor remotely (depending on the base). Take the call
from the room monitor and press O R. The room monitor function will deactivate
around 90 seconds after the call ends. The room monitor will make no further calls. The
other room monitor functions on the handset (e.g. no ringer) will remain activated until
you press the display key Off on the handset that is in the baby's room.
i
To reactivate the room monitor function with the same telephone
number, you must turn on the activation again and save with Save.
Setting the Walk and Talk mode
The Walk and Talk function allows two handsets (maximum range 300 metres) to call
each other no matter how far they are from the base.
Precondition:
◆ Both handsets have been registered to the same base (recommended for the room
monitor function) or
◆ Both handsets are registered to different bases and both are set to Best Base
(page 8) or
◆ One of the handsets is not registered to any base and the registered handset is set
to Best Base or
◆ Neither handset is registered to a base.
In Walk and Talk mode the handsets cannot be reached by incoming calls. The handset
operating times are greatly curtailed.
20
Gigaset SL1 / englisch / A31008-L001-B002-1-6Z19 / start_guide_time.fm / 14.11.2003
Using several handsets
Activating/deactivating the Walk and Talk mode
v (open menu); s Add. Features OK ; s Walk and Talk OK .
To deactivate: press the display key Off.
Press c (Talk key) or d (handsfree key) The call will go to all handsets that are in Walk
and Talk mode. The loudspeaker volume and the advisory tones are set in exactly the
same way as if your handsets were in range of the base (page 22). The ringers cannot
be set in Walk and Talk mode.
The ringer (page 23) and keypad lock (page 8) can be activated/deactivated in the Walk
and Talk mode.
To open the menu, press the display key ©.
i
The Walk and Talk mode is retained even when you switch your handset
off and back on.
Using a handset in Walk and Talk mode as a room monitor
à (open menu); s Room Monitor OK ; r (select On);
s (to the next line); select r (Low or High); Save.
The room monitor will only call handsets that are in the Walk and Talk mode.
W
Always check the settings of the room monitor before you leave
home, e.g. sensitivity and phone line. The distance between the
handsets should not now be changed (range).
Press the display key Off on the room monitor handset to deactivate the room monitor.
The handset returns to the normal Walk and Talk mode.
21
Gigaset SL1 / englisch / A31008-L001-B002-1-6Z19 / start_guide_time.fm / 14.11.2003
Handset settings
Handset settings
Activating/deactivating Auto Answer
If you have activated this function, when you get a call you can simply lift the handset
out of its base or the charger without having to press the Talk key (the default setting is
On).
v (open menu); s H/Set Settings OK ; Auto Answer OK (‰ = On);
press a and hold (return to idle status).
Adjusting the loudspeaker volume
You can adjust the handsfree volume on five levels and the earpiece volume on three
levels – you can even do this while an external call is in progress.
v (open menu); s Audio Settings OK ; Handset Volume OK ; r (select handsfree
volume); s (to the next line) r (select earpiece volume); Save;
press a and hold (return to idle status).
Ringer echo
You can enhance the sound quality of the long ringer melodies (4-10).
v (open menu); s Audio Settings OK ; s Ringer Echo OK (‰ = On); press a and
hold (back to idle status).
Changing the ringer tone
You can choose from six volumes and 26 melodies (including 16 polyphonic melodies).
Polyphonic melodies are only available if they have previously been recorded with the
Sound Manager or downloaded on the PC interface.
Settings for external calls, time control and name announcement
v (open menu); s Audio Settings OK ; s Ringer Settings OK ; Ext. Calls OK ;
r (select volume); s (to the next line); r (select melody);
s (to the next line if necessary); r (activate name announcement, page 16).
Activating time control
Select Time C.; r (select Time ctrl: On); s go to the line From: (4-digit input of the
time period); s go to the line Until: (4-digit input of the time period);
s r (enter ringer volume); Save (save time control); Save again (save setting);
press a and hold (back to idle status).
Individual settings for internal calls, wake-up and appointments
v (open menu); s Audio Settings OK ; s Ringer Settings OK ;
s (select function) OK ; r (select volume); s (to the next line); r (select melody);
Save (With the All setting you must also confirm the prompt with Yes.);
press a and hold (return to idle status).
22
Gigaset SL1 / englisch / A31008-L001-B002-1-6Z19 / start_guide_time.fm / 14.11.2003
Handset settings
Activating/deactivating the ringer
All handsets ring when there is an incoming call. To deactivate the ringer: press the star
key P and hold. The Ú icon appears in the display.
To activate the ringer: press the star key P and hold.
i
To cancel the ringer for the current call, press the display key Silence.
Activating/deactivating the alert tone
When you deactivate the ringer you can activate an alert tone. When you get a call, you
will hear a short tone (beep) instead of the ring tone.
Press the star key P and hold and within 3 seconds press the display key Beep on.
You will now see º in the display.
To deactivate: press the star key P and hold.
Vibration alarm
Incoming calls and other messages are indicated by vibration. This setting is separate
from the ringer settings.
v (open menu); s Audio Settings OK ; s Silent Alert OK (‰ = On);
press a and hold (back to idle status).
Sound Manager
You can record polyphonic melodies (max. length 4 seconds) or dub them using a data
cable (page 28). You can store up to 16 melodies.
Record a melody
v (open menu); s Audio Settings OK ; s Sound Manager OK ;
<New Sound> OK ; Record Sound? OK ; Press End or wait 4 seconds; Save;
Edit Entry (enter melody name) Save; press a and hold (return to idle status).
Play a melody
v (open menu); s Audio Settings OK ; s Sound Manager OK ;
s (select melody); Play; press a and hold (return to idle status).
Edit entry
v (open menu); s Audio Settings OK ; s Sound Manager OK ;
s (select melody); à ; Volume OK (adjust volume) or s Edit Entry OK (edit
name) or s View Entry OK (view filename) or s Delete Entry OK ;
press a and hold (return to idle status).
23
Gigaset SL1 / englisch / A31008-L001-B002-1-6Z19 / start_guide_time.fm / 14.11.2003
Handset settings
Activating/deactivating advisory tones
Your handset uses 'advisory tones' to tell you about different activities and statuses. The
following advisory tones can be activated and deactivated individually (the default
setting is On).
◆ Key click (every key press is confirmed),
◆ Acknowledge tones (Confirmation tone, Error tone, End of menu tone),
◆ Battery tone.
v (open menu); s Audio Settings OK ; s Advisory Tones OK ;
r (activate Key Tones:); s (to the next line) r (activate Confirm.:);
s (to the next line); r (for Battery: select On, Off or During Call); Save;
press a and hold (return to idle status).
Restoring the handset factory settings
You can reset individual settings and changes you have made. This will not affect entries
in the directory, the calls list, the email directory or the speed dial list, the handset's
registration to the base or screensavers and melodies that you have loaded. Press a to
cancel the reset.
v (open menu); s H/Set Settings OK ; s Reset Handset OK ; Yes (confirm the
prompt);
press a and hold (back to idle status)
Factory settings of the handset
Earpiece volume
Handsfree volume
Ringer volume
Time control for ringer
Ringer melody
Name announcement
Auto answer
Battery tone/Key click/Confirmation tone
Display language
Alarm clock/appointment
1
3
5
deactivated
Melody 1
deactivated
activated
activated
country specific
deactivated
Appointment name
Last number redial list
Room monitor/room monitor sensitivity
deleted
empty
deactivated/high
24
page 22
page 22
page 22
page 22
page 22
page 16
page 22
page 24
page 7
page 11/
page 12
page 12
page 17
page 20
Gigaset SL1 / englisch / A31008-L001-B002-1-6Z19 / start_guide_time.fm / 14.11.2003
Appendix
Appendix
Care and contact with liquid !
Wipe the handset with a damp cloth (use no solvent) or an antistatic cloth. Never use
a dry cloth. This can cause static.
If the handset should come into contact with liquid, on no account switch the device
on. Remove the battery immediately.
Allow the liquid to drain out of the device, and then pat all parts of the device dry.
Keep the handset with the battery removed in a warm, dry place for at least 72 hours.
In many cases, you will then be able to use it again.
Customer Care
Our online support on the Internet:
www.my-siemens.com/customercare
If you need any repair work, or have a guarantee claim to submit, our
Service-Center Ireland 18 50 77 72 77
will give you quick and reliable assistance. Keep your till receipt handy.
You will find more service numbers in the section entitled "Service" at the end of
this booklet.
Replacement or repair services are not offered in countries where our product is not sold
by authorised dealers.
Country-specific features have been taken into account. The SL1 handset is licensed
throughout the EU and in Switzerland.
The CE mark certifies conformity of the device with the essential requirements of the
R&TTE directive.
Excerpt from the original declaration
"We, Siemens AG, declare, that the above mentioned product is manufactured according to our Full
Quality Assurance System certified by CETECOM ICT Services GmbH in compliance with ANNEX V
of the R&TTE-Directive 99/5/EC. The presumption of conformity with the essential requirements
regarding Council Directive 99/5/EC is ensured."
Senior Approvals Manager
The Declaration of Conformity (DoC) has been signed. In case of need, a copy of the original DoC
can be made available via the company hotline.
25
Gigaset SL1 / englisch / A31008-L001-B002-1-6Z19 / start_guide_time.fm / 14.11.2003
Appendix
Specifications
Recommended battery
Lithium-Ion (LiIon), 700 mAh
(correct at time of going to press)
The product is supplied with an approved battery only.
Handset operating times/ charging time
Capacity
(mAh)
Standby time
(hours)
Calling time
(hours)
Charging time
(hours)
700
approx. 250
(10 days)
approx. 15
approx. 2.5
These operating and charging times apply only when using the recommended battery.
Character set chart
Standard characters
Press the relevant key repeatedly or hold it down:
1
2
I
4
5
L
M
N
O
Q
P
R
1x
Space
2x
1
3x
4x
£
5x
$
6x
¥
7x
¤
8x 9x
10 x 11 x 12 x 13 x 14 x
ã
ç
ô
õ
â
a
b
c
2
ä
á
à
â
d
e
f
3
ë
é
è
ê
g
h
i
4
ï
í
ì
î
j
k
l
5
m
n
o
6
ö
ñ
ó
ò
p
q
r
s
7
ß
û
t
u
v
8
ü
ú
ù
w
x
y
z
9
ÿ
ý
æ
ø
å
.
,
?
!
0
+
-
:
¿
¡
Abc--> 123
123 --> abc
(
)
<
=
>
%
#
@
*
/
&
§
\
"
‘
;
_
Creating and editing text (without predictive text)
◆ The cursor is controlled with u v t s.
◆ Characters (to the left of the cursor) are deleted with fC .
◆ Characters are added to the left of the cursor.
◆ To switch from upper case (first letter upper case, all other letters lower case) to
lower case, press P before you key in the letter. Pressing P again switches from
lower case letters to digits. Press again to return from digits to upper case letters.
◆ The first letter of the name of directory entries is automatically capitalised, followed
by lower case letters.
26
Gigaset SL1 / englisch / A31008-L001-B002-1-6Z19 / start_guide_time.fm / 14.11.2003
Appendix
◆ When you press a key and hold it, the characters of that key appear in the bottom
display line and are highlighted one after the other. When you release the key the
highlighted character is inserted into the input field.
– You can see in the display whether upper case, lower case or digits are selected:
– 'A' or 'a' appears on the bottom display line when you make an entry in the
directory.
Order of directory entries
1. Space (shown here as s)
2. Digits (0–9)
3. Letters (alphabetical)
4. Other characters
To work around the alphabetical order of the entries in the directory, insert a space
before the name. This entry then goes to the first position (example: "sCarla"). You can
also number the entries with digits (e.g. "1Jane", "2Mary", "3John").
Predictive text
The EATONI predictive text helps you to write names (in the directory, speed dial list or
email directory).
Each key between Q and O is assigned several letters and characters which all
appear on a selection line immediately above the display keys (beneath the text area)
as soon as you press a key. When you are entering letters, the letter you are most
probably looking for is reverse highlighted. This letter is at the beginning of the
selection line and is transferred to the text area.
53 ________Ç_____abc
Peter K
KLJ5
W
The EATONI predictive text
function is activated.
email address
¨
Selection line
If this letter is the one you want, confirm it by pressing the next key. If the letter selected
by the EATONI is not the one you want, then press the hash key R repeatedly until the
required letter appears reverse highlighted in the display line and is transferred to the
text area.
P
R
Press the star key briefly: Switches from abc to Abc, from Abc to 123 and
from 123 back to abc mode.
Goes to the next letter in the selection list.
Activating/deactivating predictive text
Predictive text is activated and deactivated according to specific functions.
Precondition: You are in a text input field (name in the directory, speed dial list or email
directory).
v (open menu); s Predictive Text OK (‰ = On);
give the a 'end call' key a short press to return to the text field. Now enter your text.
27
Gigaset SL1 / englisch / A31008-L001-B002-1-6Z19 / start_guide_time.fm / 14.11.2003
Appendix
PC Interface
You can connect the SL 1 handset to your PC with a Siemens data cable. Your PC can now
communicate with your SL 1 by means of the "Siemens Data Suite" software
(downloaded free from http:\\www.my-siemens.com\gigaset-sds) and access the
following handset parameters and lists:
Read parameters
◆ Software version
◆ Type
◆ Manufacturer's code
Read/write access to
The telephone directory
The email directory
The network provider list
The appointments list
The last number redial list
◆
◆
◆
◆
◆
Read/write access to other parameters
Ringer settings
Volume settings
Load screensavers
Load melodies
Make and answer telephone calls
◆
◆
◆
◆
◆
Data transfer
With some functions, large amounts of data are transferred between the handset and
the external device (PC). In this case the handset switches to data transfer mode, and
Data Transfer appears in the handset display. When the handset is in this mode you
cannot make any inputs on the keypad, and incoming calls are ignored.
The handset goes into data transfer mode in the following cases:
◆ Read/write access to the telephone directory
◆ Read/write access to the email directory
◆ Read/write access to the network provider list
◆ Read/write access to the appointments list
◆ Read/write access to the last number redial list
◆ Load screensavers
◆ Load melodies
The handset returns to idle status automatically if any errors occur during data transfer.
Make and answer telephone calls
If you dial a number from the external device or answer a call from it, the handset will
behave exactly as if you carried out these functions on the handset.
28
Gigaset SL1 / englisch / A31008-L001-B002-1-6Z19 / start_guide_time.fm / 14.11.2003
Appendix
Play "Balloon Shooter"
Try to hit as many balloons as possible.
v ¢ Add. Features
¢ Balloon Shooter
either ...
Start the game:
Press the display key.
[RRRRRRRRRRRRRRRRRRRR]
Start
or ...
Other options:
à
Press the display key to open the options menu.
or
¢
¢
¢
¢
p¢
¢
¢
¢
12I
4
L
MNO
¢
¢
¢
¢
To aim the cross-hairs, press:
To shoot the balloon down, press 5.
29
Gigaset SL1 / englisch / A31008-L001-B002-1-6Z19 / start_guide_time.fm / 14.11.2003
Appendix
Warranty Certificate Ireland
◆ Without prejudice to any claim the user (customer) may have in relation to the
dealer or retailer, the customer shall be granted a manufacturer's Guarantee under
the conditions set out below:
◆ In the case of new devices and their components exhibiting defects resulting from
manufacturing and/or material faults within 24 months of purchase, Siemens shall,
at its own option and free of charge, either replace the device with another device
reflecting the current state of the art, or repair the said device. In respect of parts
subject to wear and tear (including but not limited to, batteries, keypads, casing),
this warranty shall be valid for six months from the date of purchase.
◆ This Guarantee shall be invalid if the device defect is attributable to improper care or
use and/or failure to comply with information contained in the user manuals. In
particular claims under the Guarantee cannot be made if:
– The device is opened (this is classed as third party intervention)
– Repairs or other work is done by persons not authorised by Siemens.
– Components on the printed circuit board are manipulated
– The software is manipulated
– Defects or damage caused by dropping, breaking, lightning or ingress of
moisture. This also applies if defects or damage was caused by mechanical,
chemical, radio interference or thermal factors (e.g.: microwave, sauna etc.)
– Devices fitted with accessories not authorised by Siemens
◆ This Guarantee shall not apply to or extend to services performed by the authorised
dealer or the customer themselves (e.g. installation, configuration, software
downloads). User manuals and any software supplied on a separate data medium
shall be excluded from the Guarantee.
◆ The purchase receipt, together with the date of purchase, shall be required as
evidence for invoking the Guarantee. Claims under the Guarantee must be
submitted within two months of the Guarantee default becoming evident.
◆ Ownership of devices or components replaced by and returned to Siemens shall vest
in Siemens.
◆ This Guarantee shall apply to new devices purchased in the European Union. For
Products sold in the Republic of Ireland the Guarantee is issued by Siemens Ireland
Limited, Ballymoss Road, Sandyford Industrial Estate, Dublin 18 – The Republic of
Ireland.
◆ Any other claims resulting out of or in connection with the device shall be excluded
from this Guarantee. Nothing in this Guarantee shall attempt to limit or exclude a
Customers Statutory Rights, nor the manufacturer's liability for death or personal
injury resulting from its negligence.
◆ The duration of the Guarantee shall not be extended by services rendered under the
terms of the Guarantee.
◆ Insofar as no Guarantee default exists, Siemens reserves the right to charge the
customer for replacement or repair.
◆ The above provisions do not imply a change in the burden of proof to the detriment
of the customer.
To make a claim under this Guarantee, please contact the Siemens helpdesk on
1850 777 277. This number is also to be found in the accompanying user guide.
30
Gigaset SL1 / englisch / A31008-L001-B002-1-6Z19 / SL_1SIX.fm / 14.11.2003
Index
Index
A
D
Acknowledge tones . . . . . . . . . . . . . . 24
Activate
alarm clock . . . . . . . . . . . . . . . . . . 11
appointment . . . . . . . . . . . . . . . . . 12
keypad lock . . . . . . . . . . . . . . . . . . . 8
Walk and Talk. . . . . . . . . . . . . . . . . 21
Activation
handset . . . . . . . . . . . . . . . . . . . . . . 8
Advisory tones . . . . . . . . . . . . . . . . . 24
Alarm clock . . . . . . . . . . . . . . . . . . . . 11
Alert tone . . . . . . . . . . . . . . . . . . . . . 23
Anniversary . . . . . . . . . . . . . . . . . . . 12
Appointment . . . . . . . . . . . . . . . . . . 12
Auto answer . . . . . . . . . . . . . . . . . . . 22
Date and time . . . . . . . . . . . . . . . . . . 11
Date setting . . . . . . . . . . . . . . . . . . . . 11
Deactivate
appointment call . . . . . . . . . . . . . . 12
handset . . . . . . . . . . . . . . . . . . . . . . 8
keypad lock . . . . . . . . . . . . . . . . . . . 8
ringer (handset) . . . . . . . . . . . . . . . 23
wake-up call . . . . . . . . . . . . . . . . . . 11
Delete (voice pattern) . . . . . . . . . . . . 17
Delete key . . . . . . . . . . . . . . . . . . . . . 10
Dialling pause . . . . . . . . . . . . . . . . . . 13
Directory . . . . . . . . . . . . . . . . . . . . . . 14
opening the . . . . . . . . . . . . . . . . . . . 9
order of entries . . . . . . . . . . . . . . . . 27
send an entry to a handset . . . . . . . 16
storing a number . . . . . . . . . . . . . . 14
Display
12/24 hour display . . . . . . . . . . 11, 12
changing language . . . . . . . . . . . . . . 7
keys . . . . . . . . . . . . . . . . . . . . . . . . . 9
memory . . . . . . . . . . . . . . . . . . . . . 18
B
Balloon Shooter . . . . . . . . . . . . . . . . 29
Battery
charging . . . . . . . . . . . . . . . . . . . . . 6
display . . . . . . . . . . . . . . . . . . . . . . 6
inserting . . . . . . . . . . . . . . . . . . . . . 6
recommended battery . . . . . . . . . . 26
Battery tone . . . . . . . . . . . . . . . . . . . 24
Belt clip . . . . . . . . . . . . . . . . . . . . . . . 8
Best base . . . . . . . . . . . . . . . . . . . . . . 8
Block
keypad lock . . . . . . . . . . . . . . . . . . . 8
C
Call transfer . . . . . . . . . . . . . . . . . . . 19
Call waiting (internal call) . . . . . . . . . 19
Call-by-Call numbers . . . . . . . . . . . . . 14
Cancel (operation) . . . . . . . . . . . . . . 10
Care of the telephone . . . . . . . . . . . . 25
Changing the base . . . . . . . . . . . . . . . 8
Character set chart . . . . . . . . . . . . . . 26
Charging status display . . . . . . . . . . . . 6
Confirmation tone. . . . . . . . . . . . . . . 24
Consultation call (internal) . . . . . . . . 19
Control key . . . . . . . . . . . . . . . . . . . . . 9
Cursor . . . . . . . . . . . . . . . . . . . . . . . . 9
Customer Care . . . . . . . . . . . . . . . . . 25
Customer Care (Service) . . . . . . . . . . 25
E
Earpiece mode . . . . . . . . . . . . . . . . . . . 2
Earpiece volume . . . . . . . . . . . . . . . . 22
EATONI, see Predictive text
Email directory . . . . . . . . . . . . . . . . . 18
End call . . . . . . . . . . . . . . . . . . . . . . . 13
Enter
appointment . . . . . . . . . . . . . . . . . 12
birthday/anniversary . . . . . . . . . . . . 12
wake-up time . . . . . . . . . . . . . . . . . 11
Enter birthday (as appointment) . . . . . 12
Error/Error tone . . . . . . . . . . . . . . . . . 24
Escape key . . . . . . . . . . . . . . . . . . . . . 10
F
Factory settings of the
handset . . . . . . . . . . . . . 24
G
Group call . . . . . . . . . . . . . . . . . . . . . 13
31
Gigaset SL1 / englisch / A31008-L001-B002-1-6Z19 / SL_1SIX.fm / 14.11.2003
Index
H
M
Handset
activate/deactivate . . . . . . . . . . . . . . 8
belt clip . . . . . . . . . . . . . . . . . . . . . . 8
change for best reception . . . . . . . . . 8
change to another base . . . . . . . . . . 8
list . . . . . . . . . . . . . . . . . . . . . . . . . . 9
muting . . . . . . . . . . . . . . . . . . . . . 14
operating and charging times . . . . . 26
preparing to use . . . . . . . . . . . . . . . . 6
register on another base . . . . . . . . . . 8
restore factory settings . . . . . . . . . . 24
use as room monitor . . . . . . . . . . . 19
Handset charging time . . . . . . . . . . . 26
Handsfree . . . . . . . . . . . . . . . . . . . . . 13
Hash key . . . . . . . . . . . . . . . . . . . . . . . 8
Hearing aids . . . . . . . . . . . . . . . . . . . . 5
Making calls . . . . . . . . . . . . . . . . . . . . 13
answering a call . . . . . . . . . . . . . . . 13
external . . . . . . . . . . . . . . . . . . . . . 13
internal . . . . . . . . . . . . . . . . . . . . . 13
Medical appliances . . . . . . . . . . . . . . . . 5
Melody
polyphonic . . . . . . . . . . . . . . . . . . . 23
Memory. . . . . . . . . . . . . . . . . . . . . . . 18
Menu
back one menu level . . . . . . . . . . . . 10
end tone. . . . . . . . . . . . . . . . . . . . . 24
guidance through the menu . . . . . . . 9
key . . . . . . . . . . . . . . . . . . . . . . . . . 10
opening the . . . . . . . . . . . . . . . . . . . 9
Microphone . . . . . . . . . . . . . . . . . . . . . 2
Missed
anniversary. . . . . . . . . . . . . . . . . . . 12
appointment . . . . . . . . . . . . . . . . . 12
Muting (handset) . . . . . . . . . . . . . . . . 14
I
Internal
calls. . . . . . . . . . . . . . . . . . . . . . . . 13
consultation . . . . . . . . . . . . . . . . . 19
K
Key 1 (fast access) . . . . . . . . . . . . . . . . 2
Keys
cancel . . . . . . . . . . . . . . . . . . . . . . 10
control key . . . . . . . . . . . . . . . . . . . . 9
display keys . . . . . . . . . . . . . . . . . . . 9
Escape/Menu/Delete/OK . . . . . . . . . 10
key click . . . . . . . . . . . . . . . . . . . . . 24
key press (confirmation tone) . . . . . 24
keypad lock . . . . . . . . . . . . . . . . . . . 8
last number redial key . . . . . . . . . . 10
L
Language, see Display
Last number redial . . . . . . . . . . . . . . 17
Last number redial list . . . . . . . . . . . . 17
List
email directory . . . . . . . . . . . . . . . . 18
handsets . . . . . . . . . . . . . . . . . . . . . 9
Loudspeaker volume . . . . . . . . . . . . . 22
32
N
Network provider (number list) . . . . . . 14
Number, see also Tel. Number or Entry 14
O
Open
directory . . . . . . . . . . . . . . . . . . . . . . 9
menu . . . . . . . . . . . . . . . . . . . . . . . . 9
Operating time
in Walk and Talk mode. . . . . . . . . . . 20
of the handset . . . . . . . . . . . . . . . . 26
of the room monitor . . . . . . . . . . . . 19
Operation (preparing to use your
phone) . . . . . . . . . . . . . . . 6
Order in directory . . . . . . . . . . . . . . . . 27
P
Pack contents. . . . . . . . . . . . . . . . . . . . 6
PC Interface . . . . . . . . . . . . . . . . . . . . 28
Play (voice pattern) . . . . . . . . . . . . . . 17
Polyphonic melodies . . . . . . . . . . . . . 23
Power supply unit . . . . . . . . . . . . . . . . 5
Predictive text . . . . . . . . . . . . . . . . . . 27
Preparing to use (the phone) . . . . . . . . 6
Protective plastic film . . . . . . . . . . . . . . 6
Gigaset SL1 / englisch / A31008-L001-B002-1-6Z19 / SL_1SIX.fm / 14.11.2003
Index
R
Reminder call . . . . . . . . . . . . . . . . . .
Ringer . . . . . . . . . . . . . . . . . . . . . . .
Ringer echo . . . . . . . . . . . . . . . . . . .
Room monitor . . . . . . . . . . . . . . . . .
V
14
22
22
19
S
Safety precautions . . . . . . . . . . . . . . . 5
Saving
speed dial list entry . . . . . . . . . . . . 15
Select (menu option) . . . . . . . . . . . . . 9
Select option (menu) . . . . . . . . . . . . . 9
Send a directory entry . . . . . . . . . . . . 16
Service . . . . . . . . . . . . . . . . . . . . . . . 25
Setting
alarm clock . . . . . . . . . . . . . . . . . . 11
appointment . . . . . . . . . . . . . . . . . 12
date . . . . . . . . . . . . . . . . . . . . . . . 11
display language . . . . . . . . . . . . . . . 7
earpiece volume . . . . . . . . . . . . . . 22
loudspeaker volume . . . . . . . . . . . . 22
ringer volume . . . . . . . . . . . . . . . . 22
time . . . . . . . . . . . . . . . . . . . . . . . 11
Signal strength . . . . . . . . . . . . . . . . . . 2
Signal tone, see Advisory tones . . . . . 24
Sound Manager . . . . . . . . . . . . . . . . 23
Specifications . . . . . . . . . . . . . . . . . . 26
Speed dial key . . . . . . . . . . . . . . . . . . 14
Speed dial list . . . . . . . . . . . . . . . . . . 14
store a number . . . . . . . . . . . . . . . 15
Storing
directory entry . . . . . . . . . . . . . . . . 14
Switch off, see Deactivate . . . . . . . . . 11
Vibration alarm . . . . . . . . . . . . . . . . . 23
VIP (directory entry) . . . . . . . . . . . . . . 15
Voice patterns . . . . . . . . . . . . . . . . . . 17
Voice-activated dialling . . . . . . . . . 9, 16
Volume . . . . . . . . . . . . . . . . . . . . . . . 22
W
Wait melody . . . . . . . . . . . . . . . . . . . 14
Wake-up call . . . . . . . . . . . . . . . . . . . 11
Walk and Talk. . . . . . . . . . . . . . . . 20, 21
Warning tone, see Advisory tones . . . . 24
Warranty . . . . . . . . . . . . . . . . . . . . . . 30
T
Talk . . . . . . . . . . . . . . . . . . . . . . . . . . 2
Telephone number
pick from directory. . . . . . . . . . . . . 15
store (directory) . . . . . . . . . . . . . . . 14
Time setting . . . . . . . . . . . . . . . . . . . 11
Tone
error tone . . . . . . . . . . . . . . . . . . . 24
Tone (confirmation/error/batt./
end of menu) . . . . . . . . . 24
33
Gigaset SL1 / französisch / A31008-L001-B002-1-6Z19 / cover_innen.fm / 14.11.2003
s
FRANÇAIS
Be inspired
Gigaset SL1 / französisch / A31008-L001-B002-1-6Z19 / covers_I-II.fm / 14.11.2003
Présentation
Présentation
Intensité de la réception
Ð 100 % i 75 %
Ñ 50 %
Ò réception faible
| aucune réception
(clignotante)
Ecran (affichage)
Niveau de charge
= vide U pleine
= clignotante : batterie
presque vide ou batterie
en charge
Touche « Décrocher »
◆ Accepter la
communication
◆ Activer la numérotation
◆ Passer du mode Mainslibres au mode
Ecouteur
Touche de navigation
Accès aux menu,
répertoire, reconnaissance
vocale, appels internes.
Ð
V
INT 1
20.05.03
•
09:45
§§§§§§§SMS§§§§§§
Touche Mains-libres
◆ Ecoute en
mode Mains-libres
◆ Témoin lumineux:
– Fixe: Mains libre
activé
– Clignotant:
Appel entrant
◆ rappel automatique
Répertoire principal
Touche 1
Accès à la messagerie
externe / au répondeur
(Appui long env. 2sec.)
Tourche étoile
◆ Activer/désactiver les
sonneries (appui long
env. 2 sec.)
◆ Passage du mode
majuscules au mode
minuscules et au mode
chiffres lors de la saisie
Microphone
Connecteur pour
kit piéton et
interface PC
Touche R
Insérer une pause
entre les chiffres
(appui prolongé)
Touches écran
Accès aux fonctions
affichées en regard au bas
de l'écran.
Touche Raccrocher et
Marche/Arrêt
◆ Mettre fin à la
communication
◆ Annuler la fonction
◆ Niveau menu
précédent (bref appui)
◆ Retour à l'état de repos
(appui long)
◆ Marche/Arrêt du
combiné (appui long
env. 2 sec.)
Journal des
événements:
(Témoin lumineux)
◆ Appels reçus/perdus
◆ Messages répondeur
◆ Messagerie externe
◆ SMS reçus
Touche Dièse
Activer/désactiver le
verrouillage du clavier
Répertoire secondaire
Liste de numéros spéciaux
(N° abrégés, préfixes, VIP,
etc...)
Représentation d'un combiné déclaré sur une base gérant les SMS.
2
Gigaset SL1 / französisch / A31008-L001-B002-1-6Z19 / SL_1IVZ.fm / 14.11.2003
Sommaire
Sommaire
Présentation . . . . . . . . . . . . . . . . . . . . . . . . . . . . . . . . 2
Consignes de sécurité . . . . . . . . . . . . . . . . . . . . . . . . 5
Préparer le téléphone . . . . . . . . . . . . . . . . . . . . . . . . 6
Mettre en service le combiné . . . . . . . . . . . . . . . . . . . . . . . . . . . . . . . . . . . . . . . . . . . . .
Déclaration . . . . . . . . . . . . . . . . . . . . . . . . . . . . . . . . . . . . . . . . . . . . . . . . . . . . . . . . . . .
Modifier la langue d’affichage . . . . . . . . . . . . . . . . . . . . . . . . . . . . . . . . . . . . . . . . . . . .
Sélectionner la base . . . . . . . . . . . . . . . . . . . . . . . . . . . . . . . . . . . . . . . . . . . . . . . . . . . .
Fixer le clip ceinture . . . . . . . . . . . . . . . . . . . . . . . . . . . . . . . . . . . . . . . . . . . . . . . . . . .
Combiné : allumer/éteindre . . . . . . . . . . . . . . . . . . . . . . . . . . . . . . . . . . . . . . . . . . . . . .
Verrouillage du clavier . . . . . . . . . . . . . . . . . . . . . . . . . . . . . . . . . . . . . . . . . . . . . . . . . .
6
7
7
8
8
8
8
Manipulation du téléphone et de ses menus . . . . . 9
Touches . . . . . . . . . . . . . . . . . . . . . . . . . . . . . . . . . . . . . . . . . . . . . . . . . . . . . . . . . . . . . 9
Menu principal . . . . . . . . . . . . . . . . . . . . . . . . . . . . . . . . . . . . . . . . . . . . . . . . . . . . . . . 10
Date / Heure / Réveil / RdV . . . . . . . . . . . . . . . . . . . . 11
Régler la date et l'heure . . . . . . . . . . . . . . . . . . . . . . . . . . . . . . . . . . . . . . . . . . . . . . . . 11
Réveil / Alarme . . . . . . . . . . . . . . . . . . . . . . . . . . . . . . . . . . . . . . . . . . . . . . . . . . . . . . . 11
Rendez-vous (RdV) . . . . . . . . . . . . . . . . . . . . . . . . . . . . . . . . . . . . . . . . . . . . . . . . . . . . 11
Téléphoner . . . . . . . . . . . . . . . . . . . . . . . . . . . . . . . . 12
Effectuer un appel externe et terminer la communication . . . . . . . . . . . . . . . . . . . . .
Effectuer un appel interne et terminer la communication . . . . . . . . . . . . . . . . . . . . .
Accepter un appel entrant . . . . . . . . . . . . . . . . . . . . . . . . . . . . . . . . . . . . . . . . . . . . . .
Mains-libres . . . . . . . . . . . . . . . . . . . . . . . . . . . . . . . . . . . . . . . . . . . . . . . . . . . . . . . . .
Secret microphone . . . . . . . . . . . . . . . . . . . . . . . . . . . . . . . . . . . . . . . . . . . . . . . . . . . .
12
12
13
13
13
Utilisation des répertoires et autres listes . . . . . . 14
Répertoires principal et secondaire . . . . . . . . . . . . . . . . . . . . . . . . . . . . . . . . . . . . . . .
Gérer les entrées des répertoires . . . . . . . . . . . . . . . . . . . . . . . . . . . . . . . . . . . . . . . . .
Reconnaissance vocale . . . . . . . . . . . . . . . . . . . . . . . . . . . . . . . . . . . . . . . . . . . . . . . . .
Association de deux numéros « Appel par Appel » . . . . . . . . . . . . . . . . . . . . . . . . . . .
Liste des numéros Bis . . . . . . . . . . . . . . . . . . . . . . . . . . . . . . . . . . . . . . . . . . . . . . . . . .
Répertoire E-mail . . . . . . . . . . . . . . . . . . . . . . . . . . . . . . . . . . . . . . . . . . . . . . . . . . . . .
Affichage de l'espace libre . . . . . . . . . . . . . . . . . . . . . . . . . . . . . . . . . . . . . . . . . . . . . .
14
15
16
17
17
18
18
Utiliser plusieurs combinés . . . . . . . . . . . . . . . . . . 19
Double appel interne . . . . . . . . . . . . . . . . . . . . . . . . . . . . . . . . . . . . . . . . . . . . . . . . . .
Accepter/refuser un signal d'appel lors d'une communication interne . . . . . . . . . . . .
Utiliser le combiné pour la surveillance de pièce . . . . . . . . . . . . . . . . . . . . . . . . . . . .
Activer le mode Talkie-Walkie . . . . . . . . . . . . . . . . . . . . . . . . . . . . . . . . . . . . . . . . . . .
19
19
19
21
3
Gigaset SL1 / französisch / A31008-L001-B002-1-6Z19 / SL_1IVZ.fm / 14.11.2003
Sommaire
Réglage combiné . . . . . . . . . . . . . . . . . . . . . . . . . . . 22
Désactiver/activer le décroché automatique . . . . . . . . . . . . . . . . . . . . . . . . . . . . . . . .
Régler le volume d'écoute . . . . . . . . . . . . . . . . . . . . . . . . . . . . . . . . . . . . . . . . . . . . . .
Réglage des sonneries . . . . . . . . . . . . . . . . . . . . . . . . . . . . . . . . . . . . . . . . . . . . . . . . .
Sound manager (gestion mélodie) . . . . . . . . . . . . . . . . . . . . . . . . . . . . . . . . . . . . . . .
Activer/désactiver les tonalités ou bips d'avertissement . . . . . . . . . . . . . . . . . . . . . . .
Remettre le combiné en configuration usine . . . . . . . . . . . . . . . . . . . . . . . . . . . . . . .
22
22
22
23
24
24
Annexe . . . . . . . . . . . . . . . . . . . . . . . . . . . . . . . . . . . 25
Entretien et contact avec les liquides . . . . . . . . . . . . . . . . . . . . . . . . . . . . . . . . . . . . .
Service clients (Customer Care) . . . . . . . . . . . . . . . . . . . . . . . . . . . . . . . . . . . . . . . . . .
Caractéristiques techniques . . . . . . . . . . . . . . . . . . . . . . . . . . . . . . . . . . . . . . . . . . . . .
Table de caractères . . . . . . . . . . . . . . . . . . . . . . . . . . . . . . . . . . . . . . . . . . . . . . . . . . . .
Saisie assistée de texte . . . . . . . . . . . . . . . . . . . . . . . . . . . . . . . . . . . . . . . . . . . . . . . . .
Interface PC . . . . . . . . . . . . . . . . . . . . . . . . . . . . . . . . . . . . . . . . . . . . . . . . . . . . . . . . .
Jeu « Balloon Shooter » . . . . . . . . . . . . . . . . . . . . . . . . . . . . . . . . . . . . . . . . . . . . . . . .
Certificat de garantie France . . . . . . . . . . . . . . . . . . . . . . . . . . . . . . . . . . . . . . . . . . . .
Certificat de garantie Belgique . . . . . . . . . . . . . . . . . . . . . . . . . . . . . . . . . . . . . . . . . .
Garantie Suisse . . . . . . . . . . . . . . . . . . . . . . . . . . . . . . . . . . . . . . . . . . . . . . . . . . . . . . .
25
25
26
27
28
29
30
31
33
33
Index . . . . . . . . . . . . . . . . . . . . . . . . . . . . . . . . . . . . . 34
4
Gigaset SL1 / französisch / A31008-L001-B002-1-6Z19 / start_guide_time.fm / 14.11.2003
Consignes de sécurité
Consignes de sécurité
$
!
Utilisez exclusivement le bloc-secteur fourni (comme indiqué sous le support
chargeur).
Utiliser uniquement le modèle de batterie homologué (rechargeable)
(p. 26). Ne jamais utiliser des piles normales (non rechargeables), qui peuvent
endommager l'appareil et représenter un risque pour la santé ou occasionner
des blessures.
‹
Œ
Positionner correctement la batterie rechargeable (comme décrit p. 6).
N'utiliser que le et utiliser le type de batterie recommandé dans ce manuel
d'utilisation.
Le combiné peut perturber le fonctionnement de certains équipements
médicaux. Tenir compte des recommandations émises à ce sujet par le corps
médical.
Le combiné peut provoquer un bourdonnement désagréable dans les aides
auditives.
Le combiné n'est pas étanche aux projections d'eau (p. 25).
Ne pas téléphoner en conduisant (fonction Talkie-Walkie).
Éteignez le téléphone pendant que vous êtes en avion (fonction TalkieWalkie). S'assurer que le téléphone ne peut pas être mis en marche
involontairement.
Ne pas utiliser le téléphone dans un environnement présentant un risque
d'explosion (par exemple ateliers industriels de peinture).
ƒ
Lorsque vous confiez votre Gigaset à un tiers, toujours joindre le mode
d'emploi.
Bien respecter les règles concernant la protection de l'environnement lorsque
vous mettez au rebut le téléphone et la batterie. Ne pas jeter cette dernière au
feu, ni l' ouvrir ou la mettre en court-circuit.
i
Toutes les fonctions décrites dans ce mode d'emploi ne sont pas
nécessairement disponibles dans tous les pays.
5
Gigaset SL1 / französisch / A31008-L001-B002-1-6Z19 / start_guide_time.fm / 14.11.2003
Préparer le téléphone
Préparer le téléphone
L'emballage contient les éléments suivants :
Un combiné SL 1, un support chargeur et son bloc secteur, un clip ceinture pour le
combiné, une batterie, un manuel d'utilisation.
Mettre en service le combiné
L’écran est protégé par un film. Retirer le film de protection
Insérer la batterie
◆ Placer la batterie en respectant le sens(voir schéma de gauche)
◆ Positionner le couvercle en le décalant de 3 mm environ vers le bas puis pousser
vers le haut jusqu'à ce qu'il s'enclipse,
◆ Pour ouvrir le couvercle, appuyer sur le cercle en creux et pousser vers le bas.
W
Utiliser uniquement la batterie homologuée par Siemens à la p. 26.
Autrement dit, ne jamais utiliser de piles traditionnelles (non
rechargeables) ou d'autres types de batteries, susceptibles de nuire à la
santé et de causer des dégâts corporels. Par exemple, l'enveloppe des
piles ou de la batterie peut se désagréger (dangereux). De la même
manière, l'appareil peut subir des dysfonctionnements et des dommages.
Charger la batterie
Placez votre combiné sur le chargeur avec l'écran orienté vers le haut. Pour charger la
batterie, laisser le combiné sur le chargeur. La batterie n'est pas chargée à la livraison.
Le chargement de la batterie est signalé en haut à droite de l'écran par le clignotement
du témoin de charge =.
W
Il est recommandé la première fois de charger la batterie pendant cinq
heures sans interruption, sans tenir compte des indications s'affichant sur
l'écran. La capacité de charge de la batterie diminue pour des raisons
techniques après quelque temps.
Le niveau de charge de la batterie n’est indiqué avec précision qu’à la suite d’un cycle
charge/décharge ininterrompu. En conséquence, vous ne devez pas retirer inutilement
la batterie et interrompre la charge avant son terme.
6
Gigaset SL1 / französisch / A31008-L001-B002-1-6Z19 / start_guide_time.fm / 14.11.2003
Préparer le téléphone
◆ Une fois la première charge effectuée, vous pouvez reposer votre
combiné sur le chargeur après une communication. La charge est
contrôlée électroniquement. La batterie est ainsi ménagée durant la
charge.
◆ La batterie s’échauffe durant la charge ; il s’agit d’un phénomène
normal et sans danger.
i
Déclaration
Avant de pouvoir utiliser votre Gigaset SL 1, vous devez procéder à sa déclaration
manuelle. Vous devez activer la déclaration du combiné au niveau du combiné et de la
base.
1. Sur le combiné
v
s
s
s
Ouvrir le menu.
[______________________________________________]
OK
Réglages comb.
Sélectionner et valider.
[______________________________________________]
OK
Inscrire comb.
Sélectionner et valider.
OK
[______________________________________________]
Base 1
Sélectionner la base (1 à 4) et valider, par exemple
Base 1.
OK
Entrer le code PIN système de la base (configuration
usine : 0000) et valider.
Une fois le code PIN système entré, le message Base 1, par exemple, clignote à l'écran.
2. Au niveau de la base
Reportez-vous au manuel d'utilisation de la base pour savoir comment déclarer le
combiné sur la base.
Modifier la langue d’affichage
Le texte peut s'afficher à l'écran dans différentes langues.
v
s
s
[______________________________________________]
OK
Réglages comb.
Sélectionner et valider.
[______________________________________________]
OK
Langue
s
Sélectionner et valider. La langue en cours est
signalée par ‰ (configuration usine : Anglais.
OK
Sélectionner une langue et valider.
a
Ouvrir le menu.
Appuyer de manière prolongée (retour au mode
repos).
Vous avez malencontreusement défini la mauvaise langue (et ce qui s'affiche reste
incompréhensible) :
Appuyer sur v M 2, sélectionner la langue avec s puis appuyer sur OK pour
valider.
7
Gigaset SL1 / französisch / A31008-L001-B002-1-6Z19 / start_guide_time.fm / 14.11.2003
Préparer le téléphone
Sélectionner la base
Si votre combiné est déclaré sur plusieurs bases, vous pouvez l'associer à une base
donnée ou à celle offrant la meilleure qualité de réception (Meilleure base).
v s Réglages comb. OK s Sélect. Base OK ;
s (sélectionner la base déclarée ou Meilleure base) OK .
Fixer le clip ceinture
Placer le clip ceinture à l’arrière du
combiné et appuyer jusqu’à ce que
les « ergots » disposés latéralement
s’enclipsent dans les trous.
Combiné : allumer/éteindre
Pour allumer : appuyer sur la touche Raccrocher a de manière prolongée.
Pour éteindre : appuyer de nouveau sur la touche Raccrocher a de manière
prolongée lorsque le téléphone est en repos.
Lorsque vous placez le combiné sur le chargeur, il s'allume automatiquement..
Verrouillage du clavier
Appuyer de manière prolongée sur la touche R (l' écran affiche le symbole Ø).
Pour déverrouiller : Appuyer de nouveau de manière prolongée sur la touche R.
Le verrouillage clavier se désactive automatiquement lorsque vous recevez un appel.
Il se réactive à nouveau à la fin de la communication.
i
8
Lorsque le verrouillage clavier est activé, les numéros d'appel d'urgence
ne sont pas non plus accessibles.
Gigaset SL1 / französisch / A31008-L001-B002-1-6Z19 / start_guide_time.fm / 14.11.2003
Manipulation du téléphone et de ses menus
Manipulation du téléphone et de ses menus
Touches
Touche de navigation
La touche de navigation comporte quatre flèches de direction de couleur noire ainsi que
les symboles correspondants. En fonction de l'indication sur laquelle vous pressez, la
fonction particulière est appelée. Dans le mode d'emploi, le côté sur lequel vous devez
presser est marqué par un triangle noir, par exemple : touche v pour le côté
droit = Ouvrir le menu.
La touche de navigation vous permet également d'exécuter les fonctions de la touche
écran de droite.
Exemple :
Touche de navigation
Différentes fonctions de la touche de navigation :
t
s
v
u
À l'état de repos
Dans les listes et les menus
Activer la reconnaissance
Feuilleter vers le haut
vocale
(appui prolongé)
Ouvrir le répertoire principal Feuilleter vers le bas
Ouvrir le menu
Liste des combinés
accessibles
Ouvrir l'entrée sélectionnée
(comme OK )
Remonter d'un niveau de
menu ou annuler
Dans un champ de saisie
Faire remonter le curseur
d'une ligne
Faire descendre le curseur
d'une ligne
Déplacer le curseur vers la
droite
Déplacer le curseur vers la
gauche
Touches écran
Les touches écran sont les touches à bascule horizontales situées directement sous
l'écran. Leur fonction varie selon le contexte d'utilisation. La fonction en cours est
affichée à l'écran, juste au-dessus.
Exemple :
•
§§§§§§§SMS§§§§§§
Touches écran
9
Gigaset SL1 / französisch / A31008-L001-B002-1-6Z19 / start_guide_time.fm / 14.11.2003
Manipulation du téléphone et de ses menus
La signification des icônes est la suivante :
Þ
OK
à
f
C
Ý
ä
Touche de répétition de la numérotation (Bis) : la liste des 10 derniers numéros
appelés s'affiche.
Touche OK : activer la fonction du menu ou enregistrer l'entrée en la validant.
Touche Menu : à l'état de repos, afficher le menu principal.
En cours de communication, ouvrir un menu contextuel.
Touche Effacer : effacer les entrées de la droite vers la gauche, caractère par
caractère.
Touche Échapper : revenir au niveau de menu précédent ou annuler l'opération.
Ouverture de l'annuaire E-Mail.
Retour à l'état de repos depuis n'importe quel niveau du menu
Appuyer sur la touche Raccrocher a pendant 1 seconde environ ou n'appuyer sur
aucune touche.
L'écran revient automatiquement à l'état de repos après 2 minutes. Les modifications
qui n'ont pas été validés à l'aide des touches OK , Oui, Sauver, Envoi ou Sauvegarder OK
sont perdues.
Menu principal
Pour ouvrir, lorsque le téléphone est à l'état de repos, presser sur le côté droit de la
touche de navigation v et utiliser s pour naviguer jusqu'à l'entrée souhaitée.
1
2
3
4
5
6
7
8
9
10
SMS / MiniMsg.
SVC réseau
Famille/Loisirs
RDV/Heure
Sons / Audio
Coûts
Réglages comb.
Réglages base
Répondeur
Les options proposées dans les menus
dépendent de votre base.
Gigaset SL1 / französisch / A31008-L001-B002-1-6Z19 / start_guide_time.fm / 14.11.2003
Date / Heure / Réveil / RdV
Date / Heure / Réveil / RdV
Régler la date et l'heure
Le réglage de la date et de l’heure est nécessaire pour indiquer précisément l’heure
d’arrivée des appels.
v ; s RDV/Heure OK ; s Date/Heure OK ; ~ (entrer le jour, le mois et l'année) ;
s (à la ligne suivante) ~ (entrer l'heure et les minutes) ; s (éventuellement à la
ligne suivante) r (sélectionner le mode 12 ou 24 heures) ; Sauver, a (retour à l'état de
repos).
Si vous avez choisi le mode d'affichage 12 heures, vous pouvez utiliser la touche écran
am/pm, pour sélectionner les heures du matin (am) ou de l'après-midi (pm).
Réveil / Alarme
Préalable : Il est nécessaire d’avoir réglé au préalable la date et l’heure (p. 11).
Activer et régler le réveil
v s RDV/Heure OK ; s Réveil/Alarme OK ; r (sélectionner Act.) ;
s ~ (entrer l'heure de réveil) ; Sauver ; a (retour à l'état de repos).
Si vous avez choisi le mode d'affichage 12 heures, vous pouvez utiliser la touche écran
am/pm à la ligne Heure:, pour passer du mode d'affichage am à pm.
Le réveil ne sonne que si le combiné est à l'état de repos. Il ne sonne pas si la surveillance
de pièce ou si le mode Talkie-Walkie est activé, pendant une conversation ou pendant
une opération de rappel automatique.
Reportez-vous à la p. 22 pour le réglage de la sonnerie (volume et mélodie).
Désactiver la fonction de réveil
Le réveil est réglé sur une heure particulière mais il ne doit pas sonner.
v s RDV/Heure OK ; s Réveil/Alarme OK . ; r (sélectionner Dés.) ; Sauver ;
a (retour à l'état de repos).
Arrêt du réveil
Appuyer sur la touche écran Silence ou sur une touche quelconque.
Rendez-vous (RdV)
Vous pouvez créer jusqu'à cinq rendez-vous, qui vous seront rappelés depuis votre
combiné.
Activer et régler le rendez-vous
v; s RDV/Heure OK ; Entrer RDV OK ; s Rendez-vous 2 (exemple) OK ;
r (sélectionner Act.) ; s ~ (entrer le jour et le mois) ; s ~ (entrer l'heure et les
minutes) ; s Modifier ; ~ (entrer le nom) OK ; Sauver ; a (retour à l'état de repos).
Un rendez-vous paramétré est marqué par le symbole ¼.
11
Gigaset SL1 / französisch / A31008-L001-B002-1-6Z19 / start_guide_time.fm / 14.11.2003
Téléphoner
La sonnerie rendez-vous ne sonne que si le combiné est à l'état de repos. Elle ne sonne
pas si la surveillance de pièce ou si le mode Talkie-Walkie est activé, pendant une
conversation ou pendant une opération de rappel automatique.
Si vous avez choisi le mode d'affichage 12 heures, vous pouvez utiliser la touche écran
am/pm à la ligne Heure:, pour passer du mode d'affichage am à pm.
Reportez-vous à la p. 22 pour le réglage de la sonnerie (volume et mélodie).
Arrêt de la sonnerie rendez-vous
Lorsque vous recevez un signal de rendez-vous, vous pouvez le désactiver à l'aide de la
touche écran Silence.
Dates échues
Afficher et effacer les rendez-vous et les dates anniversaires non acquittés à échéance.
v s RDV/Heure OK ; s Dates échues OK ; s sélectionner le rendez-vous ou la
date anniversaire.
[RRRRRRRRRRRRRRRRRRRRRR]
Effacer
Presser sur la touche écran.
... ensuite
a
Appuyer de manière prolongée (retour à l'état de
repos).
Un rendez-vous dépassé est identifié par ¼, une date anniversaire arrivée à échéance
est identifiée par ‚.
Téléphoner
Effectuer un appel externe et terminer la communication
~ (entrer le numéro d'appel), c (ou vice versa).
Mettre fin à la communication/interruption de la numérotation : a (touche
Raccrocher).
Pause interchiffre
Vous pouvez insérer une pause interchiffre entre le préfixe et le numéro d'appel.
Pour ce faire, pressez pendant 2 secondes environ sur la touche S. Composer ensuite
le numéro.
Effectuer un appel interne et terminer la communication
Les communications entre combinés déclarés sur la même base sont gratuites.
Appeler un combiné en particulier
u s (sélectionner le combiné) ; Presser sur la touche c.
Ou : presser sur u 2 (exemple).
Pour mettre fin à la communication : presser sur la touche a (touche Raccrocher).
12
Gigaset SL1 / französisch / A31008-L001-B002-1-6Z19 / start_guide_time.fm / 14.11.2003
Téléphoner
Appeler tous les combinés en même temps (« appel général »)
u appuyer sur la touche c ou sur sur la touche Etoile P.
Pour mettre fin à la communication : presser sur la touche a (touche Raccrocher).
Accepter un appel entrant
Votre combiné sonne, l'appel entrant s'affiche à l'écran et la touche d clignote.
c Appuyer sur la touche Décrocher (ou sur la touche écran Accept. ou ou la touche
Mains-libres d).
Lorsque la fonction Décroché auto. est activée (p. 22), il vous suffit de prendre le
prendre le combiné de son chargeur afin de prendre l'appel.
Si vous êtes gêné par la sonnerie, pressez sur la touche écran Silence. Vous pouvez
prendre l'appel tant qu'il est visible à l'écran.
Mains-libres
Activer/désactiver le mode Mains-libres
Avant de composer : ~ (entrer le numéro) ; appuyer sur la touche d (Mains-libres).
Lorsque vous êtes en communication : appuyer sur la touche d (Mains-libres).
Pour reprendre la communication à l'écouteur : appuyer sur la touche « Décrocher »
c.
Si vous souhaitez reposer le combiné sur sa base sans interrompre la communication,
maintenez la touche Mains-libres d enfoncée tout en reposant le combiné.
i
Avant d’activer la fonction Mains-libres, vous devez en avertir votre
correspondant.
Régler le volume pendant une conversation en mode Mains-libres
Vous êtes en communication, le mode Mains-libres d est activé ; appuyer à nouveau
sur la touche Mains-libres d ; r augmenter ou diminuer le volume ; Sauver.
Secret microphone
u. La communication est « suspendue » (musique d'attente).
Pour reprendre la communication : presser sur la touche écran Ý .
13
Gigaset SL1 / französisch / A31008-L001-B002-1-6Z19 / start_guide_time.fm / 14.11.2003
Utilisation des répertoires et autres listes
Utilisation des répertoires et autres listes
Répertoires principal et secondaire
Les répertoires principal et secondaire se partagent une capacité de 200 fiches.
Le répertoire principal est appelé à l'aide de la touche s. Il est possible d'associer à
chaque fiche un jour anniversaire et le statut « VIP ».
Le répertoire secondaire est une liste spéciale dans laquelle vous pouvez enregistrer
des numéros particulièrement importants, tels que des numéros de téléphone
personnels, des préfixes ou numéros de services par exemple. Le répertoire secondaire
est appelé à l'aide de la touche C.
Les deux répertoires s'utilisent de la même manière, hormis l'enregistrement des
entrées.
◆ L'aide à la saisie de texte EATONI (p. 28, désactivée en configuration usine) facilite
l'entrée de noms.
◆ Pour savoir comment effectuer la saisie de texte, reportez-vous au tableau des
caractères (p. 27).
◆ Vous pouvez entrer jusqu'à 32 chiffres pour un numéro et 16 lettres pour un nom.
◆ Lors de la saisie des numéros, vous pouvez utiliser à , s Insérer pause OK ou
maintenir pendant 2 secondes la touche S appuyée pour ajouter la pause
correspondante.
Enregistrer un fiche dans le répertoire principal
s (ouvrir le répertoire) ; Nouvelle entrée OK ~ (entrer le numéro) ;
s (à la ligne suivante) ; ~ (entrer le nom) ; à (ouvrir le menu), Sauvegarder OK ;
(pour associer une date anniversaire, après avoir entré le nom : presser sur s pour
passer à la ligne Annivers.:, presser sur la touche écran Modifier, entrer la date
anniversaire puis l'heure, choisir la mélodie ou le visuel pour le rappel. Sauvegarder les
données en appuyant sur Sauver) ; appuyer sur a de manière prolongée (retour à l'état
de repos).
Pour supprimer une date anniversaire dans le champ correspondant d'une fiche
répertoire, appuyer sur la touche Modifier de l'écran ; appuyer ensuite sur Effacer sur
l'écran suivant, puis sur Sauver sur le dernier écran.
Rappel de date anniversaire
Un rappel de date anniversaire utilise la mélodie que vous avez choisie. L'écran affiche
les fiches répertoire concernées avec le symbole ‚ ‚ ‚.
i
14
Si votre téléphone est connecté à un autocommutateur privé, vous devez
éventuellement spécifier le préfixe afin de le faire apparaître au début de
l'entrée de l'annuaire.
Gigaset SL1 / französisch / A31008-L001-B002-1-6Z19 / start_guide_time.fm / 14.11.2003
Utilisation des répertoires et autres listes
Enregistrer une fiche du répertoire secondaire
Pour un accès rapide, un raccourci clavier (touches 0, 2 à 9) peut être affecté à neuf des
entrées du répertoire secondaire.
Maintenir un appui long sur la touche de raccourci puis décrocher avec la touche c,
pour appeler. Vous êtes immédiatement en communication avec le numéro affecté à la
touche en question.
C (ouvrir le répertoire secondaire) ; Nouvelle entrée OK ~ (entrer le numéro) ;
s (à la ligne suivante) ; ~ (entrer le nom) ; à (ouvrir le menu) ;
Sauvegarder OK ;
(Pour en plus affecter un raccourci clavier, après avoir entré le nom : presser sur s pour
passer à la ligne Touche:, presser sur r pour entrer un chiffre [0, 2–9] correspondant
à la touche de raccourci choisie, puis sauvegarder avec Sauver) ; appuyer sur a de
manière prolongée (retour à l'état de repos).
Vous ne pouvez pas affecter deux fois le même touche.
Composer un numéro à partir de l'un des répertoires
presser sur s ou sur C (ouvrir le répertoire principal ou secondaire) ;
s (sélectionner l'entrée) ; c.
Gérer les entrées des répertoires
Pour utiliser l'une de ces fonctions, sélectionner une fiche de l'un des répertoires puis
presser sur s pour ouvrir le menu contextuel.
Presser sur s pour naviguer jusqu'à la fonction choisie.
Utiliser le No
Modifier entrée
Effacer entrée
Entrer comme VIP
Copier et modif.
Copier entrée
Effacer liste
Copier liste
Mémoire dispo.
Valable uniquement pour le
répertoire principal (s)
Valable uniquement pour le
répertoire principal (s)
Après avoir sélectionné une entrée, presser sur la touche Afficher pour visualiser l'entrée,
puis sur Modifier pour la modifier.
Les fonctions « Comme VIP » et « Copier et modifier »
Vous pouvez marquer comme VIP (Very Important Person) les fiches importantes du
répertoire principal en leur attribuant une mélodie particulière. La mélodie de sonnerie
vous permet alors de savoir qui vous appelle.
Condition : le service "Présentation du numéro" a été souscrit..
Pour éviter de devoir saisir deux fois une même entrée, vous pouvez en réaliser une
copie, puis modifier cette entrée.
15
Gigaset SL1 / französisch / A31008-L001-B002-1-6Z19 / start_guide_time.fm / 14.11.2003
Utilisation des répertoires et autres listes
Copier une ou toutes les fiches entre combinés
Vous pouvez transférer des fiches ou le répertoire complet à un autre combiné SL 1, S1,
C2 ou Comfort déclaré sur la même base Gigaset. Les commandes vocales enregistrées
et les raccourcis clavier ne sont pas transmis. La transmission des paramètres VIP est
dépendante du combiné.
Presser sur s ou sur C (ouvrir le répertoire principal ou secondaire) ; s (sélectionner
l'entrée) ; v (ouvrir le menu) ; s Copier entrée OK ou s Copier liste OK ) ;
~ (saisir le numéro interne du combiné destinataire) ; OK .
Vous pouvez sélectionner d'autres entrées aussi longtemps que vous validez avec la
touche écran Oui. La touche écran Non permet de mettre fin à l'envoi.
Reconnaissance vocale
La reconnaissance vocale permet de composer un numéro en prononçant le nom de
l'interlocuteur. Vous devez à cet effet enregistrer un modèle vocal pour chaque fiche
concernée, c'est-à-dire enregistrer dans le combiné le nom énoncé.
Quatre utilisateurs au maximum peuvent enregistrer un modèle vocal pour une même
fiche. L'utilisateur doit s'identifier avant l'enregistrement, par exemple comme
Utilisateur 2.
Il est possible d'enregistrer au total 23 modèles vocaux. Une fiche assortie d'un modèle
vocal est marquée dans le répertoire vocal par un ´.
Enregistrement de modèles vocaux associés à une fiche du répertoire
principal
Enregistrez votre modèle vocal dans un environnement silencieux (à une distance de 25
cm environ).
Etape 1 : le répertoire vocal :
s (ouvrir le répertoire principal) ; s(sélectionner l'entrée) ; R.Vocale ; s Utilisateur 2
(par exemple) OK .
Etape 2 : commencer l'enregistrement :
Enreg. ; OK (Valider le message à l'écran). Énoncer le nom après y avoir été invité sur
l'écran et par un Bip. Répétez le nom après y avoir été invité une nouvelle fois sur écran
et par un nouveau Bip. Il est automatiquement enregistré.
appuyer sur a de manière prolongée (retour à l'état de repos).
Si votre modèle vocal est trop semblable à celui d'un autre utilisateur, un message vous
en informe. Fermez ce message en pressant sur Ý , revenez au début de
l'enregistrement vocal et recommencez l'enregistrement.
Numéroter en utilisant la reconnaissance vocale : presser sur la touche t de manière
prolongée et énoncer le nom après y avoir été invité par un Bip.
16
Gigaset SL1 / französisch / A31008-L001-B002-1-6Z19 / start_guide_time.fm / 14.11.2003
Utilisation des répertoires et autres listes
Annonce du nom de l'appelant
Chaque fois qu'un appel externe entre, vous pouvez également faire annoncer une fois
le nom de l'appelant parallèlement à la sonnerie.
Préalables : présentation du numéro. Enregistrement d'un modèle vocal pour ce nom
(p. 16).
Activer/désactiver l'annonce du nom
v (ouvrir le menu) ; s Sons / Audio OK ; s Régl.sonnerie OK ; Appels externes
OK ; presser 2 x sur s (deux lignes plus loin) ; r (Annonc.nom) activer/désactiver ;
Sauver ; appuyer sur a de manière prolongée (retour à l'état de repos).
Écouter les modèles vocaux
Ouvrir le répertoire pour la reconnaissance vocale (voir Étape 1, p. 16). Ensuite :
s (sélectionner l'entrée) ; Ecouter ; appuyer sur a de manière prolongée (retour à
l'état de repos).
Ré-enregistrer ou effacer un modèle vocal
Ouvrir le répertoire pour la reconnaissance vocale (voir étape 1, p. 16). Ensuite :
s (sélectionner l'entrée) ; v(ouvrir le menu) ; Enreg. modèle OK ou
s Effac. modèle OK ; appuyer sur a de manière prolongée (retour à l'état de repos).
Lorsqu'une entrée a été supprimée, le numéro et le nom sont conservés. De même, les
modèles vocaux d'autres utilisateurs restent présents.
Modification du nom de l'utilisateur
s (ouvrir le répertoire principal) ; s (sélectionner l'entrée) ; R.Vocale ; s Utilisateur 2
(par exemple) ; Modifier ; ~ (entrer le nom) Sauver ; appuyer sur a de manière
prolongée
(retour à l'état de repos).
Association de deux numéros « Appel par Appel »
Cette fonction permet, par exemple, d'insérer un préfixe, enregistré dans le répertoire
secondaire, devant le numéro à appeler (association de préfixe et numéro).
C (ouvrir le répertoire secondaire) ; s (sélectionner l'entrée) ; à (ouvrir le
menu) ; Utiliser le No OK ; s (ouvrir le répertoire principal) ; s (sélectionner
l'entrée) ; OK ;
ou ~ entrer le numéro ; c.
Liste des numéros Bis
La liste des numéros Bis contient les dix derniers numéros appelés.
Répétition manuelle de la numérotation
Þ (ouvrir la liste des numéros Bis) ; s (sélectionner l'entrée) ; c.
17
Gigaset SL1 / französisch / A31008-L001-B002-1-6Z19 / start_guide_time.fm / 14.11.2003
Utilisation des répertoires et autres listes
Rappel automatique du dernier numéro
Cette fonction permet de rappeler automatiquement le numéro à un intervalle de
20 secondes. Le correspondant répond : Appuyer sur la touche Décrocher c. Au bout
de 30 secondes sans réponse, l'appel est interrompu. La fonction se désactive après
10 tentatives infructueuses.
a presser sur la touche Raccrocher ; • (ouvrir la liste des numéros Bis) ;
v (ouvrir le menu) ; Renumérot.Auto. OK .
Interrompre le rappel automatique : Appuyer sur la touche écran Arrêt ou sur une
touche quelconque.
Gérer les entrées de la liste des numéros Bis
Vous pouvez utiliser les fonctions du menu indiquées ci-après : • (afficher la liste
des numéros/noms Bis) ; s (sélectionner l'entrée) ; v (ouvrir le menu) ;
s (sélectionner une fonction).
Renumérot.Auto.
Utiliser le No
No.vers répert.
Effacer entrée
Effacer liste
Répertoire E-mail
La partition E-Mail du répertoire principal vous permet d'enregistrer des adresses E-Mail.
Vous pouvez enregistrer jusqu'à 200 fiches pour l'ensemble des répertoires principal, EMail et secondaire.
La gestion des entrées du répertoire E-Mail est analogue à celle des entrées des autres
répertoires p. 15.
Enregistrement d'une nouvelle adresse E-Mail
Etape 1 : Ouverture du répertoire E-Mail : s (ouvrir le répertoire principal) s
<Répert. e-mail> OK .
Etape 2 : Création d'une adresse E-Mail : Nouvelle entrée OK ;
~ (entrer une adresse) ; à (ouvrir le menu pour sélectionner éventuellement s,
« . », « @ » ou la fonction de saisie assistée de texte OK ). Lorsque l'aide à la saisie du
texte est activée, pour saisir le caractère @ appuyer sur R 1 x longuement et 1 x
brièvement.
Etape 3 : Enregistrement d'une adresse E-Mail :
à (ouvrir le menu) ; Sauvegarder OK ; Appuyer sur a de manière prolongée
(retour à l'état de repos).
Après avoir sélectionné une entrée, presser sur la touche écran Afficher, puis sur Modifier
pour corriger une adresse existante. Enregistrez l'entrée, comme indiqué à l'étape 3.
Affichage de l'espace libre
L'espace de stockage se répartit entre les différents répertoires. Vous pouvez voir à
l'écran l'espace de stockage restant pour toutes les listes.
s (ouvrir le répertoire principal) ; s (sélectionner l'entrée) ; v (ouvrir le menu) ; s
Mémoire dispo. OK ; Appuyer sur a de manière prolongée (retour à l'état de repos).
18
Gigaset SL1 / französisch / A31008-L001-B002-1-6Z19 / start_guide_time.fm / 14.11.2003
Utiliser plusieurs combinés
Utiliser plusieurs combinés
Transfert de l’appel vers un autre combiné
Vous êtes en communication avec un correspondant externe:
u (ouvrir la liste des combinés) ; s (sélectionner un combiné ou Appel général) ;
OK .
Avant ou après que le correspondant interne ne réponde: presser sur la touche a
(touche Raccrocher).
Si le correspondant interne ne répond pas ou est occupé, l'appel vous est
automatiquement renvoyé (Retour d'appel s'affiche à l'écran).
Double appel interne
Lors d'une communication externe, vous pouvez passer un appel interne.
u (ouvrir la liste des combinés) ; s (sélectionner le combiné), OK .
Pour mettre fin à la communication : presser sur la touche écran Fin (retour au
correspondant externe).
Accepter/refuser un signal d'appel lors d'une communication
interne
Si vous recevez un appel externe alors que vous êtes en communication interne, un
signal d’appel (bip court) retentit. Appuyer sur la touche écran Accept. ou sur Refuser.
Le signal d'appel refusé reste audible sur les autres combinés déclarés.
Utiliser le combiné pour la surveillance de pièce
Cette fonction appelle un numéro interne ou externe préalablement programmé dès
que le niveau sonore réglé est atteint dans la pièce. La fonction Surveillance de pièce
reste active sur le combiné même après avoir raccroché.
La surveillance de pièce est limitée à l'environnement immédiat du combiné placé en
surveillance.
Lorsque la fonction Surveillance de pièce est activée, les appels entrants destinés au
combiné qui se trouve en surveillance sont uniquement signalés à l’écran,sans
sonnerie. L'écran et le clavier ne sont pas éclairés.
Dans le cas d'un numéro externe, veillez à ce que le poste vers lequel est transféré
l’appel de surveillance de pièce ne soit pas bloqué par un répondeur activé.
◆ Si la fonction Surveillance de pièce appelle un numéro externe, le propriétaire de ce
numéro doit en être averti.
◆ L'appel Surveillance de pièce vers un numéro externe s'interrompt au bout de 90
secondes environ. Le délai est de 180 secondes environ pour un appel vers un
numéro interne (combiné) (en fonction de la base).
W
Il faut impérativement vérifier le paramétrage du combiné de
surveillance de pièce avant de partir, notamment la sensibilité et
l’établissement de la communication.
19
Gigaset SL1 / französisch / A31008-L001-B002-1-6Z19 / start_guide_time.fm / 14.11.2003
Utiliser plusieurs combinés
i
L’autonomie du combiné est considérablement réduite lorsque la
fonction Surveillance de pièce est activée. Placez le combiné, laissé en
surveillance, dans son chargeur, de manière à éviter que la batterie ne se
vide.
La fonction surveillance de pièce peut également être réalisée en mode
Talkie-Walkie.
Activer la fonction de surveillance de pièce et première saisie du numéro
à appeler
Etape 1 : accéder à la fonction : v; s Famille/Loisirs OK ; Surveill. Pièce OK
Etape 2 : activer la surveillance de pièce : r (ligne Activation: sélectionner Act.)
Etape 3 : saisir le numéro cible : s (à la ligne suivante) ; Modifier
Entrer le numéro Interne du combiné destinataire : INT s (sélectionner le
combiné) OK ou :
Entrer le numéro externe : ~; à (ouvrir le menu) ; Sauvegarder OK .
Etape 4 : Paramétrer la sensibilité : s (à la ligne suivante) ; r (faible ou
élevée) ; Sauver
La fonction surveillance de pièce est à présent activée.
Lorsque la surveillance de pièce est activée, pressez sur v (Menu Ouvrir) pour accéder
directement au réglage de la surveillance de pièce.
Désactivation de la surveillance de pièce
La surveillance de pièce peut être désactivée à distance (en fonction de la base).
Prendre l'appel déclenché par la fonction surveillance de pièce et presser sur les touches
O R. La fonction est désactivée environ 90 secondes après la fin de la
communication. La surveillance de pièce ne produira plus d'appel. Les autres fonctions
de surveillance de pièce accessibles sur le combiné (par exemple, l'absence de sonnerie)
restent activées jusqu'à ce vous ayez pressé sur la touche écran Dés. du combiné.
i
20
Pour réactiver la fonction surveillance de pièce avec le même numéro,
vous devez réinitialiser l'activation et l'enregistrer à l'aide de la fonction
Sauver.
Gigaset SL1 / französisch / A31008-L001-B002-1-6Z19 / start_guide_time.fm / 14.11.2003
Utiliser plusieurs combinés
Activer le mode Talkie-Walkie
La fonction Talkie-Walkie permet à deux combinés de communiquer entre eux (avec une
portée de 300 m maximale), indépendamment de leur éloignement par rapport à la
base.
Préalable :
◆ les deux combinés ont été déclarés sur la même base (recommandé pour la fonction
surveillance de pièce) ou
◆ les deux combinés ont été déclarés sur des bases différentes et sont paramétrés sur
Meilleure base (p. 8) ou
◆ l’un des combinés n’est déclaré sur aucune base et le combiné déclaré est paramétré
sur Meilleure base ou
◆ les deux combinés n’ont été déclarés sur aucune base.
En mode Talkie-Walkie, les combinés ne peuvent plus recevoir d’appels entrants.
L’autonomie des combinés est considérablement réduite.
Activer/désactiver le mode Talkie-Walkie
v (ouvrir le menu) ; s Famille/Loisirs OK ; s Talkie-Walkie OK .
Désactiver : presser sur la touche écran Arrêt.
Presser sur la touche Décrocher c (ou la touche écran ou la touche Mains-libres d).
L'appel du combiné est émis vers l'ensemble des combinés ayant activé le mode TalkieWalkie. Le réglage du volume du haut-parleur et des bips d'avertissement s’effectue en
suivant exactement la même procédure que si vos combinés étaient en contact avec la
base (p. 22). Il n'est pas possible de régler les bips d'avertissement en mode TalkieWalkie.
Il est possible d'activer/désactiver la sonnerie (p. 23) ou le verrouillage clavier (p. 8) en
mode Talkie-Walkie.
Pour ouvrir le menu, pressez sur la touche écran ©.
i
Le mode Talkie-Walkie reste activé même après avoir éteint, puis rallumé
le combiné.
Utiliser le combiné en mode Talkie-Walkie pour la surveillance de pièce
à (ouvrir le menu) ; s Surveill. Pièce OK ; r (sélectionner Ma.) ;
s (à la ligne suivante) ; r (sélectionner Faible ou Elevée) ; Sauver.
L'appel du combiné surveillance de pièce est émis uniquement vers les combinés ayant
activé le mode Talkie-Walkie.
W
Il faut impérativement vérifier le paramétrage du combiné de
surveillance de pièce avant de partir, notamment la sensibilité et
l’établissement de la communication. La distance entre les combinés
ne devrait plus, par la suite, être changée (portée).
Pressez sur la touche écran Dés. sur le combiné pour la surveillance de pièce afin de le
désactiver. Le combiné revient en mode Talkie-Walkie normal.
21
Gigaset SL1 / französisch / A31008-L001-B002-1-6Z19 / start_guide_time.fm / 14.11.2003
Réglage combiné
Réglage combiné
Désactiver/activer le décroché automatique
Si vous avez activé cette fonction, prenez simplement le combiné sur le chargeur
lorsque vous recevez un appel, sans presser sur la touche Décrocher (réglage usine :
activé).
v (ouvrir le menu) ; s Réglages comb. OK ; Décroché auto. OK (‰ = activé) ;
appuyer sur a de manière prolongée (retour à l'état de repos).
Régler le volume d'écoute
Vous disposez de cinq niveaux de réglage pour le mode Mains-libres, de trois niveaux de
réglage pour le volume de l'écouteur– même pendant une communication externe.
v (ouvrir le menu) ; s Sons / Audio OK ; Volume écoute OK ; r (sélectionner
le volume du mode Mains libres) ; s (à la ligne suivante) r (sélectionner le volume
de l'écouteur) ; Sauver ; appuyer sur a de manière prolongée (retour à l'état de repos).
Réglage des sonneries
Vous avez le choix entre six volumes et 26 mélodies (dont 16 polyphoniques). Les
sonneries polyphoniques ne sont disponibles que si elles ont été auparavant
enregistrées avec le Sound Manager (voir p. 23) ou par le biais de l'interface ordinateur
PC (voir p. 29).
Réglage de la tonalité
Vous avez la possibilité d'augmenter la qualité audio des mélodies longues (4-10).
v (ouvrir le menu) ; s Sons / Audio OK ; s Sonn. avec echo OK (‰ = activé) ;
appuyer sur a de manière prolongée (retour à l'état de repos).
Réglage pour les appels externes et selon plage horaire
v (ouvrir le menu) ; s Sons / Audio OK ; s Régl.sonnerie OK ;
Appels externes OK ; r (sélectionner le volume) ; s (à la ligne suivante) ;
r (sélectionner la mélodie) ; s (éventuellement à la ligne suivante) ;
r (activer l'annonce du nom, p. 17).
Volume différent pour une plage horaire
Sélectionner SV Nuit ; r (sélectionner SVC nuit: Act.) ; s passer à la ligne De: (début
de la plage horaire); s passer à la ligne A: (fin de la plage horaire) ; s r (définition
du volume de la sonnerie) ; Sauver (enregistrement du réglage horaire) ; répéter Sauver
(enregistrer le réglage) ; appuyer sur a de manière prolongée (retour à l'état de
repos).
22
Gigaset SL1 / französisch / A31008-L001-B002-1-6Z19 / start_guide_time.fm / 14.11.2003
Réglage combiné
Réglages spécifiques pour les appels internes, le réveil et les rendez-vous
v (ouvrir le menu) ; s Sons / Audio OK ; s Régl.sonnerie OK ;
s (sélectionner une fonction) OK ; r (sélectionner le volume) ; s (à la ligne
suivante) ; r (sélectionner la mélodie) ; Sauver (à effectuer également lors du réglage
Tous appels presser sur Oui pour valider le réglage.) ; appuyer sur a de manière
prolongée (retour à l'état de repos).
Activer/désactiver la sonnerie
En cas d’appel entrant externe, tous les combinés sonnent. Désactiver la sonnerie :
appuyer sur la touche Etoile P de manière prolongée. Le symbole Ú s'affiche à
l'écran.
Activer la sonnerie : appuyer sur la touche Etoile P de manière prolongée.
i
Pour désactiver la sonnerie pour l'appel en court, pressez sur la
touche écran Silence.
Sonnerie discrète (Bip)
Un bip retentit lorsque vous désactivez la sonnerie. Un bip court retentit alors à la place
de la sonnerie lors d'un appel.
Maintenir la touche Étoile P longuement appuyée et presser la touche écran Bip
dans un délai de 3 secondes. L'écran affiche ºº.
Désactiver : appuyer sur la touche P de manière prolongée.
Vibreur
Les appels entrants et les autres messages sont signalés par le vibreur. Ce réglage est
indépendant du réglage de la sonnerie.
v (ouvrir le menu) ; s Sons / Audio OK ; s Vibreur OK (‰ = activé);
presser sur a de manière prolongée (retour à l'état de repos).
Sound manager (gestion mélodie)
Vous pouvez enregistrer des sonneries polyphoniques (d'une durée maximale de
4 secondes) ou les transférer à l'aide d'un câble de transfert depuis votre PC (p. 29).
Vous pouvez enregistrer jusqu'à 16 sonneries.
Enregistrer une sonnerie (via le microphone)
v(ouvrir le menu) ; sSons / Audio OK ; s Gestion mélodie OK ;
<Nouv.mélodie> OK ; Enregistr.Mélodie? OK ; l'enregistrement commence via le
microphone et se termine après 4 sec. ou an appuyant sur Fin; Sauver ; Modifier entrée
(attribuer un nom à la sonnerie) Sauver ;
appuyer sur a de manière prolongée (retour à l'état de repos).
23
Gigaset SL1 / französisch / A31008-L001-B002-1-6Z19 / start_guide_time.fm / 14.11.2003
Réglage combiné
Ecouter la sonnerie
v (ouvrir le menu) ; s Sons / Audio OK ; s Gestion mélodie OK ;
s (sélectionner la sonnerie) ; Ecouter ; appuyer sur a de manière prolongée (retour à
l'état de repos).
Editer l'entrée
v(ouvrir le menu) ; s Sons / Audio OK ; s Gestion mélodie OK ;
s (sélectionner la sonnerie) ; à ; Volume OK (Modifier le volume) ou
s Modifier entrée OK (Modifier le nom) ou s Afficher entrée OK (afficher le nom du
fichier) ou s Effacer entrée OK ; appuyer sur a de manière prolongée (retour à
l'état de repos).
Activer/désactiver les tonalités ou bips d'avertissement
Votre combiné vous informe, par des signaux sonores (bip), de l'activation des
fonctionnalités et des différents états. Vous pouvez activer/désactiver les tonalités
d'avertissement suivantes, indépendamment les unes des autres (configuration usine :
activé).
◆ Clic clavier (chaque pression sur une touche est confirmée),
◆ Tonalités de validation (tonalité de validation, tonalité d'erreur, tonalité de fin de
menu),
◆ Tonalité d'alarme batteries.
v (ouvrir le menu) ; s Sons / Audio OK ; s Tonal. avertis. OK ;
r (activer Clic clavier:) ; s (à la ligne suivante) ; r (activer Bip confir.:) ;
s (à la ligne suivante) ; r (pour Batter.: sélectionner Act., Dés. ou en
communication) ; Sauver ; appuyer sur a de manière prolongée (retour à l'état de
repos).
Remettre le combiné en configuration usine
Vous pouvez restaurer des paramètres et annuler des modifications. Les entrées des
répertoires, du journal des appels, des adresses E-Mail, la déclaration du combiné sur la
base ainsi que les images fond d'écran et les sonneries que vous avez chargées sont
conservées. Pour interrompre la réinitialisation, appuyez sur a.
v(ouvrir le menu) ; s Réglages comb. OK ; s Réinit. Combiné
OK ; Oui (confirmer la question) ; appuyer sur a de manière prolongée (retour à
l'état de repos).
24
Gigaset SL1 / französisch / A31008-L001-B002-1-6Z19 / start_guide_time.fm / 14.11.2003
Annexe
Configuration d'usine du combiné
Volume de l'écouteur
Volume pour la fonction Mains-libres
Volume de la sonnerie
Réglage horaire pour la sonnerie
Mélodie de la sonnerie
Présentation vocale du nom
Décroché automatique
Alarme batteries/clic clavier/tonalité de
confirmation
Langue d’affichage
Réveil/rendez-vous
Rendez-vous
Liste des numéros bis
Surveillance de pièce/sensibilité de la surveillance
de pièce
1
3
5
désactivée
Mélodie 1
désactivée
activé
activé
p. 22
p. 22
p. 22
p. 22
p. 22
p. 17
p. 22
p. 24
spécifique au pays
désactivée
effacé
vide
désactivée / élevée
p. 7
p. 11/p. 11
p. 11
p. 17
p. 20
Annexe
!
Entretien et contact avec les liquides
Essuyer la base et le combiné avec un chiffon légèrement humecté (pas de solvant)
ou un chiffon antistatique. Ne jamais utiliser de chiffon sec. Il existe un risque de charge
statique.
Si le combiné a été mis en contact avec un liquide, il ne faut en aucun cas le mettre
en marche. Retirer immédiatement la batterie.
Laisser le liquide s'écouler, sécher toutes les parties avec un linge absorbant.
Placer le mobile sans batterie pendant au moins 72 heures dans un endroit chaud et sec.
Ensuite, il est possible que le combiné puisse fonctionner à nouveau. Si ce n'est pas le
cas contacter le service client pour connaître la marche à suivre. Le bénéfice de la
garantie ne pourra cependant pas être accordé.
Service clients (Customer Care)
Notre assistance en ligne sur Internet :
www.my-siemens.com/customercare
En cas de réparation nécessaire ou pour faire valoir la garantie, vous trouverez une
aide simple et efficace auprès de notre
centre de services France
01 56 38 42 00
centre de services Belgique
078 15 22 21
centre de services Suisse
080 8212 000
www.my-siemens.com/contact
25
Gigaset SL1 / französisch / A31008-L001-B002-1-6Z19 / start_guide_time.fm / 14.11.2003
Annexe
Service pour la Suisse :
Omnicom AG
Industrie Neuhof 9
3422 Kirchberg b. Berne
Vous trouverez d'autres numéros de service à la fin du manuel d'utilisation, à la
rubrique « Service ».
Nous ne proposons pas d'échange ou de services de réparation dans les pays où notre
produit n'est pas distribué pas des revendeurs autorisés.
Les spécificités nationales sont prises en compte. Le combiné SL 1 est autorisé en
Europe et en Suisse.
La conformité de l’appareil aux exigences fondamentales de la directive européenne
R&TTE (99/05/CEE) est confirmée par le label CE.
Extrait de la déclaration originale :
"We, Siemens AG, declare, that the above mentioned product is manufactured according to our Full
Quality Assurance System certified by CETECOM ICT Services GmbH in compliance with ANNEX V
of the R&TTE-Directive 99/5/EC. The presumption of conformity with the essential requirements
regarding Council Directive 99/5/EC is ensured."
Senior Approvals Manager
The Declaration of Conformity (DoC) has been signed. In case of need a copy of the original DoC
can be made available via the company hotline.
Caractéristiques techniques
Batteries homologuée
Siemens Lithium Ion (LiIon), 700 mAh
Ref: V30145-K1310-X250
(Situation lors de la mise sous presse du présent manuel d'utilisation)
L'appareil est exclusivement fourni avec une batterie homologuée.
Autonomie/temps de charge du combiné
Capacité
(mAh)
Autonomie (heures)
Autonomie en
communication
(heures)
700
environ 250 (10 jours) environ 15
Temps de charge
(heures)
environ 2,5
Les temps d'utilisation et de charge indiqués ne sont valables que lors de l'utilisation des
batteries recommandées.
26
Gigaset SL1 / französisch / A31008-L001-B002-1-6Z19 / start_guide_time.fm / 14.11.2003
Annexe
Table de caractères
Police par défaut
Appuyer sur la touche correspondante plusieurs fois ou de manière prolongée :
1
2
I
4
5
L
M
N
O
Q
P
R
1x
Espace
2x
1
3x
4x
£
5x
$
6x
¥
7x
¤
8x 9x
10 x 11 x 12 x 13 x 14 x
ã
ç
ô
õ
â
a
b
c
2
ä
á
à
â
d
e
f
3
ë
é
è
ê
g
h
i
4
ï
í
ì
î
j
k
l
5
m
n
o
6
ö
ñ
ó
ò
p
q
r
s
7
ß
û
t
u
v
8
ü
ú
ù
w
x
y
z
9
ÿ
ý
æ
ø
å
.
,
?
!
0
+
-
:
¿
¡
Abc--> 123
123 --> abc
(
)
<
=
>
%
#
@
*
/
&
§
\
“
‘
;
_
Traitement de texte (sans aide à la saisie du texte)
◆ Commander le curseur avec u v t s.
◆ Effacer les caractères (à gauche du curseur) avec fC .
◆ L'insertion des caractères s'effectue à gauche du curseur.
◆ Pour passer du mode majuscule (majuscule initiale et lettres suivantes en
minuscule) au mode minuscule, presser P avant d'entrer la lettre. Si vous appuyez
de nouveau sur P, vous passez des minuscules aux chiffres. Une nouvelle pression
permet de passer de l'écriture des chiffres au mode majuscule.
◆ Pour les entrées dans les répertoires, la première lettre du nom s'écrit
automatiquement en majuscule et les lettres suivantes en minuscule.
◆ Une pression longue sur une touche permet d'afficher successivement puis de
sélectionner les caractères de la touche correspondante sur la ligne inférieure de
l'écran. Lorsque vous relâchez la touche, le caractère sélectionné est ajouté à la
zoned'édition.
– Vous pouvez voir sur l'écran quel est le mode d'édition qui est activé (majuscules,
minuscules, chiffres) :
– lors de la saisie dans l'annuaire, la ligne inférieure de l'écran affiche un « A » ou
un « a ».
Classement des entrées d'annuaire
1. Espace (représenté ici par s)
2. Chiffres (0 - 9)
3. Lettres (alphabétique)
4. Autres symboles
27
Gigaset SL1 / französisch / A31008-L001-B002-1-6Z19 / start_guide_time.fm / 14.11.2003
Annexe
Pour enregistrer une entrée qui ne sera pas classée de manière alphabétique, faire
précéder le nom d’un espacement. Cette entrée figure alors en tête de la liste (exemple:
« sCarla »). Les entrées peuvent également être numérotées (par exemple : 1Laura,
2Carla, 3Albert).
Saisie assistée de texte
L'aide à la saisie de texte EATONI vous assiste dans la saisie des noms (répertoires
principal et secondaire) mais aussi pour la rédaction des textes SMS.
Plusieurs lettres et caractères sont affectés à chaque touche entre Q et O. Ils sont
tous disposés sur une ligne de sélection juste au-dessus des touches de fonction (sous
le champ de texte) dès que vous appuyez sur une touche. Lors d'un appui touche pour
la saisie de lettres, celle la plus probable par rapport à la lettre précédente est proposée
sur fond gris. Elle figure au début de cette ligne de sélection et est insérée dans le
champ de texte.
53 ________Ç_____abc
Peter K
KLJ5
W
La saisie assistée de texte
EATONI est activée.
Adresse e-mail
¨
Ligne de sélection
Dans le cas où la lettre proposée correspond à celle que vous avez choisie, validez-la en
pressant sur la touche suivante. Si au contraire, la lettre choisie par EATONI ne
correspond pas à votre choix, pressez sur la touche dièse R jusqu'à ce que la lettre
recherchée apparaisse sur fond gris dans la ligne d'affichage et qu'elle puisse ainsi être
copiée dans la zone texte.
P
R
Presser brièvement sur la touche Étoile : passer du mode abc au mode Abc,
du mode Abc au mode 123 et du mode 123 au mode abc.
Permet de passer à la lettre suivante dans la ligne de sélection.
Activer/désactiver la saisie assistée de texte
La saisie assistée de texte est activée ou désactivée selon la fonction choisie.
Préalable : Vous vous trouvez dans une zone de saisie de texte (nom dans les
répertoires principal et secondaire, adresses E-Mail, SMS).
v (ouvrir le menu) ; s Saisie intuitive OK (‰ = activé) ; appuyer brièvement sur la
touche Raccrocher a pour revenir au champ de texte. Entrer alors le texte.
28
Gigaset SL1 / französisch / A31008-L001-B002-1-6Z19 / start_guide_time.fm / 14.11.2003
Annexe
Interface PC
Il est possible de relier le combiné SL 1 à votre ordinateur (PC) à l'aide d'un câble de
transfert de données Siemens. Votre ordinateur PC peut alors communiquer avec votre
SL 1 à l'aide du programme « Siemens Data Suite » (à télécharger gratuitement sous
http://www.my-siemens.com\gigaset-sds) et accéder aux paramètres et listes ci-après
du combiné :
Lecture des paramètres
◆ Version SW
◆ Type
◆ Code constructeur
Accès en lecture/écriture à
Répertoire principal
Adresses E-Mail
Répertoire secondaire
la liste des rendez-vous
la liste des numéros bis
◆
◆
◆
◆
◆
Accès en lecture/écriture à d'autres paramètres
réglage de la sonnerie
réglage du volume
chargement de fond d'écran
chargement de sonneries
appeler et recevoir des appels
◆
◆
◆
◆
◆
Transmission des données
Certaines fonctions transmettent d'importants volumes de données entre le combiné et
le périphérique externe. Le combiné passe alors en mode transmission de données et
l'écran affiche Echange données. Lorsque ce mode est activé, le clavier est verrouillé
et les appels entrants sont ignorés.
Le combiné passe au mode transmission de données dans les cas suivants :
◆ accès en lecture/écriture au répertoire principal
◆ accès en lecture/écriture à aux adresses E-Mail
◆ accès en lecture/écriture à la liste des au répertoire secondaire
◆ accès en lecture-écriture à la liste des rendez-vous
◆ accès en lecture-écriture à la liste des numéros bis
◆ chargement de fond
◆ chargement de sonneries
En cas d'erreur de transmission, le combiné passe automatiquement au mode repos.
29
Gigaset SL1 / französisch / A31008-L001-B002-1-6Z19 / start_guide_time.fm / 14.11.2003
Annexe
Appeler et recevoir des appels
Lorsque vous prenez un appel externe ou que vous avez une communication externe, le
combiné fonctionne comme si vous aviez exécuté ces fonctions sur le combiné.
Jeu « Balloon Shooter »
Essayez d'atteindre le maximum de ballons.
v ¢ Famille/Loisirs
¢ Balloon Shooter
soit ...
Lancer un jeu :
Presser sur la touche écran.
[RRRRRRRRRRRRRRRRRRRRR]
Départ
soit ...
Autres options :
à
Pour afficher le menu Options, appuyer sur la touche
écran.
ou
¢
¢
¢
¢
p¢
¢
¢
¢
12I
4
L
MNO
¢
¢
¢
¢
Pour déplacer le réticule, presser sur :
Pour tirer sur le ballon, presser sur la touche 5.
30
Gigaset SL1 / französisch / A31008-L001-B002-1-6Z19 / start_guide_time.fm / 14.11.2003
Annexe
Certificat de garantie France
La présente garantie bénéficie, dans les conditions ci-après, à l'utilisateur final ayant
procédé à l'acquisition de ce Produit Siemens (ci-après le Client). Pour la France, la
présente garantie ne limite en rien, ni ne supprime, les droits du Client issus des articles
1641 et suivants du Code Civil Français relatifs à la garantie légale des vices cachés.
◆ Si ce Produit Siemens et ses composants présentent des vices de fabrication et/ou de
matière dans les 24 mois suivant son achat neuf, Siemens procédera à sa réparation
ou le remplacera gratuitement et de sa propre initiative par un modèle identique ou
par un modèle équivalent correspondant à l'état actuel de la technique. La présente
garantie n'est valable que pendant une période de 6 mois à compter de sa date
d'achat neuf pour les pièces et éléments de ce Produit Siemens qui sont soumis à
l'usure (par ex. batteries, claviers et boîtiers).
◆ La présente garantie n'est pas valable en cas de non-respect des informations
contenues dans le mode d'emploi, ou en cas de dommage manifestement provoqué
par une manipulation ou une utilisation inadéquate.
◆ La présente garantie ne s'applique pas aux éléments et données fournis par le
vendeur du Produit Siemens, ou installés par le Client lui-même (par ex.
l'installation, la configuration, le téléchargement de logiciels, l'enregistrement de
données). Sont également exclus de la présente garantie le manuel d'utilisation
ainsi que tout logiciel fourni séparément sur un autre support de données, ainsi que
les Produits Siemens dotés d'éléments ou d'accessoires non homologués par
Siemens, les Produits dont les dommages sont causés volontairement ou par
négligence (bris, casses, humidité, température inadéquate, oxydation, infiltration
de liquide, surtension électrique, incendie, ou tout autre cas de force majeure), les
Produits Siemens présentant des traces d'ouverture (ou de réparation et/ou
modifications effectuées par un tiers non agréé par Siemens), et les Produits
envoyés en port dû à Siemens ou à son centre agréé.
◆ La facture ou le ticket de caisse comportant la date d'achat par le Client sert de
preuve de garantie. Une copie de ce document justifiant de la date de départ de la
garantie est à fournir pour toute mise en œuvre de la présente garantie. Un
justificatif d'achat doit au moins comporter le nom et le logo de l'enseigne, la date
d'achat, le modèle concerné et le prix. Le Client doit faire valoir ses droits à garantie
dans les deux mois de la découverte du vice du téléphone, sauf disposition
impérative contraire.
◆ Le présent Produit Siemens ou ses composants échangés et renvoyés à Siemens ou
son prestataire deviennent propriété de Siemens.
◆ La présente garantie s'applique uniquement aux Produits Siemens neufs achetés au
sein de l'Union Européenne. Elle est délivrée par Siemens SAS, 9, rue du Docteur
Finot, F- 93200 SAINT-DENIS pour les téléphones achetés en France.
◆ La présente garantie représente l'unique recours du Client à l'encontre de Siemens
pour la réparation des vices affectant le Produit Siemens. Siemens exclut donc toute
autre responsabilité au titre des dommages matériels et immatériels directs ou
indirects, et notamment la réparation de tout préjudice financier découlant d'une
perte de bénéfice ou d'exploitation, ainsi que des pertes de données. En aucun cas
Siemens n'est responsable des dommages survenus aux biens du Client sur lesquels
est connecté, relié ou intégré le Produit Siemens, sauf disposition impérative
contraire.
31
Gigaset SL1 / französisch / A31008-L001-B002-1-6Z19 / start_guide_time.fm / 14.11.2003
Annexe
◆ De même, la responsabilité de Siemens ne peut être mise en cause pour les
dommages survenus aux logiciels intégrés dans le Produit Siemens par le Client ou
tout tiers à l'exception de Siemens.
◆ La mise en jeu de la présente garantie, et l'échange ou la réparation concernant le
Produit Siemens ne font pas naître une nouvelle période de garantie, qui demeure
en tout état de cause la durée initiale, sauf disposition impérative contraire.
◆ Siemens se réserve le droit de facturer au client les frais découlant du remplacement
ou de la réparation du Produit Siemens lorsque le défaut du Produit Siemens n'est
pas couvert par la garantie. De même Siemens pourra facturer au Client les frais
découlant de ses interventions sur un Produit Siemens remis par le Client et en bon
état de fonctionnement.
Pour faire usage de la présente garantie, veuillez contacter en priorité votre revendeur,
ou bien le service téléphonique de Siemens dont vous trouverez le numéro dans le
manuel d'utilisation ci-joint.
32
Gigaset SL1 / französisch / A31008-L001-B002-1-6Z19 / start_guide_time.fm / 14.11.2003
Annexe
Certificat de garantie Belgique
Nonobstant ses droits vis-à-vis du dealer, l'utilisateur (client) peut faire valoir son droit
de garantie aux conditions suivantes :
◆ Si le nouvel appareil ou ses accessoires présentent des défauts dans les 24 mois
après l'achat suite à des vices de fabrication et/ou fautes de matériel, Siemens a le
choix soit de réparer gratuitement l'appareil soit de le remplacer par un autre
appareil de technique récente. Dans le cas de pièces exposées à l'usure (batteries,
clavier, boîtier), cette garantie sera valable pour une période de six mois après la
date d'achat.
◆ Cette garantie n'est pas d'application dans la mesure où le défaut de l'appareil
résulte d'une mauvaise utilisation et/ou du non-respect des instructions contenues
notamment dans le manuel d'utilisateur.
◆ Cette garantie ne s'applique pas aux services qui sont effectués par des dealers
autorisés ou le client lui-même (tels que installation, configuration, téléchargement
de logiciels). Les instructions d'utilisation et logiciels éventuels livrés sur des
supports d'information séparés sont également exclus de cette garantie.
◆ La preuve d'achat datée tient lieu de certificat de garantie. Pour être recevable, tout
appel à cette garantie devra être exercé dans les deux mois après constatation du
défaut.
◆ Les appareils resp. accessoires échangés qui sont retournés à Siemens dans le cadre
du remplacement, deviennent la propriété de Siemens.
◆ Cette garantie est valable pour les nouveaux appareils achetés en Union
Européenne. La garantie pour les appareils achetés en Belgique est assurée par
Siemens S.A., Chaussée de Charleroi 116, B-1060 Bruxelles.
◆ Des droits de garantie autres que ceux stipulés dans cette garantie sont exclus, sauf
si la responsabilité repose sur des dispositions impératives telles que la législation
sur la responsabilité du fait des produits.
◆ La durée de garantie ne se prolonge pas par la prestation de services fournis dans le
cadre de la garantie pendant la période de garantie.
◆ Pour autant qu'il ne s'agisse pas d'un cas de garantie, Siemens se réserve le droit de
facturer au client les frais de réparation ou de remplacement.
◆ Les dispositions susmentionnées n'impliquent aucun changement à la charge de
preuve incombant au client.
Pour bénéficier de cette garantie, veuillez prendre contact téléphoniquement avec
Siemens. Vous trouverez le numéro de téléphone dans le manuel d'utilisateur ci-joint.
Garantie Suisse
La garantie est de 12 mois.
33
Gigaset SL1 / französisch / A31008-L001-B002-1-6Z19 / SL_1SIX.fm / 14.11.2003
Index
Index
A
Activer
Rendez-vous . . . . . . . . . . . . . . . . . 11
Talkie-Walkie . . . . . . . . . . . . . . . . . 21
Affichage
Affichage 12/24 heures . . . . . . 11, 12
Espace de stockage . . . . . . . . . . . . 18
Aides auditives . . . . . . . . . . . . . . . . . . 5
Annuaire téléphonique . . . . . . . . . . . 14
Classement des entrées . . . . . . . . . 27
Ouvrir . . . . . . . . . . . . . . . . . . . . . . . 9
Annuler (opération). . . . . . . . . . . . . . 10
Appel collectif . . . . . . . . . . . . . . . . . . 13
Appeler
Externe . . . . . . . . . . . . . . . . . . . . . 12
Interne . . . . . . . . . . . . . . . . . . . . . 12
Arrêt
Réveil . . . . . . . . . . . . . . . . . . . . . . 11
Sonnerie rendez-vous . . . . . . . . . . . 12
Autonomie
du combiné . . . . . . . . . . . . . . . . . . 26
du combiné surveillance de pièce . . 20
en mode Talkie-Walkie . . . . . . . . . . 21
B
Balloon Shooter. . . . . . . . . . . . . . . . . 30
Batterie
Affichage . . . . . . . . . . . . . . . . . . . . . 6
Batterie homologuée . . . . . . . . . . . 26
Charger . . . . . . . . . . . . . . . . . . . . . . 6
Placer . . . . . . . . . . . . . . . . . . . . . . . 6
Bip . . . . . . . . . . . . . . . . . . . . . . . . . . 23
Bip d’avertissement, voir Tonalités
d’avertissement
Blocage
Verrouillage clavier . . . . . . . . . . . . . . 8
Bloc-secteur . . . . . . . . . . . . . . . . . . . . 5
C
Caractéristiques techniques . . . . . . . . 26
Classement dans l’annuaire . . . . . . . . 27
Clip ceinture . . . . . . . . . . . . . . . . . . . . 8
Combiné
Allumer/éteindre . . . . . . . . . . . . . . . 8
Clip ceinture . . . . . . . . . . . . . . . . . . 8
Déclaration sur une autre base . . . . . 8
34
Liste . . . . . . . . . . . . . . . . . . . . . . . . . 9
Préparer le téléphone . . . . . . . . . . . . 6
Rétablir la configuration usine . . . . . 24
Secret microphone . . . . . . . . . . . . . 13
Sélectionner la base . . . . . . . . . . . . . 8
Sélectionner la base pour une meilleure
réception . . . . . . . . . . . . . . . . . . . . 8
temps d’utilisation et de charge . . . . 26
Utiliser pour la surveillance de pièce 19
Configuration d’usine du combiné. . . . 24
Consignes de sécurité . . . . . . . . . . . . . . 5
Contenu de l’emballage . . . . . . . . . . . . 6
Curseur . . . . . . . . . . . . . . . . . . . . . . . . 9
Customer Care (Service clients) . . . . . . 25
D
Date / Heure / Réveil / RdV . . . . . . . . . . 11
Date anniversaire . . . . . . . . . . . . . 11, 12
Décroché automatique . . . . . . . . . . . . 22
Désactiver . . . . . . . . . . . . . . . . . . . . . 11
Combiné . . . . . . . . . . . . . . . . . . . . . 8
Sonnerie (sur le combiné) . . . . . . . . 23
Verrouillage clavier . . . . . . . . . . . . . . 8
Dièse, touche . . . . . . . . . . . . . . . . . . . . 8
Double appel (interne) . . . . . . . . . . . . 19
E
EATONI, voir Saisie assistée de texte
Echapper, touche . . . . . . . . . . . . . . . . 10
Ecouter (modèles vocaux) . . . . . . . . . 17
Ecran
Modifier la langue . . . . . . . . . . . . . . . 7
Touches . . . . . . . . . . . . . . . . . . . . . . 9
Effacer (modèles vocaux) . . . . . . . . . . 17
Effacer, touche . . . . . . . . . . . . . . . . . . 10
Enregistrer
Entrée du répertoire principal . . . . . 14
Entrée du répertoire secondaire . . . . 15
Entrer
Date anniversaire . . . . . . . . . . . . . . 11
Heure de réveil . . . . . . . . . . . . . . . . 11
Rendez-vous . . . . . . . . . . . . . . . . . . 11
Entrer une date anniversaire . . . . . . . . 11
Entretien du téléphone . . . . . . . . . . . . 25
Envoi de fiche d’un des répertoires . . . 16
Equipements médicaux . . . . . . . . . . . . 5
Gigaset SL1 / französisch / A31008-L001-B002-1-6Z19 / SL_1SIX.fm / 14.11.2003
Index
Erreur/tonalité d’erreur . . . . . . . . . . . 24
Espace de stockage . . . . . . . . . . . . . . 18
F
Film protecteur . . . . . . . . . . . . . . . . . . 6
Numéro d’appel
Enregistrer numéro de l’annuaire . . . 15
Numéros de services . . . . . . . . . . . . . 14
O
Garantie . . . . . . . . . . . . . . . . . . . . . . 31
Ouvrir
Annuaire téléphonique . . . . . . . . . . . 9
Menu . . . . . . . . . . . . . . . . . . . . . . . . 9
I
P
G
Indication du niveau de charge . . . . . . 6
Intensité de la réception . . . . . . . . . . . 2
Interface PC . . . . . . . . . . . . . . . . . . . 29
Interne
Appeler . . . . . . . . . . . . . . . . . . . . . 12
Double appel . . . . . . . . . . . . . . . . . 19
L
Langue voir Ecran
Liste
Combinés . . . . . . . . . . . . . . . . . . . . 9
Répertoire E-Mail . . . . . . . . . . . . . . 18
Liste des numéros bis . . . . . . . . . . . . 17
M
Mains-libres . . . . . . . . . . . . . . . . . . . 13
Meilleure base . . . . . . . . . . . . . . . . . . 8
Menu
Niveau menu précédent . . . . . . . . . 10
Ouvrir . . . . . . . . . . . . . . . . . . . . . . . 9
Tonalité de fin . . . . . . . . . . . . . . . . 24
Touche . . . . . . . . . . . . . . . . . . . . . 10
Mettre fin à la communication . . . . . . 12
Mettre le téléphone en service . . . . . . . 6
Microphone . . . . . . . . . . . . . . . . . . . . 2
Mise sous tension
Combiné . . . . . . . . . . . . . . . . . . . . . 8
Réveil . . . . . . . . . . . . . . . . . . . . . . 11
Verrouillage clavier . . . . . . . . . . . . . 8
Mode Ecouteur . . . . . . . . . . . . . . . . . . 2
Musique d'attente . . . . . . . . . . . . . . . 13
N
Non acquitté
Date anniversaire . . . . . . . . . . . . . . 12
Rendez-vous . . . . . . . . . . . . . . . . . 12
Numéro
Enregistrer (répertoire principal) . . . 14
Pause interchiffre . . . . . . . . . . . . . . . . 12
Préfixes . . . . . . . . . . . . . . . . . . . . . . . 14
Préparer le téléphone . . . . . . . . . . . . . . 6
R
Rappel automatique . . . . . . . . . . . . . . 17
Rappel de date anniversaire . . . . . . . . 14
Reconnaissance vocale . . . . . . . 9, 16, 17
Réglage
Date . . . . . . . . . . . . . . . . . . . . . . . . 11
Heure. . . . . . . . . . . . . . . . . . . . . . . 11
Langue d’affichage . . . . . . . . . . . . . . 7
Rendez-vous . . . . . . . . . . . . . . . . . . 11
Réveil . . . . . . . . . . . . . . . . . . . . . . . 11
Tonalité . . . . . . . . . . . . . . . . . . . . . 22
Volume de l’écouteur . . . . . . . . . . . 22
Volume de la sonnerie . . . . . . . . . . 22
Volume du haut-parleur . . . . . . . . . 22
Rendez-vous . . . . . . . . . . . . . . . . . . . 12
Répertoire E-mail . . . . . . . . . . . . . . . . 18
Répertoire principal
Enregistrer un numéro . . . . . . . . . . 14
Envoyer une fiche à un combiné . . . 16
Répertoire secondaire . . . . . . . . . . . . 14
Enregistrer un numéro . . . . . . . . . . 15
Envoyer une fiche à un combiné . . . 16
Réveil . . . . . . . . . . . . . . . . . . . . . . . . 11
S
Saisie assistée de texte . . . . . . . . . . . . 28
Secret microphone . . . . . . . . . . . . . . . 13
Sélectionner (entrée du menu) . . . . . . . 9
Sélectionner l’entrée (menu) . . . . . . . . 9
Sélectionner la base . . . . . . . . . . . . . . . 8
Service Clientèle . . . . . . . . . . . . . . . . 25
Signal d’appel (communication
interne) . . . . . . . . . . . . . 19
Signal d’avertissement, voir Tonalités
d’avertissement
35
Gigaset SL1 / französisch / A31008-L001-B002-1-6Z19 / SL_1SIX.fm / 14.11.2003
Index
Sonnerie . . . . . . . . . . . . . . . . . . . . . .
polyphonique . . . . . . . . . . . . . . . .
Sound Manager . . . . . . . . . . . . . . . . .
Surveillance de pièce . . . . . . . . . . . . .
22
23
23
19
T
Tableau des jeux de caractères . . . . . . 27
Talkie-Walkie . . . . . . . . . . . . . . . . . . . 21
Téléphoner . . . . . . . . . . . . . . . . . . . . 13
Accepter un appel entrant . . . . . . . 13
Externe . . . . . . . . . . . . . . . . . . . . . 12
Temps de charge du combiné. . . . . . . 26
Tonalité (validation/erreur/alarme
batteries/fin de menu) . . 24
Tonalité d’alarme batteries . . . . . . . . . 24
Tonalité d’erreur . . . . . . . . . . . . . . . . 24
Tonalité de confirmation . . . . . . . . . . 24
Tonalités d’avertissement . . . . . . . . . . 24
Tonalités de validation . . . . . . . . . . . . 24
Touches
« Décrocher » . . . . . . . . . . . . . . . . . . 2
1 (accès rapide) . . . . . . . . . . . . . . . . 2
Annuler . . . . . . . . . . . . . . . . . . . . . 10
Clic clavier . . . . . . . . . . . . . . . . . . . 24
Dièse . . . . . . . . . . . . . . . . . . . . . . . . 8
Échapper/Menu/Effacer/OK . . . . . . . 10
Pression sur une touche (tonalité de
confirmation) . . . . . . . . . . . . . . . 24
Touche de navigation . . . . . . . . . . . . 9
Touche de répétition de la numérotation (Bis) . . . . . . . . . . . . . . . . . . . 10
Touches écran . . . . . . . . . . . . . . . . . 9
Verrouillage clavier . . . . . . . . . . . . . . 8
Transmettre une communication . . . . 19
U
Utilisation des répertoires et
autres listes . . . . . . . . . . 14
V
Vibreur . . . . . . . . . . . . . . . . . . . . . . .
VIP (entrée de l'annuaire). . . . . . . . . .
Volume . . . . . . . . . . . . . . . . . . . . . . .
Volume de l’écouteur . . . . . . . . . . . . .
Volume du haut-parleur . . . . . . . . . . .
36
23
15
22
22
22
Gigaset SL1 / italiano / A31008-L001-B002-1-6Z19 / cover_innen.fm / 14.11.2003
s
ITALIANO
Be inspired
Gigaset SL1 / italiano / A31008-L001-B002-1-6Z19 / covers_I-II.fm / 14.11.2003
Breve descrizione
Breve descrizione
Intensità campo di ricezione
Ð 100 % i 75 %
Ñ intens. 50 % minore Ò
| nessun segnale
(lampeggia)
Tasto impegno linea
◆ Rispondere alla
chiamata
◆ Attivare la selezione
◆ Commutazione tra viva
voce e "ricevitore"
Tasto di navigazione
Apre il menu, la rubrica, la
chiamata vocale. Permette
lo spostamento nel campo
di inserimento
Tasto viva voce
◆ Commutazione tra
"ricevitore" e viva voce
◆ Se è acceso: il viva voce
è attivo
◆ Se lampeggia: chiamata
in arrivo,
ricomposizione
automatica del numero
Aprire la rubrica
Tasto 1
Scegliere segreteria di rete/
segreteria telefonica
(solo SL 150) (premere per
ca. 2 sec.)
Tasto asterisco
◆ Attivare/disattivare le
suonerie (premere per
circa 2 sec.)
◆ Durante l’inserimento di
testo, alternanza tra
scrittura maiuscola,
Tasto R
Inserire la pausa di selezione
(premere a lungo)
Display (campo di visualizzazione)
Livello di carica
=scarica U carica
= Se lampeggia: la
batteria sta per esaurirsi e/
o la batteria è in fase di
carica
Funzioni attuali e tasti
del display
Con i tasti del display si ha
accesso alle funzioni
rappresentate sul display
V
Ð
INT 1
20.05.03
•
09:45
§§§§§§§SMS§§§§§§
Microfono
Presa di
connessione per
interfaccia cuffie
e PC
Tasto di fine chiamata,
tasto acceso/spento
◆ Terminare la chiamata
◆ Annullare la funzione
◆ Tornare al livello preced.
del menu (premere
brevemente)
◆ Tornare in stand-by
(premere per circa
1 sec.)
◆ Portatile acceso/spento
(premere per circa
2 sec.)
Tasto messaggi
◆ Accesso alla lista delle
chiamate e alla lista dei
messaggi
◆ Se lampeggia:
chiamate e messaggi
nuovi
Tasto cancelletto
Tastiera bloccata/
sbloccata (premere per
circa 1 sec.)
Tasto lista di selezione
rapida
Aprire lista di selezione
rapida (premere
brevemente)
Rappresentazione di un portatile registrato su una base predisposta agli SMS.
2
Gigaset SL1 / italiano / A31008-L001-B002-1-6Z19 / SL_1IVZ.fm / 14.11.2003
Indice
Indice
Breve descrizione . . . . . . . . . . . . . . . . . . . . . . . . . . . . 2
Norme di sicurezza . . . . . . . . . . . . . . . . . . . . . . . . . . 5
Mettere in funzione il telefono . . . . . . . . . . . . . . . . 6
Mettere in funzione il portatile . . . . . . . . . . . . . . . . . . . . . . . . . . . . . . . . . . . . . . . . . . .
Registrazione . . . . . . . . . . . . . . . . . . . . . . . . . . . . . . . . . . . . . . . . . . . . . . . . . . . . . . . . .
Modificare la lingua del display . . . . . . . . . . . . . . . . . . . . . . . . . . . . . . . . . . . . . . . . . .
Cambiare base . . . . . . . . . . . . . . . . . . . . . . . . . . . . . . . . . . . . . . . . . . . . . . . . . . . . . . . .
Fissare la clip per la cintura . . . . . . . . . . . . . . . . . . . . . . . . . . . . . . . . . . . . . . . . . . . . . .
Accendere/spegnere il portatile . . . . . . . . . . . . . . . . . . . . . . . . . . . . . . . . . . . . . . . . . . .
Attivare/disattivare il blocco tastiera . . . . . . . . . . . . . . . . . . . . . . . . . . . . . . . . . . . . . . .
6
7
7
8
8
8
8
Uso del telefono e guida sul menu . . . . . . . . . . . . . 9
Tasti . . . . . . . . . . . . . . . . . . . . . . . . . . . . . . . . . . . . . . . . . . . . . . . . . . . . . . . . . . . . . . . . 9
Menu principale . . . . . . . . . . . . . . . . . . . . . . . . . . . . . . . . . . . . . . . . . . . . . . . . . . . . . . 10
Funzioni con l’ora . . . . . . . . . . . . . . . . . . . . . . . . . . 11
Impostare la data e l'ora . . . . . . . . . . . . . . . . . . . . . . . . . . . . . . . . . . . . . . . . . . . . . . . . 11
Impostare la sveglia . . . . . . . . . . . . . . . . . . . . . . . . . . . . . . . . . . . . . . . . . . . . . . . . . . . 11
Impostare il promemoria . . . . . . . . . . . . . . . . . . . . . . . . . . . . . . . . . . . . . . . . . . . . . . . 12
Telefonare . . . . . . . . . . . . . . . . . . . . . . . . . . . . . . . . 13
Telefonare sulla linea esterna e terminare una chiamata . . . . . . . . . . . . . . . . . . . . . .
Telefonare sulla linea interna e terminare la chiamata . . . . . . . . . . . . . . . . . . . . . . .
Rispondere alle chiamate . . . . . . . . . . . . . . . . . . . . . . . . . . . . . . . . . . . . . . . . . . . . . . .
Viva voce . . . . . . . . . . . . . . . . . . . . . . . . . . . . . . . . . . . . . . . . . . . . . . . . . . . . . . . . . . .
Azzerare l'audio del portatile . . . . . . . . . . . . . . . . . . . . . . . . . . . . . . . . . . . . . . . . . . . .
13
13
13
13
14
Utilizzare la rubrica e altre liste . . . . . . . . . . . . . . . 14
Rubrica e lista di selezione rapida . . . . . . . . . . . . . . . . . . . . . . . . . . . . . . . . . . . . . . . .
Gestire le voci della rubrica o delle liste di selezione rapida . . . . . . . . . . . . . . . . . . . .
Chiamata vocale . . . . . . . . . . . . . . . . . . . . . . . . . . . . . . . . . . . . . . . . . . . . . . . . . . . . . .
Unire un numero Call-by-Call a un numero di telefono . . . . . . . . . . . . . . . . . . . . . . . .
Lista di ripetizione dei numeri selezionati . . . . . . . . . . . . . . . . . . . . . . . . . . . . . . . . . .
Rubrica e-mail . . . . . . . . . . . . . . . . . . . . . . . . . . . . . . . . . . . . . . . . . . . . . . . . . . . . . . . .
Visualizzare lo spazio libero in memoria . . . . . . . . . . . . . . . . . . . . . . . . . . . . . . . . . . .
14
15
16
17
17
18
18
Utilizzare più portatili . . . . . . . . . . . . . . . . . . . . . . . 19
Consultazione sulla linea interna . . . . . . . . . . . . . . . . . . . . . . . . . . . . . . . . . . . . . . . . .
Accettare/respingere avvisi di chiamata durante una chiamata interna . . . . . . . . . . .
Utilizzare il portatile come Babycall . . . . . . . . . . . . . . . . . . . . . . . . . . . . . . . . . . . . . . .
Impostare la modalità Walkie-Talkie . . . . . . . . . . . . . . . . . . . . . . . . . . . . . . . . . . . . . .
19
19
19
20
3
Gigaset SL1 / italiano / A31008-L001-B002-1-6Z19 / SL_1IVZ.fm / 14.11.2003
Indice
Impostare il portatile . . . . . . . . . . . . . . . . . . . . . . . 22
Attivare/disattivare la risposta automatica . . . . . . . . . . . . . . . . . . . . . . . . . . . . . . . . .
Modificare il volume di conversazione . . . . . . . . . . . . . . . . . . . . . . . . . . . . . . . . . . . .
Modificare la suoneria . . . . . . . . . . . . . . . . . . . . . . . . . . . . . . . . . . . . . . . . . . . . . . . . .
Sound Manager . . . . . . . . . . . . . . . . . . . . . . . . . . . . . . . . . . . . . . . . . . . . . . . . . . . . . .
Attivare/disattivare i toni di avviso . . . . . . . . . . . . . . . . . . . . . . . . . . . . . . . . . . . . . . . .
Ripristinare i parametri iniziali del portatile . . . . . . . . . . . . . . . . . . . . . . . . . . . . . . . . .
22
22
22
23
24
24
Appendice . . . . . . . . . . . . . . . . . . . . . . . . . . . . . . . . 25
Manutenzione e contatto con liquidi . . . . . . . . . . . . . . . . . . . . . . . . . . . . . . . . . . . . . .
Servizio clienti (Customer Care) . . . . . . . . . . . . . . . . . . . . . . . . . . . . . . . . . . . . . . . . . .
Dati tecnici . . . . . . . . . . . . . . . . . . . . . . . . . . . . . . . . . . . . . . . . . . . . . . . . . . . . . . . . . .
Tabella della serie di caratteri . . . . . . . . . . . . . . . . . . . . . . . . . . . . . . . . . . . . . . . . . . . .
Inserimento di testo facilitato . . . . . . . . . . . . . . . . . . . . . . . . . . . . . . . . . . . . . . . . . . .
Interfaccia PC . . . . . . . . . . . . . . . . . . . . . . . . . . . . . . . . . . . . . . . . . . . . . . . . . . . . . . . .
Gioco “Balloon Shooter” . . . . . . . . . . . . . . . . . . . . . . . . . . . . . . . . . . . . . . . . . . . . . . . .
Condizioni di Garanzia . . . . . . . . . . . . . . . . . . . . . . . . . . . . . . . . . . . . . . . . . . . . . . . . .
Garanzia Svizzera . . . . . . . . . . . . . . . . . . . . . . . . . . . . . . . . . . . . . . . . . . . . . . . . . . . . .
25
25
27
27
28
29
30
31
31
Indice analitico . . . . . . . . . . . . . . . . . . . . . . . . . . . . 32
4
Gigaset SL1 / italiano / A31008-L001-B002-1-6Z19 / start_guide_time.fm / 14.11.2003
Norme di sicurezza
Norme di sicurezza
$
!
Utilizzare soltanto l’alimentatore in dotazione, come indicato sul lato
inferiore dell’apparecchio.
Utilizzare soltanto le batterie raccomandate, ricaricabili (pag. 27) !
Questo significa nessun altro tipo di batteria o batterie non ricaricabili, in
quanto potrebbero causare danni alla salute e alle persone.
‹
Œ
Inserire le batterie ricaricabili secondo la polarità indicata e utilizzarle
conformemente alle indicazioni delle istruzioni d’uso presenti.
L’apparecchio può creare interferenze con apparecchiature mediche.
Osservare quindi le indicazioni presenti nell’ambiente in cui ci si trova
(per esempio ambulatori).
Con apparecchi acustici, il portatile può causare fruscii molto fastidiosi.
Il portatile non è protetto dagli spruzzi d’acqua (pag. 25).
Durante la guida, è vietato telefonare (funzione Walkie-Talkie).
Disattivare il telefono durante i viaggi in aereo (funzione Walkie-Talkie) e
assicurarlo contro l’accensione accidentale.
Non utilizzare il telefono in ambienti dove sussistono rischi di esplosione
(per es. officine di verniciatura).
ƒ
In caso di cessione del Gigaset a terzi, fornire anche le istruzioni d’uso.
Smaltire la batteria e il telefono secondo quanto prescritto dalle norme per la
tutela dell’ambiente.
i
Non tutte le funzioni descritte nelle presenti istruzioni d’uso sono
disponibili in tutti i paesi.
5
Gigaset SL1 / italiano / A31008-L001-B002-1-6Z19 / start_guide_time.fm / 14.11.2003
Mettere in funzione il telefono
Mettere in funzione il telefono
La confezione contiene:
un portatile SL 1, un supporto di ricarica con alimentatore, una clip per cintura per il
portatile, una batteria, le istruzioni d’uso.
Mettere in funzione il portatile
Il display è protetto da una pellicola. Si prega di rimuovere la pellicola!
Inserire la batteria
◆ Inserire la batteria correttamente (vedere la figura a sinistra),
◆ Appoggiare il coperchio abbassato di circa 3 mm e farlo scorrere verso l’alto fino a
chiuderlo ad incastro.
◆ Per aprirlo premere sulla parte incassata e farlo scorrere verso il basso.
W
Utilizzare solo la batteria ricaricabile raccomandata da Siemens a pag. 27!
Ciò significa, non utilizzare in nessun caso una batteria comune (non
ricaricabile), poiché non si escludono danni alla salute e alle persone. Per
es. potrebbe rompersi il rivestimento della batteria (pericolo). Oppure
potrebbero risultare anomalie di funzionamento e/o danni
all’apparecchio.
Caricare la batteria
Riporre il portatile con il display rivolto in avanti nella base. Lasciare il portatile nel
supporto di ricarica per caricare la batteria, poiché al momento dell’acquisto non è
carica. Il caricamento della batteria viene segnalato in alto a destra sul display mediante
il lampeggiamento del simbolo della batteria =.
W
6
Si consiglia di effettuare la prima carica di cinque ore senza interruzioni,
indipendentemente da quanto indicato nel livello di carica! Dopo un po’
di tempo, la capacità di ricarica della batteria si riduce a causa dell’usura.
Gigaset SL1 / italiano / A31008-L001-B002-1-6Z19 / start_guide_time.fm / 14.11.2003
Mettere in funzione il telefono
Lo stato di carica della batteria viene visualizzato correttamente soltanto al termine di
un processo ininterrotto di carica/scarica. Non bisognerebbe quindi togliere
inutilmente la batteria, né terminare la procedura di caricamento prima del tempo.
◆ Una volta eseguita la prima carica, dopo ogni conversazione il
portatile può essere sempre riposto nel supporto di ricarica. La carica
è controllata elettronicamente. Questo garantisce che la batteria
venga caricata in modo da non rovinarsi.
◆ Durante la carica la batteria si surriscalda; ciò è normale e non
comporta pericoli.
i
Registrazione
Prima di poter essere utilizzato, il Gigaset SL 1 deve essere registrato manualmente. La
registrazione deve essere attivata sul portatile e sulla base.
1. Sul portatile
v
s
s
s
Aprire il menu.
OK
[______________________________________________]
Impostazioni
Scegliere e confermare.
[______________________________________________]
OK
Reg. Portatile
Scegliere e confermare.
[______________________________________________]
OK
Base 1
Scegliere la base (1–4) e confermare, per es. Base 1.
OK
Inserire il PIN di sistema della base (impostazione
all’acquisto: 0000) e confermare.
Dopo aver inserito il PIN di sistema, sul display lampeggia per es. Base 1.
2. Sulla base
Le istruzioni relative alla preparazione della registrazione del portatile sulla base sono
contenute nel manuale d’uso della base.
Modificare la lingua del display
È possibile visualizzare il testo sul display in diverse lingue.
v
s
s
s
a
Aprire il menu.
[______________________________________________]
OK
Impostazioni
Scegliere e confermare.
[______________________________________________]
OK
Lingua
Scegliere e confermare. La lingua attuale presenta il
segno ‰ .
OK
Scegliere e confermare la lingua.
Premere a lungo (si torna in stand-by).
Se per sbaglio è stata impostata una lingua errata (incomprensibile):
premere v M 2 selezionare con s la lingua corretta e premere OK per
confermare.
7
Gigaset SL1 / italiano / A31008-L001-B002-1-6Z19 / start_guide_time.fm / 14.11.2003
Mettere in funzione il telefono
Cambiare base
Se il portatile è registrato su più basi, è possibile impostarlo su una base specifica o sulla
base con la ricezione migliore (Base migliore).
v; s Impostazioni OK ; s Scegli base OK ;
s (scegliere la base registrata o Base migliore) OK .
Fissare la clip per la cintura
Fissare la clip per la cintura sul retro
del portatile fino a bloccare le
estremità laterali sporgenti nelle
tacche.
Accendere/spegnere il portatile
Per accendere: premere a lungo a il tasto di fine chiamata.
Per spegnere: premere a di nuovo a lungo in condizione stand-by il tasto di fine
chiamata.
Quando viene riposto nel supporto di ricarica, il portatile si attiva automaticamente.
Attivare/disattivare il blocco tastiera
Premere a lungo il tasto cancelletto R (sul display compare il simbolo Ø).
Per spegnere/sbloccare: premere nuovamente a lungo il tasto cancelletto R
La tastiera si sblocca automaticamente non appena giunge una chiamata. Al termine
della chiamata si blocca di nuovo.
i
8
Con la tastiera bloccata non è possibile selezionare neanche i numeri di
emergenza.
Gigaset SL1 / italiano / A31008-L001-B002-1-6Z19 / start_guide_time.fm / 14.11.2003
Uso del telefono e guida sul menu
Uso del telefono e guida sul menu
Tasti
Tasto di navigazione
Il tasto di navigazione è provvisto di quattro tasti freccia neri e dei simboli
corrispondenti. A seconda della selezione premuta, viene attivata una determinata
funzione. Nelle istruzioni d’uso, il lato da premere è evidenziato in nero, per es.: tasto
v per destra = aprire il menu.
Con il tasto di navigazione è spesso possibile eseguire anche le funzioni del tasto del
display destro.
Esempio:
Tasto di navigazione
Diverse funzioni del tasto di navigazione:
t
s
v
u
In stand-by
Attivare la chiamata vocale
(premere a lungo)
Aprire la rubrica
Nelle liste e nei menu
Scorrere verso l’alto
In un campo di inserimento
Spostare il cursore più in alto
di una riga
Scorrere verso il basso
Aprire il menu
Confermare la voce
selezionata (come OK )
Salire di un livello nel menu
o annullare
Spostare il cursore più in
basso di una riga
Spostare il cursore verso
destra
Spostare il cursore verso
sinistra
Si apre la lista dei portatili
Tasti del display
I tasti del display sono i tasti doppi orizzontali posti direttamente sotto il display. In
base alla situazione, la loro funzione cambia. La funzione attuale viene visualizzata
direttamente sul display.
Esempio:
•
§§§§§§§SMS§§§§§§
Tasti del display
9
Gigaset SL1 / italiano / A31008-L001-B002-1-6Z19 / start_guide_time.fm / 14.11.2003
Uso del telefono e guida sul menu
Quando vengono premuti i tasti, i diversi simboli hanno il seguente significato:
Þ
OK
à
f
C
Ý
ä
Tasto ripetizione dei numeri selezionati: apre la lista degli ultimi 10 numeri di
telefono.
Tasto OK: conferma la funzione del menu e/o salva l’inserimento confermandolo.
Tasto del menu: apre il menu principale in stand-by.
Durante una telefonata, apre un menu a seconda della condizione.
Tasto di cancellazione: cancella l’inserimento di un carattere per volta da destra
verso sinistra.
Tasto Escape: sale di un livello o annulla la procedura.
Aprire la rubrica e-mail.
Ritornare in stand-by da un punto qualsiasi del menu
Premere per circa 1 sec. il tasto di fine chiamata a oppure non premere nessun tasto.
Dopo 2 min. il display passa automaticamente in stand-by. Le modifiche che non sono
state confermate o archiviate premendo OK , Sì, Salva, Invia o Salva OK vengono
cancellate.
Menu principale
Per aprire il menu mentre il telefono è in stand-by premere il lato destro del tasto di
navigazione v e scorrere con s fino alla voce desiderata.
1
2
3
4
5
6
7
8
9
10
Msg.testo/SMS
Serv. di rete
BabyC/WalkieT
Appuntam/ora
Audio
Addebiti
Impostazioni
Impost.base
Segreteria
L’offerta delle voci di menu dipende dal
tipo di base e dal paese di utilizzo.
Gigaset SL1 / italiano / A31008-L001-B002-1-6Z19 / start_guide_time.fm / 14.11.2003
Funzioni con l’ora
Funzioni con l’ora
Impostare la data e l'ora
È necessario impostare la data e l’ora per poter visualizzare correttamente quando sono
arrivate le chiamate.
v; s Appuntam/ora OK ; s Data / Ora OK ; ~ (inserire giorno/mese/anno);
s (nella riga successiva) ~ (inserire ora/min.);
s (ev. nella riga successiva) r (scegliere la visualizzazione a 12 o 24 ore); Salva,
a (si torna in stand-by).
Se è impostata la visualizzazione a 12 ore, nella riga Ora: è possibile utilizzare il tasto
del display AM/PM per scegliere tra am e pm.
Impostare la sveglia
Presupposto: data e ora sono state impostate (pag. 11).
Attivare e impostare la sveglia.
v; s Appuntam/ora OK ; s Sveglia OK ; r (scegliere On);
s ~ (inserire l’ora della sveglia); Salva; a (si torna in stand-by).
Se è impostata la visualizzazione a 12 ore, nella riga Ora: è possibile utilizzare il tasto
del display AM/PM per scegliere tra am e pm.
La chiamata di sveglia si ha solo quando il portatile è in stand-by e non se sono attive le
funzioni Babycall o Walkie-Talkie, né durante una conversazione o durante una
ripetizione automatica della selezione.
Per informazioni su come impostare il volume e la melodia, leggere pag. 22.
Disattivare la sveglia
La sveglia è impostata su un’ora specifica ma non deve suonare.
v; s Appuntam/ora OK ; s Sveglia OK .
r (scegliereOff); Salva; a (si torna in stand-by).
Disattivare la chiamata di sveglia
Premere il tasto del display Suon.Off oppure premere un tasto qualsiasi.
11
Gigaset SL1 / italiano / A31008-L001-B002-1-6Z19 / start_guide_time.fm / 14.11.2003
Funzioni con l’ora
Impostare il promemoria
È possibile fare in modo che il portatile ricordi fino a cinque promemoria.
Attivare e impostare un promemoria
v; s Appuntam/ora OK ; InserireAppunt. OK ; s Appuntamento 2 (esempio) OK .
r (scegliere On); s ~ (inserire giorno/mese); s ~ (inserire ora/min.);
s Modif.; ~ (inserire il nome) OK ; Salva; a (si torna in stand-by).
Un promemoria impostato viene segnalato dal simbolo ¼.
La chiamata di promemoria si ha solo quando il portatile è in stand-by e non se sono
attive le funzioni Babycall o Walkie-Talkie, né durante una conversazione o durante una
ripetizione automatica della selezione.
Se è impostata la visualizzazione a 12 ore, nella riga Ora: è possibile utilizzare il tasto
del display AM/PM per scegliere tra am e pm.
Per informazioni su come impostare il volume e la melodia, leggere pag. 22.
Disattivare la chiamata promemoria
Quando viene segnalato un promemoria, è possibile disattivarlo con Suon.Off.
Promemoria non accettati, visualizzare e cancellare gli anniversari
v; s Appuntam/ora OK ; s Appunt.scaduti OK ; s scegliere promemoria/
anniversario).
[RRRRRRRRRRRRRRRRRRRRRR]
Cancella
Premere il tasto del display.
... poi in ogni caso
a
Premere a lungo (si torna in stand-by).
Un promemoria scaduto è contrassegnato da ¼, un anniversario scaduto da ‚.
12
Gigaset SL1 / italiano / A31008-L001-B002-1-6Z19 / start_guide_time.fm / 14.11.2003
Telefonare
Telefonare
Telefonare sulla linea esterna e terminare una chiamata
~ (inserire il numero di telefono), c premere (tasto di impegno linea) (la sequenza
delle due operazioni non è importante).
Terminare una conversazione/ interrompere la selezione: premere a (tasto di fine
chiamata).
Pausa di selezione
Tra il prefisso e il numero è possibile inserire una pausa di selezione.
Premere per circa 2 sec. il tasto S quindi inserire il numero di telefono.
Telefonare sulla linea interna e terminare la chiamata
Le conversazioni con altri portatili registrati sulla stessa base sono gratuite.
Chiamare un determinato portatile
u; s (scegliere il portatile); premerec. Oppure: premere u 2 (esempio).
Per terminare: premere a (tasto di fine chiamata).
Chiamare tutti i portatili insieme ("chiamata collettiva")
u; premere P (tasto asterisco).
Per terminare: premere a (tasto di fine chiamata).
Rispondere alle chiamate
Il portatile squilla, la chiamata viene visualizzata sul display e il tasto viva voce d
lampeggia. Premere c (tasto impegna linea) (o il tasto del display Rispondi o il tasto viva
voce d).
Se la funzione RispostaAutom. è attiva (pag. 22), per rispondere alla chiamata è
sufficiente sollevare il portatile dal supporto di ricarica.
Se la suoneria disturba, premere il tasto del display Suon.Off. Fino a quando è
visualizzata sul display, la chiamata può ancora essere accettata.
Viva voce
Attivare/disattivare il viva voce
Per chiamare utilizzando il viva voce: ~(inserire il numero di telefono); premere d
(tasto viva voce).
Durante la conversazione: premere d (tasto viva voce).
Per spegnere: premere c (tasto impegno linea).
Se si desidera appoggiare il portatile sul supporto di ricarica durante una conversazione,
è necessario tenere premuto il tasto viva voce d mentre lo si ripone.
i
Prima di utilizzare la funzione viva voce, informare l’interlocutore.
13
Gigaset SL1 / italiano / A31008-L001-B002-1-6Z19 / start_guide_time.fm / 14.11.2003
Utilizzare la rubrica e altre liste
Modificare il volume durante la conversazione in viva voce
Si sta svolgendo una conversazione e il viva voce d è attivo.
Premere nuovamente d(tasto viva voce); r volume più basso o più alto; Salva.
Azzerare l'audio del portatile
u. La conversazione viene "mantenuta" (motivo musicale).
Per terminare: premere il tasto del display Ý .
Utilizzare la rubrica e altre liste
Rubrica e lista di selezione rapida
Nella rubrica e nella lista di selezione rapida possono essere memorizzati fino a 200
numeri di telefono. La rubrica viene richiamata con il tasto s. Per ogni voce della
rubrica è possibile registrare un anniversario e contrassegnare la voce come ”VIP“.
La lista di selezione rapida è una rubrica telefonica speciale in cui è possibile archiviare
numeri di telefono particolarmente importanti, per es. numeri di telefono privati,
prefissi di operatori di rete (i cosiddetti numeri "Call-by-Call") o altri. La lista di selezione
rapida viene richiamata con il tasto C.
Fatto salvo per la memorizzazione delle voci, l’utilizzo della lista di selezione rapida
è identico all’utilizzo della rubrica.
◆ Il sistema per inserimento di testo facilitato EATONI assiste durante l’inserimento dei
nomi (pag. 28, nelle impostazioni standard è disattivato).
◆ Per informazioni su come inserire correttamente il testo, vedere la tabella della
serie di caratteri (pag. 27).
◆ Per un numero è possibile inserire fino a 32 cifre, per un nome fino a 16 lettere.
◆ Al momento dell’inserimento di un numero, tramite à , s Inserisci Pausa OK
oppure premendo il tasto S per circa 2 sec. è possibile inserire una pausa.
Salvare i numeri di telefono nella rubrica
s (aprire la rubrica); Nuova voce OK ; ~ (inserire il numero di telefono);
s (nella riga successiva); ~ (inserire i nomi); à (aprire il menu), Salva OK .
(Per inserire anche un anniversario, dopo l’inserimento del nome: utilizzando s
passare alla riga Anniver.:, premere il tasto del display Modif. e inserire la data. Premere
Salva.); premere a lungo a (si torna in stand-by).
È possibile cancellare un anniversario premendo il tasto del display Modif. sulla voce
della rubrica nel campo relativo all'anniversario, premendo Cancella dopo il
cambiamento del display e premendo Salva dopo l'ulteriore cambiamento del display.
14
Gigaset SL1 / italiano / A31008-L001-B002-1-6Z19 / start_guide_time.fm / 14.11.2003
Utilizzare la rubrica e altre liste
Chiamata promemoria di un anniversario
Una chiamata promemoria viene segnalata sul portatile dalla melodia selezionata. Sul
display, la voce della rubrica viene contrassegnata con ‚ ‚ ‚.
i
Se il telefono è collegato a un sistema telefonico, può essere necessario
inserire le cifre del prefisso interurbano per le prime cifre della voce della
rubrica.
Salvare numeri di telefono nella lista di selezione rapida
È possibile attribuire una cifra a un massimo di nove voci della lista di selezione
rapida (0, 2–9). Premendo a lungo una di queste cifre mentre ci si trova in stand-by e
premendo il tasto impegno linea c, si viene immediatamente connessi al numero di
telefono corrispondente alla cifra.
C (aprire la lista di selezione rapida); Nuova voce OK ; ~ (inserire il numero di
telefono); s (nella riga successiva) ~(inserire i nomi); à (aprire il menu); Salva
OK . (Per inserire una cifra di selezione rapida, dopo l’inserimento del nome:
utilizzando s passare alla riga Sul tasto:, con r scegliere una cifra [0, 2-9] per
questo numero di telefono, premere il tasto del display Salva). Premere a lungo a (si
torna in stand-by).
Le cifre già utilizzate non possono essere assegnate due volte.
Selezionare con la rubrica/lista di selezione rapida
s o C (aprire la rubrica/lista di selezione rapida); s (scegliere la voce); c.
Gestire le voci della rubrica o delle liste di selezione rapida
Per utilizzare una delle seguenti funzioni di menu, premere il tasto della rubrica s o il
tasto della linea di selezione rapida C. Scorrere con s fino alla voce e quindi premere
v per aprire il menu. Scorrere con s fino alla funzione desiderata.
Oppure: s oppure C; ~ (inserire le lettere iniziali); ev. scorrere con s o
~ inserire altre lettere del nome; c.
Utilizza Numero
Modifica
Cancella
Voce VIP
Copia e modifica
Trasferisci
Cancella Tutto
Trasfer.Tutto
Memoria Libera
Vale solo per la rubrica (s)
Vale solo per la rubrica (s)
Se è stata selezionata una voce, per visualizzare o modificare la voce premere il tasto del
display Visualiz. e quindi eventualmente Modif..
15
Gigaset SL1 / italiano / A31008-L001-B002-1-6Z19 / start_guide_time.fm / 14.11.2003
Utilizzare la rubrica e altre liste
Le funzioni "Contrassegnare come VIP" e "Copiare e modificare"
Le voci della rubrica corrispondenti a chiamanti particolarmente importanti possono
essere selezionate come VIP (Very Important Person), in modo che venga loro attribuita
una melodia particolare. In questo modo, dalla suoneria è possibile capire chi è il
chiamante. Presupposto: trasmissione del numero di telefono.
Per evitare di immettere due volte una voce simile, è possibile inserire una copia e
modificare questa voce.
Inviare a un portatile voci singole o una lista completa
È possibile trasmettere voci singole o la lista completa a un altro portatile SL 1, S1, C2 o
Comfort della serie Gigaset 4000, 3000 e 2000 registrato sulla stessa base. Il campione
vocale registrato e le cifre per la selezione rapida non vengono trasmesse. Le
impostazioni VIP vengono trasmesse in base al tipo di portatile
s o C (aprire la rubrica/lista di selezione rapida); s (scegliere la voce);
v (aprire il menu); s Trasferisci OK o s Trasfer.Tutto OK );
~ (inserire il numero interno del portatile destinatario); OK .
Se dopo che è stata inviata una voce, questa viene confermata con il tasto del display Sì
è possibile scegliere altre voci. Premendo il tasto del display No viene terminato il
processo di invio.
Chiamata vocale
Con la chiamata vocale la selezione viene effettuata pronunciando il nome
dell’interlocutore. A questo scopo occorre registrare un campione vocale, in altre parole
il nome pronunciato viene memorizzato nel telefono.
Per ogni voce possono registrare un campione vocale fino a quattro utenti. Prima della
registrazione, l’utente deve "identificarsi", per es. come Utente 2.
Nel complesso, possono essere memorizzati 23 campioni vocali per le voci della
rubrica. Una voce con un campione vocale registrato è contrassegnata nella rubrica
vocale con ´.
Registrare un campione vocale per una voce della rubrica esistente
Pronunciare il campione vocale in un ambiente silenzioso (a una distanza di ca. 25 cm).
Fase 1: aprire la rubrica per la selezione vocale:
s (aprire la rubrica); s (scegliere una voce); Voce; s Utente 2 (esempio) OK .
Fase 2: iniziare la registrazione:
Registr.; OK (Confermare la richiesta sul display). Alla comparsa della richiesta sul
display, pronunciare il nome. Alla comparsa di una nuova richiesta sul display, ripetere
il nome. La registrazione viene memorizzata automaticamente.
Premere a lungo a (si torna in stand-by).
Se il campione vocale è troppo simile a quello di un altro utente, la somiglianza viene
segnalata con un messaggio. Terminare questo messaggio con Ý , tornare all’inizio
della registrazione e ripeterla.
Selezionare con la chiamata vocale: premere a lungo il tasto t e pronunciare il
nome.
16
Gigaset SL1 / italiano / A31008-L001-B002-1-6Z19 / start_guide_time.fm / 14.11.2003
Utilizzare la rubrica e altre liste
Annuncio del nome alla ricezione di una chiamata
In caso di una chiamata esterna in arrivo, oltre alla suoneria è possibile far sì che venga
annunciato una volta il nome del chiamante.
Presupposti: trasmissione del numero di telefono. È stato registrato un campione
vocale (pag. 16).
Attivazione/disattivazione dell’annuncio del nome
v (aprire il menu); s Audio OK ; s Impost.suoneria OK ; Chiamate est. OK ;
2 volte s (nella seconda riga), r (ID Chiamant) attivare/disattivare; Salva;
Premere a lungo a (si torna in stand-by).
Ascoltare il campione vocale
Aprire la rubrica per la selezione vocale (v. Fase 1, pag. 16). Quindi:
s (scegliere una voce); Ascolta; premere a a lungo (si torna in stand-by).
Modificare o cancellare il campione vocale
Aprire la rubrica per la selezione vocale (v. Fase 1, pag. 16). Quindi:
s (scegliere una voce); v (aprire il menu); Registra modello OK o s Cancella
modello OK ; Premere a lungo a (si torna in stand-by).
Dopo la cancellazione di una voce, il numero di telefono e il nome restano conservati.
Vengono conservati anche i campioni vocali degli altri utenti.
Modificare il nome dell’utente
s (aprire la rubrica); s (scegliere una voce); Voce;
s Utente 2 (esempio); Modif.; ~ (inserire il nome) Salva;
Premere a lungo a (si torna in stand-by).
Unire un numero Call-by-Call a un numero di telefono
Si tratta di una funzione che consente di selezionare un prefisso di un operatore di rete,
memorizzato nella lista di selezione rapida, prima del numero di telefono
("congiungimento").
C (aprire la lista di selezione rapida); s (scegliere la voce); à (aprire il menu);
Utilizza Numero OK ; s (aprire la rubrica); s (scegliere una voce) OK ; oppure ~
inserire il numero; c.
Lista di ripetizione dei numeri selezionati
Nella lista dei numeri selezionati si trovano gli ultimi dieci numeri diversi selezionati.
Ripetizione manuale dei numeri selezionati
Þ (aprire la lista di ripetizione dei numeri selezionati); s (scegliere una voce); c.
17
Gigaset SL1 / italiano / A31008-L001-B002-1-6Z19 / start_guide_time.fm / 14.11.2003
Utilizzare la rubrica e altre liste
Ripetizione automatica dei numeri selezionati
Con questa funzione, il numero viene automaticamente composto ogni 20 secondi. Se
l'utente risponde: premere c (tasto impegno linea). In caso di mancata risposta, la
chiamata viene interrotta dopo circa 30 secondi. Dopo dieci tentativi falliti, la funzione
si disattiva.
Premere a (tasto di fine chiamata); • (aprire la lista dei numeri selezionati);
v (aprire il menu); RiselezioneAutom. OK .
Interrompere la ripetizione automatica dei numeri selezionati: premere il tasto del
display Off oppure premere un tasto qualsiasi.
Gestire le voci della lista di ripetizione dei numeri selezionati
Possono essere utilizzate le seguenti funzioni di menu:
• (aprire la lista dei numeri selezionati); s (scegliere una voce); v (aprire il
menu); s (scegliere la funzione).
RiselezioneAutom.
Utilizza Numero
Copia in Rubrica
Cancella
Cancella Tutto
Rubrica e-mail
Nella rubrica e-mail vengono archiviati gli indirizzi e-mail. Complessivamente può
essere memorizzato un massimo di 200 voci nella rubrica, nella rubrica e-mail e nella
lista di selezione rapida.
Le voci della rubrica e-mail vengono gestite come una voce della rubrica pag. 15.
Memorizzare nuovi indirizzi e-mail
Fase 1: aprire la rubrica e-mail:
s (aprire la rubrica) s Rubrica E-mail OK .
Fase 2: inserire una voce e-mail:
Nuova voce OK ; ~ (inserire l’indirizzo); à
(aprire il menu);
( ev. s, “.”, “@” oppure scegliere la funzione di inserimento testo facilitato OK ). Con
l’inserimento testo facilitato attivato, premere 1 volta a lungo e 1 volta brevemente R
Fase 3: memorizzare una voce e-mail:
à (aprire il menu); Salva OK ; Premere a lungo a (si torna in stand-by).
Dopo aver selezionato una voce, premere il tasto del display Visualiz., quindi Modif. e
inserire l’indirizzo. Salvare come descritto in ”Fase 3“.
Visualizzare lo spazio libero in memoria
Lo spazio in memoria viene suddiviso tra la rubrica, la lista di selezione rapida (pag. 14)
e la rubrica e-mail (pag. 18). Viene visualizzato lo spazio libero in tutte le liste.
s (aprire la rubrica); s (scegliere una voce); v (aprire il menu);
s Memoria Libera OK ; Premere a lungo a (si torna in stand-by).
18
Gigaset SL1 / italiano / A31008-L001-B002-1-6Z19 / start_guide_time.fm / 14.11.2003
Utilizzare più portatili
Utilizzare più portatili
Trasferire la chiamata esterna a un altro portatile
u (aprire la lista numeri interni); s (scegliere un determinato portatile oppure
Chiam.collettiva); OK .
L’utente interno risponde: premere a (tasto di fine chiamata).
Se l’utente non risponde o è occupato, la chiamata torna automaticamente indietro (sul
display si legge Richiamata).
Consultazione sulla linea interna
Durante una conversazione esterna, è possibile effettuare una chiamata interna.
u (aprire la lista numeri interni); s (scegliere un portatile), OK .
Per terminare: premere il tasto del display Fine (si torna all’utente esterno).
Accettare/respingere avvisi di chiamata durante una chiamata
interna
Se durante una conversazione interna giunge una seconda chiamata dalla linea
esterna, si sente un breve tono di avviso. Premere il tasto del display Rispondi o Rifiuta.
Il tono di avviso rifiutato resta udibile sugli altri portatili registrati.
Utilizzare il portatile come Babycall
Con questa funzione, viene chiamato un numero interno o esterno memorizzato in
precedenza non appena nella stanza viene raggiunto il livello di rumore impostato.
Anche dopo la fine della chiamata, la funzione Babycall resta attiva sul portatile.
La distanza tra il portatile e il bambino deve essere di almeno 1 – 2 metri.
Il microfono deve essere rivolto verso il bambino.
Se la funzione Babycall è attiva, le chiamate in arrivo vengono segnalate sul portatile
che si trova nelle vicinanze del bambino senza suoneria, solo mediante visualizzazione
sul display. Il display e la tastiera non sono illuminati.
Durante l’immissione di un numero esterno, assicurarsi che la linea a cui viene inoltrata
la chiamata Babycall non sia bloccata da una segreteria telefonica attiva.
◆ Quando si inoltra la funzione Babycall su un numero esterno, ricordarsi di avvisare il
proprietario di tale numero.
◆ La chiamata Babycall a un numero esterno si interrompe dopo circa 90 sec., quella
a un numero interno (portatile) dopo circa 180 sec. (a seconda della base).
W
Prima di uscire, verificare l’impostazione della funzione Babycall (ad
es. sensibilità e connessione).
i
La funzione Babycall attiva riduce notevolmente l’autonomia del
portatile. Eventualmente, inserire il portatile che si trova in prossimità del
bambino nel supporto di ricarica in modo da essere certi che la batteria
non si esaurisca.
La funzione Babycall è possibile anche nella modalità Walkie-Talkie.
19
Gigaset SL1 / italiano / A31008-L001-B002-1-6Z19 / start_guide_time.fm / 14.11.2003
Utilizzare più portatili
Attivare la funzione Babycall e inserire per la prima volta il numero di
destinazione
Fase 1: aprire il campo di inserimento: v; s BabyC/WalkieT OK ; Baby Call OK .
Fase 2: attivare la funzione Babycall: r (scegliere On nella riga BabyCall:);
Fase 3: inserire il numero di destinazione: s (nella riga successiva); Modif.;
Inserire il numero di telefono interno : INT s (scegliere il portatile) OK ; oppure:
inserire il numero di telefono esterno: ~; à (aprire il menu); Salva OK ;
Fase 4: impostare la sensibilità: Ev. s (nella riga successiva); r; Salva;
La funzione Babycall è attiva.
Se la funzione Babycall è attiva, con v (aprire il menu) è possibile passare direttamente
all’impostazione Babycall.
Disattivare la funzione Babycall
È possibile disattivare la funzione Babycall dall’esterno (a seconda della base).
Accettare la chiamata avviata dalla funzione Babycall e premere i tasti O R. Trascorsi
circa 90 sec. dal termine del collegamento, la funzione è disattivata. Non vi saranno più
chiamate Babycall. Le altre funzioni Babycall sul portatile (per es. nessuna suoneria)
resteranno attive finché non verrà premuto il tasto del display Off.
i
Per riattivare la funzione Babycall con lo stesso numero di telefono,
occorre ripetere l’attivazione e memorizzare con Salva.
Impostare la modalità Walkie-Talkie
La funzione Walkie-Talkie consente la comunicazione tra due portatili,
indipendentemente da quanto questi si trovino distanti dalla base (portata max. 300
m).
Presupposto:
◆ entrambi i portatili sono stati registrati sulla stessa base (consigliato per la funzione
Babycall) o
◆ entrambi i portatili sono registrati su basi diverse ed entrambi sono impostati su
Base migliore (pag. 8) o
◆ uno dei portatili non è registrato su nessuna base e il portatile registrato è impostato
su Base migliore o
◆ entrambi i portatili non sono registrati su nessuna base.
Nella modalità Walkie-Talkie, i portatili non sono più raggiungibili dalle chiamate in
arrivo. L’autonomia dei portatili si riduce notevolmente.
20
Gigaset SL1 / italiano / A31008-L001-B002-1-6Z19 / start_guide_time.fm / 14.11.2003
Utilizzare più portatili
Attivare / disattivare la modalità Walkie-Talkie
v (aprire il menu); s BabyC/WalkieT OK ; s Walkie-Talkie OK .
Per disattivare: Premere il tasto del display Off.
Premere c (tasto impegno linea) oppure d (tasto viva voce). La chiamata viene
trasmessa a tutti i portatili in modalità Walkie-Talkie. L'impostazione della suoneria e dei
toni di avviso viene effettuata come se il portatile fosse a contatto con la base (pag. 22).
L’impostazione della suoneria nella modalità Walkie-Talkie non è possibile.
L'attivazione/disattivazione della suoneria (pag. 23) o del blocco tastiera (pag. 8) sono
possibili nella modalità Walkie-Talkie.
Per aprire il menu, premere il tasto del display ©.
i
La modalità Walkie-Talkie viene conservata anche quando il portatile
viene spento e riacceso.
Utilizzare il portatile come Babycall nella modalità Walkie-Talkie
à (aprire il menu); s Baby Call OK ; r (scegliere On);
s (nella riga successiva); r (scegliere basso o alto); Salva.
La chiamata Babycall viene inoltrata solo ai portatili che si trovano in modalità WalkieTalkie.
W
Prima di uscire, verificare l’impostazione della funzione Babycall (ad
es. sensibilità e connessione). Successivamente la distanza tra i
portatili non dovrebbe più essere modificata (portata)
Premere il tasto del display Off sul portatile Babycall per disattivare il Babycall. Il portatile
torna nella normale modalità Walkie-Talkie.
21
Gigaset SL1 / italiano / A31008-L001-B002-1-6Z19 / start_guide_time.fm / 14.11.2003
Impostare il portatile
Impostare il portatile
Attivare/disattivare la risposta automatica
Se è stata attivata questa funzione, basta sollevare il portatile ad ogni chiamata dal
supporto di ricarica, senza dover premere il tasto di impegno linea (impostazione
d’acquisto: on).
v (aprire il menu); s Impostazioni OK ; RispostaAutom. OK (‰ = on).
Premere a lungo a (si torna in stand-by).
Modificare il volume di conversazione
È possibile impostare il volume del viva voce su cinque livelli e il volume del ricevitore
su tre livelli, anche durante una conversazione esterna.
v (aprire il menu); s Audio OK ; Volume telefono OK ; r (scegliere il volume del
viva voce); s (nella riga successiva) r (scegliere il volume del ricevitore); Salva;
premere a lungo a (si torna in stand-by).
Risalto del suono
È possibile migliorare la qualità del suono delle melodie lunghe (4-10).
v (aprire il menu); s Audio OK ; s EnfasiSuoneria OK (‰ = ON); premere a lungo
a(si torna in stand-by).
Modificare la suoneria
È possibile scegliere tra sei impostazioni per il volume e 26 melodie (di cui 16 in
polifonia). Le melodie in polifonia sono disponibili soltanto se precedentemente
registrate con il Sound Manager o caricate con l’interfaccia PC.
Impostazioni per le chiamate esterne, il controllo a tempo e l’annuncio del
nome
v (aprire il menu); s Audio OK ; s Impost.suoneria OK ; Chiamate est. OK ;
r (scegliere il volume); s (nella riga successiva) r (scegliere la melodia);
s (eventualmente nella riga successiva) r (attivare l’annuncio del nome, pag. 17);
Attivare il controllo a tempo
Selezionare C.Tempo; r (Selezionare Ctrl. Tempo: On.); s passare alla riga Da:
(inserimento del tempo in quattro cifre); s passare alla riga A: (inserimento del tempo
in quattro cifre); s r (inserimento del volume delle melodie); Salva (salvare il
controllo a tempo); premere ancora Salva (salvare l’impostazione); premere a a lungo
(si torna in stand-by).
22
Gigaset SL1 / italiano / A31008-L001-B002-1-6Z19 / start_guide_time.fm / 14.11.2003
Impostare il portatile
Impostazione individuale delle chiamate interne, della chiamata di sveglia
e dei promemoria
v (aprire il menu); s Audio OK ; s Impost.suoneria OK ; s (scegliere la funzione)
OK ;
r (scegliere il volume); s (nella riga successiva) r (scegliere la melodia);
Salva. (Inoltre, nell’impostazione Tutte uguali premere Sì per confermare la richiesta).
Premere a lungo a (si torna in stand-by).
Attivare/disattivare la suoneria
Quando giungono chiamate esterne squillano tutti portatili. Disattivare la suoneria:
premere a lungo il tasto asterisco P. Sul display appare il simbolo Ú.
Attivare la suoneria: premere a lungo il tasto asterisco P.
i
Per disattivare la suoneria per la chiamata attuale, premere il tasto
del display Suon.Off.
Attivare/disattivare il tono di attenzione
Quando viene disattivata la suoneria, è possibile attivare un tono di attenzione. In caso
di chiamata, al posto della suoneria si sente un tono breve ("Beep").
Premere a lungo il tasto asterisco P ed entro 3 sec. premere il tasto del display Beep.
Sul display si legge º.
Per disattivare: premere a lungo il tasto asterisco P
Vibrazione
Le chiamate in entrata ed altri messaggio vengono segnalati dalla vibrazione. Questa
impostazione dipende dalle impostazioni della suoneria.
v (aprire il menu); s Audio OK ; s Vibrazione OK (‰ = on); a premere a lungo
(si torna in stand-by).
Sound Manager
Si possono registrare melodie in polifonia (durata mass. 4 sec.) o le si possono trasferire
con un cavo dati (pag. 29). Si possono salvare fino a 16 melodie.
Registrare una melodia
v (aprire il menu); s Audio OK ; s Suonerie OK ; <Nuova Suon.> OK ;
Registra suoneria? OK ; Fine premere o attendere 4 secondi; Salva; Modifica (inserire il
nome della melodia) Salva; a premere a lungo (si torna in stand-by).
Riprodurre una melodia
v (aprire il menu); s Audio OK ; s Suonerie OK ; s (scegliere la melodia).
Ascolta; Premerea a lungo (si torna in stand-by).
23
Gigaset SL1 / italiano / A31008-L001-B002-1-6Z19 / start_guide_time.fm / 14.11.2003
Impostare il portatile
Modificare la voce
v (aprire il menu); s Audio OK ; s Suonerie OK ; s (scegliere la melodia).
à ; Volume OK (modificare il volume) oppure s Modifica OK (Modificare il
nome) oppure s Visualizza OK (Visualizzare il nome del file) oppure
OK ; Premerea a lungo (si torna in stand-by).
s Cancella
Attivare/disattivare i toni di avviso
Il portatile indica acusticamente diverse attività e situazioni. I seguenti toni di avviso
possono essere attivati o disattivati in modo indipendente (impostazione all’acquisto:
on).
◆ Acustica tasti (ogni pressione di tasti viene confermata),
◆ Toni di conferma (tono di conferma, tono di errore, tono di fine menu),
◆ Tono batteria.
v (aprire il menu); s Audio OK ; s Toni di avviso OK ;
r (attivare Tono tasti:); s (nella riga successiva) r (attivare Conferma:);
s (nella riga successiva) r (per BatScar: On, Off o scegliere in conversazione)
Salva; Premere a lungo a (si torna in stand-by).
Ripristinare i parametri iniziali del portatile
È possibile resettare singole impostazioni e modifiche. Le voci della rubrica, della lista
chiamate, della rubrica e-mail e della lista di selezione rapida, la registrazione del
portatile sulla base nonché lo screensaver e le melodie che sono stati caricati, vengono
conservati. Con a si interrompe la procedura.
v (aprire il menu); s Impostazioni OK ; s Reset Portatile OK ; Sì (confermare la
richiesta); premere a lungo a (si torna in stand-by)
Impostazione del portatile al momento dell’acquisto
Volume del ricevitore
Volume del viva voce
Volume della suoneria
Controllo a tempo per la suoneria
Melodia suoneria
Annuncio del nome
Risposta automatica
Tono batteria/acustica tasti/tono di conferma
Lingua display
Sveglia/promemoria
Nome promemoria
Lista di ripetizione dei numeri selezionati
Babycall/Sensibilità Babycall
24
1
3
5
disattivato
Melodia 1
disattivato
attivo
attivo
specifica del paese
disattivato
cancellato
vuota
disattivato/alto
pag. 22
pag. 22
pag. 22
pag. 22
pag. 22
pag. 17
pag. 22
pag. 24
pag. 7
pag. 11/pag. 12
pag. 12
pag. 17
pag. 20
Gigaset SL1 / italiano / A31008-L001-B002-1-6Z19 / start_guide_time.fm / 14.11.2003
Appendice
Appendice
Manutenzione e contatto con liquidi !
Pulire il portatile con un panno umido (senza solvente) o antistatico. Non utilizzare in
nessun caso un panno asciutto. Possono generarsi cariche elettrostatiche dannose per
l’apparato.
Qualora il portatile fosse venuto a contatto con liquidi, non accenderlo in nessun caso.
Estrarre immediatamente la batteria.
Lasciar defluire il liquido dall'apparecchio ed asciugare quindi tutte le parti con un
panno.
Lasciare il portatile senza batteria per almeno 72 ore in un luogo caldo e asciutto. A
questo punto, in molti casi è possibile rimetterlo in funzione.
Servizio clienti (Customer Care)
Se desiderate porre domande tecniche o relative all’uso dell’apparecchio, potete
consultare il nostro sito Internet:
http://www.my-siemens.com/customercare
oppure potete rivolgervi al servizio clienti che vi supporterà per ogni esigenza.
Italia: Servizio Clienti Siemens
Tel. 02-243.64400
Fax 02 -243. 64401
Svizzera: Servizio Clienti Siemens
Tel. 0848 212 000
www.my-siemens.com/contact
Tenere a portata di mano la prova d’acquisto.
25
Gigaset SL1 / italiano / A31008-L001-B002-1-6Z19 / start_guide_time.fm / 14.11.2003
Appendice
Centro di riparazioni (solo per la Svizzera):
Omnicom AG
Industrie Neuhof 9
3422 Kirchberg b. Bern
Nei paesi in cui il nostro prodotto è venduto da rivenditori non autorizzati non sono
offerti servizi di sostituzione o riparazione.
Conformità CE
Con la presente Siemens AG dichiara che questo cordless è conforme ai requisiti
essenziali ed alle altre disposizioni pertinenti stabilite dalla Direttiva 1999/05/CEE.
La conformità dell’apparecchio alla Direttiva R&TTE (1999/05/CEE) è confermata dalla
presenza del marchio CE.
Sono considerate anche le particolarità specifiche del Paese. Il terminale portatile SL 1
gode di approvazione per la Svizzera e tutti i paesi della UE.
Estratto della dichiarazione originale
”We, Siemens AG, declare, that the above mentioned product is manufactured according to our Full
Quality Assurance System certified by CETECOM ICT Services GmbH in compliance with ANNEX V
of the R&TTE-Directive 99/5/EC. The presumption of conformity with the essential requirements
regarding Council Directive 99/05/EC is ensured."
Senior Approvals Manager“
The Declaration of Conformity (DoC) has been signed. In case of need a copy of the original DoC
can be made available via the company hotline.
È possibile richiedere copia integrale della Dichiarazione di Conformià alla Direttiva R&TTE
(1999/05/CEE) al Sevizio Clienti Siemens (vedi pag. 25).
26
Gigaset SL1 / italiano / A31008-L001-B002-1-6Z19 / start_guide_time.fm / 14.11.2003
Appendice
Dati tecnici
Batteria raccomandata
Agli ioni di litio (LiIon), 700 mAh
(Condizione valida al momento della stampa delle istruzioni d’uso)
L’apparecchio viene venduto soltanto con la batteria adatta.
Autonomia/tempo di ricarica del portatile
Capacità
(mAh)
Autonomia in
stand-by (ore)
Autonomia in
Tempo di ricarica
conversazione (ore) (ore)
700
circa 250 (10 giorni) circa 15
circa 2,5
I tempi di autonomia e ricarica indicati valgono solo se si utilizza la batteria
raccomandata.
Tabella della serie di caratteri
Scrittura standard
Premere più volte o a lungo il tasto corrispondente:
1
2
I
4
5
L
M
N
O
Q
P
R
1
volte
2
volte
3
4
5
6
7
8
9
10
11
12
13
14
volte volte volte volte volte volte volte volte volte volte volte volte
Spazio
1
£
$
¥
¤
a
b
c
2
ä
á
à
â
d
e
f
3
ë
é
è
ê
g
h
i
4
ï
í
ì
î
j
k
l
5
m
n
o
6
ö
ñ
ó
ò
p
q
r
s
7
ß
û
â
ã
ç
ô
õ
t
u
v
8
ü
ú
ù
w
x
y
z
9
ÿ
ý
æ
ø
å
.
,
?
!
0
+
-
:
¿
¡
Abc -->
123
123 -->
abc
(
)
<
=
>
%
#
@
*
/
&
§
\
“
‘
;
_
Elaborare il testo (senza sistema per inserimento di testo facilitato)
◆ Il cursore viene comandato con u v t s.
◆ Cancellare i caratteri (a sinistra del cursore) con fC .
◆ I caratteri vengono inseriti a destra del cursore.
◆ Per passare dalla scrittura maiuscola (1a lettera maiuscola, quelle successive
minuscole), alla scrittura minuscola, premere Pprima di inserire la lettera.
Premendo di nuovo P si passa dalla scrittura minuscola a quella in cifre. Premendo
nuovamente si passa dalla scrittura in cifre, alla scrittura maiuscola.
◆ Nel caso delle voci della rubrica, la prima lettera del nome viene scritta
automaticamente maiuscola, quelle successive minuscole.
27
Gigaset SL1 / italiano / A31008-L001-B002-1-6Z19 / start_guide_time.fm / 14.11.2003
Appendice
◆ Se viene premuto a lungo un tasto, i caratteri del tasto corrispondente vengono
visualizzati nell’ultima riga del display ed evidenziati l’uno dopo l’altro. Quando il
tasto viene rilasciato, il carattere evidenziato viene inserito nel campo di
inserimento.
– Sul display viene indicato se è impostata la scrittura con caratteri maiuscoli,
minuscoli o in cifre.
– Durante l’inserimento nella rubrica, nell’ultima riga del display si legge "A" o "a".
Sequenza delle voci della rubrica
1. Spazio (qui rappresentato con s)
2. Numeri (0–9)
3. Lettere (in ordine alfabetico)
4. Simboli restanti
Per evitare di seguire l’ordine alfabetico, inserire uno spazio prima del nome. Questa
voce viene inserita all’inizio della rubrica (esempio: ”sCarla"). Le voci possono essere
numerate anche con cifre (per es. "1Ale", "2Carla", "3Alberto").
Inserimento di testo facilitato
Il sistema per inserimento di testo faciliato EATONI aiuta a scrivere i nomi (rubrica, lista
di selezione rapida o rubrica e-mail).
Ad ogni tasto da Q a O sono associati più caratteri che possono essere ordinati in
una riga di selezione direttamente sopra i tasti del display (sotto il campo di
inserimento testo), non appena viene premuto un tasto. Quando viene immessa una
lettera, viene visualizzata in negativo la lettera probabilmente desiderata. Tale
lettera si trova all’inizio della riga di selezione e viene ripresa nell’area destinata al testo.
53 ________Ç_____abc
Pietro K
KLJ5
W
L’inserimento di testo facilitato
EATONI è attivo
Indirizzo e-mail
¨
Riga di selezione
Se questa lettera è quella desiderata, confermarla premendo il tasto successivo. Se il
carattere selezionato da EATONI non corrisponde a quello desiderato, premere il tasto
cancelletto R fino a leggere il carattere desiderato in negativo nella riga di
visualizzazione, in modo che venga ripreso nell’area destinata al testo.
P
R
28
Premere brevemente il tasto asterisco. Si passa dal modo abc ad Abc, da Abc
a 123 e da 123 a abc.
Passa alle lettere successive nella riga di selezione.
Gigaset SL1 / italiano / A31008-L001-B002-1-6Z19 / start_guide_time.fm / 14.11.2003
Appendice
Attivare / disattivare il sistema per inserimento di testo facilitato
L’inserimento di testo facilitato viene attivato o disattivato in base alla funzione.
Presupposto: trovarsi in un campo di inserimento testo (nome nella rubrica o lista di
selezione rapida o rubrica e-mail).
v (aprire il menu); s AiutoDigit.Testo OK (‰ = on);
Premere brevemente il tasto di fine chiamata a (si torna nel campo di inserimento).
Immettere il testo.
Interfaccia PC
i
Funzione non disponibile in tutti i paesi.
Il portatile SL 1 può essere collegato al proprio computer mediante un cavo per la
trasmissione dati Siemens. Il computer, con l’ausilio del programma “Siemens Data
Suite” (che può essere scaricato gratuitamente da
http:\\www.my-siemens.com\gigaset-sds), può comunicare con il SL 1 ed accedere ai
seguenti parametri ed elenchi del portatile:
Selezione dei parametri
◆ Versione SW
◆ Tipo
◆ Codice del produttore
Accesso in modalità di lettura / scrittura a
rubrica
rubrica e-mail
elenco provider di rete (se prevista la funzione nel Paese d’uso)
elenco promemoria
lista dei numeri selezionati
◆
◆
◆
◆
◆
Accesso in modalità di lettura / scrittura ad altri parametri
Impostazioni della suoneria
Impostazioni del volume
Caricamento dei salvaschermo
Caricamento delle melodie
Esecuzione delle telefonate e accettazione delle chiamate
◆
◆
◆
◆
◆
29
Gigaset SL1 / italiano / A31008-L001-B002-1-6Z19 / start_guide_time.fm / 14.11.2003
Appendice
Trasmissione dei dati
Alcune funzioni prevedono il trasferimento di grosse quantità di dati tra il portatile e
l’apparecchio esterno. In questo caso, il portatile passa in modalità di trasmissione dei
dati, nel display viene visualizzato il messaggio Trasferm. dati. In questa modalità non
è possibile inserire nessun dato tramite la tastiera e le chiamate in entrata vengono
ignorate.
Il portatile passa in modalità di trasmissione dei dati nei seguenti casi:
◆ Accesso in modalità di lettura / scrittura alla rubrica
◆ Accesso in modalità di lettura / scrittura alla rubrica e-mail
◆ Accesso in modalità di lettura / scrittura all’elenco dei provider di rete
◆ Accesso in modalità di lettura / scrittura all’elenco dei promemoria
◆ Accesso in modalità di lettura / scrittura alla lista dei numeri selezionati
◆ Caricamento dei salvaschermo
◆ Caricamento delle melodie
Se durante la trasmissione dei dati si verifica un errore, il portatile passa
automaticamente in stand-by.
Eseguire le telefonate ed accettare le chiamate
Se si seleziona un numero di un apparecchio esterno oppure se si esegue una telefonata
da quest’ultimo, il portatile si comporta esattamente come se queste funzioni fossero
eseguite dal portatile.
Gioco “Balloon Shooter”
Il gioco consiste nel colpire il maggior numero di palloncini possibile.
v ¢ BabyC/WalkieT
¢ Balloon Shooter
o ...
Iniziare il gioco:
Premere il tasto del display.
[RRRRRRRRRRRRRRRRRRRRR]
Avvio
o ...
Altre opzioni:
à
Per aprire il menu opzioni, premere il tasto del
display.
¢
¢
¢
oppure
¢
¢
¢
¢
p¢
Per sparare al palloncino, premere il tasto 5.
30
¢
12I
4
L¢
MNO
¢
¢
Per spostare il mirino premere:
Gigaset SL1 / italiano / A31008-L001-B002-1-6Z19 / start_guide_time.fm / 14.11.2003
Appendice
Condizioni di Garanzia
Il terminale è sottoposto alla Direttiva Europea 99/44/CE ed al relativo D. Lgs. di
recepimento per l’Italia n. 24 del 02/02/2002 per ciò che riguarda il regime di garanzia
legale per i beni di consumo. Di seguito si riporta un estratto delle condizioni di garanzia
convenzionale. Il testo completo ed aggiornato delle condizioni di garanzia e l'elenco
dei centri di assistenza sono comunque a Vostra disposizione consultando il sito
http://www.my-siemens.it
o contattando il servizio Clienti Siemens al numero 02-243.64400.
Al consumatore (cliente) viene accordata dal produttore una garanzia alle condizioni di
seguito indicate, lasciando comunque impregiudicati, nei confronti del venditore, i
diritti di cui al D. Lgs. 02/02/2002 n. 24:
◆ In caso dispositivi nuovi e relativi componenti risultassero viziati da un difetto di
fabbricazione e/o di materiale entro 24 mesi dalla data di acquisto, Siemens si
impegna, a sua discrezione, a riparare o sostituire gratuitamente il dispositivo con
un altro più attuale. Per le parti soggette a usura (quali batterie, tastiere e
alloggiamenti) la validità della garanzia è di 6 mesi dalla data di acquisto.
◆ La garanzia non vale se il difetto è stato provocato da un utilizzo non conforme e/o
se non ci si è attenuti ai manuali d'uso.
◆ La garanzia non può essere estesa a prestazioni (quali installazioni, configurazioni,
download di software) effettuate dal concessionario o dal cliente stesso. Sono altresì
esclusi dalla garanzia i manuali e il software eventualmente fornito su supporto a
parte.
◆ Per ottenere il riconoscimento della garanzia è necessario conservare un documento
fiscalmente valido comprovante la data di acquisto. I difetti di conformità devono
essere denunciati entro il termine di due mesi dal momento della loro
constatazione.
◆ I dispositivi o i componenti resi a fronte di una sostituzione diventano di proprietà di
Siemens.
◆ La presente garanzia è valida per tutti i dispositivi acquistati all'interno dell'Unione
Europea. Garante per i prodotti acquistati in Italia è la Siemens S.p.A., Viale Piero e
Alberto Pirelli 10, 20126 Milano.
◆ Si escludono ulteriori responsabilità di Siemens, salvo il caso di comportamento
doloso o gravemente colposo di quest'ultima. A titolo esemplificativo e non
limitativo si segnala che Siemens non risponderà in nessun caso di: eventuali
interruzioni di funzionamento del dispositivo, mancato guadagno, perdita di dati,
danni a software supplementari installati dal cliente o perdita di altre informazioni.
◆ La prestazione eseguita in garanzia non prolunga il periodo di garanzia.
◆ Nei casi non coperti da garanzia, Siemens si riserva il diritto di addebitare al cliente
le spese relative alla sostituzione o riparazione.
◆ Il presente regolamento non modifica in alcun caso le regole probatorie a
svantaggio del cliente.
Per l'adempimento della garanzia contattare il Centro telefonico Siemens. I numeri
telefonici sono riportati nell'allegato manuale d'uso.
Garanzia Svizzera
La validità della garanzia è di 12 mesi.
31
Gigaset SL1 / italiano / A31008-L001-B002-1-6Z19 / SL_1SIX.fm / 14.11.2003
Indice analitico
Indice analitico
A
Accendere
portatile . . . . . . . . . . . . . . . . . . . . . 8
Alimentatore . . . . . . . . . . . . . . . . . . . . 5
Anniversario . . . . . . . . . . . . . . . . . . . 12
Annullare (procedura) . . . . . . . . . . . . 10
Apparecchi acustici . . . . . . . . . . . . . . . 5
Apparecchiature mediche . . . . . . . . . . 5
Aprire
menu . . . . . . . . . . . . . . . . . . . . . . . 9
rubrica. . . . . . . . . . . . . . . . . . . . . . . 9
Ascoltare (campione vocale) . . . . . . . 17
Assistenza . . . . . . . . . . . . . . . . . . . . . 25
Assistenza clienti . . . . . . . . . . . . . . . . 25
Attivare
blocco tastiera . . . . . . . . . . . . . . . . . 8
promemoria . . . . . . . . . . . . . . . . . . 12
sveglia . . . . . . . . . . . . . . . . . . . . . . 11
Walkie-Talkie . . . . . . . . . . . . . . . . . 21
Autonomia
del portatile . . . . . . . . . . . . . . . . . . 27
del portatile Babycall . . . . . . . . . . . 19
nella modalità Walkie-Talkie . . . . . . 20
Avviso di chiamata (chiamata interna) 19
B
Babycall . . . . . . . . . . . . . . . . . . . . . . 19
Balloon Shooter. . . . . . . . . . . . . . . . . 30
Base migliore . . . . . . . . . . . . . . . . . . . 8
Batteria
batteria raccomandata . . . . . . . . . . 27
caricare . . . . . . . . . . . . . . . . . . . . . . 6
inserire . . . . . . . . . . . . . . . . . . . . . . 6
visualizzazione . . . . . . . . . . . . . . . . . 6
Blocco
blocco tastiera . . . . . . . . . . . . . . . . . 8
C
Cambiare base . . . . . . . . . . . . . . . . . . 8
Campione vocale . . . . . . . . . . . . . . . . 17
Cancellare (campione vocale) . . . . . . 17
Chiamata
linea interna . . . . . . . . . . . . . . . . . 13
sulla linea esterna . . . . . . . . . . . . . 13
Chiamata collettiva . . . . . . . . . . . . . . 13
Chiamata di sveglia . . . . . . . . . . . . . . 11
32
Chiamata promemoria . . . . . . . . . . . . 15
Chiamata vocale . . . . . . . . . . . . . . 9, 16
Clip per la cintura . . . . . . . . . . . . . . . . . 8
Condizioni di Garanzia . . . . . . . . . . . . 31
Consultazione (interna) . . . . . . . . . . . 19
Contenuto della confezione . . . . . . . . . 6
Cursore . . . . . . . . . . . . . . . . . . . . . . . . 9
Customer Care (assistenza) . . . . . . . . . 25
D
Dati tecnici . . . . . . . . . . . . . . . . . . . . 27
Disattivare
blocco tastiera . . . . . . . . . . . . . . . . . 8
chiamata di sveglia . . . . . . . . . . . . . 11
chiamata promemoria . . . . . . . . . . . 12
suoneria (sul portatile) . . . . . . . . . . 23
Disattivare (portatile) . . . . . . . . . . . . . 14
Display
cambiare lingua . . . . . . . . . . . . . . . . 7
tasti . . . . . . . . . . . . . . . . . . . . . . . . . 9
E
EATONI v. Inserimento di testo facilitato
Errore/tono di errore . . . . . . . . . . . . . . 24
F
Funzionamento (mettere in funzione il
telefono). . . . . . . . . . . . . . 6
Funzioni con l’ora . . . . . . . . . . . . . . . . 11
G
Garanzia . . . . . . . . . . . . . . . . . . . . . . 31
I
Impostare
data . . . . . . . . . . . . . . . . . . . . . . . . 11
Lingua display . . . . . . . . . . . . . . . . . . 7
ora . . . . . . . . . . . . . . . . . . . . . . . . . 11
promemoria . . . . . . . . . . . . . . . . . . 12
sveglia . . . . . . . . . . . . . . . . . . . . . . 11
volume altoparlante . . . . . . . . . . . . 22
volume del ricevitore . . . . . . . . . . . . 22
volume della suoneria . . . . . . . . . . . 22
Impostare l’ora . . . . . . . . . . . . . . . . . . 11
Impostare la data . . . . . . . . . . . . . . . . 11
Gigaset SL1 / italiano / A31008-L001-B002-1-6Z19 / SL_1SIX.fm / 14.11.2003
Indice analitico
Impostazione del portatile
al momento dell’acquisto 24
Indicazione del livello di carica . . . . . . . 6
Inserimento di testo facilitato . . . . . . 28
Inserire
compleanno/anniversario . . . . . . . . 12
ora della sveglia . . . . . . . . . . . . . . . 11
promemoria . . . . . . . . . . . . . . . . . 12
Inserire il compleanno
(come promemoria) . . . . 12
Intensità del campo di ricezione . . . . . . 2
Interfaccia PC . . . . . . . . . . . . . . . . . . 29
Inviare una voce della rubrica . . . . . . 16
L
Linea interna
chiamata . . . . . . . . . . . . . . . . . . . . 13
consultare . . . . . . . . . . . . . . . . . . . 19
Lingua v. Display
Lista
portatili . . . . . . . . . . . . . . . . . . . . . . 9
Rubrica e-mail . . . . . . . . . . . . . . . . 18
Lista di ripetizione dei
numeri selezionati . . . . . 17
Lista di selezione rapida . . . . . . . . . . 14
salvare numeri . . . . . . . . . . . . . . . . 15
M
Manutenzione del telefono . . . . . . . . 25
Melodia
Polifonia . . . . . . . . . . . . . . . . . . . . 23
Melodie in polifonia . . . . . . . . . . . . . 23
Menu
aprire . . . . . . . . . . . . . . . . . . . . . . . 9
guida attraverso il menu . . . . . . . . . 9
salire di un livello nel menu . . . . . . 10
tasto . . . . . . . . . . . . . . . . . . . . . . . 10
tono di fine . . . . . . . . . . . . . . . . . . 24
Mettere in funzione (telefono) . . . . . . . 6
Microfono . . . . . . . . . . . . . . . . . . . . . . 2
Motivo musicale . . . . . . . . . . . . . . . . 14
N
Non accettato
anniversario . . . . . . . . . . . . . . . . . 12
promemoria . . . . . . . . . . . . . . . . . 12
Norme di sicurezza . . . . . . . . . . . . . . . 5
Numeri Call-by-Call . . . . . . . . . . . . . . 14
Numero di telefono
copiare dalla rubrica . . . . . . . . . . . . 16
salvare (rubrica) . . . . . . . . . . . . . . . 14
Numero v. anche Numero di telefono o
Voce . . . . . . . . . . . . . . . . 14
O
Operatore di rete (lista dei numeri) . . . 14
P
Pausa di selezione . . . . . . . . . . . . . . . 13
Pellicola . . . . . . . . . . . . . . . . . . . . . . . . 6
Portatile
accendere/spegnere . . . . . . . . . . . . . 8
autonomia e tempi di ricarica . . . . . 27
cambiare base . . . . . . . . . . . . . . . . . 8
clip per la cintura . . . . . . . . . . . . . . . 8
disattivare . . . . . . . . . . . . . . . . . . . 14
lista . . . . . . . . . . . . . . . . . . . . . . . . . 9
mettere in funzione . . . . . . . . . . . . . 6
passare alla ricezione migliore . . . . . . 8
registrare su altre basi . . . . . . . . . . . . 8
ripristinare i parametri iniziali . . . . . 24
utilizzare come Babycall . . . . . . . . . 19
Promemoria. . . . . . . . . . . . . . . . . . . . 12
R
Ricevitore . . . . . . . . . . . . . . . . . . . . . . 2
Ripetizione dei numeri selezionati . . . . 17
Risalto del suono . . . . . . . . . . . . . . . . 22
Risposta automatica . . . . . . . . . . . . . . 22
Rubrica . . . . . . . . . . . . . . . . . . . . . . . 14
aprire . . . . . . . . . . . . . . . . . . . . . . . . 9
inviare una voce a un portatile . . . . 16
salvare numeri di telefono . . . . . . . . 14
sequenza delle voci. . . . . . . . . . . . . 28
Rubrica e-mail . . . . . . . . . . . . . . . . . . 18
S
Salvare
voce della lista di selezione rapida . . 15
voce della rubrica . . . . . . . . . . . . . . 14
Scegliere (voce di menu) . . . . . . . . . . . 9
Scegliere una voce (menu) . . . . . . . . . . 9
Segnale acustico v. Toni di avviso . . . . 24
Sequenza nella rubrica . . . . . . . . . . . . 28
Sound Manager . . . . . . . . . . . . . . . . . 23
Spazio in memoria . . . . . . . . . . . . . . . 18
33
Gigaset SL1 / italiano / A31008-L001-B002-1-6Z19 / SL_1SIX.fm / 14.11.2003
Indice analitico
Spegnere
portatile . . . . . . . . . . . . . . . . . . . . . 8
Spegnere v. Disattivare . . . . . . . . . . . 11
Suoneria . . . . . . . . . . . . . . . . . . . . . . 22
Sveglia . . . . . . . . . . . . . . . . . . . . . . . 11
T
Tabella della serie di caratteri . . . . . . . 27
Tasti
acustica tasti . . . . . . . . . . . . . . . . . 24
annullare . . . . . . . . . . . . . . . . . . . . 10
blocco tastiera . . . . . . . . . . . . . . . . . 8
Escape/Menu/Cancella/OK . . . . . . . 10
pressione dei tasti
(tono di conferma) . . . . . . . . . . . . 24
tasti del display . . . . . . . . . . . . . . . . 9
tasto di navigazione . . . . . . . . . . . . . 9
Tasto . . . . . . . . . . . . . . . . . . . . . . . . . 2
Tasto 1 (selezione rapida) . . . . . . . . . . 2
Tasto cancelletto . . . . . . . . . . . . . . . . . 8
Tasto di cancellazione . . . . . . . . . . . . 10
Tasto di navigazione . . . . . . . . . . . . . . 9
Tasto di selezione rapida . . . . . . . . . . 14
Tasto Escape . . . . . . . . . . . . . . . . . . . 10
Telefonare . . . . . . . . . . . . . . . . . . . . . 13
rispondere alle chiamate . . . . . . . . 13
sulla linea esterna . . . . . . . . . . . . . 13
Tempi di ricarica del portatile . . . . . . . 27
Terminare la chiamata . . . . . . . . . . . . 13
Toni di avviso . . . . . . . . . . . . . . . . . . 24
Toni di conferma . . . . . . . . . . . . . . . . 24
Tono
tono d’errore . . . . . . . . . . . . . . . . . 24
Tono (conferma/ errore/batteria/
fine menu) . . . . . . . . . . . 24
Tono batteria. . . . . . . . . . . . . . . . . . . 24
Tono di attenzione. . . . . . . . . . . . . . . 23
Tono di avvertimento v. Toni di avviso 24
Tono di conferma . . . . . . . . . . . . . . . 24
Trasferire la chiamata . . . . . . . . . . . . 19
V
Vibrazione . . . . . . . . . . . . . . . . . . . . 23
VIP (voce della rubrica) . . . . . . . . . . . 16
Visualizzazione
spazio in memoria . . . . . . . . . . . . . 18
visualizzazione 12/24 ore . . . . . 11, 12
Viva voce . . . . . . . . . . . . . . . . . . . . . 13
Volume . . . . . . . . . . . . . . . . . . . . . . . 22
34
Volume conversazione . . . . . . . . . . . . 22
Volume del ricevitore . . . . . . . . . . . . . 22
W
Walkie-Talkie . . . . . . . . . . . . . . . . 20, 21
Gigaset SL1 / italiano / A31008-L001-B002-1-6Z19 / cover_innen.fm / 14.11.2003
s
ESPAÑOL
Be inspired
Gigaset SL1 / italiano / A31008-L001-B002-1-6Z19 / covers_I-II.fm / 14.11.2003
Esquema general
Esquema general
Campo de la intensidad de recepción
Ð 100 % i 75 %
Ñ 50 % Ò baja intensidad
| intensidad nula (parpadea)
Tecla de descolgar
◆ Aceptar llamada
◆ Iniciar marcación
◆ Conmutación de la
función manos libres al
"funcionamiento con
auricular"
Tecla de control
Ð
V
Abrir el menú, listín telefóINT 1
nico, iniciar marcación por
20.05.03
09:45
voz. Navegación por el
• §§§§§§§SMS§§§§§§
campo de entrada
Tecla de la función manos
libres
◆ Conmutación de funcionamiento con "auricular" a
la función manos libres
◆ Se ilumina: la función
manos libres está activa
◆ Parpadea: llamada
entrante, rellamada
automática
Abrir el listín telefónico
Tecla 1
Seleccionar Contestador
automático de red/
Contestador automático
(pulsar aprox. 2 seg)
Display (indicación)
Estado de carga
= vacía
U llena
= parpadea: la batería
está casi vacía o se está
cargando
Funciones actuales y
teclas del display
Con las teclas del display
puede acceder a las
funciones representadas
en el mismo.
Tecla de colgar, act./
desact.
◆ Finalizar comunicación
◆ Cancelar función
◆ Retroceso de un nivel de
menú (pulsar
brevemente)
◆ Vuelta al estado de
reposo (pulsar aprox. 1
seg)
◆ Conexión/desconexión
del terminal inalámbrico
(pulsar aprox. 2 seg)
Tecla de mensajes
◆ Acceso a las listas de
llamantes y de
mensajes
◆ Parpadea: mensajes o
llamadas nuevos
Tecla de almohadilla
Activación/desactivación
del bloqueo del teclado
(pulsar aprox. 1 seg)
Micrófono
Tecla asterisco
◆ Activación/desactivación
Conector para
Tecla de listas de
de los tonos del timbre
auriculares e
marcación abreviada
(pulsar aprox. 2 seg)
interfaz de PC
Abrir lista de marcación
◆ En la introducción de texto:
abreviada (pulsar
cambio entre escritura en
brevemente)
mayúsculas, minúsculas y
de cifras
Tecla de señalización
Introducir pausa en la marcación
(pulsar prolongadamente)
Representación de un terminal inalámbrico registrado en una estación base
con capacidad para SMS.
2
Gigaset SL1 / italiano / A31008-L001-B002-1-6Z19 / SL_1IVZ.fm / 14.11.2003
Contenido
Contenido
Esquema general . . . . . . . . . . . . . . . . . . . . . . . . . . . . 2
Indicaciones de seguridad . . . . . . . . . . . . . . . . . . . . 5
Puesta en servicio del teléfono . . . . . . . . . . . . . . . . 6
Puesta en servicio del terminal inalámbrico . . . . . . . . . . . . . . . . . . . . . . . . . . . . . . . . .
Registro . . . . . . . . . . . . . . . . . . . . . . . . . . . . . . . . . . . . . . . . . . . . . . . . . . . . . . . . . . . . .
Modificación del idioma del display . . . . . . . . . . . . . . . . . . . . . . . . . . . . . . . . . . . . . . . .
Cambio de estación base . . . . . . . . . . . . . . . . . . . . . . . . . . . . . . . . . . . . . . . . . . . . . . . .
Sujeción del clip para el cinturón . . . . . . . . . . . . . . . . . . . . . . . . . . . . . . . . . . . . . . . . . .
Encendido/apagado del terminal inalámbrico . . . . . . . . . . . . . . . . . . . . . . . . . . . . . . . .
Activación/desactivación del bloqueo del teclado . . . . . . . . . . . . . . . . . . . . . . . . . . . . .
6
7
7
8
8
8
8
Uso del teléfono y guía a través del menú . . . . . . . 9
Teclas . . . . . . . . . . . . . . . . . . . . . . . . . . . . . . . . . . . . . . . . . . . . . . . . . . . . . . . . . . . . . . . 9
Menú principal . . . . . . . . . . . . . . . . . . . . . . . . . . . . . . . . . . . . . . . . . . . . . . . . . . . . . . . 10
Funciones de indicación horaria . . . . . . . . . . . . . . 10
Ajuste de la fecha y la hora . . . . . . . . . . . . . . . . . . . . . . . . . . . . . . . . . . . . . . . . . . . . . 10
Ajuste del despertador . . . . . . . . . . . . . . . . . . . . . . . . . . . . . . . . . . . . . . . . . . . . . . . . . 11
Ajuste de una cita . . . . . . . . . . . . . . . . . . . . . . . . . . . . . . . . . . . . . . . . . . . . . . . . . . . . . 11
Realización de llamadas . . . . . . . . . . . . . . . . . . . . . 12
Llamadas externas y finalización de la comunicación . . . . . . . . . . . . . . . . . . . . . . . . .
Llamadas internas y finalización de la comunicación . . . . . . . . . . . . . . . . . . . . . . . . .
Aceptación de llamadas . . . . . . . . . . . . . . . . . . . . . . . . . . . . . . . . . . . . . . . . . . . . . . . .
Función manos libres . . . . . . . . . . . . . . . . . . . . . . . . . . . . . . . . . . . . . . . . . . . . . . . . . .
Activación del modo silencio (para el interlocutor) en el terminal inalámbrico . . . . .
12
12
12
13
13
Empleo del listín telefónico y de otras listas . . . . 13
Listín telefónico y lista de marcación abreviada . . . . . . . . . . . . . . . . . . . . . . . . . . . . .
Administración de las entradas del listín telefónico y de la lista de marcación
abreviada . . . . . . . . . . . . . . . . . . . . . . . . . . . . . . . . . . . . . . . . . . . . . . . . . . . . . . . . . . .
Marcación por voz . . . . . . . . . . . . . . . . . . . . . . . . . . . . . . . . . . . . . . . . . . . . . . . . . . . .
Encadenamiento de un número Call-by-Call con un número de teléfono . . . . . . . . .
Lista de rellamada . . . . . . . . . . . . . . . . . . . . . . . . . . . . . . . . . . . . . . . . . . . . . . . . . . . .
Directorio de correo electrónico . . . . . . . . . . . . . . . . . . . . . . . . . . . . . . . . . . . . . . . . .
Indicación del espacio libre de memoria . . . . . . . . . . . . . . . . . . . . . . . . . . . . . . . . . . .
13
15
16
17
17
18
18
3
Gigaset SL1 / italiano / A31008-L001-B002-1-6Z19 / SL_1IVZ.fm / 14.11.2003
Contenido
Utilización de varios terminales . . . . . . . . . . . . . . . 19
Consulta interna . . . . . . . . . . . . . . . . . . . . . . . . . . . . . . . . . . . . . . . . . . . . . . . . . . . . . .
Aceptación/rechazo de una llamada en espera durante una comunicación interna .
Utilización de un terminal inalámbrico con la función de vigilancia de habitación . .
Ajuste del modo "walky-talky" . . . . . . . . . . . . . . . . . . . . . . . . . . . . . . . . . . . . . . . . . . .
19
19
19
21
Ajuste del terminal inalámbrico . . . . . . . . . . . . . . 22
Activación/desactivación de la aceptación automática de llamada . . . . . . . . . . . . . .
Modificación del volumen del auricular . . . . . . . . . . . . . . . . . . . . . . . . . . . . . . . . . . .
Modificación de los tonos del timbre . . . . . . . . . . . . . . . . . . . . . . . . . . . . . . . . . . . . . .
Gestor de sonido . . . . . . . . . . . . . . . . . . . . . . . . . . . . . . . . . . . . . . . . . . . . . . . . . . . . .
Activación y desactivación de los tonos de indicación . . . . . . . . . . . . . . . . . . . . . . . .
Reinicio del terminal inalámbrico al estado de suministro . . . . . . . . . . . . . . . . . . . . .
22
22
22
23
24
24
Anexo . . . . . . . . . . . . . . . . . . . . . . . . . . . . . . . . . . . . 25
Cuidados y contacto con líquidos . . . . . . . . . . . . . . . . . . . . . . . . . . . . . . . . . . . . . . . .
Servicio Técnico (Servicio de Atención al Cliente) . . . . . . . . . . . . . . . . . . . . . . . . . . . .
Características técnicas . . . . . . . . . . . . . . . . . . . . . . . . . . . . . . . . . . . . . . . . . . . . . . . .
Tabla de símbolos . . . . . . . . . . . . . . . . . . . . . . . . . . . . . . . . . . . . . . . . . . . . . . . . . . . . .
Ayuda para la introducción de texto . . . . . . . . . . . . . . . . . . . . . . . . . . . . . . . . . . . . . .
Interfaz de PC . . . . . . . . . . . . . . . . . . . . . . . . . . . . . . . . . . . . . . . . . . . . . . . . . . . . . . . .
Juego "Balloon Shooter" . . . . . . . . . . . . . . . . . . . . . . . . . . . . . . . . . . . . . . . . . . . . . . . .
Certificado de garantía . . . . . . . . . . . . . . . . . . . . . . . . . . . . . . . . . . . . . . . . . . . . . . . . .
25
25
26
26
27
28
29
30
Índice . . . . . . . . . . . . . . . . . . . . . . . . . . . . . . . . . . . . 31
4
Gigaset SL1 / italiano / A31008-L001-B002-1-6Z19 / start_guide_time.fm / 14.11.2003
Indicaciones de seguridad
Indicaciones de seguridad
$
!
Utilice exclusivamente el alimentador suministrado, como se indica en la
parte inferior del equipo.
Utilice sólo la batería recargable recomendada (p. 26). Es decir, no utilice en
ningún caso otro tipo de pilas o baterías no recargables, ya que podrían causar
problemas de salud y daños personales.
‹
Œ
Coloque la batería recargable con la polaridad correcta y utilícela de acuerdo
con estas instrucciones de uso.
Pueden provocar anomalías en el funcionamiento de equipos médicos. Tenga
en cuenta las condiciones eléctricas del entorno de aplicación (p. ej.,
consultorios médicos).
El terminal inalámbrico puede ocasionar un zumbido molesto en aparatos
auditivos. No lo acerque demasiado al oído.
El terminal inalámbrico no está protegido contra las salpicaduras del agua
(p. 25).
Mientras conduzca un vehículo no debe hablar por teléfono (función "walkytalky").
Desconecte el teléfono cuando se encuentre en un avión (función "walkytalky"). Asegúrelo contra una conexión involuntaria.
No utilice el teléfono en entornos expuestos a peligro de explosión (p. ej., en
talleres de pintura).
ƒ
Si transfiere su Gigaset a terceros, entréguelo siempre junto con las
instrucciones de uso.
Elimine las baterías y el teléfono respetando el medio ambiente.
i
Algunas funciones descritas en estas instrucciones de uso no están
disponibles en todos los países.
5
Gigaset SL1 / italiano / A31008-L001-B002-1-6Z19 / start_guide_time.fm / 14.11.2003
Puesta en servicio del teléfono
Puesta en servicio del teléfono
El embalaje contiene:
un terminal inalámbrico SL 1, un soporte cargador con alimentador enchufable, un clip
de cinturón para el terminal inalámbrico, una batería y las instrucciones de uso.
Puesta en servicio del terminal inalámbrico
El display está protegido con una lámina de plástico. Retire la lámina de protección.
Colocación de la batería
◆ Coloque la batería con la polaridad correcta (véase la ilustración de la izquierda).
◆ Coloque la tapa unos 3 mm hacia abajo y empújela hacia arriba hasta que encaje.
◆ Para abrir la tapa, presione sobre la cavidad y empuje hacia abajo.
W
Emplee únicamente la batería recargable recomendada en la p. 26 por
Siemens. No utilice en ningún caso una batería tradicional (no
recargable) u otros tipos de pilas, ya que no podría excluirse la posibilidad
de que se produjeran daños para la salud y materiales. Podría dañarse, p.
ej., el revestimiento de la pila o batería (lo cual es peligroso). También
podrían producirse averías de funcionamiento o daños en el aparato.
Carga de la batería
Coloque el terminal inalámbrico con el display hacia delante en el soporte cargador.
Mantenga el terminal inalámbrico en el soporte cargador para cargar la batería, ya que
ésta no se suministra cargada. El proceso de carga de la batería se indica en la parte
superior derecha del display mediante el parpadeo del símbolo de batería =.
W
6
En el primer proceso de carga se recomienda cargar sin interrupción
durante cinco horas, independientemente de la indicación del estado de
carga. La capacidad de carga de la batería recargable disminuye, por
motivos técnicos, al cabo de cierto tiempo.
Gigaset SL1 / italiano / A31008-L001-B002-1-6Z19 / start_guide_time.fm / 14.11.2003
Puesta en servicio del teléfono
El estado de carga de la batería no se indicará correctamente hasta que no se haya
efectuado un proceso de carga y descarga sin interrupción. Por este motivo, no debe
extraer innecesariamente la batería ni finalizar el proceso de carga antes de tiempo.
◆ Tras el primer proceso de carga, puede volver a colocar el terminal en
i
el soporte cargador después de cada llamada. La carga se controla de
forma electrónica. Así se carga la batería con el cuidado necesario.
◆ La batería se calienta durante el proceso de carga; es normal y no
representa ningún peligro.
Registro
Para que sea posible utilizar el Gigaset SL1, es necesario registrarlo manualmente. El
registro debe iniciarlo en el terminal inalámbrico y en la estación base.
1. En el terminal inalámbrico
v
s
s
s
Abrir el menú.
OK
[______________________________________________]
Impostazioni
Seleccionar y confirmar.
[______________________________________________]
OK
Reg. Portatile
Seleccionar y confirmar.
[______________________________________________]
OK
Base 1
Seleccionar base (1–4) y confirmar; p. ej., Base 1.
OK
Introducir el pin del sistema (estado de suministro:
0000) y confirmarlo.
Tras la introducción del PIN del sistema, en el display parpadea, p. ej., Base 1.
2. En la estación base
Para registrar el terminal inalámbrico en la estación base, consulte las instrucciones de
uso de dicha estación base.
Modificación del idioma del display
Puede visualizar los textos del display en varios idiomas.
v
s
s
[______________________________________________]
OK
Impostazioni
Seleccionar y confirmar.
[______________________________________________]
OK
Lingua
s
Seleccionar y confirmar. El idioma actual está
marcado con ‰ (estado de suministro: inglés).
OK
Seleccionar y confirmar el idioma.
a
Abrir el menú.
Pulsar prolongadamente (vuelta al estado de
reposo).
Si ha seleccionado por error un idioma que no puede entender:
Pulsar v M 2, seleccionar el idioma adecuado con s y pulsar OK para
confirmar.
7
Gigaset SL1 / italiano / A31008-L001-B002-1-6Z19 / start_guide_time.fm / 14.11.2003
Puesta en servicio del teléfono
Cambio de estación base
Si el terminal inalámbrico está registrado en varias estaciones base, puede ajustarlo
para una estación base determinada o para la que tenga la mejor recepción (Base
migliore).
v; s Impostazioni OK ; s Scegli base OK ;
s (Seleccionar base registrada o Base migliore) OK .
Sujeción del clip para el cinturón
Empuje el clip para el cinturón
sobre la parte posterior del terminal
hasta que los "resaltes" laterales
encajen en las perforaciones.
Encendido/apagado del terminal inalámbrico
Para encenderlo: pulsar la tecla de colgar a prolongadamente.
Para apagarlo: volver a pulsar la tecla de colgar a prolongadamente en el estado de
reposo.
Al colocar el terminal inalámbrico en el soporte cargador, se enciende
automáticamente.
Activación/desactivación del bloqueo del teclado
Pulsar prolongadamente la tecla de almohadilla R (en el display aparece el símbolo
Ø).
Para desactivarlo/activarlo: volver a pulsar prolongadamente la tecla de almohadilla
R.
El bloqueo del teclado se desactiva automáticamente cuando recibe una llamada. Al
finalizar la comunicación vuelve a activarse.
i
8
Con el bloqueo del teclado activado tampoco pueden marcarse los
números de emergencia.
Gigaset SL1 / italiano / A31008-L001-B002-1-6Z19 / start_guide_time.fm / 14.11.2003
Uso del teléfono y guía a través del menú
Uso del teléfono y guía a través del menú
Teclas
Tecla de control
La tecla de control está provista de cuatro flechas negras de dirección con los símbolos
correspondientes. Según la marca que pulse se activa una función determinada. En las
instrucciones de uso se marca en negro el lado que tiene que pulsar en cada momento;
p. ej.: Tecla v que equivale a pulsar el lado derecho = abrir el menú.
Con la tecla de control también puede ejecutar con frecuencia las funciones de la tecla
de display derecha.
Ejemplo:
Tecla de control
Tabla con las diversas funciones de la tecla de control:
t
s
v
u
En el estado de reposo
En las listas y los menús
Inicio de la marcación por voz Hojear hacia arriba
(pulsar prolongadamente)
Abrir el listín telefónico
Hojear hacia abajo
Abrir el menú
Abrir la lista de terminales
inalámbricos
Confirmar la entrada
seleccionada (como OK )
Retroceder un nivel de
menú o cancelar
En un campo de entrada
Mover el cursor una línea
hacia arriba
Mover el cursor una línea
hacia abajo
Mover el cursor hacia la
derecha
Mover el cursor hacia la
izquierda
Teclas de display
Las teclas de display son las teclas con balanceo horizontales situadas directamente
debajo del display. Su función cambia según cada situación en el uso del teléfono. La
función actual se presenta directamente en la parte superior del display.
Ejemplo:
•
§§§§§§§SMS§§§§§§
Teclas de display
9
Gigaset SL1 / italiano / A31008-L001-B002-1-6Z19 / start_guide_time.fm / 14.11.2003
Funciones de indicación horaria
Al pulsar las teclas, los diversos símbolos tienen el significado siguiente:
Þ
Tecla de rellamada: abre la lista de los 10 últimos números marcados.
à
Tecla de menú: en estado de reposo abre el menú principal.
Al llamar abre un menú que depende del estado.
Tecla de borrado: borra entradas de derecha a izquierda y de carácter en carácter.
OK
f
C
Ý
ä
Tecla OK: confirma la función de menú o guarda la entrada confirmándola.
Tecla Escape: retrocede un nivel de menús o cancela el proceso.
Abre el directorio de correo electrónico.
Cómo volver desde cualquier lugar del menú al estado de reposo
Pulsar la tecla de colgar a aprox. 1 seg o bien no pulsar ninguna tecla.
Tras 2 minutos el display cambia automáticamente al estado de reposo. Las
modificaciones que no haya confirmado o guardado pulsando OK , Sì, Salva, Invia o
Salva OK se desechan.
Menú principal
Para abrirlo pulse en el estado de reposo del teléfono la parte derecha de la tecla de
control v y hojee con s hasta la entrada que desee.
1
2
3
4
5
6
7
8
9
Msg.testo/SMS
Serv. di rete
BabyC/WalkieT
Appuntam/ora
Audio
Addebiti
Impostazioni
Impost.base
Segreteria
Las posibilidades de entradas de menú
dependen de la estación base en
cuestión.
Funciones de indicación horaria
Ajuste de la fecha y la hora
El ajuste de la fecha y la hora es necesario para que pueda mostrarse correctamente
cuándo han entrado llamadas.
v; s Appuntam/ora OK ; s Data / Ora OK ; ~ (introducir día/mes/año);
s (en la línea siguiente) ~ (introducir hora/min);
s (si es necesario, en la línea siguiente) r (seleccionar la indicación de 12 o de 24
horas); Salva, a (vuelta al estado de reposo).
Si está ajustada la indicación de 12 horas, en la línea Ora: y con la tecla de display
AM/PM puede cambiar entre am y pm.
10
Gigaset SL1 / italiano / A31008-L001-B002-1-6Z19 / start_guide_time.fm / 14.11.2003
Funciones de indicación horaria
Ajuste del despertador
Condición: que la fecha y la hora ya estén ajustados (p. 10).
Activación y ajuste del despertador
v; s Appuntam/ora OK ; s Sveglia OK ; r (seleccionar On);
s ~ (introducir la hora del despertador); Salva; a (vuelta al estado de reposo).
Si está ajustada la indicación de 12 horas, en la línea Ora: y con la tecla de display
AM/PM puede cambiar entre am y pm.
La alarma del despertador suena únicamente si el terminal inalámbrico se encuentra en
el estado de reposo y no están activadas las funciones vigilancia de habitación ni "walkytalky"; tampoco suena durante una comunicación ni durante una rellamada automática.
Puede consultar cómo se ajusta el volumen y la melodía en la p. 22.
Desactivación del despertador
El despertador está programado para una hora determinada, pero no debe sonar.
v; s Appuntam/ora OK ; s Sveglia OK .
r (seleccionar Off); Salva; a (vuelta al estado de reposo).
Desactivación de la alarma del despertador
Pulsar la tecla de display Suon.Off o pulsar cualquier tecla.
Ajuste de una cita
Puede hacer que el terminal inalámbrico le recuerde hasta cinco citas.
Activación y ajuste de citas
v; s Appuntam/ora OK ; InserireAppunt. OK ; s Appuntamento 2 (ejemplo) OK .
r (seleccionar On); s ~ (introducir día/mes); s ~ (introducir hora/min);
s Modif.; ~ (introducir nombre) OK ; Salva; a (vuelta al estado de reposo).
Cuando se ha ajustado una cita se muestra con el símbolo ¼.
La alarma correspondiente a la cita suena únicamente si el terminal inalámbrico se
encuentra en el estado de reposo y no están activadas las funciones vigilancia de
habitación ni "walky-talky"; tampoco suena durante una comunicación ni durante una
rellamada automática.
Si está ajustada la indicación de 12 horas, en la línea Ora: y con la tecla de display
AM/PM puede cambiar entre am y pm.
Puede consultar cómo se ajusta el volumen y la melodía en la p. 22.
11
Gigaset SL1 / italiano / A31008-L001-B002-1-6Z19 / start_guide_time.fm / 14.11.2003
Realización de llamadas
Desactivación de la alarma de una cita
Si se señala una cita, la puede desactivar con Suon.Off.
Citas no aceptadas,indicación y borrado de aniversarios
v; s Appuntam/ora OK ; s Appunt.scaduti OK ; s seleccionar cita/aniversario).
[RRRRRRRRRRRRRRRRRRRRRR]
Cancella
Pulsar la tecla de display.
... entonces
a
Pulsar prolongadamente (vuelta al estado de reposo).
Las citas pasadas se marcan con ¼, y los aniversarios pasados con ‚.
Realización de llamadas
Llamadas externas y finalización de la comunicación
~ (introducir número de teléfono), c pulsar (tecla de descolgar) (no importa el
orden).
Finalizar llamada/cancelar marcación: pulsar a (tecla de colgar).
Pausa de marcación
Puede insertar una pausa de marcación entre el prefijo y el número de teléfono.
Para ello, pulse durante aprox. 2 seg la tecla S. Seguidamente introduzca el número
de teléfono.
Llamadas internas y finalización de la comunicación
Las comunicaciones con otros terminales inalámbricos registrados en la misma estación
base son gratuitas.
Llamada a un terminal inalámbrico determinado
u; s (seleccionar terminal inalámbrico); pulsar c. O bien: pulsar u 2
(ejemplo).
Para finalizar: pulsar a (tecla de colgar).
Llamada simultánea a todos los terminales inalámbricos ("llamada
colectiva"):
u; pulsar P (tecla de asterisco).
Para finalizar: pulsar a (tecla de colgar).
Aceptación de llamadas
El terminal inalámbrico suena, la llamada se indica en el display y la tecla de la función
manos libres d parpadea. Pulsar c (tecla de descolgar) (o la tecla de display Rispondi
o la tecla de la función manos libres d).
12
Gigaset SL1 / italiano / A31008-L001-B002-1-6Z19 / start_guide_time.fm / 14.11.2003
Empleo del listín telefónico y de otras listas
Si está activa la función RispostaAutom. (p. 22), basta coger el terminal inalámbrico
del soporte cargador para aceptar la llamada.
Si el timbre molesta, pulse la tecla de display Suon.Off. Aún puede aceptar la llamada
siempre que se muestre en el display.
Función manos libres
Activación/desactivación de la función manos libres
Antes de marcar: ~ (introducir el número de teléfono); pulsar d (tecla de la función
manos libres).
Durante una comunicación: pulsar d (tecla de manos libres).
Para desactivar: pulsar c (tecla de descolgar).
Si quiere poner el terminal inalámbrico en el soporte cargador durante una
comunicación, debe mantener pulsada la tecla de la función manos libres d al
colocarlo.
i
Antes de activar la función manos libres se recomienda comunicarlo a su
interlocutor.
Modificación del volumen durante la función manos libres en una
comunicación
Está en comunicación y la función manos libres d está activa.
Volver a pulsar d (tecla de manos libres); r volumen más alto o más bajo; Salva.
Activación del modo silencio (para el interlocutor) en el terminal
inalámbrico
u. La comunicación se "retiene" (melodía de espera).
Para finalizar: pulsar la tecla Ý de display.
Empleo del listín telefónico y de otras listas
Listín telefónico y lista de marcación abreviada
En el listín telefónico y en la lista de marcación abreviada pueden guardarse hasta 200
números de teléfono.
Puede abrir el listín telefónico con la tecla s. En cada entrada del listín telefónico
puede añadir un aniversario y puede marcar la entrada como "VIP".
La lista de marcación abreviada es un listín telefónico especial en el que puede colocar
los números de teléfono realmente importantes; p. ej., números de teléfono privados,
prefijos de proveedores de red ("números Call-by-Call") u otros. Puede abrir la lista de
marcación abreviada con la tecla C.
El uso de la lista de marcación abreviada es idéntico al del listín telefónico, excepto
para guardar entradas.
13
Gigaset SL1 / italiano / A31008-L001-B002-1-6Z19 / start_guide_time.fm / 14.11.2003
Empleo del listín telefónico y de otras listas
◆ Para introducir nombres dispone de la ayuda para la introducción de texto EATONI
(p. 27, desactivada en el estado de suministro).
◆ Para introducir texto correctamente, consulte la tabla del conjunto de caracteres
(p. 26).
◆ Puede introducir un número de hasta 32 cifras y un nombre de hasta 16 letras.
◆ Al introducir un número puede introducir la pausa correspondiente mediante à ,
s Inserisci Pausa OK o pulsando durante unos 2 seg la tecla S.
Guardar un número de teléfono en el listín telefónico
s (abrir el listín telefónico); Nuova voce OK ; ~ (introducir el número de teléfono);
s (en la línea siguiente) ~ (introducir nombre); à (abrir el menú), Salva OK .
(Para añadir, además, un aniversario tras introducir el nombre: saltar con s a la línea
Anniver.:, pulsar la tecla de display Modif. e introducir la fecha. Pulsar Salva); pulsar a
prolongadamente (vuelta al estado de reposo).
Puede borrar un aniversario en la entrada del listín telefónico, en el campo para el
aniversario, pulsando las teclas de display Modif. tras el cambio de display Cancella y
pulsando Salva tras el otro cambio de display.
Llamada de recordatorio de un aniversario
Una llamada de recordatorio se señala en el terminal inalámbrico con la melodía de
timbre seleccionada. En el display, la entrada del listín telefónico se indica con ‚ ‚ ‚.
i
Si su teléfono está conectado a un sistema telefónico, debe introducir, en
su caso, la cifra de prefijo (indicador de central AKZ) como primera cifra
de la entrada en el listín telefónico.
Guardar un número de teléfono en la lista de marcación abreviada
Puede asignar hasta nueve entradas de la lista de marcación abreviada a cada una de
las cifras 0, 2–9, respectivamente. Si en el estado de reposo pulsa prolongadamente
una de estas cifras y la tecla de descolgar c, establecerá conexión inmediatamente
con el número de teléfono asignado a la cifra.
C (abrir la lista de marcación rápida); Nuova voce OK ; ~ (introducir el número de
teléfono); s (en la línea siguiente), ~ (introducir nombre); à (abrir el menú);
Salva OK .
(Para añadir, además, una cifra de marcación abreviada tras introducir el nombre: saltar
con s a la línea Sul tasto:, seleccionar con r una cifra [0, 2–9] para este número de
teléfono, pulsar la tecla de display Salva). Pulsar a prolongadamente (vuelta al estado
de reposo).
Las cifras ya utilizadas no pueden asignarse doblemente.
Marcar del listín telefónico/lista de marcación abreviada
s o C (abrir el listín telefónico/la lista de marcación abreviada); s (seleccionar
entrada); c.
14
Gigaset SL1 / italiano / A31008-L001-B002-1-6Z19 / start_guide_time.fm / 14.11.2003
Empleo del listín telefónico y de otras listas
Administración de las entradas del listín telefónico y de la lista de
marcación abreviada
Para utilizar una de las siguientes funciones de menú, pulse la tecla de listín telefónico
s o la tecla de la lista de marcación abreviada C. Hojee con s hasta la entrada y,
finalmente, pulse v para abrir el menú. Hojee con s hasta la función que desee.
O bien: s o C; ~ (introducir la inicial); en caso necesario, hojear con s o
~ introducir el resto de letras del nombre; c.
Utilizza Numero
Modifica
Cancella
Voce VIP
Copia e modifica
Trasferisci
Cancella Tutto
Trasfer.Tutto
Memoria Libera
Válido únicamente para el listín
telefónico (s)
Válido únicamente para el listín
telefónico (s)
Si ha seleccionado una entrada, para verla o modificarla, pulse la tecla de display Visualiz.
y, seguidamente, Modif..
Las funciones "marcar como VIP" y "copiar y modificar"
Las entradas del listín telefónico correspondientes a llamantes importantes puede
marcarlas como VIP ("Very Important Person" o "Persona muy importante"); es decir,
puede asignarles una melodía especial. Según la melodía del timbre sabrá quién le
llama. Condición: la presentación del número de teléfono.
Para no tener que introducir por duplicado una entrada similar puede efectuar una
copia y, a continuación, modificar dicha entrada.
Envío de una sola entrada o de una lista completa a un terminal
inalámbrico
Puede transmitir entradas individuales o la lista completa a otro terminal inalámbrico
SL1, S1, C2 o terminales inalámbricos Comfort de la serie Gigaset 4000, 3000 y 2000
registrados en la misma estación base. Las muestras de voz guardadas y las cifras de
marcación abreviada no se transmiten. Los ajustes VIP se transmitirán dependiendo del
terminal inalámbrico
s o C (abrir el listín telefónico/la lista de marcación abreviada); s (seleccionar
entrada);
v (abrir el menú); s Trasferisci OK o s Trasfer.Tutto OK );
~ (introducir el número de teléfono interno del terminal inalámbrico del receptor);
OK .
Siempre que tras enviar una entrada confirme con la tecla de display Sì, podrá
seleccionar más entradas. Mediante la tecla de display No finaliza el proceso de envío.
15
Gigaset SL1 / italiano / A31008-L001-B002-1-6Z19 / start_guide_time.fm / 14.11.2003
Empleo del listín telefónico y de otras listas
Marcación por voz
Con la función de marcación por voz puede marcar el número de un interlocutor
diciendo su nombre. Para ello debe guardarse una muestra de voz; es decir, en el
terminal inalámbrico se guarda el nombre pronunciado por el usuario.
Hasta cuatro usuarios pueden guardar/grabar, cada uno, una muestra de voz por cada
entrada. Antes de la grabación, el usuario debe "identificarse", p. ej., como Utente 2.
En total pueden guardarse 23 muestras de voz para entradas del listín telefónico. Las
entradas que incluyen una muestra de voz están marcadas con ´ en el listín telefónico
de voz.
Grabación de una muestra de voz para una entrada existente en el listín
telefónico
Pronuncie la muestra de voz en un ambiente silencioso (a una distancia aprox. de 25
cm).
Paso 1: abrir el listín telefónico para la marcación por voz:
s (abrir el listín telefónico); s(seleccionar entrada); Lingua; s Utente 2 (ej.) OK .
Paso 2: iniciar la grabación:
Regist; OK (confirmar la solicitud del display). Pronuncie el nombre después de que se
lo haya pedido el display. Repita el nombre después de que se lo vuelva a pedir el
display. La grabación se guarda automáticamente.
Pulsar a prolongadamente (vuelta al estado de reposo).
Si su muestra de voz se parece demasiado a la de otro usuario, el sistema se lo avisará
con un mensaje. Finalice este mensaje con Ý , vuelva al inicio de la grabación y
repítala.
Marcación por voz: pulsar la tecla t prolongadamente y pronunciar el nombre.
Anuncio del nombre de un llamante
Para una llamada externa entrante puede hacer que se pronuncie el nombre del
llamante además de sonar el timbre.
Condiciones: la presentación del número de teléfono. Se ha guardado una muestra de
voz (p. 16).
Activación/desactivación del anuncio del nombre
v (abrir el menú); s Audio OK ; s Impost.suoneria OK ; Chiamate est. OK ;
2 veces s (hasta la línea después de la siguiente), r (ID Chiamant) activar/
desactivar; Salva; pulsar a prolongadamente (vuelta al estado de reposo).
Escucha de una muestra de voz
Abrir el listín telefónico para la marcación por voz (véase Paso 1, p. 16).
Seguidamente:
s (seleccionar entrada); Ascolta; pulsar a prolongadamente (vuelta al estado de
reposo).
16
Gigaset SL1 / italiano / A31008-L001-B002-1-6Z19 / start_guide_time.fm / 14.11.2003
Empleo del listín telefónico y de otras listas
Modificación o borrado de muestra de voz
Abrir el listín telefónico para la marcación por voz (véase Paso 1, p. 16).
Seguidamente:
s (seleccionar entrada); v (abrir el menú); Registra modello OK o s Cancella
modello OK ; pulsar a prolongadamente (vuelta al estado de reposo).
Después de borrar una entrada permanecen el número de teléfono y el nombre.
También siguen estando disponibles las muestras de voz de otros usuarios.
Modificación del nombre de usuario
s (abrir el listín telefónico); s (seleccionar entrada); Lingua;
s Utente 2 (ej.); Modif.; ~ (introducir nombre) Salva;
pulsar a prolongadamente (vuelta al estado de reposo).
Encadenamiento de un número Call-by-Call con un número de
teléfono
Esta función permite anteponer un prefijo de un proveedor de red, guardado en la lista
de marcación rápida, al número de teléfono ("encadenamiento").
C (abrir la lista de marcación abreviada); s (seleccionar entrada); à (abrir el
menú); Utilizza Numero OK ; s (abrir el listín telefónico); s (seleccionar entrada)
OK ; o ~ introducir el número; c.
Lista de rellamada
En la lista de rellamada se incluyen los diez últimos números marcados.
Rellamada manual
Þ (abrir la lista de rellamada); s (seleccionar entrada); c.
Rellamada automática
Mediante esta función se marca automáticamente el número de teléfono cada 20 seg.
Si el interlocutor se presenta: pulsar c (tecla de descolgar). Si no se presenta, la
llamada se cancela tras 30 seg. La función se desactiva después de diez intentos sin
éxito.
Pulsar a (tecla de colgar); • (abrir la lista de rellamada);
v (abrir el menú); RiselezioneAutom. OK .
Cancelar la rellamada: pulsar la tecla de display Off o pulsar cualquier tecla.
17
Gigaset SL1 / italiano / A31008-L001-B002-1-6Z19 / start_guide_time.fm / 14.11.2003
Empleo del listín telefónico y de otras listas
Administración de las entradas de la lista de rellamada
Puede utilizar las funciones de menú siguientes:
• (abrir la lista de rellamada); s (seleccionar entrada); v (abrir el menú);
s (seleccionar función).
RiselezioneAutom.
Utilizza Numero
Copia in Rubrica
Cancella
Cancella Tutto
Directorio de correo electrónico
En el directorio de correo electrónico puede guardar las direcciones de dichos correos.
En total puede guardar un máximo de 200 entradas en el listín telefónico, en el
directorio de correo electrónico y en la lista de marcación abreviada.
Las entradas del directorio de correo electrónico puede administrarlas igual que las
entradas de un listín telefónico p. 15.
Almacenamiento de nuevas direcciones de correo electrónico
Paso 1: abrir el directorio de correo electrónico:
s (abrir el listín telefónico) s Cartella di E-Mail OK .
Paso 2: efectuar la entrada de correo electrónico:
Nuova voce OK ; ~ (introducir la dirección); à
(abrir el menú);
( en caso necesario, s, ".", "@" o seleccionar la función de ayuda para la introducción de
texto OK ). Si está activa la ayuda para la introducción de texto, pulsar R 1 vez
prolongadamente y 1 vez brevemente.
Paso 3: guardar la entrada de correo electrónico:
à (abrir el menú); Salva OK ; pulsar a prolongadamente (vuelta al estado de
reposo).
Si ha seleccionado una entrada, pulse la tecla de display Visualiz., seguidamente Modif. e
introduzca la dirección. Guárdela como se describe en el "Paso 3".
Indicación del espacio libre de memoria
El espacio de memoria se distribuye entre el listín telefónico, la lista de marcación
abreviada (p. 13) y el directorio de correo electrónico (p. 18). Se indica el espacio de
memoria de todas las listas.
s (abrir el listín telefónico); s (seleccionar entrada); v (abrir el menú);
s Memoria Libera OK ; pulsar a prolongadamente (vuelta al estado de reposo).
18
Gigaset SL1 / italiano / A31008-L001-B002-1-6Z19 / start_guide_time.fm / 14.11.2003
Utilización de varios terminales
Utilización de varios terminales
Transferencia de una llamada externa a otro terminal inalámbrico
u (abrir la lista interna); seleccionar s (un terminal inalámbrico determinado o
Chiam.collettiva); OK .
Cuando el terminal interno al que ha transferido la llamada descuelgue, pulse a (tecla
de colgar).
Si no está localizable o comunica, la llamada regresa automáticamente a su terminal (en
el display se ve Richiamata).
Consulta interna
Durante una comunicación externa puede efectuar una llamada interna.
u (abrir la lista interna); s (seleccionar terminal inalámbrico), OK .
Para finalizar: pulsar la tecla de display Fine (vuelta al estado de reposo).
Aceptación/rechazo de una llamada en espera durante una
comunicación interna
Si durante una comunicación interna recibe una llamada externa, oirá el tono de aviso
de llamada en espera (tono breve). Pulsar la tecla de display Rispondi o Rifiuta.
El tono de llamada en espera rechazada puede oírse aún en otros terminales
inalámbricos registrados.
Utilización de un terminal inalámbrico con la función de vigilancia
de habitación
Con esta función se llama a un número de teléfono interno o externo guardado
previamente tan pronto como se alcance un nivel de ruido definido. Incluso tras colgar
permanece activada la función de vigilancia de habitación en el terminal inalámbrico.
La distancia entre el terminal inalámbrico y el bebé debe estar comprendida entre 1 y 2
metros.
El micrófono debe apuntar hacia el bebé.
Cuando está activada la función de vigilancia de habitación, las llamadas entrantes se
señalan en el terminal inalámbrico que se encuentra cerca del bebé sin timbre y se
indican únicamente en el display. En este caso no se ilumina ni el display ni el teclado.
Tenga cuidado de que, al introducir el número de teléfono externo, la conexión a la que
se desvía la llamada correspondiente a la función de vigilancia de habitación no se
bloquee con un contestador automático conectado.
◆ Cuando desvíe la función de vigilancia de habitación a un número de teléfono
externo, debe informar de ello al propietario de este número.
19
Gigaset SL1 / italiano / A31008-L001-B002-1-6Z19 / start_guide_time.fm / 14.11.2003
Utilización de varios terminales
◆ La llamada de vigilancia de habitación a un número de teléfono externo se
interrumpe tras 90 seg aprox., y a un número de teléfono interno (terminal
inalámbrico) tras 180 seg aprox. (en función de la estación base).
W
Antes de que se vaya debe comprobar sin falta el ajuste de la función
de vigilancia de habitación; p. ej., la sensibilidad y el establecimiento
de la conexión.
i
La función de vigilancia de habitación activada reduce
considerablemente el tiempo de servicio del terminal inalámbrico. Si es
necesario, coloque el terminal inalámbrico situado cerca del bebé en el
soporte cargador, para asegurarse de que no se acaba la batería.
La función de vigilancia de habitación también es posible en el modo
"walky-talky".
Activación de la función de vigilancia de habitación e introducción por
primera vez del número de teléfono de destino
Paso 1: abrir el campo de entrada: v; s BabyC/WalkieT OK ; Baby Call OK .
Paso 2: activar la función de vigilancia de habitación: r (seleccionar en la línea
BabyCall: On);
Paso 3: introducir el número de destino: s (en la línea siguiente); Modif.;
Introducir el número de teléfono interno: INT s (seleccionar terminal inalámbrico)
OK ; o bien:
Introducir el número de teléfono externo: ~; à (abrir el menú); Salva OK ;
Paso 4: ajustar la sensibilidad: en caso necesario, s (en la siguiente línea); r; Salva;
La función de vigilancia de habitación está ahora activada.
Si la función de vigilancia de habitación está activada, puede ir directamente al ajuste
de dicha función con v (abrir el menú).
Desactivación de la función vigilancia de habitación
Puede desactivar la función de vigilancia de habitación externamente (en función de
la estación base). Acepte la llamada originada por la función de vigilancia de habitación
y pulse las teclas O R. Transcurridos 90 seg después de finalizar la conexión se
desactiva la función. Ya no volverán a producirse más llamadas de la función vigilancia
de habitación. El resto de funciones correspondientes a la vigilancia de habitación del
terminal inalámbrico (p. ej., la ausencia de timbre) permanecerán activas hasta que
pulse la tecla de display Off en el terminal inalámbrico situado al lado del bebé.
i
20
Para activar de nuevo la función de vigilancia de habitación con el mismo
número de teléfono hay que volver a efectuar la activación y guardar con
Salva.
Gigaset SL1 / italiano / A31008-L001-B002-1-6Z19 / start_guide_time.fm / 14.11.2003
Utilización de varios terminales
Ajuste del modo "walky-talky"
La función "walky-talky" permite que dos terminales inalámbricos se comuniquen (con
un alcance máximo de 300 m), independientemente de la distancia a la que se
encuentren de la estación base.
Condición:
◆ ambos terminales inalámbricos están registrados en la misma estación base
(recomendado para la función vigilancia de habitación) o
◆ ambos terminales inalámbricos están registrados en bases distintas y ambos están
ajustados en la opción Base migliore (p. 8) o
◆ uno de los terminales inalámbricos no está registrado en ninguna base y el terminal
inalámbrico registrado está ajustado en la opción Base migliore o
◆ ninguno de los dos terminales inalámbricos está registrado en una estación base.
En el modo "walky-talky" las llamadas entrantes no pueden llegar a los terminales
inalámbricos. Los tiempos de servicio de los terminales inalámbricos se reducen
considerablemente.
Activación/desactivación del modo "walky-talky"
v (abrir el menú); s BabyC/WalkieT OK ; s Walkie-Talkie OK .
Para desactivar: Pulsar la tecla de display Off.
Pulsar c (tecla de descolgar) o d (tecla de manos libres). La llamada va a todos los
terminales inalámbricos en el modo "walky-talky". El ajuste del volumen del auricular y
de los tonos de timbre se realiza exactamente igual que si tuviera los terminales
inalámbricos en contacto con la estación base (p. 22). El ajuste de los tonos de timbre
en el modo "walky-talky" no es posible.
La activación/desactivación del timbre (p. 23) o el bloqueo del teclado (p. 8) son
posibles en el modo "walky-talky".
Para abrir el menú, pulse la tecla de display ©.
i
Incluso si apaga y vuelve a encender el terminal inalámbrico, permanece
el modo "walky-talky".
Utilización del terminal inalámbrico en el modo "walky-talky" para la
vigilancia de habitación
à (abrir el menú); s Baby Call OK ; r (seleccionar On);
s (en la siguiente línea); r (seleccionar basso o alto); Salva.
La llamada de la función de vigilancia de habitación va a los terminales inalámbricos que
se encuentran en el modo "walky-talky".
W
Antes de que se vaya debe comprobar sin falta el ajuste de la función
de vigilancia de habitación; p. ej., la sensibilidad y el establecimiento
de conexión. A continuación, no debe volver a modificarse la
distancia entre los terminales inalámbricos (alcance máximo).
Pulse la tecla de display Off en el terminal inalámbrico con la función de vigilancia de
habitación para desactivar dicha función. El terminal inalámbrico vuelve al modo de
"walky-talky" normal.
21
Gigaset SL1 / italiano / A31008-L001-B002-1-6Z19 / start_guide_time.fm / 14.11.2003
Ajuste del terminal inalámbrico
Ajuste del terminal inalámbrico
Activación/desactivación de la aceptación automática de llamada
Si está activada esta función, basta retirar el terminal inalámbrico del soporte cargador
para contestar una llamada, sin necesidad de pulsar la tecla de descolgar (estado de
suministro: activada).
v (abrir el menú); s Impostazioni OK ; RispostaAutom. OK (‰ = activado);
pulsar a prolongadamente (vuelta al estado de reposo).
Modificación del volumen del auricular
El volumen de la función manos libres puede ajustarse en cinco niveles y el del auricular
en tres niveles, incluso durante una llamada externa.
v (abrir el menú); s Audio OK ; Volume telefono OK ; r (seleccionar el volumen
de la función manos libres); s (en la línea siguiente) r (seleccionar el volumen del
auricular); Salva; pulsar a prolongadamente (vuelta al estado de reposo).
Tono del sonido
Puede aumentar la calidad del tono del sonido de las melodías de timbre largas (4 - 10).
v (abrir el menú); s Audio OK ; s EnfasiSuoneria OK (‰ = activado); pulsar a
prolongadamente (vuelta al estado de reposo).
Modificación de los tonos del timbre
Es posible seleccionar entre seis volúmenes y 26 melodías (de las que 16 son melodías
polifónicas). Las melodías polifónicas sólo están disponibles si previamente se graban
con el Gestor de sonido o se cargan mediante la interfaz de PC.
Ajustes para las llamadas externas, el control de tiempo y el anuncio de
nombres
v (abrir el menú); s Audio OK ; s Impost.suoneria OK ; Chiamate est. OK ; r
(seleccionar volumen); s (en la línea siguiente) r (seleccionar melodía);
s (si es necesario, en la línea siguiente) r (activar el anuncio de nombres, p. 16);
Activación del control de tiempo
Seleccionar C.Tempo; r (seleccionar Ctrl. Tempo: On.); s saltar a la línea Da:
(introducción de 4 cifras del intervalo de tiempo); s saltar a la línea A: (introducción
de 4 cifras del intervalo de tiempo); s r (introducción del volumen del timbre); Salva
(guardar el control de tiempo); otra vez Salva (guardar ajuste); pulsar a
prolongadamente (vuelta al estado de reposo).
22
Gigaset SL1 / italiano / A31008-L001-B002-1-6Z19 / start_guide_time.fm / 14.11.2003
Ajuste del terminal inalámbrico
Ajuste individual para llamadas internas, alarma del despertador y citas
v (abrir el menú); s Audio OK ; s Impost.suoneria OK ; s (seleccionar función)
OK ; r (seleccionar volumen); s (en la línea siguiente) r (seleccionar melodía);
Salva. (Adicionalmente para el ajuste Tutte uguali confirmar la consulta con Sì.) Pulsar
a prolongadamente (vuelta al estado de reposo).
Activación/desactivación del tono del timbre
En el caso de llamadas entrantes externas suenan todos los terminales inalámbricos.
Desactivación del tono del timbre: pulsar la tecla asterisco P prolongadamente. En
el display aparece el símbolo Ú.
Activación del tono del timbre: pulsar la tecla asterisco P prolongadamente.
i
Para desactivar el tono del timbre para la llamada actual, pulsar la
tecla de display Suon.Off.
Activación/desactivación del tono de atención
Al desactivar el tono del timbre puede activar el tono de atención. Cuando hay una
llamada, en este caso suena un tono breve ("bip") en lugar del timbre.
Pulsar la tecla asterisco P prolongadamente y en un intervalo de 3 seg, pulsar la
tecla de display Beep. En el display se muestra º.
Para desactivar: pulsar la tecla asterisco P prolongadamente.
Alarma por vibración
Las llamadas entrantes y otros mensajes se indican mediante vibración. Este ajuste es
independiente del ajuste de tono del timbre.
v (abrir el menú); s Audio OK ; s Vibrazione OK (‰ = activado); pulsar a
prolongadamente (vuelta al estado de reposo).
Gestor de sonido
Es posible grabar melodías polifónicas (4 seg de duración como máximo) o regrabarlas
mediante un cable de datos (p. 28). Es posible guardar hasta 16 melodías.
Grabación de melodías
v (abrir el menú); s Audio OK ; s Suonerie OK ; <Nuova Suon.> OK ; Registra
suoneria? OK ; Fine pulsar o esperar 4 seg; Salva; Modifica (introducir nombre de la
melodía) Salva; pulsar a prolongadamente (vuelta al estado de reposo).
Reproducción de melodías
v (abrir el menú); s Audio OK ; s Suonerie OK ; s (seleccionar melodía); Ascolta;
pulsar a prolongadamente (vuelta al estado de reposo).
Edición de entradas
v (abrir el menú); s Audio OK ; s Suonerie OK ; s (seleccionar melodía); à ;
Volume OK (cambiar volumen) o s Modifica OK (cambiar
23
Gigaset SL1 / italiano / A31008-L001-B002-1-6Z19 / start_guide_time.fm / 14.11.2003
Ajuste del terminal inalámbrico
nombre) o s Visualizza OK (indicar nombre de archivo) o s Cancella
a prolongadamente (vuelta al estado de reposo).
OK ; pulsar
Activación y desactivación de los tonos de indicación
El terminal inalámbrico le indica acústicamente diversas actividades y estados. Los
tonos de indicación siguientes pueden activarse o desactivarse independientemente
unos de los otros (estado de suministro: activados).
◆ Clic de teclas (se confirma cada vez que se pulsa una tecla),
◆ Tonos de confirmación (tono de confirmación, tono de error, tono de final de
menú),
◆ Tono de baterías.
v (abrir el menú); s Audio OK ; s Toni di avviso OK ;
r (activar Tono tasti: ); s (en la siguiente línea) r (activar Conferma:);
s (en la siguiente línea) r (para seleccionar BatScar: On, Off o en transf.);
Salva; pulsar a prolongadamente (vuelta al estado de reposo).
Reinicio del terminal inalámbrico al estado de suministro
Puede reiniciar los ajustes y modificaciones individuales. Las entradas del listín
telefónico, de la lista de llamantes, del directorio de correo electrónico y de la lista de
marcación abreviada y el registro del terminal inalámbrico en la estación base, los
protectores de pantalla y las melodías descargadas permanecen igual. Con a se
cancela el reinicio.
v (abrir el menú); s Impostazioni OK ; s Reset Portatile OK ; Sì (confirmar la
consulta); pulsar a prolongadamente (vuelta al estado de reposo)
Estado de suministro del terminal inalámbrico
Volumen del auricular
Volumen para la función manos libres
Volumen del tono del timbre
Control de tiempo para el tono del timbre
Melodía del tono del timbre
Anuncio de nombre
Aceptación automática de llamada
Tono de baterías/clic de teclas/tono confirmación
Idioma del display
Despertador/cita
Nombre correspondiente a la cita
Lista de rellamada
Vigilancia de habitación/Sensibilidad de la
vigilancia de habitación
24
1
3
5
desactivado
Melodía 1
desactivado
activada
activado
específico del país
desactivado
borrado
vacía
desactivada/alta
p. 22
p. 22
p. 22
p. 22
p. 22
p. 16
p. 22
p. 24
p. 7
p. 11/p. 11
p. 11
p. 17
p. 20
Gigaset SL1 / italiano / A31008-L001-B002-1-6Z19 / start_guide_time.fm / 14.11.2003
Anexo
Anexo
Cuidados y contacto con líquidos !
Limpie el terminal inalámbrico con un paño húmedo (sin disolventes) o un paño
antiestático. No utilice en ningún caso un paño seco. Existe el peligro de que se forme
carga estática.
Si el terminal inalámbrico entrara en contacto con líquido, no conecte en ningún caso
el aparato. Retire inmediatamente la batería.
Deje que el líquido escurra fuera del aparato y seque después todas las piezas.
Almacene el terminal inalámbrico sin baterías durante un mínimo de 72 horas en un
lugar seco y caliente. Después es posible en muchos casos la nueva puesta en
funcionamiento.
Servicio Técnico (Servicio de Atención al Cliente)
Nuestro Servicio de Asistencia Online en Internet:
www.my-siemens.com/customerservice
En caso de averías del equipo o consultas acerca de la garantía, diríjase a nuestro
Servicio de
Asistencia
902 115061
Por favor tenga a mano el resguardo de compra.
Encontrará más números de Asistencia al final de las instrucciones de uso en
"Asistencia".
En los países en los que no se compran nuestros productos a través de proveedores
autorizados no se ofrecen servicios de sustitución o reparación.
Se han observado las características específicas del país. El terminal inalámbrico SL 1
está homologado para toda la UE y Suiza.
El sello CE corrobora la conformidad del equipo con los requerimientos básicos de la
Directiva R&TTE.
Extracto de la declaración original:
"We, Siemens AG, declare, that the above mentioned product is manufactured according to our Full
Quality Assurance System certified by CETECOM ICT Services GmbH in compliance with ANNEX V
of the R&TTE-Directive 99/5/EC. The presumption of conformity with the essential requirements
regarding Council Directive 99/5/EC is ensured."
Senior Approvals Manager"
The Declaration of Conformity (DoC) has been signed. In case of need a copy of the original DoC
can be made available via the company hotline.
25
Gigaset SL1 / italiano / A31008-L001-B002-1-6Z19 / start_guide_time.fm / 14.11.2003
Anexo
Características técnicas
Batería recomendada
Batería Ion Litio (LiIon), 700 mAh
(la posición se indica en las instrucciones de uso)
El aparato sólo se suministra con una batería homologada.
Tiempos de servicio/tiempos de carga del terminal inalámbrico
Capacidad
(mAh)
Autonomía (horas) Tiempo de
Tiempo de carga
conversación (horas) (horas)
700
aprox. 250 (10 días) aprox. 15
aprox. 2,5
Los tiempos de servicio y de carga son válidos únicamente si se emplea la batería
recomendada.
Tabla de símbolos
Escritura estándar
Pulsar la tecla correspondiente varias veces o de forma prolongada:
1
2
I
4
5
L
M
N
O
Q
P
R
1 vez
2
3
4
5
6
7
8
9
10
11
12
13
14
veces veces veces veces veces veces veces veces veces veces veces veces veces
Espacios
en blanco
1
â
£
$
¥
¤
a
b
c
2
ä
á
à
â
d
e
f
3
ë
é
è
ê
g
h
i
4
ï
í
ì
î
j
k
l
5
m
n
o
6
ö
ñ
ó
ò
p
q
r
s
7
ß
û
ã
ç
ô
õ
t
u
v
8
ü
ú
ù
w
x
y
z
9
ÿ
ý
æ
ø
å
.
,
?
!
0
+
-
:
¿
¡
Abc -->
123
123 -->
abc
(
)
<
=
>
%
#
@
*
/
&
§
\
“
‘
;
_
Edición de texto (sin ayuda para la introducción de texto)
◆ Puede controlar el cursor con u v t s.
◆ Puede borrar caracteres (a la izquierda del cursor) con fC .
◆ Puede añadir caracteres a la izquierda del cursor.
◆ Para cambiar de escritura en mayúsculas (la primera letra se escribe en mayúscula y
todas las demás en minúsculas) a escritura en minúsculas, pulse antes de escribir la
letra P. Si vuelve a pulsar P cambiará de escritura en minúsculas a escritura de
cifras. Al volver a pulsar, cambiará de nuevo de la escritura de cifras a la escritura en
mayúsculas.
26
Gigaset SL1 / italiano / A31008-L001-B002-1-6Z19 / start_guide_time.fm / 14.11.2003
Anexo
◆ Al realizar entradas en el listín telefónico se escribe automáticamente en mayúsculas
la primera letra del nombre y, a continuación, letras minúsculas.
◆ Si pulsa una tecla prolongadamente, se muestran los caracteres de la tecla
correspondiente en la línea más baja del display y se marcan consecutivamente. Si
suelta la tecla se inserta el carácter marcado en el campo de entrada.
– La escritura en mayúsculas, minúsculas o cifras se indica en el display:
– al introducir datos en el listín telefónico, en la línea más baja del display hay una
"A" o una "a".
Orden de las entradas del listín telefónico
1. Espacio en blanco (representado aquí con s)
2. Cifras (0 - 9)
3. Letras (por orden alfabético)
4. Otros caracteres
Si desea pasar por alto el orden alfabético de los registros, inserte un espacio en blanco
antes del nombre. El registro en cuestión se colocará de este modo en primer lugar
(ejemplo: „sLuisa"). También puede numerar las entradas con cifras (p. ej., "1Carmen",
"2Luisa", "3Alberto").
Ayuda para la introducción de texto
La función de ayuda para la introducción de texto EATONI facilita la escritura de
nombres (listín telefónico, lista de marcación abreviada o directorio de correo
electrónico).
Cada tecla entre la Q y la O tiene varias letras y signos asignados, dispuestos en
una línea de selección directamente sobre las teclas de display (bajo el campo de texto)
tan pronto como pulse una tecla. Al introducir letras se representa en formato
invertido la letra buscada más frecuentemente según su probabilidad. Está al inicio de
esta línea de selección y se incorpora en el campo de texto.
53 ________Ç_____abc
Pedro C
KLJ5
W
La ayuda para la introducción de
texto EATONI está activada.
Dirección de correo electrónico
¨
Línea de selección
Si esta letra corresponde a la deseada, confírmela pulsando la tecla siguiente. Si la letra
seleccionada por EATONI no es la deseada, pulse la tecla de almohadilla R una serie
de veces hasta que se represente en formato invertido la letra buscada en la línea de
representación y se incorpore en el campo de texto.
P
R
Pulse la tecla asterisco brevemente: cambia del modo abc al Abc, del Abc al
123 y del 123 al abc.
Salta en la línea de selección a la letra siguiente.
27
Gigaset SL1 / italiano / A31008-L001-B002-1-6Z19 / start_guide_time.fm / 14.11.2003
Anexo
Activación/desactivación de la ayuda para la introducción de texto
La ayuda para la introducción de texto se activa y desactiva específicamente según la
función.
Condición: se encuentra en un campo de introducción de texto (nombre en el listín
telefónico, lista de marcación abreviada o directorio de correo electrónico).
v (abrir el menú); s AiutoDigit.Testo OK (‰ = activado);
pulsar brevemente la tecla de colgar a (vuelta al campo de texto). Introduzca ahora
el texto.
Interfaz de PC
El terminal inalámbrico SL 1 puede conectarse a un ordenador mediante un cable de
datos de Siemens. Con la ayuda del programa "Siemens Data Suite" (que podrá
descargar gratuitamente en http:\\www.my-siemens.com\gigaset-sds), el ordenador
puede comunicarse con el equipo SL 1 y acceder a los siguientes parámetros y listas del
terminal inalámbrico:
Informatión del terminal
◆ Versión de software
◆ Tipo
◆ Código del fabricante
Acceso de lectura/escritura a
Listín telefónico
Directorio de correo electrónico
Lista de proveedores de red
Lista de citas
Lista de rellamada
◆
◆
◆
◆
◆
Acceso de lectura/escritura a otras características
◆ Ajuste del tono del timbre
◆ Ajuste del volumen
◆ Carga de protectores de pantalla
◆ Carga de melodías
◆ Realización y aceptación de llamadas
Transferencia de datos
Es posible transferir grandes cantidades de datos entre el terminal inalámbrico y un
equipo externo. En este caso, el terminal inalámbrico cambia al modo de transferencia
de datos y en el display se muestra Trasferm. dati. En este modo no es posible
introducir registros con el teclado y se ignorarán las llamadas entrantes.
28
Gigaset SL1 / italiano / A31008-L001-B002-1-6Z19 / start_guide_time.fm / 14.11.2003
Anexo
En los casos siguientes el terminal inalámbrico cambia al modo de transferencia de
datos:
◆ Acceso de lectura/escritura al listín telefónico
◆ Acceso de lectura/escritura al directorio de correo electrónico
◆ Acceso de lectura/escritura a la lista de proveedores de red
◆ Acceso de lectura/escritura a la lista de citas
◆ Acceso de lectura/escritura a la lista de rellamada
◆ Carga de protectores de pantalla
◆ Carga de melodías
Si se produce un fallo durante la transferencia, el terminal inalámbrico cambia
automáticamente al estado de reposo.
Realización y aceptación de llamadas
Seleccione un equipo externo o acepte una comunicación y utilice el terminal
inalámbrico exactamente igual que si hubiese ejecutado estas funciones en dicho
terminal.
Juego "Balloon Shooter"
Intente, a ser posible, hacer blanco en cuatro globos.
v ¢ BabyC/WalkieT
bien ...
¢ Balloon Shooter
Iniciar juego:
Pulsar la tecla de display.
[RRRRRRRRRRRRRRRRRRRR]
Avvio
o bien
Otras opciones:
à
Pulsar la tecla de display para abrir el menú de
opciones.
o
p¢
¢
¢
¢
¢
¢
¢
¢
12I
4
L
MNO
¢
¢
¢
¢
Para mover el objetivo, pulse:
Para disparar al globo, pulse la tecla 5.
29
Gigaset SL1 / italiano / A31008-L001-B002-1-6Z19 / start_guide_time.fm / 14.11.2003
Anexo
Certificado de garantía
Sin perjuicio de las reclamaciones que presente al vendedor, se otorgará al usuario
(cliente) la garantía del fabricante bajo las condiciones detalladas a continuación:
◆ En caso de que los nuevos terminales y sus componentes resulten defectuosos como
consecuencia de la fabricación o defectos de material dentro de un plazo de 24
meses a partir de su adquisición, Siemens, discrecionalmente y de forma gratuita,
reparará dicho terminal o sustituirá el terminal por otro que corresponda al estado
tecnológico del terminal actual. En cuanto a las partes sometidas a desgaste (p.ej.
pilas, teclados, carcasas) esta garantía será válida durante seis meses a partir de la
fecha de su adquisición.
◆ Esta garantía perderá su validez en caso de que el defecto del equipo se pueda
atribuir al uso indebido o al incumplimiento de la información detallada en el
manual de usuario.
◆ Esta garantía no incluye los servicios prestados por el vendedor autorizado ni los que
el cliente instale (p.ej. instalación, configuración, descargas de software). Asimismo
se excluye de la garantía los manuales y cualquier software que se hayan
proporcionado en un medio de datos separado.
◆ El recibo y la fecha de compra constituyen el comprobante para exigir el
cumplimiento de la garantía. Cualquier reclamación de garantía deberá presentarse
dentro de un plazo de dos meses tras haber ocurrido el defecto cubierto por la
garantía.
◆ Los terminales o componentes reemplazados y devueltos a Siemens volverán a ser
propiedad de Siemens.
◆ Esta garantía se aplica a nuevos dispositivos adquiridos en la Unión Europea. La
garantía la concede Siemens S.A., Ronda de Europa,5 28760 Tres Cantos.
◆ Se excluirán aquellas reclamaciones que difieran de o excedan las citadas en la
garantía de este fabricante, siempre que no estén cubiertas por la legislación
española de protección a los consumidores. Siemens no se responsabiliza de
interrupciones operativas, lucro cesante ni pérdida de datos, software adicional
cargado por el cliente ni de ninguna otra información, ni de cualquier daño
indirecto, o que no sea previsible y típico para este tipo de contratos. Será
responsabilidad del cliente obtener una copia de seguridad de dicha información.
Más allá de esta garantía, quedan excluidas cualesquiera otras responsabilidades de
Siemens en relación con este terminal o con cualquiera de sus componentes, sin
perjuicio de lo establecido en la legislación española sobre protección de los
consumidores y sobre responsabilidad civil por daños causados por productos
defectuosos, y siempre que no medie dolo o culpa grave de Siemens.
◆ La duración de la garantía no se extenderá en virtud de los servicios prestados según
las condiciones de garantía.
◆ Siemens se reserva el derecho de cobrarle al cliente el reemplazo o la reparación en
caso de que el defecto no sea cubierto por la garantía, siempre que dicho cliente
haya sido informado previamente de esta circunstancia.w
◆ Las normas antes mencionadas no suponen ninguna exigencia de inversión de la
carga de la prueba en detrimento del cliente.
◆ Para solicitar el cumplimiento de esta garantía, contacte con el servicio telefónico de
Siemens.
El número correspondiente figura en la guía de usuario adjunta.
30
Gigaset SL1 / italiano / A31008-L001-B002-1-6Z19 / SL_1SIX.fm / 14.11.2003
Índice
Índice
A
C
Abrir
listín telefónico . . . . . . . . . . . . . . . . 9
menú . . . . . . . . . . . . . . . . . . . . . . . 9
Aceptación automática de llamada . . 22
Activación
bloqueo del teclado . . . . . . . . . . . . . 8
cita . . . . . . . . . . . . . . . . . . . . . . . . 11
despertador . . . . . . . . . . . . . . . . . . 11
Walky-talky . . . . . . . . . . . . . . . . . . 21
Activación del modo silencio
(para el interlocutor)
(terminal
inalámbrico) . . . . . . . . . 13
Ajuste
cita . . . . . . . . . . . . . . . . . . . . . . . . 11
despertador . . . . . . . . . . . . . . . . . . 11
fecha. . . . . . . . . . . . . . . . . . . . . . . 10
hora . . . . . . . . . . . . . . . . . . . . . . . 10
idioma del display . . . . . . . . . . . . . . 7
volumen del altavoz . . . . . . . . . . . . 22
volumen del auricular . . . . . . . . . . 22
volumen del tono del timbre . . . . . 22
Ajuste de la fecha . . . . . . . . . . . . . . . 10
Ajuste de la hora . . . . . . . . . . . . . . . . 10
Alarma del despertador . . . . . . . . . . . 11
Alarma por vibración . . . . . . . . . . . . . 23
Alimentador enchufable . . . . . . . . . . . 5
Aniversario . . . . . . . . . . . . . . . . . 11, 12
Apagado
terminal inalámbrico . . . . . . . . . . . . 8
Aparatos auditivos . . . . . . . . . . . . . . . 5
Atención al Cliente (Servicio) . . . . . . . 25
Ayuda para la introducción de texto . . 27
Cambio de estación base . . . . . . . . . . . 8
Campo de la intensidad de recepción . . 2
Cancelar (proceso) . . . . . . . . . . . . . . . 10
Características técnicas . . . . . . . . . . . 26
Cita . . . . . . . . . . . . . . . . . . . . . . . . . . 12
Clip para el cinturón . . . . . . . . . . . . . . . 8
Consulta (interna) . . . . . . . . . . . . . . . 19
Contenido del embalaje . . . . . . . . . . . . 6
Cuidados del teléfono . . . . . . . . . . . . 25
Cursor . . . . . . . . . . . . . . . . . . . . . . . . . 9
B
Balloon Shooter . . . . . . . . . . . . . . . . 29
Batería
batería recomendada . . . . . . . . . . . 26
carga . . . . . . . . . . . . . . . . . . . . . . . . 6
colocación . . . . . . . . . . . . . . . . . . . . 6
indicación . . . . . . . . . . . . . . . . . . . . 6
Bloqueo
bloqueo del teclado . . . . . . . . . . . . . 8
Borrar (muestra de voz) . . . . . . . . . . . 17
D
Desactivación
alarma de cita. . . . . . . . . . . . . . . . . 12
alarma del despertador . . . . . . . . . . 11
bloqueo del teclado . . . . . . . . . . . . . 8
tono del timbre (en el terminal
inalámbrico) . . . . . . . . . . . . . . . . . 23
Desconectar, véase Desactivación . . . . 11
Despertador . . . . . . . . . . . . . . . . . . . 11
Directorio de correo electrónico . . . . . 18
Display
modificación del idioma . . . . . . . . . . 7
teclas . . . . . . . . . . . . . . . . . . . . . . . . 9
E
EATONI, véase Ayuda para la
introducción de texto
Encendido
terminal inalámbrico . . . . . . . . . . . . . 8
Envío de una entrada del listín
telefónico . . . . . . . . . . . . 15
Equipos médicos . . . . . . . . . . . . . . . . . 5
Error/tono de error . . . . . . . . . . . . . . . 24
Escucha (de muestra de voz) . . . . . . . 16
Espacio de memoria . . . . . . . . . . . . . . 18
Estado de suministro del terminal
inalámbrico . . . . . . . . . . 24
F
Finalización de comunicación . . . . . . . 12
Función manos libres . . . . . . . . . . . . . 13
Funcionamiento con auricular . . . . . . . 2
Funciones de indicación horaria . . . . . 10
31
Gigaset SL1 / italiano / A31008-L001-B002-1-6Z19 / SL_1SIX.fm / 14.11.2003
Índice
G
Garantía . . . . . . . . . . . . . . . . . . . . . .
Gestor de sonido . . . . . . . . . . . . . . . .
Guardar
entrada de la lista de
marcación abreviada . . . . . . . . . .
entrada del listín telefónico . . . . . .
M
30
23
14
14
I
Idioma, véase Display
Indicación
espacio de memoria . . . . . . . . . . . . 18
indicación horaria
de 12/24 horas . . . . . . . . . . . 10, 11
Indicación del estado de carga . . . . . . . 6
Indicaciones de seguridad . . . . . . . . . . 5
Interfaz de PC . . . . . . . . . . . . . . . . . . 28
Interna
consulta . . . . . . . . . . . . . . . . . . . . 19
llamada . . . . . . . . . . . . . . . . . . . . . 12
Introducción
cita . . . . . . . . . . . . . . . . . . . . . . . . 11
cumpleaños/aniversario . . . . . . . . . 11
hora del despertador . . . . . . . . . . . 11
Introducción de cumpleaños
(como cita) . . . . . . . . . . 11
Marcación por voz . . . . . . . . . . . . . 9, 16
Mejor base . . . . . . . . . . . . . . . . . . . . . . 8
Melodía
polifónica . . . . . . . . . . . . . . . . . . . . 23
Melodía de espera . . . . . . . . . . . . . . . 13
Melodías polifónicas . . . . . . . . . . . . . . 23
Menú
abrir . . . . . . . . . . . . . . . . . . . . . . . . . 9
guía a través del menú . . . . . . . . . . . 9
retrocede un nivel de menús . . . . . . 10
tecla . . . . . . . . . . . . . . . . . . . . . . . . 10
tono de final . . . . . . . . . . . . . . . . . . 24
Micrófono . . . . . . . . . . . . . . . . . . . . . . 2
Muestra de voz . . . . . . . . . . . . . . . . . 16
N
No aceptados
aniversario . . . . . . . . . . . . . . . . . . . 12
cita. . . . . . . . . . . . . . . . . . . . . . . . . 12
Número de teléfono
guardar (listín telefónico) . . . . . . . . 14
tomar del listín telefónico . . . . . . . . 15
Número, véase también Número de
teléfono/Entrada . . . . . . . 14
Números "Call-by-Call" . . . . . . . . . . . . 13
L
O
Lámina de protección . . . . . . . . . . . . . 6
Lista
directorio de correo electrónico . . . 18
terminales inalámbricos . . . . . . . . . . 9
Lista de marcación abreviada . . . . . . . 13
guardar un número . . . . . . . . . . . . 14
Lista de rellamada . . . . . . . . . . . . . . . 17
Listín telefónico. . . . . . . . . . . . . . . . . 13
abrir . . . . . . . . . . . . . . . . . . . . . . . . 9
envío de entrada a terminal
inalámbrico . . . . . . . . . . . . . . . . . 15
guardar un número de teléfono . . . 14
orden de las entradas . . . . . . . . . . . 27
Llamada
externa . . . . . . . . . . . . . . . . . . . . . 12
interna . . . . . . . . . . . . . . . . . . . . . 12
Llamada colectiva . . . . . . . . . . . . . . . 12
Llamada de recordatorio . . . . . . . . . . 14
Llamada en espera (llamada interna) . 19
Orden en el listín telefónico . . . . . . . . 27
32
P
Pausa de marcación . . . . . . . . . . . . . . 12
Proveedor de red (lista de números) . . 13
Puesta en servicio (del teléfono) . . . . . . 6
R
Realización de llamadas . . . . . . . . . . . 12
aceptación de llamadas . . . . . . . 12, 13
externas . . . . . . . . . . . . . . . . . . . . . 12
Rellamada . . . . . . . . . . . . . . . . . . . . . 17
S
Seleccionar (entrada de menú) . . . . . . . 9
Seleccionar la entrada (menú) . . . . . . . 9
Servicio . . . . . . . . . . . . . . . . . . . . . . . 25
Servicio (puesta en servicio
del teléfono) . . . . . . . . . . . 6
Servicio de Atención al Cliente . . . . . . 25
Gigaset SL1 / italiano / A31008-L001-B002-1-6Z19 / SL_1SIX.fm / 14.11.2003
Índice
T
Tabla de símbolos . . . . . . . . . . . . . . . 26
Tecla . . . . . . . . . . . . . . . . . . . . . . . . . 2
Tecla 1 (marcación rápida) . . . . . . . . . . 2
Tecla de almohadilla . . . . . . . . . . . . . . 8
Tecla de borrado . . . . . . . . . . . . . . . . 10
Tecla de control . . . . . . . . . . . . . . . . . 9
Tecla de marcación abreviada . . . . . . 13
Tecla Escape . . . . . . . . . . . . . . . . . . . 10
Teclas
bloqueo del teclado . . . . . . . . . . . . . 8
cancelar . . . . . . . . . . . . . . . . . . . . 10
clic de tecla . . . . . . . . . . . . . . . . . . 24
Escape/Menú/Borrado/OK . . . . . . . . 10
pulsación de tecla (tono
de confirmación) . . . . . . . . . . . . . 24
tecla de control . . . . . . . . . . . . . . . . 9
tecla de rellamada . . . . . . . . . . . . . 10
teclas de display . . . . . . . . . . . . . . . 9
Terminal inalámbrico
activación del modo silencio
(para el interlocutor) . . . . . . . . . . 13
cambio a otra estación base . . . . . . . 8
cambio a una recepción mejor . . . . . 8
clip para el cinturón . . . . . . . . . . . . . 8
encendido/apagado . . . . . . . . . . . . . 8
lista . . . . . . . . . . . . . . . . . . . . . . . . . 9
puesta en servicio . . . . . . . . . . . . . . 6
registro en otra estación base . . . . . . 8
reinicio al estado de suministro . . . 24
tiempos de servicio y de carga . . . . 26
utilización con la función de vigilancia
de habitación . . . . . . . . . . . . . . . 19
Tiempo de servicio
en el modo "walky-talky" . . . . . . . . 21
terminal inalámbrico . . . . . . . . . . . 26
vigilancia de habitación . . . . . . . . . 20
Tiempos de carga del
terminal inalámbrico . . . 26
Tono
tono de error . . . . . . . . . . . . . . . . . 24
Tono (confirmación/error/batería/
final de menú) . . . . . . . . 24
Tono de atención . . . . . . . . . . . . . . . 23
Tono de aviso, véase Tonos de indicación
Tono de baterías . . . . . . . . . . . . . . . . 24
Tono de confirmación . . . . . . . . . . . . 24
Tono de señal, véase Tonos de indicación
Tono del sonido . . . . . . . . . . . . . . . . 22
Tono del timbre . . . . . . . . . . . . . . . . . 22
Tonos de confirmación . . . . . . . . . . . . 24
Tonos de indicación . . . . . . . . . . . . . . 24
Transferencia de llamada . . . . . . . . . . 19
V
Vigilancia de habitación . . . . . . . . . . . 19
VIP (entrada del listín telefónico) . . . . 15
Volumen . . . . . . . . . . . . . . . . . . . . . . 22
Volumen del auricular . . . . . . . . . . . . 22
W
Walky-talky . . . . . . . . . . . . . . . . . . . . 21
33
Gigaset SL1 / português / A31008-L001-B002-1-6Z19 / cover_innen.fm / 14.11.2003
s
PORTUGUÊS
Be inspired
Gigaset SL1 / português / A31008-L001-B002-1-6Z19 / covers_I-II.fm / 14.11.2003
Esquema
Esquema
Intensidade de ligação à
base
Ð 100 % i 75 %
Ñ 50 % Ò reduzida
| sem ligação (pisca)
Tecla Atender/Marcar
◆ Atender uma chamada;
◆ Iniciar o processo de
marcação
◆ Comutar de mãos-livres
para utilização normal.
Tecla de Navegação
Aceder ao menu, lista
telefónica, marcação por
voz, navegação no campo
de entrada.
Tecla Mãos-livres
◆ Comutar de utilização
normal para utilização
em mãos-livres;
◆ Ilumina-se: Mãos-livres
está activada;
Display (ecrã)
Estado de carga da
bateria
= vazia
U cheia
= pisca: bateria quase
vazia e/ou a carregar.
Ð
V
INT 1
20.05.03
•
09:45
§§§§§§§SMS§§§§§§
Teclas de Display
Com as teclas de Display
tem acesso às funções
apresentadas no display.
Tecla Ligar/Desligar
◆ Terminar uma
◆
◆
◆
chamada;
Interromper uma
função;
Voltar ao menu anterior
(premir brevemente);
Voltar ao estado de
repouso (premir cerca
de 1 segundo);
Ligar/desligar o
terminal móvel (premir
cerca de 2 segundos)
◆ Pisca: recebe uma
chamada, repetição
automática da marcação.
◆
Aceder à lista telefónica
Tecla 1
Seleccionar o atendedor
de chamadas externo/
atendedor de chamadas
(premir cerca de 2 seg.)
Tecla Asterisco
◆ Activar/desactivar os
sinais de chamar (premir
cerca de 2 segundos);
◆ Ao escrever texto comuta
entre letras maiúsculas,
letras minúsculas e
dígitos.
Tecla de Sinalização
Inserir uma pausa na marcação (premir sem soltar).
Tecla de Mensagens
◆ Aceder à lista de chamadas e à lista de
mensagens;
◆ Pisca: novas mensagens e chamadas.
Microfone
Conector para
auricular e ligação
ao PC
Tecla Cardinal
Activar/desactivar a
protecção do teclado
(premir cerca de 1 seg.).
Lista de Números Rápidos
Aceder à lista de números
rápidos (premir
brevemente).
Apresentação de um terminal móvel registado numa base com funcionalidade SMS.
2
Gigaset SL1 / português / A31008-L001-B002-1-6Z19 / SL_1IVZ.fm / 14.11.2003
Índice
Índice
Esquema . . . . . . . . . . . . . . . . . . . . . . . . . . . . . . . . . . . 2
Índice . . . . . . . . . . . . . . . . . . . . . . . . . . . . . . . . . . . . . . 3
Indicações de segurança . . . . . . . . . . . . . . . . . . . . . . 5
Preparar o telefone . . . . . . . . . . . . . . . . . . . . . . . . . . 6
Preparar o terminal móvel . . . . . . . . . . . . . . . . . . . . . . . . . . . . . . . . . . . . . . . . . . . . . . .
Registo . . . . . . . . . . . . . . . . . . . . . . . . . . . . . . . . . . . . . . . . . . . . . . . . . . . . . . . . . . . . . .
Alterar o idioma do terminal móvel . . . . . . . . . . . . . . . . . . . . . . . . . . . . . . . . . . . . . . .
Escolher base . . . . . . . . . . . . . . . . . . . . . . . . . . . . . . . . . . . . . . . . . . . . . . . . . . . . . . . . .
Prender o clip de cinto . . . . . . . . . . . . . . . . . . . . . . . . . . . . . . . . . . . . . . . . . . . . . . . . . .
Ligar/desligar o terminal móvel . . . . . . . . . . . . . . . . . . . . . . . . . . . . . . . . . . . . . . . . . . .
Activar/desactivar a protecção do teclado . . . . . . . . . . . . . . . . . . . . . . . . . . . . . . . . . . .
6
7
7
8
8
8
8
Utilizar o telefone e explicação do menu . . . . . . . . 8
Teclas . . . . . . . . . . . . . . . . . . . . . . . . . . . . . . . . . . . . . . . . . . . . . . . . . . . . . . . . . . . . . . . 8
Menu principal . . . . . . . . . . . . . . . . . . . . . . . . . . . . . . . . . . . . . . . . . . . . . . . . . . . . . . . 10
Data e Hora . . . . . . . . . . . . . . . . . . . . . . . . . . . . . . . 10
Programar a data e a hora . . . . . . . . . . . . . . . . . . . . . . . . . . . . . . . . . . . . . . . . . . . . . . 10
Programar o despertador . . . . . . . . . . . . . . . . . . . . . . . . . . . . . . . . . . . . . . . . . . . . . . 10
Programar um evento . . . . . . . . . . . . . . . . . . . . . . . . . . . . . . . . . . . . . . . . . . . . . . . . . 11
Estabelecer chamadas . . . . . . . . . . . . . . . . . . . . . . 12
Estabelecer chamadas externas e terminar chamada . . . . . . . . . . . . . . . . . . . . . . . .
Estabelecer chamadas internas e terminar chamada . . . . . . . . . . . . . . . . . . . . . . . . .
Atender uma chamada . . . . . . . . . . . . . . . . . . . . . . . . . . . . . . . . . . . . . . . . . . . . . . . .
Mãos-livres . . . . . . . . . . . . . . . . . . . . . . . . . . . . . . . . . . . . . . . . . . . . . . . . . . . . . . . . . .
Desactivar o microfone (MUTE) . . . . . . . . . . . . . . . . . . . . . . . . . . . . . . . . . . . . . . . . .
12
12
12
12
13
Utilizar a lista telefónica e outras listas . . . . . . . . 13
Lista telefónica e lista de números rápidos . . . . . . . . . . . . . . . . . . . . . . . . . . . . . . . . .
Gerir os registos da lista telefónica e da lista de números rápidos . . . . . . . . . . . . . . .
Marcação por voz . . . . . . . . . . . . . . . . . . . . . . . . . . . . . . . . . . . . . . . . . . . . . . . . . . . .
Colocar um número rápido antes de um número de telefone . . . . . . . . . . . . . . . . . .
Lista de repetição da marcação . . . . . . . . . . . . . . . . . . . . . . . . . . . . . . . . . . . . . . . . . .
Lista de e-mail . . . . . . . . . . . . . . . . . . . . . . . . . . . . . . . . . . . . . . . . . . . . . . . . . . . . . . .
Visualizar o espaço de memória livre . . . . . . . . . . . . . . . . . . . . . . . . . . . . . . . . . . . . .
13
14
15
17
17
17
18
3
Gigaset SL1 / português / A31008-L001-B002-1-6Z19 / SL_1IVZ.fm / 14.11.2003
Índice
Utilizar vários terminais móveis . . . . . . . . . . . . . . . 18
Consulta interna . . . . . . . . . . . . . . . . . . . . . . . . . . . . . . . . . . . . . . . . . . . . . . . . . . . . . .
Atender/rejeitar uma chamada em espera durante uma chamada interna . . . . . . . .
Utilizar o terminal móvel como Babyphone . . . . . . . . . . . . . . . . . . . . . . . . . . . . . . . .
Programar o modo Walky-Talky . . . . . . . . . . . . . . . . . . . . . . . . . . . . . . . . . . . . . . . . . .
18
18
19
20
Configurar o terminal móvel . . . . . . . . . . . . . . . . . 21
Activar/desactivar o atendimento automático de chamadas . . . . . . . . . . . . . . . . . . .
Alterar o volume áudio . . . . . . . . . . . . . . . . . . . . . . . . . . . . . . . . . . . . . . . . . . . . . . . .
Alterar o sinal de chamar . . . . . . . . . . . . . . . . . . . . . . . . . . . . . . . . . . . . . . . . . . . . . . .
Gerir melodias . . . . . . . . . . . . . . . . . . . . . . . . . . . . . . . . . . . . . . . . . . . . . . . . . . . . . . .
Activar/desactivar os sinais de aviso . . . . . . . . . . . . . . . . . . . . . . . . . . . . . . . . . . . . . .
Repor o terminal móvel no estado de fábrica . . . . . . . . . . . . . . . . . . . . . . . . . . . . . . .
21
21
21
23
23
23
Anexo . . . . . . . . . . . . . . . . . . . . . . . . . . . . . . . . . . . . 25
Conservação e contacto com a humidade . . . . . . . . . . . . . . . . . . . . . . . . . . . . . . . . . .
Serviço de Apoio a Clientes (Customer Care) . . . . . . . . . . . . . . . . . . . . . . . . . . . . . . .
Dados técnicos . . . . . . . . . . . . . . . . . . . . . . . . . . . . . . . . . . . . . . . . . . . . . . . . . . . . . . .
Tabela de caracteres . . . . . . . . . . . . . . . . . . . . . . . . . . . . . . . . . . . . . . . . . . . . . . . . . . .
Função Escrita simples . . . . . . . . . . . . . . . . . . . . . . . . . . . . . . . . . . . . . . . . . . . . . . . . .
Ligação ao PC . . . . . . . . . . . . . . . . . . . . . . . . . . . . . . . . . . . . . . . . . . . . . . . . . . . . . . . .
Jogo "Balloon Shooter" . . . . . . . . . . . . . . . . . . . . . . . . . . . . . . . . . . . . . . . . . . . . . . . . .
Garantia . . . . . . . . . . . . . . . . . . . . . . . . . . . . . . . . . . . . . . . . . . . . . . . . . . . . . . . . . . . .
25
25
26
26
27
28
29
30
Índice remissivo . . . . . . . . . . . . . . . . . . . . . . . . . . . . 31
4
Gigaset SL1 / português / A31008-L001-B002-1-6Z19 / start_guide_time.fm / 14.11.2003
Indicações de segurança
Indicações de segurança
$
!
Utilize apenas o alimentador fornecido, o qual está referido no lado inferior
do equipamento.
Utilize apenas a bateria recarregável recomendada (pág. 26)! Ou seja, não
utilize outro tipo de baterias, nem baterias não recarregáveis, pois poderão
provocar danos pessoais e prejudicar a saúde.
‹
Œ
Coloque a bateria recarregável com a polaridade correcta e utilize o tipo de
bateria de acordo com as indicações deste manual de instruções.
O funcionamento de equipamentos médicos poderá ser afectado. Respeite as
condições técnicas na área de utilização (por ex., num consultório).
O terminal móvel poderá causar ruídos desagradáveis em próteses auditivas.
O terminal móvel não está protegido contra salpicos de água (pág. 25).
Quando conduzir, o condutor não deve telefonar (função Walky-Talky).
Desligar o terminal móvel quando está dentro de um avião (função WalkyTalky). Proteger contra uma ligação inadvertida.
Não utilizar o telefone em locais com perigo de explosão (por ex., em oficinas
de pintura).
ƒ
Entregue o seu Gigaset a terceiros sempre acompanhado deste manual de
instruções.
Quando eliminar as baterias e o telefone faça-o sem prejudicar o meio
ambiente.
i
Nem todas as funções descritas neste manual de instruções estão
disponíveis em todos os países.
5
Gigaset SL1 / português / A31008-L001-B002-1-6Z19 / start_guide_time.fm / 14.11.2003
Preparar o telefone
Preparar o telefone
Conteúdo da embalagem:
um terminal móvel SL1, um carregador com alimentador, um clip de cinto para o terminal móvel, uma bateria, este manual de instruções.
Preparar o terminal móvel
O display está protegido por uma película. Por favor retire a película de protecção!
Colocar a bateria
◆ Colocar a bateria com a polaridade indicada (ver figura da esquerda),
◆ Colocar a tampa da bateria, deslocando-a cerca de 3 mm para baixo e empurrando-
a para cima até esta encaixar,
◆ Para abrir, pressionar a parte estriada da tampa e empurrar para baixo.
W
Utilize apenas a bateria recarregável recomendada pela Siemens na
pág. 26! Ou seja, nunca utilize uma bateria normal (não recarregável)
nem outro tipo de bateria, pois poderá provocar danos pessoais e
prejudicar a saúde. Poderia, por ex., destruir o revestimento da bateria ou
a própria bateria (perigoso). Da mesma forma, podem ocorrer avarias de
funcionamento e danos no equipamento.
Carregar a bateria
Coloque o terminal móvel no carregador com o display voltado para a frente. Deixe o
terminal móvel ficar no carregador para carregar a bateria, uma vez que esta não vem
carregada de fábrica. O carregamento da bateria é indicado no canto superior direito do
display através do piscar do símbolo da bateria = .
W
6
Quando se carrega a bateria pela primeira vez, aconselhamos a carregar
durante cinco horas sem interrupção – independentemente da indicação
do estado de carga da bateria! Por razões técnicas, a capacidade de carga
da bateria reduz-se passado algum tempo.
Gigaset SL1 / português / A31008-L001-B002-1-6Z19 / start_guide_time.fm / 14.11.2003
Preparar o telefone
O estado de carga da bateria só é correctamente indicado após um carregamento/descarregamento sem interrupções. Por este motivo, não deverá remover a bateria desnecessariamente, assim como, interromper o carregamento antes do tempo.
◆ Depois do primeiro carregamento, pode colocar o terminal móvel no
carregador, no final de cada chamada. O processo de carregamento é
controlado electronicamente. Assim, a bateria é cuidadosamente
carregada.
◆ A bateria aquece durante o processo de carregamento; isto é normal
e não é perigoso.
i
Registo
Antes de poder utilizar o seu Gigaset SL1 deve registá-lo manualmente. O registo tem
que ser feito no terminal móvel e na base.
1. No terminal móvel
v
s
s
s
Aceder ao menu.
OK
[______________________________________________]
Réglages
Seleccionar e confirmar.
[______________________________________________]
OK
Inscrire comb.
Seleccionar e confirmar.
[______________________________________________]
OK
Base 1
Seleccionar base (1 a 4) e confirmar, por ex., Base 1.
OK
Inserir o PIN do sistema da base (de fábrica: 0000) e
confirmar.
Depois de inserido o PIN do sistema, no display pisca, por exemplo Base 1.
2. Na base
Para saber como iniciar o registo do terminal móvel na base, leia o manual de instruções
da base.
Alterar o idioma do terminal móvel
Pode visualizar os menus do display em vários idiomas.
v
s
s
OK
[______________________________________________]
Réglages
Seleccionar e confirmar.
[______________________________________________]
OK
Langue
s
Seleccionar e confirmar. O idioma seleccionado está
marcado com ‰ (de fábrica: English).
OK
Seleccionar o idioma pretendido e confirmar.
a
Aceder ao menu.
Premir sem soltar (volta ao estado de repouso).
Se tiver seleccionado um idioma que não compreenda:
Primav M 2, seleccione o idioma pretendido com s e prima OK para confirmar.
7
Gigaset SL1 / português / A31008-L001-B002-1-6Z19 / start_guide_time.fm / 14.11.2003
Utilizar o telefone e explicação do menu
Escolher base
Se o seu terminal móvel estiver registado em várias bases, pode configurá-lo para uma
determinada base ou para a base com melhor recepção (Meilleure base).
v; s Réglages OK ; s Sélect. Base OK ;
s (seleccionar uma das bases registadas ou a opção Meilleure base) OK .
Prender o clip de cinto
Pressionar o clip na parte de trás do
terminal móvel até que os encaixes
laterais fiquem presos.
Ligar/desligar o terminal móvel
Para ligar: prima sem soltar a tecla Desligara.
Para desligar: prima, novamente sem soltar, a tecla Desligara, com o terminal móvel
no estado de repouso.
O colocar o terminal móvel liga-se automaticamente quando é colocado no carregador.
Activar/desactivar a protecção do teclado
Para activar a protecção do teclado prima, sem soltar, a tecla Cardinal R (no display
aparece o símbolo Ø).
Para desactivar a protecção do teclado prima, novamente sem soltar, a tecla Cardinal
R.
A protecção do teclado será automaticamente desactivada ao receber uma chamada.
No final da chamada, a protecção do teclado activa-se novamente.
i
Com a protecção do teclado activada não se podem marcar os números
de emergência.
Utilizar o telefone e explicação do menu
Teclas
Tecla de Navegação
A tecla de Navegação tem quatro setas de direcção pretas com os respectivos símbolos.
Consoante o lado da tecla que premir, acede a uma função específica. No decorrer da
explicação do manual de instruções, o lado que deve premir está marcado a preto, por
ex., na tecla v, ao premir o lado direito = acede ao menu.
8
Gigaset SL1 / português / A31008-L001-B002-1-6Z19 / start_guide_time.fm / 14.11.2003
Utilizar o telefone e explicação do menu
Poderá também utilizar a tecla de Navegação para executar muitas das funções da
tecla de Display direita.
Exemplo:
Tecla de Navegação:
Diferentes funções da tecla de Navegação::
t
s
v
u
No estado de repouso
Iniciar a marcação por voz
(premir sem soltar)
Aceder à lista telefónica
Aceder ao o menu
Aceder à lista de números
internos
Nas listas e nos menus
Percorrer para cima
Num campo de edição
Deslocar o cursor uma linha
para cima
Percorrer para baixo
Deslocar o cursor uma linha
para baixo
Confirmar a opção seleccio- Deslocar o cursor para a
nada (ou premir OK )
direita
Voltar ao menu anterior ou Deslocar o cursor para a
interromper
esquerda
Teclas de Display
As teclas de Display são as teclas horizontais que se encontram mesmo por debaixo do
display. As funções atribuídas às teclas de Display mudam consoante o contexto de utilização. A função actual é indicada directamente acima do display.
Exemplo:
•
§§§§§§§SMS§§§§§§
Teclas de Display
Os símbolos apresentados no display têm os seguintes significados:
Þ
Repetição da marcação: aceder à lista dos últimos 10 números marcados.
à
Menu aceder ao menu principal, com o terminal móvel no estado de repouso.
Durante uma chamada, acede ao menu dependente correspondente.
Apagar: apaga caracter a caracter, da direita para a esquerda.
OK
f
C
Ý
ä
OK: confirmar as funções de menu ou gravar os dados inseridos.
Voltar: volta ao menu anterior ou interrompe o processo em curso.
Aceder à lista de e-mail.
9
Gigaset SL1 / português / A31008-L001-B002-1-6Z19 / start_guide_time.fm / 14.11.2003
Data e Hora
Voltar ao estado de repouso a partir de qualquer ponto do menu.
Premir a tecla Desligar a durante cerca de 1 segundo ou não premir nenhuma tecla.
Passados 2 minutos, o display passa automaticamente para o estado de repouso. As
alterações que não tenha confirmado ou gravado, premindo OK , Oui, Sauver, Envoi ou
com Sauvegarder OK , serão perdidas.
Menu principal
Para aceder ao menu principal, com o telefone no estado de repouso, prima o lado
direito da tecla de Navegação v e percorra até ao registo pretendido com s.
1
2
3
4
5
6
7
8
9
SMS / MiniMsg.
SVC réseau
Famille/Loisirs
RDV/Heure
Sons / Audio
Coûts
Réglages comb.
Réglages base
Répondeur
A escolha de menus depende da base
utilizada.
Data e Hora
Programar a data e a hora
A programação da data e da hora é importante para que as chamadas recebidas possam
ser correctamente indicadas.
v; s RDV/Heure OK ; s Date/Heure OK ; ~ (inserir dia/mês/ano);
s (na linha seguinte) ~ (inserir horas/minutos);
s (caso seja necessário, na linha seguinte) r (seleccionar o modo 12 ou 24 horas);
Sauver,
a (volta ao estado de repouso).
Se escolheu o modo 12 horas, na linha Heure: pode utilizar a tecla de Display am/pm para
seleccionar entre am e pm.
Programar o despertador
Condição prévia: A data e a hora já foram programadas (pág. 10).
Activar e programar o despertador
v; s RDV/Heure OK ; s Réveil/Alarme OK ; r (seleccionar Act.);
s ~ (inserir a hora de despertar); Sauver; a (volta ao estado de repouso).
Se escolheu o modo de 12 horas, na linha Heure: pode utilizar a tecla de Display am/pm
para seleccionar entre am e pm.
10
Gigaset SL1 / português / A31008-L001-B002-1-6Z19 / start_guide_time.fm / 14.11.2003
Data e Hora
O alarme de despertar só será sinalizado se o terminal móvel se encontrar no estado de
repouso e se as funções Babyphone, Walky-Talky e Repetição Automática da Marcação
estiverem desactivadas.
Para saber como programar o volume e a melodia, ver pág. 21.
Desactivar o Despertador
Poderá desactivar a função despertador mesmo depois desta ter sido programada.
v; s RDV/Heure OK ; s Réveil/Alarme OK .
r (seleccionar Dés.); Sauver; a (volta ao estado de repouso).
Desligar o alarme de despertar
Durante a sinalização do alarme de despertar, premir a tecla de Display Silence ou outra
tecla qualquer.
Programar um evento
O terminal móvel poderá lembrá-lo da existência de até cinco eventos.
Activar o e programar um evento
v; s RDV/Heure OK ; Entrer RDV OK ; s Rendez-vous 2 (exemplo) OK .
r (seleccionar Act.); s ~ (inserir dia/mês); s ~ (inserir horas/minutos);
s Modifier; ~ (inserir o nome) OK ; Sauver; a (volta ao estado de repouso).
Um evento quando está activado é indicado com o símbolo ¼.
O alarme de um evento só será sinalizado se o terminal móvel se encontrar no estado
de repouso, e se as funções Babyphone, Walky-Talky e Repetição Automática de Marcação estiverem desactivadas.
Se escolheu o modo 12 horas, na linha Heure: pode utilizar a tecla de Display am/pm para
seleccionar entre am e pm.
Para saber como programar o volume e a melodia, ver pág. 21.
Desligar o alarme de um evento
Durante a sinalização de um evento, poderá desligá-lo com Silence.
Visualizar e apagar eventos ou aniversários perdidos
v; s RDV/Heure OK ; s Dates échues OK ; s seleccionar o evento/aniversário)
perdido.
[RRRRRRRRRRRRRRRRRRRRRR]
Effacer
Premir a tecla de Display.
... depois
a
Premir sem soltar (volta ao estado de repouso).
Um evento perdido é indicado com ¼, e um aniversário perdido é indicado com ‚.
11
Gigaset SL1 / português / A31008-L001-B002-1-6Z19 / start_guide_time.fm / 14.11.2003
Estabelecer chamadas
Estabelecer chamadas
Estabelecer chamadas externas e terminar chamada
~ (inserir o número de telefone a marcar), premir c (tecla Marcar) - a ordem é indiferente.
Terminar uma chamada ou interromper o processo de marcação: premira (tecla Desligar).
Pausa na marcação
Pode inserir uma pausa na marcação entre o indicativo e o número de telefone.
Para isso, prima durante cerca de 2 segundos a tecla S. Em seguida, marque o número
de telefone.
Estabelecer chamadas internas e terminar chamada
As chamadas para outros terminais móveis registados na mesma base são gratuitas.
Chamar um terminal móvel específico
Premiru; s (seleccionar o terminal móvel); c. Ou então: premir u 2 (por
exemplo).
Para terminar a chamada: premira (tecla Desligar).
Chamar todos os terminais móveis ao mesmo tempo ("chamada colectiva")
Premiru; P (tecla Asterisco).
Para terminar a chamada: premira (tecla Desligar).
Atender uma chamada
Quando o seu terminal móvel toca, a chamada aparece indicada no display e a tecla
Mãos-livres d pisca. Premir c(tecla Atender) ou a tecla de Display Accept. ou a tecla
Mãos-livres d).
Se a função Décroché auto. estiver activada (pág. 21), poderá simplesmente retirar o
terminal móvel do carregador para atender a chamada.
Se o sinal de chamar incomodar, prima a tecla de Display Silence. Só pode atender a
chamada durante o tempo em que esta é indicada no display.
Mãos-livres
Activar/desactivar a função Mãos-livres
Antes de marcar: ~ (inserir o número de telefone); premir d (tecla Mãos-livres).
Durante uma chamada: premird (tecla Mãos-livres).
Para desactivar a função mãos-livres: premirc (tecla Atender/Marcar).
12
Gigaset SL1 / português / A31008-L001-B002-1-6Z19 / start_guide_time.fm / 14.11.2003
Utilizar a lista telefónica e outras listas
Se, durante uma chamada, quiser colocar o terminal móvel no carregador, para falar em
modo mãos-livres, terá que premira tecla Mãos-livresd quando colocar o terminal
móvel no carregador.
i
Antes de activar a função Mãos-livres, deve informar o seu interlocutor.
Alterar o volume (durante uma chamada) quando se está a utilizar a função Mãos-livres
Está a conversar ao telefone e tem a função Mãos-livres d activada.
Premir novamente d (tecla Mãos-livres); r diminuir ou aumentar o volume; Sauver.
Desactivar o microfone (MUTE)
Ao premir u, a chamada é "colocada em espera" (o interlocutor ouve a melodia de
chamada em espera).
Para voltar a activar o microfone: premir a tecla de Display Ý .
Utilizar a lista telefónica e outras listas
Lista telefónica e lista de números rápidos
Na lista telefónica e na lista de números rápidos podem gravar-se até 200 registos de
telefone.
Aceder à lista telefónica com a tecla s. Em cada registo da lista telefónica pode gravar
uma data de aniversário e marcar o registo como "VIP".
A lista de números rápidos é uma lista telefónica especial, na qual pode gravar números de telefone especialmente importantes, por ex., números de telefone privados, ou
outros números de telefone para marcação rápida. Acede à lista de números rápidos
com a tecla C.
A utilização da lista de números rápidos é semelhante à utilização da lista telefónica.
◆ Ao inserir nomes nos registos das listas, pode ser apoiado pela função de ajuda
(EATONI) Escrita simples (pág. 27). A função Escrita simples está desactivada de
fábrica.
◆ Para saber como inserir texto de forma correcta, consulte a tabela de caracteres
(pág. 26).
◆ Pode inserir até 32 algarismos para um número de telefone e até 16 letras para um
nome.
◆ Ao marcar um número, pode inserir uma pausa com à , s Insérer pause OK
ou, premindo durante cerca de 2 segundos a tecla S, inserir a pausa correspondente.
13
Gigaset SL1 / português / A31008-L001-B002-1-6Z19 / start_guide_time.fm / 14.11.2003
Utilizar a lista telefónica e outras listas
Gravar um registo na lista telefónica
s (aceder à lista telefónica); Nouvelle entrée OK ; ~ (inserir o número de telefone);
s (na linha seguinte) ~ (inserir o nome); à (aceder ao menu), Sauvegarder OK .
Para inserir uma data de aniversário, depois do nome do registo: premir s, saltar para
a linha Annivers.: premir tecla de Display Modifier e inserir a data. Premir Sauver ; premira sem soltar (volta ao estado de repouso).
Pode apagar a data de aniversário de um registo da lista telefónica se, no campo de aniversário, premir a tecla de Display Modifier e, depois do display mudar, premir a tecla de
Display Effacer e, finalmente, quando o display mudar outra vez, premir Sauver.
Alarme de aniversário
O alarme de um aniversário é sinalizado no terminal móvel com a melodia seleccionada.
O registo da lista telefónica é visualizado no display com ‚ ‚ ‚.
i
Se o seu telefone estiver ligado a uma central telefónica, e caso seja
necessário, terá que inserir o código de acesso à rede como primeiro
algarismo do seu registo da lista telefónica.
Gravar um registo na lista de números rápidos
Pode atribuir os números das teclas 0, 2–9 a até nove registos da lista de números rápidos. Se, no estado de repouso, premir sem soltar uma destas teclas e, de seguida, premir a tecla Marcar c, estabelece uma marcação abreviada para o número de telefone
que está atribuído a essa tecla.
C (aceder à lista de números rápidos); Nouvelle entrée OK ; ~ (inserir o número de
telefone);
s (na linha seguinte), ~ (inserir o nome); à (aceder ao menu); Sauvegarder OK .
Para atribuir uma tecla para marcação abrevida, depois de inserir o nome do registo:
premir s para saltar para a linha Touche:, com r seleccionar uma tecla [0, 2–9] para
esse registo e, depois, premir a tecla de Display Sauver. Premir sem soltar a (volta ao
estado de repouso).
As teclas para marcação abreviada já atribuídas não podem voltar a ser escolhidas.
Marcar com a lista telefónica/lista de números rápidos
s ou C (aceder à lista telefónica/lista de números rápidos); s (seleccionar o
registo); c.
Gerir os registos da lista telefónica e da lista de números rápidos
Para utilizar uma das seguintes funções do menu, prima a tecla da lista telefónica s ou
a tecla da lista de números rápidos C. Percorra até ao registo com s e, em seguida,
prima v para aceder ao menu. Utilize a tecla s para percorrer até à função do menu
desejada.
Poderá também: s ou C; ~ (inserir a primeira letra), caso seja necessário, percorrer as opções com s ou ~ inserir mais letras do nome; c.
Utiliser le No
14
Gigaset SL1 / português / A31008-L001-B002-1-6Z19 / start_guide_time.fm / 14.11.2003
Utilizar a lista telefónica e outras listas
Modifier entrée
Effacer entrée
Entrer comme VIP
Copier et modif.
Copier entrée
Effacer liste
Copier liste
Mémoire dispo.
Válido apenas para a lista
telefónica (s)
Válido apenas para a lista
telefónica (s)
Uma vez que seleccionou um registo, prima a tecla de Display Afficher para consultar o
registo e, em seguida, prima a tecla de Display Modifier para alterar o mesmo.
As funções "Marcar como VIP" e "Copiar e Alterar"
Os registos existentes na lista telefónica, de pessoas que lhe são especialmente importantes, podem ser marcados como registos VIP (Very Important Person), ou seja, serão
sinalizados com uma melodia específica. Saberá então, pela melodia do sinal de chamar, quem está a telefonar. Condição prévia: A identificação do número de telefone foi
transmitida.
Para não inserir um registo parecido duas vezes, pode fazer uma cópia e em seguida
alterar este registo.
Enviar um registo ou uma lista completa para um terminal móvel
Pode transferir registos individuais ou a lista completa para um outro terminal móvel
SL1, S1, C2 ou para um terminal móvel, com funções de conforto, da familia Gigaset
4000, 3000 ou 2000, desde que esteja registado na mesma base. As definições dos
registos VIP, comandos de voz e teclas para marcação abreviada não são enviadas.
s ou C (aceder a lista telefónica/lista de números rápidos); s (seleccionar o
registo);
v (aceder ao menu); s Copier entrée OK ou s Copier liste OK );
~ (inserir o número interno do terminal móvel destinatário); OK .
Se depois de enviar um registo confirmar com a tecla de Display Oui, poderá escolher
mais registos para enviar. Com a tecla de Display Non termina o processo de envio.
Marcação por voz
Com a função marcação por voz, pode marcar um número de telefone pronunciando o
nome da pessoa que pretende falar. Para isso, necessita de atribuir/gravar um comando
de voz, ou seja, o nome que pronunciar será gravado no terminal móvel.
Até quatro utilizadores podem atribuir/gravar um comando de voz por registo. Antes da
gravação, cada utilizador deve "identificar-se", por ex., como Utilisateur 2.
Na lista telefónica podem ser gravados, no total, 23 comandos de voz. Um registo com
um comando de voz atribuído, fica marcado na lista telefónica com o símbolo ´.
Gravar um comando de voz num registo da lista telefónica
Grave o seu comando de voz num ambiente pouco ruidoso (a uma distância de cerca de
25 cm).
15
Gigaset SL1 / português / A31008-L001-B002-1-6Z19 / start_guide_time.fm / 14.11.2003
Utilizar a lista telefónica e outras listas
Passo 1: Aceder à lista telefónica para gravar um comando de voz:
s (aceder à lista telefónica); s(seleccionar o registo); Langue; s Utilisateur 2 (por
exemplo); OK .
Passo 2: Iniciar a gravação:
REnrg ; OK (confirmar a indicação do display). A seguir à correspondente indicação no
display, pronuncie o nome. Repita o nome quando for solicitado novamente no display.
O comando de voz é automaticamente gravado.
Premir sem soltar a (volta ao estado de repouso).
Se o seu comando de voz for muito parecido com o de outro utilizador, será avisado
com uma mensagem. Volte ao início da gravação do comando de voz com Ý , e
repita a gravação.
Utilizar a marcação por voz: Premir sem soltar a tecla t e pronunciar o nome.
Anunciar o nome de quem telefona
Ao receber uma chamada externa, pode identificar quem lhe está a telefonar através do
anúncio do nome (da pessoa que faz a chamada) durante a melodia do sinal de chamar.
Condições prévias: A identificação do número de telefone foi transmitida. Foi atribuído
um comando de voz para esse registo (pág. 15).
Activar/desactivar a função Anunciar o Nome
v (aceder ao menu); s Régl.Audio/sons/Avisos OK ; s Régl.sonnerie OK ; Appels
externes OK ;
2x s (percorrer duas linhas para baixo), r (Annonc.nom) ligar/desligar; Sauver;
Premir sem soltar a (volta ao estado de repouso).
Reproduzir um comando de voz
Seleccionar um registo da lista telefónica para ouvir um comando de voz (ver passo 1,
pág. 15). Em seguida:
s (seleccionar o registo); Ecouter; premir sem soltar a (volta ao estado de repouso).
Alterar ou apagar um comando de voz
Aceder à lista telefónica para ouvir o comando de voz (ver passo 1, pág. 15). Em
seguida:
s (seleccionar o registo); v (aceder ao menu); Enreg. modèle OK ou s Effac.
modèle OK ; premir sem soltar a (volta ao estado de repouso).
Ao apagar um comando de voz, o número de telefone e o nome desse registo mantêmse. Os comandos de voz de outros utilizadores continuam disponíveis para esse registo.
Alterar o nome do utilizador
s (aceder à lista telefónica); s (seleccionar o registo); Langue;
s Utilisateur 2 (por exemplo) ; Modifier; ~ (inserir o nome) Sauver;
Premir sem soltar a (volta ao estado de repouso).
16
Gigaset SL1 / português / A31008-L001-B002-1-6Z19 / start_guide_time.fm / 14.11.2003
Utilizar a lista telefónica e outras listas
Colocar um número rápido antes de um número de telefone
Esta função pode ser utilizada para colocar um número rápido (que esteja gravado na
lista de números rápidos) antes do número de telefone que pretende marcar. C (aceder à lista de números rápidos); s (seleccionar o registo); à (aceder ao menu);
Utiliser le No OK ; s (aceder à lista telefónica); s (seleccionar o registo) OK ; ou
~ inserir o número de telefone; c.
Lista de repetição da marcação
Na lista de repetição da marcação encontram-se os últimos dez números marcados.
Repetição manual da marcação
Þ (aceder à lista de repetição da marcação); s (seleccionar o registo); c.
Repetição automática da marcação
Com esta função o número de telefone é marcado automaticamente em cada 20 segundos. Quando o interlocutor atender: premir c (tecla Atender). Se o interlocutor não
atender, a chamada é interrompida passados cerca de 30 segundos. A função desactivase após dez tentativas não sucedidas.
Premira (tecla Desligar); • (aceder à lista de repetição da marcação);
v (aceder ao menu); Renumérot.Auto. OK .
Para interromper a repetição automática da marcação: Premir a tecla de Display Dés.
ou outra tecla qualquer.
Gerir os registos da lista de repetição da marcação
Pode utilizar as seguintes funções do menu:
• (aceder à lista de repetição da marcação); s (seleccionar o registo);
v (aceder ao menu);
s (seleccionar a função).
Renumérot.Auto.
Utiliser le No
No.vers répert.
Effacer entrée
Effacer liste
Lista de e-mail
Na lista de e-mail pode gravar endereços de e-mail. No total, podem ser gravados até
200 registos na lista telefónica, lista de e-mail e lista de números rápidos.
Os registos da lista de e-mail podem ser geridos da mesma forma que os registos da lista
telefónica (pág. 14).
17
Gigaset SL1 / português / A31008-L001-B002-1-6Z19 / start_guide_time.fm / 14.11.2003
Utilizar vários terminais móveis
Gravar um endereço de e-mail novo
Passo 1: Aceder à lista de e-mail:
s (aceder à lista telefónica); s Effacement OK .
Passo 2: Inserir um endereço de e-mail:
Nouvelle entrée OK ; ~(inserir o endereço de e-mail); à
(aceder ao menu);
(com s, inserir ".", "@" ou activar/desactivar a função Escrita simples OK ). Com a função
Escrita simples activada, pode inserir "@" premindo R uma vez, sem soltar, e uma vez,brevemente.
Passo 3: Gravar um endereço de e-mail:
à (aceder ao menu); Sauvegarder OK ; Premir sem soltar a (volta ao estado de
repouso).
Se tiver seleccionado um registo, prima a tecla de Display Afficher e, em seguida, Modifier
e insira o endereço de e-mail. Grave, conforme está descrito no "Passo 3".
Visualizar o espaço de memória livre
O espaço de memória está dividido entre a lista telefónica, a lista de números rápidos
(pág. 13) e a lista de e-mail (pág. 17). O espaço de memória livre apresentado é referente a todas as listas.
s (aceder à lista telefónica); s (seleccionar o registo); v (aceder ao menu);
s Mémoire dispo. OK ; premir sem soltar a (volta ao estado de repouso).
Utilizar vários terminais móveis
Transferir uma chamada externa para outro terminal móvel
u (aceder à lista de números internos); seleccionars (um terminal móvel específico
ou Appel général); OK .
O interlocutor interno atende a chamada: premira (tecla Desligar).
Se a chamada não for atendida pelo interlocutor interno ou se este estiver ocupado, a
chamada regressa automaticamente para si (no display aparece Retour d'appel).
Consulta interna
Durante uma chamada externa pode fazer uma consulta interna.
u (aceder à lista de números internos); seleccionar s (terminal móvel), OK .
Para terminar: premir tecla de Display Fin (volta ao interlocutor externo).
Atender/rejeitar uma chamada em espera durante uma chamada
interna
Se, durante uma chamada interna receber uma chamada externa, ouve o sinal de chamada em espera (toque curto). Premir a tecla de Display Accept. ou Refuser.
Se rejeitar a chamada, o sinal de chamada em espera continua a ouvir-se nos outros terminais móveis registados na base.
18
Gigaset SL1 / português / A31008-L001-B002-1-6Z19 / start_guide_time.fm / 14.11.2003
Utilizar vários terminais móveis
Utilizar o terminal móvel como Babyphone
Com esta função, o terminal móvel estabelece uma chamada para um número previamente programado (número interno ou externo), assim que se atingir o nível de ruído
definido para esse compartimento. A função Babyphone continuará activada no terminal móvel, mesmo depois de ter desligado essa chamada.
A distância do terminal móvel em relação ao bébé a supervisionar deverá ser de 1 a 2
metros.
O microfone deve estar virado para o bébé a supervisionar.
Quando a função Babyphone está activada, as chamadas encaminhadas para o terminal
móvel que se encontra perto do bebé são sinalizadas sem sinal de chamar e, unicamente, apresentadas no display. Neste caso, o display e o teclado não ficam iluminados.
No caso de utilizar esta função com um número de telefone externo, deverá ter a preocupação de saber se esse número não está bloqueado por um atendedor de chamadas.
◆ Quando programar esta função para um número de telefone externo, deverá avisar
o proprietário desse número.
◆ Quando a função Babyphone está programada para um número de telefone
externo, a sinalização da chamada pára passados cerca de 90 segundos e para um
número interno (terminal móvel) pára passados cerca de 180 segundos (dependendo da base).
W
Antes de se ausentar do local deve, impreterivelmente, verificar a
programação do Babyphone como, por exemplo, o nível de
sensibilidade de ruído.
i
A função Babyphone quando está activada reduz significativamente a
autonomia do terminal móvel. Se for necessário, coloque o terminal
móvel no carregador para que a bateria não se gaste.
A função Babyphone também pode ser utilizada no modo Walky-Talky.
Activar a função Babyphone e inserir, pela primeira vez, o número de telefone de destino
Passo 1: Aceder ao campo de programação: v; s Famille/Loisirs OK ; Surveill.
Pièce OK .
Passo 2: Activar a função Babyphone: r (na linha Activation:, seleccionar Ma.);
Passo 3: Inserir o número de telefone de destino: s (na linha seguinte); Modifier;
Inserir o número interno: INT s (seleccionar o terminal móvel) OK ; ou:
Inserir o número de telefone externo: ~; à (aceder ao menu);
Sauvegarder OK ;
Passo 4: Programar a sensibilidade de ruído: Se for necessário, premir s (na linha
seguinte); r; Sauver;
A função Babyphone está agora activada.
Se a função Babyphone estiver activada, pode utilizar a tecla v (aceder ao menu) para
passar directamente para a programação do Babyphone.
19
Gigaset SL1 / português / A31008-L001-B002-1-6Z19 / start_guide_time.fm / 14.11.2003
Utilizar vários terminais móveis
Desactivar a função Babyphone
Pode desactivar a função Babyphone a partir de um telefone externo (dependendo da
base). Atenda a chamada da função Babyphone e prima as teclas O R. A função
desactiva-se passados cerca de 90 segundos depois de desligar a chamada. Desta forma,
não ocorrerá mais nenhuma chamada Babyphone. As restantes funções de Babyphone
no terminal móvel (por ex., sem sinal de chamar) continuam activadas até premir, no
terminal móvel que está junto do bebé, a tecla de Display Dés..
i
Para activar novamente a função Babyphone com o mesmo número de
telefone, deve aceder ao respectivo campo de programação, ligar a
função e activá-la com Sauver.
Programar o modo Walky-Talky
A função Walky-Talky permite estabelecer uma comunicação entre dois terminais
móveis (alcance máximo de 300 metros), independentemente da distância a que estes
se encontram da base.
Condição prévia:
◆ Ambos os terminais móveis foram registados na mesma base (recomendado para a
função Babyphone), ou
◆ ambos os terminais estão registados em bases diferentes e ambos estão programados para a opção Meilleure base (pág. 8), ou
◆ um dos terminais móveis não está registado em nenhuma base e o terminal móvel
registado está programado para a opção Meilleure base, ou
◆ nenhum dos terminais móveis está registado em qualquer base.
No modo Walky-Talky, os terminais móveis não se encontram disponíveis para receber
chamadas. A autonomia dos terminais móveis reduz-se significativamente.
Activar/desactivar o modo Walky-Talky
v (aceder ao menu); s Famille/Loisirs OK ; s Talkie-Walkie OK .
Para desligar: prima a tecla de Display Dés..
Ao premir c (tecla Atender) ou d (tecla Mãos-livres), a chamada será estabelecida
para todos os terminais móveis que se encontrem no modo Walky-Talky. A programação
do volume áudio e dos sinais de aviso ocorre exactamente como se os seus terminais
móveis estivessem em contacto com a base (pág. 21). A programação dos sinais de chamar não é possível no modo Walky-Talky.
As funções "activar/desactivar o sinal de chamar" (pág. 22) e "activar/desactivar a protecção do teclado" (pág. 8) são possíveis no modo Walky-Talky.
Para aceder ao menu, prima a tecla de Display ©.
i
20
Ao desligar e ligar o terminal móvel, este mantém-se no modo WalkyTalky.
Gigaset SL1 / português / A31008-L001-B002-1-6Z19 / start_guide_time.fm / 14.11.2003
Configurar o terminal móvel
Utilizar a função Babyphone com o terminal móvel no modo Walky-Talky
à (aceder ao menu); s Surveill. Pièce OK ; r (seleccionar Ma.);
s (na linha seguinte); r (seleccionar Faible ou Elevée); Sauver.
A chamada Babyphone só é sinalizada em terminais móveis que se encontram no modo
Walky-Talky.
Prima a tecla de Display Dés. do terminal móvel, para desligar a função Babyphone. O
terminal móvel regressa ao modo Walky-Talky normal.
W
Antes de se afastar, deve verificar a programação do Babyphone, por
ex., quanto à sensibilidade de ruído e à ligação. Não deve alterar a
distância entre os terminais móveis neste momento (alcance).
Configurar o terminal móvel
Activar/desactivar o atendimento automático de chamadas
Ao receber uma chamada com esta função activada, basta retirar o terminal móvel do
carregador para atender a chamada, sem que seja necessário premir a tecla Atender (de
fábrica: activada).
v (aceder ao menu); s Réglages OK ; Décroché auto. OK (‰ = função activada);
Premir sem soltar a (volta ao estado de repouso).
Alterar o volume áudio
Pode programar o volume do altifalante (para a função mãos-livres) em cinco níveis e o
volume do auscultador em três níveis – mesmo durante uma chamada externa.
v (aceder ao menu); s Régl.Audio/sons OK ; Volume écoute OK ; r (seleccionar
volume da função "mãos-livres"); s (na linha seguinte) r (seleccionar volume do auscultador); Sauver;
Premir sem soltar a (volta ao estado de repouso).
Efeito de Eco
Pode melhorar a qualidade do som das melodias compridas (4-10).
v (aceder ao menu); s Régl.Audio/sons OK ; s Sonn. avec echo OK (‰ = função
activada); premir sem soltar a (volta ao estado de repouso).
Alterar o sinal de chamar
Pode escolher entre 6 níveis de volume e 26 melodias (incluindo 16 melodias polifónicas). As melodias polifónicas só estão disponíveis, se já tiverem sido compostas pela
função Gerir Melodias ou se tiverem sido instaladas através da ligação ao PC.
21
Gigaset SL1 / português / A31008-L001-B002-1-6Z19 / start_guide_time.fm / 14.11.2003
Configurar o terminal móvel
Configurações para chamadas externas, volume diferenciado do sinal de
chamar e função Anunciar Nome
v (aceder ao menu); s Régl.Audio/sons OK ; s Régl.sonnerie OK ; Appels externes OK ;
r (seleccionar o nível de volume); s (na linha seguinte) r (seleccionar a melodia);
s (caso seja necessário, na linha seguinte); r (activar a função Anunciar Nome,
pág. 16);
Activar o volume diferenciado do sinal de chamar
Seleccionar SV Nuit ; r (seleccionar SVC nuit: Act..); s saltar para a linha De: (inserir
4 dígitos para o intervalo de tempo); s saltar para a linha A: (inserir 4 dígitos para o
intervalo de tempo); s r (definir o nível de volume do sinal de chamar); Sauver (gravar o volume diferenciado do sinal de chamar); mais uma vez Sauver (gravar as definições); premir sem soltar a (volta ao estado de repouso).
Configurações para as chamadas internas, alarmes de despertar e eventos
v (aceder ao menu); s Régl.Audio/sons OK ; s Régl.sonnerie OK ; s (seleccionar
a função) OK ; r (seleccionar o nível de volume); s (na linha seguinte) r (seleccionar a melodia);
Sauver. Se seleccionar a opção Tous appels tem que confirmar com Oui.)
Premir sem soltar a (volta ao estado de repouso).
Activar/desactivar o sinal de chamar
Quando se recebem chamadas externas tocam todos os terminais móveis. Desactivar
o sinal de chamar: premir sem soltar a tecla Asterisco P. No display aparece o símbolo
Ú.
Para activar o sinal de chamar: premir sem soltar a tecla Asterisco P.
i
Para desligar o sinal de chamar da chamada actual, prima a tecla de
Display Silence.
Activar/desactivar o sinal de aviso de chamada ("Bip")
Ao desactivar o sinal de chamar, pode activar um sinal de aviso de chamada. Desta
forma, quando receber uma chamada, ouve um sinal breve ("Bip") em vez do sinal de
chamar.
Premir sem soltar a tecla asterisco P e, no intervalo de 3 segundos, premir a tecla de
Display Bip. No display, aparece o símbolo º.
Para desactivar: premir sem soltar a tecla Asterisco P.
Sinalização por vibração
As chamadas recebidas e outras mensagens podem ser sinalizadas por vibração. Esta
definição é independente da definição dos sinais de chamar.
v (aceder ao menu); s Régl.Audio/sons OK ; sVibreur OK (‰ = activado); premir
sem soltar a (volta ao estado de repouso).
22
Gigaset SL1 / português / A31008-L001-B002-1-6Z19 / start_guide_time.fm / 14.11.2003
Configurar o terminal móvel
Gerir melodias
Pode gravar melodias polifónicas (duração máxima de 4 segundos) ou reproduzir por
intermédio de um cabo de dados (pág. 28). No total, podem ser gravadas até 16 melodias.
Gravar uma melodia
v (aceder ao menu); s Régl.Audio/sons OK ; sGestion mélodie OK ; <Nouv.mélodie> OK ;
Enregistr.Mélodie? OK ; premir Fin ou esperar 4 segundos; Sauver; Modifier entrée (alterar o nome da melodia) Sauver; premir sem soltar a (volta ao estado de repouso).
Reproduzir uma melodia
v (aceder ao menu); s Régl.Audio/sons OK ; sGestion mélodie OK ; s (seleccionar a melodia);
Ecouter; premir sem soltar a (volta ao estado de repouso).
Definição do registo
v (aceder ao menu); s Régl.Audio/sons OK ; s Gestion mélodie OK ; s (seleccionar a melodia);
à ; Volume OK (definir o nível de volume) ou s Modifier entrée OK (alterar o
nome da melodia ou s Afficher entrée OK (visualizar o tipo de registo) ou
sEffacer entrée OK ; premir sem soltar a (volta ao estado de repouso).
Activar/desactivar os sinais de aviso
O seu terminal móvel avisa-o de forma acústica de diversas situações e estados. Os
seguintes sinais de aviso podem ser activados e desactivados, independentemente uns
dos outros (de fábrica: activados).
◆ Som das teclas (cada premir de teclas é confirmado),
◆ Confirmação (sinal de confirmação, sinal de erro, sinal de fim de menu),
◆ Bateria.
v (aceder ao menu); s Régl.Audio/sons OK ; s Tonal. avertis. OK ;
r (ligar Clic clavier:); s (na linha seguinte) r (ligar Bip confir.:);
s (na linha seguinte) r ((para Batter.: seleccionar Act., Dés. ou LIG CH.);
Sauver; premir sem soltar a (volta ao estado de repouso).
Repor o terminal móvel no estado de fábrica
Pode repor as configurações e alterações efectuadas. Os registos da lista telefónica, da
lista de chamadas, da lista de e-mails ou da lista de números rápidos, o registo do terminal móvel na base, bem como, imagens e melodias que tenha instalado, não são afectados. Com a interrompe a reposição.
v (aceder ao menu); s Réglages OK ; s Réinit. Combiné OK ; Oui (confirmar a
solicitação); premir sem soltar a (volta ao estado de repouso).
23
Gigaset SL1 / português / A31008-L001-B002-1-6Z19 / start_guide_time.fm / 14.11.2003
Configurar o terminal móvel
Estado de fábrica do terminal móvel
Volume do auscultador
Volume do altifalante (função mãos-livres)
Volume do sinal de chamar
Volume diferenciado do sinal de chamar
Melodia do sinal de chamar
Função Anunciar Nome
Atendimento automático de chamadas
Sinal de Bateria / Som das Teclas / Confirmação
Idioma do terminal móvel
Despertador / Evento
1
3
5
desactivado
Melodia 1
desactivada
activado
activados
específico do país
desactivado
Nome do evento
Lista de repetição da marcação
Função Babyphone / Sensibilidade de ruído
apagado
vazia
desactivada / alta
24
pág. 21
pág. 21
pág. 21
pág. 22
pág. 21
pág. 16
pág. 21
pág. 23
pág. 7
pág. 10/
pág. 11
pág. 11
pág. 17
pág. 19
Gigaset SL1 / português / A31008-L001-B002-1-6Z19 / start_guide_time.fm / 14.11.2003
Anexo
Anexo
Conservação e contacto com a humidade !
Limpar o terminal móvel com um pano húmido (sem detergente) ou com um pano antiestático. Nunca utilizar um pano seco. Existe o perigo de induzir cargas electrostáticas.
Se o terminal móvel entrar em contacto com humidade, não ligue o equipamento de
modo algum. Retirar imediatamente a bateria.
Deixe o líquido pingar para fora do terminal móvel e, em seguida, seque-o.
Guarde o terminal móvel, sem a bateria, durante pelo menos 72 horas num local seco
e quente. Na maioria dos casos, é possível ligar o terminal móvel novamente.
Serviço de Apoio a Clientes (Customer Care)
O nosso Serviço de Apoio a Clientes na Internet:
www.my-siemens.com/customercare
No caso de ser necessário reparar os equipamentos, que estejam dentro da garantia,
poderá obter ajuda rápida e credível em:
Serviço de Apoio a Clientes
Telefone: 21 417 85 85
E-mail: [email protected]
Por favor, conserve disponível o recibo da compra.
Para informações técnicas relacionadas com os equipamentos:
Hotline Siemens
Telefone: 808 201 521
E-mail: [email protected]
Encontra outros números de assistência técnica no final destas instruções de funcionamento em "Serviço".
Nos países em que os nossos produtos são vendidos por revendedores não autorizados,
não são efectuadas trocas ou reparações.
Foram consideradas particularidades específicas do país. O terminal móvel SL1 é autorizado na UE e na Suíça.
A certificação deste equipamento foi realizada segundo a directiva europeia R&TTE, o
que é comprovada pelo símbolo CE.
25
Gigaset SL1 / português / A31008-L001-B002-1-6Z19 / start_guide_time.fm / 14.11.2003
Anexo
Extracto da declaração original:
„We, Siemens AG, declare, that the above mentioned product is manufactured according to our Full
Quality Assurance System certified by CETECOM ICT Services GmbH in compliance with ANNEX V
of the R&TTE-Directive 99/5/EC. The presumption of conformity with the essential requirements
regarding Council Directive 99/5/EC is ensured.“
Senior Approvals Manager
A Declaração de Conformidade (DoC) foi assinada. Caso seja necessária uma cópia da DoC original
poderá ser disponibilizada através da Hotline Siemens..
Dados técnicos
Bateria recomendada
Iões de lítio (LiIon), 700 mAh
(bateria recomendada na altura da impressão do manual de instruções)
O equipamento é fornecido com a bateria autorizada.
Autonomia/tempo de carga do terminal móvel
Capacidade
(mAh)
Autonomia em
stand-by (horas)
Autonomia em
conversação
(horas)
Tempo de carga
(horas)
700
cerca de 250 (10
dias)
cerca de 15
cerca de 2,5
A autonomia e o tempo de carga indicados só são válidos se se utilizar a bateria recomendada.
Tabela de caracteres
Escrita padrão
Premir várias vezes, ou premir sem soltar, a tecla correspondente:
1
2
I
4
5
L
M
N
O
Q
P
R
26
1x
Espaço
2x
1
3x
4x
£
5x
$
6x
¥
7x
¤
8x 9x
10 x 11 x 12 x 13 x 14 x
ã
ç
ô
õ
â
a
b
c
2
ä
á
à
â
d
e
f
3
ë
é
è
ê
g
h
i
4
ï
í
ì
î
j
k
l
5
m
n
o
6
ö
ñ
ó
ò
p
q
r
s
7
ß
û
t
u
v
8
ü
ú
ù
w
x
y
z
9
ÿ
ý
æ
ø
å
.
,
?
!
0
+
-
:
¿
¡
abc --> 123
123 --> abc
(
)
<
=
>
%
#
@
*
/
&
§
\
"
‘
;
_
Gigaset SL1 / português / A31008-L001-B002-1-6Z19 / start_guide_time.fm / 14.11.2003
Anexo
Editar texto (sem ajuda da função Escrita simples)
O cursor é controlado com u v t s.
Os caracteres (à esquerda do cursor) apaga com . fC .
Os caracteres são inseridos à esquerda do cursor.
Para comutar de maiúsculas (a primeira letra maiúscula e as seguintes letras minúsculas) para minúsculas, prima a tecla P antes de inserir a letra. Se premir novamente a tecla P, comuta de minúsculas para dígitos. Se voltar a premir a mesma
tecla, comuta de dígitos para maiúsculas.
◆ Nos registos da lista telefónica, a primeira letra do nome é escrita automaticamente
em maiúsculas e as seguintes letras em minúsculas.
◆ Se premir uma tecla sem soltar, os caracteres da tecla correspondente são indicados
na última linha do display e seleccionados um após o outro. Quando soltar essa
tecla, o caracter seleccionado é inserido no campo de edição.
– Pode ver no display se está seleccionada a definição para maiúsculas, minúsculas
ou dígitos.
– Ao inserir um registo na lista telefónica, aparece, na última linha do display, "A"
ou "a".
◆
◆
◆
◆
Ordenação dos registos na lista telefónica
1. Espaço (aqui apresentado com s)
2. Dígitos (0–9)
3. Letras (alfabeticamente)
4. Restantes caracteres
Para inverter a ordem alfabética dos registos, insira um espaço antes do nome. Este
registo é colocado na primeira posição (exemplo: "sCarla"). Pode também numerar os
registos com dígitos (por ex., "1Teresa", "2Carla", "3Alberto").
Função Escrita simples
A função Escrita simples (EATONI) ajuda-o a escrever nomes (na lista telefónica, lista de
números rápidos ou lista de e-mail).
A cada tecla entre Q e O são atribuídas várias letras e símbolos, que se encontram
ordenados numa linha de selecção, directamente acima das teclas de Display (por
baixo do campo de edição), assim que premir uma tecla. Ao inserir letras, estas serão
apresentadas conforme haja maior ou menor probabilidade (da esquerda para a
direita, respectivamente) de aparecerem. A letra cuja probabilidade é maior, encontrase no início da linha de selecção e é transferida para o campo de texto.
53 ________Ç_____abc
Pedro.K
KLJ5
W
A função Escrita simples
(EATONI) está activada.
Endereço de e-mail
¨
Linha de selecção
27
Gigaset SL1 / português / A31008-L001-B002-1-6Z19 / start_guide_time.fm / 14.11.2003
Anexo
Se esta letra corresponder à desejada, confirme, premindo a tecla seguinte. Se a letra
sugerida pela função EATONI não corresponder à desejada, prima a tecla Cardinal R,
as vezes necessárias, até que a letra procurada apareça indicada na linha selecção, com
o marcador preto..
P
R
Premir a tecla Asterisco brevemente. Comuta do modo abc para Abc, de Abc
para 123 e de 123 para abc.
Na linha de selecção, salta para a letra seguinte.
Activar/desactivar a função Escrita simples
A função Escrita simples pode ser activada ou desactivada consoante o campo onde se
encontrar.
Condição prévia: Encontra-se no campo de edição de texto (nome de um registo da
lista telefónica, da lista de números rápidos ou da lista de e-mail).
v (aceder ao menu); s Saisie intuitive OK (‰ = activada);
Premir brevemente a tecla Desligar a (volta ao campo de texto). Escreva agora o
texto.
Ligação ao PC
Pode estabelecer uma ligação entre o seu terminal móvel SL1 e um computador, utilizando um cabo de dados Siemens. Assim, o computador pode comunicar com o seu terminal móvel SL1 através do software "Siemens Data Suite" (instalação grátis em
http:\\www.my-siemens.com\mysiemens) e aceder aos parâmetros e listas do terminal
móvel, a seguir mencionados:
Ler parâmetros
◆ Versão do software
◆ Tipo
◆ Código do fabricante
Acesso à leitura/escrita
na lista telefónica
na lista de e-mail
na lista de números rápidos
na lista de eventos
na lista de repetição da marcação
◆
◆
◆
◆
◆
Acesso à leitura/escrita de outros parâmetros
Definições dos sinais de chamar
Definições do volume
Instalar imagens
Instalar melodias
Marcar e atender
◆
◆
◆
◆
◆
28
Gigaset SL1 / português / A31008-L001-B002-1-6Z19 / start_guide_time.fm / 14.11.2003
Anexo
Transferência de dados
Em algumas funções, são transferidas grandes quantidades de dados entre o terminal
móvel e o computador. Neste caso, o terminal móvel comuta para o modo de transferência de dados e no display do terminal móvel aparece Echange données. Neste
estado, não é possível inserir registos através do teclado, e as chamadas que receber são
ignoradas.
O terminal móvel comuta para o modo de transferência de dados nos seguintes
casos:
◆ Acesso à leitura/escrita na lista telefónica
◆ Acesso à leitura/escrita na lista de e-maill
◆ Acesso à leitura/escrita na lista de números rápidos
◆ Acesso à leitura/escrita na lista de eventos
◆ Acesso à leitura/escrita na lista de repetição da marcação
◆ Instalação de animações de ecrã
◆ Instalação de melodias
Se, durante a transferência de dados ocorrer algum erro, o terminal móvel passa automaticamente para o estado de repouso.
Marcar e atender chamadas
Se marcar um número através do computador ou atender uma chamada a partir do
mesmo, o terminal móvel comporta-se exactamente as mesmas funções através do terminal móvel.
Jogo "Balloon Shooter"
Tente atingir o número máximo de balões que conseguir.
v ¢ Famille/Loisirs
ou ...
¢ Balloon Shooter
Iniciar o jogo:
Prima a tecla de Display.
[RRRRRRRRRRRRRRRRRRRR]
Départ
ou ...
Outras opções:
à
Premir a tecla de Display para aceder ao menu de
opções.
¢
¢
¢
ou
¢
¢
¢
¢
p¢
¢
12I
4
L¢
MNO
¢
¢
Para deslocar a mira prima:
Para terminar o jogo, prima a tecla 5.
29
Gigaset SL1 / português / A31008-L001-B002-1-6Z19 / start_guide_time.fm / 14.11.2003
Anexo
Garantia
Independentemente dos seus direitos por causa de defeitos perante o vendedor, ao consumidor (cliente) é concedida uma garantia do fabricante, sujeita aos seguintes termos
e condições:
◆ Os equipamentos novos e os respectivos componentes que apresentarem defeito de
fabrico dentro de 24 meses a partir da data da compra serão gratuitamente reparados ou substituídos por um equipamento que corresponda ao nível técnico actual.
Fica ao critério da Siemens reparar ou substituir o equipamento. Para as peças sujeitas a desgaste (por ex. teclados, baterias, caixas), esta garantia tem validade de seis
meses a partir da data da compra.
◆ Excluem-se desta garantia todos os danos causados por manuseamento incorrecto
e/ou por inobservância das informações nos manuais.
◆ Esta garantia não é aplicável ou extensível a serviços executados por vendedores
autorizados ou pelo próprio cliente (por ex., instalação, configuração, download de
software). Manuais e software fornecidos num suporte de dados separado também
estão excluídos da garantia.
◆ O talão de compra (com data) é válido para a comprovação da garantia. As reclamações devem ser apresentadas dentro de um mês após a constatação do defeito com
direito a garantia.
◆ Os equipamentos ou componentes substituídos e devolvidos à Siemens passam a
ser propriedade da Siemens.
◆ Esta garantia é válida para novos equipamentos adquiridos na União Europeia. A
emissora da garantia é, para Produtos vendidos em Portugal Siemens S.A, Rua Irmão
Siemens nº 1, 2720-093 Amadora.
◆ Estão excluídos outros direitos adicionais ou diferentes dos referidos nesta garantia
do fabricante. A Siemens não assume a responsabilidade por interrupções operacionais, lucros cessantes, danos indirectos, nem pela perda de dados, de software adicional instalado pelo cliente ou de outras informações. O cliente é responsável pelas
cópias de segurança das suas informações. A exclusão da garantia não é válida nos
casos em que a garantia seja obrigatória por lei, por exemplo, segundo a lei de responsabilidade civil do produtor, ou em casos de dolo, danos à saúde ou à vida.
◆ A duracão da garantia não é prorrogada após a execução de um serviço no âmbito
da garantia.
◆ A Siemens reserva-se o direito de cobrar do cliente os custos decorrentes de uma
substituição ou de uma reparação que não sejam defeitos abrangidos pela garantia.
◆ As condições mencionadas nos parágrafos anteriores não estão vinculadas a uma
alteração das regras do ónus da prova para a desvantagem do cliente.
Para exercer os seus direitos de garantia, contacte o serviço de assistência técnica por
telefone da Siemens. Os números encontram-se no manual de utilização fornecido.
30
Gigaset SL1 / português / A31008-L001-B002-1-6Z19 / SL_1SIX.fm / 14.11.2003
Índice remissivo
Índice remissivo
A
Comando de voz . . . . . . . . . . . . . . . . 16
Consulta interna (durante chamada
externa) . . . . . . . . . . . . . . . . . . . 18
Conteúdo da embalagem . . . . . . . . . . . 6
Cuidar do terminal móvel . . . . . . . . . . 25
Cursor . . . . . . . . . . . . . . . . . . . . . . . . . 9
Customer Care . . . . . . . . . . . . . . . . . . 25
Aceder
lista telefónica . . . . . . . . . . . . . . . . . 9
menu . . . . . . . . . . . . . . . . . . . . . . . 9
Activar
despertador . . . . . . . . . . . . . . . . . . 10
evento. . . . . . . . . . . . . . . . . . . . . . 11
protecção do teclado . . . . . . . . . . . . 8
Walky-Talky . . . . . . . . . . . . . . . . . . 20
Administrador de melodias . . . . . . . . 23
Alimentador . . . . . . . . . . . . . . . . . . . . 5
Alterar
idioma do terminal móvel . . . . . . . . 7
Aniversário . . . . . . . . . . . . . . . . . . . . 11
Apagar (comando de voz) . . . . . . . . . 16
Atendimento automático de
chamadas . . . . . . . . . . . . . . . . . 21
Auscultador . . . . . . . . . . . . . . . . . . . . 2
Autonomia
da funçao Babyphone . . . . . . . . . . 19
do terminal móvel . . . . . . . . . . . . . 26
no modo Walky-Talky . . . . . . . . . . . 20
Dados técnicos . . . . . . . . . . . . . . . . . 26
Data e Hora . . . . . . . . . . . . . . . . . . . . 10
Desactivar
Despertador . . . . . . . . . . . . . . . . . . 11
protecção do teclado . . . . . . . . . . . . 8
sinal de chamar (no terminal móvel) 22
Desactivar v. Desligar . . . . . . . . . . . . . 11
Desligar
alarme de um evento . . . . . . . . . . . 11
terminal móvel . . . . . . . . . . . . . . . . . 8
Despertador . . . . . . . . . . . . . . . . . . . 11
Display
teclas de. . . . . . . . . . . . . . . . . . . . . . 9
B
E
Babyphone . . . . . . . . . . . . . . . . . . . . 19
Balloon Shooter . . . . . . . . . . . . . . . . 29
bateria
bateria recomendada . . . . . . . . . . . 26
carregar . . . . . . . . . . . . . . . . . . . . . 6
colocar . . . . . . . . . . . . . . . . . . . . . . 6
Indicação. . . . . . . . . . . . . . . . . . . . . 6
Efeito de eco . . . . . . . . . . . . . . . . . . . 21
Enviar um registo da lista telefónica . . 15
Equipamentos médicos . . . . . . . . . . . . 5
Escolher base. . . . . . . . . . . . . . . . . . . . 8
Espaço de memória livre . . . . . . . . . . 18
Estabelecer chamadas . . . . . . . . . . . . 12
atender uma chamada . . . . . . . . . . 12
externas . . . . . . . . . . . . . . . . . . . . . 12
Estado de fábrica do terminal móvel . . 23
Evento. . . . . . . . . . . . . . . . . . . . . . . . 11
C
Chamada em espera (chamada
interna). . . . . . . . . . . . . . . . . . . 18
Chamadas
durante chamadas externas . . . . . . 18
externas . . . . . . . . . . . . . . . . . . . . 12
interna . . . . . . . . . . . . . . . . . . . . . 12
internas . . . . . . . . . . . . . . . . . . . . . 12
Chamar Todos ("chamada colectiva") . 12
Clip de cinto . . . . . . . . . . . . . . . . . . . . 8
Colocar uma chamada externa em
espera. . . . . . . . . . . . . . . . . . . . 13
D
F
função Escrita simples EATONI ver. ajuda
na escrita de texto
Funcionamento (colocar o telefone em
funcionamento) . . . . . . . . . . . . . . 6
31
Gigaset SL1 / português / A31008-L001-B002-1-6Z19 / SL_1SIX.fm / 14.11.2003
Índice remissivo
G
Garantia . . . . . . . . . . . . . . . . . . . . . .
Gerir melodias. . . . . . . . . . . . . . . . . .
Gravar
registo na lista de números rápidos .
registo na lista telefónica . . . . . . . .
30
23
14
14
I
Idioma, ver Terminal móvel
Indicação
Espaço de memória . . . . . . . . . . . . 18
Modo de 12/24 horas . . . . . . . . . . . 11
Indicação do estado das baterias . . . . . 6
Indicações de segurança . . . . . . . . . . . 5
Inserir
aniversário . . . . . . . . . . . . . . . . . . . 11
evento . . . . . . . . . . . . . . . . . . . . . . 11
hora do despertar . . . . . . . . . . . . . 10
Inserir a data de aniversário . . . . . . . . 11
Inserir aniversário . . . . . . . . . . . . . . . 14
Intensidade de ligação à base. . . . . . . . 2
Interromper (processo) . . . . . . . . . . . . 9
L
Ligação ao PC . . . . . . . . . . . . . . . . . . 28
Ligar
terminal móvel. . . . . . . . . . . . . . . . . 8
Walky-Talky . . . . . . . . . . . . . . . . . . 21
Lista
e-mail . . . . . . . . . . . . . . . . . . . . . . 17
números internos . . . . . . . . . . . . . . . 9
Lista de e-mail . . . . . . . . . . . . . . . . . . 17
Lista de números rápidos . . . . . . . . . . 13
gravar registo. . . . . . . . . . . . . . . . . 14
Lista de repetição da marcação . . . . . 17
Lista telefónica . . . . . . . . . . . . . . . . . 13
aceder . . . . . . . . . . . . . . . . . . . . . . . 9
enviar registos para um terminal
móvel . . . . . . . . . . . . . . . . . . . . . 15
gravar um registo . . . . . . . . . . . . . . 14
M
Mãos-livres . . . . . . . . . . . . . . . . . . . . 12
Marcação por voz . . . . . . . . . . . . . 9, 15
Melhor base . . . . . . . . . . . . . . . . . . . . 8
Melodia
polifónica . . . . . . . . . . . . . . . . . . . 23
32
Melodia de chamada em espera . . . . . 13
Melodias polifónicas . . . . . . . . . . . . . . 23
Menu
aceder . . . . . . . . . . . . . . . . . . . . . . . 9
anterior . . . . . . . . . . . . . . . . . . . . . . 9
explicação do menu . . . . . . . . . . . . . 8
sinal de fim . . . . . . . . . . . . . . . . . . . 23
tecla . . . . . . . . . . . . . . . . . . . . . . . . . 9
Microfone . . . . . . . . . . . . . . . . . . . . . . 2
Modo de 12/24 horas . . . . . . . . . . . . . 10
N
Número de telefone
copiar a partir da lista telefónica. . . . 15
gravar (lista telefónica) . . . . . . . . . . 14
O
ou . . . . . . . . . . . . . . . . . . . . . . . . . . . 13
P
Pausa na marcação . . . . . . . . . . . . . . . 12
Película de protecção . . . . . . . . . . . . . . 6
Perdidos
aniversários . . . . . . . . . . . . . . . . . . 11
eventos . . . . . . . . . . . . . . . . . . . . . 11
Programar
data . . . . . . . . . . . . . . . . . . . . . . . . 10
despertador . . . . . . . . . . . . . . . . . . 10
evento . . . . . . . . . . . . . . . . . . . . . . 11
hora . . . . . . . . . . . . . . . . . . . . . . . . 10
volume áudio . . . . . . . . . . . . . . . . . 21
volume do auscultador . . . . . . . . . . 21
volume do sinal de chamar . . . . . . . 21
Programar a data . . . . . . . . . . . . . . . . 10
Programar a hora . . . . . . . . . . . . . . . . 10
Protecção
teclado . . . . . . . . . . . . . . . . . . . . . . . 8
Próteses auditivas. . . . . . . . . . . . . . . . . 5
R
Repetição da marcação . . . . . . . . . . . . 17
Reproduzir (comando de voz) . . . . . . . 16
Gigaset SL1 / português / A31008-L001-B002-1-6Z19 / SL_1SIX.fm / 14.11.2003
Índice remissivo
S
Serviço de Apoio a Clientes . . . . . . . .
Sinais de confirmação . . . . . . . . . . . .
Sinal (confirmação/erro/bateria/fim de
menu) . . . . . . . . . . . . . . . . . . .
Sinal de aviso . . . . . . . . . . . . . . . . . .
Sinal de aviso, ver Sinais de aviso . . . .
Sinal de bateria . . . . . . . . . . . . . . . . .
Sinal de chamar . . . . . . . . . . . . . . . .
Sinal de confirmação . . . . . . . . . . . . .
Sinal de erro . . . . . . . . . . . . . . . . . . .
Sinalização por vibração . . . . . . . . . .
Som
teclas . . . . . . . . . . . . . . . . . . . . . .
V
25
23
23
22
23
23
21
23
23
22
VIP (registo na lista telefónica) . . . . . . 15
Volume . . . . . . . . . . . . . . . . . . . . . . . 21
Volume Áudio . . . . . . . . . . . . . . . . . . 21
W
Walky-Talky . . . . . . . . . . . . . . . . . 20, 21
23
T
Tabela de caracteres . . . . . . . . . . . . . 26
Tecla . . . . . . . . . . . . . . . . . . . . . . . . . 2
Tecla (lista de números rápidos) . . . . . 13
Tecla 1 (marcação abreviada). . . . . . . . 2
Tecla Apagar (de Display). . . . . . . . . . . 9
Tecla Cardinal . . . . . . . . . . . . . . . . . . . 8
Tecla de Navegação . . . . . . . . . . . . . . . 8
Tecla Voltar (de Display) . . . . . . . . . . . 9
Teclas . . . . . . . . . . . . . . . . . . . . . . . . . 8
premir de teclas (sinal de
confirmação) . . . . . . . . . . . . . . . . 23
som teclas . . . . . . . . . . . . . . . . . . . 23
tecla de Navegação . . . . . . . . . . . . . 8
tecla de Repetição da Marcação . . . . 9
Teclas de Display . . . . . . . . . . . . . . . 9
Voltar/Menu/Apagar/OK (de Display) . 9
Tempo de carga do terminal móvel . . 26
Terminal móvel
alterar o idioma . . . . . . . . . . . . . . . . 7
autonomia e tempo de carga . . . . . 26
clip de cinto . . . . . . . . . . . . . . . . . . . 8
colocar em funcionamento. . . . . . . . 6
ligar/desligar . . . . . . . . . . . . . . . . . . 8
lista telefónica . . . . . . . . . . . . . . . . . 9
registar numa outra base . . . . . . . . . 8
repor no estado de fábrica . . . . . . . 23
trocar para outra base . . . . . . . . . . . 8
trocar para uma melhor recepção . . . 8
utilizar como Babyphone . . . . . . . . 19
Terminar a chamada . . . . . . . . . . . . . 12
Transferir uma chamada . . . . . . . . . . 18
33
Gigaset SL1 / niederländisch / A31008-L001-B002-1-6Z19 / cover_0_Vorlage.fm / 14.11.2003
s
NEDERLANDS
Be inspired
Gigaset SL1 / niederländisch / A31008-L001-B002-1-6Z19 / covers_I-II.fm / 14.11.2003
Overzicht van de handset
Overzicht van de handset
Ontvangstniveau
Ð 100 % i 75 %
Ñ 50 % Ò minder ontv.
| geen ontvangst
(knippert)
Verbindingstoets
◆ Gesprek beantwoorden
◆ Nummer kiezen
◆ Omschakelen van
handsfree- naar
handmatig
Navigatietoets
Opent het menu,
telefoonboek,
SpraakSturing. Navigatie in
het invoerveld
Handsfree-toets
◆ Omschakelen van
handmatig naar
handsfree
◆ Verlicht:
handsfree is
ingeschakeld
◆ Knippert:
inkomende oproep,
automatische
nummerherhaling
Telefoonboek openen
Toets 1
Voicemail/
Antwoordapparaat
selecteren (circa 2 sec.
indrukken)
Display
Batterij-indicatie
= leeg U vol
= knippert: Batterij
bijna leeg of batterij
wordt opgeladen
Ð
V
Verbreek-, Aan-/Uit-toets
INT 1
20.05.03
•
Huidige functies en
displaytoetsen
Met de displaytoetsen
heeft u toegang tot de
weergegeven functies.
09:45
§SMS
◆ Gesprek beëindigen
◆ Functie annuleren
◆ Eén menu-niveau terug
(kort indrukken)
◆ Terug naar de ruststand
(circa 1 sec. indrukken)
◆ Handset aan/uit (circa
2 sec. indrukken)
Berichtentoets/
oproeplijst
◆ Toegang tot bellers- en
berichtenlijst
◆ Knippert: nieuwe SMS.
berichten en oproepen
Microfoon
Hekje-toets
Toetsblokkering aan/uit
(circa 2 sec. indrukken)
Laadcontact/
Toets snelkieslijst
aansluitpunt voor
Snelkieslijst openen
headset en pcSterretje-toets
interface
◆ Oproepsignalen aan/uit
R-toets
(circa 2 sec. indrukken)
◆ Ruggespraak-/doorverbindtoets
◆ Bij de tekstinvoer wisselen
(flash)
tussen hoofdletters, kleine
◆
Kiestoonpauze invoeren (circa 2
letters en cijfers
seconden indrukken).
Weergave van een handset die aangemeld is op een basisstation dat geschikt is
voor SMS.
2
Gigaset SL1 / niederländisch / A31008-L001-B002-1-6Z19 / SL_1IVZ.fm / 14.11.2003
Inhoudsopgave
Inhoudsopgave
Overzicht van de handset . . . . . . . . . . . . . . . . . . . . . 2
Veiligheidsinstructies . . . . . . . . . . . . . . . . . . . . . . . . 5
Toestel in gebruik nemen . . . . . . . . . . . . . . . . . . . . . 6
Handset in gebruik nemen . . . . . . . . . . . . . . . . . . . . . . . . . . . . . . . . . . . . . . . . . . . . . . .
Handmatige aanmelding . . . . . . . . . . . . . . . . . . . . . . . . . . . . . . . . . . . . . . . . . . . . . . . .
Displaytaal wijzigen . . . . . . . . . . . . . . . . . . . . . . . . . . . . . . . . . . . . . . . . . . . . . . . . . . . .
Van basisstation wisselen . . . . . . . . . . . . . . . . . . . . . . . . . . . . . . . . . . . . . . . . . . . . . . .
Draagclip bevestigen . . . . . . . . . . . . . . . . . . . . . . . . . . . . . . . . . . . . . . . . . . . . . . . . . . .
Handset in-/uitschakelen . . . . . . . . . . . . . . . . . . . . . . . . . . . . . . . . . . . . . . . . . . . . . . . .
Toetsblokkering in-/uitschakelen . . . . . . . . . . . . . . . . . . . . . . . . . . . . . . . . . . . . . . . . . .
6
7
7
8
8
8
8
Bediening van de telefoon en menubeheer . . . . . . 8
Toetsen . . . . . . . . . . . . . . . . . . . . . . . . . . . . . . . . . . . . . . . . . . . . . . . . . . . . . . . . . . . . . . 8
Hoofdmenu . . . . . . . . . . . . . . . . . . . . . . . . . . . . . . . . . . . . . . . . . . . . . . . . . . . . . . . . . 10
Tijdfuncties . . . . . . . . . . . . . . . . . . . . . . . . . . . . . . . . 10
Datum en tijd instellen . . . . . . . . . . . . . . . . . . . . . . . . . . . . . . . . . . . . . . . . . . . . . . . . . 10
Wekker instellen . . . . . . . . . . . . . . . . . . . . . . . . . . . . . . . . . . . . . . . . . . . . . . . . . . . . . . 10
Afspraak instellen . . . . . . . . . . . . . . . . . . . . . . . . . . . . . . . . . . . . . . . . . . . . . . . . . . . . . 11
Telefoneren . . . . . . . . . . . . . . . . . . . . . . . . . . . . . . . 11
Extern bellen en gesprek beëindigen . . . . . . . . . . . . . . . . . . . . . . . . . . . . . . . . . . . . .
Intern bellen en gesprek beëindigen . . . . . . . . . . . . . . . . . . . . . . . . . . . . . . . . . . . . . .
Oproep aannemen . . . . . . . . . . . . . . . . . . . . . . . . . . . . . . . . . . . . . . . . . . . . . . . . . . . .
Handsfree telefoneren . . . . . . . . . . . . . . . . . . . . . . . . . . . . . . . . . . . . . . . . . . . . . . . . .
Microfoon van de handset uitschakelen . . . . . . . . . . . . . . . . . . . . . . . . . . . . . . . . . . .
11
12
12
12
12
Telefoonboek en overige lijsten gebruiken . . . . . 13
Telefoonboek en snelkieslijst . . . . . . . . . . . . . . . . . . . . . . . . . . . . . . . . . . . . . . . . . . . .
Items telefoonboek resp. snelkieslijst beheren . . . . . . . . . . . . . . . . . . . . . . . . . . . . . .
SpraakSturing . . . . . . . . . . . . . . . . . . . . . . . . . . . . . . . . . . . . . . . . . . . . . . . . . . . . . . . .
Een voorkiesnummer aan een telefoonnummer koppelen. . . . . . . . . . . . . . . . . . . . .
Nummerherhalingslijst . . . . . . . . . . . . . . . . . . . . . . . . . . . . . . . . . . . . . . . . . . . . . . . .
E-maillijst . . . . . . . . . . . . . . . . . . . . . . . . . . . . . . . . . . . . . . . . . . . . . . . . . . . . . . . . . . .
Vrije geheugenruimte tonen . . . . . . . . . . . . . . . . . . . . . . . . . . . . . . . . . . . . . . . . . . . .
13
14
15
16
16
17
17
Meerdere handsets gebruiken . . . . . . . . . . . . . . . . 17
Interne ruggespraak . . . . . . . . . . . . . . . . . . . . . . . . . . . . . . . . . . . . . . . . . . . . . . . . . . .
Wisselgesprek bij intern gesprek aannemen/weigeren . . . . . . . . . . . . . . . . . . . . . . . .
Handset voor ruimtebewaking gebruiken . . . . . . . . . . . . . . . . . . . . . . . . . . . . . . . . . .
Handsets als walkie-talkie gebruiken . . . . . . . . . . . . . . . . . . . . . . . . . . . . . . . . . . . . . .
17
17
18
19
3
Gigaset SL1 / niederländisch / A31008-L001-B002-1-6Z19 / SL_1IVZ.fm / 14.11.2003
Inhoudsopgave
Handset instellen . . . . . . . . . . . . . . . . . . . . . . . . . . . 20
Automatisch opnemen uit-/inschakelen . . . . . . . . . . . . . . . . . . . . . . . . . . . . . . . . . . .
Handsetvolume wijzigen . . . . . . . . . . . . . . . . . . . . . . . . . . . . . . . . . . . . . . . . . . . . . . .
Belsignalen wijzigen . . . . . . . . . . . . . . . . . . . . . . . . . . . . . . . . . . . . . . . . . . . . . . . . . . .
Geluidsmanager . . . . . . . . . . . . . . . . . . . . . . . . . . . . . . . . . . . . . . . . . . . . . . . . . . . . . .
Attentiesignalen in-/uitschakelen . . . . . . . . . . . . . . . . . . . . . . . . . . . . . . . . . . . . . . . .
Standaardinstellingen herstellen van de handset (reset) . . . . . . . . . . . . . . . . . . . . . .
20
20
20
21
22
22
Bijlage . . . . . . . . . . . . . . . . . . . . . . . . . . . . . . . . . . . . 24
Onderhoud en contact met vloeistof . . . . . . . . . . . . . . . . . . . . . . . . . . . . . . . . . . . . . .
Klantenservice (Customer Care) . . . . . . . . . . . . . . . . . . . . . . . . . . . . . . . . . . . . . . . . .
Technische gegevens . . . . . . . . . . . . . . . . . . . . . . . . . . . . . . . . . . . . . . . . . . . . . . . . . .
Tekenreekstabel . . . . . . . . . . . . . . . . . . . . . . . . . . . . . . . . . . . . . . . . . . . . . . . . . . . . . .
SnelSchrijven . . . . . . . . . . . . . . . . . . . . . . . . . . . . . . . . . . . . . . . . . . . . . . . . . . . . . . . .
PC-interface . . . . . . . . . . . . . . . . . . . . . . . . . . . . . . . . . . . . . . . . . . . . . . . . . . . . . . . . .
Spelletje "Balloon Shooter" . . . . . . . . . . . . . . . . . . . . . . . . . . . . . . . . . . . . . . . . . . . . . .
Garantie Nederland . . . . . . . . . . . . . . . . . . . . . . . . . . . . . . . . . . . . . . . . . . . . . . . . . . .
Garantiecertificaat België . . . . . . . . . . . . . . . . . . . . . . . . . . . . . . . . . . . . . . . . . . . . . . .
24
24
25
25
26
27
28
29
30
Trefwoordenregister . . . . . . . . . . . . . . . . . . . . . . . . 31
4
Gigaset SL1 / niederländisch / A31008-L001-B002-1-6Z19 / start_guide_time.fm / 14.11.2003
Veiligheidsinstructies
Veiligheidsinstructies
$
!
Gebruik uitsluitend de meegeleverde netvoedingsadapter.
Plaats enkel de aanbevolen, oplaadbare batterij (pagina 25)! Dit wil
zeggen geen ander type batterij of niet-oplaadbare batterij, omdat dit
gevaarlijk kan zijn voor de gezondheid en zelfs lichamelijk letsel kan
veroorzaken.
‹
Œ
Plaats de heroplaadbare batterij juist gepoold en gebruik hem volgens de
aanwijzingen in deze gebruiksaanwijzing.
De werking van medische apparatuur kan worden beïnvloed. Let op de
technische voorwaarden van de betreffende omgeving (bijv. artsenpraktijk).
De handset kan bij gehoorapparaten een onaangename bromtoon
veroorzaken.
De handset is niet spatwaterdicht (pagina 24).
Telefoneer niet tijdens het autorijden (walkie-talkie-functie).
Schakel de telefoon uit als u zich in een vliegtuig bevindt (walkietalkiefunctie).
Gebruik het toestel niet in een omgeving waar explosiegevaar bestaat
(bijvoorbeeld in spuiterijen, tankstations etc.).
ƒ
Draag uw Gigaset alleen inclusief de gebruiksaanwijzing over aan derden.
Lever de gebruikte handset en oude en/of defecte batterij in als klein chemisch
afval.
Batterij niet
weggooien,
maar inleveren
als KCA.
i
Niet alle in deze gebruiksaanwijzing beschreven functies zijn in alle
landen beschikbaar.
5
Gigaset SL1 / niederländisch / A31008-L001-B002-1-6Z19 / start_guide_time.fm / 14.11.2003
Toestel in gebruik nemen
Toestel in gebruik nemen
Bij levering dient de verpakking het volgende te bevatten:
een handset SL 1, een lader met netvoedingsadapter, een riemclip voor de handset, een
batterij en een gebruiksaanwijzing.
Handset in gebruik nemen
Om het display te beschermen, is er een folie aangebracht. U kunt deze beschermfolie
nu verwijderen!
Batterij plaatsen
◆ Om het klepje te openen op de uitsparing drukken en naar onderen schuiven.
◆ Batterij juist plaatsen (zie linker afbeelding).
◆ Klepje ca. 3 mm naar beneden verschoven plaatsen en naar boven schuiven tot
het vastklikt.
W
Plaats enkel de door Siemens op pagina 25 aanbevolen oplaadbare
batterij! Gebruik in geen geval een gewone (niet oplaadbare) batterij of
een ander type batterij, want die kunnen schade aan gezondheid en
lichamelijk letsel veroorzaken.
Batterij laden
Plaats de handset met het display naar boven in de lader. Laat nu de handset voor het
opladen van de batterij in de lader staan, omdat de batterij bij levering niet is opgeladen.
Het opladen van de batterij wordt op het display rechtsboven door knipperen van het
batterijsymbool = getoond.
W
6
Als u de handset voor het eerst oplaadt, adviseren wij een ononderbroken
laadtijd van vijf uur – onafhankelijk van de batterijniveau-indicatie! Om
technische redenen vermindert de laadcapaciteit van de batterij na enige
tijd.
Gigaset SL1 / niederländisch / A31008-L001-B002-1-6Z19 / start_guide_time.fm / 14.11.2003
Toestel in gebruik nemen
Het laadniveau van de batterij wordt pas na een ononderbroken laad-/
ontlaadprocedure juist weergegeven. U moet de batterij daarom niet onnodig
verwijderen en het laadproces niet voortijdig beëindigen.
◆ Na het eerste laadproces kunt u uw handset na elk gesprek in de lader
terugplaatsen. Het laden wordt elektronisch gestuurd. Hierdoor
wordt de batterij bij het laden ontzien.
◆ De batterij wordt warm tijdens het laden. Dit is normaal en
ongevaarlijk.
i
Handmatige aanmelding
Voordat u uw Gigaset SL 1 kunt gebruiken, dient u hem handmatig aan te melden. De
aanmelding dient zowel op de handset als op het basisstation plaats te vinden.
1. Op de handset
v
s
s
s
Menu openen.
OK
[______________________________________________]
Instell. Handset
Selecteren en bevestigen.
[______________________________________________]
OK
HS aanmelden
Selecteren en bevestigen.
[______________________________________________]
OK
Basis 1
Basisstation (1–4) selecteren en bevestigen,
bijvoorbeeld Basis 1.
OK
PIN-code van het basisstation (standaard: 0000)
invoeren en bevestigen.
Na invoer van de PIN-code knippert op het display bijvoorbeeld Basis 1.
2. Op het basisstation
Hoe de aanmelding van de handset op het basisstation plaatsvindt, leest u in de
gebruiksaanwijzing van het basisstation.
Displaytaal wijzigen
U kunt de displayteksten in diverse talen laten weergeven.
v
s
s
[______________________________________________]
OK
Instell. Handset
Selecteren en bevestigen.
OK
[______________________________________________]
Taal
s
Selecteren en bevestigen. De huidige taal is met ‰
gemarkeerd (bij levering: Engels).
OK
Taal selecteren en bevestigen.
a
Menu openen.
Lang indrukken (terug naar ruststand).
U heeft per ongeluk een voor u onbegrijpelijke taal ingesteld:
v M 2 indrukken, met s de juiste taal selecteren en met OK bevestigen.
7
Gigaset SL1 / niederländisch / A31008-L001-B002-1-6Z19 / start_guide_time.fm / 14.11.2003
Bediening van de telefoon en menubeheer
Van basisstation wisselen
Als uw handset op meerdere basisstations is aangemeld, kunt u deze op een bepaald
basisstation of op het basisstation met de beste ontvangst (Beste basis) instellen.
v; s Instell. Handset OK ; s Kies basis OK ;
s (Aangemeld basisstation of Beste basis selecteren) OK .
Draagclip bevestigen
Druk de draagclip op de achterzijde
van de handset en zorg dat de
nokjes aan de zijkant in de
uitsparingen klikken.
Handset in-/uitschakelen
Voor inschakelen: Verbreektoets a lang indrukken.
Voor uitschakelen: Verbreektoets a in de ruststand opnieuw lang indrukken.
Wanneer u de handset in de lader legt, schakelt deze automatisch in.
Toetsblokkering in-/uitschakelen
Hekje R lang indrukken (op het display verschijnt het symbool Ø).
Voor uitschakelen/deblokkeren: Hekje R opnieuw lang indrukken.
Bij een inkomende oproep wordt de toetsblokkering automatisch uitgeschakeld. Nadat
het gesprek is beëindigd, wordt de toetsblokkering weer ingeschakeld.
i
Als de toetsblokkering is ingeschakeld, kunt u ook geen noodnummers
bellen!
Bediening van de telefoon en menubeheer
Toetsen
Navigatietoets
De navigatietoets is van vier zwarte pijlen en bijbehorende symbolen voorzien.
Afhankelijk van de markering waar u op drukt, wordt een bepaalde functie opgeroepen.
In de gebruiksaanwijzing is de toetszijde waarop u moet drukken, gemarkeerd in het
zwart, bijvoorbeeld: Toets v voor rechts = menu openen.
Met de navigatietoets kunt u vaak ook de functies van de rechter display-toets
uitvoeren.
8
Gigaset SL1 / niederländisch / A31008-L001-B002-1-6Z19 / start_guide_time.fm / 14.11.2003
Bediening van de telefoon en menubeheer
Voorbeeld:
Navigatietoets
Verschillende functies van de navigatietoets:
t
s
v
u
In ruststand
SpraakSturing starten
(lang indrukken)
Telefoonboek openen
In lijsten en menu’s
Naar boven bladeren
In een invoerveld
De cursor een regel naar
boven verplaatsen
Naar beneden bladeren
Menu openen
Geselecteerd item
bevestigen (als OK )
Een menu-niveau
terugspringen of afbreken
De cursor een regel naar
beneden verplaatsen
De cursor naar rechts
verplaatsen
Lijst van de handsets
openen
De cursor naar links
verplaatsen
Displaytoetsen
De displaytoetsen zijn de langwerpige kanteltoetsen direct onder het display.
Overeenkomstig de betreffende bedieningsstand wisselt de functie. De actuele functie
wordt direct daarboven op het display weergegeven.
Voorbeeld:
•
§SMS
Displaytoetsen
De verschillende symbolen hebben bij toetsbediening de volgende betekenis:
Þ
Nummerherhalingstoets: Lijst met de laatste 10 telefoonnummers openen.
à
Menutoets: In ruststand het hoofdmenu openen.
Bij het telefoneren een situatie-afhankelijk menu openen.
Wistoets: Ingevoerde tekens van rechts naar links één voor één verwijderen.
OK
f
C
Ý
ä
OK-toets: Menufunctie bevestigen of invoer door bevestiging opslaan.
Escape-toets: Een menu-niveau terug of procedure afbreken.
E-maillijst openen.
Vanaf een willekeurige menu-positie terugkeren naar de ruststand
Verbreektoets a circa 1 sec. indrukken of geen toets indrukken.
Na 2 min. schakelt het display automatisch over naar de ruststand. Wijzigingen die u
niet door indrukken van OK , Ja, Opslaan, Verstrn of met Opslaan OK heeft bevestigd
of opgeslagen, worden niet doorgevoerd.
9
Gigaset SL1 / niederländisch / A31008-L001-B002-1-6Z19 / start_guide_time.fm / 14.11.2003
Tijdfuncties
Hoofdmenu
Voor openen drukt u in de ruststand van de telefoon op de rechterkant van de
navigatietoets v en bladert met s naar het gewenste item.
1
2
3
4
5
6
7
8
9
SMS-berichten
Netdiensten
Familie/fun
Afspraak/klok
Geluidsinstell.
Gesprekskosten
Instell. Handset
Instell. Basis
Antwoordapp.
Het aanbod aan menu-items is
afhankelijk van uw basisstation.
Tijdfuncties
Datum en tijd instellen
De datum- en tijdsinstelling is nodig om correct te kunnen aangeven wanneer oproepen
zijn binnengekomen.
v; s Afspraak/klok OK ; s Datum/tijd OK ; ~ dag/maand/jaar invoeren;
s (op de volgende regel) ~ uren/min. invoeren; s (evt. op de volgende regel);
r 12- of 24-uur indicatie kiezen; Opslaan;a (terug naar de ruststand).
Bij ingestelde 12-uur indicatie kunt u op de regel Tijd: met de display-toets 12u/24u
tussen am en pm kiezen.
Wekker instellen
Voorwaarde: Datum en tijd zijn ingesteld.
Wekker inschakelen en instellen
v; s Afspraak/klok OK ; s Wekker OK ; r Aan selecteren;
s ~ Wektijd invoeren; Opslaan; a (terug naar de ruststand).
Bij ingestelde 12-uur indicatie kunt u op de regel Tijd: met de display-toets 12u/24u
tussen am en pm kiezen.
Een wekoproep klinkt alleen in de ruststand van de handset en niet bij ingeschakelde
ruimtebewaking, walkie-talkie, in gesprek of tijdens automatische nummerherhaling.
Hoe u het geluidsvolume en de melodie instelt, leest u op pagina 20.
Wekker uitschakelen
De wekker is op een bepaalde tijd ingesteld, maar mag niet overgaan.
v; s Afspraak/klok OK ; s Wekker OK .
r Uit selecteren; Opslaan; a (terug naar de ruststand).
10
Gigaset SL1 / niederländisch / A31008-L001-B002-1-6Z19 / start_guide_time.fm / 14.11.2003
Telefoneren
Wekoproep uitschakelen
Display-toets Stil of een willekeurige toets indrukken.
Afspraak instellen
U kunt met uw handset max. vijf afspraken opslaan.
Afspraak inschakelen en instellen
v; s Afspraak/klok OK ; Afspraken OK ; s Afspraak 2 (voorbeeld) OK .
r Aan selecteren; s ~ dag/maand invoeren; s ~ uren/min. invoeren;
s Wijzigen; ~ Naam invoeren OK ; Opslaan; a (terug naar de ruststand).
Een ingestelde afspraak wordt met het symbool ¼ weergegeven.
Het afspraaksignaal klinkt alleen in de ruststand van de handset en niet bij
ingeschakelde ruimtebewaking, walkie-talkie, in gesprek of tijdens automatische
nummerherhaling.
Bij ingestelde 12-uur indicatie kunt u op de regel Tijd: met de display-toets 12u/24u
tussen am en pm kiezen.
Hoe u het geluidsvolume en de melodie instelt, leest u op pagina 20.
Afspraaksignaal uitschakelen
Wanneer een afspraak wordt aangekondigd, kunt u dit met Stil uitschakelen.
Niet aangenomen afspraken, verjaardagen weergeven en wissen
v; s Afspraak/klok OK ; s Gemiste afspraak OK ; s Afspraak/verjaardag
selecteren).
[RRRRRRRRRRRRRRRRRRRRRR]
Wissen
Displaytoets indrukken.
... vervolgens
a
lang indrukken (terug naar ruststand).
Een verlopen afspraak is met ¼, een verlopen verjaardag is met ‚ gemarkeerd.
Telefoneren
Extern bellen en gesprek beëindigen
~ Telefoonnummer invoeren, c Verbindingstoets indrukken (volgorde
onbelangrijk).
Gesprek beëindigen/Kiesprocedure afbreken: a verbreektoets indrukken.
Kiespauze
U kunt tussen het netnummer en het telefoonnummer een kiespauze invoegen.
Druk circa 2 sec. op de toets S. Vervolgens voert u het telefoonnummer in.
11
Gigaset SL1 / niederländisch / A31008-L001-B002-1-6Z19 / start_guide_time.fm / 14.11.2003
Telefoneren
Intern bellen en gesprek beëindigen
Gesprekken met andere, op hetzelfde basisstation aangemelde handsets zijn gratis.
Een bepaalde handset bellen
u; s Handset selecteren; c indrukken. Of: u 2 (voorbeeld) indrukken.
Voor beëindigen: a verbreektoets indrukken.
Alle handsets gelijktijdig bellen ("Groepsoproep")
u; c verbindingstoets indrukken of u; P Sterretje-toets indrukken.
Voor beëindigen: a verbreektoets indrukken.
Oproep aannemen
Uw handset gaat over, de oproep wordt op het display getoond en de handsfreetoets d knippert. c Verbindingstoets indrukken of display-toets Opnemen of
handsfree-toets d.
Is de functie Auto aannemen ingeschakeld (pagina 20), dan hoeft u alleen maar de
handset uit de lader te halen om de oproep aan te nemen.
Als de beltoon stoort, drukt u op de display-toets Stil. De oproep kunt u nog zolang
aannemen als deze op het display wordt getoond.
Handsfree telefoneren
Handsfree telefoneren in-/uitschakelen
Kiezen: ~ Telefoonnummer invoeren; d handsfree-toets indrukken.
Tijdens een gesprek: d handsfree-toets indrukken.
Uitschakelen: c Verbindingstoets indrukken.
Als u de handset tijdens een gesprek in de lader wilt plaatsen, moet u de handsfree-toets
d bij het terugplaatsen ingedrukt houden.
i
Voordat u de functie handsfree gebruikt, dient u dit aan uw
gesprekspartner te laten weten.
Volume aanpassen tijdens het handsfree-gesprek
U voert een gesprek, handsfree d is ingeschakeld.
d handsfree-toets opnieuw indrukken;
r Geluidsvolume zachter of harder Opslaan.
Microfoon van de handset uitschakelen
u. Het gesprek wordt "in de wacht gezet" (wachtmuziek).
Voor beëindigen: display-toets Ý indrukken.
12
Gigaset SL1 / niederländisch / A31008-L001-B002-1-6Z19 / start_guide_time.fm / 14.11.2003
Telefoonboek en overige lijsten gebruiken
Telefoonboek en overige lijsten gebruiken
Telefoonboek en snelkieslijst
In het telefoonboek en in de snelkieslijst kunt u max. 200 telefoonnummers opslaan.
Het telefoonboek roept u met de toets s op. Voor elk telefoonboek-item kunt u een
verjaardag vaststellen en het item als "VIP" markeren.
De snelkieslijst is een speciaal telefoonboek waarin u bijzonder belangrijke
telefoonnummers kunt vastleggen, bijvoorbeeld privé-telefoonnummers,
voorkiesnummers van netwerkaanbieders. U roept de snelkieslijst met de toets C op.
De bediening van de snelkieslijst is, afgezien van het opslaan van items, hetzelfde
als die van het telefoonboek.
◆ Het invoeren van namen wordt ondersteund door de functie SnelSchrijven
(pagina 26, standaard uitgeschakeld).
◆ Hoe u de tekst correct invoert, vindt u in de tekenreekstabel (pagina 25).
◆ Voor een nummer kunt u maximaal 32 cijfers en voor een naam maximaal 16 letters
invoeren.
◆ Bij invoer van een nummer kunt u met à , s Pauze invoegen OK of door
circa 2 sec. de toets S in te drukken een kiestoonpauze invoegen.
Telefoonnummer in het telefoonboek opslaan
s Telefoonboek openen; Nieuwe invoer OK ; ~ Telefoonnummer invoeren;
s (op de volgende regel) ~ naam invoeren; à Menu openen; Opslaan OK
Om bovendien een verjaardag in te voeren, na invoer van de naam: met s naar de
regel Verjaardag: springen, display-toets Wijzigen indrukken en datum invoeren.
Opslaan indrukken; a lang indrukken (terug naar de ruststand).
U kunt een verjaardag wissen door binnen het telefoonboek-item in het veld voor de
verjaardag de displaytoets Wijzigen in te drukken. Nadat het display veranderd is, drukt
u op Wissen en vervolgens op Opslaan.
Herinneringssignaal voor een verjaardag
Een herinneringssignaal wordt met de geselecteerde belmelodie op de handset
aangekondigd. Op het display wordt het telefoonboek-item met ‚ ‚ ‚ aangegeven.
i
Als uw telefoon op een telefooncentrale is aangesloten, moet u eventueel
het nummer van de buitenlijn als eerste cijfer voor uw telefoonboek-item
invoeren.
Telefoonnummer in de snelkieslijst opslaan
U kunt aan maximaal negen items van de snelkieslijst een van de cijfers 0, 2–9
toekennen. Wanneer u in de ruststand een van deze cijfers lang indrukt en daarna de
verbindingstoets c indrukt, bent u direct met het telefoonnummer verbonden
waaraan het cijfer is toegekend.
13
Gigaset SL1 / niederländisch / A31008-L001-B002-1-6Z19 / start_guide_time.fm / 14.11.2003
Telefoonboek en overige lijsten gebruiken
C Snelkieslijst openen; Nieuwe invoer OK ; ~ Telefoonnummer invoeren;
s (op de volgende regel) ~ Naam invoeren; à Menu openen, Opslaan OK
Om bovendien een snelkiescijfer in te voeren, na invoer van de naam: met s naar de
regel Snelkeuze: springen, met r een cijfer (0, 2–9) dit telefoonnummer selecteren,
display-toets Opslaan indrukken.; a lang indrukken (terug naar de ruststand).
Een cijfer kan slechts aan één telefoonnummer worden toegewezen.
Kiezen met telefoonboek/snelkieslijst
s resp. C Telefoonboek/Snelkieslijst openen; s Item selecteren; c.
Items telefoonboek resp. snelkieslijst beheren
Om een van de volgende menufuncties te gebruiken, drukt u op de telefoonboektoets
s resp. de toets snelkieslijst C. Bladert u met s naar het item en druk daarna op v
om het menu te openen. Blader met s naar de gewenste functie.
Of: s resp. C; ~ (Beginletter invoeren); evt. met s bladeren of
~ meer letters van de naam invoeren; c.
Gebruik nummer
Invoer wijzigen
Invoer wissen
Als VIP markeren
Kopiëren/wijzigen
Versturen
Lijst wissen
Lijst versturen
Geheugenruimte
Geldt alleen voor het telefoonboek (s)
Geldt alleen voor het telefoonboek (s)
Heeft u een item geselecteerd, drukt u voor het bekijken resp. wijzigen van het item de
display-toets Weergvn en dan Wijzigen.
De functies "Als VIP markeren" en "Kopiëren en wijzigen"
Telefoonboek-items van bijzonder belangrijke bellers kunt u als VIP (Very Important
Person) markeren, dit wil zeggen een bepaalde melodie toekennen. U hoort dan aan de
belmelodie wie er belt. Voorwaarde: het telefoonnummer van de beller wordt
meegestuurd.
Om eenzelfde item niet tweemaal te hoeven invoeren, kunt u een kopie aanmaken en
dit item vervolgens wijzigen.
Afzonderlijke items of volledige lijst naar handset versturen
U kunt afzonderlijke items of de complete lijst aan een andere, op hetzelfde basisstation
aangemelde SL1-, S1-, C2-handset of Comfort-handset vanaf de serie Gigaset 2000
overdragen. SpraakCommando’s en snelkiesnummers worden niet overgedragen. De
instellingen VIP worden afhankelijk van de handset overgedragen
s resp. C Telefoonboek/Snelkieslijst openen; s Item selecteren;
v Menu openen; s Versturen OK of s Lijst versturen OK ;
~ Intern nummer van de ontvanger-handset invoeren; OK .
14
Gigaset SL1 / niederländisch / A31008-L001-B002-1-6Z19 / start_guide_time.fm / 14.11.2003
Telefoonboek en overige lijsten gebruiken
Zolang u na het zenden van een item dit met de displaytoets Ja bevestigt, kunt u verdere
items selecteren. Met de displaytoets Nee beëindigt u het verzenden.
SpraakSturing
Met de SpraakSturing kiest u door de naam van de gesprekspartner uit te spreken.
Hiervoor moet u een SpraakCommando vastleggen, dat wil zeggen de door u
uitgesproken naam wordt in de handset opgeslagen.
Maximaal vier gebruikers kunnen per item een SpraakCommando vastleggen/
opnemen. Voor de opname moet de gebruiker zich "identificeren", bijvoorbeeld als
Gebruiker 2.
In totaal kunnen 23 SpraakCommando’s worden opgeslagen voor telefoonboek-items.
Een met een SpraakCommando vastgelegd item is in het spraak-telefoonboek met ´
gemarkeerd.
SpraakCommando opnemen voor een bestaand telefoonboek-item
Spreek uw SpraakCommando in een rustige omgeving (afstand tot de handset circa 25
cm) in.
Stap 1: Telefoonboek voor de SpraakSturing openen:
s Telefoonboek openen; s Item selecteren; Taal; s Gebruiker 2 (voorbeeld) OK .
Stap 2: Opname starten:
opn.; OK (Display-verzoek bevestigen). Spreek na het betreffende verzoek op het
display de naam uit. Herhaal de naam na het nieuwe verzoek op het display. De opname
wordt automatisch opgeslagen;
a lang indrukken (terug naar de ruststand).
Als uw SpraakCommando te veel lijkt op dat van een andere gebruiker, verschijnt
hierover een melding. Beëindig deze melding met Ý , keer naar het begin van de
spraakopname terug en herhaal de opname.
Met SpraakSturing kiezen: Toets t lang indrukken en de naam uitspreken.
Weergave van de naam bij een oproep
Bij een inkomende, externe oproep kunt u naast het belsignaal ook de naam van de
beller eenmaal laten weergeven.
Voorwaarden: Het telefoonnummer wordt meegestuurd en u heeft voor dit nummer
een SpraakCommando opgenomen (pagina 15).
Weergave van de naam in-/uitschakelen
v Menu openen; s Geluidsinstell. OK ; s Belsignalen OK ; Externe Oproep OK ;
2x s (op de daaropvolgende regel); r Naamoproep: in-/uitschakelen; Opslaan;
a lang indrukken (terug naar de ruststand).
SpraakCommando’s afspelen
Telefoonboek voor de SpraakSturing openen (zie stap 1, pagina 15). Daarna:
s (Item selecteren); Afspelen; a lang indrukken (terug naar de ruststand).
15
Gigaset SL1 / niederländisch / A31008-L001-B002-1-6Z19 / start_guide_time.fm / 14.11.2003
Telefoonboek en overige lijsten gebruiken
SpraakCommando wijzigen of wissen
Telefoonboek voor de SpraakSturing openen (zie stap 1, pagina 15). Vervolgens:
s Item selecteren; v Menu openen; Profiel opnemen OK of s Profiel wissen
OK ; a lang indrukken (terug naar de ruststand).
Na het wissen van een item blijven telefoonnummer en naam behouden. Ook de
SpraakCommando’s van andere gebruikers zijn nog aanwezig.
Gebruikersnaam wijzigen.
s Telefoonboek openen; s Item selecteren; Taal;
s Gebruiker 2 (voorbeeld); Wijzigen; ~ naam invoeren Opslaan;
a lang indrukken (terug naar de ruststand).
Een voorkiesnummer aan een telefoonnummer koppelen.
Met deze functie kunt u een voorkiesnummer van een netwerkaanbieder dat in de
snelkieslijst is opgeslagen, voor het telefoonnummer plaatsen ("koppelen").
C Snelkieslijst openen; s Item selecteren; à Menu openen;
Gebruik nummer OK ; s Telefoonboek openen; s Item selecteren OK ;
of ~ het nummer invoeren; c.
Nummerherhalingslijst
In de nummerherhalingslijst staan de tien laatst gebelde telefoonnummers.
Handmatige nummerherhaling
Þ Nummerherhalingslijst openen; s Item selecteren; c Verbindingstoets
indrukken.
Automatische nummerherhaling
In deze functie wordt het telefoonnummer automatisch elke 20 sec. herhaald. De
deelnemer meldt zich: c Verbindingstoets indrukken. Bij niet-melden breekt de oproep
na ca. 30 sec. af. De functie stopt automatisch na tien mislukte pogingen.
a Verbreek-toets indrukken; • Nummerherhalingslijst openen;
v Menu openen; Auto nr.herhaling OK .
Automatische nummerherhaling afbreken: Display-toets Uit of een willekeurige toets
indrukken.
Items van de nummerherhalingslijst beheren
De volgende menufuncties kunt u gebruiken:
• Nummerherhalingslijst openen; s Item selecteren; v Menu openen;
s Functie selecteren.
Auto nr.herhaling
Gebruik nummer
Naar tel.boek
Invoer wissen
Lijst wissen
16
Gigaset SL1 / niederländisch / A31008-L001-B002-1-6Z19 / start_guide_time.fm / 14.11.2003
Meerdere handsets gebruiken
E-maillijst*
In de e-maillijst slaat u e-mailadressen op. U kunt in totaal max. 200 items in het
telefoonboek, de e-mail- en de snelkieslijst opslaan.
Items van de e-maillijst beheert u als een telefoonboek-item (pagina 14).
Nieuw e-mailadres opslaan
Stap 1: E-maillijst openen:
s Telefoonboek openen; s Emaillijst OK .
Stap 2: E-mailitem aanmaken:
Nieuwe invoer OK ; ~ Adres invoeren; à
Menu openen;
( evt. s, ".", "@" functie SnelSchrijven selecteren OK ). Bij ingeschakelde functie
SnelSchrijven R 1x lang en 1x kort indrukken.
Stap 3: E-mailitem opslaan:
à Menu openen; Opslaan OK ; a lang indrukken (terug naar de ruststand).
Wanneer u een item heeft geselecteerd, drukt u op de display-toets Weergvn, dan op
Wijzigen en voert u het adres in. Sla op zoals hierboven beschreven.
Vrije geheugenruimte tonen
De geheugenruimte wordt tussen het telefoonboek, de snelkieslijst (pagina 13) en de
e-maillijst (pagina 17) verdeeld. De geheugenruimte van alle lijsten wordt getoond.
s telefoonboek openen; s Item selecteren; v Menu openen;
s Geheugenruimte OK ; a lang indrukken (terug naar de ruststand).
Meerdere handsets gebruiken
Gesprek doorverbinden naar een andere handset
u Interne lijst openen; s bepaalde handset of Aan allen selecteren; OK .
De interne deelnemer meldt zich: a verbreektoets indrukken.
Als deze zich niet meldt of bezet is, komt de oproep automatisch bij u terug (op het
display staat Herhalingsoproep).
Interne ruggespraak
Tijdens een extern gesprek kunt u intern telefoneren.
u Interne lijst openen) s handset selecteren; OK .
Voor beëindigen: Display-toets Einde indrukken (terug naar de externe deelnemer).
Wisselgesprek bij intern gesprek aannemen/weigeren
Als u tijdens een intern gesprek een externe oproep krijgt, hoort u de aankloptoon
(korte toon). Display-toets Opnemen of Afwijzen indrukken.
De afgewezen aankloptoon is op andere aangemelde handsets nog te horen.
*Informeer bij uw service-provider of deze functie wordt ondersteund
17
Gigaset SL1 / niederländisch / A31008-L001-B002-1-6Z19 / start_guide_time.fm / 14.11.2003
Meerdere handsets gebruiken
Handset voor ruimtebewaking gebruiken
Met deze functie wordt een eerder opgeslagen intern of extern telefoonnummer
opgeroepen, zodra in de ruimte het ingestelde geluidsniveau is bereikt. Ook na het
verbreken blijft de functie ruimtebewaking op de handset ingeschakeld.
De afstand tot eventuele geluidsbronnen dient 1 tot 2 meter te zijn.
De microfoon moet op de geluidsbron gericht zijn.
Wanneer de ruimtebewakingfunctie is ingeschakeld, worden inkomende oproepen op
de handset, die voor ruimtebewaking wordt gebruikt, zonder belsignaal gemeld en
alleen op het display getoond. Display en toetsen zijn daarbij niet verlicht.
Let er bij het invoeren van een extern telefoonnummer op, dat de aansluiting waaraan
de ruimtebewakingoproep wordt doorgegeven, niet door een ingeschakeld
antwoordapparaat is geblokkeerd.
◆ Als u uw ruimtebewaking naar een extern telefoonnummer omleidt, dient u de
eigenaar van dit nummer hierover te informeren.
◆ De ruimtebewakingoproep naar een extern telefoonnummer wordt na circa 90 sec.
afgebroken, naar een intern telefoonnummer (handset) na circa 180 sec.
(afhankelijk van het basisstation).
W
Controleer voordat u vertrekt de instellingen van de handset,
bijvoorbeeld de gevoeligheid en het tot stand komen van de
verbinding.
i
De ingeschakelde ruimtebewakingfunctie vermindert de gebruiksduur
van de handset aanzienlijk. Plaats de handset, die zich in de buurt van de
baby bevindt, in de lader om er zeker van te zijn dat de batterij niet leeg
raakt.
De ruimtebewakingfunctie is ook in de walkie-talkie-modus mogelijk.
Ruimtebewakingfunctie inschakelen en bestemmingsnummer invoeren
Stap 1: Invoerveld openen: v; s Familie/fun OK ; Ruimtebewaking OK ;
Stap 2: Ruimtebewaking inschakelen: r op de regel Ruimtebew.: Aan kiezen;
Stap 3: Bestemmingsnummer invoeren: s (op de volgende regel); Wijzigen;
Intern telefoonnummer invoeren: INT s Handset selecteren OK of:
Extern telefoonnummer invoeren: ~; à Menu openen, Opslaan OK
Stap 4: Eventueel gevoeligheid instellen: s (op de volgende regel); r; Opslaan.
De ruimtebewakingfunctie is nu ingeschakeld.
Als de ruimtebewaking is ingeschakeld, kunt u met v Menu openen direct
overschakelen naar de instellingen voor ruimtebewaking.
18
Gigaset SL1 / niederländisch / A31008-L001-B002-1-6Z19 / start_guide_time.fm / 14.11.2003
Meerdere handsets gebruiken
Ruimtebewaking op afstand uitschakelen
U kunt de ruimtebewaking van Extern (afhankelijk van basisstation) uitschakelen.
Beantwoord de oproep van de ruimtebewaking en druk op de toetsen O R. Ongeveer
90 sec. na het beëindigen van de verbinding is de functie uitgeschakeld. ontvangt geen
nieuwe oproepen meer van de ruimtebewaking . De overige functies van de
ruimtebewaking (bijvoorbeeld “Belsignaal uit”) blijven ingeschakeld tot u op de handset
die de ruimte bewaakt op displaytoets Uit drukt.
i
Om de functie Ruimtebewaking opnieuw in te schakelen voor hetzelfde
telefoonnummer, dient u de functie opnieuw in te schakelen en met
Opslaan te bevestigen.
Handsets als walkie-talkie gebruiken
De walkie-talkie-functie maakt, onafhankelijk van de afstand tot het basisstation, een
gesprek mogelijk tussen twee handsets (max. reikwijdte 300 m).
Voorwaarde:
◆ Beide handsets zijn op hetzelfde basisstation aangemeld of
◆ beide handsets zijn aangemeld bij verschillende basisstations en beide zijn op Beste
basis ingesteld (pagina 8) of
◆ een van de handsets is niet aangemeld bij een basisstation en de aangemelde
handset is op Beste basis ingesteld of
◆ beide handsets zijn niet bij een basisstation aangemeld.
In de walkie-talkie-modus zijn de handsets voor inkomende oproepen niet meer
bereikbaar. De gebruiksduur van de handsets vermindert aanzienlijk.
Walkie-talkie-modus in-/uitschakelen
v Menu openen; s Familie/fun OK ; s Walkie-talkie OK .
Voor uitschakelen: Display-toets Uit indrukken.
c Verbindingstoets of d handsfree-toets indrukken. De oproep gaat naar alle
handsets in de walkie-talkie-modus.
Het in- en uitschakelen van het belsignaal (pagina 21) of de toetsblokkering (pagina 8)
is in de walkie-talkie-modus mogelijk.
Het instellen van de bel- en attentiesignalen verloopt op dezelfde wijze als bij uw
handset met het basisstation (pagina 20).
Om het menu te openen, drukt u de display-toets © in.
i
Ook als u uw handset uit- en weer inschakelt, blijft de walkie-talkiemodus behouden.
19
Gigaset SL1 / niederländisch / A31008-L001-B002-1-6Z19 / start_guide_time.fm / 14.11.2003
Handset instellen
Handset in de walkie-talkie-modus gebruiken voor ruimtebewaking
à Menu openen; s Ruimtebewaking OK ; r Aan selecteren;
s (op de volgende regel); r Laag of Hoog kiezen; Opslaan.
W
De ruimtebewakingsoproep gaat alleen naar handsets die zich in de
walkie-talkie-modus bevinden. Controleer voordat u vertrekt de
instellingen van de handset, bijvoorbeeld de gevoeligheid en het tot
stand komen van de verbinding.
Druk op display-toets Uit op de handset die de ruimte bewaakt om de functie
Ruimtebewaking uit te schakelen. De handset bevindt zich weer in de normale walkietalkie-modus.
Handset instellen
Automatisch opnemen uit-/inschakelen
Wanneer u deze functie heeft ingeschakeld, neemt u de handset bij een oproep gewoon
uit de lader zonder daarvoor de verbindingstoets te hoeven indrukken (standaard: aan).
v Menu openen; s Instellingen OK ; Auto aannemen OK (‰ = Aan);
a lang indrukken (terug naar de ruststand).
Handsetvolume wijzigen
U kunt het volume voor handsfree-spreken op vijf niveau’s en het handsetvolume op
drie niveaus instellen – ook tijdens een extern gesprek.
v Menu openen; s Geluidsinstell. OK ; Luidsprekers OK ;
r Volume handsfree-spreken selecteren; s (op de volgende regel);
r Handsetvolume selecteren; Opslaan; a lang indrukken (terug naar de ruststand).
Geluidskwaliteit verbeteren
In bepaalde situaties kan de geluidskwaliteit tegenvallen. U heeft de mogelijkheid om
via het menupunt Geluidsinstell. voor de belmelodiën (4-10) een echo-effect te
activeren.
v Menu openen; s Geluidsinstell. OK ; s Lage tonen OK (‰ = Aan);
a lang indrukken (terug naar de ruststand).
Belsignalen wijzigen
U kunt uit zes geluidsvolumes en 26 melodieën (daarvan 16 polyfone melodieën)
kiezen. Polyfone melodieën zijn enkel beschikbaar als ze voordien met de geluidsmanager opgenomen, of via de pc-interface geladen werden.
20
Gigaset SL1 / niederländisch / A31008-L001-B002-1-6Z19 / start_guide_time.fm / 14.11.2003
Handset instellen
Instellingen voor Externe Oproepen, Tijdsbesturing en NaamWeergave
v Menu openen; s Geluidsinstell. OK ; s Belsignalen OK ; Externe Oproep
OK ; r Volume selecteren; s (op de volgende regel); r Melodie selecteren;
s (evt. op de volgende regel); r NaamWeergave inschakelen, pagina 15.
Tijdsbesturing inschakelen
Nacht selecteren; r Activeren: Aan selecteren;
s op de volgende regel Van: springen (4-cijferige invoer van de tijd);
s op de regel Tot: springen (4-cijferige invoer van de tijd);
s r Invoer volume belsignaal; Opslaan Tijdsbesturing opslaan;
nogmaals Opslaan Instelling opslaan; a lang indrukken (terug naar de ruststand).
Eigen instelling voor Interne Oproepen, Wekoproepen, Afspraken en Alle
Oproepen
v Menu openen; s Geluidsinstell. OK ; s Belsignalen OK ;
s Functie selecteren OK ; r Volume selecteren; s (op de volgende regel);
r Melodie selecteren; Opslaan Bovendien bij de instelling Alle oproepen met Ja
vraag bevestigen; a lang indrukken (terug naar de ruststand).
Belsignaal uit-/inschakelen
Bij een externe oproep gaan alle handsets over. Belsignaal uitschakelen: Sterretje P
lang indrukken. Op het display verschijnt het symbool Ú.
Belsignaal inschakelen: Sterretje P lang indrukken.
i
Om het belsignaal voor de actuele oproep uit te schakelen, drukt u
op de display-toets Stil.
Attentiegeluid in-/uitschakelen
Bij het uitschakelen van het belsignaal kunt u een attentiegeluid inschakelen. Bij een
oproep klinkt dan een kort geluid ("beep") in plaats van het belsignaal.
Sterretje P lang indrukken en binnen 3 sec. de displaytoets Beep indrukken. Op het
display staat º. Voor uitschakelen: Sterretje P lang indrukken.
Trilalarm
Inkomende oproepen en andere meldingen worden door trilling weergegeven. Deze
instelling is onafhankelijk van de instellingen van het belsignaal.
v Menu openen; s Geluidsinstell. OK ; s Trilalarm OK (‰ = Aan);
a lang indrukken (terug naar de ruststand).
Geluidsmanager
U kunt polyfone melodieën opnemen (max. lengte 4 sec.) of met een datakabel
invoeren (pagina 27). Maximaal 16 melodieën kunnen opgeslagen worden.
21
Gigaset SL1 / niederländisch / A31008-L001-B002-1-6Z19 / start_guide_time.fm / 14.11.2003
Handset instellen
Melodie opnemen
v Menu openen; s Geluidsinstell. OK ; s Geluidsmanager OK ;
<Nieuw geluid> OK ; Geluid opnemen? OK ; Einde indrukken of 4 sec. wachten;
Opslaan; Invoer wijzigen(naam van de melodie invoeren) Opslaan;
a lang indrukken (terug naar de ruststand).
Melodie afspelen
v Menu openen; s Geluidsinstell. OK ; s Geluidsmanager OK ;
s Melodie selecteren; Afspelen; a lang indrukken (terug naar de ruststand).
Item bewerken
v Menu openen; s Geluidsinstell. OK ; s Geluidsmanager OK ;
s Melodie selecteren; à ; Vol. Luidspreker OK Volume wijzigen of
s Invoer wijzigen OK Namen wijzigen of s Invoer weergeven OK Bestandsnamen
weergeven of s Invoer wissen OK ;
a lang indrukken (terug naar de ruststand).
Attentiesignalen in-/uitschakelen
Uw handset wijst u akoestisch op verschillende activiteiten en situaties. De volgende
attentiesignalen kunt u onafhankelijk van elkaar in- of uitschakelen (bij levering: Aan).
◆ Toetssignaal (het drukken op een toets wordt bevestigd),
◆ Bevestigingssignalen (bevestigingssignaal, foutsignaal, eindsignaal menu),
◆ Batterijtoon.
v Menu openen; s Geluidsinstell. OK ; s Attentietonen OK ;
r Toetssign.: inschakelen s (op de volgende regel);
r Bevestigng: inschakelen; s (op de volgende regel);
r Batterij: Aan, Uit resp. in Verb. kiezen; Opslaan;
a lang indrukken (terug naar de ruststand).
Standaardinstellingen herstellen van de handset (reset)
U kunt afzonderlijke instellingen en wijzigingen herstellen. Items van het telefoonboek,
de bellerslijst, de e-maillijst en snelkieslijst. De aanmelding van de handset op het
basisstation evenals logo’s en melodieën die u geladen heeft, blijven behouden. Met a
breekt u het herstellen van de standaardinstellingen af.
v Menu openen; s Instellingen OK ; s Reset Handset OK ;
Ja (vraag bevestigen); a lang indrukken (terug naar de ruststand)
22
Gigaset SL1 / niederländisch / A31008-L001-B002-1-6Z19 / start_guide_time.fm / 14.11.2003
Handset instellen
Standaardinstellingen van de handset
Volume van de handset
Volume voor handsfree
Volume belsignaal
Tijdsduur voor belsignaal
Melodie belsignaal
NaamWeergave
Automatisch opnemen
Batterijtoon/toetssignaal/bevestigingssignaal
Displaytaal
Wekker/afspraak
1
3
5
uitgeschakeld
melodie 1
uitgeschakeld
ingeschakeld
ingeschakeld
Nederlands
uitgeschakeld
Afspraaktekst
Nummerherhalingslijst
Ruimtebewaking/gevoeligheid ruimtebewaking
gewist
leeg
uitgeschakeld/hoog
pagina 20
pagina 20
pagina 20
pagina 21
pagina 20
pagina 15
pagina 20
pagina 22
pagina 7
pagina 10/
pagina 11
pagina 11
pagina 16
pagina 18
23
Gigaset SL1 / niederländisch / A31008-L001-B002-1-6Z19 / start_guide_time.fm / 14.11.2003
Bijlage
Bijlage
Onderhoud en contact met vloeistof !
Neem de handset af met een vochtige doek (geen oplosmiddel) of een antistatische
doek. Gebruik nooit een droge doek. Deze kan statische elektriciteit veroorzaken.
Wanneer de handset met vloeistof in contact is gekomen, mag u het toestel in geen
geval inschakelen. Verwijder onmiddellijk de batterij.
Laat alle vloeistof uit het toestel lopen en dep vervolgens alle delen droog.
Laat de handset zonder batterij gedurende ten minste 72 uur liggen op een droge,
warme plek. Daarna is het in veel gevallen mogelijk om het toestel weer te gebruiken.
Klantenservice (Customer Care)
Wij geven u snel en individueel advies!
Onze on line-support op internet:
www.my-siemens.nl/service
www.my-siemens.be
Nederland
België
In geval van een noodzakelijke reparatie of aanspraak op garantie krijgt u snelle en
betrouwbare hulp van onze
servicecentra in Nederland
servicecentra in België
0900 333 3102
078 15 22 21
Houd uw aankoopbewijs a.u.b. bij de hand.
Meer servicenummers vindt u aan het einde van de gebruiksaanwijzing onder
"Service".
In landen waar ons product niet door geautoriseerde dealers wordt verkocht, wordt
geen vervanging of reparatie aangeboden.
Met landspecifieke bijzonderheden is rekening gehouden.
De handset SL 1 is EU-wijd en in Zwitserland goedgekeurd.
De overeenstemming van het toestel met de basiseisen van de R&TTE-richtlijn is door
de CE-markering bevestigd.
Uittreksel uit de oorspronkelijke verklaring:
"We, Siemens AG, declare, that the above mentioned product is manufactured according to our Full
Quality Assurance System certified by CETECOM ICT Services GmbH in compliance with ANNEX V
of the R&TTE-Directive 99/5/EC. The presumption of conformity with the essential requirements
regarding Council Directive 99/5/EC is ensured."
Senior Approvals Manager
The Declaration of Conformity (DoC) has been signed. In case of need, a copy of the original DoC
can be made available via the company hotline.
24
Gigaset SL1 / niederländisch / A31008-L001-B002-1-6Z19 / start_guide_time.fm / 14.11.2003
Bijlage
Technische gegevens
Aanbevolen batterij
Lithium-ionen (LiIon), 700 mAh
(situatie bij het ter perse gaan van de gebruiksaanwijzing, september 2003)
Het toestel wordt enkel met een goedgekeurde batterij geleverd.
Gebruiksduur/laadtijd van de handset
Capaciteit
(mAh)
Standby-tijd (uren) Gesprekstijd
(uren)
Laadtijd
(uren)
700
circa 250 (10 dagen) circa 15
circa 2,5
De genoemde gebruiks- en oplaadduur gelden alleen bij gebruik van de aanbevolen
batterij.
Tekenreekstabel
Standaardtekens
Betreffende toets herhaald of lang indrukken:
1
2
I
4
5
L
M
N
O
Q
P
R
1x
Spatie
2x
1
3x
4x
£
5x
$
6x
¥
7x
¤
8x 9x
10 x 11 x 12 x 13 x 14 x
ã
ç
ô
õ
â
a
b
c
2
ä
á
à
â
d
e
f
3
ë
é
è
ê
g
h
i
4
ï
í
ì
î
j
k
l
5
m
n
o
6
ö
ñ
ó
ò
p
q
r
s
7
ß
û
t
u
v
8
ü
ú
ù
w
x
y
z
9
ÿ
ý
æ
ø
å
.
,
?
!
0
+
-
:
¿
¡
Abc--> 123
123 --> abc
(
)
<
=
>
%
#
@
*
/
&
§
\
"
‘
;
_
Tekst bewerken (zonder SnelSchrijven)
◆ De cursor verplaatst u met u v t s.
◆ Teken (links van de cursor) wist u met fC .
◆ Tekens worden links van de cursor toegevoegd.
◆ Om van hoofdletters (1e letter groot geschreven, alle overige klein geschreven) naar
kleine letters te gaan, drukt u voor invoer van de letter op P. Door nogmaals op P
te drukken gaat u van kleine letters over op cijfers. En na nogmaals indrukken gaat
u van cijfers weer naar hoofdletters.
◆ Bij invoer in het telefoonboek wordt de eerste letter van de naam automatisch een
hoofdletter en alle volgende kleine letters.
25
Gigaset SL1 / niederländisch / A31008-L001-B002-1-6Z19 / start_guide_time.fm / 14.11.2003
Bijlage
◆ Als u een toets lang indrukt, worden de tekens van de betreffende toets op de
onderste display-regel getoond en na elkaar gemarkeerd. Wanneer u de toets
loslaat, wordt het gemarkeerde teken aan het invoerveld toegevoegd.
– De instelling van hoofdletters, kleine letters of cijfers wordt op het display
getoond:
– bij invoer in het telefoonboek staat op de onderste display-regel "A" of "a".
Volgorde van telefoonboek-items
1. Spaties (hier weergegeven met s)
2. Cijfers (0–9)
3. Letters (alfabetisch)
4. Overige tekens
Om de alfabetische volgorde van de items te omzeilen, voegt u vóór de naam een spatie
in. Deze naam komt dan op de eerste plaats (voorbeeld: "sCarla"). U kunt de items ook
nummeren (bijvoorbeeld "1Tom", "2Carla", "3Albert").
SnelSchrijven
De functie SnelSchrijven ondersteunt u bij het schrijven van namen (telefoonboek,
snelkieslijst of e-maillijst).
Aan elke toets van Q tot O zijn meerdere letters en tekens toegekend, die allemaal
in een keuzeregel direct boven de display-toets (onder het tekstveld) worden
gerangschikt zodra u een toets indrukt. Bij de invoer van letters wordt telkens de
waarschijnlijk eerst gezochte letter invers weergegeven. Deze staat aan het begin van
de keuzeregel en wordt in het tekstveld overgenomen.
53 ________Ç_____abc
Peter K
KLJ5
W
De functie SnelSchrijven is
ingeschakeld.
SMS-tekst
¨
Selectieregel
Als deze letter aan uw wens voldoet, bevestigt u dit door de volgende toets in te
drukken. Als de door SnelSchrijven gekozen letter niet aan uw wens voldoet, drukt u zo
vaak op de hekje-toets R tot de gezochte letter invers in de weergaveregel verschijnt
en daarmee in het tekstveld wordt overgenomen.
P
R
Sterretje kort indrukken: gaat van de modus abc naar Abc, van Abc naar 123
en van 123 naar abc (geldt telkens voor de volgende letter).
Springt op de keuzeregel naar de volgende letter.
SnelSchrijven in-/uitschakelen
De functie SnelSchrijven wordt specifiek voor de functie in- of uitgeschakeld.
Voorwaarde: U bevindt zich in een tekstinvoerveld (SMS, naam in telefoonboek,
snelkieslijst of e-maillijst).
v Menu openen; s SnelSchrijven OK (‰ = Aan);
a Verbreektoets kort indrukken (terug in het tekstveld). Voer nu de tekst in.
26
Gigaset SL1 / niederländisch / A31008-L001-B002-1-6Z19 / start_guide_time.fm / 14.11.2003
Bijlage
PC-interface
De handset SL 1 kan via een Siemens-datakabel met uw computer verbonden worden.
Uw computer kan dan met behulp van het programma "Siemens Data Suite" (gratis te
downloaden onder http:\\www.my-siemens.com\gigaset-sds) met uw SL 1
communiceren en geeft toegang tot de volgende parameters en lijsten van de handset:
Uitlezen van parameters
◆ SW-versie
◆ Type
◆ Code fabrikant
Lees-/schrijftoegang tot
het telefoonboek
de e-maillijst
de netwerkaanbiederlijst
de lijst met afspraken
de nummerherhalingslijst
◆
◆
◆
◆
◆
Lees-/schrijftoegang tot andere parameters
Belsignaalinstellingen
Volume-instellingen
Laden van logo’s
Laden van melodieën
Gesprekken voeren en oproepen aannemen
◆
◆
◆
◆
◆
Gegevensoverdracht
Bij sommige functies worden grote hoeveelheden gegevens tussen handset en extern
toestel overgedragen. In dit geval schakelt de handset over op de datamodus. Op het
display wordt Versturen weergegeven. In deze modus kunnen geen gegevens via het
toetsenbord ingevoerd worden en binnenkomende oproepen worden genegeerd.
In de volgende gevallen schakelt de handset over op de datamodus:
◆ Lees-/schrijftoegang tot het telefoonboek
◆ Lees-/schrijftoegang tot de e-maillijst
◆ Lees-/schrijftoegang tot de netwerkaanbiederlijst
◆ Lees-/schrijftoegang tot de lijst met afspraken
◆ Lees-/schrijftoegang tot de nummerherhalingslijst
◆ Laden van logo’s
◆ Laden van melodieën
Treedt er tijdens de transmissie een fout op, schakelt de handset automatisch over in de
ruststand.
27
Gigaset SL1 / niederländisch / A31008-L001-B002-1-6Z19 / start_guide_time.fm / 14.11.2003
Bijlage
Spelletje "Balloon Shooter"
Probeer zoveel mogelijk ballonnetjes te raken.
v ¢ Familie/fun
¢ Balloon Shooter
óf
Spelletje starten:
Displaytoets indrukken.
[RRRRRRRRRRRRRRRRRRRRR]
Start
óf
Overige opties:
à
Druk op de displaytoets om het optie-menu te
openen.
of
¢
¢
¢
¢
Om te schieten, drukt u op de toets 5.
28
p¢
¢
¢
¢
12I
4
L
MNO
¢
¢
¢
¢
Om het vizier te verplaatsen, drukt u op:
Gigaset SL1 / niederländisch / A31008-L001-B002-1-6Z19 / start_guide_time.fm / 14.11.2003
Bijlage
Garantie Nederland
Siemens verleent de consument een garantie van 24 maanden voor dit toestel, te
rekenen vanaf de datum van aankoop. Als bewijs hiervoor geldt de aankoopfactuur.
Binnen de garantietermijn zal Siemens alle gebreken die het gevolg zijn van materiaalen/of productiefouten kosteloos repareren of het defecte toestel vervangen. In dit geval
kan contact worden opgenomen met de Siemens Klantenservice, alwaar de reparatie
dient te worden aangemeld. Bij de Klantenservice worden een zogenaamd RMAnummer (Return Material Authorisation) en verzendinstructies verstrekt. Wanneer de
consument wordt verzocht het product aan Siemens Nederland ter reparatie aan te
bieden, zullen de verzendkosten voor eigen rekening zijn.
De garantie vervalt indien:
◆ Reparaties, vervanging of uitbreidingen aan het toestel zijn verricht door anderen
dan Siemens zonder haar schriftelijke toestemming;
◆ Het toestel naar het oordeel van Siemens is verwaarloosd dan wel onvoorzichtig en/
of ondeskundig is gebruikt, behandeld en/of onderhouden, en/of er sprake is van
normale slijtage;
◆ Typenummers en/of serienummers en/of garantiestickers zijn beschadigd,
verwijderd en/of veranderd;
◆ Wijzigingen in garantiekaart en/of aankoopfactuur zijn aangebracht;
◆ Door verkeerd inleggen en/of lekkage van vervangbare accu's (oplaadbare
batterijen) door gebruik van niet voorgeschreven accu's (oplaadbare batterijen)
defecten zijn ontstaan;
◆ Defecten zijn ontstaan door het niet volgens voorschriften aansluiten en/of
installeren van de (goedgekeurde) zaken;
◆ Defecten zijn ontstaan ten gevolge van afwijkende omgevingscondities, voor zover
dergelijke condities zijn aangegeven;
◆ Defecten zijn ontstaan door overige van buitenaf komende oorzaken;
◆ De verzegeling, voorzover aanwezig, is verbroken.
De garantietermijn wordt niet verlengd of vernieuwd door uitvoering van
garantiewerkzaamheden, met dien verstande dat de garantie op uitgevoerde
werkzaamheden drie maanden bedraagt.
Wettelijke aanspraken van de consument, waaronder tevens begrepen wettelijke
aanspraken jegens de verkoper, worden door deze garantie noch uitgesloten, noch
beperkt.
Deze garantie wordt verleend door:
Siemens Nederland N.V.
29
Gigaset SL1 / niederländisch / A31008-L001-B002-1-6Z19 / start_guide_time.fm / 14.11.2003
Bijlage
Garantiecertificaat België
Ongeacht zijn aanspraken ten opzichte van de dealer, kan de gebruiker (klant)
aanspraak maken op een garantie onder de onderstaande voorwaarden:
◆ Wanneer het nieuwe apparaat en bijbehorende componenten binnen 24 maanden
na aankoop defecten vertonen als gevolg van productie- en/of materiaalfouten, zal
Siemens naar eigen keuze het apparaat kosteloos repareren of vervangen door een
ander apparaat volgens de laatste stand van de techniek. In geval van delen die aan
slijtage onderhevig zijn (zoals batterijen, keypads, behuizing), geldt deze
garantiebepaling voor een periode van zes maanden na aankoopdatum.
◆ Deze garantie is niet van toepassing voor zover het defect aan het apparaat het
gevolg is van onoordeelkundig gebruik en/of het niet in acht nemen van de
informatie zoals vermeld in de gebruiksaanwijzingen.
◆ Deze garantie geldt niet voor diensten die zijn uitgevoerd door geautoriseerde
dealers of de klant zelf (zoals installatie, configuratie, software-downloads).
Gebruiksaanwijzingen en eventueel op aparte informatiedragers meegeleverde
software zijn eveneens van deze garantie uitgesloten.
◆ Als garantiebewijs geldt de aankoopbon met de aankoopdatum. Aanspraken die
onder deze garantie vallen, dienen binnen twee maanden nadat het defect
vastgesteld is geldend te worden gemaakt.
◆ Vervangen apparaten resp. bijbehorende componenten die in het kader van de
vervanging aan Siemens zijn teruggestuurd, worden eigendom van Siemens.
◆ Deze garantie geldt voor nieuwe apparaten die gekocht zijn in de Europese Unie. De
garantie voor toestellen aangekocht in België wordt verleend door N.V. Siemens,
Charleroisesteenweg 116, B 1060 Brussel.
◆ Verdergaande of andere aanspraken dan vermeld in deze garantie zijn uitgesloten,
behoudens voor zover aansprakelijkheid berust op bepalingen van dwingend recht,
zoals de wettelijke regeling inzake productaansprakelijkheid.
◆ De duur van de garantie wordt niet verlengd voor diensten die in het kader van de
garantie tijdens de duur van de garantie worden verleend.
◆ Voor zover het niet om een garantiegeval gaat, behoudt Siemens zich het recht voor,
de klant voor het vervangen of repareren kosten in rekening te brengen.
◆ De bovenvermelde bepalingen beogen geen verandering in de bewijslast ten nadele
van de klant.
Neem, om gebruik te maken van deze garantie, telefonisch contact op met Siemens.
Het telefoonnummer vindt u in de bijgevoegde gebruikshandleiding.
30
Gigaset SL1 / niederländisch / A31008-L001-B002-1-6Z19 / SL_1SIX.fm / 14.11.2003
Trefwoordenregister
Trefwoordenregister
A
G
Aansluitpunt . . . . . . . . . . . . . . . . . . . . 2
Afbreken (procedure) . . . . . . . . . . . . . 9
afspelen (SpraakCommando). . . . . . . 15
Afspraak . . . . . . . . . . . . . . . . . . . . . . 11
Afzetten zie uitschakelen . . . . . . . . . . 11
Attentiegeluid . . . . . . . . . . . . . . . . . . 21
Attentiesignalen . . . . . . . . . . . . . . . . 22
Automatisch opnemen . . . . . . . . . . . 20
Garantie . . . . . . . . . . . . . . . . . . . . . . 29
Gebruik (telefoon in gebruik nemen) . . 6
Gebruiksduur
in walkie-talkie-modus . . . . . . . . . . 19
van de babyfoon . . . . . . . . . . . . . . . 18
van de handset . . . . . . . . . . . . . . . . 25
Geheugenruimte . . . . . . . . . . . . . . . . 17
Gehoorapparaten. . . . . . . . . . . . . . . . . 5
Geluidskwaliteit . . . . . . . . . . . . . . . . . 20
Geluidsmanager . . . . . . . . . . . . . . . . 21
Geluidssignaal zie attentiesignalen . . . 22
Gesprek beëindigen . . . . . . . . . . . . . . 11
Gesprek doorverbinden . . . . . . . . . . . 17
Groepsoproep . . . . . . . . . . . . . . . . . . 12
B
Balloon Shooter . . . . . . . . . . . . . . . . 28
Batterij
aanbevolen batterij . . . . . . . . . . . . 25
indicatie . . . . . . . . . . . . . . . . . . . . . 6
opladen . . . . . . . . . . . . . . . . . . . . . . 6
plaatsen . . . . . . . . . . . . . . . . . . . . . 6
Batterijtoon . . . . . . . . . . . . . . . . . . . 22
Bellen
extern . . . . . . . . . . . . . . . . . . . . . . 11
intern . . . . . . . . . . . . . . . . . . . . . . 12
Beschermfolie . . . . . . . . . . . . . . . . . . . 6
Beste basisstation . . . . . . . . . . . . . . . . 8
Bevestigings . . . . . . . . . . . . . . . . . . . 22
Bevestigingstoon . . . . . . . . . . . . . . . 22
Blokkering
toetsblokkering . . . . . . . . . . . . . . . . 8
C
Cursor . . . . . . . . . . . . . . . . . . . . . . . . 9
Customer Care (Service) . . . . . . . . . . 24
D
Datum instellen . . . . . . . . . . . . . . . . 10
Display
taal wijzigen . . . . . . . . . . . . . . . . . . 7
toetsen . . . . . . . . . . . . . . . . . . . . . . 9
Draagclip . . . . . . . . . . . . . . . . . . . . . . 8
E
E-maillijst . . . . . . . . . . . . . . . . . . . . . 17
Escape-toets . . . . . . . . . . . . . . . . . . . . 9
F
Fout/foutsignaal . . . . . . . . . . . . . . . . 22
H
Handmatig . . . . . . . . . . . . . . . . . . . . . 2
Handset
aanmelden aan ander basisstation) . . 8
draagclip . . . . . . . . . . . . . . . . . . . . . 8
gebruiksduur en laadtijd . . . . . . . . . 25
in gebruik nemen . . . . . . . . . . . . . . . 6
in-/uitschakelen . . . . . . . . . . . . . . . . 8
lijst . . . . . . . . . . . . . . . . . . . . . . . . . 9
microfoon uitschakelen . . . . . . . . . . 12
standaardinstellingen herstellen . . . 22
voor ruimtebewaking gebruiken . . . 18
wisselen naar beste ontvangst. . . . . . 8
wisselen naar een ander basisstation . 8
Handsetvolume . . . . . . . . . . . . . . . . . 20
Handsfree . . . . . . . . . . . . . . . . . . 12, 20
Hekje . . . . . . . . . . . . . . . . . . . . . . . . . 8
Herinneringssignaal . . . . . . . . . . . . . . 13
I
In gebruik nemen (telefoon) . . . . . . . . . 6
Indicatie
12-/24-uursweergave . . . . . . . . 10, 11
geheugenruimte. . . . . . . . . . . . . . . 17
Indicatie batterijniveau . . . . . . . . . . . . . 6
Inschakelen
afspraak . . . . . . . . . . . . . . . . . . . . . 11
handset . . . . . . . . . . . . . . . . . . . . . . 8
toetsblokkering. . . . . . . . . . . . . . . . . 8
walkie-talkie . . . . . . . . . . . . . . . 19, 20
31
Gigaset SL1 / niederländisch / A31008-L001-B002-1-6Z19 / SL_1SIX.fm / 14.11.2003
Trefwoordenregister
Inschakelen
wekker . . . . . . . . . . . . . . . . . . . . . 10
Instellen
afspraak . . . . . . . . . . . . . . . . . . . . 11
datum . . . . . . . . . . . . . . . . . . . . . . 10
displaytaal . . . . . . . . . . . . . . . . . . . . 7
handsetvolume . . . . . . . . . . . . . . . 20
luidsprekervolume . . . . . . . . . . . . . 20
tijd . . . . . . . . . . . . . . . . . . . . . . . . 10
volume oproepsignaal . . . . . . . . . . 20
wekker . . . . . . . . . . . . . . . . . . . . . 10
Intern
bellen . . . . . . . . . . . . . . . . . . . . . . 12
Interne
ruggespraak. . . . . . . . . . . . . . . . . . 17
Invoeren
afspraak . . . . . . . . . . . . . . . . . . . . 11
verjaardag . . . . . . . . . . . . . . . . . . . 11
wektijd . . . . . . . . . . . . . . . . . . . . . 10
Item (menu) selecteren . . . . . . . . . . . . 9
K
Kiespauze . . . . . . . . . . . . . . . . . . . . . 11
Klantenservice . . . . . . . . . . . . . . . . . 24
L
Laadtijd van de handset . . . . . . . . . . . 25
Lijst
e-maillijst . . . . . . . . . . . . . . . . . . . . 17
handsets . . . . . . . . . . . . . . . . . . . . . 9
M
Medische apparatuur . . . . . . . . . . . . . . 5
Melodie
polyfone . . . . . . . . . . . . . . . . . . . . 21
Menu
door het menu navigeren . . . . . . . . . 8
één menu-niveau terug . . . . . . . . . . 9
eindtoon . . . . . . . . . . . . . . . . . . . . 22
openen . . . . . . . . . . . . . . . . . . . . . . 9
toets . . . . . . . . . . . . . . . . . . . . . . . . 9
Microfoon . . . . . . . . . . . . . . . . . . . . . . 2
Microfoon uitschakelen (handset) . . . 12
N
Navigatietoets . . . . . . . . . . . . . . . . . . . 8
Netvoedingsadapter . . . . . . . . . . . . . . 5
Netwerkaanbieders (nummerlijst) . . . 13
32
Niet aangenomen
afspraak . . . . . . . . . . . . . . . . . . . . . 11
verjaardag . . . . . . . . . . . . . . . . . . . 11
Nummer zie telefoonnummer of item . 13
Nummerherhaling . . . . . . . . . . . . . . . 16
Nummerherhalingslijst . . . . . . . . . . . . 16
O
On line-support . . . . . . . . . . . . . . . . . 24
Onderhoud van het toestel . . . . . . . . . 24
Ontvangstniveau . . . . . . . . . . . . . . . . . 2
Openen
menu . . . . . . . . . . . . . . . . . . . . . . . . 9
telefoonboek . . . . . . . . . . . . . . . . . . 9
Opslaan
snelkieslijst item . . . . . . . . . . . . . . . 13
telefoonboek-item . . . . . . . . . . . . . 13
P
PC-interface . . . . . . . . . . . . . . . . . . . . 27
Polyfone melodieën . . . . . . . . . . . . . . 21
R
Ruggespraak (intern) . . . . . . . . . . . . . 17
Ruimtebewaking . . . . . . . . . . . . . . . . 18
S
Selecteren (menu-item) . . . . . . . . . . . . 9
Service . . . . . . . . . . . . . . . . . . . . . . . 24
Signaal (bevestiging/fout/batterij/
einde menu) . . . . . . . . . . 22
Snelkieslijst . . . . . . . . . . . . . . . . . . . . 13
nummer opslaan. . . . . . . . . . . . . . . 13
Snelkiestoets . . . . . . . . . . . . . . . . . . . 13
SnelSchrijffunctie . . . . . . . . . . . . . . . . 26
SpraakCommando . . . . . . . . . . . . . . . 15
SpraakSturing . . . . . . . . . . . . . . . . 9, 15
Standaardinstellingen herstellen van de
handset . . . . . . . . . . . . . 22
T
Taal zie display
Technische gegevens . . . . . . . . . . . . . 25
Tekensettabel. . . . . . . . . . . . . . . . . . . 25
Telefoneren . . . . . . . . . . . . . . . . . . . . 12
extern . . . . . . . . . . . . . . . . . . . . . . 11
oproep beantwoorden . . . . . . . . . . 12
Gigaset SL1 / niederländisch / A31008-L001-B002-1-6Z19 / SL_1SIX.fm / 14.11.2003
Trefwoordenregister
Telefoonboek . . . . . . . . . . . . . . . . . . 13
item naar handset versturen . . . . . . 14
openen . . . . . . . . . . . . . . . . . . . . . . 9
telefoonnummer opslaan . . . . . . . . 13
volgorde van vermeldingen . . . . . . 26
Telefoonnummer
opslaan (telefoonboek) . . . . . . . . . 13
uit het telefoonboek overnemen. . . 14
Tijd instellen . . . . . . . . . . . . . . . . . . . 10
Tijdfuncties . . . . . . . . . . . . . . . . . . . . 10
Toets 1 (snelkiezen) . . . . . . . . . . . . . . 2
Toetsen
afbreken . . . . . . . . . . . . . . . . . . . . . 9
displaytoetsen . . . . . . . . . . . . . . . . . 9
escape/menu/wissen/OK. . . . . . . . . . 9
navigatietoets . . . . . . . . . . . . . . . . . 8
nummerherhalingstoets . . . . . . . . . . 9
toetsblokkering . . . . . . . . . . . . . . . . 8
toetsdruk (bevestigingstoon) . . . . . 22
toetssignaal . . . . . . . . . . . . . . . . . . 22
Toon
fouttoon . . . . . . . . . . . . . . . . . . . . 22
Trilalarm . . . . . . . . . . . . . . . . . . . . . . 21
Wekker . . . . . . . . . . . . . . . . . . . . . . . 10
Wekoproep . . . . . . . . . . . . . . . . . . . . 11
Wisselgesprek (intern gesprek) . . . . . . 17
Wissen (SpraakCommando) . . . . . . . . 16
Wistoets . . . . . . . . . . . . . . . . . . . . . . . 9
U
Uitschakelen
afspraaksignaal . . . . . . . . . . . . . . . 11
belsignaal (op de handset) . . . . . . . 21
handset . . . . . . . . . . . . . . . . . . . . . . 8
toetsblokkering . . . . . . . . . . . . . . . . 8
wekoproep . . . . . . . . . . . . . . . . . . 11
V
Van basisstation wisselen . . . . . . . . . . 8
Veiligheidsinstructies . . . . . . . . . . . . . 5
Verbindingstoets . . . . . . . . . . . . . . . . . 2
Verjaardag . . . . . . . . . . . . . . . . . . . . 11
Verjaardag (als afspraak) invoeren . . . 11
Verpakkingsinhoud . . . . . . . . . . . . . . . 6
Versturen van een telefoonboekitem . 14
VIP (telefoonboekvermelding) . . . . . . 14
Volgorde in het telefoonboek. . . . . . . 26
Volume. . . . . . . . . . . . . . . . . . . . . . . 20
W
Waarschuwingstoon, zie
Attentiesignalen . . . . . . . 22
Wachtmuziek . . . . . . . . . . . . . . . . . . 12
Walkie-talkie . . . . . . . . . . . . . . . . 19, 20
33
Gigaset SL1 / niederländisch / A31008-L001-B002-1-6Z19 / Service.fm / 14.11.2003
Service
You can get assistance easily when you have technical questions or questions about
how to use your device by using our online support service on the Internet at:
www.my-siemens.com/customercare.
Abu Dhabi. . . . . . . . . . . . . . . 0 26 42 38 00
Argentina . . . . . . . . . . . . 0 80 08 88 98 78
Australia . . . . . . . . . . . . . . . 18 00 62 24 14
Austria . . . . . . . . . . . . . . . . 05 17 07 50 04
Bahrain . . . . . . . . . . . . . . . . . . . . . 40 42 34
Bangladesh . . . . . . . . . . . . . . 0 17 52 74 47
Belgium . . . . . . . . . . . . . . . . 0 78 15 22 21
Bosnia Herzegovina . . . . . . . 0 33 27 66 49
Brazil . . . . . . . . . . . . . . . . 0 80 07 07 12 48
Brunei . . . . . . . . . . . . . . . . . . . 02 43 08 01
Bulgaria. . . . . . . . . . . . . . . . . . 02 73 94 88
Cambodia . . . . . . . . . . . . . . . . 12 80 05 00
Canada . . . . . . . . . . . . . . 1 88 87 77 02 11
China . . . . . . . . . . . . . . . 0 21 50 31 81 49
Croatia . . . . . . . . . . . . . . . . . 0 16 10 53 81
Czech Republic . . . . . . . . . . 02 33 03 27 27
Denmark . . . . . . . . . . . . . . . . . 35 25 86 00
Dubai . . . . . . . . . . . . . . . . . . 0 43 96 64 33
Egypt. . . . . . . . . . . . . . . . . . . 0 23 33 41 11
Estonia . . . . . . . . . . . . . . . . . . 06 30 47 97
Finland . . . . . . . . . . . . . . . . 09 22 94 37 00
France. . . . . . . . . . . . . . . . . 01 56 38 42 00
Germany . . . . . . . . . . . . . . .01805 333 222
Greece . . . . . . . . . . . . . . 0 80 11 11 11 16
Hong Kong . . . . . . . . . . . . . . . 28 61 11 18
Hungary . . . . . . . . . . . . . . . 06 14 71 24 44
Iceland . . . . . . . . . . . . . . . . . . . 5 11 30 00
India . . . . . . . . . . . . . . 01 13 73 85 89 - 98
Indonesia . . . . . . . . . . . . 0 21 46 82 60 81
Ireland . . . . . . . . . . . . . . . . 18 50 77 72 77
Italy. . . . . . . . . . . . . . . . . . . 02 66 76 44 00
Ivory Coast . . . . . . . . . . . . . . . 80 00 03 33
Jordan . . . . . . . . . . . . . . . . . . 0 64 39 86 42
Kenya . . . . . . . . . . . . . . . . . . . . 2 72 37 17
Kuwait . . . . . . . . . . . . . . . . . . . 2 45 41 78
Latvia . . . . . . . . . . . . . . . . . . . . 7 50 11 14
Lebanon . . . . . . . . . . . . . . . . . 01 44 30 43
Libya . . . . . . . . . . . . . . . . . . 02 13 50 28 82
Lithuania. . . . . . . . . . . . . . . . 8 22 74 20 10
Luxembourg . . . . . . . . . . . . . 43 84 33 99
Macedonia. . . . . . . . . . . . . . . . 02 13 14 84
Malaysia. . . . . . . . . . . . . . . 03 21 63 11 18
Malta . . . . . . . . . . . . 00 35 32 14 94 06 32
Mauritius . . . . . . . . . . . . . . . . . . 2 11 62 13
Mexico . . . . . . . . . . . . . .01 80 07 11 00 03
Morocco . . . . . . . . . . . . . . . . . 22 66 92 09
Netherlands . . . . . . . . . . . . 0900-3333102
New Zealand . . . . . . . . . . . 08 00 27 43 63
Norway . . . . . . . . . . . . . . . . . . 22 70 84 00
Oman. . . . . . . . . . . . . . . . . . . . . . 79 10 12
Pakistan . . . . . . . . . . . . . . . 02 15 66 22 00
Philippines . . . . . . . . . . . . . . 0 27 57 11 18
Poland . . . . . . . . . . . . . . . . 08 01 30 00 30
Portugal . . . . . . . . . . . . . . . . 8 00 85 32 04
Qatar . . . . . . . . . . . . . . . . . . . . 04 32 20 10
Romania . . . . . . . . . . . . . . 02 12 04 60 00
Russia. . . . . . . . . . . . . . . . (800) 200 10 10
Saudi Arabia . . . . . . . . . . . . 0 22 26 00 43
Serbia. . . . . . . . . . . . . . . . . 01 13 22 84 85
Singapore . . . . . . . . . . . . . . . . 62 27 11 18
Slovak Republic . . . . . . . . . 02 59 68 22 66
Slovenia . . . . . . . . . . . . . . . . 0 14 74 63 36
South Africa. . . . . . . . . . . . 08 60 10 11 57
Spain . . . . . . . . . . . . . . . . . . 9 02 11 50 61
Sweden . . . . . . . . . . . . . . . . 0 87 50 99 11
Switzerland . . . . . . . . . . . . 08 48 21 20 00
Taiwan . . . . . . . . . . . . . . . . 02 25 18 65 04
Thailand. . . . . . . . . . . . . . . . 0 22 68 11 18
Tunisia . . . . . . . . . . . . . . . . . 0 71 86 19 02
Turkey . . . . . . . . . . . . . . . 0 21 65 79 71 00
Ukraine . . . . . . . . . . . . . . 8 80 05 01 00 00
United Arab Emirates . . . . . 0 43 31 95 78
United Kingdom . . . . . . . 0 87 05 33 44 11
USA . . . . . . . . . . . . . . . . . 1 88 87 77 02 11
Vietnam . . . . . . . . . . . . . . . . . . 45 63 22 44
34
separate page before cover backpage