1
EN
Dear Customer,
Gigaset Communications GmbH is the legal successor to
Siemens Home and Office Communication Devices GmbH &
Co. KG (SHC), which in turn continued the Gigaset business
of Siemens AG. Any statements made by Siemens AG or
SHC that are found in the user guides should therefore be
understood as statements of Gigaset Communications
GmbH.
We hope you enjoy your Gigaset.
DE
Sehr geehrte Kundin, sehr geehrter Kunde,
die Gigaset Communications GmbH ist Rechtsnachfolgerin
der Siemens Home and Office Communication Devices
GmbH & Co. KG (SHC), die ihrerseits das Gigaset-Geschäft
der Siemens AG fortführte. Etwaige Erklärungen der
Siemens AG oder der SHC in den Bedienungsanleitungen
sind daher als Erklärungen der Gigaset Communications
GmbH zu verstehen.
Wir wünschen Ihnen viel Freude mit Ihrem Gigaset.
FR
Chère Cliente, Cher Client,
la société Gigaset Communications GmbH succède en droit
à Siemens Home and Office Communication Devices GmbH
& Co. KG (SHC) qui poursuivait elle-même les activités Gigaset de Siemens AG. Donc les éventuelles explications de Siemens AG ou de SHC figurant dans les modes d’emploi
doivent être comprises comme des explications de Gigaset
Communications GmbH.
Nous vous souhaitons beaucoup d’agrément avec votre
Gigaset.
IT
NL
ES
PT
Gentile cliente,
la Gigaset Communications GmbH è successore della Siemens Home and Office Communication Devices GmbH &
Co. KG (SHC) che a sua volta ha proseguito l’attività della
Siemens AG. Eventuali dichiarazioni della Siemens AG o
della SHC nei manuali d’istruzione, vanno pertanto intese
come dichiarazioni della Gigaset Communications GmbH.
Le auguriamo tanta soddisfazione con il vostro Gigaset.
Geachte klant,
Gigaset Communications GmbH is de rechtsopvolger van
Siemens Home and Office Communication Devices GmbH &
Co. KG (SHC), de onderneming die de Gigaset-activiteiten
van Siemens AG heeft overgenomen. Eventuele uitspraken
of mededelingen van Siemens AG of SHC in de gebruiksaanwijzingen dienen daarom als mededelingen van Gigaset
Communications GmbH te worden gezien.
Wij wensen u veel plezier met uw Gigaset.
Estimado cliente,
la Gigaset Communications GmbH es derechohabiente de la
Siemens Home and Office Communication Devices GmbH &
Co. KG (SHC) que por su parte continuó el negocio Gigaset
de la Siemens AG. Las posibles declaraciones de la
Siemens AG o de la SHC en las instrucciones de uso se
deben entender por lo tanto como declaraciones de la Gigaset Communications GmbH.
Le deseamos que disfrute con su Gigaset.
SCaros clientes,
Gigaset Communications GmbH é a sucessora legal da Siemens Home and Office Communication Devices GmbH &
Co. KG (SHC), que, por sua vez, deu continuidade ao sector
de negócios Gigaset, da Siemens AG. Quaisquer declarações por parte da Siemens AG ou da SHC encontradas nos
manuais de utilização deverão, portanto, ser consideradas
como declarações da Gigaset Communications GmbH.
Desejamos que tenham bons momentos com o seu Gigaset.
Issued by
Gigaset Communications GmbH
Schlavenhorst 66, D-46395 Bocholt
Gigaset Communications GmbH is a trademark
licensee of Siemens AG
DA
Kære Kunde,
Gigaset Communications GmbH er retlig efterfølger til Siemens Home and Office Communication Devices GmbH &
Co. KG (SHC), som fra deres side videreførte Siemens AGs
Gigaset-forretninger. Siemens AGs eller SHCs eventuelle
forklaringer i betjeningsvejledningerne skal derfor forstås
som Gigaset Communications GmbHs forklaringer.
Vi håber, du får meget glæde af din Gigaset.
FI
Arvoisa asiakkaamme,
Gigaset Communications GmbH on Siemens Home and
Office Communication Devices GmbH & Co. KG (SHC)-yrityksen oikeudenomistaja, joka jatkoi puolestaan Siemens
AG:n Gigaset-liiketoimintaa. Käyttöoppaissa mahdollisesti
esiintyvät Siemens AG:n tai SHC:n selosteet on tämän
vuoksi ymmärrettävä Gigaset Communications GmbH:n
selosteina.
Toivotamme Teille paljon iloa Gigaset-laitteestanne.
SV
Kära kund,
Gigaset Communications GmbH övertar rättigheterna från
Siemens Home and Office Communication Devices GmbH &
Co. KG (SHC), som bedrev Gigaset-verksamheten efter Siemens AG. Alla förklaringar från Siemens AG eller SHC i
användarhandboken gäller därför som förklaringar från
Gigaset Communications GmbH.
Vi önskar dig mycket nöje med din Gigaset.
NO
Kjære kunde,
Gigaset Communications GmbH er rettslig etterfølger etter
Siemens Home and Office Communication Devices GmbH &
Co. KG (SHC), som i sin tur videreførte Gigaset-geskjeften i
Siemens AG. Eventuelle meddelelser fra Siemens AG eller
SHC i bruksanvisningene er derfor å forstå som meddelelser
fra Gigaset Communications GmbH.
Vi håper du får stor glede av din Gigaset-enhet.
EL
Αγαπητή πελάτισσα, αγαπητέ πελάτη,
η Gigaset Communications GmbH είναι η νομική διάδοχος της
Siemens Home and Office Communication Devices GmbH &
Co. KG (SHC), η οποία έχει αναλάβει την εμπορική
δραστηριότητα Gigaset της Siemens AG. Οι δηλώσεις της
Siemens AG ή της SHC στις οδηγίες χρήσης αποτελούν
επομένως δηλώσεις της Gigaset Communications GmbH.
Σας ευχόμαστε καλή διασκέδαση με τη συσκευή σας Gigaset.
HR
Poštovani korisnici,
Gigaset Communications GmbH pravni je sljednik tvrtke
Siemens Home and Office Communication Devices GmbH &
Co. KG (SHC), koji je nastavio Gigaset poslovanje tvrtke
Siemens AG. Zato sve izjave tvrtke Siemens AG ili SHC koje
se nalaze u uputama za upotrebu treba tumačiti kao izjave
tvrtke Gigaset Communications GmbH.
Nadamo se da sa zadovoljstvom koristite svoj Gigaset
uređaj.
SL
Spoštovani kupec!
Podjetje Gigaset Communications GmbH je pravni naslednik
podjetja Siemens Home and Office Communication Devices
GmbH & Co. KG (SHC), ki nadaljuje dejavnost znamke
Gigaset podjetja Siemens AG. Vse izjave podjetja Siemens
AG ali SHC v priročnikih za uporabnike torej veljajo kot izjave
podjetja Gigaset Communications GmbH.
Želimo vam veliko užitkov ob uporabi naprave Gigaset.
© Gigaset Communications GmbH 2008
All rights reserved.
Subject to availability. Rights of modifications
reserved.
www.gigaset.com
CS
Vážení zákazníci,
společnost Gigaset Communications GmbH je právním
nástupcem společnosti Siemens Home and Office
Communication Devices GmbH & Co. KG (SHC), která dále
přejala segment produktů Gigaset společnosti Siemens AG.
Jakékoli prohlášení společnosti Siemens AG nebo SHC, které
naleznete v uživatelských příručkách, je třeba považovat za
prohlášení společnosti Gigaset Communications GmbH.
Doufáme, že jste s produkty Gigaset spokojeni.
SK
Vážený zákazník,
Spoločnosť Gigaset Communications GmbH je právnym
nástupcom spoločnosti Siemens Home and Office
Communication Devices GmbH & Co. KG (SHC), ktorá zasa
pokračovala v činnosti divízie Gigaset spoločnosti Siemens
AG. Z tohto dôvodu je potrebné všetky vyhlásenia
spoločnosti Siemens AG alebo SHC, ktoré sa nachádzajú v
používateľských príručkách, chápať ako vyhlásenia
spoločnosti Gigaset Communications GmbH.
Veríme, že budete so zariadením Gigaset spokojní.
RO
Stimate client,
Gigaset Communications GmbH este succesorul legal al
companiei Siemens Home and Office Communication
Devices GmbH & Co. KG (SHC), care, la rândul său, a
continuat activitatea companiei Gigaset a Siemens AG.
Orice afirmaţii efectuate de Siemens AG sau SHC şi incluse
în ghidurile de utilizare vor fi, prin urmare, considerate a
aparţine Gigaset Communications GmbH.
Sperăm ca produsele Gigaset să fie la înălţimea dorinţelor
dvs.
SR
Poštovani potrošaču,
Gigaset Communications GmbH je pravni naslednik
kompanije Siemens Home and Office Communication
Devices GmbH & Co. KG (SHC), kroz koju je nastavljeno
poslovanje kompanije Gigaset kao dela Siemens AG. Stoga
sve izjave od strane Siemens AG ili SHC koje se mogu naći u
korisničkim uputstvima treba tumačiti kao izjave kompanije
Gigaset Communications GmbH.
Nadamo se da ćete uživati u korišćenju svog Gigaset
uređaja.
BG
Уважаеми потребители,
Gigaset Communications GmbH е правоприемникът на
Siemens Home and Office Communication Devices GmbH
& Co. KG (SHC), която на свой ред продължи бизнеса на
подразделението Siemens AG. По тази причина
всякакви изложения, направени от Siemens AG или
SHC, които се намират в ръководствата за
потребителя, следва да се разбират като изложения на
Gigaset Communications GmbH.
Надяваме се да ползвате с удоволствие вашия Gigaset.
HU
Tisztelt Vásárló!
A Siemens Home and Communication Devices GmbH & Co.
KG (SHC) törvényes jogutódja a Gigaset Communications
GmbH, amely a Siemens AG Gigaset üzletágának utódja.
Ebből következően a Siemens AG vagy az SHC felhasználói
kézikönyveiben található bármely kijelentést a Gigaset
Communications GmbH kijelentésének kell tekinteni.
Reméljük, megelégedéssel használja Gigaset készülékét.
Issued by
Gigaset Communications GmbH
Schlavenhorst 66, D-46395 Bocholt
Gigaset Communications GmbH is a trademark
licensee of Siemens AG
PL
Szanowny Kliencie,
Firma Gigaset Communications GmbH jest spadkobiercą
prawnym firmy Siemens Home and Office Communication
Devices GmbH & Co. KG (SHC), która z kolei przejęła
segment produktów Gigaset od firmy Siemens AG. Wszelkie
oświadczenia firm Siemens AG i SHC, które można znaleźć
w instrukcjach obsługi, należy traktować jako oświadczenia
firmy Gigaset Communications GmbH.
Życzymy wiele przyjemności z korzystania z produktów
Gigaset.
TR
Sayın Müşterimiz,
Gigaset Communications GmbH, Siemens AG'nin Gigaset
işletmesini yürüten Siemens Home and Office
Communication Devices GmbH & Co. KG (SHC)'nin yasal
halefidir. Kullanma kılavuzlarında bulunan ve Siemens AG
veya SHC tarafından yapılan bildiriler Gigaset
Communications GmbH tarafından yapılmış bildiriler olarak
algılanmalıdır.
Gigaset'ten memnun kalmanızı ümit ediyoruz.
RU
Уважаемыи покупатель!
Компания Gigaset Communications GmbH является
правопреемником компании Siemens Home and Office
Communication Devices GmbH & Co. KG (SHC), которая,
в свою очередь, приняла подразделение Gigaset в свое
управление от компании Siemens AG. Поэтому любые
заявления, сделанные от имени компании Siemens AG
или SHC и встречающиеся в руководствах
пользователя, должны восприниматься как заявления
компании Gigaset Communications GmbH.
Мы надеемся, что продукты Gigaset удовлетворяют
вашим требованиям.
© Gigaset Communications GmbH 2008
All rights reserved.
Subject to availability. Rights of modifications
reserved.
www.gigaset.com
Gigaset CL 1 / IM 1 deu / A31008-A021-B001-1-6Z19 / cover_Innen.fm / 11.09.2003
s
DEUTSCH
Be inspired
Gigaset CL 1 / IM 1 deu / A31008-A021-B001-1-6Z19 / overview.fm / 11.09.2003
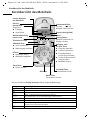
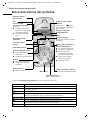
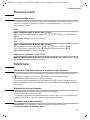
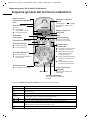
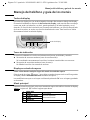
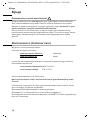
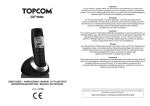
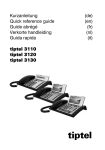
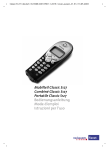
Kurzübersicht des Mobilteils
Kurzübersicht des Mobilteils
Interne Nummer
des Mobilteils
Uhrzeit
Anruferliste
Zugriff auf
◆ T-NetBox
◆ Anruferliste
Ladezustand Akku
U voll
blinkend: Akku fast leer
= leer
1
Wahlwiederholung
22-35
Þ Ü
V
INT MENU
Display (Anzeigefeld)
Menü
Display-Tasten
Aktuelle Funktionen im
Display aufrufen
Intern-Liste
Telefonbuch-Taste
Abheben-Taste
◆ Anruf annehmen
◆ Wahlvorgang einleiten
Auflegen- und
Ein-/Aus-Taste
◆ Gespräch beenden
◆ Funktion abbrechen
◆ Eine Menüebene
zurück (kurz drücken)
◆ Zurück in Ruhezustand
(lang drücken)
◆ Mobilteil ein/aus
R-Taste
◆ Rückfrage (Flash)
◆ Wahlpause eingeben
Stern-Taste
◆ Rufton ein/aus
Mikrofon
Kurzwahl-Taste
Kurzwahlliste öffnen
Raute-Taste
Tastensperre ein/aus
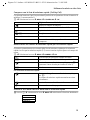
Die verschiedenen Display-Anzeigen haben folgende Bedeutung:
Anzeige
Bedeutung bei Tastendruck
Wahlwiederholung: Die Liste der letzten 5 Rufnummern öffnen (S. 14)
[_______]
INT
[_______________]
MENU
Intern: Liste der internen Mobilteile öffnen.
Þ
Ü
t bzw. s
u bzw. v
ß
[_______]
OK
2
Briefkastensymbol: Anruferliste und Liste mit T-NetBox öffnen (S. 14).
Menü: Im Ruhezustand das Hauptmenü öffnen.
Beim Telefonieren ein zustandsabhängiges Menü öffnen.
Zeilenweise nach oben bzw. nach unten blättern.
Schreibmarke (Cursor) zeichenweise nach links bzw. nach rechts bewegen.
Lösch-Taste: Eingabe zeichenweise von rechts nach links löschen. Löscht das
Zeichen links von der Schreibmarke.
Menüfunktion bestätigen bzw. Eingabe durch Bestätigung speichern.
Gigaset CL 1 / IM 1 deu / A31008-A021-B001-1-6Z19 / CL1IVZ.fm / 11.09.2003
Inhaltsverzeichnis
Inhaltsverzeichnis
Kurzübersicht des Mobilteils . . . . . . . . . . . . . . . . . . . 2
Sicherheitshinweise . . . . . . . . . . . . . . . . . . . . . . . . . . 5
Mobilteil in Betrieb nehmen . . . . . . . . . . . . . . . . . . . 6
Schutzfolie entfernen . . . . . . . . . . . . . . . . . . . . . . . . . . . . . . . . . . . . . . . . . . . . . . . . . .
Akkus einlegen . . . . . . . . . . . . . . . . . . . . . . . . . . . . . . . . . . . . . . . . . . . . . . . . . . . . . . .
Mobilteil aus-/einschalten . . . . . . . . . . . . . . . . . . . . . . . . . . . . . . . . . . . . . . . . . . . . . .
Mobilteil an der Basis anmelden . . . . . . . . . . . . . . . . . . . . . . . . . . . . . . . . . . . . . . . . . .
Akkus laden . . . . . . . . . . . . . . . . . . . . . . . . . . . . . . . . . . . . . . . . . . . . . . . . . . . . . . . . . .
Display-Sprache einstellen . . . . . . . . . . . . . . . . . . . . . . . . . . . . . . . . . . . . . . . . . . . . . .
Tastensperre ein-/ausschalten . . . . . . . . . . . . . . . . . . . . . . . . . . . . . . . . . . . . . . . . . . . .
6
6
6
7
7
8
8
Bedienen des Telefons und Menü-Übersicht . . . . . . 9
Display-Tasten . . . . . . . . . . . . . . . . . . . . . . . . . . . . . . . . . . . . . . . . . . . . . . . . . . . . . . . . 9
Hinweistöne . . . . . . . . . . . . . . . . . . . . . . . . . . . . . . . . . . . . . . . . . . . . . . . . . . . . . . . . . . 9
Display im Ruhezustand . . . . . . . . . . . . . . . . . . . . . . . . . . . . . . . . . . . . . . . . . . . . . . . . 9
Hauptmenü . . . . . . . . . . . . . . . . . . . . . . . . . . . . . . . . . . . . . . . . . . . . . . . . . . . . . . . . . . 9
Zeichentabelle und Texteingabe . . . . . . . . . . . . . . . . . . . . . . . . . . . . . . . . . . . . . . . . . 10
Zeitfunktionen . . . . . . . . . . . . . . . . . . . . . . . . . . . . 11
Datum und Uhrzeit einstellen . . . . . . . . . . . . . . . . . . . . . . . . . . . . . . . . . . . . . . . . . . . 11
Telefonieren . . . . . . . . . . . . . . . . . . . . . . . . . . . . . . 11
Extern anrufen und Gespräch beenden . . . . . . . . . . . . . . . . . . . . . . . . . . . . . . . . . . . 11
Anruf annehmen . . . . . . . . . . . . . . . . . . . . . . . . . . . . . . . . . . . . . . . . . . . . . . . . . . . . . 11
Mobilteil stummschalten . . . . . . . . . . . . . . . . . . . . . . . . . . . . . . . . . . . . . . . . . . . . . . . 11
Telefonbuch und weitere Listen nutzen . . . . . . . 12
Telefonbuch und Kurzwahlliste . . . . . . . . . . . . . . . . . . . . . . . . . . . . . . . . . . . . . . . . . . 12
Wahlwiederholungsliste . . . . . . . . . . . . . . . . . . . . . . . . . . . . . . . . . . . . . . . . . . . . . . . 14
Anruferliste . . . . . . . . . . . . . . . . . . . . . . . . . . . . . . . . . . . . . . . . . . . . . . . . . . . . . . . . . 14
Mehrere Mobilteile nutzen . . . . . . . . . . . . . . . . . . 15
Intern anrufen und Gespräch beenden . . . . . . . . . . . . . . . . . . . . . . . . . . . . . . . . . . . .
Gespräch an ein anderes Mobilteil weitergeben . . . . . . . . . . . . . . . . . . . . . . . . . . . .
Intern rückfragen . . . . . . . . . . . . . . . . . . . . . . . . . . . . . . . . . . . . . . . . . . . . . . . . . . . . .
Anklopfen beim internen Gespräch annehmen/abweisen . . . . . . . . . . . . . . . . . . . . .
15
15
15
15
3
Gigaset CL 1 / IM 1 deu / A31008-A021-B001-1-6Z19 / CL1IVZ.fm / 11.09.2003
Inhaltsverzeichnis
Mobilteil einstellen . . . . . . . . . . . . . . . . . . . . . . . . . 16
Automatische Rufannahme aus-/einschalten . . . . . . . . . . . . . . . . . . . . . . . . . . . . . . .
Lautstärke und Melodie ändern . . . . . . . . . . . . . . . . . . . . . . . . . . . . . . . . . . . . . . . . . .
Rufton aus-/einschalten . . . . . . . . . . . . . . . . . . . . . . . . . . . . . . . . . . . . . . . . . . . . . . . .
Akkuwarnton aus-/einschalten . . . . . . . . . . . . . . . . . . . . . . . . . . . . . . . . . . . . . . . . . . .
Mobilteil in den Lieferzustand zurücksetzen . . . . . . . . . . . . . . . . . . . . . . . . . . . . . . . .
16
16
16
16
16
Anhang . . . . . . . . . . . . . . . . . . . . . . . . . . . . . . . . . . . 17
Pflege und Kontakt mit Flüssigkeit . . . . . . . . . . . . . . . . . . . . . . . . . . . . . . . . . . . . . . .
Kundenservice (Customer Care) . . . . . . . . . . . . . . . . . . . . . . . . . . . . . . . . . . . . . . . . .
Technische Daten . . . . . . . . . . . . . . . . . . . . . . . . . . . . . . . . . . . . . . . . . . . . . . . . . . . . .
Garantie-Schein Belgien . . . . . . . . . . . . . . . . . . . . . . . . . . . . . . . . . . . . . . . . . . . . . . . .
Garantie Schweiz . . . . . . . . . . . . . . . . . . . . . . . . . . . . . . . . . . . . . . . . . . . . . . . . . . . . .
17
17
18
18
19
Stichwortverzeichnis . . . . . . . . . . . . . . . . . . . . . . . . 20
4
Gigaset CL 1 / IM 1 deu / A31008-A021-B001-1-6Z19 / starting.fm / 11.09.2003
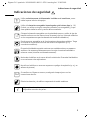
Sicherheitshinweise
Sicherheitshinweise
$
!
Verwenden Sie nur das mitgelieferte Steckernetzgerät, wie auf der Unterseite des Gerätes gekennzeichnet.
Legen Sie nur zugelassene, aufladbare Akkus des gleichen Typs (S. 18) ein!
D. h. niemals herkömmliche (nicht aufladbare) Batterien, da sie zu Gesundheits- und Personenschäden führen können.
‹
Œ
Legen Sie wiederaufladbare Akkus richtig gepolt ein und verwenden Sie den
Akkutyp gemäß dieser Bedienungsanleitung (Symbole sind in den Akkufächern des Mobilteils angebracht).
Medizinische Geräte können in ihrer Funktion beeinflusst werden. Beachten
Sie die technischen Bedingungen des jeweiligen Umfeldes (z. B. Arztpraxis).
Das Mobilteil kann in Hörgeräten einen unangenehmen Brummton verursachen. Das Mobilteil während des Klingelns (ankommender Ruf) nicht direkt an
Ihr Ohr halten.
Stellen Sie das Telefon nicht in Bädern oder Duschräumen auf. Das Mobilteil
ist nicht nicht spritzwassergeschützt.
Nutzen Sie das Telefon nicht in explosionsgefährdeten Umgebungen
(z.B. Lackierereien).
ƒ
Geben Sie Ihr Gigaset nur mit der Bedienungsanleitung an Dritte weiter.
Entsorgen Sie Akkus und Telefon umweltgerecht.
i
Nicht alle in dieser Bedienungsanleitung beschriebenen Funktionen sind
in allen Ländern verfügbar.
5
Gigaset CL 1 / IM 1 deu / A31008-A021-B001-1-6Z19 / starting.fm / 11.09.2003
Mobilteil in Betrieb nehmen
Mobilteil in Betrieb nehmen
Die Verpackung enthält:
◆ Mobilteil Gigaset CL 1
◆ Steckernetzgerät mit Netzkabel
◆ zwei Akkus
◆ Ladeschale
◆ Bedienungsanleitung
Schutzfolie entfernen
Das Display ist durch eine Folie geschützt. Bitte Schutzfolie abziehen!
Akkus einlegen
◆ Akkus richtig gepolt einlegen – siehe linke Abbildung,
◆ Deckel etwa 3 mm nach unten versetzt auflegen und nach oben schieben, bis er
einrastet.
Zum Öffnen des Deckels auf die Vertiefung drücken und Deckel nach unten schieben.
◆ Legen Sie nur empfohlene (S. 18), aufladbare Akkus des gleichen
W
Typs ein! D. h. niemals normale Batterien, da sie zu Gesundheits- und
Personenschäden führen können.
◆ Verwenden Sie keine fremden Aufladegeräte, die Akkus könnten
beschädigt werden.
Mobilteil aus-/einschalten
Um das Mobilteil aus- oder einzuschalten, drücken Sie die Auflegen-Taste a.
Anschließend erklingt der Bestätigungston (s. S. 9). Wenn Sie ein ausgeschaltetes
Mobilteil in die Ladeschale stellen, schaltet es sich automatisch ein.
6
Gigaset CL 1 / IM 1 deu / A31008-A021-B001-1-6Z19 / starting.fm / 11.09.2003
Mobilteil in Betrieb nehmen
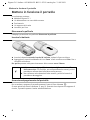
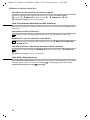
Mobilteil an der Basis anmelden
Die Anmeldung müssen Sie am Mobilteil und an der Basis einleiten.
1. Am Mobilteil
[_______________]
MENU
Display-Taste drücken, um das Menü zu öffnen.
[__________] [______________________________________________]
[__________]
MT ANMELDEN
OK
Auswählen und bestätigen.
[______]
OK
System-PIN der Basis eingeben (Lieferzustand: 0000)
und bestätigen.
Bei der folgenden Anmeldeprozedur blinken im Display alle Symbole.
2. An der Basis
Innerhalb von 60 Sek. nach Eingabe der System-PIN:
Anmelde-/Paging-Taste an der Basis ca. 3 Sek. drücken (siehe auch Bedienungsanleitung
der Basis). Die Anmeldeprozedur beginnt. Nach erfolgreichem Anmelden wird dem
Mobilteil automatisch die nächste freie Nummer zugewiesen.
Akkus laden
Lassen Sie das Mobilteil zum Laden der Akkus in der Ladeschale stehen, denn die Akkus
sind im Lieferzustand nicht geladen. Das Aufladen der Akkus wird am Mobilteil durch
Blinken des Akkusymbols V angezeigt.
Nach dem Aufladen der Akkus ist Ihr Telefon einsatzbereit. Für eine korrekte Zeiterfassung der Anrufe müssen Sie noch Datum und Uhrzeit einstellen (S. 11)
◆ Beim ersten Laden empfehlen wir eine ununterbrochene Ladezeit wie in der Tabelle
(S. 18) angegeben – unabhängig von der Ladezustandsanzeige! Die Ladekapazität
der Akkus reduziert sich technisch bedingt nach einiger Zeit.
◆ Nach dem ersten Ladevorgang können Sie Ihr Mobilteil nach jedem Gespräch in die
Ladeschale zurückstellen. Das Laden wird elektronisch gesteuert. Dadurch werden
die Akkus schonend geladen, aber nicht überladen.
◆ Die Akkus erwärmen sich während des Aufladens; das ist normal und ungefährlich.
7
Gigaset CL 1 / IM 1 deu / A31008-A021-B001-1-6Z19 / starting.fm / 11.09.2003
Mobilteil in Betrieb nehmen
Display-Sprache einstellen
Sie können sich die Display-Texte in verschiedenen Sprachen anzeigen lassen.
Display-Taste drücken, um das Menü zu öffnen.
[______________]
MENU
Mit den Tasten O 2 die Prozedur aufrufen.
Tasten Q 2 für Englisch (Lieferzustand) drücken.
Weitere Sprachen:
Q 1 für Deutsch,
Q 5 für Spanisch,
Q N für Dänisch,
1 1 für Finnisch,
1 4 für Türkisch,
i
Q I für Französisch,
Q L für Portugiesisch,
Q O für Norwegisch,
1 2 für Tschechisch,
1 5 für Russisch,
Q 4 für Italienisch,
Q M für Niederländisch,
1 Q für Schwedisch,
1 I für Polnisch,
1 L für Kroatisch.
Haben Sie aus Versehen eine falsche (für Sie unverständliche) Sprache
eingestellt, führen Sie die oben beschriebene Prozedur durch!
Tastensperre ein-/ausschalten
Sie können die Tasten des Mobilteils „sperren“, z. B. wenn Sie das Mobilteil mitnehmen.
Unbeabsichtigte Tastenbetätigungen bleiben dann ohne Auswirkung. Die Tastensperre
schaltet sich automatisch aus, wenn Sie angerufen werden. Nach Gesprächsende schaltet sie sich wieder ein.
Tastensperre einschalten:
Raute-Taste R lang drücken (Bestätigungston).
Im Display erscheint das Symbol Ø.
Tastensperre ausschalten:
Raute-Taste R lang drücken (Bestätigungston).
i
8
Bei eingeschalteter Tastensperre können auch Notrufnummern nicht
gewählt werden!
Gigaset CL 1 / IM 1 deu / A31008-A021-B001-1-6Z19 / guidance.fm / 11.09.2003
Bedienen des Telefons und Menü-Übersicht
Bedienen des Telefons und Menü-Übersicht
Display-Tasten
Display-Tasten sind die länglichen Tasten direkt unter dem Display. Ihr Mobilteil hat zwei
Display-Tasten. Jede ist wie eine Wipp-Taste zu bedienen, d. h. sie kann sowohl an ihrer
linken als auch an ihrer rechten Seite gedrückt werden. Abhängig von der jeweiligen
Bediensituation und davon, welche Tastenseite Sie drücken, rufen Sie eine bestimmte
Funktion auf. Diese Funktion wird direkt über der Display-Taste angezeigt.
Þ
Ü
INT MENU
Display-Tasten
Hinweistöne
Ihr Mobilteil weist Sie akustisch auf verschiedene Tätigkeiten und Zustände hin.
◆ Aufsteigende Tonfolge (Bestätigungston):
Die Aktion wurde korrekt durchgeführt bzw. die Eingabe ist korrekt.
◆ Absteigende Tonfolge (Fehlerton):
Die Aktion ist fehlgeschlagen bzw. die Eingabe ist fehlerhaft.
Display im Ruhezustand
Von einer beliebigen Stelle im Menü in den Ruhezustand zurückkehren
Auflegen-Taste a ca. 1 Sek. lang drücken oder keine Taste drücken: Nach 60 Sek.
wechselt das Display automatisch in den Ruhezustand.
Änderungen, die Sie nicht durch Drücken von OK bestätigt haben, werden verworfen.
Hauptmenü
Zum Öffnen des Hauptmenüs drücken Sie im Ruhezustand des Telefons die Displaytaste
MENU und blättern mitszum gewünschten Eintrag.
1
2
3
4
5
T-NET-LM
AUDIO
BASIS-EINST
T-NETBOX
MT ANMELDEN
Das Angebot der
Menüeinträge hängt
von Ihrer Basis ab.
9
Gigaset CL 1 / IM 1 deu / A31008-A021-B001-1-6Z19 / guidance.fm / 11.09.2003
Bedienen des Telefons und Menü-Übersicht
Zeichentabelle und Texteingabe
Entsprechende Taste mehrmals bzw. lang drücken.
1
2
I
4
5
L
M
N
O
Q
P
10
1x
2x 3x 4x 5x 6x
Leerzeichen
1
A
B
C
2
D
E
F
3
G
H
I
4
J
K
L
5
M
N
O
6
P
Q
R
S
T
U
V
8
7
W
X
Y
Z
9
+
0
-
|
?
*
/
(
)
,
_
Gigaset CL 1 / IM 1 deu / A31008-A021-B001-1-6Z19 / telephony.fm / 11.09.2003
Zeitfunktionen
Zeitfunktionen
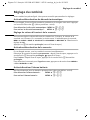
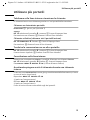
Datum und Uhrzeit einstellen
Die Datums- und Uhrzeiteinstellung sind notwendig, damit korrekt angezeigt wird,
wann Anrufe eingegangen sind. Für die Uhrzeit können Sie zwischen der 12-Stundenund der 24-Stunden-Anzeige (Lieferzustand) wählen.
Datum
¢ BASIS-EINST ¢ UHR ¢ DATUM
¢ Tag/Monat/Jahr eingeben (Beispiel: 2 Q Q 5 Q I für „20.05.2003“) ¢ OK
MENU
a lang drücken (zurück in den Ruhezustand).
Uhrzeit
¢ BASIS-EINST ¢ UHR ¢ UHRZEIT
¢ Stunden/Minuten eingeben (Beispiel: 1 O Q 5 für „19.05 Uhr“) ¢ OK
bei eingestellter 12-Stunden-Anzeige: ¢ Tageshälfte auswählen ¢ OK
MENU
a lang drücken (zurück in den Ruhezustand).
12- oder 24-Stunden-Anzeige einstellen
MENU
¢ BASIS-EINST ¢ UHR ¢ MODUS ¢ 12 H oder 24 H auswählen ¢ OK
a lang drücken (zurück in den Ruhezustand).
Telefonieren
Extern anrufen und Gespräch beenden
Externe Anrufe sind Anrufe in das öffentliche Telefonnetz.
~ (Rufnummer eingeben), c (Abheben-Taste) drücken.
Zum Beenden: a (Auflegen-Taste) drücken.
Sie können auch zuerst die Abheben-Taste c drücken (Sie hören einen Freiton) und
dann die Rufnummer eingeben. Mit der Auflegen-Taste a brechen Sie das Wählen ab.
Anruf annehmen
Ihr Mobilteil klingelt, der Anruf wird im Display angezeigt.
Abheben-Taste c drücken.
Ist die Funktion Automatische Rufannahme eingeschaltet (S. 16), müssen Sie das
Mobilteil nur aus der Ladeschale nehmen, um den Anruf anzunehmen.
Mobilteil stummschalten
INT drücken. Das Gespräch wird „gehalten“ (Wartemelodie).
Zum Beenden: MENU ¢ ZURUECK ¢ OK.
11
Gigaset CL 1 / IM 1 deu / A31008-A021-B001-1-6Z19 / directories.fm / 11.09.2003
Telefonbuch und weitere Listen nutzen
Telefonbuch und weitere Listen nutzen
Telefonbuch und Kurzwahlliste
Die Bedienung der beiden Listen ist gleich, nur dass Sie beim Öffnen des Telefonbuchs
die Taste h und beim Öffnen der Kurzwahlliste die Taste C drücken.
Im Telefonbuch h können Sie bis zu 20 Rufnummern mit zugehörigen Namen speichern. Dies erleichtert Ihnen das Wählen.
Die Kurzwahlliste ist ein spezielles Telefonbuch, in dem Sie bis zu 10 besonders wichtige Rufnummern ablegen können, z. B. Vorwahlen von Netzanbietern (sog. „Call-byCall-Nummern“).
Rufnummer im Telefonbuch/in der Kurzwahlliste speichern
h bzw. C ¢ MENU ¢ NEUEINTRAG ¢ OK
a
i
[______]
OK
Rufnummer eingeben und bestätigen (Telefonbuch
max. 22 Ziffern, Kurzwahlliste max. 12 Ziffern).
[______]
OK
Namen (max. 12-stellig) eingeben
(Texteingabe S. 10) und bestätigen.
Lang drücken (zurück in den Ruhezustand).
Ist Ihr Telefon an eine Telefonanlage angeschlossen, die für externe
Anrufe eine Vorwahlziffer (z. B. „0“) benötigt, müssen Sie diese Vorwahlziffer als erste Ziffer Ihres Telefonbucheintrags eingeben.
Mit dem Telefonbuch wählen
h
Telefonbuch öffnen.
Anfangsbuchstaben des Namens eingeben. Beispiel:
Für den Namen Emma (Anfangsbuchstabe „E“) die
Taste I zweimal drücken. Der erste Name mit „E“
wird angezeigt.
Bei mehreren Einträgen mit „E“ den gewünschten
Namen auswählen.
c
12
Abheben-Taste drücken. Die Nummer wird gewählt.
Gigaset CL 1 / IM 1 deu / A31008-A021-B001-1-6Z19 / directories.fm / 11.09.2003
Telefonbuch und weitere Listen nutzen
Mit der Kurzwahlliste wählen (Call-by-Call)
Mit dieser Funktion kann die Vorwahl eines Netzanbieters der Rufnummer vorangestellt
werden („Verketten“).
C ¢ Eintrag auswählen ¢ MENU ¢ VERWENDEN ¢ OK
entweder ...
Rufnummer eintippen:
Rufnummer eingeben.
oder ...
Rufnummer aus dem Telefonbuch wählen:
h
Telefonbuch öffnen.
[__________] OK
[______]
Rufnummer auswählen und bestätigen.
... alle weiter
c
Abheben-Taste drücken. Die Nummer wird gewählt.
Kurzwahlnummer für die Schnellwahl speichern
Sie können acht Nummern aus der Kurzwahlliste für die Schnellwahl speichern. Die
Ziffer für die Schnellwahl (2-9) geben Sie an der ersten Position im Namenfeld ein.
C ¢ Eintrag auswählen ¢ MENU ¢ NUMMER ¢ OK
[___________
OK ]
Bestätigen, um ins Namenfeld zu wechseln.
[___________
u]
Schreibmarke an die erste Position im Namenfeld
bewegen.
Schnellwahlnummer eingeben, z.B. 2
(Taste 4 x drücken, um die Ziffer 2 einzugeben).
Bestätigen.
[___________
OK ]
Um die Schnellwahl zu nutzen:
Schnellwahlnummer lang drücken, z.B. 2:
Die gespeicherte Kurzwahlnummer wird angezeigt.
Rufnummer zum „Verketten“ eingeben.
c
Abheben-Taste drücken.
Einträge im Telefonbuch und in der Kurzwahlliste verwalten
h bzw. C ¢ Eintrag auswählen ¢ MENU ¢ gewünschte Funktion auswählen:
VERWENDEN
NEUEINTRAG
NUMMER
LOESCHEN
Telefonbuch/Kurzwahlliste löschen
Beim Löschen wird die jeweilige Liste mit allen Einträgen gelöscht.
h bzw. C ¢ MENU ¢ Taste L drücken ¢ LOESCHEN ? ¢ OK
a lang drücken (zurück in den Ruhezustand).
13
Gigaset CL 1 / IM 1 deu / A31008-A021-B001-1-6Z19 / directories.fm / 11.09.2003
Telefonbuch und weitere Listen nutzen
Wahlwiederholungsliste
In der Wahlwiederholungsliste stehen die fünf zuletzt gewählten Rufnummern.
Rufnummern wählen
Þ Displaytaste drücken ¢ Eintrag auswählen ¢ Taste c drücken
Einträge ändern und/oder in das Telefonbuch übernehmen
Þ Displaytaste drücken ¢ Eintrag auswählen ¢ MENU ¢ VERWENDEN oder
NR INS TB
¢ OK
Wahlwiederholungsliste löschen
Þ Displaytaste drücken ¢ MENU ¢ Taste L drücken ¢ LOESCHEN ? ¢ OK
a lang drücken (zurück in den Ruhezustand).
Anruferliste
In der Anruferliste werden die Rufnummern der entgangenen Anrufe gespeichert. Sie
öffnen die Anruferliste mit der Display-Taste Û. Neue Nachrichten werden durch
Blinken des Symbols Û signalisiert.
14
Gigaset CL 1 / IM 1 deu / A31008-A021-B001-1-6Z19 / registration.fm / 11.09.2003
Mehrere Mobilteile nutzen
Mehrere Mobilteile nutzen
Intern anrufen und Gespräch beenden
Interne Anrufe sind kostenlose Gespräche mit anderen Mobilteilen der selben Basis.
Ein bestimmtes Mobilteil anrufen
INT 2 drücken (z.B. für Mobilteil 2)
Oder:
¢ Mobilteil auswählen ¢ Abheben-Taste c drücken
Zum Beenden des Gesprächs: a Auflegen-Taste drücken.
INT
Sammelruf (alle Mobilteile gleichzeitig anrufen)
¢ AN ALLE ¢ Abheben-Taste c drücken
Zum Beenden: a Auflegen-Taste drücken.
INT
Gespräch an ein anderes Mobilteil weitergeben
¢ Mobilteil auswählen ¢ Abheben-Taste c drücken
Der interne Teilnehmer meldet sich: Auflegen-Taste a drücken.
INT
Intern rückfragen
Während eines externen Gesprächs können Sie intern anrufen.
INT ¢ Mobilteil auswählen ¢ Abheben-Taste c drücken
Zum Beenden: MENU ¢ ZURUECK ¢ OK (zurück zum externen Teilnehmer)
Anklopfen beim internen Gespräch annehmen/abweisen
Wenn Sie während eines internen Gesprächs einen externen Anruf erhalten, hören Sie
den Anklopfton (kurzer Ton).
Annehmen: MENU ¢ ANNEHMEN ¢ OK
(Sie sprechen mit dem externen Teilnehmer).
Abweisen: MENU ¢ ABWEISEN ¢ OK
(Sie sprechen mit dem internen Teilnehmer).
Der abgewiesene Anklopfton ist an weiteren Mobilteilen noch zu hören.
15
Gigaset CL 1 / IM 1 deu / A31008-A021-B001-1-6Z19 / settings_bs_hs.fm / 11.09.2003
Mobilteil einstellen
Mobilteil einstellen
Ihr Mobilteil ist voreingestellt. Sie können die Einstellungen individuell ändern.
Automatische Rufannahme aus-/einschalten
Bei einem Anruf nehmen Sie das Mobilteil einfach aus der Ladeschale, ohne dafür die
Abheben-Taste c drücken zu müssen (Lieferzustand: Ein).
Automatische Rufannahme ausschalten: MENU ¢ O 1 Q
Automatische Rufannahme einschalten: MENU ¢ O 1 1
Lautstärke und Melodie ändern
Sie können die Hörerlautstärke in 3 Stufen, die Rufton-Lautstärke in 6 Stufen (6 ist
ansteigende Lautstärke) einstellen sowie aus 10 Rufton-Melodien auswählen.
MENU ¢ AUDIO ¢ HOERER oder RUFLAUTST oder MELODIE ¢ Einstellung auswählen ¢ OK
a lang drücken (zurück in den Ruhezustand).
Rufton aus-/einschalten
Bei ankommenden externen Anrufen klingeln alle Mobilteile.
Auf Dauer ausschalten: Stern-Taste P lang drücken, im Display erscheint Ú.
Zum Einschalten: Stern-Taste P lang drücken.
Um den Rufton für den aktuellen Anruf auszuschalten, drücken Sie die Displaytaste
MENU und bestätigen Sie RUF AUS mit OK.
Akkuwarnton aus-/einschalten
Hinweiston bei fast leerem Akku (Lieferzustand: eingeschaltet).
Akkuwarnton ausschalten:
MENU ¢ O 4 Q
Akkuwarnton einschalten:
MENU ¢ O 4 1
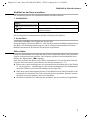
Mobilteil in den Lieferzustand zurücksetzen
Sie können individuelle Einstellungen und Änderungen in den Lieferzustand zurücksetzen. Einträge des Telefonbuchs, der Anruferliste, der Wahlwiederholungsliste und der
Kurzwahlliste sowie die Anmeldung des Mobilteils an der Basis bleiben erhalten.
¢ O I ¢ RESET ? ¢ OK
a lang drücken (zurück in den Ruhezustand).
MENU
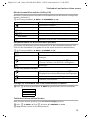
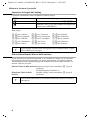
Lieferzustand des Mobilteils
Hörer-Lautstärke
Rufton-Lautstärke
Rufton-Melodie
Telefonbuch
Wahlwiederholungsliste
Anruferliste
Kurzwahlliste
Automatische Rufannahme
Akkuwarnton
Display-Sprache
16
Lieferzustand
1
5
1
leer
leer
leer
leer
eingeschaltet
eingeschaltet
englisch
Zustand nach Rücksetzen
1
5
1
bleibt erhalten
bleibt erhalten
bleibt erhalten
bleibt erhalten
eingeschaltet
eingeschaltet
englisch
Beschreibung
S. 16
S. 16
S. 16
S. 12
S. 14
S. 14
S. 12
S. 16
S. 16
S. 8
Gigaset CL 1 / IM 1 deu / A31008-A021-B001-1-6Z19 / appendix.fm / 11.09.2003
Anhang
Anhang
Pflege und Kontakt mit Flüssigkeit !
Wischen Sie das Mobilteil mit einem feuchten Tuch (keine Lösungsmittel) oder einem
Antistatiktuch ab. Benutzen Sie nie ein trockenes Tuch. Es besteht die Gefahr der statischen Aufladung.
Sollte das Mobilteil mit Flüssigkeit in Kontakt gekommen sein, auf keinen Fall das
Gerät einschalten. Sofort alle Akkus entnehmen.
Lassen Sie die Flüssigkeit aus dem Gerät abtropfen und tupfen Sie anschließend alle
Teile trocken.
Lagern Sie das Mobilteil ohne Akkus für mindestens 72 Stunden an einem trockenen,
warmen Ort. Danach ist in vielen Fällen die Inbetriebnahme wieder möglich.
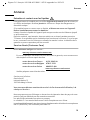
Kundenservice (Customer Care)
Wir bieten Ihnen schnelle und individuelle Beratung!
Unser Online-Support im Internet:
www.my-siemens.de/kundenservice
Schweiz
www.my-siemens.de/kundenservice
Belgien
Im Falle einer notwendigen Reparatur, evtl. Garantie- oder Gewährleistungsansprüche
erhalten Sie schnelle und zuverlässige Hilfe bei unserem
Service-Center Schweiz 0848 212 000
www.my-siemens.com/contact
Service-Center Belgien
078 15 22 21
Die Service-Adresse für die Schweiz ist:
Omnicom AG
Industrie Neuhof 9
3422 Kirchberg b. Bern
Weitere Servicenummern finden Sie am Ende der Bedienungsanleitung unter
„Service“.
In Ländern, in denen unser Produkt nicht durch autorisierte Händler verkauft wird, werden keine Austausch- bzw. Reparaturleistungen angeboten.
Länderspezifische Besonderheiten sind berücksichtigt.
Das Mobilteil CL1 ist EU-weit und in der Schweiz zugelassen.
Die Übereinstimmung des Gerätes mit den grundlegenden Anforderungen der R&TTEDirektive ist durch das CE-Kennzeichen bestätigt.
.
17
Gigaset CL 1 / IM 1 deu / A31008-A021-B001-1-6Z19 / appendix.fm / 11.09.2003
Anhang
Auszug aus der Originalerklärung:
„We, Siemens AG, declare, that the above mentioned product is manufactured according to our Full
Quality Assurance System certified by CETECOM ICT Services GmbH in compliance with ANNEX V
of the R&TTE-Directive 99/5/EC. The presumption of conformity with the essential requirements
regarding Council Directive 99/5/EC is ensured“
Senior Approvals Manager
The Declaration of Conformity (DoC) has been signed. In case of need a copy of the original DoC
can be made available via the company hotline.
Technische Daten
Empfohlene Akkus
Nickel-Metall-Hydrid (NiMH) - Typ AAA
Sanyo Twicell 700 (700 mAh)
Sanyo Twicell 650 (650 mAh)
Panasonic 700mAh „for Dect“ (700 mAh)
GP 700mAh (700 mAh)
Varta Phone Power AAA (700 mAh)
YDT AAA SUPER 700 (700 mAh)
(Stand bei Drucklegung der Bedienungsanleitung)
Das Gerät wird mit zugelassenen Akkus geliefert.
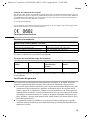
Betriebszeiten/Ladezeiten des Mobilteils
Kapazität
(mAh)
Bereitschaftszeit
(Stunden)
Gesprächszeit
(Stunden)
700
bis zu 200 (ca. 8 Tage) etwa 16
Ladezeit
(Stunden)
etwa 5
Die genannten Betriebs- und Ladezeiten gelten nur bei Verwendung der Empfohlenen
Akkus.
Garantie-Schein Belgien
Dem Verbraucher (Kunden) wird unbeschadet seiner Mängelansprüche gegenüber dem
Vertragshändler eine Garantie zu den nachstehenden Bedingungen eingeräumt:
◆ Wenn das neue Gerät oder Zubehör innerhalb von 24 Monaten nach Ankauf Defekte
aufweist infolge von Produktions- bzw. Materialfehlern, hat Siemens die Wahl, das
Gerät kostenlos zu reparieren oder durch ein anderes, dem Stand der Technik entsprechendes Gerät zu ersetzen. Im Falle von Teilen, die dem Verschleiß ausgesetzt
sind (wie Batterien, Tastatur, Gehäuse), gilt diese Garantie für eine Dauer von sechs
Monaten nach Kaufdatum.
◆ Diese Garantie gilt nicht, soweit der Defekt der Geräte auf unsachgemäßer Behandlung und/oder Nichtbeachtung der Handbücher beruht.
◆ Diese Garantie erstreckt sich nicht auf vom Vertragshändler oder vom Kunden selbst
erbrachte Leistungen (z.B. Installation, Konfiguration, Softwaredownloads). Handbücher und ggf. auf einem separaten Datenträger mitgelieferte Software sind ebenfalls von der Garantie ausgeschlossen.
18
Gigaset CL 1 / IM 1 deu / A31008-A021-B001-1-6Z19 / appendix.fm / 11.09.2003
Anhang
◆ Als Garantienachweis gilt der Kaufbeleg, mit Kaufdatum. Garantieansprüche sind
innerhalb von zwei Monaten nach Feststellung des Defekts geltend zu machen.
◆ Ersetzte Geräte bzw. deren Komponenten, die im Rahmen des Austauschs an Sie-
mens zurückgeliefert werden, gehen in das Eigentum von Siemens über.
◆ Diese Garantie gilt für in der Europäischen Union erworbene Neugeräte. Garantie-
geberin für in Belgien erworbene Geräte ist Siemens S.A. Chaussée de Charleroi
116,B1060 Bruxelles
◆ Weitergehende oder andere Ansprüche aus dieser Garantie sind ausgeschlossen,
ausgenommen soweit die Haftung auf zwingendem Recht beruht wie etwa die
gesetzliche Regelung zur Produkthaftung.
◆ Durch eine erbrachte Garantieleistung verlängert sich der Garantiezeitraum nicht.
◆ Soweit kein Garantiefall vorliegt, behält sich Siemens vor, dem Kunden den Austausch oder die Reparatur in Rechnung zu stellen.
◆ Eine Änderung der Beweislastregeln zum Nachteil des Kunden ist mit den vorstehenden Regelungen nicht verbunden.
Zur Einlösung dieser Garantie wenden Sie sich bitte an den Siemens Telefonservice. Die
Rufnummer entnehmen Sie bitte der Bedienungsanleitung.
Garantie Schweiz
Die Garantiedauer beträgt 12 Monate.
19
Gigaset CL 1 / IM 1 deu / A31008-A021-B001-1-6Z19 / CL1SIX.fm / 11.09.2003
Stichwortverzeichnis
Stichwortverzeichnis
A
K
Akkus
einlegen . . . . . . . . . . . . . . . . . . . . . 6
empfohlene . . . . . . . . . . . . . . . . . . 18
laden . . . . . . . . . . . . . . . . . . . . . . . . 7
Akkuwarnton . . . . . . . . . . . . . . . . . . 16
Anruferliste . . . . . . . . . . . . . . . . . . 2, 14
Ausschalten
Mobilteil . . . . . . . . . . . . . . . . . . . . . 6
Tastensperre . . . . . . . . . . . . . . . . . . 8
Automatische Rufannahme . . . . . . . . 16
Kurzwahlliste . . . . . . . . . . . . . . . . . . . 12
alle Einträge löschen . . . . . . . . . . . . 13
Kurzwahlnummer . . . . . . . . . . . . . . . 13
B
Betriebszeit des Mobilteils . . . . . . . . . 18
C
Call-by-Call . . . . . . . . . . . . . . . . . . . . 13
D
Datum einstellen . . . . . . . . . . . . . . . . 11
Display
im Ruhezustand . . . . . . . . . . . . . . . . 9
Sprache einstellen . . . . . . . . . . . . . . 8
E
Einschalten
Mobilteil . . . . . . . . . . . . . . . . . . . . . 6
Tastensperre . . . . . . . . . . . . . . . . . . 8
G
Garantie . . . . . . . . . . . . . . . . . . . . . . 19
Gespräch beenden . . . . . . . . . . . . . . 11
H
Hauptmenü. . . . . . . . . . . . . . . . . . . . . 9
Hinweiston . . . . . . . . . . . . . . . . . . . . . 9
I
Intern
Rufnummer . . . . . . . . . . . . . . . . . . . 2
L
Ladezeiten des Mobilteils . . . . . . . . . . 18
Ladezustandsanzeige . . . . . . . . . . . . . . 7
M
Menü-Führung . . . . . . . . . . . . . . . . . . . 9
Mikrofon . . . . . . . . . . . . . . . . . . . . . . . 2
Mobilteil
anmelden . . . . . . . . . . . . . . . . . . . . . 7
Betriebs- und Ladezeiten . . . . . . . . . 18
ein-/ausschalten . . . . . . . . . . . . . . . . 6
in Betrieb nehmen . . . . . . . . . . . . . . 6
stummschalten . . . . . . . . . . . . . . . . 11
zurücksetzen . . . . . . . . . . . . . . . . . 16
N
Nummer s. Rufnummer . . . . . . . . . . . 12
O
Online-Support . . . . . . . . . . . . . . . . . 17
R
Rufannahme, automatische . . . . . . . . 16
Rufnummer
aus der Anruferliste übernehmen . . . 14
speichern . . . . . . . . . . . . . . . . . . . . 12
Rufton aus-/einschalten . . . . . . . . . . . 16
Ruhezustand (Display) . . . . . . . . . . . . . 9
S
Schnellwahl
Kurzwahlnummer . . . . . . . . . . . . . . 13
Sicherheitshinweise . . . . . . . . . . . . . . . 5
Steckernetzgerät . . . . . . . . . . . . . . . . . 5
Stummschalten (Mobilteil) . . . . . . . . . 11
T
Tastensperre . . . . . . . . . . . . . . . . . . . . 8
20
Gigaset CL 1 / IM 1 deu / A31008-A021-B001-1-6Z19 / CL1SIX.fm / 11.09.2003
Stichwortverzeichnis
Technische Daten . . . . . . . . . . . . . . . 18
Telefonbuch . . . . . . . . . . . . . . . . . . . 12
Eintrag ändern . . . . . . . . . . . . . . . . 13
Einträge verwalten. . . . . . . . . . . . . 13
Rufnummer/Eintrag speichern . . . . 12
Telefonieren
Anruf annehmen . . . . . . . . . . . . . . 11
extern . . . . . . . . . . . . . . . . . . . . . . 11
Texteingabe . . . . . . . . . . . . . . . . . . . 10
Ton
Hinweiston . . . . . . . . . . . . . . . . . . . 9
U
Uhrzeit einstellen . . . . . . . . . . . . . . . 11
W
Wählen
mit dem Telefonbuch . . . . . . . . . . .
mit der Kurzwahlliste . . . . . . . . . . .
Wahlwiederholung . . . . . . . . . . . . . .
Warnton s. Ton . . . . . . . . . . . . . . . . .
Wartemelodie . . . . . . . . . . . . . . . . . .
12
13
14
16
11
Z
Zeichentabelle . . . . . . . . . . . . . . . . . 10
Zeitfunktionen . . . . . . . . . . . . . . . . . 11
21
Gigaset CL1 / englisch / A31008-A021-B001-1-6Z19 / cover_innen.fm / 11.09.2003
s
ENGLISH
Be inspired
Gigaset CL1 / English / A31008-A021-B001-1-6Z19 / overview.fm / 11.09.2003
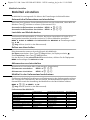
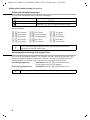
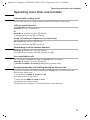
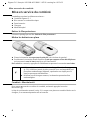
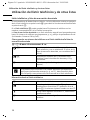
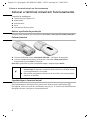
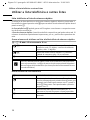
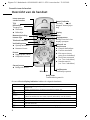
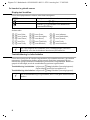
Brief overview
Brief overview
Internal number
of the handset
Time
Caller list
Access to
◆ Answering
machine/mail box
◆ Calls list
Redial
Battery charging status
U full
Flashing: battery almost
flat
= flat
1
22-35
Þ Ü
V
INT MENU
Display (display screen)
Menu
Display keys
Activate current functions
in display
Internal list
Directory key
Talk key
◆ Answering a call
◆ Initiate dialling
End call and
On/Off key
◆ End call
◆ Cancel function
◆ One menu level back
(short press)
◆ Return to idle state
(hold down)
◆ Handset on/off
Recall key
◆ Enquiry (Flash)
◆ Enter a dial pause
Star key
◆ Ringer on/off
Microphone
Speed dial key
Open the speed dial list
Hash key
Keypad lock on/off
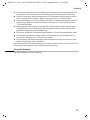
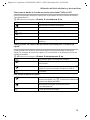
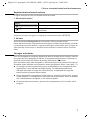
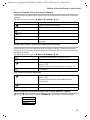
The various display symbols have the following meanings:
Display
Þ
Ü
[_______]
INT
[_______________]
MENU
t or s
u or v
ß
[_______]
OK
2
Meaning when pressed
Last number redial: opens a list of the last 5 numbers dialled (page 14)
Mailbox/answering machine symbol: opens caller list and answering machine/
mailbox (page 14).
Internal: opens the list of internal phones.
Menu: activates the main menu when in standby.
Open a status-dependent menu while making a call.
Scrolls up or down.
Moves cursor to the left or right.
Delete key: delete input from right to left one character at a time. Deletes
character by character, from the right to the left.
Confirm menu function or confirm an input and store.
Gigaset CL1 / englisch / A31008-A021-B001-1-6Z19 / CL1IVZ.fm / 11.09.2003
Contents
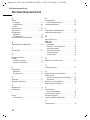
Contents
Brief overview . . . . . . . . . . . . . . . . . . . . . . . . . . . . . . . 2
Safety precautions . . . . . . . . . . . . . . . . . . . . . . . . . . . 5
Making the handset ready for service . . . . . . . . . . . 6
Removing the protective film . . . . . . . . . . . . . . . . . . . . . . . . . . . . . . . . . . . . . . . . . . . .
Inserting the batteries . . . . . . . . . . . . . . . . . . . . . . . . . . . . . . . . . . . . . . . . . . . . . . . . . .
Deactivating/activating the handset . . . . . . . . . . . . . . . . . . . . . . . . . . . . . . . . . . . . . . .
Registering the handset on the base . . . . . . . . . . . . . . . . . . . . . . . . . . . . . . . . . . . . . . .
Charging batteries . . . . . . . . . . . . . . . . . . . . . . . . . . . . . . . . . . . . . . . . . . . . . . . . . . . . .
Setting the display language . . . . . . . . . . . . . . . . . . . . . . . . . . . . . . . . . . . . . . . . . . . . .
Activating/deactivating the keypad lock . . . . . . . . . . . . . . . . . . . . . . . . . . . . . . . . . . . .
6
6
6
7
7
8
8
Operating the telephone, menu overview . . . . . . . 9
Display keys . . . . . . . . . . . . . . . . . . . . . . . . . . . . . . . . . . . . . . . . . . . . . . . . . . . . . . . . . . 9
Advisory tones . . . . . . . . . . . . . . . . . . . . . . . . . . . . . . . . . . . . . . . . . . . . . . . . . . . . . . . . 9
Display in idle status . . . . . . . . . . . . . . . . . . . . . . . . . . . . . . . . . . . . . . . . . . . . . . . . . . . 9
Main menu . . . . . . . . . . . . . . . . . . . . . . . . . . . . . . . . . . . . . . . . . . . . . . . . . . . . . . . . . . 9
Character map and text entry . . . . . . . . . . . . . . . . . . . . . . . . . . . . . . . . . . . . . . . . . . . 10
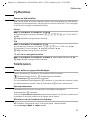
Date and time . . . . . . . . . . . . . . . . . . . . . . . . . . . . . 11
Setting the date and the time . . . . . . . . . . . . . . . . . . . . . . . . . . . . . . . . . . . . . . . . . . . 11
Making calls . . . . . . . . . . . . . . . . . . . . . . . . . . . . . . 11
Making external calls and ending a call . . . . . . . . . . . . . . . . . . . . . . . . . . . . . . . . . . . 11
Answering a call . . . . . . . . . . . . . . . . . . . . . . . . . . . . . . . . . . . . . . . . . . . . . . . . . . . . . 11
Muting the handset . . . . . . . . . . . . . . . . . . . . . . . . . . . . . . . . . . . . . . . . . . . . . . . . . . . 11
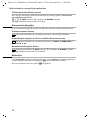
Using the directory and other lists . . . . . . . . . . . . 12
Directory and speed dial list . . . . . . . . . . . . . . . . . . . . . . . . . . . . . . . . . . . . . . . . . . . . 12
Last number redial list . . . . . . . . . . . . . . . . . . . . . . . . . . . . . . . . . . . . . . . . . . . . . . . . . 14
Caller list . . . . . . . . . . . . . . . . . . . . . . . . . . . . . . . . . . . . . . . . . . . . . . . . . . . . . . . . . . . 14
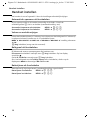
Operating more than one handset . . . . . . . . . . . . 15
Internal calls, ending a call . . . . . . . . . . . . . . . . . . . . . . . . . . . . . . . . . . . . . . . . . . . . .
Forwarding a call to another handset . . . . . . . . . . . . . . . . . . . . . . . . . . . . . . . . . . . . .
Int. consultation call . . . . . . . . . . . . . . . . . . . . . . . . . . . . . . . . . . . . . . . . . . . . . . . . . .
Accepting/rejecting call waiting during an internal call . . . . . . . . . . . . . . . . . . . . . . .
15
15
15
15
3
Gigaset CL1 / englisch / A31008-A021-B001-1-6Z19 / CL1IVZ.fm / 11.09.2003
Contents
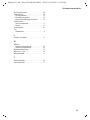
Handset settings . . . . . . . . . . . . . . . . . . . . . . . . . . . 16
Activating/deactivating Auto Answer . . . . . . . . . . . . . . . . . . . . . . . . . . . . . . . . . . . . .
Changing the volume and melody . . . . . . . . . . . . . . . . . . . . . . . . . . . . . . . . . . . . . . .
Activating/deactivating the ringer . . . . . . . . . . . . . . . . . . . . . . . . . . . . . . . . . . . . . . . .
Activating/deactivating the battery warning tone . . . . . . . . . . . . . . . . . . . . . . . . . . . .
Restoring the handset factory settings . . . . . . . . . . . . . . . . . . . . . . . . . . . . . . . . . . . .
16
16
16
16
17
Appendix . . . . . . . . . . . . . . . . . . . . . . . . . . . . . . . . . 18
Care and contact with liquid . . . . . . . . . . . . . . . . . . . . . . . . . . . . . . . . . . . . . . . . . . . .
Service (Customer Care) . . . . . . . . . . . . . . . . . . . . . . . . . . . . . . . . . . . . . . . . . . . . . . .
Technical Data . . . . . . . . . . . . . . . . . . . . . . . . . . . . . . . . . . . . . . . . . . . . . . . . . . . . . . .
Warranty Certificate Ireland . . . . . . . . . . . . . . . . . . . . . . . . . . . . . . . . . . . . . . . . . . . . .
18
18
19
19
Index . . . . . . . . . . . . . . . . . . . . . . . . . . . . . . . . . . . . . 21
4
Gigaset CL1 / English / A31008-A021-B001-1-6Z19 / starting.fm / 11.09.2003
Safety precautions
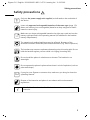
Safety precautions
$
!
Only use the power supply unit supplied, as indicated on the underside of
the device.
Insert only approved rechargeable batteries of the same type (page 19)!
Never use ordinary (non-rechargeable) batteries as they may pose a health
hazard or cause injury.
‹
Œ
Make sure you insert rechargeable batteries the right way round and use the
battery type specified in this operating manual (as indicated in the handset
battery compartment).
The operation of medical appliances may be affected. Be aware of the
technical conditions within the particular environment (e.g. doctor's practice).
The handset may cause an unpleasant humming noise in hearing aids. Do not
hold the handset against your ear while it is ringing (incoming call).
Do not install the phone in a bathroom or shower. The handset is not
watertight.
Do not operate the phone in places where there is a risk of explosion (such as
paint workshops).
ƒ
If you give your Gigaset to someone else, make sure you also give them the
operating manual.
Dispose of the batteries and phone in accordance with environmental
regulations.
i
Not all of the functions described in these instructions are available in all
countries.
5
Gigaset CL1 / English / A31008-A021-B001-1-6Z19 / starting.fm / 11.09.2003
Making the handset ready for service
Making the handset ready for service
The pack contains:
◆ Gigaset CL 1 handset
◆ Power supply unit with power cord
◆ Two batteries
◆ Charger
◆ Operating instructions
Removing the protective film
The display is protected by a plastic film. Please remove the protective film!
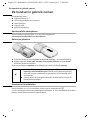
Inserting the batteries
◆ Insert the batteries the right way round – see illustration left.
◆ Place the cover on the battery compartment about 3 mm down from the latch and
push it up until it clicks into position.
To open the cover, press on the indentation and push downwards.
◆ Insert only approved, rechargeable batteries of the same type
W
(page 19)! Never use normal batteries, since these could lead to a
health hazard or cause injury.
◆ Do not use a non-Siemens charging unit as this could damage the
batteries.
Deactivating/activating the handset
To switch the handset on or off, press the end call key a.
Afterwards the confirmation tone rings (see page 9). A deactivated handset activates
automatically when placed in the charging shell.
6
Gigaset CL1 / English / A31008-A021-B001-1-6Z19 / starting.fm / 11.09.2003
Making the handset ready for service
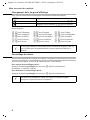
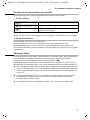
Registering the handset on the base
You must initiate handset registration on the handset and on the base.
1. On the handset
[_______________]
MENU
Press display key to open menu.
[__________] [______________________________________________]
[__________]
REGISTER HS
OK
Select the menu item and confirm.
[______]
OK
Enter the system PIN for the base station (default
setting: 0000) and confirm.
During the following registration process, all symbols will flash in the display.
2. At the base
Within 60 secs. of entering the system PIN:
Press the registration/paging key on the base for approximately 3 seconds (see also the
operating instructions for the base). The registration process then starts. When
registration is successful, the handset is automatically assigned the lowest unassigned
number.
Charging batteries
Leave the handset in the charger for the batteries to charge - the batteries are supplied
uncharged. The battery charging process is indicated on the handset by a flashing
battery symbol V.
Once the batteries have been charged, your phone is ready for service. You need to set
the date and time to ensure that the time of incoming calls can be noted correctly
(page 11).
◆ We recommend initially charging the batteries without interruption for the amount
of time listed in the table (page 19) – irrespective of the charging status icon! After
a while the charge capacity of the batteries will decrease for technical reasons.
◆ Once initial charging is complete, you can replace your handset in the charger after
each call. Charging is controlled electronically. This ensures optimum battery
charging without overloading.
◆ The batteries heat up during charging. This is normal and not dangerous.
7
Gigaset CL1 / English / A31008-A021-B001-1-6Z19 / starting.fm / 11.09.2003
Making the handset ready for service
Setting the display language
You can view the display texts in different languages.
Press display key to open menu.
[______________]
MENU
Using the keys O 2 call up the procedure.
Press keys Q 2 for English (default status).
Other languages:
Q 1 for German,
Q 5 for Spanish,
Q N for Danish,
1 1 for Finnish,
1 4 for Turkish,
i
Q I for French,
Q L for Portuguese,
Q O for Norwegian,
1 2 for Czech,
1 5 for Russian,
Q 4 for Italian,
Q M for Dutch,
1 Q for Swedish,
1 I for Polish,
1 L for Croatian.
If you set the wrong language in error, use the above mentioned
procedure to set the correct one!
Activating/deactivating the keypad lock
You can lock the handset keypad if, for example, you are carrying the handset. This
protects the keypad against inadvertent activation. The key lock switches itself off
automatically if you receive a call. It re-activates when the call is finished.
Activating keypad lock:
Hold down hash key R (confirmation tone).
In the display, the icon Ø appears.
Deactivating keypad lock:
Hold down hash key R (confirmation tone).
i
8
Emergency numbers cannot be dialled if the key lock is activated!
Gigaset CL1 / English / A31008-A021-B001-1-6Z19 / guidance.fm / 11.09.2003
Operating the telephone, menu overview
Operating the telephone, menu overview
Display keys
Display keys are the long keys directly below the display. Your handset has two display
keys. Each of these is operated like a rocker key, i.e. it can be pushed down on the lefthand as well as the right-hand side. Dependent on the current operating status and
which side of the key you press, you will call up a particular function. This function is
shown directly above the display key.
Þ
Ü
INT MENU
Display keys
Advisory tones
Your handset uses "advisory tones" to tell you about different activities and statuses.
◆ Rising tone sequence (confirmation tone):
The action has been carried out or the entry is correct.
◆ Falling tone sequence (error tone):
The function has not worked or the entry is incorrect.
Display in idle status
Reverting to idle status from anywhere in the menu
Press the end call key a for around 1 second, or do not press any key. After 60 secs.
the display will automatically return to idle status.
Changes that you have not confirmed by pressing OK will be rejected.
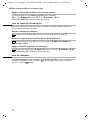
Main menu
To open the main menu, press the following display key in idle status, MENU and use
the s key to scroll to the desired entry.
1
2
3
4
5
SEL SERVICES
AUDIO SET
BASE SET
MAILBOX
REGISTER HS
The available
menu entries are dependent
on your base.
9
Gigaset CL1 / English / A31008-A021-B001-1-6Z19 / guidance.fm / 11.09.2003
Operating the telephone, menu overview
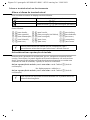
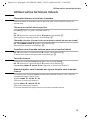
Character map and text entry
Either press the relevant key several times, or hold down.
1
2
I
4
5
L
M
N
O
Q
P
10
1x
2x 3x 4x 5x 6x
Space
1
A
B
C
2
D
E
F
3
G
H
I
4
J
K
L
5
M
N
O
6
P
Q
R
S
T
U
V
8
7
W
X
Y
Z
9
+
0
-
|
?
*
/
(
)
,
_
Gigaset CL1 / English / A31008-A021-B001-1-6Z19 / telephony.fm / 11.09.2003
Date and time
Date and time
Setting the date and the time
Settings for date and time are needed to ensure that these are shown correctly for
incoming calls. You can choose between a 12-hour and 24-hour display (default setting)
to display the time.
Date
¢ BASE SET ¢ DATE/TIME ¢ DATE SET
¢ Enter day/month/year (example: 2 Q Q 5 Q I for "20.05.2003") ¢ OK
MENU
Press a and hold (return to idle status).
Time
¢ BASE SET ¢ DATE/TIME ¢ CLOCK SET
¢ Enter hours/minutes (example: 1 O Q 5 for "19.05") ¢ OK
With the 12-hour display: ¢ select a.m. or p.m. ¢ OK
MENU
Press a and hold (return to idle status).
Setting the 12 or 24 hour display
MENU
OK
¢
¢ BASE SET ¢ DATE/TIME ¢ CLOCK MODE ¢ 12 H or 24 H are to be selected
Press a and hold (return to idle status).
Making calls
Making external calls and ending a call
External calls are calls using the public telephone network.
~ (Enter the number), press c (talk key).
To end the call: Press a ("end call" key).
You can also first press the talk key c (you hear a dial tone) and then enter the phone
number. You can use the end call key a to cancel dialling.
Answering a call
Your handset rings, and the call appears in the display.
Press the talk key c.
If the auto answer function is activated (page 16) you just need to lift the handset out
of the charger to take the call.
Muting the handset
Press INT. The call is "held" (wait melody).
To end the call: MENU ¢ GO BACK ¢ OK.
11
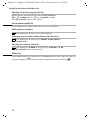
Gigaset CL1 / English / A31008-A021-B001-1-6Z19 / directories.fm / 11.09.2003
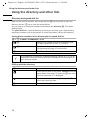
Using the directory and other lists
Using the directory and other lists
Directory and speed dial list
Both lists are used in the same way, except that the h key is pressed to open the
directory and the C key to open the speed dial list.
You can save up to 20 phone numbers and names in the directory h. This makes
dialling easier.
The speed dial list is a special directory in which you can store up to 10 particularly
important numbers such as the prefixes of network providers (call-by-call numbers).
Saving phone numbers in the directory/in the speed dial list
h or C ¢ MENU ¢ NEW ENTRY ¢ OK
[______]
OK
Enter phone number and confirm (directory max.
22 digits, speed dial list max. of 12 digits).
[______]
OK
Enter a name (up to 12 characters)
(for inputting text page 10) and confirm.
a
i
Hold down (back to idle status).
If your phone is connected to a PABX that requires a prefix (e.g. "0") for an
outside line, then you must save this prefix number as the first digit in all
your directory entries.
Dialling with the directory
h
Open the directory.
Enter the first letter of the name. Example: with the
name Emma (first letter "E") press the I key twice.
The first name with "E" is displayed.
If there is more than one entry starting with "E",
select the name you want.
c
12
Press the talk key. The number is dialled.
Gigaset CL1 / English / A31008-A021-B001-1-6Z19 / directories.fm / 11.09.2003
Using the directory and other lists
Dialling with the speed dial list (call-by-call)
You can use this function to put a network provider prefix in front of the telephone
number (linking).
C ¢ Select entry ¢ MENU ¢ EDIT ENTRY ¢ OK
either ...
Key in phone number:
Enter the telephone number.
or ...
Select a number from the directory:
h
Open the directory.
[__________] OK
[______]
Select phone number and confirm.
... and then
c
Press the talk key. The number is dialled.
Saving speed dial numbers for fast access
You can save eight numbers in the speed dial list for fast access. The digits for fast access
(2-9) are entered at the first position in the name field.
C ¢ Select entry ¢ MENU ¢ SHOW ENTRY ¢ OK
[___________
OK ]
Confirm to change to the name field.
[___________
u]
Move the cursor to the first position in the name
field.
Enter speed dialling number, e.g. 2
(Press key 4 x, to enter the digit 2).
Confirm.
[___________
OK ]
In order to use speed dialling:
Hold down the speed dial number e.g. 2:
The speed dial number saved is displayed.
Enter phone number to be "linked".
c
Press the talk key.
Managing entries in the directory and in the speed dial list
h or C ¢ Select entry ¢ MENU ¢ Select desired function:
EDIT ENTRY
NEW ENTRY
SHOW ENTRY
DELETE
13
Gigaset CL1 / English / A31008-A021-B001-1-6Z19 / directories.fm / 11.09.2003
Using the directory and other lists
Deleting the directory/speed dial list
Deletion means the selected list is selected with all entries.
h or C ¢ MENU ¢ Press L key ¢ DELETE ? ¢ OK
Press a and hold (return to idle status).
Last number redial list
The last five phone numbers dialled are shown in the redial list.
Dialling phone numbers
Þ Press display key ¢ Select entry ¢ Press c key
Changing entries and/or adding them to the directory
Þ Press display key ¢ Select entry ¢ MENU ¢ EDIT ENTRY or
COPY TO DIR
¢ OK
Deleting last number redial list
Þ Press display key ¢ MENU ¢ Press L key ¢ DELETE ? ¢ OK
Press a and hold (return to idle status).
Caller list
In the caller list the phone numbers of the missed calls are saved. Open the caller list
using the display key Û. New messages are signalled by the icon flashing Û .
14
Gigaset CL1 / English / A31008-A021-B001-1-6Z19 / registration.fm / 11.09.2003
Operating more than one handset
Operating more than one handset
Internal calls, ending a call
Internal calls are free of charge between handsets that have the same base.
Calling a specific handset
Press INT 2 (e.g., for handset 2)
Or:
Select INT ¢ handset ¢ Press c talk key
To end the call: Press the a end call key.
Group call (calling all handsets at the same time)
INT ¢ CALL ALL ¢ Press c talk key
To end the call: Press the a end call key.
Forwarding a call to another handset
¢ handset ¢ Press c talk key
The internal user answers: Press the "end call" key a.
Select INT
Int. consultation call
You can make an internal call while an external call is in progress.
Select INT ¢ handset ¢ Press c talk key
To end the call: MENU ¢ GO BACK ¢ OK (back to outside caller)
Accepting/rejecting call waiting during an internal call
If you get an external call while conducting an internal call, you will hear the call
waiting tone (short tone).
To accept the call: MENU ¢ ACCEPT ¢ OK
(you speak to the outside caller).
To reject the call: MENU ¢ REJECT ¢ OK
(you speak to the internal caller).
The rejected call waiting tone can still be heard on other handsets.
15
Gigaset CL1 / English / A31008-A021-B001-1-6Z19 / settings_bs_hs.fm / 11.09.2003
Handset settings
Handset settings
Your handset has default settings. You can change these settings individually.
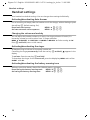
Activating/deactivating Auto Answer
For an incoming call simply take the handset out of the charger, without having to press
the talk key c (default setting: On).
Deactivate auto answer:
MENU ¢ O 1 Q
Activate automatic call acceptance:
MENU ¢ O 1 1
Changing the volume and melody
You can adjust the handset volume to 3 levels, the ringer volume to 6 levels (6 is
increasing volume) as well as select from 10 ringer melodies.
MENU ¢ AUDIO SET ¢ H/SET VOL or RINGER or MELODY ¢ Select setting ¢ OK
Press a and hold (return to idle status).
Activating/deactivating the ringer
All handsets ring to indicate an incoming outside call.
Cancelling the ringer permanently: Press the star key P and hold, Ú appears in the
display.
To activate: Press the star key P and hold.
To deactivate the ringer for the current call, press the display key MENU and confirm
SILENT with OK.
Activating/deactivating the battery warning tone
Advisory tone when battery almost flat (default setting: activated).
Deactivating the battery warning tone:
MENU ¢ O 4 Q
Activating the battery warning tone:
MENU ¢ O 4 1
16
Gigaset CL1 / English / A31008-A021-B001-1-6Z19 / settings_bs_hs.fm / 11.09.2003
Handset settings
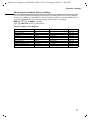
Restoring the handset factory settings
You can restore individual settings and changes you have made to the factory default.
Entries in the directory, the caller list, the last number redial list, and the speed dial list
as well as registration of the handset with the base remain unchanged.
MENU
¢ O I ¢ RESET ? ¢ OK
Press a and hold (return to idle status).
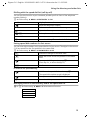
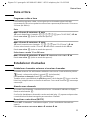
Factory settings of the handset
Loudspeaker volume
Ringer volume
Ringer melody
Directory
Last number redial list
Calls list
Speed dial list
Auto answer
Battery warning tone
Display language
Default settings
1
5
1
empty
empty
empty
empty
activated
activated
English
Status after reset
1
5
1
unaffected
unaffected
unaffected
unaffected
activated
activated
English
Description
page 16
page 16
page 16
page 12
page 14
page 14
page 12
page 16
page 16
page 8
17
Gigaset CL1 / English / A31008-A021-B001-1-6Z19 / appendix.fm / 11.09.2003
Appendix
Appendix
Care and contact with liquid !
Wipe the handset with a damp cloth (use no solvent) or an antistatic cloth. Never use
a dry cloth. This can cause static.
If the handset should come into contact with liquid, on no account switch the device
on. Remove all batteries immediately.
Allow the liquid to drain out of the device, and then pat all parts of the device dry.
Keep the handset with the batteries removed in a warm, dry place for at least 72 hours.
In many cases, you will then be able to use it again.
Service (Customer Care)
Our online support on the Internet:
www.my-siemens.com/customercare
If you need any repair work, or have a guarantee claim to submit, our
Service Center Ireland
18 50 77 72 77
will give you quick and reliable assistance. Keep your till receipt handy.
You will find more service numbers in the section entitled "Service" at the end of
this booklet.
Replacement or repair services are not offered in countries where our product is not sold
by authorised dealers.
Country-specific features have been taken into account.
The CL1 handset is licensed throughout the EU and in Switzerland.
The CE mark certifies conformity of the device with the essential requirements of the
R&TTE directive.
Excerpt from the original declaration:
"We, Siemens AG, declare, that the above mentioned product is manufactured according to our Full
Quality Assurance System certified by CETECOM ICT Services GmbH with ANNEX V of the R&TTEDirective 99/5/EC. The presumption of conformity with the essential requirements regarding
Council Directive 99/5/EC is ensured"
Senior Approvals Manager
The Declaration of Conformity (DoC) has been signed. In case of need, a copy of the original DoC
can be made available via the company hotline.
18
Gigaset CL1 / English / A31008-A021-B001-1-6Z19 / appendix.fm / 11.09.2003
Appendix
Technical Data
Recommended batteries
Nickel-metal-hydride (NiMH) - Type AAA
Sanyo Twicell 700 (700 mAh)
Sanyo Twicell 650 (650 mAh)
Panasonic 700mAh "for Dect" (700 mAh)
GP 700 mAh (700 mAh)
Varta Phone Power AAA (700 mAh)
YDT AAA SUPER 700 (700 mAh)
(status as of operating instructions printing)
The device is supplied with approved batteries.
Handset operating times/charging times
Capacity
(mAh)
Standby time
(hours)
Calling time
(hours)
Charging time
(hours)
700
up to 200 (8 days)
approx. 16
approx. 5
These operating and charging times apply only when using the recommended batteries.
Warranty Certificate Ireland
◆ Without prejudice to any claim the user (customer) may have in relation to the
◆
◆
◆
◆
dealer or retailer, the customer shall be granted a manufacturer's Guarantee under
the conditions set out below:
In the case of new devices and their components exhibiting defects resulting from
manufacturing and/or material faults within 24 months of purchase, Siemens shall,
at its own option and free of charge, either replace the device with another device
reflecting the current state of the art, or repair the said device. In respect of parts
subject to wear and tear (including but not limited to, batteries, keypads, casing),
this warranty shall be valid for six months from the date of purchase.
This Guarantee shall be invalid if the device defect is attributable to improper care or
use and/or failure to comply with information contained in the user manuals. In
particular claims under the Guarantee cannot be made if:
– The device is opened (this is classed as third party intervention)
– Repairs or other work is done by persons not authorised by Siemens.
– Components on the printed circuit board are manipulated
– The software is manipulated
– Defects or damage caused by dropping, breaking, lightning or ingress of
moisture. This also applies if defects or damage was caused by mechanical,
chemical, radio interference or thermal factors (e.g.: microwave, sauna etc.)
– Devices fitted with accessories not authorised by Siemens
This Guarantee shall not apply to or extend to services performed by the authorised
dealer or the customer themselves (e.g. installation, configuration, software
downloads). User manuals and any software supplied on a separate data medium
shall be excluded from the Guarantee.
The purchase receipt, together with the date of purchase, shall be required as
evidence for invoking the Guarantee. Claims under the Guarantee must be
submitted within two months of the Guarantee default becoming evident.
19
Gigaset CL1 / English / A31008-A021-B001-1-6Z19 / appendix.fm / 11.09.2003
Appendix
◆ Ownership of devices or components replaced by and returned to Siemens shall vest
in Siemens.
◆ This Guarantee shall apply to new devices purchased in the European Union. For
Products sold in the Republic of Ireland the Guarantee is issued by Siemens Ireland
Limited, Ballymoss Road, Sandyford Industrial Estate, Dublin 18 - The Republic of
Ireland.
◆ Any other claims resulting out of or in connection with the device shall be excluded
from this Guarantee. Nothing in this Guarantee shall attempt to limit or exclude a
Customers Statutory Rights, nor the manufacturer's liability for death or personal
injury resulting from its negligence.
◆ The duration of the Guarantee shall not be extended by services rendered under the
terms of the Guarantee.
◆ Insofar as no Guarantee default exists, Siemens reserves the right to charge the
customer for replacement or repair.
◆ The above provisions do not imply a change in the burden of proof to the detriment
of the customer.
To make a claim under this Guarantee, please contact the Siemens helpdesk on
1850 777 277. This number is also to be found in the accompanying user guide.
20
Gigaset CL1 / englisch / A31008-A021-B001-1-6Z19 / CL1SIX.fm / 11.09.2003
Index
Index
A
F
Activating
Handset . . . . . . . . . . . . . . . . . . . . . 6
Keypad lock . . . . . . . . . . . . . . . . . . . 8
Activating/deactivating the ringer . . . 16
Advisory tone . . . . . . . . . . . . . . . . . . . 9
Auto answer . . . . . . . . . . . . . . . . . . . 16
Fast access
Speed dial number . . . . . . . . . . . . . 13
B
Batteries
Charging . . . . . . . . . . . . . . . . . . . . . 7
Inserting . . . . . . . . . . . . . . . . . . . . . 6
Recommended . . . . . . . . . . . . . . . 19
Battery warning tone . . . . . . . . . . . . 16
C
Call-by-Call . . . . . . . . . . . . . . . . . . . . 13
Calls list . . . . . . . . . . . . . . . . . . . . 2, 14
Character map . . . . . . . . . . . . . . . . . 10
Charging status display . . . . . . . . . . . . 7
Customer Care (Service) . . . . . . . . . . 18
Customer service . . . . . . . . . . . . . . . 18
D
Date and time . . . . . . . . . . . . . . . . . . 11
Date setting . . . . . . . . . . . . . . . . . . . 11
Deactivate
Handset . . . . . . . . . . . . . . . . . . . . . 6
Deactivating
Keypad lock . . . . . . . . . . . . . . . . . . . 8
Dialling
With directory . . . . . . . . . . . . . . . . 12
With the speed dial list . . . . . . . . . . 13
Directory . . . . . . . . . . . . . . . . . . . . . 12
Editing an entry . . . . . . . . . . . . . . . 13
Managing entries . . . . . . . . . . . . . . 13
Saving phone number/entry . . . . . . 12
Display
In idle status . . . . . . . . . . . . . . . . . . 9
Setting the language . . . . . . . . . . . . 8
E
End call . . . . . . . . . . . . . . . . . . . . . . 11
H
Handset
Activate/deactivate . . . . . . . . . . . . . . 6
Muting . . . . . . . . . . . . . . . . . . . . . . 11
Operating and charging times . . . . . 19
Preparing to use . . . . . . . . . . . . . . . . 6
Registering . . . . . . . . . . . . . . . . . . . . 7
Reset . . . . . . . . . . . . . . . . . . . . . . . 17
Handset charging times . . . . . . . . . . . 19
I
Idle status (display) . . . . . . . . . . . . . . . 9
Internal
Telephone number . . . . . . . . . . . . . . 2
K
Keypad lock . . . . . . . . . . . . . . . . . . . . . 8
L
Last number redial . . . . . . . . . . . . . . . 14
M
Main menu . . . . . . . . . . . . . . . . . . . . . 9
Making calls
Answering a call . . . . . . . . . . . . . . . 11
External . . . . . . . . . . . . . . . . . . . . . 11
Menu management . . . . . . . . . . . . . . . 9
Microphone . . . . . . . . . . . . . . . . . . . . . 2
Muting (handset) . . . . . . . . . . . . . . . . 11
N
Number see Phone number . . . . . . . . 12
O
Operating time for handset . . . . . . . . 19
P
Power supply unit . . . . . . . . . . . . . . . . 5
21
Gigaset CL1 / englisch / A31008-A021-B001-1-6Z19 / CL1SIX.fm / 11.09.2003
Index
S
Safety precautions . . . . . . . . . . . . . . . . 5
Service . . . . . . . . . . . . . . . . . . . . . . . 18
Set time by . . . . . . . . . . . . . . . . . . . . 11
Speed dial list . . . . . . . . . . . . . . . . . . 12
Deleting all entries . . . . . . . . . . . . . 14
Speed dial number . . . . . . . . . . . . . . 13
T
Technical data . . . . . . . . . . . . . . . . . . 19
Telephone number
Copying from the caller list . . . . . . . 14
Saving . . . . . . . . . . . . . . . . . . . . . . 12
Text entry . . . . . . . . . . . . . . . . . . . . . 10
Tone
Advisory tone . . . . . . . . . . . . . . . . . 9
W
Wait melody . . . . . . . . . . . . . . . . . . . 11
Warning tone, see tone . . . . . . . . . . . 16
Warranty . . . . . . . . . . . . . . . . . . . . . . 19
22
Gigaset CL1 / französisch / A31008-A021-B001-1-6Z19 / cover_innen.fm / 9/12/03
s
FRANÇAIS
Be inspired
Gigaset CL1 / français / A31008-A021-B001-1-6Z19 / overview.fm / 9/12/03
Présentation du combiné
Présentation du combiné
Numéro interne
du combiné
Heure
Journal des appels
Accès à
◆ Messagerie externe
◆ Journal des appels
Bis
Liste des numéros
internes
1
22-35
Þ Ü
V
INT MENU
Touche Décrocher
◆ Prendre un appel
◆ Lancer la
numérotation
désactivée
Menu
Touche Raccrocher et
marche/arrêt
◆ Fin de communication
◆ Annuler la fonction en
cours
◆ Menu précédent
(appui bref)
◆ Retour au repos (appui
prolongé)
◆ Combiné marche/arrêt
Touche R
◆ Double appel
(flashing)
◆ Pause interchiffre
Touche Etoile
Ecran (affichage)
Touches écran
Accès aux fonctions
affichées en regard
Touche répertoire
◆ Sonnerie activée/
Charge de la batterie
U pleine
clignotante : batterie
presque vide
= vide
Touche répertoire
secondaire
Ouvrir le répertoire
Microphone
secondaire
Touche Dièse
Verrouillage clavier activé/désactivé
Les différents affichages ont la signification suivante :
Affichage
Þ
Ü
[_______]
INT
[_______________]
MENU
t ou s
u ou v
ß
[_______]
OK
2
Signification
Répétition de la numérotation (bis) : ouvrir la liste des 5 derniers numéros
composés (p. 15)
Symbole en forme d’enveloppe : ouvrir le journal des appels ou de la
messagerie externe (p. 15).
Interne : ouvrir la liste des combinés internes.
Menu : ouvrir le menu principal à l’état de repos.
Selon la situation, ouvrir un menu contextuel.
Se déplacer ligne par ligne vers le haut ou le bas.
Déplacer le curseur vers la gauche ou la droite.
Touche Effacer : effacer de la droite vers la gauche. Efface le caractère à gauche
du curseur.
Activer la fonction du menu ou enregistrer l'entrée en la validant.
Gigaset CL1 / französisch / A31008-A021-B001-1-6Z19 / CL1IVZ.fm / 9/12/03
Sommaire
Sommaire
Présentation du combiné . . . . . . . . . . . . . . . . . . . . . 2
Consignes de sécurité . . . . . . . . . . . . . . . . . . . . . . . . 5
Mise en service du combiné . . . . . . . . . . . . . . . . . . . 6
Retirer le film protecteur . . . . . . . . . . . . . . . . . . . . . . . . . . . . . . . . . . . . . . . . . . . . . . . .
Mettre les batteries en place . . . . . . . . . . . . . . . . . . . . . . . . . . . . . . . . . . . . . . . . . . . . .
Combiné : Marche/arrêt . . . . . . . . . . . . . . . . . . . . . . . . . . . . . . . . . . . . . . . . . . . . . . . . .
Inscription du combiné sur la base . . . . . . . . . . . . . . . . . . . . . . . . . . . . . . . . . . . . . . . .
Charge des batteries . . . . . . . . . . . . . . . . . . . . . . . . . . . . . . . . . . . . . . . . . . . . . . . . . . .
Changement de la langue d'affichage . . . . . . . . . . . . . . . . . . . . . . . . . . . . . . . . . . . . .
Verrouillage du clavier . . . . . . . . . . . . . . . . . . . . . . . . . . . . . . . . . . . . . . . . . . . . . . . . . .
6
6
6
7
7
8
8
Manipulation du téléphone et de son menu . . . . . . 9
Touches écran . . . . . . . . . . . . . . . . . . . . . . . . . . . . . . . . . . . . . . . . . . . . . . . . . . . . . . . . 9
Tonalités d'avertissement . . . . . . . . . . . . . . . . . . . . . . . . . . . . . . . . . . . . . . . . . . . . . . . 9
Ecran à l’état de repos . . . . . . . . . . . . . . . . . . . . . . . . . . . . . . . . . . . . . . . . . . . . . . . . . . 9
Menu principal . . . . . . . . . . . . . . . . . . . . . . . . . . . . . . . . . . . . . . . . . . . . . . . . . . . . . . . . 9
Tableau des caractères et saisie de texte . . . . . . . . . . . . . . . . . . . . . . . . . . . . . . . . . . 10
Date/Heure . . . . . . . . . . . . . . . . . . . . . . . . . . . . . . . 11
Réglage de la date et l'heure . . . . . . . . . . . . . . . . . . . . . . . . . . . . . . . . . . . . . . . . . . . . 11
Téléphoner . . . . . . . . . . . . . . . . . . . . . . . . . . . . . . . 11
Appels externes . . . . . . . . . . . . . . . . . . . . . . . . . . . . . . . . . . . . . . . . . . . . . . . . . . . . . . 11
Prise d’appel . . . . . . . . . . . . . . . . . . . . . . . . . . . . . . . . . . . . . . . . . . . . . . . . . . . . . . . . . 12
Secret microphone . . . . . . . . . . . . . . . . . . . . . . . . . . . . . . . . . . . . . . . . . . . . . . . . . . . 12
Utilisation des répertoires et autres listes . . . . . . 13
Répertoires principal et secondaire . . . . . . . . . . . . . . . . . . . . . . . . . . . . . . . . . . . . . . . 13
Liste des numéros bis . . . . . . . . . . . . . . . . . . . . . . . . . . . . . . . . . . . . . . . . . . . . . . . . . 15
Journal des appels . . . . . . . . . . . . . . . . . . . . . . . . . . . . . . . . . . . . . . . . . . . . . . . . . . . . 15
Utilisation de plusieurs combinés . . . . . . . . . . . . 16
Appels internes . . . . . . . . . . . . . . . . . . . . . . . . . . . . . . . . . . . . . . . . . . . . . . . . . . . . . .
Renvoi de l’appel vers un autre combiné . . . . . . . . . . . . . . . . . . . . . . . . . . . . . . . . . .
Double appel interne . . . . . . . . . . . . . . . . . . . . . . . . . . . . . . . . . . . . . . . . . . . . . . . . . .
Signal d'appel durant une communication interne . . . . . . . . . . . . . . . . . . . . . . . . . .
16
16
16
16
3
Gigaset CL1 / französisch / A31008-A021-B001-1-6Z19 / CL1IVZ.fm / 9/12/03
Sommaire
Réglage du combiné . . . . . . . . . . . . . . . . . . . . . . . . 17
Activation/désactivation du décroché automatique . . . . . . . . . . . . . . . . . . . . . . . . . .
Réglage du volume d'écoute et de la sonnerie . . . . . . . . . . . . . . . . . . . . . . . . . . . . . .
Activation/désactivation de la sonnerie . . . . . . . . . . . . . . . . . . . . . . . . . . . . . . . . . . . .
Activer/désactiver l'alarme batterie . . . . . . . . . . . . . . . . . . . . . . . . . . . . . . . . . . . . . . .
Réinitialisation de la configuration usine du combiné . . . . . . . . . . . . . . . . . . . . . . . .
17
17
17
17
18
Annexe . . . . . . . . . . . . . . . . . . . . . . . . . . . . . . . . . . . 19
Entretien et contact avec les liquides . . . . . . . . . . . . . . . . . . . . . . . . . . . . . . . . . . . . . .
Service clients (Customer Care) . . . . . . . . . . . . . . . . . . . . . . . . . . . . . . . . . . . . . . . . . .
Caractéristiques techniques . . . . . . . . . . . . . . . . . . . . . . . . . . . . . . . . . . . . . . . . . . . . .
Certificat de garantie France . . . . . . . . . . . . . . . . . . . . . . . . . . . . . . . . . . . . . . . . . . . .
Certificat de garantie Belgique . . . . . . . . . . . . . . . . . . . . . . . . . . . . . . . . . . . . . . . . . .
Garantie Suisse . . . . . . . . . . . . . . . . . . . . . . . . . . . . . . . . . . . . . . . . . . . . . . . . . . . . . . .
19
19
20
20
22
22
Index . . . . . . . . . . . . . . . . . . . . . . . . . . . . . . . . . . . . . 23
4
Gigaset CL1 / français / A31008-A021-B001-1-6Z19 / starting.fm / 9/12/03
Consignes de sécurité
Consignes de sécurité
$
!
Utilisez uniquement le bloc-secteur fourni, tel qu'il est identifié sous la base.
Utilisez uniquement des batteries rechargeables homologuées de même
type (p. 20) ! N’utilisez jamais des piles normales (non rechargeables) qui
peuvent endommager l'appareil, représenter un risque pour la santé et
provoquer des blessures.
‹
Œ
Lors de la mise en place des batteries rechargeables, respectez la polarité et
utilisez le type de batterie indiqué dans le mode d'emploi (se reporter aux
symboles figurant dans le logement des batteries du combiné).
Le fonctionnement des équipements médicaux peut être perturbé. Respectez
les conditions imposées par l'environnement.
Le combiné peut provoquer un bourdonnement désagréable dans les aides
auditives. De façon générale, ne placez pas d'appareil électronique à proximité
immédiate du téléphone. Pendant la sonnerie (arrivée d'un appel), ne tenez
pas le combiné directement collé à l'oreille.
N’utilisez pas le téléphone dans une salle de bains ou une douche. Le combiné
n'est pas protégé contre les projections d'eau (p. 19).
N’utilisez pas le téléphone dans un environnement présentant un risque
d’explosion (par ex. ateliers industriels de peinture).
ƒ
Lorsque vous confiez votre Gigaset à un tiers, joignez toujours le mode
d'emploi.
La mise au rebut des batteries ou du téléphone doit se faire en conformité avec
les règles de respect de l'environnement. Ne pas jeter les batteries au feu, ni
les ouvrir ou les mettre en court-circuit.
◆ Lorsque le verrouillage du clavier est activé (p. 8), les numéros d'appel
i
d'urgence ne peuvent pas être composés !
◆ Les fonctions décrites dans ce mode d'emploi ne sont pas toutes
disponibles dans certains pays.
5
Gigaset CL1 / français / A31008-A021-B001-1-6Z19 / starting.fm / 9/12/03
Mise en service du combiné
Mise en service du combiné
L'emballage contient les éléments suivants :
◆ Combiné Gigaset CL 1
◆ Bloc-secteur et cordon électrique
◆ Deux batteries
◆ Chargeur
◆ Mode d’emploi
Retirer le film protecteur
L'écran est protégé par un film. Retirez le film protecteur !
Mettre les batteries en place
◆ Placez les batteries en respectant la polarité (voir schéma de gauche).
◆ Positionnez le couvercle décalé d'environ 3 mm par rapport au bas du téléphone
puis poussez-le vers le haut jusqu'à ce qu'il s'enclenche.
Pour ouvrir le couvercle, appuyez sur l’évidement et poussez le couvercle vers le bas.
◆ Utilisez uniquement des batteries rechargeables de même type
W
(p. 20) ! N’utilisez jamais de piles normales (non rechargeables) qui
pourraient endommager l'appareil, représenter un risque pour la
santé et provoquer des blessures.
◆ N’utilisez pas de chargeur externe, les batteries pourraient être
endommagées.
Combiné : Marche/arrêt
Pour mettre en marche ou arrêter le combiné, maintenir appuyée la touche
Raccrocher a.
Le bip de confirmation retentit (voir p. 9). Lorsque vous placez un combiné éteint sur le
chargeur, il est automatiquement mis en marche.
6
Gigaset CL1 / français / A31008-A021-B001-1-6Z19 / starting.fm / 9/12/03
Mise en service du combiné
Inscription du combiné sur la base
Vous devez effectuer l'inscription du combiné au niveau du combiné puis sur la base.
1. Sur le combiné
[_______________]
MENU
Appuyer sur la touche écran pour ouvrir le menu.
[__________] [______________________________________________]
[__________]
INSCR COMBI
OK
Sélectionner et valider.
[______]
OK
Entrer le PIN système de la base (valeur par défaut :
0000) et valider.
Tout l'écran clignote.
2. Sur la base
Dans les 60 s qui suivent l'entrée du PIN système :
Appuyez sur la touche Inscription/Paging à l'avant de la base pendant environ 3 s (voir
mode d'emploi de la base). La procédure d'inscription commence. Une fois l'inscription
achevée, le premier numéro interne libre est automatiquement attribué au combiné.
Charge des batteries
Pour charger les batteries, placez le combiné sur le chargeur. Les batteries ne sont pas
chargées à la livraison. La charge des batteries est signalée sur le combiné par le
clignotement du symbole de batterie V.
Une fois les batteries chargées, votre téléphone est prêt à être utilisé. Pour que
l'horodatage des appels soit correct, vous devez encore paramétrer la date et l'heure
(p. 11).
◆ Lors de la première charge, nous recommandons de charger la batterie de manière
ininterrompue (voir tableau p. 20), indépendamment de l’état de charge affiché !
Pour des raisons techniques, la capacité de charge des batteries diminue au bout
d'un certain temps. Elles peuvent devoir être simultanément remplacées à terme.
◆ Après la première opération de charge, vous pouvez reposer votre combiné sur le
chargeur après une communication. La charge est gérée de façon électronique. Les
batteries sont ainsi préservées, sans risque de surcharge.
◆ Les batteries chauffent pendant la charge ; il s'agit d'un phénomène normal et sans
danger.
7
Gigaset CL1 / français / A31008-A021-B001-1-6Z19 / starting.fm / 9/12/03
Mise en service du combiné
Changement de la langue d'affichage
Vous pouvez faire afficher les messages d’écran dans différentes langues.
Appuyer sur la touche écran pour ouvrir le menu.
[______________]
MENU
Activer la procédure à l'aide des touches O 2.
Appuyer sur les touches Q I pour le français.
Autres langues :
Q 1 pour l’allemand,
Q 5 pour l’espagnol,
Q N pour le danois,
1 1 pour le finnois,
1 4 pour le turc,
i
Q 2 pour l’anglais,
Q L pour le portugais,
Q O pour le norvégien,
1 2 pour le tchèque,
1 5 pour le russe,
Q 4 pour l’italien,
Q M pour le néerlandais,
1 Q pour le suédois,
1 I pour le polonais,
1 L pour le croate.
Si vous avez malencontreusement défini la mauvaise langue (et que ce
qui s'affiche reste incompréhensible), suivez la procédure décrite cidessus !
Verrouillage du clavier
Vous pouvez verrouiller les touches du combiné. Les appuis involontaires sur les touches
sont ainsi inopérants. Le verrouillage du clavier est automatiquement désactivé lorsque
vous recevez un appel. A la fin de la communication, il est réactivé.
Pour activer le verrouillage clavier :
Appuyez de manière prolongée sur la touche R (bip de confirmation).
Le symbole Ø s'affiche à l'écran.
Pour désactiver le verrouillage clavier :
Appuyez de manière prolongée sur la touche R (bip de confirmation).
i
8
Lorsque le verrouillage du clavier est activé, les numéros d'appel
d'urgence ne peuvent pas être composés !
Gigaset CL1 / français / A31008-A021-B001-1-6Z19 / guidance.fm / 9/12/03
Manipulation du téléphone et de son menu
Manipulation du téléphone et de son menu
Touches écran
Les touches écran sont les touches oblongues placées sous l'écran. Votre combiné est
équipé de deux touches écran. Chacune d'entre elles s'utilise comme une bascule,
c'est-à-dire que vous pouvez appuyer sur le côté gauche ou sur le côté droit de la touche.
En fonction de la situation et du côté sur lequel vous appuyez, vous appelez une
fonction précise. Cette fonction est affichée directement au-dessus de la touche écran.
Þ
Ü
INT MENU
Touches écran
Tonalités d'avertissement
Votre combiné vous informe par un signal sonore des différentes activités et des
différents états.
◆ Séquence de tonalités montantes (bip de confirmation) :
L'action a été exécutée correctement ou l'entrée est correcte.
◆ Séquence de tonalités descendantes (bip d'erreur) :
Echec de l'action ou entrée erronée.
Ecran à l’état de repos
Retour à l'état de repos depuis n'importe quel niveau du menu
◆ Appuyer pendant env. 1 s sur la touche Raccrocher a
◆ N'appuyer sur aucune touche : après 60 s, l'écran passe automatiquement à l'état de
repos.
Les modifications que vous n'avez pas validées en appuyant sur OK seront rejetées.
Menu principal
Pour ouvrir le menu principal, appuyez sur la touche écran, le téléphone étant en mode
repos MENU et faites défiler avecsjusqu’à l'entrée souhaitée.
1
2
3
4
5
SVC RESEAU
AUDIO > SONS
REGLAGE BASE
MESSAGERIE
INSCR COMBI
Les offres de menu
proposées
dépendent de la base.
9
Gigaset CL1 / français / A31008-A021-B001-1-6Z19 / guidance.fm / 9/12/03
Manipulation du téléphone et de son menu
Tableau des caractères et saisie de texte
Appuyez sur la touche correspondante plusieurs fois ou de manière prolongée.
1
2
I
4
5
L
M
N
O
Q
P
10
1x
2x 3x 4x 5x 6x
Espace
1
A
B
C
2
D
E
F
3
G
H
I
4
J
K
L
5
M
N
O
6
P
Q
R
S
T
U
V
8
7
W
X
Y
Z
9
+
0
-
|
?
*
/
(
)
,
_
Gigaset CL1 / français / A31008-A021-B001-1-6Z19 / telephony.fm / 9/12/03
Date/Heure
Date/Heure
Réglage de la date et l'heure
Le réglage de la date et de l'heure est nécessaire pour que l'heure d'arrivée des appels
s'affiche correctement. Pour l'heure, vous avez le choix entre deux modes : 12 heures et
24 heures (valeur par défaut).
Date
¢ REGLAGE BASE ¢ DATE > HEURE ¢ DATE
¢ Entrer jour/mois/année (exemple : 2 Q Q 5 Q I pour « 20.05.2003 »)
¢ OK
MENU
Appuyer sur a de manière prolongée (retour à l'état de repos).
Heure
¢ REGLAGE BASE ¢ DATE > HEURE ¢ HEURE
¢ Entrer les heures/minutes (exemple : 1 O Q 5 pour « 19h05 ») ¢ OK
En mode 12 heures : ¢ Sélectionner la demi-journée ¢ OK
MENU
Appuyer sur a de manière prolongée (retour à l'état de repos).
Sélection du mode d’affichage 12 ou 24 heures
¢ REGLAGE BASE ¢ DATE > HEURE ¢ MODE 12/24 ¢
¢ OK
MENU
24 H
Sélectionner 12 H ou
Appuyer sur a de manière prolongée (retour à l'état de repos).
Téléphoner
Appels externes
Les appels externes sont les appels à destination du réseau public
~ (entrer le numéro d’appel), appuyer sur c (touche Décrocher).
Pour mettre fin à la communication : appuyer sur a (touche Raccrocher).
Vous pouvez également appuyer d'abord sur la touche Décrocher c (vous entendez
une tonalité libre) puis entrer le numéro. Utilisez la touche Raccrocher a si vous
souhaitez annuler la numérotation.
11
Gigaset CL1 / français / A31008-A021-B001-1-6Z19 / telephony.fm / 9/12/03
Téléphoner
Prise d’appel
Votre combiné sonne, l'appel est affiché à l'écran.
Appuyez sur la touche « Décrocher » c.
Lorsque la fonction Décroché automatique est activée (p. 17), il vous suffit de prendre
le combiné sur son chargeur pour accepter l'appel.
Secret microphone
Appuyer sur INT. La communication est mise en attente ( musique d'attente).
Pour revenir à la communication : MENU ¢ RETOUR ¢ OK.
12
Gigaset CL1 / français / A31008-A021-B001-1-6Z19 / directories.fm / 9/12/03
Utilisation des répertoires et autres listes
Utilisation des répertoires et autres listes
Répertoires principal et secondaire
L'utilisation des deux répertoires est identique, seule différence : pour ouvrir le
répertoire principal il faut appuyer sur la touche h, tandis que la touche Csert à
ouvrir le répertoire secondaire.
Dans le répertoire principal h, vous pouvez enregistrer jusqu'à 20 numéros avec les
noms correspondants. Cela vous facilite la numérotation.
Le répertoire secondaire est un répertoire spécial dans lequel vous pouvez enregistrer
10 numéros particulièrement importants fréquemment utilisés, des numéros de
services ou encore des préfixes qu’il est possible de chaîner à un numéro.
Enregistrer un numéro dans le répertoire principal/secondaire
h ou C ¢ MENU ¢ NOUV ENTREE ¢ OK
a
i
[______]
OK
Entrer le numéro et valider (répertoire principal max.
22 caractères, répertoire secondaire max.
12 caractères).
[______]
OK
Entrer un nom (max. 12 caractères)
(saisie de texte p. 10) et valider.
Appuyer de manière prolongée (retour à l'état de
repos).
Si votre téléphone est raccordé à un autocommutateur privé utilisant un
préfixe (par exemple « 0 ») pour appeler à l'extérieur, vous devez entrer
ce préfixe comme premier chiffre de l'entrée du répertoire.
Composer un numéro depuis le répertoire
h
Ouvrir le répertoire principal.
Entrer la première lettre du nom. Exemple : pour le
nom « Emma » (première lettre « E ») appuyer deux
fois sur la touche I. Le premier nom commençant
par « E » est affiché.
Lorsqu'il y a plusieurs entrées commençant par « E »,
sélectionner le nom souhaité.
c
Appuyer sur la touche Décrocher. Le numéro est
composé.
13
Gigaset CL1 / français / A31008-A021-B001-1-6Z19 / directories.fm / 9/12/03
Utilisation des répertoires et autres listes
Composer un numéro depuis le répertoire secondaire
Le répertoire secondaire peut être utilisé en complément de la même manière que le
répertoire principal. De plus il permet de chaîner par exemple un préfixe et un numéro.
C ¢ Sélectionner une entrée ¢ MENU ¢ UTILISER ¢ OK
soit ...
Compléter le numéro :
Compléter le numéro.
Chaîner avec un numéro issu du répertoire
principal :
soit ...
h
Ouvrir le répertoire principal.
[_________] OK
[_____]
Sélectionner le numéro et valider.
... ensuite
c
Appuyer sur la touche Décrocher. L'ensemble des
deux numéros est composé.
Touches de raccourci vers le répertoire secondaire
Pour un accès rapide et fréquent, vous pouvez affecter des touches de raccourci
(touches 2 à 9) à huit des dix numéros du répertoire secondaire. Pour ce faire, il suffit
d'indiquer comme suit le numéro de touche devant le nom associé au numéro.
C ¢ Sélectionner l’entrée ¢ MENU ¢ AFFICHER ¢ OK
[___________]
OK
Valider pour passer dans le champ de saisie du nom.
[___________]
u
Déplacer le curseur en première position devant le
nom.
Entrer le numéro de la touche raccourci, p. ex. 2
(appuyer 4 x sur la touche pour entrer le chiffre 2).
Valider.
[___________]
OK
Pour utiliser une touche raccourci :
Appuyer de manière prolongée sur la touche
raccourci, p. ex. 2 :
Le numéro correspondant est affiché.
Compléter éventuellement le numéro.
c
Appuyer sur la touche Décrocher.
Gestion des entrées des répertoires principal et secondaire
h ou C ¢ Sélectionner l’entrée ¢ MENU ¢ Sélectionner la fonction souhaitée :
UTILISER
NOUV ENTREE
AFFICHER
EFFACER
14
Gigaset CL1 / français / A31008-A021-B001-1-6Z19 / directories.fm / 9/12/03
Utilisation des répertoires et autres listes
Effacer le répertoire principal/secondaire
L'effacement concerne toutes les entrées du répertoire concerné.
h ou C ¢ MENU ¢ Appuyer sur la touche L ¢ EFFACER ? ¢ OK
Appuyer sur a de manière prolongée (retour à l'état de repos).
Liste des numéros bis
Les cinq derniers numéros appelés se trouvent dans la liste des numéros bis.
Composer un numéro
Þ Appuyer sur la touche écran ¢ Sélectionner l’entrée ¢ Appuyer sur la touche c
Modifier et/ou enregistrer des numéros « BIS » dans le répertoire principal
Þ Appuyer sur la touche écran ¢ Sélectionner l’entrée ¢ MENU ¢ UTILISER ou
VERS REPERT
¢ OK
Effacer la liste des numéros bis
Þ Appuyer sur la touche écran ¢ MENU ¢ Appuyer sur la touche L
¢ EFFACER ? ¢ OK
Appuyer sur a de manière prolongée (retour à l'état de repos).
Journal des appels
Le journal des appels consigne les numéros correspondants aux appels reçus mais
non décrochés (appels perdus durant votre absence par ex.). Pour ouvrir le journal des
appels, appuyez sur la touche écran Û. Les nouveaux messages sont signalés par le
clignotement du symbole Û .
15
Gigaset CL1 / français / A31008-A021-B001-1-6Z19 / registration.fm / 9/12/03
Utilisation de plusieurs combinés
Utilisation de plusieurs combinés
Appels internes
Les appels internes sont des communications gratuites entre combinés de la même
base.
Appeler un combiné en particulier
Appuyer sur INT 2 (par ex. pour le combiné 2)
Ou :
¢ Sélectionner le combiné ¢ Appuyer sur la touche Décrocher c
Pour mettre fin à une communication : appuyer sur la touche Raccrocher a.
INT
Appeler tous les combinés (appel général)
¢ APP GENERAL ¢ Appuyer sur la touche Décrocher c
Pour mettre fin à la communication : appuyer sur la touche Raccrocher a.
INT
Renvoi de l’appel vers un autre combiné
¢ Sélectionner le combiné ¢ Appuyer sur la touche Décrocher c
Le correspondant interne répond : appuyer sur la touche Raccrocher a.
INT
Double appel interne
Lors d'une communication externe, vous pouvez passer un appel interne.
INT ¢ Sélectionner le combiné ¢ Appuyer sur la touche Décrocher c
Pour mettre fin à la communication : MENU ¢ RETOUR ¢ OK (reprendre avec le
correspondant externe)
Signal d'appel durant une communication interne
Si vous recevez un appel externe alors que vous êtes en communication interne, un
signal d’appel (bip court) retentit.
Accepter : MENU ¢ ACCEPTER ¢ OK
(vous êtes en communication avec le correspondant externe, la communication interne
est interrompue).
Refuser : MENU ¢ REFUSER ¢ OK
(vous restez en communication avec le correspondant interne).
Le signal d'appel refusé peut être entendu sur d'autres combinés.
16
Gigaset CL1 / français / A31008-A021-B001-1-6Z19 / settings_bs_hs.fm / 9/12/03
Réglage du combiné
Réglage du combiné
Votre combiné est préconfiguré. Vous pouvez toutefois personnaliser les réglages.
Activation/désactivation du décroché automatique
En cas d'appel, il vous suffit de prendre le combiné sur le chargeur sans avoir à appuyer
sur la touche Décrocher c (valeur par défaut : activé).
Pour désactiver le décroché automatique : MENU ¢ O 1 Q
Pour activer le décroché automatique :
MENU ¢ O 1 1
Réglage du volume d'écoute et de la sonnerie
Vous pouvez régler le volume d'écoute du combiné sur 3 niveaux, le volume de la
sonnerie sur 6 niveaux (6 = crescendo) et choisir entre 10 mélodies pour la sonnerie.
MENU ¢ AUDIO > SONS ¢ VOL ECOUT ou SONNERIE ou MELODIE ¢ Sélectionner le
réglage ¢ OK
Appuyer sur a de manière prolongée (retour à l'état de repos).
Activation/désactivation de la sonnerie
En cas d’appel entrant, tous les combinés sonnent immédiatement.
Désactiver la sonnerie de manière permanente : depuis l'état de repos, appuyer sur la
touche Etoile P de manière prolongée, Ú apparaît à l’écran.
Pour l’activer : depuis l'état de repos, appuyer sur la touche Etoile P de manière
prolongée.
Pour désactiver la sonnerie pour l’appel en cours, appuyez sur la touche écran MENU et
validez SILENCE avec OK.
Activer/désactiver l'alarme batterie
Bip d’avertissement pour les batteries presque vides (valeur par défaut : activé).
Pour désactiver l’alarme batterie :
MENU ¢ O 4 Q
Pour activer l’alarme batterie :
MENU ¢ O 4 1
17
Gigaset CL1 / français / A31008-A021-B001-1-6Z19 / settings_bs_hs.fm / 9/12/03
Réglage du combiné
Réinitialisation de la configuration usine du combiné
Vous pouvez annuler les réglages personnalisés et restaurer les paramètre d’usine. Les
entrées des répertoires principal et secondaire, du journal des appels, la liste des
numéros bis ainsi que l’inscription du combiné sur la base restent inchangés.
MENU
¢ O I ¢ REINIT ? ¢ OK
Appuyer sur a de manière prolongée (retour à l'état de repos).
Configuration usine du combiné
Volume du combiné
Volume de la sonnerie
Mélodie de la sonnerie
Répertoire principal
Liste des numéros bis
Journal des appels
Répertoire secondaire
Décroché automatique
Alarme batterie
Langue d’affichage
18
Configuration usine
1
5
1
vide
vide
vide
vide
activé
activé
spécifique au pays
Etat après réinitialisation
1
5
1
conservé
conservé
conservé
conservé
activé
activé
spécifique au pays
Description
p. 17
p. 17
p. 17
p. 13
p. 15
p. 15
p. 13
p. 17
p. 17
p. 8
Gigaset CL1 / français / A31008-A021-B001-1-6Z19 / appendix.fm / 9/12/03
Annexe
Annexe
Entretien et contact avec les liquides !
Essuyez la base et le combiné avec un chiffon légèrement humecté (pas de solvant) ou
un chiffon antistatique. N’utilisez jamais de chiffon sec. Risque de chargement en
électricité statique.
Si le combiné entre en contact avec un liquide, n’allumez en aucun cas l'appareil.
Retirez immédiatement toutes les batteries.
Laissez s'écouler le liquide de l'appareil puis essuyez ensuite tous les éléments jusqu'à
ce qu'ils soient secs.
Placez le combiné, sans batteries, dans un endroit sec et chaud, pendant au moins
72 heures. Il est possible que le combiné puisse fonctionner à nouveau. Si ce n’est pas
le cas, contactez le service client pour connaître la marche à suivre. Le bénéfice de la
garantie ne pourra cependant pas être accordé.
Service clients (Customer Care)
Notre assistance en ligne sur Internet :
www.my-siemens.com/customercare
En cas de réparation nécessaire ou pour faire valoir la garantie, vous trouverez une
aide simple et efficace auprès de notre
centre de services France
01 56 38 42 00
centre de services Belgique
078 15 22 21
centre de services Suisse
080 8212 000
www.my-siemens.com/contact
Veuillez préparer votre ticket de caisse.
Service pour la Suisse :
Omnicom AG
Industrie Neuhof 9
3422 Kirchberg b. Berne
Vous trouverez d'autres numéros de service à la fin du manuel d'utilisation, à la
rubrique « Service ».
Nous ne proposons pas d'échange ou de services de réparation dans les pays où notre
produit n'est pas distribué pas des revendeurs autorisés.
Les spécificités nationales sont prises en compte.
Le combiné CL1 est autorisé dans toute l'Union Européenne et en Suisse.
La conformité de l'appareil avec les exigences fondamentales de la directive européenne
R&TTE (99/05/CEE), est confirmée par le label CE.
19
Gigaset CL1 / français / A31008-A021-B001-1-6Z19 / appendix.fm / 9/12/03
Annexe
Extrait de la déclaration originale :
„We, Siemens AG, declare, that the above mentioned product is manufactured according to our Full
Quality Assurance System certified by CETECOM ICT Services GmbH in compliance with ANNEX V
of the R&TTE-Directive 99/5/EC. The presumption of conformity with the essential requirements
regarding Council Directive 99/5/EC is ensured“
Senior Approvals Manager
The Declaration of Conformity (DoC) has been signed. In case of need a copy of the original DoC
can be made available via the company hotline.
Caractéristiques techniques
Batteries recommandées
Nickel Hydrure Métallique (NiMH) - type AAA
Sanyo Twicell 700 (700 mAh)
Sanyo Twicell 650 (650 mAh)
Panasonic 700mAh « for Dect » (700 mAh)
GP 700mAh (700 mAh)
Varta Phone Power AAA (700 mAh)
YDT AAA SUPER 700 (700 mAh)
(état à l’impression de ce mode d’emploi)
L’appareil est livré avec des batteries homologuées.
Autonomie/temps de charge du combiné
Capacité
(mAh)
Autonomie en
veille (heures)
Autonomie en
communication
(heures)
Temps de charge
(heures)
700
jusqu’à 200
(env. 8 jours)
environ 16
environ 5
Les autonomies et temps de charge indiqués ne sont valables que lors de l'utilisation des
batteries recommandées.
Certificat de garantie France
La présente garantie bénéficie, dans les conditions ci-après, à l'utilisateur final ayant
procédé à l'acquisition de ce Produit Siemens (ci-après le Client). Pour la France, la
présente garantie ne limite en rien, ni ne supprime, les droits du Client issus des articles
1641 et suivants du Code Civil Français relatifs à la garantie légale des vices cachés.
◆ Si ce Produit Siemens et ses composants présentent des vices de fabrication et/ou de
matière dans les 24 mois suivant son achat neuf, Siemens procédera à sa réparation
ou le remplacera gratuitement et de sa propre initiative par un modèle identique ou
par un modèle équivalent correspondant à l'état actuel de la technique. La présente
garantie n'est valable que pendant une période de 6 mois à compter de sa date
d'achat neuf pour les pièces et éléments de ce Produit Siemens qui sont soumis à
l'usure (par ex. batteries, claviers et boîtiers).
20
Gigaset CL1 / français / A31008-A021-B001-1-6Z19 / appendix.fm / 9/12/03
Annexe
◆ La présente garantie n'est pas valable en cas de non-respect des informations
◆
◆
◆
◆
◆
◆
◆
◆
contenues dans le mode d'emploi, ou en cas de dommage manifestement provoqué
par une manipulation ou une utilisation inadéquate.
La présente garantie ne s'applique pas aux éléments et données fournis par le
vendeur du Produit Siemens, ou installés par le Client lui-même (par ex.
l'installation, la configuration, le téléchargement de logiciels, l'enregistrement de
données). Sont également exclus de la présente garantie le manuel d'utilisation
ainsi que tout logiciel fourni séparément sur un autre support de données, ainsi que
les Produits Siemens dotés d'éléments ou d'accessoires non homologués par
Siemens, les Produits dont les dommages sont causés volontairement ou par
négligence (bris, casses, humidité, température inadéquate, oxydation, infiltration
de liquide, surtension électrique, incendie, ou tout autre cas de force majeure), les
Produits Siemens présentant des traces d'ouverture (ou de réparation et/ou
modifications effectuées par un tiers non agréé par Siemens), et les Produits
envoyés en port dû à Siemens ou à son centre agréé.
La facture ou le ticket de caisse comportant la date d'achat par le Client sert de
preuve de garantie. Une copie de ce document justifiant de la date de départ de la
garantie est à fournir pour toute mise en œuvre de la présente garantie. Un
justificatif d'achat doit au moins comporter le nom et le logo de l'enseigne, la date
d'achat, le modèle concerné et le prix. Le Client doit faire valoir ses droits à garantie
dans les deux mois de la découverte du vice du téléphone, sauf disposition
impérative contraire.
Le présent Produit Siemens ou ses composants échangés et renvoyés à Siemens ou
son prestataire deviennent propriété de Siemens.
La présente garantie s'applique uniquement aux Produits Siemens neufs achetés au
sein de l'Union Européenne. Elle est délivrée par Siemens SAS, 9, rue du Docteur
Finot, F- 93200 SAINT-DENIS pour les téléphones achetés en France.
La présente garantie représente l'unique recours du Client à l'encontre de Siemens
pour la réparation des vices affectant le Produit Siemens. Siemens exclut donc toute
autre responsabilité au titre des dommages matériels et immatériels directs ou
indirects, et notamment la réparation de tout préjudice financier découlant d'une
perte de bénéfice ou d'exploitation, ainsi que des pertes de données. En aucun cas
Siemens n'est responsable des dommages survenus aux biens du Client sur lesquels
est connecté, relié ou intégré le Produit Siemens, sauf disposition impérative
contraire.
De même, la responsabilité de Siemens ne peut être mise en cause pour les
dommages survenus aux logiciels intégrés dans le Produit Siemens par le Client ou
tout tiers à l'exception de Siemens.
La mise en jeu de la présente garantie, et l'échange ou la réparation concernant le
Produit Siemens ne font pas naître une nouvelle période de garantie, qui demeure
en tout état de cause la durée initiale, sauf disposition impérative contraire.
Siemens se réserve le droit de facturer au client les frais découlant du remplacement
ou de la réparation du Produit Siemens lorsque le défaut du Produit Siemens n'est
pas couvert par la garantie. De même Siemens pourra facturer au Client les frais
découlant de ses interventions sur un Produit Siemens remis par le Client et en bon
état de fonctionnement.
21
Gigaset CL1 / français / A31008-A021-B001-1-6Z19 / appendix.fm / 9/12/03
Annexe
Pour faire usage de la présente garantie, veuillez contacter en priorité votre revendeur,
ou bien le service téléphonique de Siemens dont vous trouverez le numéro dans le
manuel d'utilisation ci-joint.
Certificat de garantie Belgique
Nonobstant ses droits vis-à-vis du dealer, l'utilisateur (client) peut faire valoir son droit
de garantie aux conditions suivantes :
◆ Si le nouvel appareil ou ses accessoires présentent des défauts dans les 24 mois
après l'achat suite à des vices de fabrication et/ou fautes de matériel, Siemens a le
choix soit de réparer gratuitement l'appareil soit de le remplacer par un autre
appareil de technique récente. Dans le cas de pièces exposées à l'usure (batteries,
clavier, boîtier), cette garantie sera valable pour une période de six mois après la
date d'achat.
◆ Cette garantie n'est pas d'application dans la mesure où le défaut de l'appareil
résulte d'une mauvaise utilisation et/ou du non-respect des instructions contenues
notamment dans le manuel d'utilisateur.
◆ Cette garantie ne s'applique pas aux services qui sont effectués par des dealers
autorisés ou le client lui-même (tels que installation, configuration, téléchargement
de logiciels). Les instructions d'utilisation et logiciels éventuels livrés sur des
supports d'information séparés sont également exclus de cette garantie.
◆ La preuve d'achat datée tient lieu de certificat de garantie. Pour être recevable, tout
appel à cette garantie devra être exercé dans les deux mois après constatation du
défaut.
◆ Les appareils ou les accessoires échangés qui sont retournés à Siemens dans le cadre
du remplacement, deviennent la propriété de Siemens.
◆ Cette garantie est valable pour les nouveaux appareils achetés en Union
Européenne. La garantie pour les appareils achetés en Belgique est assurée par
Siemens S.A, Chaussée de Charleroi 116, B 1060 Bruxelles.
◆ Des droits de garantie autres que ceux stipulés dans cette garantie sont exclus, sauf
si la responsabilité repose sur des dispositions impératives telles que la législation
sur la responsabilité du fait des produits.
◆ La durée de garantie ne se prolonge pas par la prestation de services fournis dans le
cadre de la garantie pendant la période de garantie.
◆ Pour autant qu'il ne s'agisse pas d'un cas de garantie, Siemens se réserve le droit de
facturer au client les frais de réparation ou de remplacement.
◆ Les dispositions susmentionnées n'impliquent aucun changement à la charge de
preuve incombant au client.
Pour bénéficier de cette garantie, veuillez prendre contact téléphoniquement avec
Siemens. Vous trouverez le numéro de téléphone dans le manuel d'utilisateur ci-joint.
Garantie Suisse
La garantie est de 12 mois.
22
Gigaset CL1 / französisch / A31008-A021-B001-1-6Z19 / CL1SIX.fm / 9/12/03
Index
Index
A
D
Activer
verrouillage du clavier . . . . . . . . . . . 8
Activer/désactiver la sonnerie . . . . . . 17
Affichage du témoin de charge . . . . . . 7
Alarme batterie . . . . . . . . . . . . . . . . . 17
Arrêt
combiné . . . . . . . . . . . . . . . . . . . . . 6
Autonomie du combiné . . . . . . . . . . . 20
Date/Heure . . . . . . . . . . . . . . . . . . . . 11
Décroché automatique . . . . . . . . . . . . 17
Désactiver
verrouillage du clavier . . . . . . . . . . . . 8
B
Batteries
charger . . . . . . . . . . . . . . . . . . . . . . 7
insérer. . . . . . . . . . . . . . . . . . . . . . . 6
recommandées . . . . . . . . . . . . . . . 20
Bip d'avertissement, voir tonalité . . . . 17
Bloc-secteur . . . . . . . . . . . . . . . . . . . . 5
C
Caractéristiques techniques . . . . . . . . 20
Combiné
autonomie et temps de charge . . . . 20
inscrire . . . . . . . . . . . . . . . . . . . . . . 7
marche/arrêt . . . . . . . . . . . . . . . . . . 6
mettre en service . . . . . . . . . . . . . . . 6
réinitialiser la configuration usine . . 18
secret micro. . . . . . . . . . . . . . . . . . 12
Composer
avec le répertoire . . . . . . . . . . . . . . 13
avec le répertoire secondaire . . . . . 14
Consignes de sécurité . . . . . . . . . . . . . 5
Customer Care (Service clients) . . . . . 19
E
Ecran
à l’état de repos . . . . . . . . . . . . . . . . 9
régler la langue . . . . . . . . . . . . . . . . 8
Etat de repos (écran) . . . . . . . . . . . . . . 9
F
Fin de communication . . . . . . . . . . . . 11
G
Garantie . . . . . . . . . . . . . . . . . . . . . . 20
I
Interne
numéro . . . . . . . . . . . . . . . . . . . . . . 2
J
Journal des appels . . . . . . . . . . . . . 2, 15
M
Menu principal . . . . . . . . . . . . . . . . . . 9
Microphone . . . . . . . . . . . . . . . . . . . . . 2
Mise en marche
combiné. . . . . . . . . . . . . . . . . . . . . . 6
Musique d'attente . . . . . . . . . . . . . . . 12
23
Gigaset CL1 / französisch / A31008-A021-B001-1-6Z19 / CL1SIX.fm / 9/12/03
Index
N
T
Navigation dans le menu . . . . . . . . . . . 9
Numéro
enregistrer . . . . . . . . . . . . . . . . . . . 13
prendre du journal des appels . . . . . 15
Numérotation rapide
touche raccourci . . . . . . . . . . . . . . 14
Tableau des caractères . . . . . . . . . . . . 10
Téléphoner
en externe . . . . . . . . . . . . . . . . . . . 11
prise d’appel . . . . . . . . . . . . . . . . . . 12
Temps de charge du combiné . . . . . . . 20
Tonalité d’avertissement . . . . . . . . . . . . 9
Touche raccourci . . . . . . . . . . . . . . . . 14
P
Présélection . . . . . . . . . . . . . . . . . . . 14
R
Régler l’heure . . . . . . . . . . . . . . . . . .
Régler la date . . . . . . . . . . . . . . . . . .
Répertoire principal . . . . . . . . . . . . . .
enregistrer un numéro/une entrée .
gérer les entrées . . . . . . . . . . . . . .
modifier une entrée . . . . . . . . . . . .
Répertoire secondaire . . . . . . . . . . . .
effacer toutes les entrées . . . . . . . .
Répétition de la numérotation . . . . . .
11
11
13
13
14
14
13
15
15
S
Saisie de texte . . . . . . . . . . . . . . . . . .
Secret micro (du combiné) . . . . . . . . .
Service . . . . . . . . . . . . . . . . . . . . . . .
Service Clientèle . . . . . . . . . . . . . . . .
24
10
12
19
19
V
Verrouillage du clavier . . . . . . . . . . . . . 8
Gigaset CL1 / italiano / A31008-A021-B001-1-6Z19 / cover_front.fm / 11.09.2003
s
ITALIANO
Be inspired
Gigaset CL1 / italiano / A31008-A021-B001-1-6Z19 / overview.fm / 11.09.2003
Breve descrizione del portatile
Breve descrizione del portatile
Numero interno
del portatile
Ora
Livello di carica della
batteria
Lista di coloro
che hanno chiamato
Accesso a
◆ T-NetBox (segreteria
telefonica di rete della
Deutsche Telekom)
◆ Lista delle chiamate
perse
=scarica
1
22-35
Þ Ü
V
INT MENU
U carica
se lampeggia: la batteria è
quasi scarica
Display (campo di
visualizzazione)
Menu
Tasti del display
Ripetizione della
selezione
Richiamare le funzioni attuali
sul display
Lista dei numeri
interni
Tasto di fine chiamata e
tasto acceso/spento
◆ Terminare la chiamata
◆ Annullare la funzione
◆ Tornare al livello
Tasto della rubrica
Tasto di impegno linea
◆ Rispondere ad una
precedente del menu
(premere brevemente)
◆ Tornare in stand-by
(premere a lungo)
◆ Portatile on/off
chiamata
◆ Avviare la composizione
Tasto R
◆ Consultazione (flash)
◆ Inserire una pausa di
selezione
Tasto asterisco
◆ Squillo att./dis.
Microfono
Tasto di selezione rapida
Aprire lista di selezione rapida
Tasto cancelletto
Blocco tastiera att./dis.
Le diverse visualizzazioni del display hanno il seguente significato:
Visualizzazione
Þ
Ü
[_______]
INT
[_______________]
MENU
t ovvero s
u ovvero v
ß
[_______]
OK
2
Significando quando si preme un tasto
Ripetizione della selezione: apre la lista degli ultimi 5 numeri di telefono (pag. 14)
Simbolo busta delle lettere: apre la Lista delle chiamate perse e la lista con
il T-NetBox (pag. 14).
Interno: apre la lista dei portatili interni.
Menu: apre il menu principale in stand-by.
Durante una telefonata, apre un menu relativo alla condizione.
Scorrere di una riga verso l’alto e/o il basso.
Spostare il cursore di un carattere verso sinistra e/o destra.
Tasto di cancellazione: cancella l’inserimento di un carattere per volta da destra
verso sinistra. Cancella il carattere a sinistra del cursore.
conferma la funzione menu e/o salva l’inserimento confermandolo.
Gigaset CL1 / italiano / A31008-A021-B001-1-6Z19 / CL1IVZ.fm / 11.09.2003
Indice
Indice
Breve descrizione del portatile . . . . . . . . . . . . . . . . . 2
Avvertenze di sicurezza . . . . . . . . . . . . . . . . . . . . . . . 5
Mettere in funzione il portatile . . . . . . . . . . . . . . . . . 6
Rimuovere la pellicola . . . . . . . . . . . . . . . . . . . . . . . . . . . . . . . . . . . . . . . . . . . . . . . . . .
Inserire le batterie . . . . . . . . . . . . . . . . . . . . . . . . . . . . . . . . . . . . . . . . . . . . . . . . . . . . .
Accensione/spegnimento del portatile . . . . . . . . . . . . . . . . . . . . . . . . . . . . . . . . . . . .
Registrazione del portatile nella base . . . . . . . . . . . . . . . . . . . . . . . . . . . . . . . . . . . . .
Caricare le batterie . . . . . . . . . . . . . . . . . . . . . . . . . . . . . . . . . . . . . . . . . . . . . . . . . . . .
Impostare la lingua del display . . . . . . . . . . . . . . . . . . . . . . . . . . . . . . . . . . . . . . . . . . .
Attivare/disattivareil blocco della tastiera . . . . . . . . . . . . . . . . . . . . . . . . . . . . . . . . . . .
6
6
6
7
7
8
8
Comando del telefono e schema del menu . . . . . . . 9
Tasti del display . . . . . . . . . . . . . . . . . . . . . . . . . . . . . . . . . . . . . . . . . . . . . . . . . . . . . . . 9
Toni di avviso . . . . . . . . . . . . . . . . . . . . . . . . . . . . . . . . . . . . . . . . . . . . . . . . . . . . . . . . . 9
Display in stand-by . . . . . . . . . . . . . . . . . . . . . . . . . . . . . . . . . . . . . . . . . . . . . . . . . . . . 9
Menu principale . . . . . . . . . . . . . . . . . . . . . . . . . . . . . . . . . . . . . . . . . . . . . . . . . . . . . . . 9
Set di caratteri e inserimento testo . . . . . . . . . . . . . . . . . . . . . . . . . . . . . . . . . . . . . . 10
Funzioni orarie . . . . . . . . . . . . . . . . . . . . . . . . . . . . 11
Impostare data e ora . . . . . . . . . . . . . . . . . . . . . . . . . . . . . . . . . . . . . . . . . . . . . . . . . . 11
Telefonare . . . . . . . . . . . . . . . . . . . . . . . . . . . . . . . . 11
Telefonare sulla linea esterna e terminare una chiamata . . . . . . . . . . . . . . . . . . . . . . 11
Rispondere ad una chiamata . . . . . . . . . . . . . . . . . . . . . . . . . . . . . . . . . . . . . . . . . . . . 11
Azzerare l'audio del portatile . . . . . . . . . . . . . . . . . . . . . . . . . . . . . . . . . . . . . . . . . . . . 11
Utilizzare la rubrica e altre liste . . . . . . . . . . . . . . 12
Rubrica e lista di selezione rapida . . . . . . . . . . . . . . . . . . . . . . . . . . . . . . . . . . . . . . . . 12
Lista di ripetizione automatica della selezione . . . . . . . . . . . . . . . . . . . . . . . . . . . . . . 14
Lista delle chiamate perse . . . . . . . . . . . . . . . . . . . . . . . . . . . . . . . . . . . . . . . . . . . . . . 14
Utilizzare più portatili . . . . . . . . . . . . . . . . . . . . . . 15
Telefonare sulla linea interna e terminare la chiamata . . . . . . . . . . . . . . . . . . . . . . . .
Trasferire la conversazione su un altro portatile . . . . . . . . . . . . . . . . . . . . . . . . . . . . .
Consultazione sulla linea interna . . . . . . . . . . . . . . . . . . . . . . . . . . . . . . . . . . . . . . . .
Accettare/respingere avvisi di chiamata durante una chiamata interna . . . . . . . . . .
15
15
15
15
3
Gigaset CL1 / italiano / A31008-A021-B001-1-6Z19 / CL1IVZ.fm / 11.09.2003
Indice
Impostare il portatile . . . . . . . . . . . . . . . . . . . . . . . 16
Attivare/disattivare la risposta automatica . . . . . . . . . . . . . . . . . . . . . . . . . . . . . . . . .
Cambiare il volume e la melodia . . . . . . . . . . . . . . . . . . . . . . . . . . . . . . . . . . . . . . . . .
Attivazione/disattivazione dello squillo . . . . . . . . . . . . . . . . . . . . . . . . . . . . . . . . . . . .
Attivazione/disattivazione del tono di avviso della batteria . . . . . . . . . . . . . . . . . . . .
Ripristinare i parametri iniziali del portatile . . . . . . . . . . . . . . . . . . . . . . . . . . . . . . . .
16
16
16
16
16
Appendice . . . . . . . . . . . . . . . . . . . . . . . . . . . . . . . . 18
Manutenzione e contatto con liquidi . . . . . . . . . . . . . . . . . . . . . . . . . . . . . . . . . . . . . .
Assistenza tecnica . . . . . . . . . . . . . . . . . . . . . . . . . . . . . . . . . . . . . . . . . . . . . . . . . . . .
Marcatura CE . . . . . . . . . . . . . . . . . . . . . . . . . . . . . . . . . . . . . . . . . . . . . . . . . . . . . . . .
Dati tecnici . . . . . . . . . . . . . . . . . . . . . . . . . . . . . . . . . . . . . . . . . . . . . . . . . . . . . . . . . .
Condizioni di Garanzia . . . . . . . . . . . . . . . . . . . . . . . . . . . . . . . . . . . . . . . . . . . . . . . . .
Garanzia Svizzera . . . . . . . . . . . . . . . . . . . . . . . . . . . . . . . . . . . . . . . . . . . . . . . . . . . . .
18
18
19
19
20
21
Indice alfabetico . . . . . . . . . . . . . . . . . . . . . . . . . . . 22
4
Gigaset CL1 / italiano / A31008-A021-B001-1-6Z19 / starting.fm / 11.09.2003
Avvertenze di sicurezza
Avvertenze di sicurezza
$
!
Utilizzare soltanto l’alimentatore in dotazione, come indicato sul lato
inferiore dell’apparecchio.
Utilizzare soltanto le batterie consigliate e ricaricabili dello stesso tipo
(pag. 19).
Ciò significa, non utilizzare in nessun caso batterie comuni (non ricaricabili),
poiché possono causare danni alla salute e alle persone.
‹
Œ
Inserire le batterie ricaricabili secondo la polarità indicata e utilizzare solo i tipi
di batteria riportati nelle presenti istruzioni d’uso (negli alloggiamenti delle
batterie del portatile sono indicati i simboli).
L’apparecchio può produrre interferenze con apparecchiature mediche.
Osservare quindi le indicazioni presenti nell’ambiente in cui ci si trova (per
esempio ambulatori).
Con apparecchi acustici, il portatile può causare fruscii molto fastidiosi. Non
tenere il portatile direttamente vicino all'orecchio quando squilla (chiamata in
arrivo).
Non collocare la base in bagni o cabine della doccia. Il portatile non è protetto
dagli spruzzi d’acqua .
Non utilizzare il telefono in ambienti dove sussistono rischi di esplosione (per
es. officine di verniciatura).
ƒ
In caso di cessione del Gigaset a terzi, fornire anche le istruzioni d’uso.
Smaltire le batterie ed il telefono secondo quanto prescritto dalle norme per la
tutela dell’ambiente.
i
Non tutte le funzioni descritte nelle presenti istruzioni d’uso sono
disponibili in tutti i Paesi.
5
Gigaset CL1 / italiano / A31008-A021-B001-1-6Z19 / starting.fm / 11.09.2003
Mettere in funzione il portatile
Mettere in funzione il portatile
La confezione contiene:
◆ Mobilteil Gigaset CL 1
◆ Un alimentatore con cavo della corrente
◆ Due batterie
◆ Un supporto di ricarica
◆ Istruzioni per l’uso
Rimuovere la pellicola
Il display è protetto da una pellicola. Rimuovere la pellicola
Inserire le batterie
◆ Inserire le batterie secondo la polarità indicata, vedere la figura a sinistra.
◆ Appoggiare il coperchio abbassato di circa 3 mm e farlo scorrere verso l’alto fino a
chiuderlo ad incastro.
Per aprirlo premere sulla parte incassata e farlo scorrere verso il basso.
◆ Utilizzare soltanto (pag. 19) le batterie consigliate e ricaricabili
W
dello stesso tipo. Ciò vuol dire, non utilizzare batterie comuni, poiché
potrebbero causare danni alla salute e alle persone.
◆ Non utilizzare carica batterie di altre marche, poiché le batterie si
potrebbero danneggiare.
Accensione/spegnimento del portatile
Per accendere e spegnere il portatile premere il tasto di fine chiamata a.
Si sente quindi un tono di conferma (v. pag. 9). Quando viene riposto nel supporto di
ricarica, il portatile spento si attiva automaticamente.
6
Gigaset CL1 / italiano / A31008-A021-B001-1-6Z19 / starting.fm / 11.09.2003
Mettere in funzione il portatile
Registrazione del portatile nella base
La registrazione deve essere attivata nel portatile e nella base.
1. Nel portatile
[_______________]
MENU
Premere il tasto del display per aprire il menu.
[__________] [______________________________________________]
[__________]
REG PORTATIL
OK
Scegliere e confermare.
[______]
OK
Inserire e confermare il PIN di sistema della base
(configurazione al momento della consegna: 0000).
Durante il successivo procedimento di registrazione lampeggiano tutti i simboli del
display.
2. Nella base
Entro 60 sec. dall'inserimento del PIN di sistema:
Premere il tasto di registrazione/paging della base per circa 3 sec. (vedere anche le
istruzioni d'uso della base). Comincia il procedimento di registrazione. Dopo averlo
registrato correttamente, al portatile viene automaticamente assegnato il prossimo
numero interno libero.
Caricare le batterie
Lasciare il portatile sul supporto di ricarica per caricare le batterie, poiché al momento
dell’acquisto non sono cariche. La carica delle batterie viene indicata nel portatile dal
lampeggiamento del simbolo della Vbatteria
Dopo aver caricato le batterie il telefono è pronto all'uso. Per constatare quando sono
giunte le chiamate, bisogna ancora impostare la data e l’ora (pag. 11)
◆ Consigliamo di effettuare la prima carica senza interruzioni, come indicato nella
tabella (pag. 20)- indipendentemente da quanto indicato dal livello di carica. Dopo
un po’ di tempo, la capacità di ricarica della batteria si riduce per cause tecniche.
◆ Una volta eseguita la prima carica, dopo ogni conversazione il portatile può essere
sempre riposto nel supporto di ricarica. La carica è controllata elettronicamente. In
tal modo le batterie si ricaricano senza rovinarsi e senza sovraccaricarsi.
◆ Durante la carica, le batterie si surriscaldano; ciò è normale e non comporta pericoli.
7
Gigaset CL1 / italiano / A31008-A021-B001-1-6Z19 / starting.fm / 11.09.2003
Mettere in funzione il portatile
Impostare la lingua del display
È possibile visualizzare il testo sul display in diverse lingue.
Premere il tasto del display per aprire il menu.
[______________]
MENU
Richiamare la procedura con i tasti O S 2.
Premere i tasti Q 2 per l'inglese (configurazione
al momento dell'acquisto).
Altre lingue:
Q 1 per il tedesco ,
Q 5 per lo spagnolo,
Q N per il danese,
1 1 per il finlandese,
1 4 per il turco,
i
Q I per il francese,
Q L per il portoghese,
Q O per il norvegese,
1 2 per il ceco,
1 5 per il russo,
Q 4 per l’italiano,
Q M per l’olandese,
1 Q per lo svedese,
1 I per il polacco,
1 L per il croato.
Se per sbaglio si è impostata una lingua errata (incomprensibile), seguire
il procedimento di cui sopra.
Attivare/disattivareil blocco della tastiera
Si può "bloccare" la tastiera del portatile, p. es. quando lo si porta con sé. Eventuali
azionamenti involontari rimangono così senza conseguenze. La tastiera si sblocca
automaticamente non appena giunge una chiamata. Al termine della chiamata, la
tastiera si blocca di nuovo.
Attivare il blocco della tastiera:Premere a lungo il tasto cancelletto R (tono di
conferma).
Sul display appare il simbolo Ø.
Disattivare il blocco della:
Premere a lungo il tasto cancelletto R (tono di
tastiera
conferma).
i
8
Con la tastiera bloccata non è possibile selezionare neanche i numeri di
emergenza.
Gigaset CL1 / italiano / A31008-A021-B001-1-6Z19 / guidance.fm / 11.09.2003
Comando del telefono e schema del menu
Comando del telefono e schema del menu
Tasti del display
I tasti del display sono i tasti allungati posti direttamente sotto il display. Il portatile ha
due tasti del display. Ognuno di essi si usa come un tasto a bilanciere, si può cioè
premere sia verso sinistra che verso destra. Si può richiamare una determinata funzione
a seconda delle varie situazioni d'uso ed a seconda del lato del tasto che si preme. La
funzione viene visualizzata direttamente sopra il tasto del display.
Þ
Ü
INT MENU
Tasti del display
Toni di avviso
Il portatile indica acusticamente diverse attività e situazioni.
◆ Sequenza crescente (tono di conferma):
L'azione è stata condotta correttamente, ovvero l'immissione è corretta.
◆ Sequenza decrescente (tono d’errore):
L'azione è fallita, ovvero l'immissione non è corretta.
Display in stand-by
Ritornare in stand-by da un punto qualsiasi del menu
Premere per circa 1 sec. il tasto di fine chiamata a o non premere alcun tasto: Dopo
60 sec. il display passa automaticamente in stand-by.
Le modifiche che non sono state confermate premendo OK vengono cancellate.
Menu principale
Per aprire il menu principale, premere il tasto del display durante lo stand-by del
telefono MENU e scorrere con s fino alla voce desiderata.
1
2
3
4
5
SERV DI RETE
AUDIO
IMPOST BASE
MSGRETE
REG PORTATIL
L'offerta di
voci di menu dipende
dalla base.
9
Gigaset CL1 / italiano / A31008-A021-B001-1-6Z19 / guidance.fm / 11.09.2003
Comando del telefono e schema del menu
Set di caratteri e inserimento testo
Premere più volte o a lungo il tasto corrispondente.
1
2
3
4
5
6 volte
volt volt volt volt volt
a
e
e
e
e
1
2
I
4
5
L
M
N
O
Q
P
10
Spazio
1
A
B
C
2
D
E
F
3
G
H
I
4
J
K
L
5
M
N
O
6
P
Q
R
S
T
U
V
8
W
X
Y
Z
9
+
0
-
|
?
*
/
(
)
,
7
_
Gigaset CL1 / italiano / A31008-A021-B001-1-6Z19 / telephony.fm / 11.09.2003
Funzioni orarie
Funzioni orarie
Impostare data e ora
È necessario impostare la data e l’ora per poter visualizzare correttamente quando sono
arrivate le chiamate. È possibile scegliere tra la visualizzazione a 12 o a 24 ore
(impostazione iniziale).
Data
¢ IMPOST BASE ¢ DATA E ORA ¢ DATA
¢ inserire giorno/mese/anno (esempio: 2 Q Q 5 Q I per "20/05/2003")
¢ OK
MENU
a premere a lungo (si torna in stand-by).
Ora
¢ IMPOST BASE ¢ DATA E ORA ¢ ORA
¢ Inserire le ore/i minuti (esempio: 1 O Q 5 per le "19:05 ") ¢ OK
se si è impostato il formato a 12 ore: ¢ scegliere la metà del giorno ¢ OK
MENU
a premere a lungo (si torna in stand-by).
impostare il formato a 12 o a 24 ore
MENU
¢ IMPOST BASE ¢ DATA E ORA ¢ IMP 12/24 H ¢ 12 H o 24 H scegliere ¢ OK
a premere a lungo (si torna in stand-by).
Telefonare
Telefonare sulla linea esterna e terminare una chiamata
Le chiamate esterne sono le telefonate che si svolgono sulla rete telefonica pubblica.
~ (digitare il numero di telefono), c premere (tasto di impegno linea).
Per terminare: a premere (tasto di fine chiamata).
Si può anche premere prima il tasto di impegno linea c (si sente il segnale di linea
libera) e poi digitare il numero di telefono. Con il tasto di fine chiamata a si interrompe
la selezione.
Rispondere ad una chiamata
Il portatile squilla, sul display viene visualizzata la chiamata.
Premere il tasto di impegno linea c.
Se la funzione Disattivare la risposta automatica è attiva (pag. 16), per rispondere alla
chiamata è sufficiente sollevare il portatile dal supporto di ricarica.
Azzerare l'audio del portatile
Premere INT. La conversazione viene "mantenuta" (melodia di attesa).
Per terminare: MENU ¢ INDIETRO ¢ OK.
11
Gigaset CL1 / italiano / A31008-A021-B001-1-6Z19 / directories.fm / 11.09.2003
Utilizzare la rubrica e altre liste
Utilizzare la rubrica e altre liste
Rubrica e lista di selezione rapida
Le due liste si gestiscono in modo identico, solo che per aprire la rubrica si preme il tasto
h e per aprire la lista di selezione rapida il tasto C.
Nella Rubrica h si possono memorizzare fino a 10 numeri di telefono con i relativi
nomi. Ciò facilita la selezione.
La lista di selezione rapida è una rubrica speciale in cui è possibile archiviare fino a 10
numeri di telefono particolarmente importanti, per es. prefissi di operatori di rete (i
cosiddetti "numeri Call-by-Call").
Salvare numeri di telefono nella rubrica / nella lista di selezione rapida
h ovvero C ¢ MENU ¢ NUOVA VOCE ¢ OK
[______]
OK
Inserire il numero di telefono (rubrica max. 22 cifre,
lista di selezione rapida max. 12 cifre) e confermarlo.
[______]
OK
Inserire il nome (max. 12 battute)
(Inserimento di testo pag. 10)e confermare.
a
i
Premere a lungo (si torna in stand-by).
Se il telefono è collegato ad un impianto telefonico che usa una cifra di
prefisso per le chiamate esterne (per es. "=") bisogna inserire tale cifra di
prefisso come prima cifra della voce di rubrica.
Comporre con la rubrica
h
Aprire la rubrica.
Inserire la prima lettera del nome. Esempio: Per il
nome Emma (lettera iniziale „E“) premere due volte il
tasto I. Viene visualizzato il primo nome con "E".
Se ci sono diverse voci con "E", selezionare il nome
desiderato.
c
12
Premere il tasto di impegno linea. Il numero viene
composto.
Gigaset CL1 / italiano / A31008-A021-B001-1-6Z19 / directories.fm / 11.09.2003
Utilizzare la rubrica e altre liste
Comporre con la lista di selezione rapida (Call-by-Call)
Con questa funzione si può far precedere il prefisso di un operatore di rete al numero di
telefono ("concatenazione").
C ¢ Selezionare la voce ¢ MENU ¢ UTILIZZA NR ¢ OK
o ...
Digitare il numero di telefono:
Inserire il numero di telefono.
o ...
Selezionare il numero di telefono dalla rubrica:
h
Aprire la rubrica.
[__________] OK
[______]
Scegliere e confermare il numero.
... continua tutti
c
Premere il tasto di impegno linea. Il numero viene
composto.
Memorizzare un numero di selezione rapida per la selezione rapida
Si possono memorizzare otto numeri della lista di selezione rapida per la selezione
rapida. Le cifre per la selezione rapida (2-9) vanno inserite al primo posto nel campo del
nome.
C ¢ Selezionare la voce ¢ MENU ¢ NUMERO ¢ OK
[___________
OK ]
Confermare per passare al campo del nome.
[___________
u]
Spostare il cursore all’inizio del campo del nome.
[___________
OK ]
Confermare.
Inserire il numero di selezione rapida, per es. 2
(premere il tasto 4 volte per inserire la cifra 2).
Per utilizzare la selezione rapida:
Premere a lungo il numero di selezione rapida, per.
es. 2:
Il numero di selezione rapida memorizzato viene
visualizzato.
Inserire il numero di telefono da "concatenare"
c
Premere il tasto di impegno linea.
Gestire le voci della rubrica e della lista di selezione rapida
h ovvero C ¢ selezionare la voce ¢ MENU ¢ selezionare la funzione desiderata:
UTILIZZA NR
NUOVA VOCE
NUMERO
CANCELLA
13
Gigaset CL1 / italiano / A31008-A021-B001-1-6Z19 / directories.fm / 11.09.2003
Utilizzare la rubrica e altre liste
Cancellare la rubrica/la lista di selezione rapida
Quando si cancella viene eliminata la lista di cui si tratta con tutte le voce .
h ovvero C ¢ MENU ¢ Premere il tasto L ¢ CANCELLA ? ¢ OK
a premere a lungo (si torna in stand-by).
Lista di ripetizione automatica della selezione
Nella lista di ripetizione automatica della selezione si trovano gli ultimi cinque numeri
selezionati.
Selezionare numeri di telefono
Þ Premere il tasto del display ¢ Selezionare la voce ¢ Premere il tasto c
Modificare le voci e/o spostarle nella rubrica
Þ Premere il tasto del display ¢ Selezionare la voce ¢ MENU ¢ UTILIZZA NR o
COPIA IN RUB
¢ OK
Cancellare la lista di ripetizione automatica della selezione
Þ Premere il tasto del display ¢ MENU ¢ Premere il tasto L
¢ OK
¢ CANCELLA ?
a premere a lungo (si torna in stand-by).
Lista delle chiamate perse
Nella lista delle chiamate perse vengono memorizzate le chiamate perse. La lista delle
chiamate perse si apre con il tasto del display Û. Il lampeggiamento del simbolo
segnala la presenza di nuovi Û messaggi
14
Gigaset CL1 / italiano / A31008-A021-B001-1-6Z19 / registration.fm / 11.09.2003
Utilizzare più portatili
Utilizzare più portatili
Telefonare sulla linea interna e terminare la chiamata
Le chiamate interne sono chiamate gratuite tra i vari portatili della stessa base.
Chiamare un determinato portatile
Premere INT 2 (per es. per il portatile 2)
oppure:
¢ selezionare il portatile ¢ premere c il tasto di impegno linea
Per terminare una chiamata: a Premere il tasto di fine chiamata.
INT
Chiamata collettiva (chiamare tutti i portatili insieme)
¢ CHIAM COLL ¢ Premere c il tasto di impegno linea
Per terminare: a Premere il tasto di fine chiamata.
INT
Trasferire la conversazione su un altro portatile
INT ¢ selezionare il portatile ¢ premere c il tasto di impegno linea
L’utente interno risponde: a Premere il tasto di fine chiamata.
Consultazione sulla linea interna
Durante una conversazione esterna, è possibile effettuare una chiamata interna.
INT ¢ Selezionare il portatile ¢ Premere c il tasto di impegno linea
Per terminare: MENU ¢ INDIETRO ¢ OK (si torna all'utente esterno)
Accettare/respingere avvisi di chiamata durante una chiamata
interna
Se durante una conversazione interna giunge una chiamata dalla linea esterna, si sente
un tono di avviso (tono breve).
Rispondere: MENU ¢ RISPOSTA ¢ OK
(si parla con l’utente esterno).
Rifiutare: MENU ¢ RESPINTA ¢ OK
(si parla con l’utente interno).
Il tono di avviso rifiutato resta udibile sugli altri portatili.
15
Gigaset CL1 / italiano / A31008-A021-B001-1-6Z19 / settings_bs_hs.fm / 11.09.2003
Impostare il portatile
Impostare il portatile
Il portatile è preimpostato. È possibile modificare singolarmente le impostazioni.
Attivare/disattivare la risposta automatica
Quando giunge una chiamata, basta togliere il portatile dal supporto di ricarica senza
dover premere il tasto di impegno linea c (stato al momento dell'acquisto: on).
Disattivare la risposta automatica
MENU ¢ O 1 Q
Attivare la risposta automatica
MENU ¢ O 1 1
Cambiare il volume e la melodia
Si può impostare il volume del ricevitore su 3 livelli e il volume dello squillo su 6 livelli (il
6 è il volume in crescendo) e si può anche scegliere tra 10 melodie di suoneria.
MENU ¢ AUDIO ¢ RICEVIT o SUONERIA o MELODIA ¢ selezionare la voce ¢ OK
a premere a lungo (si torna in stand-by).
Attivazione/disattivazione dello squillo
Quando giungono chiamate esterne squillano tutti i portatili.
Disattivare in modo permanente: premere a lungo il tasto asterisco P, nel display
appare Ú.
Per l'attivazione: premere a lungo il tasto asterisco P.
Per disattivare lo squillo per la chiamata in corso premere il tasto del display MENU e
confermare MUTE con OK.
Attivazione/disattivazione del tono di avviso della batteria
Tono di avviso quando la batteria è quasi scarica (stato al momento dell'acquisto: =
attivato).
Disattivare il tono di avviso della batteria:MENU ¢ O 4 Q
Attivare il tono di avviso della batteria:MENU ¢ O 4 1
Ripristinare i parametri iniziali del portatile
È possibile ripristinare le impostazioni individuali e le modifiche così com'erano al
momento dell'acquisto. Le voci della rubrica, della lista delle chiamate perse, della lista
di ripetizione della selezione e della lista di selezione rapida nonché la registrazione del
portatile nella base rimangono invariate.
¢ O I ¢ RESET ? ¢ OK
a premere a lungo (si torna in stand-by).
MENU
16
Gigaset CL1 / italiano / A31008-A021-B001-1-6Z19 / settings_bs_hs.fm / 11.09.2003
Impostare il portatile
Configurazione del portatile al momento dell’acquisto
Volume del ricevitore
Volume della suoneria
Melodia della suoneria
Rubrica
Lista di ripetizione
automatica della selezione
Lista delle chiamate perse
Lista di selezione rapida
Risposta automatica
Tono di avviso della batteria
Lingua del display
Configurazione al
momento
dell'acquisto
1
4
1
vuota
vuota
Configurazione dopo il
reset
Descrizione
1
4
1
viene mantenuta.
viene mantenuta.
pag. 16
pag. 16
pag. 16
pag. 12
pag. 14
vuota
vuota
attivata
attivato
inglese
viene mantenuta.
viene mantenuta.
attivata
attivato
inglese
pag. 14
pag. 12
pag. 16
pag. 16
pag. 8
17
Gigaset CL1 / italiano / A31008-A021-B001-1-6Z19 / appendix.fm / 11.09.2003
Appendice
Appendice
Manutenzione e contatto con liquidi !
Pulire il portatile con un panno umido (senza solvente) o antistatico. Non utilizzare in
nessun caso un panno asciutto. C’è il rischio di caricamento elettrostatico.
Se il portatile dovesse essere venuto a contatto con dei liquidi, non accenderlo in
nessun caso. Estrarre immediatamente tutte le batterie.
Lasciar defluire il liquido dall'apparecchio ed asciugare quindi tutte le parti con un
panno.
Lasciare il portatile per almeno 72 ore in un luogo caldo e asciutto. A questo punto, in
molti casi è possibile rimetterlo in funzione.
Assistenza tecnica
Se desiderate porre domande tecniche o relative all’uso dell’apparecchio, potete consultare il nostro sito Internet:
http://www.my-siemens.com/customercare
oppure potete rivolgervi al servizio clienti che vi supporterà per ogni esigenza.
Italia: Servizio Clienti Siemens
Tel. 02-243.64400
Fax 02-243.64401
Svizzera:
Servizio Clienti Siemens
Tel. 0848 212 000
www.my-siemens.com/contact
Per consulenza personalizzata riguardo a: applicazioni e servizi dati rivolgetevi alla Hot
Line Premium: CONFORMITA' CE
Italia
899 842 423 1 euro/minuto da telefono fisso e
1,42 euro/minuto da cellulare
durata massima del servizio 10 minuti
Tenere a portata di mano la prova d'acquisto.
Centro di riparazioni:
Omnicom AG
Industrie Neuhof 9
3422 Kirchberg b. Berna
Altri numeri di assistenza sono indicati alla fine del presente manuale nel capitolo
“Assistenza tecnica”.
18
Gigaset CL1 / italiano / A31008-A021-B001-1-6Z19 / appendix.fm / 11.09.2003
Appendice
Il Gigaset è progettato per il funzionamento nel vostro Paese come indicato sul prodotto. In caso di utilizzo su reti telefoniche diverse o in caso di problemi, rivolgetevi al
fornitore del prodotto.
Con la presente Siemens AG dichiara che questo cordless è conforme ai requisiti essenziali ed alle altre disposizioni pertinenti stabilite dalla Direttiva 1999/05/CE.
La conformità dell’apparecchio alla Direttiva R&TTE (1999/05/CEE) è confermata dalla
presenza del marchio CE. Si riporta di seguito un estratto del testo originale relativo alla
dichiarazione di conformità del prodotto alla Direttiva R&TTE 1999/05/CEE.
Marcatura CE
Con la presente SIEMENS AG dichiara che questo apparato è conforme ai requisiti
essenziali ed alle altre disposizioni pertinenti stabilite dalla Direttiva 1999/05/CE.
Il portatile CL1 è progettato per i paesi della UE e per la Svizzera.
Il Gigaset è progettato per l'utilizzo nel vostro paese, come riportato sul lato inferiore
dell'apparecchio. Sono state considerate anche le particolarità specifiche del paese.
La conformità dell'apparecchio alla Direttiva R&TTE (1999/05/CEE) è confermata dalla
presenza del marchio CE.
Estratto della dichiarazione originale
“We, Siemens AG, declare, that the above mentioned product is manufactured according to our Full
Quality Assurance System certified by CETECOM ICT Services GmbH in compliance with ANNEX V
of the R&TTE-Directive 99/5/EC. The presumption of conformity with the essential requirements
regarding Council Directive 99/5/EC is ensured”
Senior Approvals Manager
The Declaration of Conformity (DoC) has been signed. In case of need a copy of the original DoC
can be made available via the company hotline.
Dati tecnici
Batterie raccomandate
Idruro di nichelio e metallo (NiMH) - Tipo AAA
Sanyo Twicell 700 (700 mAh)
Sanyo Twicell 650 (650 mAh)
Panasonic 700mAh „for Dect“ (700 mAh)
GP 700mAh (700 mAh)
Varta Phone Power AAA (700 mAh)
YDT AAA SUPER 700 (700 mAh)
(Condizione valida al momento della stampa delle istruzioni d’uso)
L’apparecchio viene venduto con le batterie adatte.
19
Gigaset CL1 / italiano / A31008-A021-B001-1-6Z19 / appendix.fm / 11.09.2003
Appendice
Autonomia/Tempi di ricarica del portatile
Capacità
(mAh)
Autonomia in
stand-by (ore)
Autonomia in
conversazione
(ore)
Tempo di ricarica
(ore)
700
fino a 200 (circa 8 gg)
circa 16
circa 5
I tempi di autonomia e ricarica indicati valgono solo se si utilizzano le batterie
raccomandate.
Condizioni di Garanzia
Il terminale è sottoposto alla Direttiva Europea 99/44/CE ed al relativo D. Lgs. di recepimento per l’Italia n. 24 del 02/02/2002 per ciò che riguarda il regime di garanzia legale
per i beni di consumo. Di seguito si riporta un estratto delle condizioni di garanzia convenzionale. Il testo completo ed aggiornato delle condizioni di garanzia e l'elenco dei
centri di assistenza sono comunque a Vostra disposizione consultando il sito
http://www.my-siemens.it
o contattando il servizio Clienti Siemens al numero 02-243.64400.
Al consumatore (cliente) viene accordata dal produttore una garanzia alle condizioni di
seguito indicate, lasciando comunque impregiudicati, nei confronti del venditore, i
diritti di cui al D. Lgs. 02/02/2002 n. 24:
◆ In caso dispositivi nuovi e relativi componenti risultassero viziati da un difetto di fabbricazione e/o di materiale entro 24 mesi dalla data di acquisto, Siemens si impegna,
a sua discrezione, a riparare o sostituire gratuitamente il dispositivo con un altro più
attuale. Per le parti soggette a usura (quali batterie, tastiere e alloggiamenti) la validità della garanzia è di 6 mesi dalla data di acquisto.
◆ La garanzia non vale se il difetto è stato provocato da un utilizzo non conforme e/o
se non ci si è attenuti ai manuali d'uso.
◆ La garanzia non può essere estesa a prestazioni (quali installazioni, configurazioni,
download di software) effettuate dal concessionario o dal cliente stesso. Sono altresì
esclusi dalla garanzia i manuali e il software eventualmente fornito su supporto a
parte.
◆ Per ottenere il riconoscimento della garanzia è necessario conservare un documento
fiscalmente valido comprovante la data di acquisto. I difetti di conformità devono
essere denunciati entro il termine di due mesi dal momento della loro constatazione.
◆ I dispositivi o i componenti resi a fronte di una sostituzione diventano di proprietà di
Siemens.
◆ La presente garanzia è valida per tutti i dispositivi acquistati all'interno dell'Unione
Europea. Garante per i prodotti acquistati in Italia è la Siemens S.p.A., Viale Piero e
Alberto Pirelli 10, 20126 Milano.
◆ Si escludono ulteriori responsabilità di Siemens, salvo il caso di comportamento
doloso o gravemente colposo di quest'ultima. A titolo esemplificativo e non limitativo si segnala che Siemens non risponderà in nessun caso di: eventuali interruzioni
di funzionamento del dispositivo, mancato guadagno, perdita di dati, danni a software supplementari installati dal cliente o perdita di altre informazioni.
20
Gigaset CL1 / italiano / A31008-A021-B001-1-6Z19 / appendix.fm / 11.09.2003
Appendice
◆ La prestazione eseguita in garanzia non prolunga il periodo di garanzia.
◆ Nei casi non coperti da garanzia, Siemens si riserva il diritto di addebitare al cliente
le spese relative alla sostituzione o riparazione.
◆ Il presente regolamento non modifica in alcun caso le regole probatorie a svantag-
gio del cliente.
Per l'adempimento della garanzia contattare il Centro telefonico Siemens. I numeri telefonici sono riportati nell'allegato manuale d'uso.
Garanzia Svizzera
La validità della garanzia è di 12 mesi.
21
Gigaset CL1 / italiano / A31008-A021-B001-1-6Z19 / CL1SIX.fm / 11.09.2003
Indice alfabetico
Indice alfabetico
A
Accensione
Portatile . . . . . . . . . . . . . . . . . . . . . 6
Alimentatore . . . . . . . . . . . . . . . . . . . . 5
Assistenza tecnica . . . . . . . . . . . . . . . 18
Attivare
Blocco della tastiera . . . . . . . . . . . . . 8
Attivazione/disattivazione dello squillo 16
Autonomia del portatile . . . . . . . . . . . 20
Avvertenze di sicurezza . . . . . . . . . . . . 5
Azzerare l'audio (portatile) . . . . . . . . . 11
B
Batterie
caricare . . . . . . . . . . . . . . . . . . . . . . 7
inserire . . . . . . . . . . . . . . . . . . . . . . 6
raccomandate . . . . . . . . . . . . . . . . 19
Blocco della tastiera. . . . . . . . . . . . . . . 8
C
Call-by-Call . . . . . . . . . . . . . . . . . . . . 13
Comporre
con la lista di selezione rapida. . . . . 13
con la rubrica . . . . . . . . . . . . . . . . . 12
D
Dati tecnici . . . . . . . . . . . . . . . . . . . . 19
Disattivare
Blocco della tastiera . . . . . . . . . . . . . 8
Display
Impostare la lingua . . . . . . . . . . . . . 8
in stand-by . . . . . . . . . . . . . . . . . . . 9
F
Funzioni orarie . . . . . . . . . . . . . . . . . 11
G
Garanzia . . . . . . . . . . . . . . . . . . . . . . 21
Guida sul menu . . . . . . . . . . . . . . . . . . 9
I
Impostare l’ora . . . . . . . . . . . . . . . . . 11
Impostare la data . . . . . . . . . . . . . . . 11
22
Indicazione del livello di carica . . . . . . . 7
Inserimento di testo . . . . . . . . . . . . . . 10
Interno
Numero di telefono . . . . . . . . . . . . . . 2
L
Lista delle chiamate perse . . . . . . . . 2, 14
Lista di selezione rapida . . . . . . . . . . . 12
cancellare tutte le voci . . . . . . . . . . 14
M
Melodia di attesa . . . . . . . . . . . . . . . . 11
Menu principale . . . . . . . . . . . . . . . . . . 9
Microfono . . . . . . . . . . . . . . . . . . . . . . 2
N
Numeri di selezione rapida . . . . . . . . . 13
Numero di telefono
copiare dalla lista di coloro che hanno
chiamato . . . . . . . . . . . . . . . . . . . 14
memorizzare . . . . . . . . . . . . . . . . . 12
Numero v. Numero di telefono . . . . . . 12
P
Portatile
accensione/spegnimento . . . . . . . . . . 6
autonomia e tempi di ricarica . . . . . 20
azzerare l'audio . . . . . . . . . . . . . . . . 11
messa in funzione . . . . . . . . . . . . . . . 6
registrare . . . . . . . . . . . . . . . . . . . . . 7
Reset . . . . . . . . . . . . . . . . . . . . . . . 16
R
Ripetizione della selezione . . . . . . . . . 14
Risposta automatica . . . . . . . . . . . . . . 16
Risposta, automatica . . . . . . . . . . . . . 16
Rubrica . . . . . . . . . . . . . . . . . . . . . . . 12
Gestire le voci . . . . . . . . . . . . . . . . . 13
Modificare una voce . . . . . . . . . . . . 13
salvare un numero di telefono / una
voce . . . . . . . . . . . . . . . . . . . . . . . 12
sequenza delle voci . . . . . . . . . . . . . 20
Gigaset CL1 / italiano / A31008-A021-B001-1-6Z19 / CL1SIX.fm / 11.09.2003
Indice alfabetico
S
Selezione rapida
Numeri di selezione rapida . . . . . . . 13
Sequenza nella rubrica . . . . . . . . . . . 20
Servizio (assistenza tecnica) . . . . . . . 18
Set di caratteri . . . . . . . . . . . . . . . . . 10
Spegnimento
Portatile . . . . . . . . . . . . . . . . . . . . . 6
Stand-by (Display) . . . . . . . . . . . . . . . . 9
T
Telefonare
Rispondere ad una chiamata . . . . . 11
sulla linea esterna . . . . . . . . . . . . . 11
Tempi di ricarica del portatile . . . . . . . 20
Terminare una chiamata . . . . . . . . . . 11
Toni di avviso . . . . . . . . . . . . . . . . . . . 9
Tono
Tono di avviso . . . . . . . . . . . . . . . . . 9
Tono di avvertimento v. Tono . . . . . . . 16
Tono di avviso della batteria. . . . . . . . 16
23
Gigaset CL1 / spanisch / A31008-A021-B001-1-6Z19 / cover_front.fm / 15.09.2003
s
ESPAÑOL
Be inspired
Gigaset CL1 / spanisch / A31008-A021-B001-1-6Z19 / overview.fm / 15.09.2003
Esquema general del terminal inalámbrico
Esquema general del terminal inalámbrico
Número interno
del terminal inalámbrico
Estado de carga de la
batería
= agotada U cargada
intermitente: batería casi
agotada
Hora
Lista de llamantes
Acceso a
◆ Contestador
Automático de Red
◆ Lista de llamantes
Rellamada
1
22-35
Þ Ü
V
INT MENU
Display (campo de
indicación)
Menú
Teclas de display
Lista interna
Activar las funciones
presentes en el display
Tecla de listín telefónico
Tecla de descolgar
◆ Aceptar llamadas
◆ Iniciar marcación
Tecla de colgar y
de act./desact.
◆ Finalizar la comunicación
◆ Cancelar una función
◆ Retroceder un nivel de
Tecla de señalización
◆ Consulta (flash)
◆ Introducir una pausa en
menú (efectuar una
pulsación breve)
◆ Volver a estado de reposo
(efectuar una pulsación
larga)
◆ Conexión/desconexión
del terminal inalámbrico
la marcación
Tecla de asterisco
◆ Act./desact. del timbre
Tecla de marcación
abreviada
Micrófono
Abrir lista de marcación
abreviada
Tecla de almohadilla
Act./desact. del bloqueo del
teclado
Las diversas indicaciones de la pantalla tienen el significado siguiente:
Indicación
Þ
Ü
[_______]
INT
[_______________]
MENU
tos
uov
ß
[_______]
OK
2
Significado al pulsar la tecla
Rellamada: abre la lista de los 5 números de teléfono últimos (p. 14).
Símbolo de sobre: abre la lista de llamantes y la lista con el Contestador Automático
de Red (p. 14).
Interno: abre la lista de terminales inalámbricos internos.
Menú: en estado de reposo abre el menú principal.
Al telefonear abre un menú que depende del estado.
Hojea línea a línea hacia arriba o hacia abajo.
Mueve el cursor de carácter en carácter hacia la izquierda o derecha.
Tecla de borrado: borra entradas de derecha a izquierda y de carácter en carácter.
Borra el carácter situado a la izquierda del cursor.
Confirma la función de menú o guarda la entrada mediante confirmación.
Gigaset CL1 / italiano / A31008-A021-B001-1-6Z19 / CL1IVZ.fm / 15.09.2003
Índice
Índice
Esquema general del terminal inalámbrico . . . . . . 2
Indicaciones de seguridad . . . . . . . . . . . . . . . . . . . . . 5
Puesta en servicio del terminal inalámbrico . . . . . . 6
Retirada de la lámina de protección . . . . . . . . . . . . . . . . . . . . . . . . . . . . . . . . . . . . . . .
Colocación de las baterías . . . . . . . . . . . . . . . . . . . . . . . . . . . . . . . . . . . . . . . . . . . . . . .
Conexión/desconexión del terminal inalámbrico . . . . . . . . . . . . . . . . . . . . . . . . . . . . .
Registro del terminal inalámbrico en la estación base . . . . . . . . . . . . . . . . . . . . . . . . .
Carga de las baterías . . . . . . . . . . . . . . . . . . . . . . . . . . . . . . . . . . . . . . . . . . . . . . . . . . .
Ajuste del idioma del display . . . . . . . . . . . . . . . . . . . . . . . . . . . . . . . . . . . . . . . . . . . . .
Activación/desactivación del bloqueo del teclado . . . . . . . . . . . . . . . . . . . . . . . . . . . .
6
6
6
7
7
8
8
Manejo del teléfono y guía de los menús . . . . . . . . 9
Teclas de display . . . . . . . . . . . . . . . . . . . . . . . . . . . . . . . . . . . . . . . . . . . . . . . . . . . . . . 9
Tonos de indicación . . . . . . . . . . . . . . . . . . . . . . . . . . . . . . . . . . . . . . . . . . . . . . . . . . . . 9
Display en estado de reposo . . . . . . . . . . . . . . . . . . . . . . . . . . . . . . . . . . . . . . . . . . . . . 9
Menú principal . . . . . . . . . . . . . . . . . . . . . . . . . . . . . . . . . . . . . . . . . . . . . . . . . . . . . . . . 9
Tabla de símbolos e introducción de textos . . . . . . . . . . . . . . . . . . . . . . . . . . . . . . . . 10
Funciones de indicación horaria . . . . . . . . . . . . . . 11
Ajuste de la fecha y la hora . . . . . . . . . . . . . . . . . . . . . . . . . . . . . . . . . . . . . . . . . . . . . 11
Realización de llamadas . . . . . . . . . . . . . . . . . . . . 11
Llamadas externas y finalización de la comunicación . . . . . . . . . . . . . . . . . . . . . . . . 11
Aceptación de llamadas . . . . . . . . . . . . . . . . . . . . . . . . . . . . . . . . . . . . . . . . . . . . . . . 11
Activación del modo silencio para el interlocutor en el terminal inalámbrico . . . . . . 11
Utilización del listín telefónico y de otras listas . 12
Listín telefónico y lista de marcación abreviada . . . . . . . . . . . . . . . . . . . . . . . . . . . . . 12
Lista de rellamada . . . . . . . . . . . . . . . . . . . . . . . . . . . . . . . . . . . . . . . . . . . . . . . . . . . . 14
Lista de llamantes . . . . . . . . . . . . . . . . . . . . . . . . . . . . . . . . . . . . . . . . . . . . . . . . . . . . 14
Utilización de varios terminales inalámbricos . . 15
Realización de llamadas internas y finalización de la comunicación . . . . . . . . . . . . .
Transferencia de una llamada a otro terminal inalámbrico . . . . . . . . . . . . . . . . . . . .
Consulta interna . . . . . . . . . . . . . . . . . . . . . . . . . . . . . . . . . . . . . . . . . . . . . . . . . . . . .
Aceptación/rechazo de una llamada en espera durante una comunicación interna .
15
15
15
15
3
Gigaset CL1 / italiano / A31008-A021-B001-1-6Z19 / CL1IVZ.fm / 15.09.2003
Índice
Ajuste del terminal inalámbrico . . . . . . . . . . . . . . 16
Activación/desactivación de la aceptación automática de llamada . . . . . . . . . . . . . .
Cambio del volumen y de la melodía . . . . . . . . . . . . . . . . . . . . . . . . . . . . . . . . . . . . . .
Activación/desactivación del timbre . . . . . . . . . . . . . . . . . . . . . . . . . . . . . . . . . . . . . .
Activación/desactivación del tono de aviso de batería . . . . . . . . . . . . . . . . . . . . . . . .
Reinicialización del terminal inalámbrico al estado de suministro . . . . . . . . . . . . . . .
16
16
16
16
17
Anexo . . . . . . . . . . . . . . . . . . . . . . . . . . . . . . . . . . . . 18
Cuidados y contacto con líquidos . . . . . . . . . . . . . . . . . . . . . . . . . . . . . . . . . . . . . . . .
Servicio Técnico (Servicio de Atención al Cliente) . . . . . . . . . . . . . . . . . . . . . . . . . . . .
Características técnicas . . . . . . . . . . . . . . . . . . . . . . . . . . . . . . . . . . . . . . . . . . . . . . . .
Certificado de garantía . . . . . . . . . . . . . . . . . . . . . . . . . . . . . . . . . . . . . . . . . . . . . . . . .
18
18
19
19
Índice alfabético . . . . . . . . . . . . . . . . . . . . . . . . . . . 21
4
Gigaset CL1 / spanisch / A31008-A021-B001-1-6Z19 / starting.fm / 15.09.2003
Indicaciones de seguridad
Indicaciones de seguridad
$
!
Utilice exclusivamente el alimentador incluido en el suministro, como
indica la parte inferior del equipo.
Utilice sólo baterías recargables homologadas y del mismo tipo (p. 19).
Es decir, no utilice en ningún caso pilas normales (no recargables), ya que
éstas podrían dañar la salud y causar daños materiales.
‹
Œ
Coloque las baterías recargables con la polaridad correcta y utilice el tipo de
batería conforme con las instrucciones de manejo (se han colocado símbolos
en los compartimentos para las baterías del terminal inalámbrico).
Puede provocar anomalías en el funcionamiento de equipos médicos. Tenga
en cuenta las condiciones técnicas del entorno de aplicación (p. ej.
consultorios médicos).
El terminal inalámbrico puede ocasionar un zumbido molesto en aparatos
auditivos. No mantenga directamente en la oreja el terminal inalámbrico
mientras suene (durante una llamada entrante).
No instale el teléfono en el cuarto de baño o de ducha. El terminal inalámbrico
no es resistente a las salpicaduras.
No utilice el teléfono en entornos expuestos a peligro de explosión (p. ej., en
talleres de pintura)
ƒ
Si transfiere su Gigaset a terceros, entréguelo siempre junto con las
instrucciones de uso.
Elimine las baterías y el teléfono respetando el medio ambiente.
i
Algunas funciones descritas en estas instrucciones de uso no están
disponibles en todos los países.
5
Gigaset CL1 / spanisch / A31008-A021-B001-1-6Z19 / starting.fm / 15.09.2003
Puesta en servicio del terminal inalámbrico
Puesta en servicio del terminal inalámbrico
El embalaje contiene:
◆ un terminal inalámbrico Gigaset CL 1
◆ un alimentador con cable de red
◆ dos baterías
◆ un soporte cargador
◆ las instrucciones de uso
Retirada de la lámina de protección
El display está protegido con una lámina de plástico. Retire esta lámina protectora.
Colocación de las baterías
◆ Coloque las baterías con la polaridad correcta – véase el gráfico izquierdo.
◆ Coloque la tapa unos 3 mm hacia abajo y empújela hacia arriba hasta que encaje.
Para abrir la tapa pulse sobre la zona más honda y empuje la tapa hacia abajo.
◆ Utilice sólo las baterías recargables recomendadas (p. 19) y del
W
mismo tipo. No utilice nunca pilas normales, ya que éstas podrían
dañar la salud y causar daños materiales.
◆ No utilice cargadores de otras marcas ya que podrían dañarse las
baterías.
Conexión/desconexión del terminal inalámbrico
Para conectar o desconectar el terminal inalámbrico, pulse la tecla de colgar a.
A continuación, suena el tono de confirmación (ver p. 9). Al colocar un terminal
inalámbrico desconectado en el soporte de carga, se conecta automáticamente.
6
Gigaset CL1 / spanisch / A31008-A021-B001-1-6Z19 / starting.fm / 15.09.2003
Puesta en servicio del terminal inalámbrico
Registro del terminal inalámbrico en la estación base
El registro debe iniciarlo en el terminal inalámbrico y en la estación base.
1. En el terminal inalámbrico
[_______________]
MENU
Pulse la tecla de display para abrir el menú.
[__________] [______________________________________________]
[__________]
REGIS TEL
OK
Seleccione y confirme.
[______]
OK
Introduzca el pin de sistema (estado de suministro:
0000) y confírmelo.
En el procedimiento de registro siguiente parpadean todos los símbolos del display.
2. En la estación base
Dentro de los 60 seg siguientes tras la introducción del PIN del sistema:
Pulse la tecla de registro/radiobúsqueda de la estación base durante aprox. 3 seg
(véanse también las instrucciones de uso de la estación base). Comienza el
procedimiento de registro. Una vez registrado con éxito el terminal inalámbrico se le
asigna automáticamente el siguiente número libre.
Carga de las baterías
Ahora, deje el terminal inalámbrico en el soporte cargador para la carga de las baterías,
ya que éstas no están cargadas en el estado de suministro. El proceso de carga de la
batería se indica en el terminal inalámbrico mediante el parpadeo del símbolo de la
batería V.
Una vez cargadas las baterías ya puede utilizarse el teléfono. Para la indicación horaria
correcta de las llamadas debe ajustar ahora la fecha y la hora (p. 11).
◆ En el primer proceso de carga se recomienda cargar sin interrupción, tal como se
indica en la tabla (p. 19), independientemente de la indicación del estado de carga.
La capacidad de carga de las baterías recargables disminuye, por motivos técnicos,
al cabo de cierto tiempo.
◆ Tras el primer proceso de carga, puede volver a colocar el terminal inalámbrico en el
soporte cargador después de cada llamada. La carga se controla de forma
electrónica. Así se cargan las baterías con el cuidado necesario y no se sobrecargan.
◆ Las baterías se calientan durante el proceso de carga; es normal y no representa
ningún peligro.
7
Gigaset CL1 / spanisch / A31008-A021-B001-1-6Z19 / starting.fm / 15.09.2003
Puesta en servicio del terminal inalámbrico
Ajuste del idioma del display
Puede visualizar los textos del display en varios idiomas.
Pulse la tecla de display para abrir el menú.
[______________]
MENU
Inicie el procedimiento con las teclas O y 2.
Pulse las teclas Q 2 para el idioma inglés (estado
de suministro).
Para otros idiomas:
Q 1 para el alemán, Q I para el francés,
Q 5 para el español, Q L para el portugués,
Q N para el danés, Q O para el noruego,
1 1 para el finlandés,1 2 para el checo,
1 4 para el turco,
1 5 para el ruso,
i
Q 4 para el italiano,
Q M para el holandés,
1 Q para el sueco,
1 I para el polaco,
1 L para el croata,
Si por error ha seleccionado un idioma incorrecto (que quizás no puede
entender), siga el procedimiento que se describe más arriba.
Activación/desactivación del bloqueo del teclado
Las teclas del terminal inalámbrico se pueden "bloquear", p. ej. si desea llevarse consigo
el terminal inalámbrico. De este modo, las pulsaciones involuntarias del teclado no
tienen efecto. El bloqueo del teclado se desactiva automáticamente cuando recibe una
llamada. Al finalizar la comunicación vuelve a activarse.
Activación del bloqueo del teclado:
pulse prolongadamente la tecla de
almohadilla R (tono de confirmación).
En el display aparece el símbolo Ø.
Desactivación del bloqueo del teclado: pulse prolongadamente la tecla de
almohadilla R (tono de confirmación).
i
8
Atención: con el bloqueo del teclado activado tampoco pueden marcarse
los números de emergencia.
Gigaset CL1 / spanisch / A31008-A021-B001-1-6Z19 / guidance.fm / 15.09.2003
Manejo del teléfono y guía de los menús
Manejo del teléfono y guía de los menús
Teclas de display
Las teclas de display son las teclas alargadas situadas directamente debajo del display.
El terminal inalámbrico dispone de dos teclas de display, cada una de ellas se maneja
como una tecla con balanceo, es decir, puede pulsarse en el lado izquierdo y en el
derecho. En función de la situación en el manejo del teléfono y en función de qué lado
de la tecla se pulsa, se activa una función determinada u otra. Esta función se indica
directamente sobre la tecla de display.
Þ
Ü
INT MENU
Teclas de display
Tonos de indicación
El terminal inalámbrico le indica acústicamente diversas actividades y estados.
◆ Secuencia de tonos ascendente (tono de confirmación):
Se ha realizado correctamente la acción o los datos introducidos son correctos.
◆ Secuencia de tonos descendente (tono de error):
Ha fallado la acción o la entrada es errónea.
Display en estado de reposo
Cómo volver desde cualquier lugar del menú al estado de reposo
Pulse la tecla de colgar a aprox. 1 seg o bien no pulse ninguna tecla: tras 60 segundos
el display cambia automáticamente al estado de reposo.
Las modificaciones que no se hayan confirmado pulsando OK o no se hayan guardado
se desechan.
Menú principal
Para abrir el menú principal, pulse en el estado de reposo del teléfono la tecla de display
MENU y hojee con s hasta el registro que desee.
1
2
3
4
5
SERV RED
AUDIO
AJUSTES BASE
C RED
REGIS TEL
Las entradas
de menú dependen
de la estación base.
9
Gigaset CL1 / spanisch / A31008-A021-B001-1-6Z19 / guidance.fm / 15.09.2003
Manejo del teléfono y guía de los menús
Tabla de símbolos e introducción de textos
Pulse la tecla correspondiente varias veces o de forma prolongada
1
2
I
4
5
L
M
N
O
Q
P
10
1 vez
2 veces 3 veces 4 veces 5 veces 6 veces
Espacio en
blanco
1
A
B
C
2
D
E
F
3
G
H
I
4
J
K
L
5
M
N
O
6
P
Q
R
S
T
U
V
8
7
W
X
Y
Z
9
+
0
-
|
?
*
/
(
)
,
_
Gigaset CL1 / spanisch / A31008-A021-B001-1-6Z19 / telephony.fm / 15.09.2003
Funciones de indicación horaria
Funciones de indicación horaria
Ajuste de la fecha y la hora
El ajuste de la fecha y la hora es necesario para que pueda mostrarse correctamente
cuándo se han recibido llamadas. Para la hora puede elegir entre los modos de
indicación de 12 o de 24 horas (éste último corresponde al estado de suministro).
Fecha
¢ AJUSTES BASE ¢ FECHA/HORA ¢ FECHA
¢ Introduzca el día/mes/año (ejemplo: 2 Q Q 5 Q I para el "20/05/2003")
¢ OK
MENU
Efectúe una pulsación larga en a (vuelta al estado de reposo).
Hora
¢ AJUSTES BASE ¢ FECHA/HORA ¢ HORA
¢ Introduzca la hora/minuto (ejemplo: 1 O Q 5 para las "19:05") ¢ OK
Únicamente para el ajuste de indicación de 12 horas: ¢ seleccione la mitad del día
correspondiente ¢ OK
MENU
Efectúe una pulsación larga en a (vuelta al estado de reposo).
Modificación del modo de indicación horaria de 12 ó 24 horas
¢ AJUSTES BASE ¢ FECHA/HORA ¢ MODO ¢ 12 H o 24 H seleccione ¢ OK
Efectúe una pulsación larga en a (vuelta al estado de reposo).
MENU
Realización de llamadas
Llamadas externas y finalización de la comunicación
Por llamadas externas se entienden las llamadas a la red telefónica pública.
~ (Introduzca el número de teléfono), pulse c (tecla de descolgar).
Para finalizar: pulse a (tecla de colgar).
También puede pulsar primero la tecla de descolgar c (oirá un tono de línea libre) y
seguidamente introducir el número de teléfono. Con la tecla de colgar a puede
cancelar la marcación.
Aceptación de llamadas
Su terminal inalámbrico suena y la llamada se indica en el display.
Pulse la tecla de descolgar c.
Si está activa la función Activación de la aceptación automática de llamadas (p. 16),
basta con que tome el terminal inalámbrico del soporte cargador para aceptar la
llamada.
Activación del modo silencio para el interlocutor en el terminal
inalámbrico
Pulse INT. La comunicación se "retiene" (melodía de espera).
Para finalizar: MENU ¢ VOLVER ¢ OK.
11
Gigaset CL1 / spanisch / A31008-A021-B001-1-6Z19 / directories.fm / 15.09.2003
Utilización del listín telefónico y de otras listas
Utilización del listín telefónico y de otras listas
Listín telefónico y lista de marcación abreviada
El funcionamiento de ambas listas es idéntico. La única diferencia consiste en que para
abrir el listín telefónico se pulsa la tecla h y para abrir la lista de marcación abreviada
se pulsa la tecla C.
En el listín telefónico h puede guardar hasta 20 números de teléfono con los
nombres correspondientes. Así se facilita la marcación.
La lista de marcación abreviada es un listín telefónico especial en el que puede poner
hasta 10 números de teléfono muy importantes, p. ej., prefijos de proveedores de red
(los llamados "números Call-by-Call").
Cómo guardar un número de teléfono en el listín telefónico/la lista de
marcación abreviada
h o C ¢ MENU ¢ NUEVO REGIST ¢ OK
[______]
OK
Introduzca el número de teléfono y confírmelo (en el
listín telefónico, con un máximo de 22 cifras; en la
lista de marcación abreviada, con un máximo de 12
cifras).
[______]
OK
Introduzca el nombre (de 12 caracteres como
máximo) (para la introducción de texto p. 10) y
confírmelo.
a
i
Efectúe una pulsación larga (vuelta al estado de
reposo).
Si el teléfono está conectado a un sistema telefónico que requiere un
prefijo para las llamadas externas (p. ej. un "0"), debe introducir dicha
cifra de prefijo como primera cifra de la entrada en el listín telefónico.
Marcación desde el listín telefónico
h
Abra el listín telefónico.
Introduzca la inicial del nombre. Ejemplo: para el
nombre Elena (letra inicial "E") pulse dos veces la
tecla I. Se muestra el primer nombre con una "E".
Si hay varios registros con la letra "E", seleccione el
nombre que desee.
c
12
Pulse la tecla de descolgar. Se marca el número de
teléfono.
Gigaset CL1 / spanisch / A31008-A021-B001-1-6Z19 / directories.fm / 15.09.2003
Utilización del listín telefónico y de otras listas
Cómo marcar desde la lista de marcación abreviada ("Call-by-Call")
Esta función permite anteponer el prefijo de un proveedor de red al número de teléfono
("encadenamiento").
C ¢ Seleccione el registro ¢ MENU ¢ UTILIZAR NUM ¢ OK
bien ...
Escriba el número de teléfono:
Introduzca el número de teléfono.
o bien
Marque el número desde el listín telefónico:
h
Abra el listín telefónico.
[__________] OK
[______]
Seleccione el número de teléfono y confírmelo.
el resto
c
Pulse la tecla de descolgar. Se marca el número de
teléfono.
Cómo guardar un número de marcación abreviada para la marcación
rápida
Puede guardar ocho número de la lista de marcación abreviada para la marcación
rápida. La cifra para la marcación rápida (2-9) se introduce en la primera posición del
campo del nombre.
C ¢ Seleccione el registro ¢ MENU ¢ MOSTRAR NUM ¢ OK
[___________
OK ]
Confírmelo para ir al campo del nombre.
[___________
u]
Coloque el cursor en la primera posición del campo
del nombre.
Introduzca el número de marcación rápida, p.ej. 2
(pulse 4 veces la tecla para introducir la cifra 2).
[___________
OK ]
Confirme.
Para utilizar la marcación rápida:
Efectúe una pulsación larga sobre el número de
marcación rápida, p.ej. 2: se muestra el número de
marcación rápida guardado.
Introduzca el número de teléfono para el
"encadenamiento"
c
Pulse la tecla de descolgar.
13
Gigaset CL1 / spanisch / A31008-A021-B001-1-6Z19 / directories.fm / 15.09.2003
Utilización del listín telefónico y de otras listas
Administración de los registros del listín telefónico y de la lista de
marcación abreviada
h o C ¢ Seleccione el registro ¢ MENU ¢ seleccione la función que desee:
UTILIZAR NUM
NUEVO REGIST
MOSTRAR NUM
BORRAR
Cómo borrar el listín telefónico/la lista de marcación abreviada
Al borrar la lista se borran todos sus registros.
h o C ¢ MENU ¢ Pulse la tecla L ¢ BORRAR ? ¢ OK
Efectúe una pulsación larga en a (vuelta al estado de reposo).
Lista de rellamada
En la lista de rellamada están los cinco últimos números marcados.
Marcación de números de teléfono.
Þ Pulse la tecla de display ¢ Seleccione el registro ¢ Pulse la tecla c
Modificación de registros y/o inclusión en el listín telefónico
Þ Pulse la tecla de display ¢ Seleccione el registro ¢ MENU ¢ UTILIZAR NUM o
COPIAR A LIS
¢ OK
Cómo borrar la lista de rellamada
Þ Pulse la tecla de display ¢ MENU ¢ Pulse la tecla L ¢ BORRAR ? ¢ OK
Efectúe una pulsación larga en a (vuelta al estado de reposo).
Lista de llamantes
En la lista de llamantes se guardan los números de teléfono de las llamadas perdidas.
La lista de llamantes se abre con la tecla de display Û. El parpadeo del símbolo Û
indica que hay mensajes nuevos.
14
Gigaset CL1 / spanisch / A31008-A021-B001-1-6Z19 / registration.fm / 15.09.2003
Utilización de varios terminales inalámbricos
Utilización de varios terminales inalámbricos
Realización de llamadas internas y finalización de la comunicación
Las llamadas internas son comunicaciones gratuitas con otros terminales inalámbricos
registrados en la misma estación base.
Llamada a un terminal inalámbrico determinado
Pulse INT 2 (p.ej. para el terminal inalámbrico 2)
O bien:
INT ¢ Seleccione el terminal inalámbrico ¢ Pulse la tecla de descolgar c
Para finalizar la comunicación: pulse la tecla de colgar a.
Llamada "colectiva" (llamada simultánea a todos los terminales
inalámbricos)
¢ LLAM COLECT ¢ Pulse la tecla de descolgar c
Para finalizar: pulse la tecla de colgar a.
INT
Transferencia de una llamada a otro terminal inalámbrico
¢ Seleccione el terminal inalámbrico ¢ Pulse la tecla de descolgar c
El interlocutor interno se presenta: pulse la tecla de colgar a.
INT
Consulta interna
Durante una comunicación externa puede efectuar una llamada interna.
INT ¢ Seleccione el terminal inalámbrico ¢ Pulse la tecla de descolgar c
Para finalizar: MENU ¢ VOLVER ¢ OK (vuelta al interlocutor externo)
Aceptación/rechazo de una llamada en espera durante una
comunicación interna
Si durante una comunicación interna recibe una llamada externa, oirá el tono de aviso
de llamada en espera (tono breve).
Para aceptarla: MENU ¢ ACEPTAR ¢ OK
(Está conectado con el interlocutor externo).
Para rechazarla: MENU ¢ RECHAZAR ¢ OK
(Está conectado con el interlocutor interno).
El tono de llamada en espera rechazada puede oírse aún en otros terminales
inalámbricos.
15
Gigaset CL1 / spanisch / A31008-A021-B001-1-6Z19 / settings_bs_hs.fm / 15.09.2003
Ajuste del terminal inalámbrico
Ajuste del terminal inalámbrico
El terminal inalámbrico está preajustado. Sin embargo, puede modificar cada uno de los
ajustes.
Activación/desactivación de la aceptación automática de llamada
En caso de una llamada, con esta función, basta con retirar el terminal inalámbrico del
soporte cargador para contestar la llamada, sin necesidad de pulsar la tecla de descolgar
c (estado de suministro: activada).
Desactivación de la aceptación automática de llamadas: MENU ¢ O 1 Q
Activación de la aceptación automática de llamadas: MENU ¢ O 1 1
Cambio del volumen y de la melodía
El volumen del auricular puede graduarse en 3 niveles, el volumen del timbre en 6
niveles (6 es el volumen ascendente) y puede seleccionar entre 10 melodías para el
timbre.
MENU ¢ AUDIO ¢ MICROT o TIMBRE o MELODIA ¢ Seleccione el ajuste ¢ OK
Efectúe una pulsación larga en a (vuelta al estado de reposo).
Activación/desactivación del timbre
En el caso de llamadas entrantes suenan todos los terminales inalámbricos.
Desactivación permanente: efectúe una pulsación larga en la tecla asterisco P; en la
pantalla aparece Ú.
Activación: efectúe una pulsación prolongada en la tecla asterisco P.
Para desactivar el timbre para la llamada que suena en el momento, pulse la tecla de
display MENU y confirme TIMB NO con OK.
Activación/desactivación del tono de aviso de batería
Tono de indicación para batería casi agotada (estado de suministro: activado).
Desactivación del tono de aviso de batería:MENU ¢ O 4 Q
Activación del tono de aviso de batería:MENU ¢ O 4 1
16
Gigaset CL1 / spanisch / A31008-A021-B001-1-6Z19 / settings_bs_hs.fm / 15.09.2003
Ajuste del terminal inalámbrico
Reinicialización del terminal inalámbrico al estado de suministro
Puede reinicializar los ajustes y modificaciones individuales al estado de suministro. Las
entradas del listín telefónico, la lista de llamantes, la lista de rellamada y la lista de
marcación rápida así como el registro del terminal inalámbrico en la estación base
permanecen sin cambios.
MENU
¢ O I ¢ REPONER ? ¢ OK
Efectúe una pulsación larga en a (vuelta al estado de reposo).
Estado de suministro del terminal inalámbrico
Estado de suministro Estado tras la
reinicialización
Volumen del auricular
1
1
Volumen del timbre
5
5
Melodía del timbre
1
1
Listín telefónico
vacío
permanece igual
Lista de rellamada
vacía
permanece igual
Lista de llamantes
vacía
permanece igual
Lista de marcación abreviada vacía
permanece igual
Aceptación automática de
activada
activada
llamadas
Tono de aviso de batería
activado
activado
Idioma del display
inglés
inglés
Descripción
p. 16
p. 16
p. 16
p. 12
p. 14
p. 14
p. 12
p. 16
p. 16
p. 8
17
Gigaset CL1 / spanisch / A31008-A021-B001-1-6Z19 / appendix.fm / 15.09.2003
Anexo
Anexo
Cuidados y contacto con líquidos !
Limpie el terminal inalámbrico con un paño húmedo (sin disolventes) o un paño
antiestático. No utilice en ningún caso un paño seco. Existe el peligro de que se forme
carga estática.
Si el terminal inalámbrico entrara en contacto con un líquido, no conecte en ningún
caso el aparato. Retire inmediatamente las baterías.
Deje que el líquido escurra fuera del aparato y seque después todas las piezas.
Guarde el terminal inalámbrico sin baterías durante un mínimo de 72 horas en un lugar
seco y caliente. Después es posible, en muchos casos, la nueva puesta en
funcionamiento.
Servicio Técnico (Servicio de Atención al Cliente)
Nuestro Servicio de Asistencia Online en Internet:
www.my-siemens.com/customercare
En caso de averías del equipo o consultas acerca de la garantía, diríjase a nuestro
Servicio de Asistencia
902 115061
Premium-Hotline
906510203
(0,913 Euro/min.)
Por favor tenga a mano el resguardo de compra.
Encontrará más números de Asistencia al final de las instrucciones de uso en
“Service”.
En los países en los que no se compran nuestros productos a través de proveedores
autorizados no se ofrecen servicios de substitución o reparación.
Se han tenido en cuenta las características específicas para cada país.
La unidad móvil E1 está homologada en la UE y en Suiza.
El correcto cumplimiento de las exigencias básicas especificadas para la unidad en la
directiva europea R&TTE se certifica con el símbolo CE.
Su Gigaset está previsto para el servicio en su país, tal y como se especifica en la parte
inferior del equipo. Se han observado las características específicas del país.
El sello CE corrobora la conformidad del equipo con los requerimientos básicos de la
Directiva R&TTE.
18
Gigaset CL1 / spanisch / A31008-A021-B001-1-6Z19 / appendix.fm / 15.09.2003
Anexo
Extracto de la declaración original
„We, Siemens AG, declare, that the above mentioned product is manufactured according to our Full
Quality Assurance System certified by CETECOM ICT Services GmbH in compliance with ANNEX V
of the R&TTE-Directive 99/5/EC. The presumption of conformity with the essential requirements
regarding Council Directive 99/5/EC is ensured“
Senior Approvals Manager
The Declaration of Conformity (DoC) has been signed. In case of need a copy of the original DoC
can be made available via the company hotline.
Características técnicas
Baterías recomendadas
Níquel metal hidruro (NiMH) - tipo AAA
Sanyo Twicell 700 (700 mAh)
Sanyo Twicell 650 (650 mAh)
Panasonic 700mAh „for Dect“ (700 mAh)
GP 700mAh (700 mAh)
Varta Phone Power AAA (700 mAh)
YDT AAA SUPER 700 (700 mAh)
(Estado en el momento de la impresión de estas instrucciones de uso)
El equipo se suministra con baterías homologadas.
Tiempos de servicio/de carga del terminal
Capacidad
(mAh)
Autonomía (horas) Tiempo de
conversación
(horas)
Tiempo de carga
(horas)
700
hasta 200 (aprox. 8
días)
aprox. 5
aprox. 16
Los tiempos de servicio y de carga son válidos únicamente si se emplean las baterías
recomendadas.
Certificado de garantía
Sin perjuicio de las reclamaciones que presente al vendedor, se otorgará al usuario
(cliente) la garantía del fabricante bajo las condiciones detalladas a continuación:
◆ En caso de que los nuevos terminales y sus componentes resulten defectuosos como
consecuencia de la fabricación o defectos de material dentro de un plazo de 24
meses a partir de su adquisición, Siemens, discrecionalmente y de forma gratuita,
reparará dicho terminal o sustituirá el terminal por otro que corresponda al estado
tecnológico del terminal actual. En cuanto a las partes sometidas a desgaste (p.ej.
pilas, teclados, carcasas) esta garantía será válida durante seis meses a partir de la
fecha de su adquisición.
◆ Esta garantía perderá su validez en caso de que el defecto del equipo se pueda
atribuir al manejo indebido o al incumplimiento de la información detallada en el
manual de usuario.
19
Gigaset CL1 / spanisch / A31008-A021-B001-1-6Z19 / appendix.fm / 15.09.2003
Anexo
◆ Esta garantía no incluye los servicios prestados por el vendedor autorizado ni los que
el cliente instale (p.ej. instalación, configuración, descargas de software). Asimismo
se excluye de la garantía los manuales y cualquier software que se hayan
proporcionado en un medio de datos separado.
◆ El recibo y la fecha de compra constituyen el comprobante para exigir el
cumplimiento de la garantía. Cualquier reclamación de garantía deberá presentarse
dentro de un plazo de dos meses tras haber ocurrido el defecto cubierto por la
garantía.
◆ Los terminales o componentes reemplazados y devueltos a Siemens volverán a ser
propiedad de Siemens.
◆ Esta garantía se aplica a nuevos dispositivos adquiridos en la Unión Europea. La
garantía la concede Siemens S.A. Ronda Europa 5, Tres Cantos.
◆ Se excluirán aquellas reclamaciones que difieran de o excedan las citadas en la
garantía de este fabricante, siempre que no estén cubiertas por la legislación
española de protección a los consumidores. Siemens no se responsabiliza de
interrupciones operativas, lucro cesante ni pérdida de datos, software adicional
cargado por el cliente ni de ninguna otra información, ni de cualquier daño
indirecto, o que no sea previsible y típico para este tipo de contratos. Será
responsabilidad del cliente obtener una copia de seguridad de dicha información.
Más allá de esta garantía, quedan excluidas cualesquiera otras responsabilidades de
Siemens en relación con este terminal o con cualquiera de sus componentes, sin
perjuicio de lo establecido en la legislación española sobre protección de los
consumidores y sobre responsabilidad civil por daños causados por productos
defectuosos, y siempre que no medie dolo o culpa grave de Siemens.
◆ La duración de la garantía no se extenderá en virtud de los servicios prestados según
las condiciones de garantía.
◆ Siemens se reserva el derecho de cobrarle al cliente el reemplazo o la reparación en
caso de que el defecto no sea cubierto por la garantía, siempre que dicho cliente
haya sido informado previamente de esta circunstancia.
◆ Las normas antes mencionadas no suponen ninguna exigencia de inversión de la
carga de la prueba en detrimento del cliente.
◆ Para solicitar el cumplimiento de esta garantía, contacte con el servicio telefónico de
Siemens.
El número correspondiente figura en la guía de usuario adjunta.
20
Gigaset CL1 / italiano / A31008-A021-B001-1-6Z19 / CL1SIX.fm / 15.09.2003
Índice alfabético
Índice alfabético
A
Guía por los menús . . . . . . . . . . . . . . . 9
Aceptación automática de llamadas . . 16
Aceptación de llamada, automática . . 16
Activación
bloqueo del teclado . . . . . . . . . . . . . 8
Activación del modo silencio (para el
interlocutor) (terminal
inalámbrico) . . . . . . . . . 11
Activación/desactivación del timbre . . 16
Ajuste de la fecha . . . . . . . . . . . . . . . 11
Ajuste de la hora . . . . . . . . . . . . . . . . 11
Alimentador enchufable . . . . . . . . . . . 5
Hotline . . . . . . . . . . . . . . . . . . . . . . . 18
I
Indicación del estado de carga . . . . . . . 7
Indicaciones de seguridad . . . . . . . . . . 5
Interno
n° de teléfono. . . . . . . . . . . . . . . . . . 2
Introducción de textos . . . . . . . . . . . . 10
L
B
Baterías
carga . . . . . . . . . . . . . . . . . . . . . . . . 7
colocación . . . . . . . . . . . . . . . . . . . . 6
recomendadas . . . . . . . . . . . . . . . . 19
Bloqueo del teclado . . . . . . . . . . . . . . . 8
C
Call-by-call . . . . . . . . . . . . . . . . . . . . 13
Características técnicas . . . . . . . . . . . 19
Conexión
terminal inalámbrico . . . . . . . . . . . . 6
D
Desactivación
bloqueo del teclado . . . . . . . . . . . . .
Desconexión
terminal inalámbrico . . . . . . . . . . . .
Display
ajuste del idioma . . . . . . . . . . . . . . .
en estado de reposo. . . . . . . . . . . . .
H
8
6
8
9
Lista de llamantes . . . . . . . . . . . . . 2, 14
Lista de marcación abreviada . . . . . . . 12
cómo borrar todos los registros . . . . 14
Listín telefónico . . . . . . . . . . . . . . . . . 12
administración de los registros . . . . 14
cómo guardar un número de teléfono/
registro . . . . . . . . . . . . . . . . . . . . 12
modificación de un registro . . . . . . . 13
M
Marcación
con la lista de marcación abreviada . 13
desde el listín telefónico . . . . . . . . . 12
Marcación rápida
número de marcación abreviada . . . 13
Melodía de espera . . . . . . . . . . . . . . . 11
Menú principal . . . . . . . . . . . . . . . . . . 9
Micrófono . . . . . . . . . . . . . . . . . . . . . . 2
N
F
N° de teléfono
cómo guardarlo . . . . . . . . . . . . . . . 12
toma desde la lista de llamantes . . . 14
Número de marcación abreviada . . . . 13
Número de serie . . . . . . . . . . . . . . . . 18
Número, vea Número de teléfono . . . . 12
Finalización de la comunicación . . . . . 11
Funciones de indicación horaria . . . . . 11
R
E
Estado de reposo (display) . . . . . . . . . . 9
G
Garantía . . . . . . . . . . . . . . . . . . . . . . 19
Realización de llamadas
aceptación de llamadas . . . . . . . . . . 11
externas . . . . . . . . . . . . . . . . . . . . . 11
Rellamada . . . . . . . . . . . . . . . . . . . . . 14
21
Gigaset CL1 / italiano / A31008-A021-B001-1-6Z19 / CL1SIX.fm / 15.09.2003
Índice alfabético
S
Servicio . . . . . . . . . . . . . . . . . . . . . . 18
Servicio de Atención al Cliente . . . . . . 18
T
Tabla de símbolos . . . . . . . . . . . . . . . 10
Terminal inalámbrico
activación del modo silencio (para el
interlocutor) . . . . . . . . . . . . . . . . 11
conexión/desconexión . . . . . . . . . . . 6
puesta en servicio . . . . . . . . . . . . . . 6
registro . . . . . . . . . . . . . . . . . . . . . . 7
reinicialización . . . . . . . . . . . . . . . . 17
tiempos de servicio y de carga . . . . 19
Tiempos de carga del terminal
inalámbrico . . . . . . . . . . 19
Tiempos de servicio del terminal
inalámbrico . . . . . . . . . . 19
Tono
tonos de indicación . . . . . . . . . . . . . 9
Tono de aviso de batería . . . . . . . . . . 16
Tono de aviso, véase Tono . . . . . . . . . 16
Tonos de indicación . . . . . . . . . . . . . . . 9
22
Gigaset CL1 / português / A31008-A021-B001-1-6Z19 / cover_front.fm / 19.09.2003
s
PORTUGUÊS
Be inspired
Gigaset CL1 / português / A31008-A021-B001-1-6Z19 / overview.fm / 19.09.2003
Esquema do terminal móvel
Esquema do terminal móvel
Número interno
do terminal móvel
Hora
Lista de chamadas
Acesso a:
◆ Atendedor EXT
◆ Lista de
chamadas
Repetição da
marcação
Lista de números
internos
Tecla da Lista Telefónica
Estado da carga das baterias
= vazias U cheias
a piscar: baterias quase vazias
1
22-35
Þ Ü
V
INT MENU
Display (campo de
indicação)
Menu
Teclas de Display
Acesso às funções
apresentadas no display
Tecla Atender/Marcar
Tecla Ligar/Desligar:
◆ Atender uma chamada
◆ Iniciar processo de
◆ Terminar a chamada
◆ Interromper uma função
◆ Voltar ao menu anterior
marcação
(premir brevemente)
◆ Voltar ao estado de
Tecla de Sinalização
◆ Consulta (Flash)
◆ Inserir uma pausa na
marcação
repouso (premir sem
soltar)
◆ Ligar/desligar o terminal
móvel
Tecla Asterisco
◆ Activar/desactivar o sinal
de chamar
Microfone
Lista de Números Rápidos
Aceder à lista de números
rápidos
Tecla Cardinal
Activar/desactivar a protecção
do teclado
As diferentes indicações do display têm os seguintes significados:
Indicar
Þ
Ü
[_______]
INT
[_______________]
MENU
tes
uev
ß
[_______]
OK
2
Efeito ao premir a tecla de Display
Repetição da marcação: acede à lista dos últimos 5 números marcados (pág. 14).
Lista de chamadas: acede à lista de chamadas e ao atendedor externo (pág. 14).
Lista de números internos: acede à lista de números internos dos terminais
móveis.
Menu: acede ao menu principal, com o terminal no estado de repouso.
Durante uma chamada, acede ao menu correspondente.
Percorre os menus para cima ou para baixo.
Desloca o cursor para a esquerda ou para a direita.
Apaga caracter a caracter da direita para a esquerda. Apaga o caracter à esquerda
do cursor.
Confirma as funções de menu ou grava os registos através de confirmação.
Gigaset CL1 / português / A31008-A021-B001-1-6Z19 / CL1IVZ.fm / 19.09.2003
Índice
Índice
Esquema do terminal móvel . . . . . . . . . . . . . . . . . . . 2
Indicações de segurança . . . . . . . . . . . . . . . . . . . . . . 5
Colocar o terminal móvel em funcionamento . . . . . 6
Retirar a película de protecção . . . . . . . . . . . . . . . . . . . . . . . . . . . . . . . . . . . . . . . . . . .
Colocar baterias . . . . . . . . . . . . . . . . . . . . . . . . . . . . . . . . . . . . . . . . . . . . . . . . . . . . . . .
Ligar/desligar o terminal móvel . . . . . . . . . . . . . . . . . . . . . . . . . . . . . . . . . . . . . . . . . .
Registar terminal móvel na base . . . . . . . . . . . . . . . . . . . . . . . . . . . . . . . . . . . . . . . . . .
Carregar as baterias . . . . . . . . . . . . . . . . . . . . . . . . . . . . . . . . . . . . . . . . . . . . . . . . . . . .
Alterar o idioma do terminal móvel . . . . . . . . . . . . . . . . . . . . . . . . . . . . . . . . . . . . . . .
Activar/desactivar a protecção do teclado . . . . . . . . . . . . . . . . . . . . . . . . . . . . . . . . . .
6
6
6
7
7
8
8
Utilizar o telefone e vista geral do menu . . . . . . . . . 9
Teclas de Display . . . . . . . . . . . . . . . . . . . . . . . . . . . . . . . . . . . . . . . . . . . . . . . . . . . . . . 9
Sinais de aviso . . . . . . . . . . . . . . . . . . . . . . . . . . . . . . . . . . . . . . . . . . . . . . . . . . . . . . . . 9
Display no estado de repouso . . . . . . . . . . . . . . . . . . . . . . . . . . . . . . . . . . . . . . . . . . . . 9
Menu principal . . . . . . . . . . . . . . . . . . . . . . . . . . . . . . . . . . . . . . . . . . . . . . . . . . . . . . . . 9
Tabela de caracteres e como inserir texto . . . . . . . . . . . . . . . . . . . . . . . . . . . . . . . . . . 10
Data e Hora . . . . . . . . . . . . . . . . . . . . . . . . . . . . . . . 11
Programar a data e hora . . . . . . . . . . . . . . . . . . . . . . . . . . . . . . . . . . . . . . . . . . . . . . . 11
Estabelecer chamadas . . . . . . . . . . . . . . . . . . . . . . 11
Estabelecer chamadas externas e terminar chamadas . . . . . . . . . . . . . . . . . . . . . . . . 11
Atender uma chamada . . . . . . . . . . . . . . . . . . . . . . . . . . . . . . . . . . . . . . . . . . . . . . . . 11
Desactivar o microfone (MUTE) . . . . . . . . . . . . . . . . . . . . . . . . . . . . . . . . . . . . . . . . . 11
Utilizar a lista telefónica e outras listas . . . . . . . . 12
Lista telefónica e lista de números rápidos . . . . . . . . . . . . . . . . . . . . . . . . . . . . . . . . . 12
Lista de repetição da marcação . . . . . . . . . . . . . . . . . . . . . . . . . . . . . . . . . . . . . . . . . . 14
Lista de chamadas . . . . . . . . . . . . . . . . . . . . . . . . . . . . . . . . . . . . . . . . . . . . . . . . . . . . 14
Utilizar vários terminais móveis . . . . . . . . . . . . . . 15
Chamadas internas e terminar chamadas . . . . . . . . . . . . . . . . . . . . . . . . . . . . . . . . . .
Transferir uma chamada externa para outro terminal móvel . . . . . . . . . . . . . . . . . . .
Consulta interna . . . . . . . . . . . . . . . . . . . . . . . . . . . . . . . . . . . . . . . . . . . . . . . . . . . . .
Atender/rejeitar uma chamada em espera durante uma chamada interna . . . . . . . .
15
15
15
15
3
Gigaset CL1 / português / A31008-A021-B001-1-6Z19 / CL1IVZ.fm / 19.09.2003
Índice
Configurar o terminal móvel . . . . . . . . . . . . . . . . . 16
Activar/desactivar o atendimento automático de chamadas . . . . . . . . . . . . . . . . . . .
Alterar o volume e a melodia . . . . . . . . . . . . . . . . . . . . . . . . . . . . . . . . . . . . . . . . . . . .
Activar/desactivar o sinal de chamar . . . . . . . . . . . . . . . . . . . . . . . . . . . . . . . . . . . . . .
Activar/desactivar o sinal de aviso da bateria fraca . . . . . . . . . . . . . . . . . . . . . . . . . . .
Repor o terminal móvel no estado de fábrica . . . . . . . . . . . . . . . . . . . . . . . . . . . . . . .
16
16
16
16
17
Anexo . . . . . . . . . . . . . . . . . . . . . . . . . . . . . . . . . . . . 18
Conservação e contacto com humidade . . . . . . . . . . . . . . . . . . . . . . . . . . . . . . . . . . .
Serviço de Apoio a Clientes (Customer Care) . . . . . . . . . . . . . . . . . . . . . . . . . . . . . . .
Dados técnicos . . . . . . . . . . . . . . . . . . . . . . . . . . . . . . . . . . . . . . . . . . . . . . . . . . . . . . .
Garantia . . . . . . . . . . . . . . . . . . . . . . . . . . . . . . . . . . . . . . . . . . . . . . . . . . . . . . . . . . . .
18
18
19
20
Índice remissivo . . . . . . . . . . . . . . . . . . . . . . . . . . . . 21
4
Gigaset CL1 / português / A31008-A021-B001-1-6Z19 / starting.fm / 19.09.2003
Indicações de segurança
Indicações de segurança
$
!
Utilize apenas o alimentador fornecido, conforme está referido no lado
inferior do eguipamento.
Utilize apenas as baterias recarregáveis recomendadas (pág. 19)! Nunca
utilize outras baterias (não recarregáveis), uma vez que estas poderão
danificar o terminal móvel e causar problemas à sua saúde.
‹
Œ
Coloque as baterias recarregáveis com a polaridade correcta e utilize o tipo de
bateria de acordo com estas instruções de funcionamento (símbolo no
compartimento das baterias do terminal móvel).
O funcionamento de equipamentos médicos poderá ser afectado. Respeite as
condições técnicas na área de utilização (por ex., num consultório).
O terminal móvel poderá causar ruídos desagradáveis em próteses auditivas.
Não segure o terminal móvel directamente junto do ouvido quando este tocar
(a receber uma chamada).
Não guarde o telefone em casas de banho. O telefone não está protegido
contra salpicos de água.
O terminal não deverá ser utilizado em locais com perigo de explosão (por ex.,
em oficinas de pintura).
ƒ
Entregue o seu Gigaset a terceiros, sempre acompanhado deste manual de
instruções.
Quando eliminar as baterias e o terminal móvel faça-o sem prejudicar o meio
ambiente.
i
Nem todas as funções descritas neste manual de instruções estão
disponíveis em todos os países.
5
Gigaset CL1 / português / A31008-A021-B001-1-6Z19 / starting.fm / 19.09.2003
Colocar o terminal móvel em funcionamento
Colocar o terminal móvel em funcionamento
Conteúdo da embalagem:
◆ Terminal móvel Gigaset CL1
◆ alimentador
◆ duas baterias
◆ base
◆ este manual de instruções
Retirar a película de protecção
O display está protegido por uma película. Por favor, retire a película de protecção!
Colocar baterias
◆ Colocar as baterias com a polaridade indicada – ver figura da esquerda,
◆ Colocar a tampa das baterias, deslocando-a cerca de 3 mm para baixo e
empurrando-a para cima até encaixar.
Para abrir, pressionar a parte estriada da tampa e empurrar para baixo.
◆ Utilize apenas as baterias recarregáveis recomendadas (pág. 19) do
W
mesmo tipo! As baterias normais poderão danificar o terminal móvel
e causar problemas à sua saúde.
◆ Não utilizar carregadores diferentes do fornecido, pois estes poderão
danificar as baterias.
Ligar/desligar o terminal móvel
Para ligar/desligar o terminal móvel, premir sem soltar a tecla Ligar/Desligar a.
Em seguida, ouve-se o sinal de confirmação (ver pág. 9). Se colocar um terminal móvel
desligado na base, este liga-se automaticamente.
6
Gigaset CL1 / português / A31008-A021-B001-1-6Z19 / starting.fm / 19.09.2003
Colocar o terminal móvel em funcionamento
Registar terminal móvel na base
O registo tem que ser feito no terminal móvel e na base.
1. No terminal móvel
[_______________]
MENU
Premir a tecla de Display para aceder ao menu.
[__________] [______________________________________________]
[__________]
REGISTAR
OK
Seleccionar e confirmar.
[______]
OK
Inserir o PIN do sistema da base (de fábrica: 0000) e
confirmar.
Durante o processo de registo, no display do terminal móvel pisca REGISTAR.
2. Na base
Antes de passarem 60 segundos de ter inserido o PIN no terminal móvel:
Premir durante cerca de 3 segundos a tecla de registo situada à frente da base (consultar
o manual de instruções da base). O processo de registo será iniciado. Após o registo ter
sido concluído com sucesso, o terminal móvel receberá o número interno livre mais
baixo.
Carregar as baterias
Para um carregamento completo das baterias deixe o terminal móvel na base, uma vez
que estas não vêm carregadas de fábrica. O carregamento das baterias é indicado no
terminal móvel através do símbolo do estado das baterias Va piscar.
Após as baterias terem sido carregadas, o telefone está pronto a funcionar. Para que as
chamadas sejam indicadas correctamente, deverá programar a data e a hora (pág. 11).
◆ Ao carregar as baterias pela primeira vez, recomendamos um carregamento sem
interrupções (como indicado na tabela da pág. 19) independentemente da
indicação do estado de carga! Por razões técnicas, a capacidade de carga das
baterias reduz-se passado algum tempo.
◆ Depois do primeiro carregamento, pode colocar o terminal móvel na base, a seguir
a cada chamada. O carregamento é controlado electronicamente. Assim, as baterias
são cuidadosamente carregadas, e não sobrecarregadas.
◆ As baterias aquecem durante o processo de carregamento; isto é normal e não é
perigoso.
7
Gigaset CL1 / português / A31008-A021-B001-1-6Z19 / starting.fm / 19.09.2003
Colocar o terminal móvel em funcionamento
Alterar o idioma do terminal móvel
Pode visualizar os menus do display em vários idiomas.
Premir a tecla de Display para aceder ao menu.
[______________]
MENU
Premir as teclas O 2 para iniciar o procedimento.
Premir as teclas Q L para Português (de fábrica).
Outros idiomas:
Q 1 para alemão,
Q I para francês,
Q 5 para espanhol,
Q L para português (de fábrica),
Q N para dinamarquês,Q O para norueguês,
1 1 para finlandês,
1 2 para checo,
1 4 para turco,
1 5 para russo,
i
Q 4 para italiano,
Q M para holandês,
1 Q para sueco,
1 I para polaco,
1 L para croata.
Se tiver seleccionado um idioma que não compreenda, siga o
procedimento acima descrito para seleccionar o idioma correcto!
Activar/desactivar a protecção do teclado
Poderá activar a protecção do teclado para, por ex., transportar o terminal móvel
consigo. Desta forma, se premir alguma tecla intencionalmente, não terá nenhum
efeito. A protecção do teclado será desactivada automaticamente ao receber uma
chamada. No final da chamada, a protecção activa-se novamente.
Activar a protecção do teclado: premir sem soltar a tecla Cardinal R (sinal de
confirmação).
No display aparece o símbolo Ø.
Activar a protecção do teclado: premir sem soltar a tecla Cardinal R (sinal de
confirmação).
i
8
Com a protecção do teclado activada também não se podem marcar os
números de emergência.
Gigaset CL1 / português / A31008-A021-B001-1-6Z19 / guidance.fm / 19.09.2003
Utilizar o telefone e vista geral do menu
Utilizar o telefone e vista geral do menu
Teclas de Display
As teclas de Display são as teclas horizontais directamente abaixo do display. O seu
terminal móvel tem duas teclas de Display. Cada uma destas teclas pode ser utilizada
como uma tecla de duas posições, isto é, pode ser premida tanto do lado direito como
do lado esquerdo. As funções atribuídas às teclas de Display mudam consoante o
contexto de utilização e dependendo do lado da tecla que premir. Esta função será
indicada acima da tecla de Display.
Þ
Ü
INT MENU
Teclas de Display
Sinais de aviso
O seu terminal móvel avisa-o de forma acústica de diversas actividades e estados.
◆ Sequência de tons crescente (sinal de confirmação):
A operação foi realizada correctamente ou o dado é correcto.
◆ Sequência de tons decrescente (sinal de erro):
Ocorreu um erro na sequência de passos executada, ou o dado está incorrecto.
Display no estado de repouso
Regressar ao estado de repouso a partir de qualquer ponto do menu.
Premir a tecla Desligar a cerca de 1 segundo ou não premir nenhuma tecla. Após 60
segundos o display volta automaticamente para o estado de repouso.
As alterações que não forem confirmadas com OK, serão ignoradas.
Menu principal
Para aceder ao menu principal, prima, com o telefone no estado de repouso, a tecla de
Display MENU e percorra comso registo pretendido.
1
2
3
4
5
REDE
AUDIO
BASE
AC EXT
REGISTAR
A apresentação de alguns menus
depende das características
disponíveis na sua base.
9
Gigaset CL1 / português / A31008-A021-B001-1-6Z19 / guidance.fm / 19.09.2003
Utilizar o telefone e vista geral do menu
Tabela de caracteres e como inserir texto
Premir a tecla pretendida várias vezes ou sem a soltar.
1
2
I
4
5
L
M
N
O
Q
P
10
1x
2x 3x 4x 5x 6x
Espaço
1
A
B
C
2
D
E
F
3
G
H
I
4
J
K
L
5
M
N
O
6
P
Q
R
S
T
U
V
8
7
W
X
Y
Z
9
+
0
-
|
?
*
/
(
)
,
_
Gigaset CL1 / português / A31008-A021-B001-1-6Z19 / telephony.fm / 19.09.2003
Data e Hora
Data e Hora
Programar a data e hora
É necessário programar a data e a hora para que as chamadas sejam indicadas
correctamente. Para a hora poderá escolher entre a apresentação do modo 12 horas ou
24 horas (de fábrica).
Data
¢ BASE ¢ DATA/HORA ¢ DATA
¢ Inserir dia/mês/ano (exemplo: 2 Q Q 5 Q I para "20.05.2003") ¢ OK
MENU
Premir sem soltar a (volta ao estado de repouso).
Hora
¢ BASE ¢ DATA/HORA ¢ HORA
¢ Inserir horas/minutos (exemplo: 1 O Q 5 para “19.05 horas”) ¢ OK
Se tiver seleccionado o modo 12 horas: ¢ seleccione a metade do dia ¢ OK
MENU
Premir sem soltar a (volta ao estado de repouso).
Seleccionar o modo 12 ou 24 horas
MENU
¢ BASE ¢ DATA/HORA ¢ MODO ¢ seleccionar 12 H ou 24 H ¢ OK
Premir sem soltar a (volta ao estado de repouso).
Estabelecer chamadas
Estabelecer chamadas externas e terminar chamadas
Chamadas externas são telefonemas realizados com recurso à rede telefónica pública.
~ (inserir o número de telefone), premir c (tecla Atender).
Para terminar a chamada: Premir a (tecla Desligar).
Também existe a possibilidade de primeiro premir a tecla Atender c (ouve o sinal de
linha livre) e depois marcar o número de telefone. Com a tecla Terminar a interrompe
a marcação.
Atender uma chamada
Ao receber uma chamada, o terminal móvel toca e a chamada é indicada no display.
Premir a tecla Atender c .
Se a função Atendimento Automático estiver activada (pág. 16), apenas terá que retirar
o terminal móvel da base/carregador para atender a chamada.
Desactivar o microfone (MUTE)
Premir INT. A chamada é “colocada em espera” (ouve a melodia de chamada em
espera).
Para voltar a activar o microfone: MENU ¢ VOLTAR ¢ OK.
11
Gigaset CL1 / português / A31008-A021-B001-1-6Z19 / directories.fm / 19.09.2003
Utilizar a lista telefónica e outras listas
Utilizar a lista telefónica e outras listas
Lista telefónica e lista de números rápidos
A utilização da lista telefónica e da lista de números rápidos é idêntica, para aceder à
lista telefónica deverá premir a tecla h e para aceder à lista de números rápidos deverá
premir a tecla C.
Na lista telefónica h poderá gravar até 20 registos com número e o respectivo nome.
Isto facilita-lhe a marcação.
A lista de números rápidos é uma lista telefónica especial na qual pode colocar até 10
números de telefone especialmente importantes, por ex., prefixos dos operadores de
rede.
Gravar números de telefone na lista telefónica/lista de números rápidos
h e C ¢ MENU ¢ NOVO REGISTO ¢ OK
[______]
OK
Inserir um número de telefone e confirmar (na lista
telefónica, máx. 22 dígitos, e na lista de números
rápidos, máx. 12 dígitos).
[______]
OK
Inserir um nome com no máximo 12 caracteres
(tabela de caracteres, pág. 10) e confirmar.
a
i
Premir sem soltar (volta ao estado de repouso).
Se o seu telefone estiver ligado a uma central telefónica tem que inserir,
caso seja necessário, o código de acesso à rede como primeiro algarismo
do seu registo da lista telefónica (ver instruções de funcionamento da sua
central telefónica).
Marcar através da lista telefónica
h
Aceder à lista telefónica.
Inserir as primeiras letras do nome. Exemplo: Premir
a tecla correspondente à primeira letra do nome, por
exemplo, para Emília que começa com "E" premir a
tecla I duas vezes. Será apresentado o primeiro
registo com "E".
Se existirem mais registos começados por "E",
percorrer a lista até encontrar o nome pretendido.
c
12
Prima a tecla Atender. O número de telefone é
marcado.
Gigaset CL1 / português / A31008-A021-B001-1-6Z19 / directories.fm / 19.09.2003
Utilizar a lista telefónica e outras listas
Marcar utilizando a lista de números rápidos
Com esta função poderá colocar o prefixo de um operador de rede antes do número de
telefone.
C ¢ seleccionar o registo ¢ MENU ¢ UTILIZAR ¢ OK
ou ...
Completar com o número de telefone pretendido:
Inserir o número de telefone.
ou ...
Escolher um número da lista telefónica:
h
Aceder à lista telefónica.
[__________] OK
[______]
Seleccionar um número de telefone e confirmar.
... todos os outros
c
Prima a tecla Atender. O número de telefone é
marcado.
Atribuir um número rápido para marcação abreviada
Poderá atribuir a até oito registos da lista de números rápidos, teclas para marcação
abreviada. Insira o número da tecla para a marcação abreviada (2-9) na primeira posição
do campo do nome.
C ¢ seleccionar o registo ¢ MENU ¢ NUMERO ¢ OK
[___________
OK ]
Confirme para passar ao campo do nome.
[___________
u]
Movimentar o cursor até à primeira posição do nome.
Inserir o número da tecla para marcação abreviada,
por ex., 2
(premir a tecla 4 vezes para inserir o número 2).
Confirmar.
[___________
OK ]
Para utilizar a marcação abreviada:
Premir sem soltar a tecla para marcação abreviada,
por ex., 2:
O número de marcação abreviada gravado é
visualizado.
Completar com o número de telefone pretendido.
c
Prima a tecla Atender.
Gerir os registos da lista telefónica e da lista de números rápidos
h ou C ¢ seleccionar o registo ¢ MENU ¢ seleccionar a função desejada:
UTILIZAR
NOVO REGISTO
NUMERO
APAGAR
13
Gigaset CL1 / português / A31008-A021-B001-1-6Z19 / directories.fm / 19.09.2003
Utilizar a lista telefónica e outras listas
Apagar a lista telefónica/lista de números rápidos
Ao executar esta função, todos os registos serão apagados.
h ou C ¢ MENU ¢ premir L tecla ¢ APAGAR ? ¢ OK
Premir sem soltar a (volta ao estado de repouso).
Lista de repetição da marcação
Na lista de repetição da marcação serão guardados os últimos cinco números de
telefone anteriormente marcados.
Marcar o número de telefone
Þ premir tecla de Display ¢ seleccionar o registo ¢ premir a tecla c
Alterar os registos e/ou transferir para a lista telefónica
Þ premir tecla de Display ¢ seleccionar o registo ¢ MENU ¢ UTILIZAR ou
POR NA LISTA
¢ OK
Apagar a lista de repetição da marcação
Þ premir a tecla de Display ¢ MENU ¢ premir a tecla L ¢ APAGAR ? ¢ OK
Premir sem soltar a (volta ao estado de repouso).
Lista de chamadas
Na lista de chamadas serão guardadas as chamadas perdidas. Poderá aceder à lista de
chamadas utilizando a tecla de Display Û. As mensagens novas são assinaladas
quando o símbolo Û piscar.
14
Gigaset CL1 / português / A31008-A021-B001-1-6Z19 / registration.fm / 19.09.2003
Utilizar vários terminais móveis
Utilizar vários terminais móveis
Chamadas internas e terminar chamadas
Poderá estabelecer chamadas internas gratuítas para outros terminais móveis da
mesma base.
Chamar um terminal móvel específico
Prima INT 2 (por ex., para o terminal móvel 2).
Ou:
¢ Seleccionar o terminal móvel ¢ premir a tecla Atender c
Para terminar a chamada: premir a tecla Desligar a.
INT
Chamada colectiva (chamar todos os terminais móveis ao mesmo tempo)
¢ CHAMAR TODOS ¢ premir a tecla Atender c
Para terminar: premir a tecla Desligar a.
INT
Transferir uma chamada externa para outro terminal móvel
¢ seleccionar o terminal móvel ¢ premir a tecla Atender c
O interlocutor interno atende: premir a tecla Desligar a.
INT
Consulta interna
Durante uma chamada externa pode fazer uma consulta interna.
INT ¢ Seleccionar o terminal móvel ¢ premir a tecla Atender c
Para terminar: MENU ¢ VOLTAR ¢ OK (regressar ao interlocutor externo).
Atender/rejeitar uma chamada em espera durante uma chamada
interna
Se, durante uma chamada interna receber uma chamada externa, ouve o sinal de
chamada em espera (toque curto).
Atender: MENU ¢ ACEITAR ¢ OK
(Fala com o interlocutor externo).
Rejeitar: MENU ¢ REJEITAR ¢ OK
(Fala com o interlocutor interno).
O sinal de chamada em espera ouve-se nos outros terminais móveis.
15
Gigaset CL1 / português / A31008-A021-B001-1-6Z19 / settings_bs_hs.fm / 19.09.2003
Configurar o terminal móvel
Configurar o terminal móvel
O seu terminal móvel já está previamente configurado. Pode alterar individualmente as
configurações.
Activar/desactivar o atendimento automático de chamadas
Se esta função estiver activada, poderá atender qualquer chamada simplesmente ao
levantar o terminal móvel da base, sem que haja necessidade de premir a tecla
Atender c (de fábrica: activado).
Para desactivar o atendimento automático: MENU ¢ O 1 Q
Para activar o atendimento automático: MENU ¢ O 1 1
Alterar o volume e a melodia
Pode seleccionar o volume do auscultador em três níveis, o volume do sinal de chamar
em seis níveis (6 é volume mais alto) bem como escolher entre 10 melodias do sinal de
chamar.
MENU ¢ AUDIO ¢ VOL MICRO ou VOL SINAL ou MELODIA ¢ seleccionar
configuração ¢ OK
Premir sem soltar a (volta ao estado de repouso).
Activar/desactivar o sinal de chamar
Se receber uma chamada externa, todos os terminais móveis tocam.
Desactivar permanentemente: premir sem soltar a tecla Asterisco P, no display
aparece Ú.
Para activar: premir sem soltar a tecla Asterisco P.
Para desligar o sinal de chamar actual, prima a tecla de Display MENU e confirme N/
TOCAR com OK.
Activar/desactivar o sinal de aviso da bateria fraca
Sinal de aviso de bateria quase vazia (de fábrica: activado).
Desactivar o sinal de aviso de bateria fraca: MENU ¢ O 4 Q
Activar o sinal de aviso de bateria fraca: MENU ¢ O 4 1
16
Gigaset CL1 / português / A31008-A021-B001-1-6Z19 / settings_bs_hs.fm / 19.09.2003
Configurar o terminal móvel
Repor o terminal móvel no estado de fábrica
Pode repor as configurações e alterações individuais. Os registos da lista telefónica, da
lista de chamadas, da lista de repetição da marcação e da lista de números rápidos, bem
como, o registo do terminal móvel na base permanecem.
MENU
¢ O I ¢ INICIALIZAR? ¢ OK
Premir sem soltar a (volta ao estado de repouso).
Estado de fábrica do terminal móvel
Estado de fábrica
Volume do auscultador
Volume do sinal de chamar
Melodia do sinal de chamar
Lista telefónica
Lista de repetição da
marcação
Lista de chamadas
Lista de números rápidos
Atendimento automático de
chamadas
Sinal de aviso da bateria fraca
Idioma do terminal móvel
1
5
1
vazia
vazia
Programações após
inicializar
1
5
1
não será apagada
não será apagada
pág. 16
pág. 16
pág. 16
pág. 12
pág. 14
vazia
vazia
activado
não será apagada
não será apagada
activado
pág. 14
pág. 12
pág. 16
activado
activado
específico dos países específico dos países
Descrição
pág. 16
pág. 8
17
Gigaset CL1 / português / A31008-A021-B001-1-6Z19 / appendix.fm / 19.09.2003
Anexo
Anexo
Conservação e contacto com humidade !
Limpar o terminal móvel com um pano húmido (sem detergente) ou com um pano antiestático. Nunca utilizar um pano seco. Existe o perigo de induzir cargas electrostáticas.
Se o terminal móvel entrar em contacto com humidade, não ligue o equipamentro de
modo algum. Retirar imediatamente todas as baterias.
Deixe o líquido pingar para fora do equipamento e, em seguida, seque-o.
Guarde o terminal móvel, sem as baterias, pelo menos por 72 horas num local seco e
quente. Na maioria dos casos, é possível ligar o terminal novamente.
Serviço de Apoio a Clientes (Customer Care)
O nosso Serviço de Apoio a Clientes na Internet:
www.my-siemens.com/customercare
No caso de ser necessário reparar os equipamentos, que estejam dentro da garantia,
poderá obter ajuda rápida e credível em:
Serviço de Apoio a Clientes
Telefone: 21 417 85 85
E-mail: [email protected]
Por favor, conserve disponível o recibo da compra.
Para informações técnicas relacionadas com os equipamentos:
Hotline Siemens
Telefone: 808 201 521
E-mail: [email protected]
Encontra outros números de assistência técnica no final deste manual de
instruções, em “Service”.
Nos países em que os nossos produtos não são vendidos por fornecedores não autorizados, não serão efectuadas trocas ou reparações.
O seu Gigaset foi concebido para funcionar no seu país como está indicado no equipamento. Foram consideradas características específicas dis países.
A certificação deste equipamento foi realizada segundo a directiva europeia R&TTE, o
que é confirmada pela marca CE.
O terminal móvel Gigaset CL1 é autorizado na UE e na Suíça.
18
Gigaset CL1 / português / A31008-A021-B001-1-6Z19 / appendix.fm / 19.09.2003
Anexo
Excerto da declaração original:
“We, Siemens AG, declare, that the above mentioned product is manufactured according to our Full
Quality Assurance System certified by CETECOM ICT Services GmbH in compliance with ANNEX V
of the R&TTE-Directive 99/5/EC. The presumption of conformity with the essential requirements
regarding Council Directive 99/5/EC is ensured”
Senior Approvals Manager
The Declaration of Conformity (DoC) has been signed. In case of need a copy of the original DoC
can be made available via the company hotline.
Dados técnicos
Baterias recomendadas
Níquel-Metal-Hidreto (NiMH) - Tipo AAA
Sanyo Twicell 700 (700 mAh)
Sanyo Twicell 650 (650 mAh)
Panasonic 700mAh "for Dect" (700 mAh)
GP 700mAh (700 mAh)
Varta Phone Power AAA (700 mAh)
YDT AAA SUPER 700 (700 mAh)
(Na altura da impressão do manual de instruções)
O equipamento é fornecido com baterias autorizadas.
Autonomia/tempo de carga do terminal móvel
Capacidade
(mAh)
Autonomia em
stand-by (horas)
Autonomia em
conversação
(horas)
Tempo de carga
(horas)
700
até 200 (8 dias)
cerca de 16
cerca de 5
A autonomia e tempo de carga indicados só são válidos se se utilizar as baterias
recomendadas.
19
Gigaset CL1 / português / A31008-A021-B001-1-6Z19 / appendix.fm / 19.09.2003
Anexo
Garantia
Independentemente dos seus direitos por causa de defeitos perante o vendedor, ao
consumidor (cliente) é concedida uma garantia do fabricante, sujeita aos seguintes
termos e condições:
◆ Os equipamentos novos e os respectivos componentes que apresentarem defeito de
fabrico dentro de 24 meses a partir da data da compra serão gratuitamente
reparados ou substituídos por um equipamento que corresponda ao nível técnico
actual. Fica ao critério da Siemens reparar ou substituir o equipamento. Para as
peças sujeitas a desgaste (por ex. teclados, baterias, caixas), esta garantia tem
validade de seis meses a partir da data da compra.
◆ Excluem-se desta garantia todos os danos causados por manuseamento incorrecto
e/ou por inobservância das informações nos manuais.
◆ Esta garantia não é aplicável ou extensível a serviços executados por vendedores
não autorizados ou pelo próprio cliente (por ex., instalação, configuração,
download de software). Manuais e software fornecidos num suporte de dados
separado também estão excluídos da garantia.
◆ O talão de compra (com data) é válido para a comprovação da garantia. As
reclamações devem ser apresentadas dentro de um mês após a constatação do
defeito com direito a garantia.
◆ Os equipamentos ou componentes substituídos e devolvidos à Siemens passam a
ser propriedade da Siemens.
◆ Esta garantia é válida para novos equipamentos adquiridos na União Europeia.
A emissora da garantia é, para Produtos vendidos em Portugal Siemens S.A, Rua
Irmão Siemens nº 1, 2720-093 Amadora
◆ Estão excluídos outros direitos adicionais ou diferentes dos referidos nesta garantia
do fabricante. A Siemens não assume a responsabilidade por interrupções
operacionais, lucros cessantes, danos indirectos, nem pela perda de dados, de
software adicional instalado pelo cliente ou de outras informações. O cliente é
responsável pelas cópias de segurança das suas informações. A exclusão da garantia
não é válida nos casos em que a garantia seja obrigatória por lei, por exemplo,
segundo a lei de responsabilidade civil do produtor, ou em casos de dolo, danos à
saúde ou à vida.
◆ A duração da garantia não é prorrogada após a execução de um serviço no âmbito
da garantia.
◆ A Siemens reserva-se o direito de cobrar do cliente os custos decorrentes de uma
substituição ou de uma reparação que não sejam defeitos abrangidos pela garantia.
◆ As condições mencionadas nos parágrafos anteriores não estão vinculadas a uma
alteração das regras do ónus da prova para a desvantagem do cliente.
Para exercer os seus direitos de garantia, contacte o serviço de assistência técnica por
telefone da Siemens. Os números encontram-se no manual de utilização fornecido.
20
Gigaset CL1 / português / A31008-A021-B001-1-6Z19 / CL1SIX.fm / 19.09.2003
Índice remissivo
Índice remissivo
A
G
Activar
protecção do teclado . . . . . . . . . . . . 8
Activar/desactivar o sinal de chamar . . 16
Alimentador . . . . . . . . . . . . . . . . . . . . 5
Atendimento automático
de chamadas . . . . . . . . . 16
Atendimento de chamadas,
automático . . . . . . . . . . 16
Autonomia do terminal móvel . . . . . . 19
Garantia . . . . . . . . . . . . . . . . . . . . . . 20
B
L
Baterias
carregar . . . . . . . . . . . . . . . . . . . . . 7
colocar . . . . . . . . . . . . . . . . . . . . . . 6
recomendadas . . . . . . . . . . . . . . . . 19
I
Indicação do estado de carga
das baterias . . . . . . . . . . . 7
Indicações de segurança . . . . . . . . . . . 5
Inserir texto . . . . . . . . . . . . . . . . . . . . 10
Interno
número de telefone . . . . . . . . . . . . . 2
Configurar a data . . . . . . . . . . . . . . . 11
Configurar a hora . . . . . . . . . . . . . . . 11
Customer Care . . . . . . . . . . . . . . . . . 18
Ligar
terminal móvel . . . . . . . . . . . . . . . . . 6
Lista de chamadas . . . . . . . . . . . . . 2, 14
Lista de números rápidos . . . . . . . . . . 12
apagar todos os registos . . . . . . . . . 14
Lista telefónica . . . . . . . . . . . . . . . . . 12
alterar registo . . . . . . . . . . . . . . . . . 13
gerir registos . . . . . . . . . . . . . . . . . 13
gravar um número/registo . . . . . . . . 12
D
M
Dados técnicos . . . . . . . . . . . . . . . . . 19
Data e Hora . . . . . . . . . . . . . . . . . . . 11
Desactivar
protecção do teclado . . . . . . . . . . . . 8
Desactivar o microfone (MUTE) . . . . . 11
Desligar
terminal móvel . . . . . . . . . . . . . . . . 6
Display
em repouso . . . . . . . . . . . . . . . . . . . 9
Marcação abreviada
números de marc. abreviada . . . . . . 13
Marcar
com a lista de números rápidos . . . . 13
com a lista telefónica . . . . . . . . . . . 12
Melodia de chamada em espera . . . . . 11
Menu principal . . . . . . . . . . . . . . . . . . 9
Microfone . . . . . . . . . . . . . . . . . . . . . . 2
E
Número de telefone
gravar . . . . . . . . . . . . . . . . . . . . . . 12
transferir da lista de chamadas . . . . 14
Número v. número de telefone . . . . . . 12
Números de marc. abreviada . . . . . . . 13
C
Estabelecer chamadas
atender uma chamada . . . . . . . . . . 11
chamada externa . . . . . . . . . . . . . . 11
Estado de repouso (display) . . . . . . . . . 9
N
21
Gigaset CL1 / português / A31008-A021-B001-1-6Z19 / CL1SIX.fm / 19.09.2003
Índice remissivo
P
Protecção do teclado . . . . . . . . . . . . . . 8
R
Repetição da marcação . . . . . . . . . . . 14
S
Serviço de Apoio a Clientes . . . . . . . . 18
Sinais de aviso . . . . . . . . . . . . . . . . . . . 9
Sinal de aviso da bateria fraca . . . . . . 16
T
Tabela de caracteres . . . . . . . . . . . . . 10
Tempo de carga do terminal móvel. . . 19
Terminal móvel
alterar o idioma . . . . . . . . . . . . . . . . 8
autonomia e tempo de carga . . . . . 19
desactivar o microfone . . . . . . . . . . 11
ligar/desligar . . . . . . . . . . . . . . . . . . 6
preparar . . . . . . . . . . . . . . . . . . . . . 6
registar . . . . . . . . . . . . . . . . . . . . . . 7
repor . . . . . . . . . . . . . . . . . . . . . . . 17
Terminar uma chamada . . . . . . . . . . . 11
22
Gigaset CL1 / niederländisch / A31008-A021-B001-1-6Z19 / cover_innen.fm / 17.09.2003
s
NEDERLANDS
Be inspired
Gigaset CL1 / Nederlands / A31008-A021-B001-1-6Z19 / overview.fm / 17.09.2003
Overzicht van de handset
Overzicht van de handset
Intern nummer
van de handset
Tijd
Bellerslijst
Toegang tot
◆ Voicemail
◆ Bellerslijst
Batterij-indicatie
U vol
knippert: batterij bijna
leeg
= leeg
1
Nummerherhaling
22-35
Þ Ü
V
INT MENU
Display
Menu
Displaytoetsen
Huidige functies in het
display oproepen
Interne lijst
Telefoonboektoets
Verbindingstoets
Verbreek- en
Aan/uit-toets
◆ Gesprek beëindigen
◆ Functie annuleren
◆ Eén menu-niveau
terug (kort indrukken)
◆ Terug naar ruststand
(ca. 1 sec. indrukken)
◆ Handset aan/uit
(ca. 2 sec. indrukken)
◆ Oproep aannemen
◆ Nummer kiezen
R-toets
◆ Ruggespraak (Flash)
◆ Kiespauze invoeren
Sterretje-toets
◆ Belsignaal aan/uit
Microfoon
Snelkiestoets
Snelkieslijst openen
Hekje-toets
Toetsblokkering aan/uit
De verschillende display-indicaties hebben de volgende betekenis:
Indicatie
Þ
Ü
[_______]
INT
[_______________]
MENU
t of s
u of v
ß
[_______]
OK
2
Betekenis bij toetsbediening
Nummerherhaling: de lijst met de 5 laatst gekozen telefoonnummers openen
(pagina 14).
Postbus: bellerslijst en voicemail-lijst openen (pagina 14).
Intern: lijst met interne handsets openen.
Menu: in de ruststand het hoofdmenu openen.
Tijdens het telefoneren een menu openen (afhankelijk van de situatie).
Eén regel omhoog of omlaag bladeren.
Cursor één teken naar links of naar rechts verplaatsen.
Wistoets: ingevoerde tekens van rechts naar links verwijderen. Wist het teken
links van de cursor.
Menufunctie bevestigen of invoer door bevestiging opslaan.
Gigaset CL1 / niederländisch / A31008-A021-B001-1-6Z19 / CL1IVZ.fm / 17.09.2003
Inhoudsopgave
Inhoudsopgave
Overzicht van de handset . . . . . . . . . . . . . . . . . . . . . 2
Veiligheidsvoorschriften . . . . . . . . . . . . . . . . . . . . . . 5
De handset in gebruik nemen . . . . . . . . . . . . . . . . . . 6
Beschermfolie verwijderen . . . . . . . . . . . . . . . . . . . . . . . . . . . . . . . . . . . . . . . . . . . . . .
Batterijen plaatsen . . . . . . . . . . . . . . . . . . . . . . . . . . . . . . . . . . . . . . . . . . . . . . . . . . . . .
Handset uit-/inschakelen . . . . . . . . . . . . . . . . . . . . . . . . . . . . . . . . . . . . . . . . . . . . . . .
Handset op het basisstation aanmelden . . . . . . . . . . . . . . . . . . . . . . . . . . . . . . . . . . . .
Batterijen laden . . . . . . . . . . . . . . . . . . . . . . . . . . . . . . . . . . . . . . . . . . . . . . . . . . . . . . .
Displaytaal instellen . . . . . . . . . . . . . . . . . . . . . . . . . . . . . . . . . . . . . . . . . . . . . . . . . . . .
Toetsblokkering in-/uitschakelen . . . . . . . . . . . . . . . . . . . . . . . . . . . . . . . . . . . . . . . . . .
6
6
6
7
7
8
8
Bedienen van de telefoon en menu-overzicht . . . . 9
Displaytoetsen . . . . . . . . . . . . . . . . . . . . . . . . . . . . . . . . . . . . . . . . . . . . . . . . . . . . . . . . 9
Attentietonen . . . . . . . . . . . . . . . . . . . . . . . . . . . . . . . . . . . . . . . . . . . . . . . . . . . . . . . . 9
Display in ruststand . . . . . . . . . . . . . . . . . . . . . . . . . . . . . . . . . . . . . . . . . . . . . . . . . . . . 9
Hoofdmenu . . . . . . . . . . . . . . . . . . . . . . . . . . . . . . . . . . . . . . . . . . . . . . . . . . . . . . . . . . 9
Tekenreekstabel voor het invoeren van tekst . . . . . . . . . . . . . . . . . . . . . . . . . . . . . . . 10
Tijdfuncties . . . . . . . . . . . . . . . . . . . . . . . . . . . . . . . 11
Datum en tijd instellen . . . . . . . . . . . . . . . . . . . . . . . . . . . . . . . . . . . . . . . . . . . . . . . . 11
Telefoneren . . . . . . . . . . . . . . . . . . . . . . . . . . . . . . . 11
Extern bellen en gesprek beëindigen . . . . . . . . . . . . . . . . . . . . . . . . . . . . . . . . . . . . . 11
Oproep aannemen . . . . . . . . . . . . . . . . . . . . . . . . . . . . . . . . . . . . . . . . . . . . . . . . . . . 11
Microfoon van de handset uitschakelen . . . . . . . . . . . . . . . . . . . . . . . . . . . . . . . . . . . 11
Telefoonboek en overige lijsten gebruiken . . . . . 12
Telefoonboek en snelkieslijst . . . . . . . . . . . . . . . . . . . . . . . . . . . . . . . . . . . . . . . . . . . 12
Nummerherhalingslijst . . . . . . . . . . . . . . . . . . . . . . . . . . . . . . . . . . . . . . . . . . . . . . . . 14
Bellerslijst . . . . . . . . . . . . . . . . . . . . . . . . . . . . . . . . . . . . . . . . . . . . . . . . . . . . . . . . . . . 14
Verschillende handsets gebruiken . . . . . . . . . . . . 15
Intern telefoneren en gesprek beëindigen . . . . . . . . . . . . . . . . . . . . . . . . . . . . . . . . .
Gesprek naar een andere handset doorschakelen . . . . . . . . . . . . . . . . . . . . . . . . . . .
Interne ruggespraak . . . . . . . . . . . . . . . . . . . . . . . . . . . . . . . . . . . . . . . . . . . . . . . . . .
Wisselgesprek bij intern gesprek aannemen/afwijzen . . . . . . . . . . . . . . . . . . . . . . . .
15
15
15
15
3
Gigaset CL1 / niederländisch / A31008-A021-B001-1-6Z19 / CL1IVZ.fm / 17.09.2003
Inhoudsopgave
Handset instellen . . . . . . . . . . . . . . . . . . . . . . . . . . . 16
Automatisch opnemen uit-/inschakelen . . . . . . . . . . . . . . . . . . . . . . . . . . . . . . . . . . .
Volume en melodie wijzigen . . . . . . . . . . . . . . . . . . . . . . . . . . . . . . . . . . . . . . . . . . . .
Belsignaal uit-/inschakelen . . . . . . . . . . . . . . . . . . . . . . . . . . . . . . . . . . . . . . . . . . . . . .
Batterijtoon uit-/inschakelen . . . . . . . . . . . . . . . . . . . . . . . . . . . . . . . . . . . . . . . . . . . .
Standaardinstellingen op de handset herstellen . . . . . . . . . . . . . . . . . . . . . . . . . . . . .
16
16
16
16
17
Bijlage . . . . . . . . . . . . . . . . . . . . . . . . . . . . . . . . . . . . 18
Onderhoud en contact met vloeistof . . . . . . . . . . . . . . . . . . . . . . . . . . . . . . . . . . . . . .
Klantenservice (Customer Care) . . . . . . . . . . . . . . . . . . . . . . . . . . . . . . . . . . . . . . . . .
Technische gegevens . . . . . . . . . . . . . . . . . . . . . . . . . . . . . . . . . . . . . . . . . . . . . . . . . .
Garantie Nederland . . . . . . . . . . . . . . . . . . . . . . . . . . . . . . . . . . . . . . . . . . . . . . . . . . .
Garantiecertificaat België . . . . . . . . . . . . . . . . . . . . . . . . . . . . . . . . . . . . . . . . . . . . . . .
18
18
19
20
21
Trefwoordenregister . . . . . . . . . . . . . . . . . . . . . . . . 22
4
Gigaset CL1 / Nederlands / A31008-A021-B001-1-6Z19 / starting.fm / 17.09.2003
Veiligheidsvoorschriften
Veiligheidsvoorschriften
$
!
Gebruik uitsluitend de meegeleverde netvoedingsadapter, zoals is
aangegeven op de onderkant van de lader of de basiseenheid.
Gebruik uitsluitend goedgekeurde, oplaadbare batterijen van hetzelfde
type (pagina 19)! Gebruik nooit gewone (niet-oplaadbare) batterijen: die
kunnen schade aan gezondheid en zelfs lichamelijk letsel veroorzaken.
‹
Œ
Gebruik alleen oplaadbare batterijen van het type dat in de
gebruiksaanwijzing wordt vermeld en plaats deze met de plus- en minpool in
de juiste stand (in het batterijvak van de handset zijn symbolen aangebracht).
De werking van medische apparatuur kan worden beïnvloed. Let op de
technische voorwaarden van de betreffende omgeving (bijvoorbeeld
artsenpraktijk).
De handset kan bij gehoorapparaten een onaangename bromtoon
veroorzaken.
Handset en basisstation zijn niet spatwaterdicht.
Gebruik het toestel niet in een omgeving waar ontploffingsgevaar bestaat
(bijvoorbeeld in spuiterijen).
ƒ
Draag uw Gigaset alleen inclusief de gebruiksaanwijzingen over aan derden.
Lever de gebruikte handset en oude en/of defecte batterijen in als klein
chemisch afval.
Batterij niet
weggooien,
maar inleveren
als KCA.
i
Niet alle in deze gebruiksaanwijzing beschreven functies zijn in alle
landen beschikbaar.
5
Gigaset CL1 / Nederlands / A31008-A021-B001-1-6Z19 / starting.fm / 17.09.2003
De handset in gebruik nemen
De handset in gebruik nemen
De verpakking bevat:
◆ Gigaset-handset CL 1
◆ netvoedingsadapter met netsnoer
◆ twee batterijen
◆ Gigaset-lader
◆ gebruiksaanwijzing
Beschermfolie verwijderen
Om het display te beschermen, is er een folie aangebracht.
U kunt deze beschermfolie nu verwijderen.
Batterijen plaatsen
◆ Plaats de batterijen met de polen in de juiste richting – zie linkerafbeelding.
◆ Klepje ongeveer 3 mm naar beneden verschoven plaatsen en naar boven
schuiven totdat het vastklikt.
Druk om het klepje te openen op de inkeping en schuif het klepje omlaag.
◆ Gebruik uitsluitend aanbevolen (pagina 19), oplaadbare
W
batterijen van hetzelfde type! Gebruik nooit gewone batterijen,
want die kunnen schade aan de gezondheid en lichamelijk letsel
veroorzaken.
◆ Gebruik alleen de meegeleverde lader. Andere laders kunnen de
batterijen beschadigen.
Handset uit-/inschakelen
Om de handset uit- of in te schakelen, drukt u op de verbreektoets a.
U hoort vervolgens een bevestigingssignaal (zie pagina 9). Als u de handset op de lader
plaatst, wordt deze automatisch ingeschakeld.
6
Gigaset CL1 / Nederlands / A31008-A021-B001-1-6Z19 / starting.fm / 17.09.2003
De handset in gebruik nemen
Handset op het basisstation aanmelden
De aanmelding moet op de handset en het basisstation plaatsvinden.
1. Op de handset
[_______________]
MENU
Displaytoets indrukken om het menu te openen.
[__________] [______________________________________________]
HS AANMELDEN [__________]
OK
Selecteren en bevestigen.
[______]
OK
PIN-code van het basisstation invoeren (standaard:
0000) en bevestigen.
Bij het vervolg van de aanmeldingsprocedure knipperen alle symbolen op het display.
2. Op het basisstation
Binnen 60 sec. na invoer van de PIN-code:
Aanmeld-/paging-toets op het basisstation circa 3 sec. indrukken (zie ook
gebruiksaanwijzing van het basisstation). De aanmeldingsprocedure begint. Na
succesvolle aanmelding wordt automatisch het volgende vrije nummer aan de handset
toegewezen.
Batterijen laden
Laat de handset voor het laden van de batterijen op de lader staan, want de batterijen
zijn standaard niet geladen. Het laden van de batterijen wordt op de handset
aangegeven door het knipperen van het batterijsymbool V.
Nadat de batterijen zijn geladen, is het toestel klaar voor gebruik. Voor een correcte
tijdregistratie van oproepen dient u nu nog de datum en de tijd in te stellen (pagina 11).
◆ Het is raadzaam de batterijen de eerste keer onafgebroken te laden gedurende de
tijd die in de tabel (pagina 19) staat vermeld, ongeacht de indicatie van het batterijniveau. Om technische redenen vermindert de laadcapaciteit van de batterijen na
enige tijd.
◆ Na het eerste laadproces kunt u uw handset na elk gesprek op het basisstation
terugplaatsen. Het laden wordt elektronisch gestuurd. Hierdoor worden de
batterijen bij het laden ontzien.
◆ De batterijen worden warm tijdens het laden. Dat is normaal en ongevaarlijk.
7
Gigaset CL1 / Nederlands / A31008-A021-B001-1-6Z19 / starting.fm / 17.09.2003
De handset in gebruik nemen
Displaytaal instellen
U kunt de displayteksten in diverse talen laten weergeven.
Displaytoets indrukken om het menu te openen.
[______________]
MENU
Met de toetsen O 2 de procedure starten.
Toetsen Q M indrukken voor Nederlands
(standaardinstelling).
Andere talen:
Q 1 voor Duits,
Q 5 voor Spaans,
Q N voor Deens,
1 1 voor Fins,
1 4 voor Turks,
i
Q I voor Frans,
Q L voor Portugees,
Q O voor Noors,
1 2 voor Tsjechisch,
1 5 voor Russisch,
Q 4 voor Italiaans,
Q 2 voor Nederlands,
1 Q voor Zweeds,
1 I voor Pools,
1 L voor Kroatisch.
Als u per ongeluk een verkeerde (voor u onbegrijpelijke) taal heeft
ingesteld, voer dan de hierboven beschreven procedure uit.
Toetsblokkering in-/uitschakelen
U kunt de toetsen van de handset vergrendelen, bijvoorbeeld wanneer u de handset
meeneemt. Onwillekeurig drukken op de toetsen wordt dan genegeerd. Bij een
inkomende oproep wordt de toetsblokkering automatisch uitgeschakeld. Nadat het
gesprek is beëindigd, wordt de toetsblokkering opnieuw ingeschakeld.
Toetsblokkering inschakelen: hekje-toets R lang indrukken (bevestigingstoon).
Op het display verschijnt het symbool Ø.
Toetsblokkering uitschakelen: hekje-toets R lang indrukken (bevestigingstoon).
i
8
Als de toetsblokkering is ingeschakeld, kunt u ook geen alarmnummers
bellen!
Gigaset CL1 / Nederlands / A31008-A021-B001-1-6Z19 / guidance.fm / 17.09.2003
Bedienen van de telefoon en menu-overzicht
Bedienen van de telefoon en menu-overzicht
Displaytoetsen
De displaytoetsen zijn de langwerpige toetsen direct onder het display. Uw handset
heeft twee displaytoetsen die beide volgens het kantelprincipe werken. Dat wil zeggen
dat de toetsen zowel aan de linker- als aan de rechterkant ingedrukt kunnen worden.
Afhankelijk van de situatie en van welke kant van de toets u indrukt, roept u een bepaald
functie op. Deze functie wordt direct boven de displaytoets weergegeven.
Þ
Ü
INT MENU
Displaytoetsen
Attentietonen
Uw handset wijst u akoestisch op diverse activiteiten en situaties.
◆ Oplopende reeks tonen (bevestigingssignaal):
De actie is correct uitgevoerd of de invoer is correct.
◆ Dalende reeks tonen (foutsignaal):
Wat u probeert te doen, is mislukt of de invoer is onjuist.
Display in ruststand
Vanuit een willekeurige positie in het menu terugkeren naar de ruststand
Verbreektoets a circa 2 sec. lang indrukken of geen toets indrukken. Na 60 seconden
schakelt het display automatisch over naar de ruststand.
Wijzigingen die u niet heeft bevestigd door op OK te drukken, worden niet
doorgevoerd.
Hoofdmenu
Om het hoofdmenu te openen, drukt u in ruststand op de displaytoets MENU en bladert
u met snaar de gewenste optie.
1
2
3
4
5
NETDIENSTEN
GELUID INST
INST BASIS
VOICEMAIL
HS AANMELDEN
Het aanbod van de
menu-opties hangt af
van uw basisstation.
9
Gigaset CL1 / Nederlands / A31008-A021-B001-1-6Z19 / guidance.fm / 17.09.2003
Bedienen van de telefoon en menu-overzicht
Tekenreekstabel voor het invoeren van tekst
Desbetreffende toets meerdere keren of lang indrukken.
1
2
I
4
5
L
M
N
O
Q
P
10
1x
2x 3x 4x 5x 6x
Spatie
1
A
B
C
2
D
E
F
3
G
H
I
4
J
K
L
5
M
N
O
6
P
Q
R
S
T
U
V
8
7
W
X
Y
Z
9
+
0
-
|
?
*
/
(
)
,
_
Gigaset CL1 / Nederlands / A31008-A021-B001-1-6Z19 / telephony.fm / 17.09.2003
Tijdfuncties
Tijdfuncties
Datum en tijd instellen
Alleen als de datum en tijd zijn ingesteld, wordt correct weergegeven op welk tijdstip
oproepen zijn binnengekomen. Voor de tijd kunt u kiezen tussen de 12-uurs weergave
en de 24-uurs weergave (standaardinstelling).
Datum
¢ INST BASIS ¢ DATUM/TIJD ¢ DATUM
¢ Dag/maand/jaar invoeren (voorbeeld: 2 Q Q 5 Q I voor "20-05-2003"")
¢ OK
MENU
a lang indrukken (terug naar de ruststand).
Tijd
¢ INST BASIS ¢ DATUM/TIJD ¢ TIJD
¢ Uren/minuten invoeren (voorbeeld: 1 O Q 5 voor "19:05 uur") ¢ OK
Bij ingestelde 12-uurs weergave: ¢ daghelft selecteren ¢ OK
MENU
a lang indrukken (terug naar de ruststand).
12- of 24-uurs weergave instellen
MENU
¢ INST BASIS ¢ DATUM/TIJD ¢ MODUS ¢ 12 U of 24 U selecteren ¢ OK
a lang indrukken (terug naar de ruststand).
Telefoneren
Extern bellen en gesprek beëindigen
Externe oproepen zijn oproepen in het openbare telefoonnetwerk.
~ Telefoonnummer invoeren, c verbindingstoets indrukken.
Voor beëindigen: a verbreektoets indrukken.
U kunt ook eerst de verbindingstoets c indrukken (u hoort dan een kiestoon) en dan
het telefoonnummer invoeren. Met de verbreektoets a breekt u het kiezen af.
Oproep aannemen
De handset gaat over en de oproep wordt in het display weergegeven.
Verbindingstoets c indrukken.
Is de functie Automatisch opnemen ingeschakeld (pagina 16), dan hoeft u alleen maar
de handset uit de lader te halen om de oproep aan te nemen.
Microfoon van de handset uitschakelen
INT indrukken. Het gesprek wordt "in de wacht gezet" (wachtmelodie).
Om te beëindigen: MENU ¢ TERUG ¢ OK.
11
Gigaset CL1 / Nederlands / A31008-A021-B001-1-6Z19 / directories.fm / 17.09.2003
Telefoonboek en overige lijsten gebruiken
Telefoonboek en overige lijsten gebruiken
Telefoonboek en snelkieslijst
Deze lijsten worden op dezelfde manier gebruikt, met als enige verschil dat u voor het
openen van het telefoonboek de toets h indrukt en voor het openen van de
snelkieslijst de toets C.
In het telefoonboek h kunt u maximaal 20 telefoonnummers en namen opslaan. Op
die manier kunt u altijd gemakkelijk het gewenste nummer kiezen.
De snelkieslijst is een speciaal telefoonboek waarin u maximaal 10 belangrijke
telefoonnummers kunt opslaan, bijvoorbeeld voorkiesnummers van
netwerkaanbieders (zgn. "LCR-nummers = Least Cost Routing").
Telefoonnummer in het telefoonboek of in de snelkieslijst opslaan
h of C ¢ MENU ¢ NIEUW NR ¢ OK
a
i
OK
[______]
Telefoonnummer invoeren en bevestigen
(telefoonboek maximaal 22 cijfers, snelkieslijst
maximaal 12 cijfers).
OK
[______]
Naam (maximaal 12 tekens) invoeren
(tekstinvoer pagina 10) en bevestigen.
Lang indrukken (terug naar ruststand).
Als het toestel is aangesloten op een telefooncentrale, waarbij u voor
externe gesprekken eerst een netlijncode (bijvoorbeeld een "0") moet
kiezen, dient u dit netnummer als eerste cijfer in te voeren.
Kiezen met het telefoonboek
h
Telefoonboek openen.
Eerste letter van de naam invoeren. Voorbeeld: voor
de naam Emma (beginletter "E") tweemaal de toets
I indrukken. De eerste naam die met de letter "E"
begint, wordt weergegeven.
Als verschillende vermeldingen met de letter "E"
beginnen, de gewenste naam selecteren.
c
12
Verbindingstoets indrukken. Het nummer wordt
gekozen.
Gigaset CL1 / Nederlands / A31008-A021-B001-1-6Z19 / directories.fm / 17.09.2003
Telefoonboek en overige lijsten gebruiken
Kiezen met de snelkieslijst (LCR)
Met deze functie kan het voorkiesnummer van een netwerkaanbieder vóór het
telefoonnummer worden geplaatst ("koppelen").
C ¢ vermelding selecteren ¢ MENU ¢ GEBRUIKEN ¢ OK
óf
Telefoonnummer intoetsen:
Telefoonnummer invoeren.
óf
Telefoonnummer in het telefoonboek kiezen:
h
Telefoonboek openen.
[__________] OK
[______]
Telefoonnummer selecteren en bevestigen.
... vervolgens
c
Verbindingstoets indrukken. Het nummer wordt
gekozen.
Snelkiesnummer voor snelkiezen opslaan
U kunt acht nummers uit de snelkieslijst opslaan voor snelkiezen. Voer de cijfers voor
snelkiezen (2-9) op de eerste positie in het naamveld in.
C ¢ vermelding selecteren ¢ MENU ¢ TOON NUMMER ¢ OK
[___________
OK ]
Bevestigen om naar het naamveld te gaan.
[___________
u]
Cursor naar de eerste positie van het naamveld
verplaatsen.
Snelkiesnummer invoeren, bijvoorbeeld 2
(toets vier keer indrukken om het cijfer 2 in te
voeren).
Bevestigen.
[___________
OK ]
Snelkiesfunctie gebruiken:
Snelkiesnummer lang indrukken, bijvoorbeeld 2.
Het opgeslagen snelkiesnummer wordt
weergegeven.
Telefoonnummer invoeren dat u wilt koppelen.
c
Verbindingstoets indrukken.
Vermeldingen in het telefoonboek en in de snelkieslijst beheren
h of C ¢ vermelding selecteren ¢ MENU ¢ gewenste functie selecteren:
GEBRUIKEN
NIEUW NR
TOON NUMMER
WISSEN
13
Gigaset CL1 / Nederlands / A31008-A021-B001-1-6Z19 / directories.fm / 17.09.2003
Telefoonboek en overige lijsten gebruiken
Telefoonboek/snelkieslijst wissen
Als u een lijst verwijdert, wordt de betreffende lijst volledig gewist, inclusief alle
vermeldingen van de lijst.
h of C ¢ MENU ¢ toets L indrukken ¢ WISSEN ? ¢ OK
a lang indrukken (terug naar de ruststand).
Nummerherhalingslijst
In de nummerherhalingslijst worden de vijf laatst gekozen nummers geregistreerd.
Telefoonnummers kiezen
Þ displaytoets indrukken ¢ vermelding selecteren ¢ toets c indrukken
Vermeldingen wijzigen en/of in het telefoonboek overnemen
Þ displaytoets indrukken ¢ vermelding selecteren ¢ MENU ¢ GEBRUIKEN of
NR NAAR TB
¢ OK
Nummerherhalingslijst wissen
Þ displaytoets indrukken ¢ MENU ¢ toets L indrukken ¢ WISSEN ? ¢ OK
a lang indrukken (terug naar de ruststand).
Bellerslijst
In de bellerslijst worden de telefoonnummers van de gemiste oproepen opgeslagen.
U opent de bellerslijst met de displaytoets Û. Nieuwe berichten worden
door het knipperen van het symbool Û aangeduid.
14
Gigaset CL1 / Nederlands / A31008-A021-B001-1-6Z19 / registration.fm / 17.09.2003
Verschillende handsets gebruiken
Verschillende handsets gebruiken
Intern telefoneren en gesprek beëindigen
Interne oproepen zijn kostenloze gesprekken met andere handsets van dezelfde
basisset.
Een bepaalde handset bellen
INT 2 indrukken (bijvoorbeeld voor handset 2)
Of:
¢ handset selecteren ¢ verbindingstoets c indrukken
Om het gesprek te beëindigen: averbreektoets indrukken.
INT
Groepsoproep (alle handsets gelijktijdig bellen)
INT ¢ AAN ALLEN ¢ verbindingstoets c indrukken
Om te beëindigen: a verbreektoets indrukken.
Gesprek naar een andere handset doorschakelen
¢ handset selecteren ¢ verbindingstoets c indrukken
De interne deelnemer meldt zich: verbreektoets a indrukken.
INT
Interne ruggespraak
Tijdens een extern gesprek kunt u intern telefoneren.
INT ¢ handset selecteren ¢ verbindingstoets c indrukken
Om te beëindigen: MENU ¢ TERUG ¢ OK (terug naar de externe deelnemer)
Wisselgesprek bij intern gesprek aannemen/afwijzen
Wanneer u tijdens een intern gesprek een externe oproep krijgt, hoort u de
wisselgesprektoon (korte toon).
Aannemen: MENU ¢ BEANTWOORD ¢ OK
(u spreekt met de externe deelnemer).
Weigeren: MENU ¢ AFWIJZEN ¢ OK
(u spreekt met de interne deelnemer).
De geweigerde wisselgesprektoon is op de overige handsets nog te horen.
15
Gigaset CL1 / Nederlands / A31008-A021-B001-1-6Z19 / settings_bs_hs.fm / 17.09.2003
Handset instellen
Handset instellen
Uw handset is vooraf ingesteld. U kunt de instellingen afzonderlijk wijzigen.
Automatisch opnemen uit-/inschakelen
Bij een oproep neemt u de handset eenvoudig uit de lader. U hoeft de
verbindingstoets c niet in te drukken (standaardinstelling: aan).
Automatisch opnemen uitschakelen:
MENU ¢ O 1 Q
Automatisch opnemen inschakelen:
MENU ¢ O 1 1
Volume en melodie wijzigen
U kunt het handsetvolume in 3 niveaus, het volume voor het belsignaal in 6 niveaus (6
is oplopend volume) instellen en uit 10 melodieën kiezen.
MENU ¢ GELUID INST ¢ H/SET VOL of BELSIGN of MELODIE ¢ instelling selecteren
¢ OK
a lang indrukken (terug naar de ruststand).
Belsignaal uit-/inschakelen
Bij inkomende externe oproepen gaan alle handsets over.
Permanent uitschakelen: sterretje-toets P lang indrukken. Op het display
verschijnt Ú.
Om in te schakelen: sterretje-toets P lang indrukken.
Als u het belsignaal voor de huidige oproep wilt uitschakelen, drukt u op de
displaytoets MENU en bevestigt u BEL UIT met OK.
Batterijtoon uit-/inschakelen
Attentietoon bij bijna lege batterij (standaardinstelling: ingeschakeld).
Batterijtoon uitschakelen:
MENU ¢ O 4 Q
Batterijtoon inschakelen:
MENU ¢ O 4 1
16
Gigaset CL1 / Nederlands / A31008-A021-B001-1-6Z19 / settings_bs_hs.fm / 17.09.2003
Handset instellen
Standaardinstellingen op de handset herstellen
U kunt persoonlijke instellingen en wijzigingen terugzetten op de
standaardinstellingen. Vermeldingen in het telefoonboek, de bellerslijst, de
nummerherhalingslijst en de snelkieslijst blijven daarbij behouden. De handset blijft
ook aangemeld op het basisstation.
¢ O I ¢ RESET ? ¢ OK
a lang indrukken (terug naar de ruststand).
MENU
Standaardinstellingen van de handset
Handsetvolume
Volume van het belsignaal
Melodie van het belsignaal
Telefoonboek
Nummerherhalingslijst
Bellerslijst
Snelkieslijst
Automatisch opnemen
Batterijtoon
Displaytaal
Standaardinstellingen
1
5
1
leeg
leeg
leeg
leeg
ingeschakeld
ingeschakeld
Nederlands
Instellingen na resetten
1
5
1
blijft behouden
blijft behouden
blijft behouden
blijft behouden
ingeschakeld
ingeschakeld
Nederlands
Beschrijving
pagina 16
pagina 16
pagina 16
pagina 12
pagina 14
pagina 14
pagina 12
pagina 16
pagina 16
pagina 8
17
Gigaset CL1 / Nederlands / A31008-A021-B001-1-6Z19 / appendix.fm / 17.09.2003
Bijlage
Bijlage
Onderhoud en contact met vloeistof !
Reinig de handset met een vochtige doek (geen oplosmiddel) of een antistatische
doek. Gebruik nooit een droge doek. Deze kan statische elektriciteit veroorzaken.
Wanneer de handset met vloeistof in contact is gekomen, mag u het toestel in geen
geval inschakelen. Verwijder onmiddellijk alle batterijen.
Laat de vloeistof uit het toestel lopen en dep vervolgens alle onderdelen droog.
Laat de handset zonder batterijen gedurende ten minste 72 uur op een droge, warme
plaats liggen. Eenmaal droog kan de handset normaal gesproken weer worden
gebruikt.
Klantenservice (Customer Care)
Wij geven u snel en persoonlijk advies!
Onze on line-support op internet:
www.my-siemens.nl/service
Nederland
www.my-siemens.be
België
In geval van een noodzakelijke reparatie of aanspraak op garantie krijgt u snelle en
betrouwbare hulp van onze
servicecentra in Nederland 0900 333 3102
servicecentra in België
078 15 22 21
Houd uw aankoopbewijs a.u.b. bij de hand.
Meer servicenummers vindt u aan het einde van de gebruiksaanwijzing onder
"Service".
In landen waar ons product niet door geautoriseerde dealers wordt verkocht, wordt
geen vervanging of reparatie aangeboden.
Met landspecifieke bijzonderheden is rekening gehouden.
De handset CL1 is in de gehele EU en in Zwitserland goedgekeurd.
De conformiteit van het toestel met de basiseisen van de R&TTE-richtlijn is gewaarborgd
door de CE-markering.
18
Gigaset CL1 / Nederlands / A31008-A021-B001-1-6Z19 / appendix.fm / 17.09.2003
Bijlage
Uittreksel uit de oorspronkelijke verklaring:
"We, Siemens AG, declare, that the above mentioned product is manufactured according to our Full
Quality Assurance System certified by CETECOM ICT Services GmbH in compliance with ANNEX V
of the R&TTE-Directive 99/05/EC. The presumption of conformity with the essential requirements
regarding Council Directive 99/5/EC is ensured"
Senior Approvals Manager
The Declaration of Conformity (DoC) has been signed. In case of need, a copy of the original DoC
can be made available via the company hotline.
Technische gegevens
Aanbevolen batterijen
Nikkel-metaalhydride (NiMH) – Type AAA
Sanyo Twicell 700 (700 mAh)
Sanyo Twicell 650 (650 mAh)
Panasonic 700mAh "for Dect" (700 mAh)
GP 700mAh (700 mAh)
Varta Phone Power AAA (700 mAh)
YDT AAA SUPER 700 (700 mAh)
(situatie bij het ter perse gaan van de gebruiksaanwijzing)
Het toestel wordt geleverd met bijpassende batterijen.
Bedrijfstijd/laadtijd van de handset
Capaciteit
(mAh)
Stand-by tijd
(uren)
Gesprekstijd
(uren)
Laadtijd
(uren)
700
maximaal 200
(circa 8 dagen)
ongeveer 16
ongeveer 5
De genoemde bedrijfs- en laadtijd gelden uitsluitend bij gebruik van de aanbevolen
batterijen.
19
Gigaset CL1 / Nederlands / A31008-A021-B001-1-6Z19 / appendix.fm / 17.09.2003
Bijlage
Garantie Nederland
Siemens verleent de consument een garantie van 24 maanden voor dit toestel, te
rekenen vanaf de datum van aankoop. Als bewijs hiervoor geldt de aankoopfactuur.
Binnen de garantietermijn zal Siemens alle gebreken die het gevolg zijn van materiaalen/of productiefouten kosteloos repareren of het defecte toestel vervangen. In dit geval
kan contact worden opgenomen met de Siemens Klantenservice, alwaar de reparatie
dient te worden aangemeld. Bij de Klantenservice worden een zogenaamd RMAnummer (Return Material Authorisation) en verzendinstructies verstrekt. Wanneer de
consument wordt verzocht het product aan Siemens Nederland ter reparatie aan te
bieden, zullen de verzendkosten voor eigen rekening zijn.
De garantie vervalt indien:
◆ reparaties, vervanging of uitbreidingen aan het toestel zijn verricht door anderen
dan Siemens zonder haar schriftelijke toestemming;
◆ het toestel naar het oordeel van Siemens is verwaarloosd dan wel onvoorzichtig en/
of ondeskundig is gebruikt, behandeld en/of onderhouden, en/of er sprake is van
normale slijtage;
◆ typenummers en/of serienummers en/of garantiestickers zijn beschadigd,
verwijderd en/of veranderd;
◆ wijzigingen in garantiekaart en/of aankoopfactuur zijn aangebracht;
◆ door verkeerd inleggen en/of lekkage van vervangbare accu's (oplaadbare
batterijen) of door gebruik van niet voorgeschreven accu's (oplaadbare batterijen)
defecten zijn ontstaan;
◆ defecten zijn ontstaan door het niet volgens voorschriften aansluiten en/of
installeren van de (goedgekeurde) zaken;
◆ defecten zijn ontstaan ten gevolge van afwijkende omgevingscondities, voor zover
dergelijke condities zijn aangegeven;
◆ defecten zijn ontstaan door overige van buitenaf komende oorzaken;
◆ de verzegeling, voorzover aanwezig, is verbroken.
De garantietermijn wordt niet verlengd of vernieuwd door uitvoering van
garantiewerkzaamheden, met dien verstande dat de garantie op de uitgevoerde
werkzaamheden drie maanden bedraagt.
Wettelijke aanspraken van de consument, waaronder tevens begrepen wettelijke
aanspraken jegens de verkoper, worden door deze garantie noch uitgesloten, noch
beperkt.
Deze garantie wordt verleend door:
Siemens Nederland N.V.
20
Gigaset CL1 / Nederlands / A31008-A021-B001-1-6Z19 / appendix.fm / 17.09.2003
Bijlage
Garantiecertificaat België
Ongeacht zijn aanspraken ten opzichte van de dealer, kan de gebruiker (klant)
aanspraak maken op een garantie onder de onderstaande voorwaarden:
◆ Wanneer het nieuwe apparaat en bijbehorende componenten binnen 24 maanden
na aankoop defecten vertonen als gevolg van productie- en/of materiaalfouten, zal
Siemens naar eigen keuze het apparaat kosteloos repareren of vervangen door een
ander apparaat volgens de laatste stand van de techniek. In geval van delen die aan
slijtage onderhevig zijn (zoals batterijen, keypads, behuizing), geldt deze
garantiebepaling voor een periode van zes maanden na aankoopdatum.
◆ Deze garantie is niet van toepassing voor zover het defect aan het apparaat het
gevolg is van onoordeelkundig gebruik en/of het niet in acht nemen van de
informatie zoals vermeld in de gebruiksaanwijzingen.
◆ Deze garantie geldt niet voor diensten die zijn uitgevoerd door geautoriseerde
dealers of de klant zelf (zoals installatie, configuratie, software-downloads).
Gebruiksaanwijzingen en eventueel op aparte informatiedragers meegeleverde
software zijn eveneens van deze garantie uitgesloten.
◆ Als garantiebewijs geldt de aankoopbon met de aankoopdatum. Aanspraken die
onder deze garantie vallen, dienen binnen twee maanden nadat het defect
vastgesteld is geldend te worden gemaakt.
◆ Vervangen apparaten resp. bijbehorende componenten die in het kader van de
vervanging aan Siemens zijn teruggestuurd, worden eigendom van Siemens.
◆ Deze garantie geldt voor nieuwe apparaten die gekocht zijn in de Europese Unie. De
garantie voor toestellen aangekocht in België wordt verleend door N.V. Siemens,
Charleroisesteenweg 116, B 1060 Brussel.
◆ Verdergaande of andere aanspraken dan vermeld in deze garantie zijn uitgesloten,
behoudens voor zover aansprakelijkheid berust op bepalingen van dwingend recht,
zoals de wettelijke regeling inzake productaansprakelijkheid.
◆ De duur van de garantie wordt niet verlengd voor diensten die in het kader van de
garantie tijdens de duur van de garantie worden verleend.
◆ Voor zover het niet om een garantiegeval gaat, behoudt Siemens zich het recht voor,
de klant voor het vervangen of repareren kosten in rekening te brengen.
◆ De bovenvermelde bepalingen beogen geen verandering in de bewijslast ten nadele
van de klant.
Neem, om gebruik te maken van deze garantie, telefonisch contact op met Siemens.
Het telefoonnummer vindt u in de bijgevoegde gebruikshandleiding.
21
Gigaset CL1 / niederländisch / A31008-A021-B001-1-6Z19 / CL1SIX.fm / 17.09.2003
Trefwoordenregister
Trefwoordenregister
A
Attentietoon . . . . . . . . . . . . . . . . . . . . 9
Automatisch opnemen . . . . . . . . . . . 16
B
Batterijen
aanbevolen . . . . . . . . . . . . . . . . . . 19
laden . . . . . . . . . . . . . . . . . . . . . . . . 7
plaatsen . . . . . . . . . . . . . . . . . . . . . 6
Batterijtoon . . . . . . . . . . . . . . . . . . . . 16
Bedrijfstijd van de handset . . . . . . . . . 19
Bellerslijst . . . . . . . . . . . . . . . . . . . 2, 14
Belsignaal uit-/inschakelen . . . . . . . . . 16
Beschermfolie . . . . . . . . . . . . . . . . . . . 6
Intern
telefoonnummer. . . . . . . . . . . . . . . . 2
K
Kiezen
met de snelkieslijst . . . . . . . . . . . . . 13
met het telefoonboek . . . . . . . . . . . 12
Klantenservice . . . . . . . . . . . . . . . . . . 18
L
Laadtijd van de handset . . . . . . . . . . . 19
LCR . . . . . . . . . . . . . . . . . . . . . . . . . . 13
M
Customer Care (Service) . . . . . . . . . . 18
Menubeheer . . . . . . . . . . . . . . . . . . . . 9
Microfoon . . . . . . . . . . . . . . . . . . . . . . 2
Microfoon uitschakelen (handset) . . . . 11
D
N
C
Datum instellen . . . . . . . . . . . . . . . . . 11
Display
in ruststand . . . . . . . . . . . . . . . . . . . 9
taal instellen . . . . . . . . . . . . . . . . . . 8
G
Garantie . . . . . . . . . . . . . . . . . . . . . . 20
Gesprek beëindigen. . . . . . . . . . . . . . 11
H
Handset
aanmelden . . . . . . . . . . . . . . . . . . . 7
bedrijfs- en laadtijd . . . . . . . . . . . . 19
in gebruik nemen . . . . . . . . . . . . . . . 6
in-/uitschakelen . . . . . . . . . . . . . . . . 6
microfoon uitschakelen . . . . . . . . . 11
resetten . . . . . . . . . . . . . . . . . . . . . 17
Hoofdmenu . . . . . . . . . . . . . . . . . . . . 9
I
Indicatie batterijniveau . . . . . . . . . . . . 7
Inschakelen
handset . . . . . . . . . . . . . . . . . . . . . . 6
toetsblokkering . . . . . . . . . . . . . . . . 8
22
Netvoedingsadapter . . . . . . . . . . . . . . . 5
Nummer zie Telefoonnummer . . . . . . 12
Nummerherhaling . . . . . . . . . . . . . . . 14
O
On line-support . . . . . . . . . . . . . . . . . 18
Opnemen, automatisch . . . . . . . . . . . 16
R
Ruststand (display) . . . . . . . . . . . . . . . . 9
S
Service . . . . . . . . . . . . . . . . . . . . . . . 18
Snelkieslijst . . . . . . . . . . . . . . . . . . . . 12
alle vermeldingen wissen . . . . . . . . 14
Snelkiesnummer . . . . . . . . . . . . . . . . 13
Snelkiezen
snelkiesnummer . . . . . . . . . . . . . . . 13
T
Technische gegevens . . . . . . . . . . . . . 19
Tekentabel . . . . . . . . . . . . . . . . . . . . . 10
Tekst invoeren . . . . . . . . . . . . . . . . . . 10
Gigaset CL1 / niederländisch / A31008-A021-B001-1-6Z19 / CL1SIX.fm / 17.09.2003
Trefwoordenregister
Telefoneren
extern . . . . . . . . . . . . . . . . . . . . . . 11
oproep aannemen . . . . . . . . . . . . . 11
Telefoonboek . . . . . . . . . . . . . . . . . . 12
telefoonnummer/-vermelding opslaan
12
vermelding wijzigen . . . . . . . . . . . . 13
vermeldingen beheren . . . . . . . . . . 13
Telefoonnummer
opslaan . . . . . . . . . . . . . . . . . . . . . 12
uit de bellerslijst overnemen . . . . . 14
Tijd instellen . . . . . . . . . . . . . . . . . . . 11
Tijdfuncties . . . . . . . . . . . . . . . . . . . . 11
Toetsblokkering . . . . . . . . . . . . . . . . . 8
Toon
attentietoon . . . . . . . . . . . . . . . . . . 9
Toon, zie Signaal . . . . . . . . . . . . . . . . 16
U
Uitschakelen
handset . . . . . . . . . . . . . . . . . . . . . . 6
toetsblokkering . . . . . . . . . . . . . . . . 8
V
Veiligheidsvoorschriften . . . . . . . . . . . 5
W
Wachtmelodie . . . . . . . . . . . . . . . . . . 11
23
Gigaset CL1 / Nederlands / A31008-A021-B001-1-6Z19 / Service.fm / 17.09.2003
Service
You can get assistance easily when you have technical questions or questions about
how to use your device by using our online support service on the Internet at:
www.my-siemens.com/customercare.
Abu Dhabi. . . . . . . . . . . . . . . 0 26 42 38 00
Argentina . . . . . . . . . . . . 0 80 08 88 98 78
Australia . . . . . . . . . . . . . . . 18 00 62 24 14
Austria . . . . . . . . . . . . . . . . 05 17 07 50 04
Bahrain . . . . . . . . . . . . . . . . . . . . . 40 42 34
Bangladesh . . . . . . . . . . . . . . 0 17 52 74 47
Belgium . . . . . . . . . . . . . . . . 0 78 15 22 21
Bosnia Herzegovina . . . . . . . 0 33 27 66 49
Brazil . . . . . . . . . . . . . . . . 0 80 07 07 12 48
Brunei . . . . . . . . . . . . . . . . . . . 02 43 08 01
Bulgaria. . . . . . . . . . . . . . . . . . 02 73 94 88
Cambodia . . . . . . . . . . . . . . . . 12 80 05 00
Canada . . . . . . . . . . . . . . 1 88 87 77 02 11
China . . . . . . . . . . . . . . . 0 21 50 31 81 49
Croatia . . . . . . . . . . . . . . . . . 0 16 10 53 81
Czech Republic . . . . . . . . . . 02 33 03 27 27
Denmark . . . . . . . . . . . . . . . . . 35 25 86 00
Dubai . . . . . . . . . . . . . . . . . . 0 43 96 64 33
Egypt. . . . . . . . . . . . . . . . . . . 0 23 33 41 11
Estonia . . . . . . . . . . . . . . . . . . 06 30 47 97
Finland . . . . . . . . . . . . . . . . 09 22 94 37 00
France . . . . . . . . . . . . . . . . . 01 56 38 42 00
Germany . . . . . . . . . . . . . . .01805 333 222
Greece . . . . . . . . . . . . . . 0 80 11 11 11 16
Hong Kong . . . . . . . . . . . . . . . 28 61 11 18
Hungary . . . . . . . . . . . . . . . 06 14 71 24 44
Iceland . . . . . . . . . . . . . . . . . . . 5 11 30 00
India . . . . . . . . . . . . . . 01 13 73 85 89 - 98
Indonesia . . . . . . . . . . . . 0 21 46 82 60 81
Ireland . . . . . . . . . . . . . . . . 18 50 77 72 77
Italy. . . . . . . . . . . . . . . . . . . 02-243 64400
Ivory Coast . . . . . . . . . . . . . . . 80 00 03 33
Jordan . . . . . . . . . . . . . . . . . . 0 64 39 86 42
Kenya . . . . . . . . . . . . . . . . . . . . 2 72 37 17
Kuwait . . . . . . . . . . . . . . . . . . . 2 45 41 78
Latvia . . . . . . . . . . . . . . . . . . . . 7 50 11 14
Lebanon . . . . . . . . . . . . . . . . . 01 44 30 43
Libya . . . . . . . . . . . . . . . . . . 02 13 50 28 82
Lithuania. . . . . . . . . . . . . . . . 8 22 74 20 10
24
last page before cover page!
Luxembourg . . . . . . . . . . . . . 43 84 33 99
Macedonia. . . . . . . . . . . . . . . . 02 13 14 84
Malaysia. . . . . . . . . . . . . . . 03 21 63 11 18
Malta . . . . . . . . . . . . 00 35 32 14 94 06 32
Mauritius . . . . . . . . . . . . . . . . . . 2 11 62 13
Mexico . . . . . . . . . . . . . .01 80 07 11 00 03
Morocco . . . . . . . . . . . . . . . . . 22 66 92 09
Netherlands. . . . . . . . . . . . 0900-3333102
New Zealand . . . . . . . . . . . 08 00 27 43 63
Norway . . . . . . . . . . . . . . . . . . 22 70 84 00
Oman. . . . . . . . . . . . . . . . . . . . . . 79 10 12
Pakistan . . . . . . . . . . . . . . . 02 15 66 22 00
Philippines . . . . . . . . . . . . . . 0 27 57 11 18
Poland . . . . . . . . . . . . . . . . 08 01 30 00 30
Portugal . . . . . . . . . . . . . . . . 8 00 85 32 04
Qatar . . . . . . . . . . . . . . . . . . . . 04 32 20 10
Romania . . . . . . . . . . . . . . 02 12 04 60 00
Russia. . . . . . . . . . . . . . . . (800) 200 10 10
Saudi Arabia . . . . . . . . . . . . 0 22 26 00 43
Serbia. . . . . . . . . . . . . . . . . 01 13 22 84 85
Singapore . . . . . . . . . . . . . . . . 62 27 11 18
Slovak Republic . . . . . . . . . 02 59 68 22 66
Slovenia . . . . . . . . . . . . . . . . 0 14 74 63 36
South Africa. . . . . . . . . . . . 08 60 10 11 57
Spain . . . . . . . . . . . . . . . . . . 9 02 11 50 61
Sweden . . . . . . . . . . . . . . . . 0 87 50 99 11
Switzerland . . . . . . . . . . . . 08 48 21 20 00
Taiwan . . . . . . . . . . . . . . . . 02 25 18 65 04
Thailand. . . . . . . . . . . . . . . . 0 22 68 11 18
Tunisia . . . . . . . . . . . . . . . . . 0 71 86 19 02
Turkey . . . . . . . . . . . . . . . 0 21 65 79 71 00
Ukraine . . . . . . . . . . . . . . 8 80 05 01 00 00
United Arab Emirates . . . . . 0 43 31 95 78
United Kingdom . . . . . . . 0 87 05 33 44 11
USA . . . . . . . . . . . . . . . . . 1 88 87 77 02 11
Vietnam . . . . . . . . . . . . . . . . . . 45 63 22 44