1
V 1.02
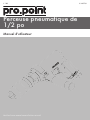
1/2" Air Drill
8349789
INSTALLATION
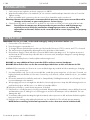
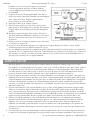
1. Set the air pressure regulator on the air compressor to 90 PSI.
2. Wrap the threaded portion of a standard 1/4” air connector with thread tape. Attach it to the tool’s air inlet.
Tighten securely.
3. Attach a standard quick connector to the air source’s hose. Attach the air hose to the tool.
Warning: Do not exceed the tool’s recommended air pressure. Excess pressure could result in
damage to the tool, to your work piece or serious injury.
4. Check the air line and its connections for air leaks. Do not use this tool until you have repaired all air leaks.
Note:Turn off the air compressor, disconnect the air pressure hose and discharge any
residual pressure inside the tool before changing accessories or making any
adjustments to the tool. Failure to do so could result in severe injury, tool or property
damage.
OPERATION
WARNING: Ensure you read, understand and apply safety instructions before use.
1. Connect the tool to the air hose.
2. Press the trigger to operate the tool.
3. To change direction push the button at the top of the handle. Direction of “R” for reverse and “F” for forward.
4. The air-flow may be regulated by adjusting flow valve at the base of the handle.
5. Ensure the air supply is clean and does not exceed 90 PSI while operating to tool. Too high an air pressure
and unclean air will shorten the product life due to excessive wear, and may be dangerous causing damage
or personal injury.
6. Keep children away from tool and workplace when using the tool.
DO NOT use any additional force upon the drill in order to remove hardware.
DO NOT allow tool to free run for an extended period of time as this will shorten its life.
WARNING! D
isconnect the tool from its air source and discharge any residual air before attaching or changing
bits or accessories.
7. Use sharp drill bits only. For wood, use twist drill bits, spade bits, power auger bits, or hole saws. For metal, use
high speed steel twist drill bits or hole saws. For masonry, such as brick, cement, cinder block, etc., use carbidetipped bits.
8. Be sure the material to be drilled is anchored or clamped firmly. If drilling thin material, use a “back-up” block
to prevent damage to the material.
9. Always apply pressure in a straight line with the bit. Use enough pressure to keep the drill bit biting, but do not
push hard enough to stall the motor or to deflect or bend the drill bit.
10.Hold the tool firmly to control the twisting action of the drill.
11.If drill stalls, it is usually because it is being overloaded. Release trigger immediately, remove drill bit from work,
and determine cause of stalling. Do not click trigger on and off in an attempt to start a stalled drill. This can
damage the drill.
12.To minimize stalling when breaking through the material, reduce pressure on drill and ease the bit through the
last part of the hole.
13.Keep the motor running when pulling the bit back out of a drilled hole. This will help prevent jamming.
NOTE:Before working, let the tool operate for no less than one minute without load.
For technical questions call: 1-800-665-8685
7