1
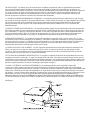
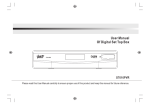
9” Portable DVD Player
LPD-902
THIS INSTRUCTION BOOK MAY CONTAIN ERRORS AND OMISSIONS.
DESIGN AND SPECIFICATION ARE SUBJECT TO CHANGE WITHOUT NOTICE.
For Support Toll Free 1-888-208-4108 Fax: (905) 209-0489
www.cosmocanada.ca
Federal Communications
Commission Statement
IMPORTANT
Since the CD Circuitry may cause interference to other radio tuners nearby, switch this unit off
when not in use or move the affected radio tuner away.
This device complies with Part 15 of the FCC Rules. Operation is subject to the following two
conditions: (1) This device may not cause harmful interference, and (2) this device must accept any
interference received, including interference that may cause undesirable operation.
This device complies with Canadian ICES-003
Standard TELEVISION receiving Apparatus
FEDERAL COMMUNICATIONS COMMISSION STATEMENT
NOTE: This equipment has been tested and found to comply with the limits for a Radio Receiver,
pursuant to part 15 of the FCC Rules.
These limits are designed to provide reasonable protection against harmful interference in a r
esidential installation. This equipment generates uses and can radiate radio frequency energy and,
if not installed and used in accordance with the instructions, may cause harmful interference to
radio communications. However, there is no guarantee that interference will not occur in a
particular installation. If this equipment does cause harmful interference to radio or television
reception, which can be determined by turning the equipment off and on, the user is encouraged
to try to correct the interference by one or more of the following measures:
- Reorient or relocate the receiving antenna.
- Increase the separation between the equipment and receiver.
- Connect the equipment into an outlet on a circuit different from that to which the
Receiver is connected.
- Consult the dealer or an experienced radio/TV technician for help.
Caution: changes or modifications no expressly approved by the party responsible for compliance
could void the user’s authority to operate the equipment.
1
OPERATING INSTRUCTIONS
CAUTION
RISK OF ELECTRIC SHOCK
DO NOT OPEN
The lightning flash
and arrowhead
within the triangle
is a warning sign
alerting you of
“dangerous voltage”
inside the product.
CAUTION: TO REDUCE THE RISK OF
ELECTIC SHOCK, DO NOT REMOVE
COVER(ON BACK). NO USERSERVICEABLE PARTS INSIDE. REFER
SERVICING TO QUALIFIED SERVICE
PERSONNEL.
The Exclamation
point within the
triangle is a warning
sign alerting you of
important
intstructions a
ccompanying the
product
CAUTION: TO PREVENT ELECTRICAL SHOCK DO NOT USE THIS
(POLARIZED) PLUG WITH AN EXTENTION CORD, RECEPTACLE, OR
OTHER OUTLET UNLESS THE BLADES CAN BE FULLY INSTERTED
TO PREVENT BLADE EXPOSURE.
PLEASE READ THIS BEFORE OPERATING THIS UNIT.
MPORTANT SAFETY INSTRUCTIONS
1. READ INSTRUCTIONS - All the safety and operating instructions should be read before the product is
operated.
2. RETAIN INSTRUCTIONS - The safety and operating instructions should be retained for future reference.
3. HEED WARNINGS - All warnings on the product and in the operating instructions should be adhered to.
4. FOLLOW INSTRUCTIONS - All operating and use instructions should be followed.
5. CLEANING -Unplug this product from the wall outlet before cleaning, Do not use liquid cleaners or aerosol
cleaners. Use a damp cloth for cleaning.
6. ATTACHMENTS - Do not use attachments not recommended by the product manufacturer as they may cause
hazards.
7. WATER AND MOISTURE -Do not use this product near water - for example, near a bath tub, wash bowl, kitchen
sink , or laundry tub; in a wet basement, or near a swimming pool, and the like.
8. ACCESSORIES - Do not place this product on an unstable cart, stand tripod, bracket, or table. The product may
fall, causing serious injury to a child or adult, and serious damage to the product. Use only with a cart, stand,
tripod, bracket, or table recommended by 、the manufacturer, or sold with the product. Any mounting of the
product should follow the manufacturer's instructions, and should use a mounting accessory recommended
by the manufacturer.
9. A product and cart combination should be moved with care. Quick stops, excessive force, and uneven surfaces
may cause the appliance and cart combination to overturn.
2
10. VENTILATION - Slots and openings in the cabinet are provided for ventilation and to ensure reliable operation
of the product and to protect it from overheating, and these openings must not be blocked or covered. The
openings should never be blocked by placing the product on a bed, sofa, rug, or other similar surface. This
product should not be placed in a built-in installation such as a bookcase or rack unless proper ventilation is
provided or the manufacturer's instruction have been adhered to.
11. POWER SOURCES - This product should be operated only from the type of power source indicated on the
marking label. If you are not sure of the type of power supply to you home, consult your product dealer or
local power company. For products intended to operate from battery power, or other sources, refer to
operating instruction.
12. GROUNDING OR POLARIZATION - This product may be equipped with a polarized alternating current line
plug (a plug having one blade wider than the other). This plug will fit into the power outlet only one way. This
is a safety feature. If you are unable to insert the plug fully into the outlet, try reversing the plug. If the plug
should still fail to fit, contact your electrician to replace your obsolete outlet. Do not defeat the safety purpose
of the polarizes plug.
ALTERNATE WARNINGS - This product is equipped with a three-wire grounding-type plug, a plug having a third
(grounding) pin. This plug will only fit into a grounding-type power outlet. This is a safety feature. If you are
unable to insert the plug into the outlet, contact your electrician to replace your obsolete outlet, Do not defeat
the safety purpose of the grounding-type plug.
13. POWER-CORD PROTECTION - Power supply cords should be routed so that they are not likely to be walked
on or pinched by items placed upon or against them, paying particular attention to cords at plugs,
convenience receptacles, and point where they exit from the product.
14. PROTECTIVE ATTACHMENT PLUG - The product is equipped with an attachment plug having overload
protection. This is a safety feature. See Instruction Manual for replacement or resetting of protective device.
If replacement of the plug is required, be sure the service technician has used a replacement plug specified
by the manufacturer that has the same overload protection as the original plug.
15. OUTDOOR ANTENNA GROUNDING- If an outside antenna is connected to the receiver, be sure the antenna
system is grounded so as to provide some protection against voltage surges and built-up static charges.
Article 810 of the National Electrical Code, ANSI/NFPA 70, provides information with regard to proper
grounding of the mast and supporting structure, grounding of the mast and supporting structure, grounding
of the mast and supporting structure, grounding of the lead-in wire to an antenna-discharge unit, size of
grounding conductors, location of antenna-discharge unit, connection to grounding electrodes, and
requirements for the grounding electrode.
See figure:
AN TEN N A
LEAD IN
W IR E
GROUND
C LAM P
AN TEN N A
D I SC HAR G E U N IT
IN EC SEC TIO N 810-210
ELEC TR IC
SERVIC E
EQ U IP M EN T
G R O U N D IN G C O N D U C TO R S
IN EC SEC TIO N 810-211
G R O U N D CLAM PS
PO W ER SER VIC EG R O U N D IN G
ELEC TR O D ESYSTEM
IN EC AR T250.PAR TH I
NEC NATIONAL ELECTRICAL CODE
3
16. LIGHTNING - For added protection for this product during a lightning storm, or when it is left unattended
and unused for long periods of time, unplug it from the wall outlet and disconnect the antenna or cable
system. This will prevent damage to the product due to lightning and power-line surges.
17. POWER LINES - An outside antenna system should not be located in the vicinity of overhead power lines or
other electric light or power circuits, or where it can fall into such power lines or circuits. When installing an
outside antenna system, extreme care should be taken to keep from touching such power lines or circuits as
contact with them might be fatal.
18. OVERLOADING - Do not overload wall outlets, extension cords, or integral convenience receptacles as this
can result in a risk of fire or electric shock.
19. OBJECT AND LIQUID ENTRY - Never push objects of any kind into this product through openings as they may
touch dangerous voltage points or short-out parts that could result in a fire or electric shock. Never spill liquid
of any kind on the product.
20. SERVICING - Do not attempt to service this product yourself as opening or removing covers may expose you
to dangerous voltage or other hazards. Refer all servicing to qualified service personnel.
21. DAMAGE REQUIRING SERVICE - Unplug this product from the wall outlet and refer servicing to qualified
service personnel under the following conditions:
a) When the power-supply cord or plug is damaged.
b) If liquid has been spilled, or objects have fallen into the product.
c) If the product has been exposed to rain or water.
d) If the product does not operate normally by following the operating instructions. Adjust only those controls
that are covered by the operating instructions as an improper adjustment of other controls may result in
damage and will often require extensive work by a qualified technician to restore the product to its normal
operation.
e) If the product has been dropped or damaged in any way, and.
f ) When the product exhibits a distinct change in performance - this indicates a need for service.
22. REPLACEMENT PARTS - When replacement parts are required, be sure the service technician has used
replacement parts specified by the manufacturer or have the same characteristics as the original part.
Unauthorized substitutions may result in fire, electric shock, or other hazards.
23. SAFETY CHECK - Upon completion of any service or repairs to this product, ask the service technician to
perform safety checks to determine that the product is in proper operating condition.
24. WALL OR CEILING MOUNTING - The product should be mounted to a wall or ceiling only as recommended by
the manufacturer.
25. HEAT - The product should be situated away from heat sources such as radiators, heat registers, stoves, or
other products (including amplifiers) that produce heat.
TIPS ON BATTERY USE
When not in use for an extended period of time for while batteries are not being used, be sure to remove them
to avoid possible damage caused by battery corrosion and leakage
Weak or distorted sound usually indicated your batteries are low. Remove and discard appropriately and replace
with new batteries
Do not mix new and old batteries or non-chargeable and rechargeable batteries.
Caution of Battery
The batteries (battery pack or batteries installed) should not be exposed to excessive head such as sunshine, fire,
or alike.
Do not attempt to recharge short circuit, disassemble, heat or through the batteries into a fire
Inserting batteries with wrong or mixed polarities will result in damage to the batteries and/or may result in a
malfunction of the unit
Do not mix old and new batteries
Do not mix alkaline, standard (carbon-zinc), or rechargeable (nickel-cadmium) batteries.
Dispose of properly in accordance with local law.
4
Please Read the instruction carefully Before Operating This Unit.
If this product is sold with switching adaptor and in-car adaptor
Switching adaptor
In-car adaptor
WARNING
To prevent fire or shock hazard, do not expose this appliance to rain or moisture.
The apparatus should not be exposed to dripping or splashing. Objects filed with liquids, such as vases, should not be placed
on the apparatus.
The ventilation should not be impeded by covering the ventilation openings with items, such as newspapers, table-clothes,
curtains, etc.
Naked flame sources, such as lighted candles, should not be placed on the apparatus.
The main plug is used as the disconnect device. The disconnection device shall be readily operable.
In order to disconnect the apparatus from mains completely, the mains plug should be disconnected from the mains socket
outlet completely.
Excess sound pressure from earphones and headphones can cause hearing loss.
In-Car Adaptor Fuse Replacement
Should the player fail to operate with the DC car adaptor/cord, check the fuse (3A). If brown, check all connections and
inspect the cord for any damage. Always replace the fuse with the same type and rating.
If the fuse blows again after replacement, this indicates a potential problem. DO NOT replace fuse with a higher rating. Doing
so, may cause damage to the player.
Caution
Since the CD circuitry may case interference to other radio tuners nearby, switch this unit off when not in use
or move it away from the affected radio tuner.
CAUTION
RISK OF ELECTRIC SHOCK
DO NOT OPEN
The lightning flash with arrowhead
symbol, within an equilateral triangle,
is intended to alert the user to the
presence of un-insulated “dangerous
voltage” within the product’s
enclosure that may be of sufficient
magnitude to constitute a risk of
electric shock to persons.
The exclamation point within an
equilateral triangle is intended to
ELECTRIC SHOCK, DO NOT REMOVE COVER alert the user to presence of
important operating and
(OR BACK). NO USER-SERVICEABLE PARTS maintenance (servicing) instructions
in the literature accompanying the
INSIDE, REFER SERVICING TO QUALIFIED
appliance.
SERVICE PERSONNEL.
WARNING: TO REDUCE THE RISK OF
Danger
nvisable Laser Radiation when
open and interlock failed or
defeated. Avoid direct exposure
to laser Beam.
Laser Safety
This unit employs an optical laser beam system in the DVD mechanism, designed with
built-in safeguards. Do not attempt to disassemble, refer to qualified service personnel.
Exposure to this invisible laser light beam may be harmful to the human eye.
This is A Class-1 Laser Product, use of controls, for adjustments or procedures
other than those specified herein, may result in hazardous laser light beam
exposure.
This device complies with Part 15 of the FCC Rules. Operation is subject to the following
two conditions: (1) This device may not cause harmful interference, and (2) this device
must accept any interference received, including interference that may cause undesirable
operation. Change or modifications to this unit not expressly approved by the party
responsible for compliance could void the user’s authority to operate the equipment.
This Class B appliance complies with Canadian ICES-003.
5
CLASS 1
LASER PRODUCT
FRONT PANEL AND REAR PANEL ILLSTRATION
Front Panel
3
4
5
6
7
8
9
10
11
13
14
15
16
17
18
19
20
21
22
12
1.LCD DISPLAY
2.SPEAKER
3.SUBTITLE BUTTON
4.MODE BUTTON
5.DVD/USB/CARD BUTTON
6.AUDIO BUTTON
7.VOLUME+ BUTTON
8.PREVIOUS BUTTON
9.MUTE BUTTON
10.VOLUME – BUTTON
11.NEXT BUTTON
12. OPEN BUTTON
13. PLAY/PAUSE BUTTON
14. STOP BUTTON
15. MENU BUTTON
16. SETUP BUTTON
17. UP BUTTON
18. RIGHT/FWD BUTTON
19. OK BUTTON
20. DOWN BUTTON
21.RIGHT/FWD BUTTON
22. DVD DOOR
Rear Panel
1
2
3
4
5
6
7
1.USB JACK
2.SD/MMC CARD JACK
3.HEADPHONE JACK
4.AV OUT JACK
5.AV IN JACK
6.POWER SWITCH
7.DC POWER INPUT JACK
8.INFRARED RECEIVER
9. POWER INDICATOR LIGHT
9 8
Remote Control
ZOOM
SOLW
MUTE
MODE
NO. KEY
AUDIO
PREV/UP
SUBTITLE
PLAY/PAUSE
ANGLE
STOP
FWD/RIGHT
REV/LEFT
VOLUME+/-
ENTER
SETUP
NEXT/DOWN
TITLE
DVD/USB/CARD
REPEAT
PROG
MENU
Remote Battery Information
Danger of explosion if the remote control’s batteries are incorrectly installed.
Replace only with the same or equivalent battery. (Battery:CR2025)
OPEN
PUSH
7
Zoom – To enlarge the Picture
Mode - DVD and external audio and video input conversion
NO.KEY – For Inputting Number Digits
Prev/Up – To skip Backward/ To Move up in the Menus
Angle – To switch between Multiple Camera Angles
Rev/Left – Reverse/Moving left In Menus
Enter - Enter is used for Selecting
Setup – To Enter the Setup menu
Next/Down – To skip forward / To Move Down in the Menus
Repeat - To repeat the selection
Prog - To play contents of disc in the order you want by programming the track to be played
Slow – To slow the DVD down
Mute – To mute the DVD Player
Audio - To change the audio setting.
Subtitle – To switch subtitles and turn on or off
Play/Pause – To play or Pause
Stop – To Stop the DVD
FWD/Right – Forward/Moving right In Menus
Volume – To adjust the Volume Level
Title - To Show the DVD Title
DVD/USB/Card – To select between DVD , USB and Card Input
Menu – To access the DVD player menu
8
SETUP
Power
DC power input: requires an AC/DC adapter (included)
The Power Indicator will turn green whenever the portable DVD player is powered on.
Battery Power
DC battery power: built-in rechargeable battery
The charge indicator will turn red whenever the built-in rechargeable battery is charging.
The Power indicator will turn green whenever the portable DVD player is powered on.
When the battery is fully charged, the Charge indicator will turn off.
Charging the Built-in Battery
1.Plug the uncluded AC/DC power adapter into the DC power Input on the portable DVD player and an AC
power outlet.
2. Adjust the Power switch to the off position
The Charge Indicator will turn red whenever the built-in rechargeable battery is charging.
DVD and CD
Loading a Disc
1.Press the Open button to open the Disc Door.
2.Load a disc into the DD player, label side facing up.
3.Manually close the Disc Door.
After a disc is loaded, it will begin playing automatically.
Playing a Loaded Disc
1.Follow the instructions for Loading a Disc.
2.If the disc does not begin playing automatically, press the Play/Pause button.
Programming a Loaded Disc
1.Follow the instructions for Loading a Disc and Playing a Loaded Disc.
2.While the loaded disc is playing, press the Program button on the remote.
3.Use the Number Keypad to enter in the titles and chapters in the order you want to view them.
DVD Titles and chapters or CD tracks will play in the order they are programmed.
4.Repeat step 3 until the desired DVD titles and chapters or CD trcks are programmed.
Setup Menu
Accessing the setup Menu
Press the setup button on the player or the remote to access the setup menu.
USB Port
Connecting a USB Thumb Drive
Connect a USB Thumb Drive to the USB Port.
Picture formats are supported (Jpeg).
Accessing the Content on a USB Drive
1.Follow the instructions for Connecting a USB thumb drive.
2.Press and hold the DVD/USB/CARD button to enter DVD/USB/CARD mode.
3.Use the Up/Down Arrow and Enter buttons to select USB mode and play content from the connected USB
thumb drive.
9
Memory Card Slot
Connecting a Memory Card
Connect a SD or MMC memory card to the Memory Card Slot.
Picture formats are supported (Jpeg).
Note: Formats are not universally compatible. Playback may be dependent on recording conditions.
1.Follow the instructions for Connecting a Memory Card.
2.Press and hold the DVD/USB/CARD button to enter DVD/USB/Card mode.
3.Use the up/Down Arrow and Enter buttons to select Card mode and play content from the
connected memory card.
AV Output and Input
Using the 3.5mm AV Output
Requires 3.5mm to 3 x RCA audio/video cable (included).
Connect the 3.5mm to 3 x RCA audio/Video cable to the 3.5 mm AV output on the portable DVD
player and the composite video and sudio input on a television.
Audio and video played through the portable DVD player will now be output through the
connected television.
Using the 3.5mm AV Input
Requires a 3.5mm to 3 x RCA audio/video cable (included)
Connect the 3.5mm to 3 x RCA audio/video cable to the 3.5mm AV Input on the portable DVD
player and a composite video outputs on an audio/video source such as a television.
Press the Mode button on the remote to switch to AV in mode
Audio and video played through the connected television will now be output to the portable DVD
player.
Trouble Shooting
No Power
No Picture
No Sound
Disc not l oading
Remote Control n ot working
USB Not loading
Cannot Advance through start of move
Ensure the AC adaptor is securely fitted into the main power
supply. If using from the battery ensure battery is fully charged.
Check whether the disc is scratched or stained; Check whether
the AV connector and outputt erminal is stained.
Check audio settings in general setup page
Ensure the disc has been correctly loaded, is clean without
scratches and ensure the formati s compatible.
Check the batteries are not exhausted.
Ensure you are in USB mode, Check USB device is securely fitted;
Check files are compatible with player.
The disc programming prohibits this action
10
Technical Specifications
Compatible disc formats
DVD,CD,CD-RW, MPEG4, DIVX, JPEG
Signal System
PAL/NTSC/AUTO
Panel Size
9 i nches
Frequency Response
20Hz to 20KHz
Video Output
1 Vp-p75 0hm unbalanced
Audio Output
1.8 Vrms/10k0hm
Dynamic Range
Greater than 85db
Laser
Power Source
Semiconductor laser, Waver length:
650nm/795nm
DC9-12V ---1.5A
Power Consumption
18W
Operating temperature
5-400 c
Battery Type
Lithium-polymer
Car Adapter Fuse
3A
11
Lecture de DVD Portatif 7” PO
LPD-902
CE LIVRET D’INSTRUCTIONS PEUT CONTENIR DES ERREURS ET DES OMISSIONS.
LE CONCEPT ET LES CARACTÉRISTIQUES SONT SUJETS À CHANGEMENT SANS PRÉAVIS.
Sans Frais : 1-888-208-4108 Télécopieur: (905) 209-0489
www.cosmocanada.ca
Federal Communications
Commission Statement
IMPORTANT
Since the CD Circuitry may cause interference to other radio tuners nearby, switch this unit off
when not in use or move the affected radio tuner away.
This device complies with Part 15 of the FCC Rules. Operation is subject to the following two
conditions: (1) This device may not cause harmful interference, and (2) this device must accept any
interference received, including interference that may cause undesirable operation.
This device complies with Canadian ICES-003
Standard TELEVISION receiving Apparatus
FEDERAL COMMUNICATIONS COMMISSION STATEMENT
NOTE: This equipment has been tested and found to comply with the limits for a Radio Receiver,
pursuant to part 15 of the FCC Rules.
These limits are designed to provide reasonable protection against harmful interference in a r
esidential installation. This equipment generates uses and can radiate radio frequency energy and,
if not installed and used in accordance with the instructions, may cause harmful interference to
radio communications. However, there is no guarantee that interference will not occur in a
particular installation. If this equipment does cause harmful interference to radio or television
reception, which can be determined by turning the equipment off and on, the user is encouraged
to try to correct the interference by one or more of the following measures:
- Reorient or relocate the receiving antenna.
- Increase the separation between the equipment and receiver.
- Connect the equipment into an outlet on a circuit different from that to which the
Receiver is connected.
- Consult the dealer or an experienced radio/TV technician for help.
Caution: changes or modifications no expressly approved by the party responsible for compliance
could void the user’s authority to operate the equipment.
1
MODE D’EMPLOI
AVERTISSEMENT
RISQUE DE CHOC
ELECTICQUE NE PAS OUVRIR!
ATTENTION Le
manuel d’utilisateur
contient des
instruction
de’operation et de
maintenance
(ré vision)
imporantes. Pour
votre sécurité, il est
nécessaire de vous
réferer a ce manual.
PRÉCAUTION AFINI DE PRÉVENIR LE
RISQUE DE CHOCK ÉLECTRIQUE NE
PAS ENLEVER LE COUVERCLE
(OU L’ARRIÉRE). IL N’Y PAS DE
PIÉCES RÉPARABLE PAR L’USAGER
SE RÉFÉRER À UN PERSONNEL
QUALIFIÉ
TENSION
DANGEREUSE Une
tension dangereuse
not isolee, qui peut
étre de puissance
suffisante pour
constituer un risque
de choc électrique
aux gens, est présent
dans ce appareil.
ATTENTION: POURÉ VITER LES CHOCS ÉLECTIQUES, INTRODUIRE
LA LAME LA PLUS LARGE DE LA FICHE DANS LA BORNE
CORRESPONDANTE DE LA PREISE ET POUSSER JUSQU’AU FOND.
VEUILLEZ LIRE CECE ANANT D’UTILISER VOTRE APPREIL
MISES EN GARDE IMPORTANTES
1. LISEZ LES INSTRUCTIONS - Toutes les instructions de sécurité et de fonctionnement devraient être lues
avant d’utiliser l’appareil.
2. CONSERVEZ LES INSTRUCTIONS - Les instructions de sécurité et de fonctionnement devraient être
conservées pour pouvoir vous y référer par la suite.
3. CONFORMEZ-VOUS AUX AVERTISSEMENTS - Tous les avertissements concernant le produit et son mode de
fonctionnement devraient être respectés.
4. SUIVEZ LES INSTRUCTIONS - Toutes les instructions concernant le fonctionnement et l’utilisation devraient
être suivies.4
5.NETTOYAGE - Débranchez l’appareil de la prise murale avant de le nettoyer. N’utilisez pas des nettoyants
liquides ou nettoyants en aérosol. Servez-vous plutôt d’un linge humide pour le nettoyage.
6.ACCESSOIRES - N’utilisez pas d’accessoires non recommandés par le fabricant de l’appareil qui pourraient
causer des dangers.
7.EAU ET HUMIDITÉ - N’utilisez pas cet appareil près de l’eau – par exemple, près d’une baignoire, un évier, un
lavabo ou une cuvette, dans un sous-sol humide, près d’une piscine, ou autres.
8.ACCESSOIRES - Ne placez pas cet appareil sur un chariot, un support, un trépied ou une table instable.
L’appareil risquerait de tomber et de causer des blessures graves à un enfant ou un adulte, ou être sérieusement
endommagé. Utilisez seulement un chariot, support, trépied ou table recommandé par le fabricant ou vendu
avec ce produit. On devrait suivre les instructions du fabricant lors de tout montage du produit et utiliser les
accessoires de montage recommandés par le fabricant.
9.Déplacez avec soin les combinaisons appareil et chariot. Des arrêts brutaux, une force excessive ou des
surfaces inégales peuvent causer le renversement de l’ensemble de chariot et appareil.
2
10. VENTILATION - Les fentes et les ouvertures dans le coffret sont prévues pour la ventilation et permettre
d’assurer un fonctionnement fiable de l’appareil et de le protéger contre la surchauffe. Ces ouvertures ne
devraient être ni bouchées ni couvertes. Les ouvertures ne devraient jamais être bouchées en plaçant l’appareil
sur un lit, un divan, un tapis ou une autre surface similaire. Cet appareil ne devrait pas être placé dans une
installation encastrée, telle qu’une bibliothèque ou une clayette à moins qu’une installation suffisante soit
fournie ou que les instructions du fabricant aient bien été respectées.
11. SOURCES D’APPROVISIONNEMENT EN COURANT - Cet appareil doit fonctionner seulement à partir du type
de source de courant indiqué sur la plaque d’évaluation. Si vous n’êtes pas certain du type d’approvisionnement
en courant, consultez votre marchand d’appareil ou votre compagnie locale d’électricité. Pour les produits
conçus pour être utilisés à partir d’une source de pile ou autres sources, référez-vous aux instructions de
fonctionnement.
12. MISE À LA TERRE OU POLARISATION – Ce produit peut être équipé d’une fiche de ligne de courant alternatif
polarisée (une fiche ayant une lame plus large que l’autre). Cette fiche entrera dans la prise de courant dans un
sens seulement. Il s’agit d’un dispositif de sécurité. Si vous êtes incapable d’insérer la fiche entièrement dans la
prise, essayez d’inverser la fiche. Si la fiche ne rentre toujours pas dans la prise, contactez un électricien pour
remplacer votre prise désuète. N’essayez pas de détruire le dispositif de sécurité de la fiche polarisée.
AUTRES AVERTISSEMENTS – Ce produit est équipé d’une fiche du type avec mise à la terre à trois fils. Il s’agit
d’une fiche ayant un troisième ergot (prise de terre). Cette fiche s’adaptera seulement sur une prise de courant
du type avec prise à la terre. Il s’agit d’un dispositif de sécurité. Si vous êtes incapable d’insérer la fiche dans la
prise de courant, contactez votre électricien pour remplacer votre prise désuète. Ne passez pas outre le
dispositif de sécurité de la fiche du type avec prise à la terre.
13. PROTECTION DU FIL DE COURANT - Les fils d’approvisionnement en courant devraient être acheminés de
façon à ce que l’on ne risque pas de marcher dessus ou qu’ils ne soient pas coincés par des articles placés
au-dessus d’eux ou contre eux, en faisant particulièrement attention aux fils à proximité des fiches, prises de
courant de service, et au point où ils sortent de l’appareil.
14. FICHE DE RACCORDEMENT DE PROTECTION - Le produit est équipé d’une fiche de raccordement ayant une
protection contre les surcharges. Il s’agit d’un dispositif de sécurité. Consultez le manuel d’instructions pour le
remplacement ou la remise en marche du dispositif de protection. Si le remplacement de la fiche est nécessaire,
assurez-vous que le technicien réparateur a bien utilisé une fiche de remplacement spécifiée par le fabricant, et
offrant la même protection contre les surcharges que la fiche d’origine.
15. MISE ? LA TERRE DE L’ANTENNE EXTERIEURE-Si une antenne extérieure est raccordée à l’appareil,
assurez-vous que l’antenne est bien mise à la terre de façon à fumoir une protection contre la surcharge de
tension et l'accumulation de charges statiques. L'article 810 du National Electrical (Code national de l’électricité)
Code, ANSI / NFPA 70, fournit des renseignements au sujet de la bonne mise à la terre du mât et de la structure
de soutien ; la mise à la terre de la descente d’antenne vers une unité de décharge d’antenne ; la dimension des
conducteurs de mise à la terre; L’emplacement de l’unité de décharge d’antenne ; le raccordement aux
électrodes de mise à la terre ÉQUIPEMENT DE SERVICE ÉLECTRIQUE CONDUCTEURS DE MISE À LA TERRE DANS
LA SECTIONÉTRIERS DE MISE À LA TERRE SYSTÈME D’ÉLECTRODE DE MISE À LA TERRE DE SERVICE ÉLECTRIQUE
Voir figure
3
16. ÉCLAIR
Pour une protection supplémentaire de l’appareil durant un orage électrique, ou lorsque vous le laissez sans
surveillance et que vous ne l’utilisez pas sur une longue période, débranchez-le de la prise murale et débranchez
l’antenne ou le système de câble. De cette façon, vous éviterez tout dommage à l’appareil qui pourrait être causé
par un éclair et par les surcharges sur la ligne de courant.
17. LIGNES DE COURANT
Un système d’antenne extérieure ne devrait pas se trouver à proximité des lignes de courant aériennes ou autre
circuit d’éclairage électrique ou d’alimentation, ou à un endroit où ce système d’antenne risquerait de tomber
sur ces lignes de courant ou circuits. Lors de l’installation d’un système d’antenne extérieure, des précautions
extrêmes devront être prises pour empêcher tout contact avec ces lignes ou circuits électriques, un tel contact
pouvant être mortel.
18. SURCHARGE
Ne surchargez ni la prise, les prises murales ou les fils de rallonge, car cela risquerait de créer un danger
d’incendie ou de chocs électriques.
19. ENTRÉE D’OBJETS OU DE LIQUIDES
Ne poussez jamais d’objets dans cet appareil à travers les ouvertures étant donné qu’ils risquent de toucher à
des points dangereux à haute tension ou de court-circuiter des pièces qui entraîneraient un incendie ou un
choc électrique. Ne renversez pas de liquide quelconque dans l’appareil.
20. ENTRETIEN
N’essayez pas de réparer vous-même cet appareil, l’ouverture ou le démontage des couvercles pouvant vous
exposer à des tensions dangereuses ou à d’autres dangers. Référez toute réparation à un personnel de service
qualifié.
21. DOMMAGE NÉCESSITANT UNE RÉPARATION
Débranchez l’appareil de la prise murale et confiez la réparation à un personnel de service qualifié sous les
conditions suivantes :
a. Lorsque le fil d’approvisionnement en courant ou la fiche est endommagé.
b. Si du liquide a été renversé ou des objets sont tombés dans l’appareil.
c. Si l’ap pareil a été exposé à la pluie ou à l’eau.
d. Si l’appareil ne fonctionne pas normalement après que le mode de fonctionnement ait été suivi. Réglez
seulement les commandes qui sont couvertes par le mode d’utilisation, sinon un ajustement des autres
commandes risque d’entraîner des dommages et nécessitera souvent un travail important de la part du
technicien qualifié qui sera appelé à remettre l’appareil en bon état de fonctionnement.
e. Si l’appareil est tombé ou si le coffret est endommagé.
f. Lorsque l’appareil fait preuve d’un changement marqué dans ses performances - ceci indique la nécessité
d’une réparation.
22. PIÈCES DE RECHANGE
Lorsque des pièces de rechange sont nécessaires, assurez-vous que le technicien effectuant la réparation utilise
des pièces de rechange spécifiées par le fabricant ou qui ont les mêmes caractéristiques que la pièce d’origine.
Des substitutions non autorisées peuvent entraîner un choc électrique et causer un incendie ou autres dangers.
23. VÉRIFICATION DE SÉCURITÉ
Une fois le service ou la réparation terminé sur cet appareil, demandez au technicien de service de réaliser une
vérification de sécurité pour déterminer si le produit est en bonne condition de fonctionnement.
24. MONTAGE AU MUR OU AU PLAFOND
Le produit devrait être monté à un mur ou un plafond seulement comme recommandé par le fabricant.
25. CHALEUR
Ce produit devrait être situé loin de toutes sources de chauffage telles que les radiateurs, les registres de chaleur,
cuisinières, ou autres appareils du genre (y compris les amplificateurs) qui produisent de la chaleur.
TIP SUR L'UTILISATION DE BATTERIE
- Si non utilisable pendant un laps de temps étendu pour alors que des batteries ne sont pas utilisées, soyez sûr
de les retirer pour éviter des dommages possibles provoqués par la corrosion et la fuite de batterie
- Le bruit Faible ou tordu a habituellement indiqué que vos batteries sont basses. Retirez et jetez convenablement
et remplacez par de nouvelles batteries
- Ne mélangez pas les nouvelles et vieilles batteries ou les batteries non imputables et rechargeables.
Précaution de Batterie
Les batteries (pack batterie ou batteries installées) ne devraient pas être exposées à la tête excessive telle que le
soleil, le feu, ou de même.
N'essayez pas de recharger le court circuit, ne désassemblez pas, la chaleur ou par les batteries dans un feu
L'Insertion des batteries avec des polarités fausses ou mélangées aura comme conséquence les dommages aux
batteries et/ou peut avoir comme conséquence un défaut de fonctionnement de l'unité
Ne mélangez pas les vieilles et nouvelles batteries
Ne mélangez pas les batteries (cadmium-nickel) alcalines, standard (carbone-zinc), ou rechargeables.
Rejetez correctement selon la loi locale.
4
Veuilez lire les instructions soigneusement avant de faire fonctionner cet appareil.
SI CE PRODUCT EST VENDU AVEC UN ADAPTEUR DE COMUTATION ET UN ADAPTEUR D’AUTOMOBILE.
Adaptateur de commutation
Adaptateur pour voiture
Avertissement
Pour réduire le risqué d’incendie ou de chocs électriques, ne pas exposer cet appareil à la pluie ou à l’humidité.
L’appareil ne devait pas être exposé aux égouttements ou aux éclaboussures et aucun objet rempli de liquid, tel que vases, ne
devrait être placé sur l’appareil.
On devra éviter d’entraver la ventilation en recouvrant les ouvertures de ventilation avec des articles, tels que journaux,
nappes, rideaux, etc.
Aucune source de flames nues, comme des bougies allumées, ne devrait être place sur l’appareil.
En ordre de débrancher le apparatus de courant murale complétement, le courant de murale il faut le débrancher de la prise
circuit complétement.
Beaucoup de son à l’oreille d’entendre et de haut parleur peut faire mal entrendre à l’oreille.
Remplacement du fusible de l’adaptateur d’auto
Au cas où le lecteur ne fontionnerait pas avec l’adaptateur/fill de voiture CC, verifies le fusible (3A). S’ill est brun, vérifiez tous
les raccordements et inspectez le fil pour voir s’il y a des dommages. Replacez toujours le fusible par un fusible du mème type
et de la même évaluation. Si le fusible sauté à nouveau après avoir été remplacé, ceci indique un problème potential. NE
remplacez PAS le fusible par un fusible à évaluation plus élevée.Vous risqueriez d’endommager le lecteur.
Attention
Le circuit CD risquant de causer du brouillage à d’autres syntonisateurs radio situés à proximité, fermez cet appareil lorsqu’il
n’est pas utilisé ou placez-le loin du syntonisateur radio affecté.
ATTENTION
Le signe d’éclair avec une pointe de
flèche àl’intêrieur d’un triangle
equilateral est conçu pour averter
l’utisateur de la présence d’une
tension dangereuse non isolée à
l’intérieur de l’enceinte de cet
appareil, qui peut avoir une
magnitude sulfisante pour constituer
un risqué de choc électrique à toute
personne.
RISQUE DE CHOC ELECTRIQUE
NE PAS OUVRIR
MISE EN GARDE: Pour réduire le risqué
d’incendie et de choc électrique, ne
retirez pas le couverle (ou le dos) de
l’appareil. Référez les réparations
seulement à un personnel de reparation
Le point d’exclamation à l’intérieur
d’un triangle équilateréral est conçu
pour averter l’utilisateur de la
presence d’instructions de
fonctionnement et d’entretien
(service) importantes dans la
documentation accompagnat cet
appareil.
qualifié.
DANGER
SÉCUTITÉ DE LASER
Cet appareil utilize un système à ray9on laser optique dans le mécanisme du CD, conçu
avec des sauegardes incorporées. N’essayez pas de le démonter; rérez-vous à un
personnel d’entretien qualifié. L’exposition é un rayon de lumière laser invisible peut
Radiation laser invisible lorque
ouveri et lorsque le verrouillage être dangereuse pour les yeux des êtres humains. IL S’AGIT D’UN PRODUIT LASER
CLASSE 1.L’UTILISATION DE COMMANDES,REGLADES OU PRODECURES AUTRES QUE
de sécurité fait défaut ou a été
détruit. Évitez l’exposotion direct CEUX SPÉCIFIÉS AUX PRÉSENTES PEUT ENTRAÎNER UNE EXPOSITION DANGEREUSE AU
au rayon laser.
RAYON DE LUMIÉRE LASER.
Ce dispositive se conforme à la partie 15 des règlements du FCC. Le fonctionnement est
assujette aux deux conditions suivants: (1) Ce dispositive ne peut pas causer des
brouillages préjudiciables et (2) ce dispositive doit accepter le Brouillage reçu, y compris
le brouillage qui peut causer un fonctionnement. Indésirable. Avertissement : Des
changements ou des modifications à cet appareil non expressément approuvés par la
personne responsable pour la conformité pourrait annuler l’autorité à l’utilisateur de
faire fonctionner l’equipement.
Cet appareil numérique de classe B se conforme à la norme canadienne ICES-003
5
CLASS 1
LASER PRODUCT
PANNEAU AVANT ET PANNEAU ARRIÈRE ILLSTRATION
Panneau avant
3
4
5
6
7
8
9
10
11
13
14
15
16
17
18
19
20
21
22
12
1.ÉCRAN LCD
2.HAUT-PARLEUR
3.BOUTON DE SOUS-TITRE
4.BOUTON DE MODE
5.BOUTON DE DVD/USB/CARD
6.BOUTON SONORE
7.BOUTON DE VOLUME+
8.BOUTON PRÉCÉDENT
9.BOUTON MUET
10.VOLUME - BOUTON
11.BOUTON SUIVANT
12. BOUTON OUVRIR
13. BOUTON DE PLAY/PAUSE
14. LA TOUCHE "ARRÊT"
15 BOUTON DE MENU
16. BOUTON D'INSTALLATION
17. VERS LE HAUT DU BOUTON
18. BOUTON DE RIGHT/FWD
19. BOUTON CORRECT
20. VERS LE BAS BOUTON
21. VERS LE BAS BOUTON
22. PORTE DE DVD
Panneau arrière
1
2
3
4
5
6
7
1.JACK D'USB
2.JACK DE CARTE DE SD/MMC
3.PRISE CASQUE
4.LES POIDS DU COMMERCE
METTENT SUR CRIC
5.POIDS DU COMMERCE DANS LE
JACK
6.INTERRUPTEUR D'ALIMENTATION
7.JACK D'ENTRÉE ALIMENTATION
DE C.C
8.RÉCEPTEUR INFRAROUGE
9.LE VOYANT DE SIGNALISATION
DE PUISSANCE
9 8
6
Remote Control
ZOOM
Ralentissez
MODE
MUET
NON CLÉ
AUDIO
SOUS-TITRE
JEU/PAUSE
PREV/UP
ARRÊT
FWD/FRIGHT
ANGLE
LEFT/REV
VOLUME +/-
ENTREZ
INSTALLATION
DOWN/NEXT
TITRE
DVD/USB/CARD
RÉPÉTITION
PROG
MENU
L'information distante de batterie
Danger d'explosion si les batteries à télécommande sont inexactement installées.
Remplacez seulement par la même chose ou la batterie équivalente. (Batterie :CR2025)
OUVREZ-VOUS
POUSSÉE
7
Zoom - pour agrandir l'image
Mode - DVD et conversion externe d'audio et d'entrée vidéo
Prev/jusqu'au saut vers l'arrière à relever les menus
Angle - avec le commutateur entre les angles d'appareil-photo multiples
Le Rev/est parti - renversez/en se déplaçant à gauche les menus
Entrez - Enter est utilisée pour la sélection
Installation - pour écrire le menu d'installation
Ensuite/vers le bas - pour sauter en avant/pour abaisser les menus
Répétition - pour répéter la sélection
Prog - pour jouer le contenu du disque dans la commande que vous voulez en programmant la piste pour être
joué
Ralentissez - pour ralentir le DVD vers le bas
Muet - pour mettre en sommeil le lecteur DVD
Audio - pour changer la configuration sonore.
Sous-titre - pour commuter des sous-titres et tourner "Marche/Arrêt"
Arrêt - pour arrêter le DVD
Jeu/pause - pour jouer ou faire une pause
FWD/Right - Expédiez/en se déplaçant juste les menus
Volume - pour ajuster le niveau du volume
Titre - pour afficher le titre de DVD
DVD/USB/Card - Pour choisir entre le DVD, USB et entrée par cartes
Menu - pour accéder au menu de lecteur DVD
8
INSTALLATION
Puissance
Entrée alimentation de C.C : exige un adaptateur d'AC/DC (inclus)
L'indicateur de puissance tournera le vert toutes les fois que le lecteur de DVD portable est mis sous tension.
Alimentation par batterie
Alimentation par batterie de C.C : batterie rechargeable intégrée
L'indicateur de charge tournera le rouge toutes les fois que la batterie rechargeable intégrée charge.
L'indicateur de puissance tournera le vert toutes les fois que le lecteur de DVD portable est mis sous tension.
Quand la batterie est entièrement chargée, l'indicateur de charge s'éteindra.
Charger la batterie intégrée
1.Branchez l'adaptateur d'alimentation uncluded d'AC/DC à l'entrée alimentation de C.C sur le lecteur de DVD
portable et un débouché d'alimentation AC.
2.Ajustez l'interrupteur d'alimentation sur la position de repos
L'indicateur de charge tournera le rouge toutes les fois que la batterie rechargeable intégrée charge.
DVD et CD
Chargement d'un disque
1.Appuyez sur le bouton Ouvrir pour ouvrir la porte de disque.
2.Chargez un disque dans le lecteur de densité double, revêtement latéral d'étiquette.
3.Fermez manuellement la porte de disque.
Après qu'un disque soit chargé, il commencera à jouer automatiquement.
Jeu d'un disque chargé
1.Suivez les instructions pour charger un disque.
2.Si le disque ne commence pas à jouer automatiquement, appuyez sur la touche attente de jeu/.
Programmation d'un disque chargé
1.Suivez les instructions pour charger un disque et jouer un disque chargé.
2.Tandis que le disque chargé joue, appuyez sur le bouton de programme sur le distant.
3.Utilisez le pavé numérique de nombre pour entrer dans les titres et les chapitres dans la commande que vous
voulez les visualiser.
Les titres de DVD et les chapitres ou les pistes de CD joueront dans la commande qu'ils sont programmés.
4.Répétez l'étape 3 jusqu'à ce que les titres de DVD et les chapitres ou les trcks désirés de CD soient programmés.
Installez le menu
Accès du menu d'installation
Appuyez pour installer le bouton sur le lecteur ou le distant pour accéder au menu d'installation.
Port USB
Connecter un lecteur de pouce d'USB
Connectez un lecteur de pouce d'USB au port USB.
Des formats d'image sont supportés (JPEG).
Accès du contenu sur un drive USB
1.Suivez les instructions pour connecter un lecteur de pouce d'USB.
2.Appuyez sur et tenez le bouton de DVD/USB/CARD pour entrer le mode de DVD/USB/CARD.
3.Utilisez la flèche haut/bas et entrez dans les boutons pour choisir le mode d'USB et le contenu de jeu à partir
du lecteur connecté de pouce d'USB.
9
Slot de carte mémoire
Connecter une carte mémoire
Connectez une carte mémoire d'écart-type ou de MMC au slot de carte mémoire.
Des formats d'image sont supportés (JPEG).
Note : Les formats ne sont pas universellement compatibles. Le playback peut dépendre des états
d'enregistrement.
1.Suivez les instructions pour connecter une carte mémoire.
2.Appuyez sur et tenez le bouton de DVD/USB/CARD pour entrer le mode de DVD/USB/Card.
3.Utilisez la flèche haut/bas et entrez dans les boutons pour choisir le mode de carte et le contenu de jeu à
partir de la carte mémoire connectée.
Poids du commerce de sortie et entrée
Utilisant le poids du commerce de sortie de 3.5mm
Exige câble d'audio de 3.5mm à 3 x RCA/visuel (inclus).
Connectez câble d'audio de 3.5mm à 3 x RCA/visuel aux 3,5 millimètres de poids du commerce sorti sur le
lecteur de DVD portable et la vidéo composite et le sudio entrent à une télévision.
Audio et vidéo joué par le lecteur de DVD portable sera maintenant sorti par la télévision connectée.
Utilisant l'entrée de 3.5mm poids du commerce
Exige câble d'audio de 3.5mm à 3 x RCA/visuel (inclus)
Connectez câble d'audio de 3.5mm à 3 x RCA/visuel aux 3.5mm poids du commerce entrés sur le
lecteur de DVD portable et des sorties vidéo composites sur un audio/source vidéo telle qu'une télévision.
Appuyez sur le bouton de mode sur le distant pour commuter au poids du commerce en mode
Audio et vidéo joué par la télévision connectée sera maintenant sorti au lecteur de DVD portable.
Dépannage
Symptôme
10
Spécifications techniques
Formats compatibles de disque
DVD, CD, CD-RW, MPEG4, DIVX, JPEG
Système de signal
PAL/NTSC/AUTO
Taille de panneau
9 pouces
Réponse en fr3quence
20Hz à 20KHz
Sor t ie vidé o
1 Vp-p75 0hm déséquilibré
Sortie audio
1,8 Vrms/10k0hm
Dynamique
Plus grand que 85db
Laser
Source d'énergie
Le laser de semi-conducteur, hésitent longueur :
650nm/795nm
DC9-12V ---1.5A
Consommation d'énergie
18W
Température de fonctionnement
5-400 C
Type de batterie
Lithium-polymère
Car fusible de l'adaptateur
3A
11