1
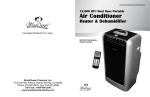
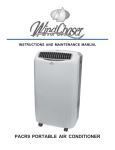
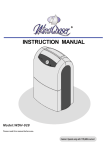
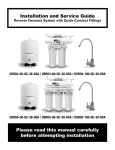
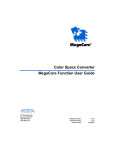
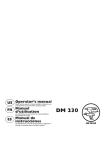
INSTRUCTION MANUAL PACR12 PORTABLE AIR CONDITIONER BEFORE INITIAL USE Attach your purchase receipt here For your reference: Serial No: Date of Purchaser: Name and Address of Dealer: UNPACKING INSTRUCTIONS 1. Place the unit in an upright position before unpacking. 2. Slide off the two packing straps. DO NOT CUT THEM. Save them for future use. 3. Slide the carton up and it will release from the base. 4. Carefully lift the carton over the unit. 5. The remote control unit, exhaust tube and accessories are located in the styrofoam on top of the unit. 6. Save ALL packaging for off season storage. PLEASE CAREFULLY READ AND KEEP THESE INSTRUCTIONS FOR FUTURE REFERENCE CONTENTS SAFETY INSTRUCTIONS 2 LEARN INTELLIGENT AIR CONDITIONING 2 IMPORTANT INSTRUCTIONS 3 ENERGY SAVING TIPS 3 TECHNICAL SPECIFICATIONS 3 PARTS ILLSTRATION 4 CONTINUOUS DRAIN FEATURE 5 EXHAUST KIT INSTALLATION 6 OPERATING INSTRUCTIONS AND FUNCTIONS 8 CLEANING THE UNIT 10 TROUBLESHOOTING GUIDE 11 PRODUCT LIMITED WARRANTY 12 1 SAFETY INSTRUCTIONS Do not damage the power cord. Never lay down the unit while it is working. Always keep it in an upright position to avoid any damage to the cooling system. Operate this unit in an ambient temperature of 90o or lower. Be sure that the air inlets and outlets are not blocked or covered up. Never place anything on top of the unit and do not cover it with any kind of cloth while it is plugged in or in-use. Your air conditioner has been designed to be used only in a house, office and similar conditions and it should not be used for any other purpose. Never connect the unit to a defective socket. This unit needs at least 12Amps of electricity to start it’s compressor. Plug the unit into a properly grounded dedicated 15Amp socket. Check your breaker box to determine which circuit the socket is on. Make sure that the unit is correctly connected before turning on the unit’s power. Never unplug the air conditioner while it is working. This could damage the electronic circuits. To avoid tripping the circuit, DO NOT USE AN EXTENSION CORD FOR THIS UNIT. To turn on your unit, always use the switch on the control panel. Do not bend or crush the warm air exhaust hose. It is dangerous to modify or to change the characteristics of the unit. Prevent children from climbing on the unit. Do not place the air conditioner near curtains (minimum distance 1.5 ft.). Do not place the power cord under a carpet. Never install the unit in direct sunshine or in the rain. When used for the first time, and every time it is turned on, it takes your unit up to 3 minutes to be operational. Keep the area around the warm air outlet sufficiently clean and make sure that it is not congested. For any repairs, refer directly to our customer service department. Repairs carried out by unqualified people may cause damage or may even be dangerous and void the warranty. Any damage resulting from failure to comply with these instructions is excluded from the warranty. LEARN INTELLIGENT AIR-CONDITIONING This Portable Air Conditioner is electronically controlled, which allows precise programming to adjust the room temperature. This unit is a small appliance that adjusts the temperature and humidity in a room. It’s flexibility makes it easy to use in different applications and in various rooms. This unit is designed for use in a home, office and computer type room. This air conditioner allows you to control the 4 factors that determine optimal comfort in a room. Humidity Rate: the humidity in a room also causes a sensation of stifling heat in the summer. Your air conditioner not only cools down the temperature, but dehumidifies the air as well. Temperature: the main function of an air conditioner is to draw hot air out of the room. Air purity: The air filter removes dust particles from the room air, creating a healthier room atmosphere. Airflow: The air conditioner regulates the airflow, allowing the flow to be directed and ensuring optimal air circulation **Note: Avoid being directly in front of the cold airflow and do not direct it onto people. To ensure the optimal efficiency of the unit,we advise you to keep doors and windows closed, and to take into account the surface of the walls and windows exposed to the sun. In this case, in order to optimize the functioning of your air conditioner, we recommend partially closing window coverings. 2 IMPORTANT INSTRUCTIONS Do not install and use your air conditioner before completely reading these instructions. This will help you optimize the operation of your air conditioner. Make sure that you haven’t lost the small box placed on the top of the unit; it contains all accessories, which are essential for use. The following advice and instructions should be followed closely: 1. Your unit must always be used in an upright position because it contains a cooling agent. Failure to comply with these instructions may damage the unit and will invalidate the warranty. 2. After unpacking, place the unit upright to allow the cooling agent to stabilize, and wait 3 hours before use. Using your unit in wine cellars or in any room with a temperature under 61°F is not recommended. ENERGY SAVING TIPS Blocking of the filter reduces the efficiency of the air and increases its power consumption by up to 6%. Avoid opening doors frequently. Each person present in a room provides between 100 Watts and 150 Watts of heat. Consequently, the more people there are in a room, the less effective the unit will be in cooling. TECHNICAL SPECIFICATIONS Cooling Capacity 12,000 BTU/Hour Power Input 1200 Watts / 10Amps Coolant R-22 Moisture Removal 3 1/2 Pints / Hour (40 Liters / Day) Airflow Volume 247 CFM (Cubic Feet / Minute) Temperature Range 61 o - 90 o F (16 o - 32 o C) Voltage/Frequency 120V/60Hz Product Dimension (WxHxD) 18 in (W) x 16 1/2 in (D) x 35 in (H) 460mm(W) x 420mm(D) x 880mm(H) Product Measurement 6 Cubic Feet Product Weight Net Weight: 97 lbs. / 44 kgs. Gross Weight: 118 / 54 kgs. Drain Hose Length 9 1/2 feet Exhaust Hose Length 11 1/2 inches (compressed); Extends up to 5 feet Exhaust Hose Diameter Inside: 4 3/8 inches / Outside: 5 1/8 inches Condensation Tank Capacity 2 3/4 Cups (0.65 Liters) 3 PARTS ILLUSTRATION 1 4 2 3 5 8 6 4 7 Front View Rear View 1. Control Panel 2. Cold Air Outlet 3. Adjustable Louvers 4. 5. 6. 7. 8. Air Filter Rating Plate Drain Hose (A) Drain Hose (B) Exhaust Air Outlet Control Panel 1. 2. 3. 4. 5. 4 Power ON/OFF Button Function Button Timer Setting Button A/C Fan Speed Button Sleep Function Button 6. LED Display 7. Alarm Indicator Light 8. Thermostat Temperature Setting Buttons 9. Air Conditioner Indicator Light 10. Dehumidifier Indicator Light CONTINUOUS DRAIN FEATURE There are two continuous drain features in this unit. 1.Drain (A) runs through the exhaust hose and offers continuous drainage via a built-in pump. When the cap is on Drain (B) and the condensation tank fills to capacity, Drain (A)’s pump will automatically turn on and pump the condensation out of the unit. If the exhaust hose is installed more than 5.9 feet above the ground, Drain (A)’s pump will not work and the condensation must then be drained from Drain (B). 2. Drain (B) is located at the bottom of the rear of the unit and offers continuous drainage via gravity. To use Drain (B), place a shallow pan underneath the drain outlet and remove the rubber cap. In order to avoid spilling water while moving the unit from room to room, please drain the condensation via Drain (B) before moving the unit. In addition, whenever you will not be using the unit for a extended period of time, such as at the end of the season, use Drain (B) to make sure the condensation is completely drained from the unit. MAX DRAIN (A) DRAIN (B) 5 EXHUAST KIT INSTALLATION WINDOW INSTALLATION 7 3 1 6 4 2 1. Drain Hose (A) 2. Grey Hose Connector 3. Exhaust Hose Clips 4. 5. 6. 7. Panel (A) Panel (B) Window Panel Kit 5 White Hose Connector Wall/Window Panel Adapter Adapter Cover Adjustable Window Panel Exhaust Window panel Kit adjusts from 33 inches to 56 inches to fit various window sizes. NOTE: FOR DEHUMIDIFYING MODE, THE EXHAUST HOSE DOES NOT NEED TO BE INSTALLED. 1) Remove the adapter cover from the wall/window panel adapter and attach the wall/window panel adapter to Panel (A) of the window kit. 2) Attach Panel (A) to Panel (B), place the combined panel inside your window frame and adjust the size of the combined panels to fit the window opening by sliding Panel (B) upwards or sideways. 3) Use the clips attached to Panel (A) to lock the panels into place. The clips are to be placed on the “L” shaped edges of Panel (A) at the point where Panel (A) meets Panel (B). 4) Close the window up against the panels to secure them in the window frame. 5) Twist the grey connector onto the exhaust hose and then pass Drain (A) through the exhaust hose before connecting the grey connector to the back of the unit (you must do this whether or not you use Drain (A)). 6) Twist the white connector onto the opposite end of the exhaust hose, take Drain (A) and feed it through the wall/window adapter, and snap-lock the white connector into the wall/window panel adapter. NOTE: For the most effective cooling, remove the adapter’s cover when the unit is running. NOTE: Drain (A) will not work if it’s raised more than 5.9 feet above the ground. If you need to extend your exhaust hose, it may be extended 5 feet only using 4 in PVC pipe (available at your local hardware store) for a maximum exhaust length of 10 feet. DO NOT USE DRYER TYPE EXHAUST HOSE TO LENGTHEN EXHAUST. 6 Horizontal Vertical EXHUAST KIT INSTALLATION (CONTINUED) WALL INSTALLATION 1. Drain Hose (A) 3 5 1 2. Grey Hose Connector 3 . Exhaust Hose 4. White Hose Connector 5. Wall/Window Panel Adapter 6. Adapter Cover 2 4 Wall 6 1) Drill a 5 1/2 inch hole in the wall at least 16 inches above the floor line. You should take precautions by having a carpenter or an electrician select the location for the hole and make the hole for you in order to ensure your safety and to avoid cutting into a support beam or electrical wires. 2) Install the wall/window adapter into the 5 1/2 inch hole and mark the screw holes. 3) Remove the wall/window adapter and drill four 1/8 inch diameter holes at these marks. 4) Place a 6 inch long piece of 4 inch PVC pipe (not included) in the wall to direct the exhaust’s airflow. 5) Place the wall/window adaptor back into the hole and install it onto the wall by fastening the four screws into the predrilled holes. 6) Twist the grey connector onto the exhaust hose and then pass Drain (A) through the exhaust hose before connecting the grey connector to the back of the unit (you must do this whether or not you use Drain (A)). 7) Twist the white connector onto the opposite end of the exhaust hose, take Drain (A) and feed it through the wall/window adapter, then snap-lock the white connector into the wall/window panel adapter. Flap flips up to cover hole when unit is not in use. Kit mounts on inside wall This unit can also be vented through the ceiling. Please consult with an air conditioning professional for ceiling venting installation. If you need to extend your exhaust hose, it may be extended 5 feet only ,using 4 inch PVC pipe (available at your local hardware store), for a maximum exhaust length of 10 feet. DO NOT USE DRYER TYPE EXHAUST HOSE TO LENGTHEN THE EXHAUST. 7 OPERATING INSTRUCTIONS AND FUNCTIONS The air conditioner can now be plugged into a 120V/60Hz dedicated 15amp socket. You are advised not to use an extension cord, however, if this is unaviodable, the extension cord must be 14 gauge, grounded at both ends and not more than 30 feet long. The compressor is an essential component of the appliance for producing cold air. This appliance is fitted with a thermal protection device which allows the compressor to be started only after a time delay of up to three minutes. Soft Touch Control Functions CONTROL PANEL FUNCTIONS 1. POWER BUTTON: Press to turn unit “ON” or “OFF”. (NOTE: The Compressor requires up to 3 minutes to start from either being switched on, or when changing from dehumidify to any air conditioning cycle chosen). 2. FUNCTION BUTTON: Press this button to select the air conditioning function or dehumidification function. 3. TIMER BUTTON: Programmable timer ON/OFF button. TIMER-ON FUNCTION: The unit can be set to automatically turn on the unit. 1. While the unit is off, press the “TIMER” button to set the number of hours (from 1 to 12 hours), from the current time, that you would like the unit to turn on. 2. When the time elapses, the unit will turn on automatically. 3. If you press the “POWER” key before the time elapses, the set time will be canceled and the unit will turn on. TIMER-OFF FUNCTION: The unit can be set to automatically turn off. 1. While the unit is on, press the “TIMER” button to set the number of hours (from 1 to 12 hours), from the current time, that you would like the unit to turn off. 2. When the time elapses, the unit will turn off automatically. 3. If you press the “POWER” key before the time elapses, the set time will be canceled and the unit will turn off. 4. A/C FAN SPEED: Press the speed button to select either LOW, MEDIUM, HIGH or AUTO A/C fan speed. When using the auto function, the unit will start at maximum speed. As the room temperature changes up or down, the fan speed will adjust accordingly. When the room temperature reaches the set temperature, the compressor will shut off, as indicated by the blinking air conditioner indicator light on the control panel, and the fan will continue to operate to circulate the air. 5. SLEEP CONTROL FUNCTION: This function is designed to: (a) gradually increase the thermostat temperature, and hence the room temperature, as you fall asleep, and (b) shut the unit off. To set the “Sleep Comfort” mode, first press the sleep button. Then set the number of hours, from the current time, that you would like the unit to remain on by pressing the timer button until the desired hours are indicated on the L.E.D. display. The temperature setting may be varied in the “Sleep Comfort” mode by pressing the “UP” or “DOWN” buttons. For each press, the temperature will be increased or decreased by 1ºF. During the course of this cycle, the microprocessor memory will gradually raise the preset temperature 2º - 3ºF over a two hour period, maintain that temperature for the balance of the time set, and then shut the unit off. CONTINUED ON NEXT PAGE 8 CONTROL PANEL FUNCTIONS CONTINUED REMOTE CONTROL FUNCTIONS 6. L.C.D. DISPLAY: Indicates the room temperature and the timer and temperature settings. The unit’s LED displays the room temperature as soon as the power is turned on and after the timer or temperature is set. 7. ALARM INDICATOR LIGHT: This light will illuminate and this unit will shut off when the condensate tank is full and the unit cannot drain. The light will remain on and the unit will remain off until the condensation is drained through Drain (B). Please refer to the TROUBLESHOOTING GUIDE in this manual for further information. 8. TEMPERATURE REGULATION BUTTONS (UP AND DOWN): These buttons raise and lower the thermostat temperature setting by 1º each time they are pressed, ranging from 61ºF - 90ºF. COOL (1) DRY A/C AUTO LO MED HI SET (2) (3) (4) SLEEP TIMER OFF ON HR 9. A/C INDICATOR LIGHT: Illuminates when the compressor is on and stays solid while the compressor is running. When the room temperature reaches the set temperature, the compressor turns off and the light blinks indicating that the unit has cooled the room to the set temperature. 10. DEHUMIDIFIER INDICATOR LIGHT: Press the “FUNCTION” button to select the dehumidification mode. When the dehumidification mode is on, the temperature buttons and the fan speed buttons do not function and the fan will operate on low speed. The dehumidifier indicator light will illuminate and stay solid while the unit is dehumidifying. When the humidity in the room is 50% or lower, the compressor will not run, the unit will not dehumidify, and the dehumidifier light will blink. Remember, the exhaust hose does not need to be used in dehumidifier mode. NOTE: This unit has a three-minute compressor delay protection circuit. Thus, the compressor may take up to three minutes to start from either being switched on or when changing between the dehumidification and air conditioning functions. ON/OFF (5) (6) 1) Air Conditioning or Dehumidifier Selector Button 2) A/C Fan Speed Selector Button 3) Thermostat Temperature Setting UP and DOWN Buttons 4) Sleep Function Button 5) Timer Setting Button 6) Power ON/OFF Button IF THERE IS A POWER INTERRUPTION WHILE THE UNIT IS OPERATING, THE UNIT WILL NOT TURN BACK ON AUTOMATICALLY WHEN THE POWER IS RESTORED. THE UNIT MUST BE TURNED BACK ON MANUALLY. THE UNIT IS DESIGNED WITH THIS SAFETY FEATURE TO PROTECT THE COMPRESSOR. 9 CLEANING THE UNIT Before cleaning the unit, turn it off and unplug it from the outlet. For safety reasons, never wash the air conditioner. EXTERIOR SURFACES OF THE UNIT Clean the air conditioner by using a damp sponge, and dry it with a clean, soft cloth. Never use alcohol or any product containing solvents. AIR FILTERS The air filters located on the back of the unit collect dust contained in the air. To keep the dust from clogging the unit, your unit must always be used with its air filters. The build up of dust reduces the efficiency of the air conditioner. Therefore, the air filters must be cleaned every two weeks, and more often if the machine operates in a dusty atmosphere. If the filters are obstructed, the air conditioner will be less efficient. Each air filter has a tab in the center and is secured to the unit by two clips on the top and two clips on the bottom of the filter. Remove the air filters with the unit switched off, by pulling the tab towards you. Clean the filters with a vacuum cleaner. If the filters are very dirty, you can wash them in warm water (never use hot or soapy water). Make sure that the air filters are completely dry before putting them back on the unit. Do not bend the filters. LONG TERM STORAGE At the end of the season, or when you do not plan to use the unit for an extended period of time, we recommend that you take the following steps: Drain excess water from the pan through Drain (B). Run the unit for 3 to 4 hours in fan mode. The fan mode can be activated by running the air conditioning function without the compressor, which will occur if you set the thermostat temperature above the room temperature. This will thoroughly dry the inside of the unit. Disconnect the unit and wrap the power cord and plug. Clean the unit and store it, protecting it from dust. Store the unit in an upright position. Keep it in a cool, dry place and away from sunshine. 10 TROUBLESHOOTING GUIDE When the air conditioner does not work, it is sometimes a minor problem which the user can handle. Before calling customer service, please check the following points to see if they solve your problem. Additional troubleshooting tips may be found on our website at: www.windchaserproducts.com. Problem The air conditioner/dehumidifier doesn’t work. Probable Causes Solutions 1) Plug not properly inserted into wall socket. 1) Plug the appliance in properly. 2) Insufficient amount of amperage to start unit. 2) Check circuit board for 15-20amp fuse availability. 3) Water tank is full / alarm light illuminated. 3) Check Drain (A) for obstruction and/or empty Drain (B). 1) Exhaust hose too long, run incorrectly or kinked. 1) Exhaust hose can only be extended using max. 5’ of 4” PVC pipe for a total exhaust length of 10’. 2) Unit too close to wall or object. 2) Unit should be at least 1 ½’ away from walls and objects 3) Flap vent obstructs wall exhaust. 3) Use screen instead of Flap vent for wall exhaust. 4) Ceiling or basement does not have ample ventilation. 4) Unit will overheat if the exhaust cannot fully vent. 5) The “timer off” function has been activated. 5) Push the power button to turn unit on. 1) In the A/C function, the ambient temperature has reached the set temperature and therefore the compressor has shut off. 1) This is normal. Set the temperature lower to turn the compressor back on. 2) In the dehumidifier function, the humidity in the room is 50% or lower and therefore the compressor is not running. 2) This is normal. The LED display shows the unit is set, but the unit is not running. The unit’s “timer on” feature is activated. 1) This is normal. The Alarm Indicator Light is Illuminated The condensate tank is full and the unit cannot drain. This safety feature turns off the unit to protect the unit and prevent the condensate tank from overflowing. The air conditioner cuts off. The air conditioner/ dehumidifier LED indicator light blinks. 2) Push the Power button to turn the unit on and deactivate the “timer on” feature. If you are using Drain (A), make sure that the drain hose is no more than 5.9 feet above the ground. If Drain (A) still does not work, the condensate must be drained through Drain (B). After draining the tank, you should be able to restart and use the unit. 11 PRODUCT LIMITED WARRANTY This warranty applies to new product only and excludes optional accessories and attachments. Extended compressor warranty applies only to product with manufacturing dates beginning January 1,1998. During the first year from the date of original purchase, this product is warranted to be free from defects in materials or workmanship under normal use, service and maintenance. During the 2nd through 5th years from the date of original purchase, the compressor (part only) is warranted against defects in material or workmanship under normal use, service and maintenance. This warranty applies to the original purchaser subject to the following terms and conditions: WHAT IS COVERED: The product’s components as originally installed by the manufacturer that are defective in materials or workmanship under normal use, service and maintenance. WHAT IS NOT COVERED BY THIS WARRANTY: This warranty does not extend to or cover: (1) Any defect due to the negligence of others; failure to install, operate or maintain unit or accessories and attachments in accordance with installation instructions (instruction manual is furnished with each new unit); unreasonable use; accidents; alteration, use of unauthorized or non-standardized parts, accessories and attachments; acts of God; theft; vandalism; blown fuses; electrical malfunction. (i.e., as resulting from power surges, shorted or overloaded circuits outlets of wiring utility power quality, etc.), incorrect installation; use of any power source other than that specified on the Product’s specification label; or repair by anyone other than a service facility specified by an authorized WINDCHASER representative. (2) Diagnostic, troubleshooting and travel costs. (3) Operation and usage orientation costs. (4) Performance or operation certification and testing costs. (5) Normal wear and tear of parts including but not limited to, hoses, cables, accessories and attachments. (6) Shipping, handling, packaging and delivery costs of the product, parts or accessories. (7) Shipping, handing and freight damages. (8) Diagnosing, repairing, removing, installing, shipping, servicing and/ or handling costs of either defective parts or replacement parts as relating to Extended 4 Year Compressor Warranty. WHO IS COVERED: The original purchaser from a retailer or liscensed air conditioning contractor. WHAT WE WILL DO: During the first year, WINDCHASER will either repair or replace, at its option, all defective product components free of charge that are covered by this Limited Warranty on a carry-in basis to the authorized WINDCHASER repair facility. During the second through fifth years, WINDCHASER at its option, will provide a new or remanufactured compressor (part only) free of charge as covered by this Limited Warranty on a carry-in basis to the authorized WINDCHASER repair facility. WHAT YOU MUST DO FOR WARRANTY SERVICE: You must return the defective Product to your authorized WINDCHASER repair facility along with a copy of the bill of sale or credit card charge receipt or other document evidencing the date of original purchase and the product’s model number. 12 Before returning this product, call for troubleshooting assistance. If you purchased the unit from a retailer, contact WindChaser Products customer service at 1-800-405-2943 for assistance. If you purchased this unit from an air conditioning wholesaler or contractor, please contact them first for assistance; if they are unable to assist you, contact WINDCHASER. Do not return the unit, components or parts to WINDCHASER without prior written approval and return authorization from WINDCHASER. You are responsible for prepaying all shipping, handling, packaging and delivery costs to and from the warranty repair center. WINDCHASER, its dealers, distributors and representatives are not responsible for damage resulting from improper packing and or mishandling by a shipper. THE FOREGOING EXPRESSES ALL OF WINDCHASER’S OBLIGATIONS AND LIABILITIES WITH RESPECT TO THE QUALITY OF PRODUCT, ITS COMPONENTS, ACCESSORIES AND ATTACHMENTS FURNISHED. ALL OTHER WARRANTIES, EXPRESS OR IMPLIED, INCLUDING THE WARRANTIES OF MERCHANTABILITY OR FITNESS FOR A PARTICULAR PURPOSE ARE DISCLAIMED. WINDCHASER SHALL NOT BE LIABLE FOR THE LOSS OF USE OF THE PRODUCT, ITS COMPONENTS, ACCESSORIES AND ATTACHMENTS, INCONVENIENCE, LOSS OR ANY OTHER DAMAGES, DIRECT OR CONSEQUENTIAL ARISING OUT OF THE USE OF, OR INABILITY TO USE THE PRODUCT, ITS COMPONENTS AND ACCESSORIES OR DAMAGES RESULTING FROM OR ATTRIBUTABLE TO DEFECTS IN THE PRODUCT, ITS COMPONENTS AND ACCESSORIES. NO ONE OTHER THAN WINDCHASER HAS AUTHORITY TO EXTEND OR MODIFY THE TERMS OF THIS LIMITED WARRANTY IN ANY MANNER WHATSOEVER. Some states do not allow the exclusion or limitation of incidental or consequential damages or limitations on how long an implied warranty lasts, so these limitations or exclusions may not apply to you. This limited warranty gives you certain legal rights and you may also have other rights specific to your country, state or province. For further information call: CUSTOMER SERVICE DEPARTMENT: TOLL FREE 1-800-405-2943 13 WindChaser Products: Developers of Fans, Heaters, Air-Treatment Products and Portable and Mini-Split Air-Conditioners WindChaser Products, Inc. 4130 Del Rey Avenue Marina Del Rey, CA 90292 Phone: (310) 827-8615 Toll Free: (800) 405-2943 Fax: (310) 827-8566 www.windchaserproducts.com International Comfort Products Corporation (Canada) 6060 Burnside Court, Unit 1• Mississauga, ON L5T 2T5 • 905-795-8113• 1-800-314-1112 PACR12-OM-E-04