1
English(Original instructions)
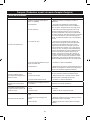
NOTE: If the button does not release completely in
the positioning hole, the shafts are not locked into
place. Slightly rotate from side to side until the button
is locked into place. If needed, turn the trimmer head
which will aid in the insertion of the shaft.
WARNING
Do not remove screws or disassemble string head.
If head is opened, compression springs could fly out
toward operator and result in serious injury.
■■ Tighten the knob securely.
INSTALLING LINE CARRIER
INSTALLING LOWER HANDLEBAR
See figure 6.
See figure 3.
The line carrier snaps onto the upper handlebar on the
side opposite the throttle cable and is used to hold pre-cut
pieces of trimmer line.
■■ Remove two handlebar knobs and two bolts from the
hardware bag.
■■ Place the lower handlebar into the openings on the
trimmer power head/wheel assembly as shown.
NOTE: Do not install the carrier where it could interfere
with the throttle cable or where it could cover any of the
warning icons or labels.
NOTE: Do not allow throttle cable to become pinched
when installing the handlebar.
To install line, remove top cap, insert line into carrier, and
replace cap. To remove line for use, pull from open area
on front of carrier.
■■ Insert the bolts through the holes in the handlebar and
frame.
■■ Install the lower handlebar knobs and tighten securely.
OPERATION
INSTALLING UPPER HANDLEBAR
FUEL AND REFUELLING
See figure 4.
■■ Remove two handlebar knobs and bolts from the
hardware bag.
Handling the fuel safely
■■ Position upper handlebar onto lower handlebar. Make
sure the throttle cable and throttle trigger are on the
right side as shown.
■■ Always refuel outdoors where there are no sparks and
flames. Do not inhale fuel vapours.
■■ Always handle fuel with care. It is highly flammable.
■■ Do not let petrol or lubricant come in contact with your
skin.
■■ Insert bolt through plastic clip, then through holes.
NOTE: Do not allow throttle cable to become pinched
when installing the handlebar.
■■ Align the holes in the clip, the upper handlebar and
lower handlebar.
■■ Keep petrol and lubricant away from the eyes. If petrol
or lubricant comes in contact with the eyes, wash
them immediately with clean water. If irritation is still
present, see a doctor immediately.
■■ Install bolt as shown.
■■ Clean up spilled petrol immediately.
■■ Thread handlebar knob onto bolt and tighten securely.
Repeat with other side.
Mixing the fuel
■■ This product is powered by a 2-stroke engine and
requires pre-mixing petrol and 2-stroke lubricant.
Premix unleaded petrol and 2-stroke engine lubricant
in a clean container approved for petrol.
INSTALLING LINE IN PRO CUT STRING HEAD
See figure 5.
Use monofilament 2.7 mm (diameter) line. Use quality
monofilament replacement line for best performance.
■■ This engine is certified to operate on unleaded petrol
intended for motor vehicle use with an octane rating of
91 ([R + M]/2) or higher.
■■ Stop the engine and disconnect the spark plug wire.
■■ Gather two of the pre-cut lengths of trimmer line
provided or cut two pieces of trimmer line in 25.4 cm
lengths.
■■ Do not use any type of pre-mixed petrol/lubricant from
fuel service stations.
■■ Use synthetic 2-stroke lubricant only. Do not use
automotive lubricant or 2-cycle outboard lubricant.
■■ Insert the lines into the load slots located on the sides
of the string head. Line should be pushed in until
approximately 2 cm protrudes from the holes on the
top of the string head.
■■ Mix 2% synthetic 2-stroke lubricant into the petrol. This
is a 50:1 ratio.
■■ Mix the fuel thoroughly and also each time before
refuelling.
■■ Remove old line by pulling it from the holes located on
the top of the string head.
8