1
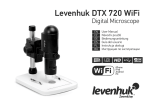
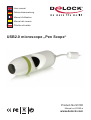
User manual
Gebrauchsanweisung
Manuel d'utilisation
Manual del usuario
Příručka uživatele
USB2.0 microscope „Pen Scope“
Product-No:93180
Manual no:93180-a
www.delock.com
Description
This handy USB2.0 microscope can be applied in different fields, e.g. science,
industry or home use. Equipped with an aspherical high-tech lense and an built-in
LED illumination X3 you can zoom in objects from 50x to 200x, take snap-shots
and time-lapsed videos. Due to its small size and light weight, the microscope is
very flexible in its application and can also display positions which are difficult to
reach.
Specification
• USB2.0 specification
• Built-in LED illumination X3
• Aspherical high-tech lense
• Features snap-shots and time-lapsed video with image capture and image
saving
• Zoom: 50x to 200x
• Pixel: 645(H) x 485(V) (300k Pixel)
• CMOS Sensor
• Power consumption: 65~130mA
• No extra power supply required
• Size: 165 x 38 mm (HxR))
• White balance: AWB (autom.)
• Automatic Iris Aperture
• For Windows 98/ME/2000/XP/Vista
System requirements
• PC or Notebook with a free USB Port
• Windows 98/ME/2000/XP/Vista
Package content*
• USB2.0 microscope
• Stand
• Software
• User manual
*Make sure that the product package contains all items before operation. If any
item is missing or damaged, then please contact your dealer immediately.
--
Note:
Follow the general instructions for installation of the USB device. If necessary,
read the manual of your computer, or ask a specialist for help.
Driver Installation
Windows Vista
1. Switch on your computer.
2. Connect the USB cable with an available USB port of your computer.
3. Put the driver CD in the CD ROM drive.
4. Afterwards, Windows displays the Hardware wizard.
5. Choose "Don´t show this message again for this device".
6. Open Windows Explorer, select: CD-drive\PenScope\Setup.exe.
7. Choose your language and click "Next".
8. Click on "Next".
9. Choose "Install the driver software anyway".
10. Click on "Finish", to restart the computer.
11. After restart you can start the Software "Toprocap", and you can use the
device.
Windows XP/2000
1. Switch on your computer.
2. Connect the USB cable with an available USB port of your computer.
3. Put the driver CD in the CD ROM drive.
4. Afterwards, Windows displays the Hardware wizard. Click on "Cancel".
5. Open Windows Explorer, select: CD-drive\PenScope\Setup.exe.
6. Choose your language and click "Next".
7. Click on "Next".
8. When driver is located, click "Continue installation".
9. Click on "Finish", to restart the computer.
10. After restart you can start the Software "Toprocap", and you can use the
device.
--
Support Delock
If you have further questions, please contact our customer support
[email protected] / www.delock.com or phone +49 30 81789324.
You can contact our service hotline during the following times:
Mon – Fri: 9:00 – 17:30 pm charge 0,12 € / min*
* A connection fee applies according to fee schedule of Deutsche Telekom AG or
your local telephone provider.
You can find current product information on our homepage: www.delock.com
Final clause
Information and data contained in this manual are subject to change without
notice in advance. Errors and misprints excepted.
Copyright
No part of this user manual may be reproduced, or transmitted for any purpose,
regardless in which way or by which means, electronically or mechanically,
without explicit written approval of Delock.
Edition: 08/2007
--
Kurzbeschreibung
Dieses handliche USB2.0 Mikroskop ist in unterschiedlichen Bereichen, unter
anderem der Wissenschaft, Industrie oder für den häuslichen Gebrauch einsetzbar. Ausgestattet mit einer asphärischen hight-tech Linse und einer eingebauten
LED Beleuchtung X3 kann das Mikroskop verschiedenste Objekte vom 50-fachen
bis max. 200-fachen vergrößern, Momentaufnahmen und Videos im Zeitraffer
aufnehmen. Dank seines kompakten Designs und geringen Gewichts, ist das
Mikroskop sehr flexibel in seiner Verwendung und kann auch schwererreichbare
Stellen ohne Probleme vergrößert darstellen.
Technische Daten
• USB2.0 Spezifikation
• Eingebaute LED Beleuchtung X3
• Asphärische Linse
• Aufzeichnung von Momentaufnahmen und Videos im Zeitraffer möglich
• Vergrößerung: 50-fach bis zu 200-fach
• Pixel: 645(H) x 485(V) (300k Pixel)
• CMOS Sensor
• Stromverbrauch :65~130mA
• Größe: 165 x 38 mm (Höhe x Durchmesser)
• Weißabgleich: AWB (autom.)
• Automatische Blende
• Für Windows 98/ME/2000/XP/Vista
Systemvoraussetzung
• PC oder Notebook mit einem freien USB Port
• CPU: Pentium MMX CPU 600MHz oder mehr
• 128MB Arbeitsspeicher
• Windows 98/ME/2000/XP/Vista
Packungsinhalt*
• USB2.0 Mikroskop
• Ständer
• Software
• Gebrauchsanweisung
*Überzeugen Sie sich vor Inbetriebnahme, dass alle Bestandteile des Lieferumfangs in der Verpackung enthalten sind. Sollte etwas fehlen oder beschädigt sein,
wenden Sie sich bitte umgehend an Ihren Fachhändler.
--
Hinweis:
Folgen Sie den hier anschließenden allgemeinen Anweisungen zur Installation
des USB Gerätes. Bei Bedarf lesen Sie bitte in Ihrem Computerhandbuch nach
oder wenden Sie sich an einen Fachmann.
Treiber Installation
Windows Vista
1. Schalten Sie den Computer ein.
2. Verbinden Sie das USB Kabel mit einem freien USB Port Ihres Computers.
3. Legen Sie die Treiber CD in Ihr Laufwerk.
4. Danach erscheint von Windows der Hardware Assistent.
5. Wählen Sie "Diese Meldung nicht noch einmal für dieses Gerät anzeigen".
6. Öffnen Sie mit dem Explorer folgendes Programm: CD-Laufwerk\PenScope\
Setup.exe
7. Wählen Sie Ihre Sprache aus und klicken Sie dann auf "Weiter".
8. Klicken Sie auf "Weiter".
9. Wählen Sie "Diese Treibersoftware trotzdem installieren".
10. Klicken Sie auf "Fertig stellen", um den Rechner neu zu starten.
11. Nach dem Neustart können Sie die Software "Toprocap" starten und das
Gerät verwenden.
Windows XP/2000
1. Schalten Sie den Computer ein.
2. Verbinden Sie das USB Kabel mit einem freien USB Port Ihres Computers.
3. Legen Sie die Treiber CD in Ihr Laufwerk.
4. Danach erscheint von Windows der Hardware Assistent. Klicken Sie auf
"Abbrechen".
5. Öffnen Sie mit dem Explorer folgendes Programm: CD-Laufwerk\PenScope\
Setup.exe
6. Wählen Sie Ihre Sprache aus und klicken Sie dann auf "Weiter".
7. Klicken Sie auf "Weiter".
8. Der Treiber wird gefunden, auf "Installation fortsetzen" klicken.
9. Klicken Sie auf "Fertig stellen", um den Rechner neu zu starten.
10. Nach dem Neustart können Sie die Software "Toprocap" starten und das
Gerät verwenden.
--
Support Delock
Bei weitergehenden Supportanfragen wenden Sie sich bitte an support@delock.
de / www.delock.de oder telefonisch an +49 30 81789324. Sie können die Service-Line zu folgenden Zeiten erreichen:
Mo – Fr: 9:00 – 17:30 Uhr brutto 0,12/min*
*Es entstehen Ihnen Verbindungsentgelte gemäß der Verbindungspreisübersicht
der Deutschen Telekom AG bzw. Ihres Telefonanbieters für ein Gespräch zur
Ortseinwahl.
Aktuelle Produktinformationen und Treiber Downloads finden Sie auch auf unserer Homepage: www.delock.de
Schlussbestimmung
Die in diesem Handbuch enthaltenen Angaben und Daten können ohne vorherige
Ankündigung geändert werden. Irrtümer und Druckfehler vorbehalten.
Copyright
Ohne ausdrückliche schriftliche Erlaubnis von Delock darf kein Teil dieser Bedienungsanleitung für irgendwelche Zwecke vervielfältigt oder übertragen werden, unabhängig davon, auf welche Art und Weise oder mit welchen Mitteln, elektronisch
oder mechanisch, dies geschieht.
Stand: 08/2007
--
Description
Ce pratique microscope USB2.0 peut s’utiliser dans différents domaines, par
exemple les sciences, l’industrie ou l’utilisation domestique. Équipé d’une lentille
asphérique de haute technologie et d’un illuminateur à LED intégré X3, vous pouvez zoomer sur les objets de 50x à 200x, prendre des clichés et des vidéos plus
longues. En raison de sa petite taille et de son faible poids, le microscope est très
flexible en termes d’applications et peut également afficher des positions difficiles
d’accès.
Spécifications techniques
• USB 2.0 spécification
• Illuminateur à LED intégré X3
• Lentille asphérique de haute technologie
• Permet les clichés et les vidéos plus longues avec capture et enregistrement d’
image
• Zoom: 50x à 200x
• Pixels: 645(H) x 485(V) (300k Pixels)
• Capteur CMOS
• Consommation électrique: 65~130mA
• Aucune alimentation supplémentaire requise
• Taille: 165 x 38 mm (HxR)
• Balance des blancs: AWB (autom.)
• Ouverture automatique
• Pour Windows 98/ME/2000/XP/Vista
Configuration système requise
• PC ou portable avec un port USB disponible
• Windows 98/ME/2000/XP/Vista
Contenu de l’emballage*
• Microscope USB2.0
• Support
• Logiciel
• Mode d’emploi
*Assurez-vous que l'emballage du produit contient tous les éléments avant de
procéder. Si un quelconque élément venait à manquer ou était endommagé,
veuillez contacter immédiatement votre revendeur.
--
Note:
Suivez les instructions générales pour l'installation de USB périphérique. Si
nécessaire, consultez le manuel de votre ordinateur, ou demander l'aide d'un
spécialiste.
Installation du pilote
Windows Vista
1. Allumez votre ordinateur.
2. Reliez le câble USB entre le boîtier et un port USB disponible de votre
ordinateur.
3. Mettez le CD pilote dans le lecteur CD ROM.
4. Ensuite, Windows affiche l'assistant matériel.
5. Choisissez "Ne plus afficher ce message pour ce périphérique".
6. Ouvrez l'Explorateur Windows, sélectionnez: CD-drive\PenScope\Setup.exe.
7. Choisissez votre langue et cliquez sur "Suivant".
8. Cliquez sur "Suivant".
9. Choisissez "Installer quand même le pilote logiciel".
10. Cliquez sur "Terminer", pour redémarrer l'ordinateur
11. Après redémarrage, vous pouvez démarrer le logiciel "Toprocap", et utiliser l’
appareil.
Windows XP/2000
1. Allumez votre ordinateur.
2. Reliez le câble USB entre le boîtier et un port USB disponible de votre
ordinateur.
3. Mettez le CD pilote dans le lecteur CD ROM.
4. Ensuite, Windows affiche l'assistant matériel. Cliquez sur "Annuler".
5. Ouvrez l'Explorateur Windows, sélectionnez: CD-drive\PenScope\Setup.exe.
6. Choisissez votre langue et cliquez sur "Suivant".
7. Cliquez sur "Suivant".
8. Une fois le pilote repéré, cliquez sur "Continuer l'installation".
9. Cliquez sur "Terminer", pour redémarrer l'ordinateur.
10. Après redémarrage, vous pouvez démarrer le logiciel "Toprocap", et utiliser l’
appareil.
--
Assistance Delock
Si vous avez d'autres questions, veuillez contacter notre assistance client: [email protected] / www.delock.fr ou par téléphone +49 30 81789324. Vous pouvez contacter notre service hotline aux horaires suivants: Lun – Ven: 9:00 – 17:30
tarif 0,12€ / min*
* Des frais de connexion s'appliquent selon les tarifs horaires de Deutsche
Telekom AG ou de votre prestataire de téléphonie local.
Vous pouvez trouver les informations sur nos produits actuels sur notre page
d'accueil: www.delock.fr
Clause finale
Les informations et données contenues dans ce manuel sont sujettes à modifications sans préavis. Sont exclues les erreurs et les fautes d'impression.
Copyright
Aucune partie de ce manuel d'utilisation ne peut être reproduite ou transmise,
quel qu'en soit le but, et sous quelque moyen que ce soit, électronique ou mécanique, sans l'approbation écrite expresse de Delock.
Version: 08/2007
--
Descripción
Este útil microscopio USB2.0 puede usarse en diferentes campos, como el científico, el industrial o el doméstico. Incluye una lente asférica de alta tecnología e
iluminación LED X3 incorporada que le permite ampliar los objetos entre 50x y
200x, tomar fotos instantáneas y grabar vídeos a intervalos regulares. Debido a
su pequeño tamaño y peso ligero, el microscopio es muy flexible en cuanto a su
aplicación y también puede mostrar puntos de difícil alcance.
Especificación técnica
• Especificación USB 2.0
• Iluminación LED X3 incorporada
• Lente asférica de alta tecnología
• Capacidad de tomar fotografías instantáneas y grabar vídeo a intervalos
regulares, con captura de imagen y grabación de imagen
• Zoom: 50x a 200x
• Píxeles: 645(H) x 485(V) (300k Píxeles)
• Sensor CMOS
• Consumo de energía: 65~130mA
• No es necesaria ninguna fuente de alimentación adicional
• Tamaño: 165 x 38 mm (HxR)
• Balance de blancos: AWB (automát.)
• Apertura automática de iris
• Para Windows 98/ME/2000/XP/Vista
Requisitos del Sistema
• PC o equipo portátil con un puerto USB disponible
• Windows 98/ME/2000/XP/Vista
Contenido del paquete*
• Microscopio USB2.0
• Base
• Software
• Manual del usuario
*Asegúrese de que el paquete del producto contenga todos los elementos antes
de su funcionamiento. Si falta o hay algo dañado, por favor póngase en contacto
con su distribuidor inmediatamente.
-10-
Nota:
Siga las instrucciones generales para la instalación de el USB dispositivo. En
caso necesario, lea el manual de su equipo o pida ayuda a un especialista.
Instalación del controlador
Windows Vista
1. Encienda su PC.
2. Conecte el cable USB a la carcasa y a un puerto USB disponible de su PC.
3. Inserte el CD del controlador en la unidad de CD ROM.
4. A continuación, Windows mostrará el asistente para hardware.
5. Elija "No mostrar este mensaje de nuevo para este dispositivo".
6. Abra el Explorador de Windows y seleccione Unidad_de_CD\PenScope\
Setup.exe.
7. Elija su idioma y haga clic en "Continuar".
8. Clic en "Continuar".
9. Elija "Instalar el software del controlador de todos modos".
10. Haga clic en "Finalizar" para reiniciar el equipo.
11. Tras un reinicio, puede ejecutar el software "Toprocap" y puede usar el
dispositivo.
Windows XP/2000
1. Encienda su PC.
2. Conecte el cable USB a la carcasa y a un puerto USB disponible de su PC.
3. Inserte el CD del controlador en la unidad de CD ROM.
4. A continuación, Windows mostrará el asistente para hardware. Haga clic en
"Cancelar".
5. Abra el Explorador de Windows y seleccione Unidad_de_CD\PenScope\
Setup.exe.
6. Elija su idioma y haga clic en "Continuar".
7. Clic en "Continuar".
8. Cuando se haya encontrado el controlador, haga clic en "Continuar
instalaciónSí".
9. Haga clic en "Finalizar" para reiniciar el equipo.
10. Tras un reinicio, puede ejecutar el software "Toprocap" y puede usar el
dispositivo.
-11-
Soporte técnico Delock
Si tiene alguna pregunta, póngase en contacto con nuestro servicio de atención
al cliente [email protected] / www.delock.es o llamando al teléfono +49 30
81789324.
El horario de atención de nuestro número de teléfono de atención al cliente es:
Lun – Vie: 9:00 – 17:30 Coste de la llamada 0,12 / min*
* Se aplicará una tarifa de conexión en función del horario de tarifas de Deutsche
Telekom AG o de la compañía telefónica local.
Puede encontrar información actual del producto en nuestra página Web:
www.delock.es
Cláusula final
La información y los datos contenidos en este manual están sujetos a cambios
sin previo aviso. Exceptuando errores y erratas.
Copyright
Queda prohibida la reproducción o transmisión para cualquier fin de parte alguna
de este manual del usuario, independientemente de la forma en que se realice,
ya sea, electrónicamente o mecánicamente, sin el consentimiento escrito de
Delock.
Versión: 08/2007
-12-
Popis
Ruční USB2.0 mikroskop může být využit v celé řadě aplikací – například pro
vědecký výzkum, v průmyslu nebo domácnosti. Je osazen asferickou vysoce
kvalitní čočkou a vestavěným osvětlením pomocí LED X3, umožňuje zvětšení
objektů 50x až 200x, pořizování snímků a videozáznamů. Vzhledem k malým
rozměrům a nízké váze je použití mikroskopu velmi pružné i v případech omezené přístupnosti k objektům pozorování.
Specifikace
• USB specifikace 2.0
• Vestavěné LED osvětlení X3
• Aserická high-tech čočka
• Možnost pořizování snímků a videozáznamů (image capture, image saving)
• Zvětšení: 50x až 200x
• Rozlišení: 645 x 485 (300k Pixel)
• CMOS Sensor
• Spotřeba: 65~130mA
• Není zapotřebí externí napájecí zdroj
• Velikost: 165 x průměr 38 mm
• Vyvážení bílé: AWB (automatické)
• Automatické nastavené clony
• Pro Windows 98/ME/2000/XP/Vista
Systémové požadavky
• PC nebo notebook s USB portem
• Windows 98/ME/2000/XP/Vista
Obsah balení*
• USB2.0 microskop
• Stojánek
• Software
• Uživatelská příručka
*Před použitím se ujististěte, zda balení obsahuje všechny položky. Pokud něco
chybí nebo je poškozeno, kontaktujte prosím svého prodejce.
-13-
Poznámka:
Dodržujte následující všeobecné instrukce pro instalaci USB zařízení. Pokud to
bude potřeba, použijte manuál vašeho počítače nebo požádejte o pomoc specialistu.
Instalace ovladače
Windows Vista
1. Zapněte počítač.
2. Připojte USB kabel k volnému USB rozhraní počítače.
3. Vložte CD s ovladači do mechaniky.
4. Windows zobrazí hlášku Pomocníka instalace.
5. Zvolte "Don´t show this message again for this device" (Nezobrazovat zprávu
pro toto zařízení znovu).
6. Spusťte prohlížeč, zvolte: CD-mechanika\PenScope\Setup.exe.
7. Zvolte jazyk a klikněte na "Next" (Pokračovat).
8. Klikněte na "Next" (Pokračovat).
9. Zvolte "Install the driver software anyway" (Instalujte ovladač).
10. Klikněte na "Finish" (Ukončení instalace), pro restart počítače.
11. Po restartu počítače můžete začít používat software "Toprocap" a mikroskop.
Windows XP/2000
1. Zapněte počítač.
2. Připojte USB kabel k volnému USB rozhraní počítače.
3. Vložte CD s ovladači do mechaniky.
4. Windows zobrazí hlášku Pomocníka instalace. Klikněte na "Cancel" (Zrušit).
5. Spusťte prohlížeč, zvolte: CD-mechanika\PenScope\Setup.exe.
6. Zvolte jazyk a klikněte na "Next" (Pokračovat).
7. Klikněte na "Next" (Pokračovat).
8. Po nalezení ovladače klikněte na "Continue installation" (Pokračovat v
instalaci).
9. Klikněte na "Finish" (Ukončení instalace), pro restart počítače.
10. Po restartu počítače můžete začít používat software "Toprocap" a mikroskop.
-14-
Technická podpora
S dalšími technickými otázkami můžete kontaktovat naše středisko podpory:
[email protected] nebo telefonicky +49 30 81789324 (pouze německy nebo
anglicky) *
Servisní středisko je v provozu v pracovní dny od 9:00 do 17:30 hodin
*Bezplatné hovory z České a Slovenské republiky nejsou možné. Další informace
vám může zprostředkovat rovněž prodejce, u kterého byl výrobek zakoupen.
Aktuální informace o produktu můžete nalézt i na našich webových stránkách
http://www.delock.com
Závěrečné upozornění
Informace a data obsažená v této příručce mohou být změněny bez předchozího
upozornění. Za tiskové chyby neručíme.
Copyright
Bez předchozího písemného výslovného svolení od Delocku nesmí být použita
žádná část této příručky pro jakékoliv účely rozmnožování, překládání nebo
dalších úprav nezávisle na tom, jakým způsobem nebo jakými prostředky k tomu
dochází (elektronicky nebo mechanicky).
Ochranná známka Delock je registrovaná obchodní značka a bez písemného
svolení jejích vlastníků nesmí být používána. Nesmí být v žádném případě upravena nebo doplněna.
Ochranné známky, obchodní jména, značky a názvy produktů použité v této
příručce mohou být registrovanými ochrannými známkami třetích firem zapsanými u příslušných úřadů.
verze: 08/2007
-15-