1
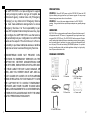
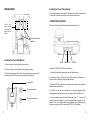
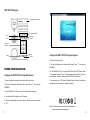
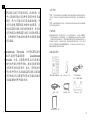
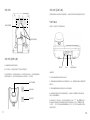
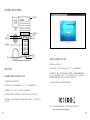
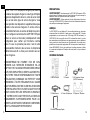
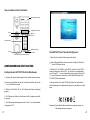
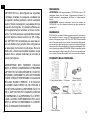
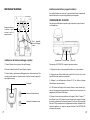
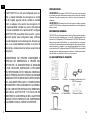
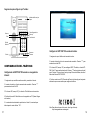
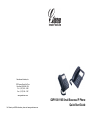
Grandstream Networks, Inc.
1297 Beacon Street, 2nd Floor
Brookline, MA 02446. USA
Tel : +1 (617) 566 – 9300
Fax: +1 (617) 249 – 1987
www.grandstream.com
For Warranty and RMA information, please visit www.grandstream.com
GXP1100/1105 Small Busness IP Phone
Quick Start Guide
Content
English............................................................................1
简体中文........................................................................7
Français.........................................................................13
Deutsch..........................................................................19
Italiano...........................................................................25
Español..........................................................................31
EN
The GXP1100/1105 is not pre-configured to support
or carry emergency calls to any type of hospital, law
enforcement agency, medical care unit (“Emergency
Service(s)”) or any other kind of Emergency Service.
You must make additional arrangements to access
Emergency Services. It is Your responsibility to purchase SIP-compliant Internet telephone service, properly configure the GXP1100/1105 to use that service,
and periodically test your configuration to confirm that
it works as You expect. If You do not do so, it is Your responsibility to purchase traditional wireless or landline
telephone services to access Emergency Services.
GRANDSTREAM DOES NOT PROVIDE CONNECTIONS TO EMERGENCY SERVICES VIA THE
GXP1100/1105. NEITHER GRANDSTREAM NOR
ITS OFFICERS, EMPLOYEES OR AFFILIATES MAY
BE HELD LIABLE FOR ANY CLAIM, DAMAGE, OR
LOSS, AND YOU HEREBY WAIVE ANY AND ALL
SUCH CLAIMS OR CAUSES OF ACTION ARISING
FROM OR RELATING TO YOUR INABILITY TO USE
THE GXP1100/1105 TO CONTACT EMERGENCY
SERVICES, AND YOUR FAILURE TO MAKE ADDITIONAL ARRANGEMENTS TO ACCESS EMERGENCY SERVICES IN ACCORDANCE WITH THE IMMEDIATELY PRECEDING PARAGRAPH.
1
PRECAUTIONS:
WARNING: Please DO NOT power cycle the GXP1100/1105 when the LED
lights are flashing during system boot up or firmware upgrade. You may corrupt
firmware images and cause the unit to malfunction.
WARNING: Use only the power adapter included in the GXP1100/1105
package. Using an alternative non-qualified power adapter may possibly damage
the unit.
OVERVIEW:
GXP1100/1105 is a next generation small business IP phone that features up to 2
call appearances with 1 SIP account, 4 programmable keys, single network port,
integrated PoE (GXP1105 only). The GXP1100/1105 delivers superior HD audio
quality, leading edge telephony features, automated provisioning for easy deployment, advanced security protection for privacy, and broad interoperability with
most 3rd party SIP devices and leading SIP/NGN/IMS platforms. It is a perfect
choice for small business, lobby, and hotel applications looking for a high quality,
basic IP phone with attractive cost.
PACKAGE CONTENTS:
1 X GXP1100/1105
Main Case
1 X Handset
1 X 5V Power Adapter
(GXP1100 only)
1 X Ethernet Cable
1 X Phone Cord
1 X Phone Stand
1 X Quick Start Guide
2
PHONE SETUP:
Installing the Phone (Phone Stand):
For installing the phone on the table with the phone stand, attach the phone stand
to the bottom of the phone where there is a slot for the phone stand.
CONNECTING THE PHONE:
Slot for the
phone stand
if placing the
phone on the
table
Refer to the illustration below when following the setup instructions.
Wall mount holes are
available
Installing the Phone (Wall Mount):
1. Attach the phone to the wall via the wall mount hole.
2. Pull out the tab on from the handset cradle (See figure below).
3. Rotate the tab and plug it back into the slot with the extension up to hold the
handset while the phone is mounted on the wall (See figure below).
Handset Rest
Tab with extension up
Tab with extension down
3
Power
Handset Port
LAN Port
To setup the GXP1100/1105, follow the steps below:
1. Connect the handset and main phone case with the phone cord.
2. Connect the LAN port of the phone to the RJ-45 socket of a hub/switch or a
router (LAN side of the router) using the Ethernet cable.
3. Connect the 5V DC output plug to the power jack on the phone; plug the power
adapter into an electrical outlet.
4. The LED on the up right corner will light up in red during the booting up/provisioning/upgrading process. Before continuing, please wait for the LED turn off.
5. Pick up the handset and the dialtone will be heard. Press “***“ to use the IVR
menu and enter menu options to hear the corresponding voice prompt. For example, dial “02“ in the IVR menu will hear the IP address. You can further configure
the phone using the web GUI by entering GXP1100/1105’s IP address.
4
GXP1100/1105 Keypad:
Message Waiting Indicator
Hold
Flash
Programmable Keys
Message
Transfer
Standard
Keypad
Mute
Redial
Volume
Configure the GXP1100/1105 Using the Keypad:
1. Make sure the phone is idle.
PHONE CONFIGURATION:
Configure the GXP1100/1105 Using Web Browser:
1. Ensure your phone is powered up and connected to the Internet.
2. Pick up the handset and the dialtone will be heard. Press “***“ to access the
IVR MENU.
2. Pick up the handset and the dialtone will be heard. Press “***“ to access the
IVR MENU.
3. In the IVR MENU, dial “01“ to configure DHCP, Static IP, or PPPoE mode. Press
“9” to toggle the selection. Press “*“ for the next menu option. Press “#“ to return to
the main menu. For details, please check GXP1100/1105 User Manual.
4. Please contact your ITSP (Internet Telephony Service Provider) for additional
settings that may be necessary to configure the phone.
3. In the IVR MENU, dial “02“ and phone’s IP address will be announced.
4. Type the phone’s IP address in your PC browser.
5. The default administrator password is “admin”; the default end-user password
is “123”.
5
Note: For the detailed user manual, please download from:
http://www.grandstream.com/support
6
ZH
GXP1100/1105不预设对医院,执法机构,医
疗中心(急救服务)以及各种紧急服务的紧急通
话服务。用户必须自行设定紧急通话功能。用
户必须自行购买SIP兼容的网络电话服务,正
确的设定GXP1100/1105使用该服务,并定期
测试您的配置以确保GXP1100/1105如预期工
作,否则请购买传统无线或有限电话服务来拨
打紧急通话。
Grandstream Networks 公司的GXP1100/
1105不支持紧急通话服务。
Grandstream
Networks 公司、其管理者和员工以及其相关
机构对此所造成的任何索赔、损失或者损害都
不负有任何法律追究责任。在此,您将无权对
任何以及所有由于无法通过GXP1100/1105拨
打紧急电话以及没有遵照前段文字描述而造成
紧急通话失败的事件提出诉讼。
注意事项:
警告:
请不要在设备启动未完成LED灯闪烁的时候或设备的升级软件的过程中断
开电源,因为如刚才所述的操作会导致话机本身的程序损坏,进而导致设备无法
启动。
警告:
请使用设备包装中的电源,因为使用其他没有经过认证的替代电源适配器
有可能对设备造成损害。
产品概览:
GXP1100/1105是一款功能丰富的下一代小型商务IP电话。它支持一个SIP账号
下的两条线路通讯,4个可编辑按键,1个 10/100 Mbps 自适应交换式以太网接
口(GXP1105支持PoE供电)。GXP1100/1105具有优异的高清晰语音质量和丰
富完备的电话功能。它支持自动配置、先进的安全隐私保护设置,并且广泛兼容
其它第三方SIP设备及主要SIP/NGN/IMS平台。对于追求性价比的企业用户来说,
GXP1100/1105将是理想的选择。
设备包装清单:
GXP1100/1105话机(1台) 电话手柄(1个)
网线 (1根)
7
手柄连线(1根)
5V电源适配器
(1个,仅GXP1100)
桌面支架 (1个)
快速安装手册(1本)
8
安装电话:
安装电话 (桌面支架):
将桌面支架插入电话背面的支架插槽中,电话将可以倾斜固定在桌面供用户使用。
电话的连接:
桌面支架插槽
使用前,请参考以下步骤连接电话。
墙体支架插槽
安装电话 (墙体支架):
1. 通过墙孔将电话固定在墙上;
5V电源
2. 如下图所示,将话机手柄槽下方的扣机零件取出;
3. 将该零件倒转,然后重新插入原处,此时零件凸出处在外。当电话使用墙体支
架固定在墙上时,手柄可以垂直地稳定扣入手柄槽中,不会滑落。
手柄
网络连接端口
连线步骤:
1. 用手柄连线连接电话手柄和电话主机;
话机手柄插槽
2. 用网线连接电话的网络接口和外部网络接口(如:集线器或交换机上的RJ-45网
络接口);
凸出处向上
3. 用电源适配器连接电话电源接口和交流电源插座;
4. 当设备启动或固件升级/自动配置过程中,电话右上方的LED灯会显示亮红色。
请耐心等待至LED灯灭;
凸出处向下
9
5. 话机启动后,拿起手柄。用户将会听到拨号音。输入“***”进入IVR菜单并且
输入相应的号码进入菜单选项获取电话信息或进行配置。例如:在IVR菜单中输
入“02”,用户可以听到话机获取的IP地址。此时,用户可以登入话机Web界面
进行更多配置。
10
使用GXP1100/1105键盘:
信息指示灯
保持
线路切换
可编程按键
留言箱
转接
标准键盘
静音
重拨
音量
通过键盘配置GXP1100/1105 :
1. 确保电话处于空闲状态;
电话的配置:
2. 拿起电话手柄,用户将会听到拨号音,按下“***”进入电话IVR菜单;
通过WEB浏览器配置GXP1100/1105 :
3. 在IVR菜单中,输入“01”进行网络配置(DHCP,静态IP地址或PPPoE模式)。
输入“9”切换该配置选项;输入“*”进入下一级菜单;输入“#”返回主菜单。
请参考GXP1100/1105产品用户手册获得更多详细配置信息;
1. 请确保电话的电源及网络连接;
4. 如有其他需要的设置,请联系您的服务提供商。
2. 拿起电话手柄,用户将会听到拨号音。按下“***”进入电话IVR菜单;
3. 在IVR菜单中,输入“02”,用户将会听到电话IP地址;
4. 在您电脑浏览器中输入话机IP地址(电话和您的电脑必须在同一个网段);
5. 如右图所示,请输入密码登陆。默认管理员密码是“admin”;默认终端用户密
码是“123”。
备注:欲获取详细的话机使用信息,请在以下链接中下载用户手册:
http://www.grandstream.com/support
11
12
FR
Le GXP1100/1105 n’est pas pré configuré pour soutenir
ou réaliser des appels d’urgence à tout type d’hôpital,
organisme d’application de la loi, unité de soins médicaux ou tout autre type de service d’urgence. Vous
devez prendre des dispositions supplémentaires pour
accéder à des services d’urgence. Il est de votre responsabilité d’acheter un service de téléphonie par Internet, configurer correctement le GXP1100/1105 pour
utiliser ce service et de tester périodiquement votre
configuration pour vérifier qu’il fonctionne comme
prévu. Si vous ne procédez pas ainsi, il est de votre
responsabilité d’acheter des services de téléphonie
traditionnels sans fil ou fixes pour accéder aux services d’urgence.
GRANDSTREAM NE FOURNIT PAS DE CONNEXIONS AUX SERVICES D’URGENCE VIA LE
GXP1100/1105. NI GRANDSTREAM NI SES DIRIGEANTS, SES EMPLOYÉS OU SES FILIALES NE PEUVENT ETRE TENUS RESPONSABLES DE TOUTE
RÉCLAMATION, DOMMAGE OU PERTE ET VOUS
RENONCEZ À TOUTE RÉCLAMATION OU CAUSE
D’ACTION RESULTANT DE OU EN RELATION AVEC
VOTRE INCAPACITE D’UTILISER LE GXP1100/1105
POUR CONTACTER LES SERVICES D’URGENCE,
ET VOTRE ECHEC A METTRE EN PLACE DES ARRANGEMENTS SUPPLEMENTAIRES POUR ACCEDER AUX SERVICES D’URGENCE CONFORMEMENT AU PARAGRAPHE PRECEDENT.
13
Précautions:
Avertissement:
Ne redémarrez pas le GXP1100/1105 lorsque les LEDs
clignotent durant l’initialisation ou la mise à jour du firmware. Ca peut corrompre le
firmware et causer un dysfonctionnement de l’équipement.
Avertissement: Utilisez seulement le boitier d’alimentation inclus dans
le pack du GXP1100/GXP1105. L’utilisation d’un boitier d’alimentation alternative
non qualifié peut endommager l’équipement.
APERÇU:
Le GXP1100/1105 est un téléphone IP de nouvelle génération pour les petites
entreprises offrant la visibilité de 2 appels avec un seul compte SIP, 4 touches
programmables, un port réseau unique, PoE intégré (GXP1105 seulement). Le
GXP1100/1105 offre une qualité de son HD, fonctionnalités riches à la pointe
des caractéristiques de la téléphonie, auto-approvisionement pour un déploiment
facile, protection de sécurité avancée pour la confidentialité, et une large interopérabilité avec la majorité des équipements SIP de tierce partie et leader des platformes SIP/NGN/IMS. C’est le choix parfait pour les petites entreprises et hôtels
à la recherche de téléphones IP basiques, de haute qualité à un prix extrêment
abordable.
CONTENU DU PACK :
1 X Boîtier Principal
1 X Câble Ethernet
1 X Combiné
1 X 5V Adaptateur Secteur
(GXP1100 seulement)
1 X Cordon Téléphonique 1 X Support du Téléphone
1 X Guide de Démarrage Rapide
14
Installation du Téléphone (Support du Téléphone) :
INSTALLATION DU téléphone:
Pour installer le téléphone sur la table avec le support du téléphone, attachez ce
dernier à la fente placée à la base du téléphone.
Connecter le téléphone:
Reportez-vous à l’illustration ci-dessous en suivant les instructions d’installation.
fente pour le
berceau du
téléphone s’il
est à mettre
sur une table
Les orifices du socle
de montage murale
sont disponible
Installation du Téléphone (Support Mural):
Port Combiné
Port LAN
1. Fixez le téléphone au mur grâce aux trous de fixation murale.
Pour configurer le GXP1100/1105, suivez les étapes ci-dessous:
2. Retirez l’attache à partir du crochet du téléphone (Voir figure ci-dessous).
1. Connectez le combiné et la base principale du téléphone en utilisant le cordon
téléphonique.
3. Retournez l’attache et rebranchez-la dans la fente d’extension jusqu’à tenir le combiné lorsque le téléphone est monté sur le mur (Voir figure ci-dessous).
15
Alimentation
2. Connectez le port LAN du téléphone à la prise RJ-45 d’un hub /switch ou routeur (côté LAN du routeur) via le câble Ethernet.
Appui du combiné
3. Connectez l’adaptateur d’alimentation dans le port 5V DC du téléphone. Branchez l’autre extrémité à une prise électrique.
Attache avec appui vers le
haut
4. Le voyant sur le coin haut droit s’allume en rouge lors du processus de démarrage/approvisionnement/mise-à-jour. Avant d’utiliser le téléphone, veuillez attendre la fin du processus et que le voyant s’éteint.
Attache avec appui vers le
bas
5. Décrochez le combiné et vous entenderez la tonalité. Appuyez sur “***” pour
utiliser le menu vocal et choisissez parmi les options du menu afin d’entendre
l’indication vocale correspondante. Par exemple, entrez “02” dans le menu vocal
et vous entenderez l’addresse IP. Vous pouvez aussi configurer le téléphone en
utilisant l’interface web en entrant l’addresse IP dans votre navigateur web sur
votre PC.
16
Astuces Pour Utiliser le Clavier du Téléphone:
Indicateur du message
en attente
Mise en attente
Flash
Touches Programmables
Message
Transfert
Teclado
Estándar
Muet
Recomposer
Volume
Configuration du GXP1100/1105 en Utilisant le Clavier du
Téléphone:
1. Assurez-vous que le téléphone est inactif.
CONFIGURATION DU TELEPHONE:
Configurer le GXP1100/1105 en Utilisant l’interface Web:
1. Vérifiez que votre téléphone est sous tension et connecté à Internet.
2. Décrochez le combiné et vous entenderez la tonalité. Appuyez sur “***” pour
utiliser le menu vocal.
3. Dans le menu vocal, entrez “02” et l’addresse IP du téléphone sera annoncée.
2. Décrochez le combiné et vous entenderez la tonalité. Appuyez sur “***” pour
utiliser le menu vocal.
3. Dans le menu vocal, entrez “01” pour configurer le mode DHCP, IP statique,
ou PPPoE. Enrez “9” pour basculer la séléction. Entrez “*” pour l’option suivante
du menu. Entrez “#” pour retourner au menu principal. Pour plus d’informations,
veuillez consulter le manuel d’utilisation du GXP1100/1105.
4. Veuillez contactez votre Fournisseur d’accès Internet pour les paramètres supplémentaires qui peuvent être nécessaire pour configurer le téléphone.
4. Saisissez l’adresse IP du téléphone dans le navigateur de votre PC (Voir la
figure à droite).
5. Le mot de passe d’administrateur est par défaut “admin”; et pour l’utilisateur
est “123”.
17
Note: Pour plus de détails, veuillez consulter le manuel d’utilisation sur:
http://www.grandstream.com/support
18
DE
GXP1100/1105 wird nicht vorkonfiguriert, um die Notanrufe an irgendwelchen Typ des Krankenhauses, die Vollzugsbehörde, das Medizinische Versorgungszentrum
(“Notdienst(e)”) oder jede andere Art des Notdienstes zu
unterstützen. Sie müssen zusätzliche Vorkehrungen treffen, um auf Notdienste zuzugreifen. Es liegt in Ihrer Verantwortung, einen SIP-konformen Internettelefondienst zu erwerben, damit Sie das GXP1100/1105 richtig konfigurieren
können, um diesen Dienst zu verwenden und regelmäßig
seine Konfiguration zu prüfen, und somit zu bestätigen,
dass es nach Ihren Erwartungen funktioniert. Wenn Sie
nicht so tun, liegt es in Ihrer Verantwortung, die traditionellen Funktelefon- oder Festnetzanschlussdienste zu erwerben, um auf Notdienste zuzugreifen.
GRANDSTREAM STELLT DIE VERBINDUNGEN ZU
NOTDIENSTEN ÜBER DAS GXP1100/1105 NICHT ZUR
VERFÜGUNG. WEDER GRANDSTREAM NOCH SEINE
ANGESTELLTE, AUFTRAGGEBER ODER GESCHÄFTSPARTNER KÖNNEN KEINE VERANTWORTUNG FÜR
JEGLICHEN ANSPRUCH, SCHADEN ODER VERLUST
TRAGEN, UND SIE VERZICHTEN HIERMIT AUF IRGENDWELCHE UND ALL DIESE ANSPRÜCHE ODER
KLAGEGRÜNDE, DIE AUS ODER IN ZUSAMMENHANG MIT IHRER UNFÄHIGKEIT ENTSTEHEN, DEN
GXP1100/1105 ZU VERWENDEN, UM SICH MIT DEN
NOTDIENSTEN IN VERBINDUNG ZU SETZEN, UND AUS
IHREM MISSERFOLG, DIE ZUSÄTZLICHEN MAßNAHMEN ZU TREFFEN, UM AUF NOTDIENSTE IN ÜBEREINSTIMMUNG MIT DEM UNMITTELBAR VORHERGEHENDEN PARAGRAPHEN ZUZUGREIFEN.
19
VORSICHTSMAßNAHMEN:
WARNUNG: Schalten Sie bitte das GXP1100/1105 NICHT aus und wieder ein,
wenn die LED-Lichter während der Systemaufladung oder der Firmware-Aktualisierung blinken. Die Firmware-Bilder können dadurch fehlerhaft werden, sowie
die Störfunktionen des Geräts werden dadurch ermittelt.
WARNUNG: Verwenden Sie nur den im GXP1100/1105 Paket eingeschlossenen Netzadapter. Die Verwendung eines alternativen, nicht geeigneten Netzadapters kann vielleicht das Gerät beschädigen.
ÜBERBLICK:
GXP1100/1105 ist ein kleines IP-Telefon der nächsten Generation mit bis zu 2
Anrufanzeigen mit 1 SIP-Konto, 4 programmierbaren Tasten, einem einzigen
Netzwerk-Port und integriertem PoE (nur GXP1105). Das GXP1100/1105 bietet
überragende HD-Audio-Qualität, führende Telefonie-Funktionen, automatisiertes
Provisioning zur einfachen Implementierung, erweiterten Sicherheits-Schutz für
die Privatsphäre und eine umfangreiche Interoperabilität mit den meisten SIPGeräten Dritter und führenden SIP / NGN / IMS-Plattformen. Die perfekte Wahl für
kleine Unternehmen sowie Lobby- und Hotel-Anwendungen, die ein hochwertiges
elementares IP-Telefon zu attraktiven Kosten erfordern.
PAKETINHALT:
1 X Telefonhauptgehäuse
1 X Ethernet-Kabel
1 X Schnelleinstieg
1 X Hörer
1 X 5V Netzadapter (nur GXP1100)
1 X Telefon-Kabel
1 X Telefon-Montage
20
Telefoninstallation (Telefonstandplatz):
Telefoninstallation:
Für die Installation des Telefons auf den Tisch mit dem Telefonstandplatz, bringen
Sie den Telefonstandplatz an der Unterseite des Telefons an, in dem es einen
Steckplatz für den Telefonstandplatz gibt.
Aussparung
für den Telef o n s t ä n d e r,
wenn
das
Telefon
auf
dem
Tisch
liegt
Telefon anschlieSSen:
Folgen Sie der Setup-Anleitung (s. Abbildung unten).
Wandbefestigungslöcher sind lieferbar
Telefoninstallation (Wandhalterung):
Netz
1. Fixieren Sie das Telefon mittels Wandmontagebohrung an der Wand.
Für das GXP1100/1105-Setup folgen Sie den Schritten unten:
2. Stecker von der Hörergabel entfernen (siehe Abbildung unten).
1. Schließen Sie den Hörer und das Haupttelefongehäuse an die Telefonschnur
an.
3. Stecker drehen und ihn wieder in die Einbaustelle einstecken um den Hörer
festzuhalten, während das Telefon an die Wand angebracht wird (sieh Abbildung
unten).
Hörergabel
Stecker mit Ansatzstück auf
Stecker mit Ansatzstück
runter
21
Hörer-Anschluss LAN-Anschluss
2. Schließen Sie den LAN-Anschluss des Telefons an die RJ-45 Steckdose eines
Netzknotens/Schalters oder eines Routers (LAN-Seite des Routers), unter Verwendung des Ethernet-Kabels an.
3. Schließen Sie den 5V DC-Ausgangsstecker an die Energiensteckfassung am
Telefon an; stecken Sie den Netzadapter in einen elektrischen Anschluss ein.
4. Die LED oben rechts leuchtet rot während des Hochfahren-/Bereitstellungs- und
Upgrading-Prozesses. Bevor Sie fortfahren, warten Sie bitte, bis der Prozess abgeschlossen ist und die LED erlischt.
5. Nehmen Sie das Mobilteil ab und das Freizeichen wird hörbar. Drücken Sie “***”,
um das IVR-Menü zu verwenden, und geben Sie Optionen ein, um die entsprechende Ansage zu hören. Zum Beispiel wählt “02” im IVR-Menü die IP-Adresse.
Sie können das Telefon weiter über die Web-GUI konfigurieren, indem Sie die IPAdresse des GXP1100/1105 in den PC-Webbrowser eingeben.
22
Tipps zum Gebrauch des Tastenfeldes:
Mitteilungwarteanzeige
Halten
Flash
Programmierbare Tasten
Nachricht
Transfer
Standardtastatur
Stumm
Wahlwiederholung
Lautstärke
Das GXP1100/1105 per Tastenfeld Konfigurieren:
1. Stellen Sie sicher, dass das Telefon gerade nicht arbeitet.
KONFIGURIERUNG DES TELEFONS:
Konfiguration des GXP1100/1105 mittels Web-Browser:
1. Versichern Sie dass das Telefon angestellt ist und mit dem Internet verbunden.
2. Nehmen Sie das Mobilteil ab und das Freizeichen wird hörbar. Drücken Sie
“***”, um das IVR-Menü aufzurufen.
3. Wählen Sie im IVR-Menü “02” und die IP-Adresse des Telefons wird bekannt
gegeben.
2. Nehmen Sie das Mobilteil ab und das Freizeichen wird hörbar. Drücken Sie
“***”, um das IVR-Menü aufzurufen.
3. Wählen Sie “01” im IVR-Menü, um den DHCP-, statischen IP- oder PPPoEModus zu konfigurieren. Drücken Sie “9”, um die Option zu aktivieren/deaktivieren. Drücken Sie “*”, um zur nächsten Menüoption zu gelangen. Drücken Sie
“#”, um zum Hauptmenü zurückzukehren. Weitere Einzelheiten finden Sie im
GXP1100/1105-Benutzerhandbuch.
4. Bitte wenden Sie sich an Ihren ITSP (Internet Telefon Service Provider) für
weitere Einstellungen, die möglicherweise nötig sind, um das Telefon zu konfigurieren.
4. Die IP-Adresse des Telefons in den Browser des PCs eingeben (siehe Abbildung rechts).
5. Das Standard-Administratorpasswort lautet “admin”, das Standard-Endbenutzerpasswort “123”.
23
Bemerkung: Das ausführliche Benutzerhandbuch kann geladen werden von:
http://www.grandstream.com/support
24
IT
GXP1100/1105 non è preconfigurato per supportare
o effettuare chiamate di emergenza a qualsiasi tipo
di ospedale, struttura giudiziaria, unità di assistenza
medica (“Servizi di emergenza”) o a qualsiasi altro tipo
di servizio di emergenza. È necessario effettuare accordi supplementari per accedere ai Servizi di emergenza. È a Vostra esclusiva responsabilità acquistare
servizi di telefonia internet conformi con SIP, configurare GXP1100/1105 correttamente per usare tale servizio ed effettuare test periodici della configurazione
per assicurarsi che funzioni in modo idoneo. Se non si
effettua ciò, è Vostra responsabilità acquistare servizi
telefonici fissi o wireless tradizionali per accedere ai
Servizi di emergenza.
GRANDSTREAM NON FORNISCE COLLEGAMENTI AI SERVIZI DI EMERGENZA ATTRAVERSO
GXP1100/1105. NÈ GRANSTREAM NÈ I SUOI RESPONSABILI, DIPENDENTI O AFFILIATI POSSONO
ESSERE RITENUTI RESPONSABILI DI QUALSIASI
RECLAMO, DANNO O PERDITA , E DI QUALSIASI AZIONE LEGALE DERIVI DA TALI RECLAMI O
CAUSE IN RELAZIONE ALL’IMPOSSIBILITÀ DI USARE IL GXP1100/1105 PER CHIAMATE AI SERVIZI
DI EMERGENZA E ALL’IMPOSSIBILITÀ DI EFFETTUARE ACCORDI SUPPLEMENTARI PER ACCEDERE AI SERVIZI DI EMERGENZA IN CONFORMITÀ AL PARAGRAFO PRECEDENTE.
25
PRECAUZIONI:
AVVERTENZA: NON
spegnere/accendere il GXP1100/1105 mentre i LED
lampeggiano durante l’avvio del sistema o l’aggiornamento del firmware. Ciò
potrebbe comportare il danneggiamento del firmware e il malfunzionamento
dell’unità.
AVVERTENZA: Usare solo l’alimentatore incluso nella confezione del
GXP1100/1105. L’uso di un alimentatore alternativo non idoneo potrebbe danneggiare l’unità.
PANORAMICA:
Il GXP1100/1105 è un telefono IP della nuova generazione per le piccole imprese
che fornisce fino a 2 linee con 1 account SIP, 4 tasti programmabili, porta single
network e PoE integrato (solo per il GXP1105). Il GXP1100/1105 offre potenzialità
audio HD di qualità superiore, un gran numero di caratteristiche all’avanguardia,
auto-provisioning per agevolare la gestione, protezione di sicurezza di livello avanzato per la privacy e vasta interoperabilità con la maggior parte dei dispositivi SIP di
terzi e delle principali piattaforme SIP/NGN/IMS. Si tratta di un’opportunità perfetta
per le piccole imprese, le reception degli uffici o gli hotel che cercano un’alta qualità e un telefono IP dotato delle funzioni di base a un prezzo molto interessante.
CONTENUTO DELLA CONFEZIONE:
1 X Case Principale Telefono
1 X Cavo Ethernet
1 X Guida Quick Start
1 X Ricevitore
1 X Cavo Telefonico
1 X Alimentatore 5V
(solo per il GXP1100)
1 X Supporto Telefono
26
Installazione del telefono (supporto telefono):
MONTAGGIO TELEFONO:
Per installare il telefono sul tavolo con il supporto telefono, fissare il supporto alla
base del telefono dove si trova un alloggiamento per tale supporto.
CONNESSIONE DEL TELEFONO:
Fare riferimento all’illustrazione riportata di seguito quando si seguono le istruzioni di installazione.
Spazio per collocare
il telefono in piedi,
nel caso in cui lo si
tenga sul tavolo
Sono disponibili
fori per il fissaggio
a muro
Installazione del telefono (montaggio a parete):
Porta ricevitore
Porta LAN
1. Fissare il telefono sul muro grazie al foro per il fissaggio.
Per impostare il GXP1100/1105, seguire la seguente procedura:
2. Estrarre l’aletta dal ricevitore (Si veda la figura di seguito).
1. Collegare il ricevitore e il case principale del telefono con il cavo telefonico.
3. Ruotare l’aletta e riposizionarla nell’alloggiamento con l’estensione verso l’alto
in modo da poter sostenere il ricevitore mentre il telefono è montato a parete (Si
veda la figura in basso).
2. Collegare la porta LAN del telefono alla presa RJ-45 di un hub o di un router
(lato LAN del router) usando un cavo ethernet.
Hörergabel
3. Collegare il jack dell’alimentatore all’uscita 5V CC sul telefono; collegare
l’alimentatore a una presa elettrica.
Stecker mit Ansatzstück auf
4. Il LED collocato nell’angolo in alto a destra s’illumina di rosso durante le procedure di avvio/provisioning/aggiornamento. Attendere la fine del processo e lo
spegnimento del LED prima di continuare.
Stecker mit Ansatzstück runter
27
Alimentazione
5. Sollevare il ricevitore: sarà possibile sentire il segnale di “libero”. Premere “***”
per utilizzare il menu IVR e inserire le opzioni del menu per ascoltare il messaggio vocale corrispondente. Per esempio, digitare “02” nel menu IVR per ascoltare
l’indirizzo IP. Si può procedere con la configurazione del telefono utilizzando la GUI
(interfaccia grafica) in rete, dopo aver immesso l’indirizzo IP del GXP1100/1105
nel browser del computer.
28
Consigli per l’uso della tastiera:
Messaggio Indicatore in Attesa
Agganciare
Flash
Tasti Funzione
Messaggio
Trasferimento
Tastierino
Standard
Mute
Ricomposizione Numero
Volume
Come configurare il GXP1100/1105 utilizzando la tastiera:
1. Assicurarsi che il telefono sia inattivo.
CONFIGURAZIONE DEL TELEFONO:
2. Sollevare il ricevitore: sarà possibile sentire il segnale di “libero”. Premere “***”
per accedere al MENU IVR.
Configurazione del GXP1100/1105 mediante un browser web:
3. Nel MENU IVR, comporre “01” per configurare la modalità DHCP, IP Statico o
PPPoE. Premere “9” per attivare la selezione. Premere “*” per l’opzione successiva del menu. Premere “#” per tornare al menu principale. Per i dettagli, verificare
il Manuale d’Uso del GXP1100/1105.
1. Assicurarsi che il telefono sia in corrente e collegato a internet.
2. Sollevare il ricevitore: sarà possibile sentire il segnale di “libero”. Premere “***”
per accedere al MENU IVR.
3. Nel MENU IVR, comporre “02” e verrà annunciato l’indirizzo IP del telefono.
4. Contattare il vostro ITSP (fornitore servizi di telefonia internet) per le impostazioni supplementari che possono essere necessarie per la configurazione del telefono.
4. Digitare l’indirizzo IP del telefono nel browser del vostro PC (Si veda la figura
a destra).
5. La password predefinita per l’amministratore è “admin”; la password predefinita per l’utente finale è “123”.
Nota: Scaricare il manuale utente dettagliato da:
http://www.grandstream.com/support
29
30
ES
PRECAUCIONES:
El GXP1100/1105 no está pre-configurado para soportar o realizar llamadas de emergencia a ningún
tipo de hospital, agencia policial, unidad de cuidado
medico o cualquier otro servicio de emergencia. Es
su responsabilidad contratar un servicio de telefonía
de Internet compatible con el protocolo SIP, configurar
el GXP1100/1105 para utilizar dicho servicio y periódicamente probar esta configuración para confirmar
que esté trabajando como usted espera. Sin este requisito, es su responsabilidad contratar un servicio de
telefonía fija o celular para tener acceso a servicios de
emergencia.
GRANDSTREAM NO PROVEE CONEXIONES A
SERVICIOS DE EMERGENCIA A TRAVÉS DEL
GXP1100/1105. NI GRANDSTREAM NI NINGUNO
DE SUS OFICIALES, EMPLEADOS O AFILIADOS
SON RESPONSABLES DE NINGUNA DEMANDA,
DAÑO O PERDIDA QUE ESTO PUEDA OCASIONAR
Y MEDIANTE ESTE COMUNICADO USTED RENUNCIA A CUALQUIER RECLAMO O CONSECUENCIA
PROVENIENTE O RELACIONADO DE LA INHABILIDAD DE CONTACTAR SERVICIOS DE EMERGENCIAS CON EL GXP1100/1105 Y SU FALTA DE NO
HABER HECHO LOS ARREGLOS DE LUGAR PARA
ACCESAR ESTOS SERVICIOS DE EMERGENCIA
DE ACUERDO CON EL PÁRRAFO ANTERIOR.
31
ADVERTENCIA: No apague el GXP1100/1105 cuando las luces indicadoras
se encuentren en estado intermitente al momento de iniciar el equipo o actualizar
el firmware. Esto podría ocasionar que la unidad no continúe funcionando correctamente.
ADVERTENCIA: Solamente utilice la fuente de poder incluida en el paquete
del GXP1100/1105. Utilizar un adaptador de poder alternativo no certificado podría
dañar su unidad.
INFORMACIÓN GENERAL:
GXP1100/1105 es la próxima generación de teléfono IP para pequeñas empresas,
el cual ofrece 2 líneas de llamadas con 1 cuenta SIP, 4 teclas programables, un
puerto de red, PoE integrado (GXP1105 solamente). El GXP1100/1105 ofrece calidad superior de audio en Alta Definición, rico en características y a la vanguardia
en telefonía IP, aprovisionamiento automatizado para facilitar su implementación,
avanzada protección y seguridad, y una amplia interoperabilidad con la mayoría
de los dispositivos SIP y plataformas líderes SIP/ NGN/IMS. Es la opción perfecta
para aplicaciones en pequeñas empresas, recepciones u hoteles que buscan de
una alta calidad, en un teléfono IP básico a un costo atractivo.
LO QUE CONTIENE EL PAQUETE:
1 X Base Principal
1 X Cable de Red
1 X Guía Rápida de Inicio
1 X Auricular
1 X Adaptador de Alimentación de 5V
(GXP1100 solamente)
1 X Cable Telefónico
1 X Soporte de Teléfono
32
Instalando El Teléfono (Soporte de Teléfono) :
Adaptando el Teléfono:
Para instalar el teléfono sobre el escritorio con el soporte de teléfono, fijar el teléfono con la parte inferior, donde hay una ranura para el soporte del teléfono.
conectando el Teléfono:
Haga referencia a la figura de mas abajo al seguir las instrucciones.
Ranura para el Soporte del
teléfono, en caso de
colocar
el teléfono sobre la
mesa
Los Orificios de
Montaje
en Pared están disponibles
Instalando El Teléfono (Montura de Pared):
1. Fije el teléfono a la pared a través del orificio de Montaje en Pared.
2. Remover la Lengüeta del Auricular (Véase la Figura a continuación).
3. Gire la lengüeta y vuelva a conectarlo en la ranura con la extensión hasta
sostener el auricular cuando el teléfono está montado en la pared (Ver la Figura
a continuación).
Soporte de Auricular
Lengüeta con extensión
hacia arriba
Lengüeta con extensión
hacia abajo
33
Poder Puerto de receptor de
cabeza
Puerto LAN
Para configurar el GXP1100/1105, siga los siguientes pasos:
1. Conecte el auricular y la base principal con el cable de teléfono.
2. Conecte el puerto LAN del teléfono a la toma RJ-45 de un hub/switch o un
router (del lado LAN del router) mediante El cable de Red.
3. Conecte el enchufe de 5V DC de salida a la toma de poder en el teléfono, enchufe el adaptador de alimentación a una toma de corriente eléctrica.
4. El LED en la esquina superior derecha se iluminará en Rojo durante el Reinicio/
Aprovisionamiento/Proceso de Actualización. Antes de continuar, por favor espere
a que el proceso se termine y el LED se apagará.
5. Levante el auricular y el tono de marcado será escuchado. Presione “***” para
escuchar el menú IVR y acceder a las opciones del menú para escuchar las
mandatos del sistema. Por ejemplo, marque “02” en el menú IVR y escuchará
la dirección IP. Además, usted puede configurar el teléfono utilizando la interfaz
web introduciendo la dirección IP de su GXP1100/1105 en el navegador web del
Computador.
34
Sugerencias para cofigurar por Teclado:
Indicador de Mensaje en
Espera
Retener
Flash
Teclas Programables
Mensaje
Transferencia
Teclado
Estándar
Silencio
Remarcar
Volumen
CONFIGURACIÓN DEL TELÉFONO:
Configurando el GXP1100/1105 usando su navegador de
Internet:
1. Asegúrese de que su teléfono está encendido y conectado a Internet.
Configurar el GXP1100/1105 usando el teclado:
1. Asegúrese de que el teléfono esté en estado inactivo.
2. Levante el auricular y el tono de marcado será escuchado. Presione “***” para
acceder al menú del IVR.
3. En el menú IVR, marque “01” para configurar DHCP, IP estática, o el modo PPPoE. Pulse “9” para cambiar la selección. Presione “*” Para la siguiente opción del
menú. Presione “#” para volver al menú principal. Para más detalles, consulte el
Manual del Usuario GXP1100/1105.
4. Por favor contacte a su PSI (Proveedor de Servicio de Internet) para los ajustes
adicionales que sean necesarios para configurar el teléfono.
2. Levante el auricular y el tono de marcado será escuchado. Presione “***”
para acceder al menú del IVR.
3. En el menú IVR, marque “02” y la dirección IP del teléfono será anunciada.
4. Escriba la dirección IP del teléfono en el navegador de su PC (Véase la figura
a la derecha).
5. La contraseña de administrador por defecto es “admin”; la contraseña por
defecto para el usuario final es “123 “.
35
Nota: Para obtener el manual de usuario, favor haga click aquí:
http://www.grandstream.com/support
36