1
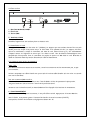
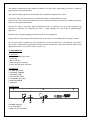
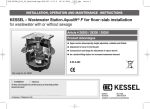
C 516
Console DMX 512 – 16 canaux
MANUEL D'UTILISATION
1. ATTENTION
Gardez cet appareil dans un endroit sec et ventilé, à l’abri de l’humidité. Débranchez le cordon
d'alimentation avant d'ouvrir le capot.
Pour votre sécurité, veuillez lire ce manuel attentivement avant toute utilisation.
2. INSTRUCTIONS DE SÉCURITÉ
Afin d'assurer un fonctionnement optimal de cet appareil, il est absolument nécessaire de suivre les
consignes de sécurité de ce manuel.
IMPORTANT:
Les dégâts causés par le non respect des consignes ne sont pas inclus dans la garantie. Le revendeur ne
les prendra pas en charge.
Tenir à l'écart des radiateurs et autres sources de chaleur.
Si l'appareil a été exposé à des fluctuations de température importantes (par exemple pendant le
transport), ne pas le brancher immédiatement. La condensation pourrait endommager votre appareil.
Laissez le hors tension jusqu'à ce qu'il ait atteint une température ambiante.
Cet appareil relève de la protection de classe III, il doit toujours être utilisé avec un transformateur.
Toujours débrancher l'alimentation, lorsque l'appareil n'est pas en cours d'utilisation ou avant de le
nettoyer.
Veuillez noter que les dommages manuels causés par des modifications sur l'appareil ou l'exploitation
non autorisée par des personnes non qualifiées ne sont pas soumis à la garantie.
Tenir l'appareil à l'écart des enfants.
Les opérations d'entretien et de service ne doivent être effectuées que par des distributeurs agréés.
3. FONCTIONNEMENT DE L'APPAREIL
Cet appareil est un contrôleur DMX pour les jeux de lumière, etc
Ce produit est conçu pour une utilisation sous tension de 12 - 20V DC, 500mA et pour une utilisation à
l'intérieur seulement.
Ne pas secouer ni forcer sur l'appareil.
Lors de l'installation, vérifiez que l'appareil n'est pas exposé à une trop forte chaleur, à l'humidité ou
à la poussière. Pour votre sécurité, il ne devrait pas être utilisé avec des rallonges.
Cet appareil ne doit jamais être stocké ou exposé à des éclaboussures, à l'eau, la pluie, l'humidité qui
peuvent endommager l'appareil. Une très forte humidité peut réduire l'isolation et conduire à des
chocs électriques mortels. Lors de l'utilisation de machines à fumée, assurez-vous que le périphérique
n'est jamais exposé au jet direct de fumée, et est installé à une distance de 0,5 mètres de la machine
à fumée.
La fourchette de température de fonctionnement autorisée est entre -5°C et
d'humidité ne doit pas dépasser 50% pour une température ambiante de 45 ° C.
45 °C). Le taux
Ne jamais utiliser l'appareil en cas d'orages : toujours le débrancher. Une sur-tension pourrait
détruire l'appareil.
Faire fonctionner l'appareil uniquement après vous être familiarisé avec ses fonctions. Il est vivement
conseillé de ne faire manipuler l'appareil que par des personnes qualifiées. La plupart des dommages
sont le résultat d'une manipulation incorrecte!
Veuillez utiliser l'emballage d'origine si l'appareil doit être transporté.
Veuillez noter que les modifications non autorisées de l'appareil sont interdites pour des raisons de
sécurité!
Si cet appareil est utilisé d'une manière différente que celle décrite dans ce manuel, le produit peut
subir des dommages. Dans ce cas, la garantie devient caduque. En outre, toute autre manipulation peut
conduire à des dangers tels que des court-circuits, brûlures, chocs électriques, etc
4. DESCRIPTION
4.1. Caractéristiques
- 16 canaux DMX avec fader linéaire
- Rackage 19 "
- Contrôle Maître
- Boutons flash par canal
- Fonction full on (plein feu) et Stand by
4.2. Vue d’ensemble
1.
2.
3.
4.
5.
6.
7.
BOUTONS FLASH
FADER DES CANAUX
LED DES CANAUX
BOUTON PLEIN FEU
BOUTON VEILLE
FADER MASTER / Règle la puissance générale
AFFICHEUR
4.3 Face arrière
1
2
1. BOUTON MARCHE/ARRET
2. Entrée DC
3. Sortie DMX
3
5. INSTALLATION
Installez l'appareil sur une surface plane ou dans un rack.
5.1. Installation en rack
Cet appareil est conçu pour des racks 19 " (483mm). Le support que vous utilisez devrait être un rack
double porte sur lequel vous pouvez ouvrir la face avant et le panneau arrière. Le support doit être
muni d'un ventilateur. Lorsque le contrôleur est dans le rack, assurez-vous qu'il y ait suffisamment
d'espace autour de l'appareil de sorte que l'air chaud circule. Une surchauffe endommagera votre
périphérique. Vous pouvez fixer le contrôleur au moyen de quatre vis M6 dans le rack. Branchez le
câble de connexion dans la prise DC. Branchez le câble d'alimentation.
5.2. Connexion avec un bloc de puissance
DMX - 512:
Les câbles ne doivent en aucun cas se toucher, sinon les accessoires ne fonctionneraient pas, ou pas
correctement.
Utiliser uniquement un câble blindé avec prise XLR 3 broches mâle/femelle afin de relier vos unités
avec votre contrôleur.
Pour une connexion DMX en série:
Connectez la sortie DMX du contrôleur avec l'entrée DMX du bloc de puissance le plus proche.
Toujours connecter une sortie avec l'entrée de la prochaine unité.
Attention: Sur la dernière unité, la chaine DMX doit être équipée d'un bouchon de terminaison.
6. FONCTIONNEMENT
Après avoir branché l'appareil au secteur, il est prêt à être utilisé. Appuyez sur le bouton Marche.
Avec le fader, vous pouvez ajuster l'intensité de lumière de tous les canaux (0-100%).
Vous pouvez accéder directement au réglage des canaux de 1-16.
7. RESOLUTION DES PROBLEMES
Problème
Cause
Solution
Hors tension
L'alimentation n'est pas
connectée.
Mode veille activé.
Tester le câble de connexion de l'alimentation, et
toutes les rallonges.
Eteignez la veille (bouton).
Pas de signal en
sortie
8. NETTOYAGE ET ENTRETIEN
Déconnecter l'appareil du secteur avant de commencer toute opération de maintenance!
Nous recommandons un nettoyage fréquent de l'appareil. Veuillez utiliser un chiffon doux non
pelucheux et humide. Ne jamais utiliser d'alcool ou de solvants!
Les opérations de services et d'entretien ne sont à effectuer que par des revendeurs agréés.
Si vous avez besoin de pièces détachées, utilisez des pièces d'origine.
Pour toutes questions, veuillez contacter votre revendeur
9. SPECIFICATIONS TECHNIQUES
Alimentation
Consommation
Nombre de canaux:
Sortie DMX 512 :
Dimensions(LxlxH)
Rack
Profondeur minimum
Poids:
230V AC,50Hz˜
Via 12-20V DC,500mA Alimentation incluse
6W
16
Connecteur XLR 3 broches avec sélecteur de polarité
483X132X80mm
19" 3 unités
170mm
2.8 kgs
Toutes les informations sont sujettes à modification sans préavis.
C 516
DMX 512 controller – 16 channels
USER MANUAL
1. CAUTION
Keep this device away from rain and moisture! Unplug mains lead before opening the housing.
For your own safety, please read this user manual carefully before using the fixture.
- follow the instructions of this manual
- consider this manual to be part of the total produce
- keep this manual for the entire service life of the product
- pass this manual on to every further owner or user of the product
2. SAFETY INSTRUCTIONS
This device has left our premises in absolutely perfect condition. In order to maintain this condition
and to ensure a safe operation, it is absolutely necessary for the user to follow the safety instructions
and warning notes written in this user manual.
IMPORTANT:
Damages caused by the disregard of this user manual are not subject to warranty.
The dealer will not accept liability for any resulting defects or problems.
Always plug in the power unit least.
Keep away from heaters and other heating sources!
If the device has been exposed to drastic temperature fluctuation(e.g. after transportation), do not
switch it on immediately. The arising condensation water might damage your device. Leave the switched
off until it has reached room temperature.
This device falls under protection-class III. The device always has to be operated with an appropriate
transformer.
Always disconnect from the mains, when the device is not in use or before cleaning it.
Please note that damages caused by manual modifications on the device or unauthorized operation by
unqualified persons are not subject to warranty.
Keep away children and amateurs from the device!
There are no serviceable parts inside the device. Maintenance and service operations are only to be
carried out by authorized dealers.
3. OPERATION
This device is a DMX-controller for controlling DMX-effects or spots in discotheques, on stages etc.
This product is allowed to be operated with a direct voltage of DC 12-20V,500mA and was designed
for indoor use only.
Do not shake the device. Avoid brute force when installing or operating the device.
When choosing the installation-spot, please make sure that the device is not exposed to extreme heat,
moisture or dust. There should not be any cables lying around, you endanger your own and the safety
of others!
This device must never be operated or stockpiled in surroundings where splash water, rain, moisture or
fog may harm the device. Moisture or very high humidity can reduce the insulation and lead to mortal
electrical shocks. When using smoke machines, make sure that the device is never exposed to the
direct smoke jet and is installed in a distance of 0.5 meters between smoke machine and device. The
room must only be saturated with an amount of smoke that the visibility will always be more than 10
meters.
The ambient temperature must always be between -5°C and +45°C. Keep away from direct insulation
(particularly in cars) and heaters.
The relative humidity must not exceed 50% with an ambient temperature of 45°C.
This device must only be operated in an altitude between -20 and 2000m over NN.
Never use the device during thunderstorms. Over voltage could destroy the device. Always disconnect
the device during thunderstorms.
Operate the device only after having familiarized with its functions. Do not permit operation by
persons not qualified for operating the device. Most damages are the result of unprofessional
operation!
Please use the original packaging if the device has to be transported.
Please consider that unauthorized modifications on the device are forbidden due to safety reasons!
If this device will be operated in any way different to the one described in this manual, the product
may suffer damages and the guarantee becomes invalid. Furthermore, any other operation may lead to
dangers like short-circuit, burns, electric shock, etc.
4. DESCRIPTION
4.1. Features
- 16-channel DMX-fader desk
- 19”housing
- Master-control
- Flash-buttons per channel
- Full On and Stand By functions
4.2. Overview
1. FLASH-BUTTONS
2. CHANNEL FADERS
3. CHANNEL-LEDs
4. FULL ON-BUTTON
5. STAND BY-BUTTON
6. MASTER FADER
7. DISPLAY
4.3. Real panel
1
1.POWER SWITCH
2. DC IN SOCKET
3. DMX OUTPUT SOCKET
2
3
.
5. SETUP
Install the device on a plane surface or install it in rack.
5.1. Installation in a rack
This device is built for 19”racks (483mm).The rack you use should be a Double-Door-Rack where you
can open the front panel and the rear panel. The rack should be provided with a cooling fan. When
mounting the controller into the rack, please make sure that there is enough space around the device
so that the heated air can be passed on. Steady overheating will damage your device. You can fix the
controller with four screws M6 in the rack. Connect the connection cable of the power-unit with the
DC IN-socket. Plug the power unit into your outlet.
5.2. Connection with the dimmer packs
DMX-512:
The wires must not come into contact with each other, otherwise the fixtures will not work at all, or
will not work properly.
Only use a stereo shielded cable and 3-pin XLR-plugs and connectors in order to connect the controller
with the fixture or one fixture with another.
For a serial DMX-chain:
Connect the DMX-output of the fixture with the DMX-input of the nearest dimmer pack. Always
connect one output with the input of the next fixture unit all fixtures are connected.
Caution: On the last fixture, the DMX-cable has to be terminated with a terminator solder.
6. OPERATION
After you connected the device to the mains, the fixture is ready for use. Switch the device on via the
Power-switch.
With the master fader, you can adjust the total light output of all channels (0-100%).
You can dim the individual channel via the channel-faders 1-16.
7. PROBLEM CHART
Problem
No power.
Cause
The power unit is not connected.
No signal output.
Stand by-mode activated.
Remedy
Check the connection cable of the
Power unit and any extension-cables.
Switch off blackout by pressing the
Black out button.
8. CLEANING AND MAINTENANCE
Disconnect from mains before starting maintenance operation!
We recommend a frequent cleaning of the device. Please use a soft lint-free and moistened cloth.
Never use alcohol or solvents!
There are no serviceable parts inside the device. Maintenance and service operations are only to be
carried out by authorized dealers.
Should you need any spare parts, please use genuine parts.
Should you have further questions, please contact your dealer.
9. THECHNICAL SPECIFICATIONS
Power supply:
230V AC,50Hz˜
Via 12-20V DC,500mA power unit included in the delivery
Power consumption:
6W
Number of control-channels: 16
DMX 512-output:
3-pin XLR-connector with polarity selector
Dimensions (LxWxH)
483X132X80mm
19”mounting dimensions with 3u
Minimum mounting deepth:
170mm
Weight:
2.8kg
Please note: Every information is subject to change without prior notice.10.23.2007