1
INSTRUCTIONS FOR OVERHAUL
1.
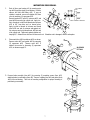
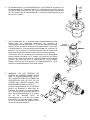
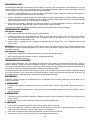
AIR CYLINDER
Drain oil from gear housing #9 by removing pipe
36
ROD
23
29
cap #43 from pipe nipple in end bearing. Remove
42
3/8
reducer #41 and relief fitting #35. If new air
9
cylinder is required, remove air cylinder #30 from
cover by removing (4) capscrews #23.
27
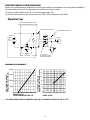
Remove washer #25, nut #26, setscrew #22, and
34
APPLY LOC-TITE TO SETSCREW
insert #28 from end of air cylinder rod. Apply Loc23
tite to threads of nut #26 and thread onto setscrew
31
24
#22 to 3/8” from drive end, as shown below.
Apply Loc-tite to threads of setscrew and thread
3
26
27
44
insert #28 over end of setscrew and against nut.
Use setscrew and nut to thread insert #28 into end
29 37
of air cylinder rod. Tighten nut against cylinder rod,
keeping 3/8” distance from drive end of setscrew to nut. If breather vent is damaged, remove and replace.
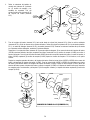
2.
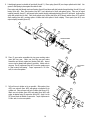
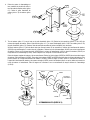
Disconnect tube #46 from elbows #29, as shown.
Remove motor #37 and gasket #32 by removing
(2) capscrews #20. Remove valve #47, if
needed, from motor by loosening (3) capscrews
#19, as shown on page 13.
38
47
19
BLEEDER
FITTING
19
48
33
30
30
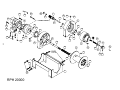
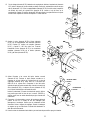
3. Remove brake assembly (item #31) by removing (2) mounting screws (item #21)
attaching brake to end bearing (item #8). Remove coupling (item #5) and gasket (item
#34) from end bearing. Take note of mounting configuration for proper mounting of
parts during re-assembly.
20
32
10
5
35
8
7