1
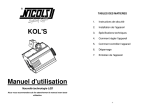
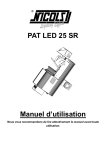
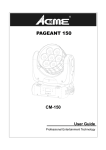
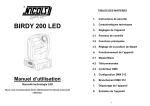
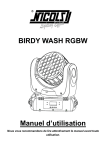
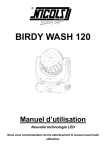
BIRDY 250 LED Manuel d’utilisation Nouvelle technologie LED Nous vous recommandons de lire attentivement le manuel avant toute utilisation. TABLES DES MATIERES 1. Instructions de sécurité 2. Caractéristiques techniques 3. Réglages de l’appareil 3.1 Panneau de contrôle 3.2 Fonctions principales 3.3 Réglage position de départ 4. Fonctionnement de l’appareil 4.1 Master/Slave 4.2 Télécommandes 4.3 Contrôleur DMX 5. Configuration DMX 512 6. Branchement DMX 512 7. Dépannage de l’appareil 8. Entretien de l’appareil 1B 1. INTRUCTIONS DE SECURITE Lire attentivement les consignes ci-après. Elles contiennent des informations importantes sur la sécurité de l'installation ainsi que sur l'utilisation et la maintenance de l'équipement. Conservez le présent manuel avec l'équipement pour référence ultérieure. En cas de vente de l'équipement à un autre utilisateur, il est important que le présent manuel soit joint à l'équipement afin que le nouvel utilisateur dispose des informations nécessaires à son utilisation et puisse prendre connaissance des mises en gardes relatives à la sécurité. Lors du déballage de l’appareil, assurez-vous que toutes les pièces sont présentes et que l’appareil n’a pas été endommagé pendant le transport. Assurez-vous que l’alimentation est compatible à la tension locale Il est important de relier le conducteur jaune/vert à la terre afin d’éviter tout choc électrique. L’appareil est destiné à une utilisation en intérieur uniquement et dans un endroit sec. L’appareil doit être utilisé dans une pièce bien ventilée et à au moins 50 cm des murs. Vérifiez que les ouïes de ventilation de l’appareil sont bien dégagées. Débranchez l’appareil du secteur avant le remplacement d’une pièce ou avant toute réparation ou entretien. Par sécurité, assurez-vous qu’aucun produit inflammable ne se trouve à côté de l’appareil lors de l’utilisation. Utilisez des élingues de sécurité pour la fixation de l’appareil. Ne jamais porter l’appareil par la tête mais toujours par la base. La température ambiante ne doit pas excéder 40°C. Ne pas faire fonctionner l’appareil si la température est au dessus de 40°C. La température du boitier peut atteindre 85°C. Ne jamais toucher l’appareil à mains nues pendant son fonctionnement. Attendez 15 minutes avant de remplacer la lampe ou de faire toute autre réparation. Dans le cas de problèmes importants dans le fonctionnement de l’appareil, arrêtez l’appareil immédiatement. Ne jamais essayer de réparer l’appareil par vous-même. Les réparations faites par des personnes non qualifiées peuvent entraîner des dommages importants sur l’appareil. Veuillez contacter votre revendeur. Toujours utiliser des pièces de même type. 2B Ne pas toucher les fils pendant le fonctionnement de l’appareil afin d’éviter tout choc électrique. Ne jamais exposer l’appareil à la pluie ou à l’humidité afin d’éviter tout choc électrique Ne pas ouvrir l’appareil dans les 5 minutes après l’arrêt de l’appareil. Le boîtier, les lentilles ou le filtre UV doivent être remplacés s’ils sont endommagés. Ne pas ouvrir l’appareil, il n’y a pas de pièces détachées. Installation de l’appareil Il est possible de fixer une lyre de fixation en utilisant les emplacements prévus à cet effet (trous des vis) Nous vous recommandons de bien vouloir veiller à ce que l'appareil soit solidement fixé afin que l'appareil ne ressente aucune vibration pendant que celui-ci est en marche. Il ne doit pas glisser. Assurez-vous que la structure sur laquelle est fixé l'appareil est assez solide pour supporter 10 fois le poids de chaque appareil. Nous vous recommandons également d‘ utiliser une élingue de sécurité, celle-ci doit pouvoir supporter 12 fois le poids de l’appareil. L’installation doit être faite par des professionnels. Assurez que votre installation soit hors de portée de toute personne et qu’elle ne gène en aucun cas le passage. 2. CARACTERISTIQUES TECHNIQUES La nouvelle lyre BIRDY 250 LED est la combinaison de la dernière génération de la technologie LED avec un optique de très grande qualité et des caractéristiques techniques incroyables. Mode 15/16 canaux DMX 3 modes de pilotage: DMX, Master/Slave, Mode musical Programmes préenregistrés sous le mode Master/Slave qui sont déclenchés au son de la musique Télécommande en option CA-8 ou CA-9 RTX. Roue de gobos rotatifs avec 7 gobos + blanc Roue de gobos fixes avec 8 gobos + ouverture Roue de couleurs avec 7 couleurs + blanc Pan 540° / Tilt 270° Réglage automatique de la position du PAN/TILT Dimmer 0~100% et vitesse de strobe réglable Prisme rotatif 3 facettes indexable 3B Auto focus Angle :17° Affichage LED pour navigation et réglage adresse DMX facilité Alimentation : 230V 50hz Consommation : 130W Source lumineuse : LED 50W Dimensions : 299 x 247 x 437 mm Gobo rotatif : 22 mm Gobo fixe : 24 mm Poids : 10.2 kg 437 103 361 236 216 259 287 299 247 Système photométrique 4B 3. FONCTIONNEMENT DE L’APPAREIL 3.1 PANNEAU DE CONTROLE Affichage ECRAN : Affiche les menus et les fonctions sélectionnées LED DMX On Signal Entrée DMX MASTER On Mode Master SLAVE On Mode Slave SOUND Clignote Mode musical MENU Pour sélectionner les fonctions DOWN Pour retourner dans les fonctions UP Pour avancer dans les fonctions ENTER Pour confirmer les fonctions sélectionnées Boutons Seulement pour le contrôle avec télécommande : Connectez les télécommandes CA-8, CA-9, CA-9RTX pour contrôler l’appareil avec les boutons Standby, function et mode. Prise alimentation : pour relier l’appareil au secteur Entrée/Sortie DMX: prise XLR 3/5 pin pour relier les appareils entre eux dans une configuration DMX 512 3.2 FONCTIONS PRINCIPALES Pour sélectionner n'importe quelles fonctions de l'appareil, appuyez sur le bouton MENU jusqu'à ce que la fonction souhaitée s'affiche. Appuyez sur le bouton ENTER pour sélectionner la fonction. L'affichage clignote. Utilisez les boutons DOWN et UP pour changer de mode. Une fois que vous avez sélectionnez le mode de votre choix, appuyez sur le bouton ENTER pour enregistrer. Pour retourner aux fonctions sans avoir fait de changement, appuyez sur le bouton MENU de nouveau. Appuyez et maintenez le bouton MENU enfoncé pendant 1 seconde ou attendez 1 minute pour sortir du mode MENU. 5B Veuillez vous référer aux fonctions mentionnées ci-dessous. 6B DMX ADRESS – Le réglage de l’adresse DMX 512 Sélectionnez DMX Address. Appuyez sur le bouton ENTER pour valider. L’adresse s’affiche et clignote. Utilisez les boutons UP et DOWN pour régler l’adresse de 1 à 512. Une fois l'adresse sélectionnée, appuyez sur le bouton ENTER pour la valider. Pour retourner aux fonctions sans avoir fait de changement, appuyez sur le bouton MENU de nouveau. Appuyez et maintenez le bouton MENU enfoncé pendant 1 seconde ou attendez 1 minute pour sortir du mode MENU. CHANNEL MODE – Le mode Canal Sélectionnez Channel Mode. Appuyez sur le bouton ENTER pour valider. Le mode s’affiche et clignote. Utilisez les boutons DOWN et UP pour sélectionner 15 Chan (mode 15 canaux) ou 16 Chan (mode 16 canaux). Une fois votre choix effectué, appuyez sur le bouton ENTER pour enregistrer. Pour retourner aux fonctions sans avoir fait de changement, appuyez sur le bouton MENU de nouveau. Appuyez et maintenez le bouton MENU enfoncé pendant 1 seconde ou attendez 1 minute pour sortir du mode MENU. SHOW MODE – Le Mode Show Sélectionnez Show Mode. Appuyez sur le bouton ENTER pour valider. Le mode s’affiche et clignote. Utilisez les boutons DOWN et UP pour sélectionner Show 1 ou Show 2 ou Show 3 ou Show 4 mode. Une fois le mode choisi, appuyez sur le bouton ENTER pour la valider. Pour retourner aux fonctions sans avoir fait de changement, appuyez sur le bouton MENU de nouveau. Appuyez et maintenez le bouton MENU enfoncé pendant 1 seconde ou attendez 1 minute pour sortir du mode MENU. SPLIT COLOUR Sélectionnez Split Color. Appuyez sur le bouton ENTER pour valider. Le mode s’affiche et clignote. Utilisez les boutons DOWN et UP pour sélectionner Yes (le mode Split Color est activé) ou No (mode normal est activé) normal). Une fois le mode choisi, appuyez sur le bouton ENTER pour la valider. Pour retourner aux fonctions sans avoir fait de changement, appuyez sur le bouton MENU de nouveau. Appuyez et maintenez le bouton MENU enfoncé pendant 1 seconde ou attendez 1 minute pour sortir du mode MENU. SLAVE MODE- Le mode Slave Sélectionnez Slave Mode. Appuyez sur le bouton ENTER pour valider. Le mode s’affiche et clignote. Utilisez les boutons DOWN et UP pour sélectionner Slave 1 (normal) ou Slave 2 (2 light show). Une fois le mode choisi, appuyez sur le bouton ENTER pour la valider. Pour retourner aux fonctions sans avoir fait de changement, appuyez sur le bouton MENU de nouveau. Appuyez et maintenez le bouton MENU enfoncé pendant 1 seconde ou attendez 1 minute pour sortir du mode MENU. 7B BLACKOUT MODE – Le mode Blackout Sélectionnez Slave Mode. Appuyez sur le bouton ENTER pour valider. Le mode s’affiche et clignote. Utilisez les boutons DOWN et UP pour sélectionner Yes (blackout activé) ou No (blackout désactivé). Une fois le mode choisi, appuyez sur le bouton ENTER pour la valider. Pour retourner aux fonctions sans avoir fait de changement, appuyez sur le bouton MENU de nouveau. Appuyez et maintenez le bouton MENU enfoncé pendant 1 seconde ou attendez 1 minute pour sortir du mode MENU. SOUND STATE – Le mode musical Sélectionnez Sound Mode. Appuyez sur le bouton ENTER pour valider. Le mode s’affiche et clignote. Utilisez les boutons DOWN et UP pour sélectionner On (mode musical activé) ou Off (mode musical désactivé). Une fois le mode choisi, appuyez sur le bouton ENTER pour la valider. Pour retourner aux fonctions sans avoir fait de changement, appuyez sur le bouton MENU de nouveau. Appuyez et maintenez le bouton MENU enfoncé pendant 1 seconde ou attendez 1 minute pour sortir du mode MENU. SOUND SENSE – Le mode sensibilité du son Sélectionnez Sound Sense. Appuyez sur le bouton ENTER pour valider. Le mode s’affiche et clignote. Utilisez les boutons DOWN et UP pour sélectionner la valeur de 0 …100. Une fois le mode choisi, appuyez sur le bouton ENTER pour la valider. Pour retourner aux fonctions sans avoir fait de changement, appuyez sur le bouton MENU de nouveau. Appuyez et maintenez le bouton MENU enfoncé pendant 1 seconde ou attendez 1 minute pour sortir du mode MENU. PAN INVERSE – Pan inversé Sélectionnez Pan Inverse. Appuyez sur le bouton ENTER pour valider. Le mode s’affiche et clignote. Utilisez les boutons DOWN et UP pour sélectionner Yes (pan inversé) or No (normal). Une fois le mode choisi, appuyez sur le bouton ENTER pour la valider. Pour retourner aux fonctions sans avoir fait de changement, appuyez sur le bouton MENU de nouveau. Appuyez et maintenez le bouton MENU enfoncé pendant 1 seconde ou attendez 1 minute pour sortir du mode MENU. TILT INVERSE – Tilt inversé Sélectionnez Tilt Inverse, Appuyez sur le bouton ENTER pour valider. Le mode s’affiche et clignote. Utilisez les boutons DOWN et UP pour sélectionner Yes (tilt inversé) ou No(normal) mode. Une fois le mode choisi, appuyez sur le bouton ENTER pour la valider. Pour retourner aux fonctions sans avoir fait de changement, appuyez sur le bouton MENU de nouveau. Appuyez et maintenez le bouton MENU enfoncé pendant 1 seconde ou attendez 8B 1 minute pour sortir du mode MENU. BACK LIGHT Sélectionnez Back light. Appuyez sur le bouton ENTER pour valider. Le mode s’affiche et clignote. Utilisez les boutons DOWN et UP pour sélectionner On (Led on) ou Off (Led off). Une fois le mode choisi, appuyez sur le bouton ENTER pour la valider. Pour retourner aux fonctions sans avoir fait de changement, appuyez sur le bouton MENU de nouveau. Appuyez et maintenez le bouton MENU enfoncé pendant 1 seconde ou attendez 1 minute pour sortir du mode MENU. GOBO1 FOCUS- Le mode ajustement du FOCUS 1 Sélectionnez Gobo1 Focus, Appuyez sur le bouton ENTER pour valider. Le mode s’affiche et clignote. Utilisez les boutons DOWN et UP pour sélectionner la valeur de 0 …255. Une fois le mode choisi, appuyez sur le bouton ENTER pour la valider. Pour retourner aux fonctions sans avoir fait de changement, appuyez sur le bouton MENU de nouveau. Appuyez et maintenez le bouton MENU enfoncé pendant 1 seconde ou attendez 1 minute pour sortir du mode MENU. GOBO2 FOCUS- Le mode ajustement du FOCUS 2 Sélectionnez Gobo2 Focus. Appuyez sur le bouton ENTER pour valider. Le mode s’affiche et clignote. Utilisez les boutons DOWN et UP pour sélectionner la valeur de 0 …255.Une fois le mode choisi, appuyez sur le bouton ENTER pour la valider. Pour retourner aux fonctions sans avoir fait de changement, appuyez sur le bouton MENU de nouveau. Appuyez et maintenez le bouton MENU enfoncé pendant 1 seconde ou attendez 1 minute pour sortir du mode MENU. FUNCTION DELAY Sélectionnez Function Delay. Appuyez sur le bouton ENTER pour valider. Le mode s’affiche et clignote. Utilisez les boutons DOWN et UP pour sélectionner No Delay ou 1S/2S/3S Delay (Attendez 1/2/3 secondes avant que le mode canal 15 et 16 soient activés ou désactivés). Une fois le mode choisi, appuyez sur le bouton ENTER pour la valider. Pour retourner aux fonctions sans avoir fait de changement, appuyez sur le bouton MENU de nouveau. Appuyez et maintenez le bouton MENU enfoncé pendant 1 seconde ou attendez 1 minute pour sortir du mode MENU. DIMMER CALIBRATE – Calibrage du dimmer Sélectionnez MENU afin que Dimmer Calibrate s’affiche. Appuyez sur le bouton ENTER L’affichage clignote. Utilisez les boutons DOWN et UP pour calibrer le dimmer : de 50 (limité à 50% de la sortie max réelle) à 100 (sortie max n’est pas limitée). Une fois votre choix 9B effectué, appuyez sur le bouton ENTER pour valider. Pour retourner aux fonctions sans avoir fait de changement, appuyez sur le bouton MENU de nouveau. Appuyez et maintenez le bouton MENU enfoncé pendant 1 seconde ou attendez 1 minute pour sortir du mode MENU. AUTO TEST – Le mode test automatique Appuyez sur le bouton MENU jusqu’à ce que Auto-Test s’affiche et clignote. Appuyez sur le bouton ENTER. L'affichage indique que l'appareil se met en mode test grâce au programme pré-enregistré. Pour retourner aux fonctions sans avoir fait de changement, appuyez sur le bouton MENU de nouveau. Appuyez et maintenez le bouton MENU enfoncé pendant 1 seconde ou attendez 1 minute pour sortir du mode MENU. TEMPERATURE - Le mode test de la température Appuyez sur le bouton MENU jusqu’à ce que Temperature Test s’affiche et clignote Appuyez sur le bouton ENTER L’appareil affiche la température de l’appareil. Pour retourner aux fonctions sans avoir fait de changement, appuyez sur le bouton MENU de nouveau. Appuyez et maintenez le bouton MENU enfoncé pendant 1 seconde ou attendez 1 minute pour sortir du mode MENU. FIXTURE TIME Appuyez sur le bouton MENU jusqu'à ce que Fixture Time s'affiche et clignote. Appuyez sur le bouton ENTER. L'affichage indique le nombre d'heures de fonctionnement de l'appareil. Pour retourner aux fonctions sans avoir fait de changement, appuyez sur le bouton MENU de nouveau. Appuyez et maintenez le bouton MENU enfoncé pendant 1 seconde ou attendez 1 minute pour sortir du mode MENU. FIRMWARE Version - La version du firmware Appuyez sur le bouton MENU jusqu'à ce que Firmware version s'affiche et clignote. Appuyez sur le bouton ENTER. L'affichage indique le numéro de la version utilisée par l'appareil. Pour retourner aux fonctions sans avoir fait de changement, appuyez sur le bouton MENU de nouveau. Appuyez et maintenez le bouton MENU enfoncé pendant 1 seconde ou attendez 1 minute pour sortir du mode MENU. DEFAULTS SETTING Appuyez sur le bouton MENU jusqu'à ce que Defaults s’affiche. Appuyez sur le bouton ENTER. L’affichage clignote. Utilisez les boutons DOWN et UP pour sélectionner Confirm? YES ou Confirm? No. Une fois que Confirm? Yes a été choisi, appuyez sur le bouton ENTER et utilisez les boutons UP et Down pour choisir PRO Def ou AUTO Def. 10B PRO Defaults (PRO Def) : Pour utilisateurs professionnels Channel Mode 16 Chan Split Color Mode Yes Slave Mode Slave 1 Black Out Yes Sound State Off Sound Sense 90 Pan Inverse No Tilt Inverse No Back Light Off Function Delay 3S Delay AUTO Defaults (AUTO Def) : Pour utilisateurs non professionnels, Channel Mode 15 Chan Split Color Mode No Slave Mode Slave 1 Black Out No Sound State On Sound Sense 90 Pan Inverse No Tilt Inverse No Back Light On Function Delay 3S Delay Remarque : D’autres paramètres ne sont PAS changés alors que vous avez choisi Defaults Setting!) Appuyez sur le bouton ENTER et les fonctions correspondantes vont se régler sur defaults setting. Pour retourner aux fonctions sans avoir fait de changement, appuyez sur le bouton MENU de nouveau. Appuyez et maintenez le bouton MENU enfoncé pendant 1 seconde ou attendez 1 minute pour sortir du mode MENU. RESET - Le mode Reset Appuyez sur le bouton MENU jusqu'à ce que Reset s'affiche et clignote. Appuyez sur le bouton ENTER. Tous les canaux de l’appareil se réinitialisent dans leur position de départ. Pour retourner aux fonctions sans avoir fait de changement, appuyez sur le bouton MENU de nouveau. Appuyez et maintenez le bouton MENU enfoncé pendant 1 seconde ou 11B attendez 1 minute pour sortir du mode MENU. 3.3 REGLAGE DE LA POSITION DE DEPART Dans le menu des fonctions principales, maintenez enfoncé le bouton ENTER pendant au moins 3 secondes pour entrer dans le menu secondaire. Utilisez les boutons DOWN et UP pour choisir Pan Offset, Tilt Offset , Color Offset, Gobo1 Offset, R-Gobo Offset, Gobo2 Offset, Prism Offset, R-Prism Offset ou Focus Offset. Appuyez sur le bouton ENTER. L’affichage clignote. Utilisez les boutons DOWN et UP pour ajuster la position de départ du PAN, du TILT, de la COULEUR, du GOBO, la rotation du GOBO, du PRISME ou la rotation du PRISME. Une fois le mode sélectionné, appuyez sur ENTER pour valider. Pour retourner aux fonctions sans avoir fait de changement, appuyez sur le bouton MENU de nouveau. Appuyez et maintenez le bouton MENU enfoncé pendant 1 seconde ou attendez 1 minute pour sortir du mode MENU. 4. FONCTIONNEMENT DE L’APPAREIL L'appareil peut fonctionner de trois manières différentes : en mode Master/Slave, accompagné du contrôleur CA-8 ou d’un contrôleur DMX universel. Il n’est pas nécessaire d’éteindre l’appareil pour changer l’adresse DMX, la nouvelle adresse DMX prendra effet immédiatement. A chaque fois que vous allumez l’appareil, ‘’LED-MS50’’ s’affiche et les moteurs se mettent en position de départ. Vous allez entendre du bruit pendant 20 secondes. Ensuite, l’appareil est prêt à recevoir un signal DMX et à activer les programmes préenregistrés. 12B 4.1 MASTER/SLAVE En configuration MASTER/SLAVE, en reliant toutes les unités, le premier appareil de la chaîne va contrôler les autres appareils en déclenchant un effet de lumière au son de la musique. Cette fonction est intéressante dès lors où vous voulez réaliser une démonstration instantanée. Vous devez configurer le 1 er appareil en mode master Show Mode et sélectionner show 1, show 2, show 3 ou show 4. L’entrée DMX de l’appareil ne sera raccordée à rien d’autre. La LED master restera allumée et la LED son se déclenchera au son de la musique. Les autres unités devront être configurées en mode slave, Slave 1 (normal) ou Slave 2 (2 light show). Leurs câbles DMX devront être reliés à la prise jack. La LED sera allumée en continu. 2-light show En mode Slave, Slave1 signifie que l’appareil fonctionne normalement alors que Slave 2 signifie qu'il y a 2 light show. Afin de créer une démonstration plus importante, vous pouvez sélectionner Slave 2 sur le deuxième appareil pour avoir un effet de mouvements plus contrasté, même si vous n’utilisez que 2 appareils. 4.2 TELECOMMANDE Vous pouvez utiliser la télécommande CA-8 seulement en mode MASTER/SLAVE. En reliant le câble de la télécommande à l’entrée DMX du premier appareil, vous contrôlez toutes les autres unités et par conséquent toutes les fonctions et les modes de ces mêmes unités. Stand By Blackout de l’appareil Function 1. Strobe synchronisé 2. Strobe désynchronisé Show 1. Appuyez pour sélectionner la 1-4 couleur 3. Strobe musical 2. Maintenez enfoncé pour sélectionner le gobo Mode Musical (LED éteinte) Show (La LED clignote lentement) 13B LED allumée 4.3 CONTROLEUR DMX Si vous utilisez un contrôleur DMX universel pour contrôler les unités, vous devez régler l'adresse DMX de 1 à 512 pour que les unités puissent recevoir le signal DMX. Appuyez sur le bouton MENU jusqu'à ce que DMX ADRESS s'affiche. Appuyez sur le bouton ENTER. L'affichage clignote. Utilisez les boutons DOWN et UP pour changer l'adresse DMX 512. Une fois l'adresse sélectionnée, appuyez sur le bouton ENTER pour enregistrer. Pour retourner aux fonctions sans avoir fait de changement, appuyez sur le bouton MENU de nouveau. Appuyez et maintenez le bouton MENU enfoncé pendant 1 seconde ou attendez 1 minute pour sortir du mode MENU. Veuillez vous référer au tableau ci-dessous pour régler l’adresse DMX des quatre premiers appareils. Adresse Adresse Adresse Adresse appareil 1 appareil 2 appareil 3 appareil 4 15 canaux 1 16 31 46 16 canaux 1 17 33 49 Mode canal 14B 5. CONFIGURATION DMX 512 Modes 15 canaux 15B 16B Modes 16 canaux 17B 6. BRANCHEMENT DMX 512 18B 1. Sur le dernier appareil, le câble DMX doit avoir un bouchon de terminaison afin de réduire les défauts du signal. Il faut alors souder une résistance de 120 Ohm 1/4W entre la borne 2 (DMX-) et la borne 3 (DMX+) dans une prise XLR 3 points. Raccordez-la à la sortie DMX du dernier appareil 2. Faîtes une chaine avec les appareils en connectant la sortie de la prise XLR de l'appareil à l'entrée de l'appareil suivant. Le câble ne doit pas être branché à un câble en Y. Des câbles inappropriés ou endommagés, des joints soudés ou des connecteurs rouillés peuvent facilement être à l'origine de la déformation du signal et couper le système. 3. La sortie DMX et les connecteurs d'entrée sont traversés par le courant pour maintenir le circuit DMX. 4. Chaque unité doit avoir une adresse DMX réglée pour recevoir les données envoyées par le contrôleur. Le nombre d'adresse est entre 0-511 (habituellement 0 et 1 sont égaux à 1) 5. Les 3 points XLR sont plus utilisés que les 5 points XLR. 3 points XLR : Borne 1: La terre, Borne 2: signal négatif (-), Borne 3: signal positif (+) 5 points XLR : Borne 1: La terre, Borne 2: signal négatif (-), Borne 3: signal positif (+) Borne 4/5 : non utilisé 7. DEPANNAGE DE L’APPAREIL Vous trouverez ci-dessous une liste de problèmes qui pourraient survenir lors de l'utilisation de votre appareil. Nous vous apportons quelques suggestions pour remédier facilement à la situation. A. L'appareil ne fonctionne pas, il n'y a pas de lumière et les ventilateurs ne fonctionnent pas. 1. Vérifiez les branchements de l’alimentation et du fusible 2. Vérifiez la tension du secteur 3. Vérifiez l’alimentation de la LED B. L'appareil ne répond pas au contrôleur DMX 1. La LED DMX doit être allumée. Si ce n'est pas le cas, vérifiez les connecteurs et les câbles pour voir si le raccordement est correct. 2. Si la LED DMX est allumée et que le canal ne répond pas, vérifiez les réglages de l'adresse et la polarité du signal DMX. 3. Si vous rencontrez des problèmes avec le signal DMX mais de façon intermittente, vérifiez les connecteurs ou la carte électronique de l'appareil défaillant ainsi que de 19B l'appareil précédent. Essayer d'utiliser un autre contrôleur DMX. Vérifiez l'absence d'interférences entre les câbles électriques. C. Les appareils ne répondent pas à la télécommande CA-8 1. Vous pouvez avoir une coupure dans le câblage DMX. Vérifiez les LED pour savoir si elles fonctionnent correctement en mode MASTER/SLAVE. 2. L'adresse DMX de l'appareil est fausse. Enregistrez de nouveau la bonne adresse D. Les appareils ne répondent pas à la musique 1. Assurez-vous que les appareils ne reçoivent pas de signal DMX 2. Vérifiez si le micro fonctionne en tapotant dessus. E. Un des canaux ne fonctionne pas correctement 1. Le moteur pas à pas est peut être endommagé ou le câble connecté à la carte est peut être cassé. 2. Le circuit intégré d'entrainement du moteur sur la carte est peut être usagé. 8. ENTRETIEN DE L’APPAREIL Le nettoyage du système d’optique interne et externe de l’appareil doit être fait régulièrement pour que le rendu lumineux soit optimum. La fréquence du nettoyage de l'appareil dépend essentiellement de l'environnement dans lequel l'appareil est installé : pièces humides, enfumées ou sales. De telles conditions peuvent être à l'origine de l'accumulation de poussière sur les lentilles de l'appareil. Nettoyez l'appareil avec un chiffon doux et utilisez un liquide de nettoyage pour vitres. Il est toujours recommandé d'essuyer correctement toutes les pièces de l'appareil. Nettoyez le système optique externe au moins tous les 20 jours. Nettoyez le système optique interne au moins une fois tous les mois ou une fois tous les 2 mois. 20B BIRDY 250 LED User Guide Professional Entertainment Technology 21B TABLE OF CONTENTS 1. Safety Instruction 2. Technical Specification 3. How To Set The Unit 3.1 Control Panel 3.2 Main functions 3.3 Home position adjustment 4. How To Control The Unit 4.1 Master/Slave 4.2 Easy controller 4.3 DMX universal controller 5. DMX 512 Configuration 6. DMX 512 Connections 7. Troubleshooting 8. Fixture Cleaning 22B 1. SAFETY INSTRUCTION Please read carefully the instruction, which includes important information about the installation, usage and maintenance. Please keep this User Guide for future consultation. If you sell the unit to another user, be sure that they also receive this instruction booklet. Unpack and check carefully there is no transportation damage before using the unit. Before operating, ensure that the voltage and frequency of power supply match the power requirements of the unit. It’s important to ground the yellow/green conductor to earth in order to avoid electric shock. The unit is for indoor use only. Use only in a dry location. The unit must be installed in a location with adequate ventilation, at least 50cm from adjacent surfaces. Be sure that no ventilation slots are blocked. Disconnect main power before replacement or servicing. Make sure there is no flammable materials close to the unit while operating as it is fire hazard. Use safety cable when fixes this unit. Don’t handle the unit by taking its head only, but always by taking its base. Maximum ambient temperature is 40°C. Don’t operate it where the temperature is higher than this. Unit surface temperature may reach up to 85°C. Don’t touch the housing bare-hand during its operation. Turn off the power and allow about 15 minutes for the unit to cool down before replacing or serving. In the event of serious operating problem, stop using the unit immediately. Never try to repair the unit by yourself. Repairs carried out by unskilled people can lead to damage or malfunction. Please contact the nearest authorized technical assistance center. Always use the same type spare parts. Do not touch any wire during operation as high voltage might be causing electric shock. To prevent or reduce the risk of electrical shock or fire, do not expose the unit to rain or moisture. Do not open the unit within five minutes after switching off. The housing, the lenses, or the ultraviolet filter must be replaced if they are visibly damaged. There are no user serviceable parts inside the unit. Do not open the housing or attempt 23B any repairs yourself. In the unlikely event your unit may require service, please contact your nearest dealer. Installation The unit should be mounted via its screw holes on the bracket. Always ensure that the unit is firmly fixed to avoid vibration and slipping while operating. And make sure that the structure to which you are attaching the unit is secure and is able to support a weight of 10 times of the unit’s weight. Also always use a safety cable that can hold 12 times of the weight of the unit when installing the fixture. The equipment must be fixed by professionals. And it must be fixed at a place where is out of the touch of people and has no one pass by or under it. 2. TECHNICAL SPECIFICATIONS BIRDY 250 LED moving head is the combination of the latest high powered LED technology, excellent optics and great features. DMX control: 15/16 channels. 3 operation modes: DMX, Master/Slave, Sound Activation. Great built-in lighting programs under master/slave mode triggered by music. Optional CA-8 easy controller or CA-9 RTX (wireless easy control kit) for instant lighting shows. Rotating gobo wheel with 7 gobos plus white, fixed gobo wheel with 8 gobos plus open. Color wheel with 7 colors plus white. Pan 540°; Tilt 270°. Automatic Pan/Tilt position correction. Smooth 0~100% dimming and variable strobe speeds. Indexable, replaceable 3-facet rotating prism. Auto focus. Beam Angle : 17° LED display for easy navigation and addressing. Perfect for disco, club, bar, parties and Mobile DJs. 24B Voltage: 230V/50hz Power consumption : 125W Light source : 1 x 50W LED Dimensions : 299 x 247 x437 mm Rotating gobo: 22 mm Fixed gobo: 24 mm Weight: 10.2 kg 437 103 361 236 216 259 287 299 247 Photometric diagram: 25B 3. HOW TO SET THE UNIT 3.1 CONTROL PANEL Display: To show the various menus and the selected functions LED DMX On DMX input present MASTER On Master Mode SLAVE On Slave Mode SOUND Flashing Sound activation MENU To select the programming functions DOWN To go backward in the selected functions UP To go forward in the selected functions ENTER To confirm the selected functions Button Only for remote control: Connecting with CA-8/CA-9/CA-9RTX to control the unit for Stand by, Function and Mode function. Mains input: Connect to supply mains power. DMX input/output: For DMX512 link, use 3/5-pin XLR plug cable to link the unit together. 3.2 MAIN FUNCTION To select any of the given functions, press the MENU button up to when the required one is showing on the display. Select the function by ENTER button and the display will blink. Use DOWN and UP button to change the mode. Once the required mode has been selected, press the ENTER button to setup, to go back to the functions without any change press the MENU button again. Hold and press the MENU button about one second or wait for one minute to exit the menu mode. The main functions are showing below: 26B 27B DMX Address Select DMX Address, press ENTER button to confirm, the present address will blink on the display. Use UP and DOWN button to adjust the address from 1 to 512. Once the address has been selected, press the ENTER button to setup, to go back to the functions without any change press the MENU button again. Hold and press the MENU button about one second or wait for one minute to exit the menu mode. Channel Mode Select Channel Mode, press ENTER button to confirm, present mode will blink on the display. Use DOWN and UP button to select the 15 Chan (15 Channel Mode) or 16 Chan (16 Channel Mode) mode. Once the mode has been selected, press the ENTER button to setup, to go back to the functions without any change press the MENU button again. Hold and press the MENU button about one second or wait for one minute to exit the menu mode. Show Mode Select Show Mode, press ENTER button to confirm, present mode will blink on the display. Use DOWN and UP button to select the Show 1 or Show 2 or Show 3 or Show 4 mode. Once the mode has been selected, press the ENTER button to setup, to go back to the functions without any change press the MENU button again. Hold and press the MENU button about one second or wait for one minute to exit the menu mode. Split Color Mode Select Split Color Mode, press ENTER button to confirm, present mode will blink on the display. Use DOWN and UP button to select the Yes (Split Color mode) or No (normal) mode. Once the mode has been selected, press the ENTER button to setup, to go back to the functions without any change press the MENU button again. Hold and press the MENU button about one second or wait for one minute to exit the menu mode. Slave Mode Select Slave Mode, press ENTER button to confirm, present mode will blink on the display. Use DOWN and UP button to select the Slave 1 (normal) or Slave 2 (2 light show) mode. Once the mode has been selected, press the ENTER button to setup, to go back to the functions without any change press the MENU button again. Hold and press the MENU button about one second or wait for one minute to exit the menu mode. Black Out Select Slave Mode, press ENTER button to confirm, present mode will blink on the display. Use DOWN and UP button to select the Yes (yes blackout) or No (no blackout) mode. Once the mode has been selected, press the ENTER button to setup, to go back to the functions 28B without any change press the MENU button again. Hold and press the MENU button about one second or wait for one minute to exit the menu mode. Sound State Select Sound State, press ENTER button to confirm, present mode will blink on the display. Use DOWN and UP button to select the On (sound on) or Off (sound off) mode. Once the mode has been selected, press the ENTER button to setup, to go back to the functions without any change press the MENU button again. Hold and press the MENU button about one second or wait for one minute to exit the menu mode. Sound Sense Select Sound Sense, press ENTER button to confirm, present mode will blink on the display. Use DOWN and UP button to select the 0 …100 mode. Once the mode has been selected, press the ENTER button to setup, to go back to the functions without any change press the MENU button again. Hold and press the MENU button about one second or wait for one minute to exit the menu mode. Pan Inverse Select Pan Inverse, press ENTER button to confirm, present mode will blink on the display. Use DOWN and UP button to select the Yes (pan inversion) or No (normal) mode. Once the mode has been selected, press the ENTER button to setup, to go back to the functions without any change press the MENU button again. Hold and press the MENU button about one second or wait for one minute to exit the menu mode. Tilt Inverse Select Pan Inverse, press ENTER button to confirm, present mode will blink on the display. Use DOWN and UP button to select the Yes (tilt inversion) or No(normal) mode. Once the mode has been selected, press the ENTER button to setup, to go back to the functions without any change press the MENU button again. Hold and press the MENU button about one second or wait for one minute to exit the menu mode. Back Light Select Back Light, press ENTER button to confirm, present mode will blink on the display. Use DOWN and UP button to select the On (Led on) or Off (Led off) mode. Once the mode has been selected, press the ENTER button to setup, to go back to the functions without any change press the MENU button again. Hold and press the MENU button about one second or wait for one minute to exit the menu mode. Gobo1 Focus Select Gobo1 Focus, press ENTER button to confirm, present mode will blink on the 29B display. Use DOWN and UP button to select the 0 …255 mode. Once the mode has been selected, press the ENTER button to setup, to go back to the functions without any change press the MENU button again. Hold and press the MENU button about one second or wait for one minute to exit the menu mode. Gobo2 Focus Select Gobo2 Focus, press ENTER button to confirm, present mode will blink on the display. Use DOWN and UP button to select the 0 …255 mode. Once the mode has been selected, press the ENTER button to setup, to go back to the functions without any change press the MENU button again. Hold and press the MENU button about one second or wait for one minute to exit the menu mode. Function Delay Select Function Delay, press ENTER button to confirm, present mode will blink on the display. Use DOWN and UP button to select the No Delay or 1S/2S/3S Delay (Wait for 1/2/3 seconds before these Functions of 15/16 CH are activated/deactivated) mode. Once the mode has been selected, press the ENTER button to setup, to go back to the functions without any change press the MENU button again. Hold and press the MENU button about one second or wait for one minute to exit the menu mode. Dimmer Calibrate Press the MENU button to show Dimmer Calibrate on the display. Press the ENTER button and the display will blink. Use the DOWN and UP button to calibrate the dimmer for a maximum output from 50 (limited to 50% of the really max. output) to 100 (maximum output is not limited). Once the mode has been selected, press the ENTER button to setup, to go back to the functions without any change press the MENU button again. Hold and press the MENU button about one second or wait for one minute to exit the menu mode. Auto-Test Press the MENU button up to when the Auto-Test is blinking on the display. Pressing ENTER button and the unit will run self-test by built-in program. To go back to the functions press the MENU button again. Hold and press the MENU button about one second or wait for one minute to exit the menu mode. Temperature Press the MENU button up to when the Temperature Test is blinking on the display. Pressing ENTER button and the display will show the temperature of the unit. To go back to the functions press the MENU button again. Hold and press the MENU button about one second or wait for one minute to exit the menu mode. 30B Fixture Time Press the MENU button up to when the Fixture Time is blinking on the display. Pressing ENTER button and the display will show the number of working hours of the unit. To go back to the functions press the MENU button again. Hold and press the MENU button about one second or wait for one minute to exit the menu mode. Firmware Version Press the MENU button up to when the Firmware version is blinking on the display. Pressing ENTER button and the display will show the version of software of the unit. To go back to the functions press the MENU button again. Hold and press the MENU button about one second or wait for one minute to exit the menu mode. Defaults Setting Press the MENU button to show Defaults on the display. Press the ENTER button and the display will blink. Use the DOWN and UP button to select the Confirm? YES or Confirm? No. Once the Confirm? Yes has been selected, press the ENTER button and use the UP and Down button to select the PRO Def or AUTO Def. PRO Defaults: For professional users, detailed explanation as followings: Channel Mode 16 Chan Split Color Mode Yes Slave Mode Slave 1 Black Out Yes Sound State Off Sound Sense 90 Pan Inverse No Tilt Inverse No Back Light Off Function Delay 3S Delay AUTO Defaults: Mostly automatic mode, for non professional users, detailed explanation as followings: Channel Mode 15 Chan Split Color Mode No Slave Mode Slave 1 Black Out No 31B Sound State Sound Sense Pan Inverse Tilt Inverse Back Light Function Delay On 90 No No On 3S Delay (Notice: Other settings are NOT changed while choosing Defaults Setting!) Press the ENTER and the corresponding functions will set to defaults setting, to go back to the functions without any change press the MENU button again. Hold and press the MENU button about one second or wait for one minute to exit the menu mode. Reset Press the MENU button up to when the Reset is blinking on the display. Pressing ENTER button and all channels of the unit will return to their standard position. 3.3 HOME POSITION ADJUST In the main functions, hold Enter button for at least 3 seconds into offset mode, use DOWN and UP button up to chose Pan Offset, Tilt Offset ,Color Offset, Gobo1 Offset, R-Gobo Offset, Gobo2 Offset, Prism Offset, R-Prism Offset or Focus Offset. Pressing ENTER button and the display will blink. Use DOWN and UP button to adjust the home position of 32B the Pan, Tilt, color, Gobo1, R-Gobo, Gobo2, Prism, R-Prism, or Focus. Once the position has been selected, press the ENTER button to setup. To go back to the functions without any change press the MENU button again. Hold and press the MENU button about one second or wait for one minute to exit the menu mode. 4. HOW TO CONTROL THE UNIT You can operate the unit in three ways: 1. By master/slave built-in preprogram function 2. By easy controller 3. By universal DMX controller No need to turn the unit off when you change the DMX address, as new DMX address setting will be effected at once. Every time you turn the unit on, it will show “LED-MS50” on the display and move all the motors to their ‘home’ position and you may hear some noises for about 20 seconds. After that the unit will be ready to receive DMX signal or run the built in programs. 4.1 MASTER/SLAVE BUILT IN PREPROGRAMMED FUNCTION By linking the units in master/slave connection, the first unit will control the other units to give an automatic, sound activated, synchronized light show. This function is good when you want an instant show. You have to set the first unit in master mode Show Mode and select show 1 or show 2 or show 3 or show 4 mode. Its DMX input jack will have nothing plugged into it, and Its master LED will be constantly on and sound LED will flash to the music. The other units will have to set in slave mode and select Slave 1 (normal) or Slave 2 (2 light show) mode, Their DMX cables plugged into the DMX input jacks (daisy chain) and the slave led lights will constantly on. 2-light show In slave mode, Slave 1 means the unit works normally and Slave 2 means 2-light show. In order to create a great light show, you can set Slave 2 on the second unit to get contrast movement to each other, even if you have two units only. 4.2 EASY CONTROLLER The easy remote control is used only in master/slave mode. By connecting to the 1/4” microphone jack of the first unit, you will find that the remote control on the first unit will control all the other units functions press the MENU button again. 33B Stand By Blackout the unit Function 1. Sync. Strobe Show 1. Press to select color 2. Async strobe 1-4 2. Hold to select gobo Show (LED Slow LED ON 3. Sound Strobe Mode Sound (LED OFF) Blinking) 4.3 DMX CONTROLLER By using a universal DMX controller to control the units, you have to set DMX address from 1 to 512 channel so that the units can receive DMX signal. Press the MENU button up to when the DMX Address is showing on the display. Pressing ENTER button and the display will blink. Use DOWN and UP button to change the DMX512 address. Once the address has been selected, press the ENTER button to set up. To go back to the functions without any change press the MENU button again. Hold and press the MENU button about one second or wait for one minute to exit the menu mode. Please refer to the following diagram to address your DMX512 channel for the first 4 units: Unit 1 Unit 2 Unit 3 Unit 4 Address Address Address Address 15channels 1 16 31 46 16channels 1 17 33 49 Channel mode 5. DMX 512 CONFIGURATION 34B 15 channel modes: 35B 36B 16 channel modes: 37B 6.DMX512 CONNECTION 38B 1. If you using a controller with 5 pins DMX output, you need to use a 5 to 3 pin adapter-cable. 2. At last unit, the DMX cable has to be terminated with a terminator. Solder a 120 ohm 1/4W resistor between pin 2(DMX-) and pin 3(DMX+) into a 3-pin XLR-plug and plug it in the DMX-output of the last unit. 3. Connect the unit together in a `daisy chain` by XLR plug from the output of the unit to the input of the next unit. The cable can not branched or split to a `Y` cable. DMX 512 is a very high-speed signal. Inadequate or damaged cables, soldered joints or corroded connectors can easily distort the signal and shut down the system. 4. The DMX output and input connectors are pass-through to maintain the DMX circuit, when one of the units’ power is disconnected. 5. Each lighting unit needs to have an address set to receive the data sent by the controller. The address number is between 0-511 (usually 0 & 1 are equal to 1). 6. The end of the DMX 512 system should be terminated to reduce signal errors. 7. 3 pin XLR connectors are more popular than 5 pin XLR. 3 pin XLR: Pin 1: GND, Pin 2: Negative signal (-), Pin 3: Positive signal (+) 5 pin XLR: Pin 1: GND, Pin 2: Negative signal (-), Pin 3: Positive signal (+), Pin 4/Pin 5: Not used. 7. TROUBLESHOOTING Following are a few common problems that may occur during operation. Here are some suggestions for easy troubleshooting: A. The unit does not work, no light and the fan does not work 1. Check the connection of power and main fuse. 2. Measure the mains voltage on the main connector. 3. Check the power on LED. B. Not responding to DMX controller 1. DMX LED should be on. If not, check DMX connectors, cables to see if link properly. 2. If the DMX LED is on and no response to the channel, check the address settings and DMX polarity. 3. If you have intermittent DMX signal problems, check the pins on connectors or on PCB of the unit or the previous one. 4. Try to use another DMX controller. 5. Check if the DMX cables run near or run alongside to high voltage cables that may cause 39B damage or interference to DMX interface circuit. C. Some units don’t respond to the easy controller 1. You may have a break in the DMX cabling. Check the LED for the response of the master/ slave mode signal. 2. Wrong DMX address in the unit. Set the proper address. D. No response to the sound 1. Make sure the unit does not receive DMX signal. 2. Check microphone to see if it is good by tapping the microphone E. One of the channels is not working well 1. The stepper motor might be damaged or the cable connected to the PCB is broken. 2. The motor’s drive IC on the PCB might be out of condition 8. FIXTURE CLEANING The cleaning of internal and external optical lenses and/or mirrors must be carried out periodically to optimize light output. Cleaning frequency depends on the environment in which the fixture operates: damp, smoky or particularly dirty surrounding can cause greater accumulation of dirt on the unit’s optics. Clean with soft cloth using normal glass cleaning fluid. Always dry the parts carefully. Clean the external optics at least every 20 days. Clean the internal optics at least every 30/60 days. 40B