1
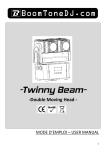
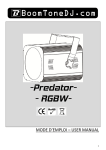
-S-1500Pro DMX1500W DMX STROBE Stroboscope 1500W DMX MODE D’EMPLOI – USER MANUAL 0 Français Instructions de sécurité Avant d’utiliser votre matériel, nous vous recommandons de lire WARNING l’ensemble des instructions de ce manuel. I. . Conservez ce manuel pour une future consultation. Si vous revendez cet appareil, veillez à transmettre également ce manuel d’utilisation au nouvel acquéreur. II. . Déballez entièrement l’appareil ainsi que tous ses accessoires. Vérifiez qu’il n’y a aucun dommage et que l’appareil se trouve en parfait état. III. Il est important d’utiliser le câble d’alimentation secteur fourni (câble avec terre). IV. Toujours débrancher l’appareil avant une intervention technique ou avant son entretien. V. Température ambiante maximum pour un fonctionnement optimal de l’appareil : 40°C. Ne pas utiliser l’appareil si la température ambiante dépasse cette valeur. VI. En cas de problème de fonctionnement, arrêtez immédiatement l’appareil. Ne pas essayer de le réparer soi-même. Contactez votre revendeur ou faites appel à un réparateur spécialisé et agréé. Il n’y a aucune pièce remplaçable par l’utilisateur. VII. Ne pas brancher cet appareil sur un bloc de puissance variable type “ Dimmer pack” VIII. Afin de réduire et d’éviter tout risque d’électrocution ou d’incendie, ne pas utiliser cet appareil dans un milieu humide ou sous la pluie. IX. Ne pas regarder directement le faisceau lumineux. X. Cet appareil S-1500Pro DMX doit être installé avec un crochet solide et de dimension adéquate au poids supporté. L’appareil doit être vissé au crochet et serré convenablement afin d’éviter toute chute due aux vibrations produites par la machine en fonctionnement. L’accroche de l’appareil doit être sécurisée par une élingue de sécurité. Assurez-vous également que la structure (ou point d’accroche) peut supporter au moins 10X le poids de l’appareil accroché. XI. L’appareil doit être installé par une personne qualifiée et doit être placé hors de portée du public. 1 Présentation du S1500Pro-DMX (1) (2) (3) (4) (5) (6) (7) Câble d’alimentation électrique Fusible de protection DIP SWITCH pour l’adressage DMX Réglage manuel de vitesse des flashs ( SPEED) Réglage manuel d’intensité lumineuse des flashs ( LIGHT) DMX OUT : Sortie DMX DMX IN : Entrée DMX Mise en route du S1500Pro-DMX Avant toute utilisation, vous devez retirer la mousse de protection de la lampe !! Choix du mode de fonctionnement FUNCTION SELECT 1 DMX-512 CONTROL SPEED & LIGHT CONTROL OFF DIP SWITCH 2-9 ADDRESS NO USE 2 10 OFF ON Mode Manuel Pour un fonctionnement de votre stroboscope en mode manuel, sélectionnez le DIP SWITCH N°10 (3) sur « ON » . Vous pouvez contrôler la vitesse(SPEED) des flashs avec le bouton rotatif (4) et l’intensité (LIGHT) du flash grâce au bouton rotatif (5). Mode DMX Adressage DMX : L’adressage DMX de votre S-1500Pro-DMX se fait par la sélection des DIP SWITCH (3) de 1 à 9 . Bien vérifier que le DIP SWITCH(3) N° 10 est bien sur « OFF ». Dip Switch : Chaque S-1500Pro-DMX possède 2 canaux DMX. Canal N° 1 = Vitesse des Flashs Canal N° 2 = Intensité lumineuse des Flashs Exemple d’adressage DMX . Vous souhaitez par exemple adresser votre stroboscope à l’adresse 116. Sélectionnez alors les DIP SWITCH(3) : N°7 + N°6 +N°5+N°3 Soit : 64+32+16+4=116 3 Maintenance et entretien Installation et remplacement du tube ATTENTION ! Risque de brûlure. Avant toute intervention, il est important d’attendre au moins 10 minutes après fonctionnement de l’appareil. En effet, en fonctionnement le tube à éclats monte à des températures voisines de 700°C. Ne jamais toucher la lampe avec vos doigts , utilisez un chiffon ou des gants en tissus. Toujours remplacer la lampe par une lampe de même puissance et de même type : Xenon 1500W / XOP-15 Procédure: 1) 2) 3) 4) 5) 6) Dévissez les vis de la vitre. Déposer la vitre. Si l’appareil est neuf , retirez délicatement la mousse protectrice qui maintien la lampe. Si, vous remplacez la lampe, retirez délicatement la lampe existante . Mettre en place la lampe neuve Remettre la vitre en place ainsi que les 4 vis. ATTENTION : 1. Ne pas branchez ou mettre ne service le stroboscope tant que la vitre de protection n’a pas été remise en place ! 4 Dépannage Voici quelques suggestions si vous rencontrez des problèmes avec votre appareil S-1500Pro-DMX. L’appareil ne fonctionne pas du tout. o Vérifiez le cordon d’alimentation et le fusible. o Assurez-vous que votre prise soit bien alimentée. L’appareil ne répond pas ou pas correctement aux commandes DMX. o Vérifiez vos câbles DMX o Vérifiez votre adressage DMX o Essayez un autre contrôleur DMX o Vérifiez que vos câbles DMX ne passent pas à proximité de câbles haute tension, ce qui pourrait créer des interférences. Nettoyage Un nettoyage extérieur de l’appareil doit être fait régulièrement. La vitre doit être nettoyée pour une luminosité optimum. Si l’appareil est installé dans un environnement poussiéreux ou avec de la fumée cet entretien régulier est très important. Il est possible qu’un nettoyage de la vitre par l’intérieur soit également nécessaire. Débranchez l’appareil avant toute intervention ! Utilisez un chiffon propre avec très peu de liquide vitre. Toujours bien sécher les parties nettoyées. Caractéristiques techniques Tension d’alimentation : 250VAC/50Hz Consommation électrique : max. 1600W Fusible : F 15A, 250VAC Lampe/ Tube: Xénon 1500W strobe tube type XOP-15 DMX-512 : 2 canaux 5 English 1- Safety Instructions Please read the instructions carefully which include important WARNING information about the installation, operation and maintenance. Please keep this User Manual for future consultation. If you sell the fixture to another user, be sure that he also receives this instruction booklet. Unpack and check carefully there is no transportation damage before using the fixture. It’s important to ground the yellow/green conductor to earth in order to avoid electric shock. Disconnect main power before servicing and maintenance. Maximum ambient temperature is Ta : 40℃. Don’t operate it where the temperature is higher than this. In the event of serious operating problem, stop using the fixture immediately. Never try to repair the fixture by yourself. Repairs carried out by unskilled people can lead to damage or malfunction. Please contact the nearest authorized technical assistance center. There are no user serviceable parts inside the fixture. Do not connect the device to any dimmer pack. To prevent or reduce the risk of electrical shock or fire, do not expose the fixture to rain or moisture. Do not look directly at the LED light beam while the fixture is on. Do not touch any wire during operation . The unit should be mounted via its screw holes on the bracket. Always ensure that the unit is firmly fixed to avoid vibration and slipping while operating. Always ensure that the structure to which you are attaching the unit is secure and is able to support a weight of 10 times of the unit’s weight. Also always use a safety cable that can hold 12 times of the weight of the unit when installing the fixture. The equipment must be fixed by professionals. And it must be fixed at a place where is out of the touch of people and has no one pass by or under it. 6 2- Unit Description (1) (2) (3) (4) (5) (6) (7) Power supply cable Fuse DIP SWITCH for DMX address SPEED adjustment LIGHT adjustment DMX OUT DMX IN Starting with the S1500Pro-DMX Operation Mode FUNCTION SELECT 1 DMX-512 CONTROL SPEED & LIGHT CONTROL OFF DIP SWITCH 2-9 ADDRESS NO USE 7 10 OFF ON Manual Mode DIP SWITCH(3) 10 ON Adjust the flash speed with the SPEED rotary (4) and adjust the brightness of flash with”LIGHT” rotary (5). DMX Mode Address setting and connection 1. Address switch: SWITCH (3) Dip Switch : from 1 to 9 for DMX addressing 2 DMX channels : Channel 1 : SPEED Channel 2 : BRIGHTNESS 8 Maintenance & cleaning a) Installing or replacing the lamps Before replacing the lamps let the lamps cool down, because during operation, the lamps can reach temperatures of up to 700℃. Wait at least 10 minutes after use before opening the housing. During the installation of the lamp do not touch the glass bulb bare handed. Always use a cloth to handle the lamp during insertion and removal. Do not install lamps with a higher wattage. They generate higher temperatures than for which the device was designed for. For the installation, you need a 1500W strobe tube. Procedure: 7) 8) 9) 10) 11) 12) Unscrew the screw Carefully remove the glass pane and sponge , making sure it doesn’t get damaged Remove the old lamp carefully Place the new lamp Close the glass pane. Fasten the screw CAUTION: 1. Do not operate this device with open cover! 2. The glass pane has to be replaced when it is damaged! 3. The lamp has to be replaced when it is damaged or deformed! 4. Only install the lamp with the device unplugged from the mains! b) Replacing the fuse If the lamp burns out, chances are the internal fuse might too. Only replace the fuse with a fuse of the same type and rating (see technical specifications at the end of this user manual). Since the fuse for this device is an internal fuse, it should only be replaced by your agent or an authorized dealer. CAUTION: c) Only replace the fuse with the device unplugged from the mains! Mounting the device The installation must always be secured with a secondary safety attachment, e.g. an appropriate safety cable. Never stand directly below the device when mounting, removing or servicing the device. Procedure: The stroboscope should be installed outside areas where persons may reach it, walk by or be seated. 9 Overhead mounting requires extensive experience, including amongst others calculating working load limits, installation material being used, and periodic safety inspection of all installation material and the device. If you lack these qualifications, do not attempt the installation yourself. Improper installation can result in bodily injury. Before mounting make sure that the installation area can hold a minimum point load of 10 times the device s weight. CAUTION: When installing the device, make sure there is no highly inflammable material within a distance of min. 0.5m! 2. Connection: Only use a stereo shielded cable and 3-pan XLR-plugs and connectors in order to connector the controller with the fixture or one fixture with another. O c c u pa t i o n o f X L R - c o n n e c t i o n : If you are using controllers with occupation, you can connect the DMX-output of the controller directly with the DMX-input of the first fixture in the DMX-chain. If you wish to connect DMX-controllers with other XLR-outputs, you need to use adapter-cables. Fixture Cleaning The cleaning of internal must be carried out periodically to optimize light output. Cleaning frequency depends on the environment in which the fixture operates: damp, smoky or particularly dirty surrounding can cause greater accumulation of dirt on the fixture’s glass. Clean with soft cloth using normal glass cleaning fluid. Always dry the parts carefully. Clean the external glass at least every 20 days. Clean the internal glass at least every 30/60 days 10 TECHNICAL SPECIFICATIONS Power supply: max. 250VAC/50Hz Power consumption: max. 1600W Fuse: F 15A, 250VAC Lamps: 1500W strobe Xenon tube type : XOP-15 11 12 13