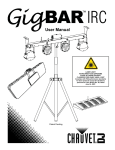
1
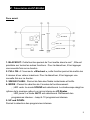
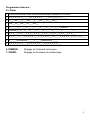
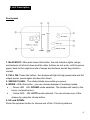
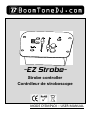
-EZ StrobeStrobe controller Contrôleur de stroboscope MODE D’EMPLOI – USER MANUAL Français 1- Instructions de sécurité Avant d’utiliser votre matériel, nous vous recommandons de lire WARNING l’ensemble des instructions de ce manuel. Conservez ce manuel pour une future consultation. Si vous revendez cet appareil, veillez à transmettre également ce manuel d’utilisation au nouvel acquéreur. Déballez entièrement l’appareil ainsi que tous ses accessoires. Vérifiez qu’il n’y a aucun dommage et que l’appareil se trouve en parfait état. Il est important d’utiliser le câble d’alimentation secteur fourni (câble avec terre). Toujours débrancher l’appareil avant une intervention technique ou avant son entretien. Température ambiante maximum pour un fonctionnement optimal de l’appareil : 40°C. Ne pas utiliser l’appareil si la température ambiante dépasse cette valeur. En cas de problème de fonctionnement, arrêtez immédiatement l’appareil. Ne pas essayer de le réparer soi-même. Contactez votre revendeur ou faites appel à un réparateur spécialisé et agréé. Il n’y a aucune pièce remplaçable par l’utilisateur. Ne pas brancher cet appareil sur un bloc de puissance variable type “ Dimmer pack” Afin de réduire et d’éviter tout risque d’électrocution ou d’incendie, ne pas utiliser cet appareil dans un milieu humide ou sous la pluie. 1 2- Présentation du EZ-Strobe Face avant: 1. BLACKOUT: Cette fonction permet de “tout mettre dans le noir” , Elle est prioritaire sur toutes les autres fonctions . Pour la désactiver, il faut appuyer une nouvelle fois sur ce bouton. 2. FULL ON: A l’inverse du « Blackout », cette fonction permet de mettre les 2 canaux à leur valeur maximum. Pour la désactiver, il faut appuyer une nouvelle fois sur ce bouton. 3. SINGLE FLASH : Permet de faire des flashs instantanés et furtifs. 4. MODE : Permet la sélection de 2 modes de fonctionnement : LED verte: Le mode SOUND est sélectionné. Le stroboscope réagit au rythme de la musique grâce à un micro interne au EZ Strobe. LED jaune: Le mode AUTO est sélectionné. Défilement des programmes internes : Jusqu’à 10 programmes internes. 5. UP and DOWN: Permet la sélection des programmes internes. 2 Programmes internes : X = Flash 0 Contrôle manuel avec les potentiomètres DIMMER et SPEED 1 x_x_x_x_x_x_x______x_x_x_x_x_x_x______x_x_x_x_x_x_x______ 2 x____xxx____x____xxx____x____xxx____x____xxx___ 3 xxx___xx___xxx___xx____xxx___ 4 x_______x_______x______x_____x_____x____x___x__x_xxxxxxx 5 xxxxxxx_x__x___x____x_____x______x_______x________x__________x___________ 6 x_x_x___x_x_x___x_x_x___x_x_x___x_x_x___x_x_x___x_x_x___x_x_x___ 7 x_x_x____x____x_x_x_x_x_____x__x_x_x_x___x_x_____x_x_x_x_x__x_x_x__x_x_____ 8 x______xxxxxxxxxxx______x______xxxxxxxxxxx______ 9 x_x_x_x_x_x_x____x_x_x_x_x_x_x____x_x_x_x_x_x_x____ 6. DIMMER: 7. SPEED: Réglage de l’intensité lumineuse. Réglage de la vitesse du stroboscope 3 Panneau arrière « STATE » : Inversion des canaux DMX de DIMMER et SPEED Certain stroboscopes possèdent la fonction DIMMER sur le canal DMX N°1 et la fonction SPEED sur le canal DMX N°2, pour d’autres c’est l’inverse. Cet inverseur permet au EZ Strobe de s’adapter à votre stroboscope. Position STATE 1: CH1 = DIMMER CH2 = SPEED Position STATE 2: CH1 = SPEED CH2 = DIMMER 3- Caractéristiques techniques Alimentation : Adaptateur secteur AC/DC 12V /500mA Sortie DMX outputs: XLR 3 broches Dimensions : 205 x 133 x 82 mm Poids : 1.05kg 4 English 1- Safety Instructions Please read the instructions carefully which include important WARNING information about the installation, operation and maintenance. Please keep this User Manual for future consultation. If you sell the fixture to another user, be sure that he also receives this instruction booklet. Unpack and check carefully there is no transportation damage before using the fixture. It’s important to ground the yellow/green conductor to earth in order to avoid electric shock. Disconnect main power before servicing and maintenance. Maximum ambient temperature is Ta : 40℃. Don’t operate it where the temperature is higher than this. In the event of serious operating problem, stop using the fixture immediately. Never try to repair the fixture by yourself. Repairs carried out by unskilled people can lead to damage or malfunction. Please contact the nearest authorized technical assistance center. There are no user serviceable parts inside the fixture. Do not connect the device to any dimmer pack. To prevent or reduce the risk of electrical shock or fire, do not expose the fixture to rain or moisture. 5 2-Unit Description Front panel 1. BLACKOUT: After push down this button, the red indicator lights, lamps and lanterns of all shut down and the other buttons do not work, until the press again, back to the original mode of lamps and lanterns and all keys back to normal. 2. FULL ON: Press this button, the strobes will light at high speed rate and full output power, press again, strobes shut down. 3. SINGLE FLASH : The strobe blinks once while you press. 4. MODE : With this button , you can choose between 2 working modes: Green LED ON: SOUND mode selected. The strobes will react to the music. (internal micro) Yellow LED ON: AUTO mode selected. You can choose one of the chases by using the chase button. 5. UP and DOWN: Press the up/down button to choose one of the 10 built-in patterns. 6 Built-in patterns: X=Flash 0 Manual MODE control with faders DIMMER et SPEED 1 x_x_x_x_x_x_x______x_x_x_x_x_x_x______x_x_x_x_x_x_x______ 2 x____xxx____x____xxx____x____xxx____x____xxx___ 3 xxx___xx___xxx___xx____xxx___ 4 x_______x_______x______x_____x_____x____x___x__x_xxxxxxx 5 xxxxxxx_x__x___x____x_____x______x_______x________x__________x___________ 6 x_x_x___x_x_x___x_x_x___x_x_x___x_x_x___x_x_x___x_x_x___x_x_x___ 7 x_x_x____x____x_x_x_x_x_____x__x_x_x_x___x_x_____x_x_x_x_x__x_x_x__x_x_____ 8 x______xxxxxxxxxxx______x______xxxxxxxxxxx______ 9 x_x_x_x_x_x_x____x_x_x_x_x_x_x____x_x_x_x_x_x_x____ 6. DIMMER: The dimming. 0 is closed, 100% the brightest 7. SPEED: Stroboscopic speed. The slowest missile, FAST the fastest 7 Back panel STATE function allows you to swap the 2 DMX channels Position STATE 1: CH1 = DIMMER CH2 = SPEED Position STATE 2: CH1 = SPEED CH2 = DIMMER 4- Technical specifications AC/DC Power adapter: AC 230V, 50Hz - 12Vdc / 500mA DMX outputs: 3pin XLR Size: 205 x 133 x 82 mm Weight: 1.05kg 8 9