1
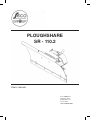
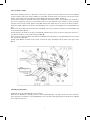
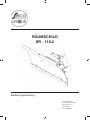
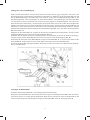
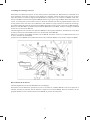
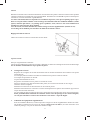
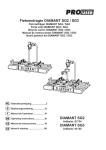
SHRNOVACÍ RADLICE
SR - 110.2
Návod k obsluze
Seco GROUP a. s.
pobočka 02 AGS
Jungmannova 11
506 48 Jičín
ČESKÁ REPUBLIKA
Vážený zákazníku,
děkujeme vám za přijetí důležitého rozhodnutí zakoupit náš stroj. Seco GROUP a.s. je postupným majitelem
společností Knotek a spol., Agrostroj a AGS Jičín a je dobře uznávána na evropských a světových trzích jako
výrobce vysoce kvalitních sekaček a strojů pro terénní úpravy prodávaných pod značkou AGS. Teď je zcela
na vás, jak budete využívat váš stroj a jak jej budete udržovat, abyste si mnoho následujících let užili bezproblémový provoz.
Pro usnadnění použití této shrnovací radlice si pečlivě přečtěte tento návod. Postupujte přesně podle pokynů,
které zajistí optimální použití a dlouhou životnost vaší shrnovací radlice. Používejte stroj pro účely, pro které
byl určen. Jakékoliv jiné použití neuvedené v tomto návodu může být nebezpečné a může vést k poškození
stroje, což může mít za následek ztrátu záruky a výrobce bude zbaven veškeré zodpovědnosti.
Více než 100 autorizovaných servisních dílen rozmístěných po celé Evropě vám nabízí služby vysoké kvality,
poskytované našimi techniky vyškolenými ve výrobním závodu.
1.
Použití
Shrnovací radlice SR - 110 je ve spojení s traktory AJ102 a AG122 určena k odklízení sněhu z chodníků,
silnic nebo pro odhrnování lehkých sypkých materiálů.
2.
Popis
Shrnovací radlice se skládá z podpěrného rámu a odpružených postranních nastavitelných radlic. Radlice
je připojena k univerzálnímu závěsu, který zajistí, že je zajištěna v jedné poloze. Radlice může být nastavena bočně. Při nárazu na pevnou překážku se radlice zvedne, aniž by se poškodila. Když se přes překážku přejede, pružina vrátí radlici do původní polohy. Při práci na sněhu mohou zadní kola prokluzovat, což
může být eliminováno nasazením sněhových řetězů a přidáním dodatečného závaží.
3.
Technické údaje:
Délka - Šířka - Výška (mm)
Pracovní šířka (cm)
Hmotnost
320 - 1100 - 385
110
25 kg
4.
Vybalení a montáž
Radlice je dodávaná zcela smontovaná. Podložky Pol. 13 (4 ks) jsou dodávány v PE sáčku. Pro připojení
k traktoru je nutné mít univerzální závěs, který je dodáván zvlášť. Pro náročnější typy prací může být
traktor zatížen přidáním dodatečného závaží.
5.
Příprava na použití, připojení, použití a údržba
Před každým použitím radlici zkontrolujte - připojení jednotlivých dílů, pevnost šroubů, připojení a úplnost. Odstraňte veškeré možné nedostatky.
Po každých 25 hodinách použití a před začátkem sezóny namažte mechanismus otáčecího zařízení mazivem.
2
Montáž univerzálního závěsu
Umístěte traktor na rovnou plochu a zajistěte jej proti pohybu. Odpojte zástrčku vodiče světel traktoru a sejměte kryt motoru. Odmontujte šrouby Pol. 1.1 a 1.2 držáku krytu motoru na obou stranách traktoru, připojte držáky krytu motoru Pol.3, držáky Pol.1 a připojte šrouby Pol.1.1 a 1.2. Připojte rozpěru Pol.7 k hřídeli horního
ramene Pol.8, připojte tuto skupinu k držáku Pol.1 (dávejte pozor na správné umístění - drážka pro pružinu
musí být na pravé straně stroje), pružinu zajistěte na levé straně závlačkou. Pevně utáhněte šrouby Pol.1.1
a 1.2. Připojte kryt motoru, zapojte vodič světel. Pomocí nastavení výšky držáku krytu motoru Pol.3 vyrovnejte
kryt motoru a utáhněte šrouby Pol.1.1 a 1.2.
Odstraňte otočné čepy Pol.7.1, připojte spodní rameno Pol.6 rozpěry Pol.7, připojte přední přívěs Pol.5 a zajistěte jej čepy Pol.7.1.
Jemně namažte hřídele horních ramen Pol.8 mazacím tukem, vložte pružinu do drážky, připojte páku Pol.9.
zajistěte ji pojistným kroužkem Pol.10.
Zasuňte šrouby do páky Pol.9, připojte páku Pol.11, připojte pružinu do šroubu Pol.11.1 a zajistěte ji maticí.
Připojte šroub Pol.11.2.
Podle obrázku připojte pružinu Pol.12 mezi spodní rameno Pol.6 a hřídel horního ramene Pol.8.
Připojení shrnovací radlice
Lehce namažte otočné čepy Pol.15 před montáží.
Nastavte páku Pol.11 do pracovní polohy I, nasaďte podložky Pol.13 na horní a spodní rameno, nasaďte otočné čepy spodního a horního ramene radlice Pol.15, otočné čepy zajistěte závlačkami pružiny. Nastavte páku
Pol.11 do přepravní polohy 0.
3
Shrnování
Nastartujte stroj podle Návodu k obsluze pro traktor, nechejte motor 3 minuty běžet. Nastavte páku plynu do
polohy „MAX“ Nastavte páku Pol.11 do přepravní polohy I.
Pomalu a postupně se rozjeďte.
Zvolená rychlost musí odpovídat příslušným podmínkám, jinak může dojít ke klouzání, nebo to dokonce může vést k přetížení stroje. V těžkých podmínkách (vysoká vrstva, těžší materiál...) může dojít
k uklouznutí, proto dodržujte minimální rychlost nebo nepoužívejte celou pracovní šířku stroje.
Při práci je vhodné používat sněhové řetězy a dodatečné závaží, které se dodávají jako doplňkové vybavení.
Přetížení stroje může vést k poškození převodovky.
Boční nastavení radlice
Uvolněte páku P, natočte radlici do požadovaného směru.
Po práci
Pečlivě vyčistěte stroj.
Nechejte páku Pol.11 v pracovní poloze I a odpojte radlici z demontážního čepu přívěsu Pol.15. DÁVEJTE
POZOR na ztracení dílů.
6.
Bezpečnostní předpisy
Dodržujte bezpečnostní předpisy uvedené v Návodu k obsluze traktoru AJ102/AG122
Ve spojení s traktory AJ102 nebo AG122 může být použit dvoukolový přívěs.
Přeprava osob je zakázána.
Svahová dostupnost je 10°.
Na svazích jezděte kolmo na vrstevnice.
Při jízdě na svazích, jízdě vzad a otáčení dávejte max. pozor.
Používejte radlici v kompletním stavu.
Připojování a odpojování provádějte na rovných plochách.
Připojení provádějte pečlivě. Mechanicky zajistěte díly stroje, které představují hrozbu samovolného
pohybu.
Při práci nezastavujte na svazích - proto zvolte vhodnou pracovní rychlost.
Zvláštní pozornost věnujte skrytým překážkám, dávejte pozor při jízdě na nerovném terénu, to
může vést ke kontaktu mezi radlicí a terénem - nebezpečí poškození.
7.
Použití dodatečného příslušenství
Pro lepší přilnavost může být traktor zatížen dodatečným závažím. Sejměte sběrač trávy a připojte nosič
závaží na jeho držáky (Obr. 2 Pol. 16 a 17) a potom nezbytné závaží. Pro omezení prokluzování můžete
použít sněhové řetězy.
4
8.
Uložení
Po konci sezóny, nebo pokud nebudete stroj používat déle než 30 dní, připravte stroj na uložení. Doporučený postup:
Pečlivě očistěte adaptér a umyjte jej.
Vyměňte vadné nebo opotřebované díly a utáhněte volné spoje.
Namažte všechny mazací body.
Adaptér ukládejte zakrytý v čistém a suchém prostředí.
9.
Likvidace
Po uplynutí provozní životnosti stroje je majitel stroje odpovědný za jeho likvidaci. Pro tuto záležitost
můžete využít společnost, která se zabývá likvidací odpadu. Nebo můžete likvidaci provést sami. V tomto
případě doporučujeme následující postup:
•
Stroj zlikvidujte v souladu s platnými zákony o nakládání s odpady.
•
Radlici rozeberte.
•
Roztřiďte díly na ekologické a díly, které představují hrozbu pro životní prostředí (guma, mazivo).
Je nutné s nebezpečnými díly zacházet ekologicky v souladu s příslušným zákonem o odpadech.
•
Výběr dílů bude proveden v souladu s platným katalogem o nakládání s odpady a v souladu se
zákonem o nakládání s odpady. S ekologickým odpadem bude nakládáno jako s recyklovatelným
materiálem.
10. Objednávání náhradních dílů
Náhradní díly objednávejte u prodejce nebo servisní organizace, která je informována o aktuálních technických změnách.
Při objednávce vždy uveďte následující:
Objednací číslo dílu
Vaši přesnou adresu a telefonní číslo
11. Záruka
Záruční doba je 24 měsíců v případech nekomerčního použití*. Při výměně jakéhokoliv dílu, nebo z důvodů kvůli reklamaci, záruka na tento díl je platná 6 měsíců od data výměny, nicméně minimálně během
záruční doby celého stroje. V případě záručních oprav se záruka prodlouží o dobu trvání opravy. Výrobce
je povinen zaručit, že výrobek bude mít charakteristiky a parametry uvedené výrobcem po celou dobu
trvání záruční doby. Výrobce není odpovědný za vady na výrobku vzniklé opotřebením, nesprávným
uložením, neprofesionálním servisem, zásahy do stroje, nehodami a za použití v rozporu s Návodem
k obsluze.
* Pro účely této záruky je nekomerčním použitím míněno, že výrobky, zakoupené v prodejně jsou používány v domácnostech osobně původním zákazníkem a ne v rámci jeho/její obchodní činnosti nebo
jiných podnikatelských činností.
Seco GROUP a.s. se neustále věnuje vývoji a vylepšování všech svých strojů. Proto se v tomto návodu
mohou objevit určité technické rozdíly v terminologii, když se porovná se skutečným výrobkem. Z toho
nemohou být vyvozovány žádné nároky. Tisk, kopírování, publikování a překlady (dokonce jen částí) nesmí
být prováděny bez písemného souhlasu Seco GROUP a.s. Výrobce si vyhrazuje právo na změny.
5
Seco Group a.s. (Inc.), kancelář pobočky 02 AGS Jičín, Jungmannova 11, 506 48 Jičín
ES PROHLÁŠENÍ O SHODĚ
v souladu se zákonem č. 22/1997 Sb.
A.
My: Seco Group a.s., Šaldova 408/30, Praha 8
Pobočka 02 AGS Jičín, Jungmannova 11
IČO: 60193450
tímto vydáváme toto následující prohlášení:
B.
Popis stroje
název stroje: Shrnovací radlice
typ: SR-110.2
Popis:
Shrnovací radlice SR - 110 je ve spojení s traktory AJ102 a AG122 určena k odklízení sněhu z chodníků,
silnic nebo pro odhrnování lehkých sypkých materiálů. Radlice je zajištěna proti srážce s tvrdými předměty. Deska radlice je úhlově nastavitelná. Pro spojení se sekačkami je potřebný univerzální závěs.
C.
Předpisy, v souladu s nimiž bylo Prohlášením o shodě hodnoceno: Zákon č. 22/1997 Sb.
D.
Vyhodnocovací proces byl proveden v souladu s postupy popsanými v: Usnesení vlády č. 170/1997 Sb.,
§3 odst. 1a
E.
Tímto prohlašujeme, že:
tento stroj, jak je popsán výše, vyhovuje požadavkům dříve specifikovaným v technických parametrech a proto je bezpečný pro použití při běžných provozních podmínkách.
byla provedena opatření pro zajištění shody všech výrobků na trhu s technickou dokumentací a požadavky na technické předpisy.
Technická dokumentace je uložena na adrese výrobce.: Seco GROUP
pobočka 02 AGS
Jungmannova 11
506 48 Jičín
V Jičíně dne 2. 1. 2007
Pan Jiří Pávek
člen představenstva
6
ploughshare
SR - 110.2
User’s manual
Seco GROUP a. s.
branch 02 AGS
Jungmannova 11
506 48 Jičín
CZECH REPUBLIC
Dear customer,
thank you for making the important decision to buy our machine. Seco GROUP a.s. is the successive owner of
companies Knotek a spol., Agrostroj and AGS Jičín and has been well-recognized on European and world markets as a manufacturer of high quality mowing and landscaping machines sold under the mark AGS.
Now it is entirely up to you how you will use your machine and how you will maintain it to enjoy trouble-free
operation for many years to come.
Please read this manual thoroughly to facilitate the use of this ploughshare. Proceed precisely according to the
instructions which will ensure optimum use and long operational life of your ploughshare.
Use the device for the purposes it has been designed for. Any other use not stated in this manual can be dangerous and can lead to damaging the machine, which can then result in the loss of your Warranty and the manufacturer shall be relieved of all responsibilities.
More than 100 authorized service shops located throughout the entire Europe offer you high quality services,
performed by our technicians trained at the manufacturing facility.
1. Use
Ploughshare SR - 110 is intended in aggregation with mowing tractors AJ102 and AG122 for clearing snow
from pavements, roads or for moving light loose materials.
2. Description
The ploughshare consists of a supporting frame and suspended lateral adjustable ploughs. The plough is
attached to a universal suspension which ensures it is secured into one position. The plough can be adjusted
laterally. Upon impact into a solid obstacle, the plough will be lifted without being damaged. Once the
obstacle has been driven over, the spring returns the plough into the original position.
When working on snow, the rear tires may slide which can be eliminated by mounting snow chains and adding additional weights.
3.
Technical data:
Length - Width - Height (mm)
Range(cm)
Weight
320 - 1100 - 385
110
25 kg
4. Unpacking and assembly
The plough is delivered completely assembled. Washers Pos. 13(4pc) are provided in the PE bag. To connect to a mowing tractor it is necessary to have a universal hitch which is provided separately. For more
demanding types of work, the tractor can be loaded by adding additional weights.
5. Preparation for use, connection, use and maintenance
Prior to each use check the plough - the attachment of individual components, screw tightness, connections
and completeness. Eliminate any possible insufficiencies.
After every 25 hours of use and prior to the start of the season, oil the turning gear mechanism with lubrication grease.
Universal hitch assembly
Position the mowing tractor on a flat surface and secure it against movement. Disconnect the tractor lighting
socket conductor and remove the hood. Remove screws Pos. 1.1 and 1.2 of the hood bracket on both sides of the
tractor, attach the hood brackets Pos.3, brackets Pos.1 and attach screws Pos.1.1 and 1.2.
Attach the brace Pos.7 to the shaft of the upper arm Poz.8, attach this group to bracket Pos.1 (pay attention to
the correct positioning - the groove for the spring must be on the right side of the machine), secure the spring
split pin on the left side. Gently tighten screws Pos.1.1 and 1.2. Attach the hood, connect the light conductor.
Using the height adjustment of the hood bracket Pos.3 level out the hood and tighten the screws Pos.1.1 and
1.2.
Remove the pintles Pos.7.1, attach the lower arm Pos.6 of the braces)’ Pos.7, attach the front hitch Pos.5 and
secure with spindles Pos.7.1.
Gently lubricate the shafts of the upper arms Pos.8 with lubrication grease, insert the spring into the groove,
attach the lever Pos.9. secure with a safety ring Pos.10.
Insert screws into the lever Pos.9, attach the lever Pos.11, attach the spring to screw Pos.11.1 and secure with a
nut. Attach screw Pos.11.2.
Attach spring Pos.12 according to the picture between the lower arm Pos.6 and the shaft of the upper arms
Pos.8.
Attaching the ploughshare Lightly lubricate the pintles Pos.15 before assembly.
Position lever Pos.11 into working position I, attach washers Pos.13 to the upper and lower arms, attach the
lower and upper arm pintles to the plough Pos.15, secure the pintles with spring split pins. Position lever Pos.11
into transport position 0.
Ploughing
Start the machine according to the User’s manual for the mowing tractor, let the motor run for 3 minutes.
Position the gas lever in “MAX” position
Position lever Pos.11 into transport position I.
Slowly and gradually start driving.
The selected speed must correspond with the respective conditions, otherwise sliding may occur, or it may even
lead to overloading the machine. In heavy conditions (high layer, heavier material....) sliding may occur, therefore
maintain minimum speed or do not use the full range of the machine.
When working, it is suitable to use snow chains and additional weights which are provided as additional equipment.
Overloading the machine may lead to a defect in the gear box.
Laterak adjustment of the plough
Release lever P, turn the plough into the desired direction.
After work
Clean the machine thoroughly.
Leave lever Pos.11 in working position I and disconnect the plough from the hitch of the dismounting spindle
Pos.15. PAY ATTENTION to losing parts.
6.
Safety regulations
Adhere to safety regulations stated in the User’s manual of mowing tractor AJ102/AG122
The semi-trailer can be used in connection with mowing tractors AJ102 or AG122.
The transportation of individuals is forbidden.
Slope accessibility is 10°.
Drive vertically on slopes in contour lines.
Pay max. attention to riding on a slope, backing out and turning.
Use the plough in its complete state.
Perform connection and disconnection on flat surfaces.
Perform connection carefully. Mechanically ensure parts of the machine which pose threat of self-propelling
motion.
Do not stop on slopes when working - therefore select the appropriate working speed.
Pay special attention to hidden obstacles, be careful of running over uneven surfaces, this can lead to contact
between the plough and surface - danger of damages.
7. Use of additional equipment
For increased grip, the tractor can be loaded with additional weights. Remove the grass collector and attach
the load carrier tp its brackets (Pic. 2 Pos. 16 and 17) a nd the necessary weight. To reduce sliding, you can
use snow chains.
8. Storage
After the end of the season or if you are not using you machine for more than 30 days, make sure to prepare
your machine for storage. Recommended procedure:
Clean the adapter thoroughly and wash.
Replace defective or worn out parts and tighten loose joints.
Oil all lubrication sights.
Store the adapter covered in a clean and dry environment.
9. Disposal
After the operational life of the machine is over, the owner of the machine is responsible for the disposal.
You can use a company for this matter which deals with the liquidation of waste. Or you can perform the
liquidation yourself. In this case we recommend the following procedure:
• Dispose of your machine in accordance with the applicable law of waste management.
• Disassemble the plough.
• Sort the parts out into ecologically friendly and parts which pose a threat to the environment (rubber,
lubrication). It is necessary to handle ecologically hazardous parts in accordance with the respective
Law on waste.
• The selection of the parts shall be done according to the applicable waste management catalogue and in
accordance with waste law management. Ecologically friendly waste shall be treated as reusable material.
10. Ordering spare parts Order spare parts at your dealer’s of a service organisation which is informed of the actual technical changes.
Always state the following on your order: Order number of part
Your exact address and telephone number
11. Warranty
The warranty period is 24 months in cases of non-commercial use*. When replacing any part, or for reasons
due to claims, the warranty for this part is valid for 6 months from the date of replacement, however for a
minimum of the warranty period of the entire machine. The warranty is extended by the duration of the
repair in the instance of warranty repairs. The manufacturer is obliged to guarantee the product has the
characters and parameters as stated by the manufacturer for the entire duration of the warranty period. The
manufacturer is not responsible for defects on the product incurred by wear and tear, incorrect storage, unprofessional service, intervention in the machine, accidents and for use in conflict with the User’s manual.
* For the purpose of this warranty non-commercial use is deemed that the product, purchased in a retail
store are used in households personally by the original consumer and not within the scope of his/her business or other entrepreneurial activities.
Seco GROUP a.s. is dedicated to continuous development and improvement of all its machines. Therefore,
some technical differences in terminology may appear in this manual when compared with the real product.
No claims can be deduced from this. Print, duplication, publication and translations (even just parts) can
not be performed without the written consent of Seco GROUP a.s. The manufacturer reserves the right to
changes.
Seco Group a.s. (Inc.), branch office 02 AGS Jičín, Jungmannova 11, 506 48 Jičín
ES DECLARATION OF CONFORMITY
in accordance with >Law no. 22/1997 Coll.
A. We: The Seco Group a.s., Šaldova 408/30, Prague 8
Branch 02 AGS Jičín, Jungmannova 11
IČO: 60193450
hereby issues this following declaration:
B. Machine description
- name of the machine: Ploughshare
- type: SR-110.2
Description:
Ploughshare SR - 110 is intended in aggregation with mowing tractors AJ102 and AG122 for clearing snow
from pavements, roads or for moving light loose materials. The plough is secured against collision with
harrd objects. The plough board is adjustable angle-wise. To aggregate with mowing machines a universal
hitch is necessary.
C. Rules and regulations according which the Declarations of conformity has been evaluated:
Law no. 22/1997 Coll.
D. The evaluation process has been done according to procedures described in:
Government decree no. 170/1997 Coll., §3 par. 1a
E. We hereby declare that:
- this machine as described above complies with the requirements specified earlier in the technical parameters and it is therefore safe for use under common operational conditions.
precautions have been applied to insure the conformity of all products present on the market with technical
documentation and requirements for technical regulations.
Technical documentation is stored at the manufacturer’s at address:Seco GROUP
branch 02 AGS
Jungmannova 11
506 48 Jičín
In Jičín on 2. 1. 2007
Mr. Jiří Pávek
member of the Board of Directors
RÄUMSCHILD
SR - 110.2
Bedienungsanleitung
Seco GROUP a. s.
Zweigbetrieb 02 AGS
Jungmannova 11
506 48 Jičín
TSCHECHIEN
Sehr geehrter Kunde,
herzlichen Dank für Ihre Entscheidung zum Kauf dieser Maschine. Die Seco GROUP a.s. ist der Nachfolgeeigentümer der Firmen Knotek a spol., Agrostroj und AGS Jičín und genießt auf dem europäischen und
weltweiten Markt hohes Ansehen als Hersteller qualitativ hochwertiger Rasenpflegemaschinen. Nun liegt es
ganz in Ihrer Hand, wie Sie die Maschine verwenden und in Stand halten, um einen jahrelangen problemlosen
Betrieb zu gewährleisten.
Bitte lesen Sie diese Anleitung gründlich durch. Dadurch erleichtern Sie sich die Benutzung dieses Räumschilds. Gehen Sie genau nach den Anweisungen vor, um eine optimale Nutzung und eine lange Lebensdauer
des Räumschilds sicherzustellen. Verwenden Sie das Gerät nur für die Zwecke, für die es vorgesehen ist. Jede
in dieser Anleitung nicht genannte Verwendung kann gefährlich sein und kann zu einer Beschädigung der
Maschine führen, was seinerseits das Erlöschen Ihres Garantieanspruchs bewirken kann, wobei der Hersteller
jegliche Haftung ablehnt.
Mehr als 100 autorisierte Reparaturwerkstätten in ganz Europa bieten Ihnen hochwertigen Service durch unsere im Herstellungsbetrieb ausgebildeten Techniker.
1.
Benutzung
Das Räumschild SR - 110 ist in Verbindung mit den Rasentraktoren AJ102 und AG122 zum Schneeräumen auf Gehwegen und Straßen sowie zum Bewegen von leichtem Schüttgut vorgesehen.
2.
Beschreibung
Das Räumschild besteht aus einem tragenden Rahmen und einem daran aufgehängten, seitlich verstellbaren Schild. Das Schild ist an einer Universalaufhängung angebracht, die eine Sicherung des Schildes in
der gewünschten Position ermöglicht. Das Räumschild kann in seitlicher Richtung verstellt werden. Beim
Auftreffen auf ein festes Hindernis wird das Räumschild angehoben, ohne beschädigt zu werden. Sobald
das Hindernis überfahren ist, bringt eine Feder das Räumschild wieder in seine ursprüngliche Position.
Beim Arbeiten in Schnee können die Hinterräder durchrutschen. Dies kann durch Montieren von Schneeketten und Anbringen zusätzlicher Gewichte verhindert werden.
3.
Technische Daten:
Länge - Breite - Höhe (mm)
Arbeitsbreite (cm)
Gewicht
320 - 1100 - 385
110
25 kg
4.
Auspacken und Montage
Das Räumschild wird komplett montiert geliefert. Beilagscheiben Pos. 13 (4 Stück) sind in einem Plastikbeutel beigefügt. Zum Anbau an einen Rasentraktor ist eine gesondert erhältliche Universalaufhängung
erforderlich. Für anspruchsvollere Arbeiten kann der Traktor durch Anbringen zusätzlicher Gewichte beschwert werden.
5.
Vorbereitung, Anbau, Benutzung und Wartung
Prüfen Sie das Räumschild vor jeder Benutzung: Befestigung der einzelnen Komponenten, fester Sitz der
Schrauben und Verbindungsteile sowie Vollständigkeit. Beheben Sie alle etwaigen Unzulänglichkeiten.
Schmieren Sie den Schwenkmechanismus nach jeweils 25 Betriebsstunden sowie vor dem Start der Saison mit Schmierfett.
2
Montage der Universalaufhängung
Stellen Sie den Rasentraktor auf eine ebene Fläche und sichern Sie ihn gegen Wegrollen. Trennen Sie die
Steckverbindung der Lichtzuleitung und nehmen Sie die Haube ab. Entfernen Sie die Schrauben Pos. 1.1 und
1.2 der Haubenhalterungen auf beiden Seiten des Traktors, bringen Sie die Haubenhalterungen Pos. 3 und
die Halterungen Pos. 1 an und befestigen Sie die Schrauben Pos. 1.1 und 1.2. Bringen Sie die Streben Pos.
7 an der Welle der oberen Arme Pos. 8 an, bringen Sie diese Gruppe an der Halterung Pos. 1 an (achten Sie
dabei auf korrekte Positionierung - die Aussparung für die Feder muss sich auf der rechten Seite der Maschine
befinden) und sichern Sie sie mit dem Federsplint auf der linken Seite. Ziehen Sie die Schrauben Pos.1.1 und
1.2 leicht an. Setzen Sie die Haube auf und stellen Sie die Verbindung der Lichtzuleitung wieder her. Richten
Sie die Haube mithilfe der Höheneinstellung der Haubenhalterungen Pos. 3 aus und ziehen Sie die Schrauben
Pos. 1.1 und 1.2. fest.
Entfernen Sie die Bolzen Pos. 7.1, bringen Sie die unteren Arme Pos. 6 der Streben Pos. 7 und die vordere
Aufhängung Pos. 5 an und sichern Sie sie mit den Bolzen Pos. 7.1.
Schmieren Sie die Wellen der oberen Arme Pos. 8 leicht mit Schmierfett, setzen Sie die Feder in die Aussparung ein, bringen Sie den Hebel Pos. 9 an und sichern Sie ihn mit einem Sicherungsring Pos. 10.
Stecken Sie die Schrauben in den Hebel Pos. 9, bringen Sie den Hebel Pos. 11 an, setzen sie die Feder auf die
Schraube Pos.11.1 und sichern Sie sie mit einer Mutter. Montieren Sie die Schraube Pos. 11.2.
Setzen Sie die Feder Pos. 12 entsprechend der Zeichnung zwischen dem unteren Arm Pos. 6 und der Welle der
oberen Arme Pos. 8 ein.
Anbringen des Räumschilds
Schmieren Sie die Bolzen Pos. 15 vor der Montage leicht mit Schmierfett.
Bringen Sie den Hebel Pos. 11 in die Arbeitsposition I, bringen Sie die Beilagscheiben Pos. 13 an den oberen
und unteren Armen an, bringen Sie die Bolzen Pos. 15 der unteren und oberen Arme am Räumschild an und
sichern Sie die Bolzen durch Federsplinte. Bringen Sie den Hebel Pos. 11 in die Transportposition 0.
3
Durchführen von Räumarbeiten
Starten Sie die Maschine gemäß der Bedienungsanleitung für den Rasentraktor und lassen Sie den Motor drei
Minuten lang laufen. Bringen Sie den Gashebel in die Stellung „MAX“ und den Hebel Pos. 11 in die Transportposition I.
Fahren Sie langsam und kontinuierlich los.
Die gewählte Geschwindigkeit muss den jeweiligen Bedingungen entsprechen, andernfalls kann es zu einem Durchrutschen der Räder oder sogar zu einer Überlastung der Maschine kommen. Unter erschwerten Bedingungen (tiefer Schnee, schwereres Material etc.) können die Räder durchrutschen. Fahren Sie
in diesem Fall mit minimaler Geschwindigkeit oder verwenden Sie nicht die volle Arbeitsbreite.
Es empfiehlt sich, Schneeketten und zusätzliche Gewichte zu verwenden, die als Zubehör erhältlich sind.
Eine Überlastung der Maschine kann zu einem Getriebeschaden führen.
Seitliches Verstellen des Räumschilds
Lösen Sie den Hebel P und schwenken Sie das Räumschild in die
gewünschte Richtung.
Nach der Arbeit
Reinigen Sie die Maschine gründlich.
Belassen Sie den Hebel Pos. 11 in der Arbeitsposition I und lösen Sie das Räumschild von der Aufhängung
durch Demontage der Bolzen Pos. 15. ACHTEN Sie darauf, dass Sie keine Teile verlieren.
6.
Sicherheitsbestimmungen
Befolgen Sie die Sicherheitsbestimmungen in der Bedienungsanleitung des Rasentraktors AJ102/AG122.
Der Anhänger kann nur mit den Rasentraktoren AJ102 oder AG122 verwendet werden.
Die Beförderung von Personen ist verboten.
Die maximale befahrbare Hangneigung beträgt 10°.
Fahren Sie an Hängen senkrecht zu den Höhenlinien.
Gehen Sie beim Fahren an Hängen, beim Zurücksetzen und beim Kurvenfahren mit größter Vorsicht vor.
Verwenden Sie das Räumschild in komplett montiertem Zustand.
Führen Sie An- und Abbauarbeiten auf ebenen Flächen durch.
Gehen Sie beim Anbau mit Sorgfalt vor. Sichern Sie mechanisch alle Teile der Maschine, bei denen die
Gefahr einer selbsttätigen Lockerung gegeben ist.
Bleiben Sie während der Arbeit nicht an Hängen stehen. Wählen Sie deshalb eine geeignete Arbeitsgeschwindigkeit.
Achten Sie besonders auf versteckte Hindernisse und lassen Sie beim Fahren auf unebenen Flächen
Vorsicht walten. Hierbei kann es zum Kontakt zwischen Räumschild und Boden und dadurch zu
Beschädigungen kommen.
4
7.
Verwendung von Sonderzubehör
Zur Erhöhung der Bodenhaftung kann der Traktor durch Zusatzgewichte beschwert werden. Entfernen
Sie den Grasfangkorb und befestigen Sie an seinen Halterungen den Gewichtsträger (Bild 2 Pos. 16
und 17) und die erforderlichen Gewichte. Um das Durchrutschen der Räder zu reduzieren, können Sie
Schneeketten verwenden.
8.
Lagerung
Am Ende der Saison oder bei Nichtverwendung des Anbaugeräts für mehr als 30 Tage sollte das Gerät für
die Lagerung vorbereitet werden. Empfohlene Vorgehensweise:
Reinigen und waschen Sie das Gerät gründlich.
Ersetzen Sie defekte bzw. verschlissene Teile und ziehen Sie lockere Verbindungen fest.
Schmieren Sie alle in Frage kommenden Stellen.
Lagern Sie das Gerät abgedeckt an einem sauberen und trockenen Ort.
9.
Entsorgung
Nach Ablauf der Lebensdauer des Räumschilds ist der Eigentümer zu dessen Entsorgung verpflichtet.
Hierzu können die Dienste einer Entsorgungsfirma in Anspruch genommen werden. Sie können die Entsorgung aber auch selbst durchführen. In diesem Fall empfehlen wir folgende Vorgehensweise:
•
Gehen Sie beim Entsorgen des Gerätes gemäß den geltenden Vorschriften vor.
•
Demontieren Sie das Räumschild.
•
Trennen Sie umweltfreundliche Teile von umweltgefährdenden Teilen (Gummi, Schmierstoffe).
Ökologisch gefährliche Teile müssen gemäß den geltenden Abfallentsorgungsvorschriften behandelt werden.
•
Die Trennung der Teile muss gemäß den geltenden Vorschriften für Mülltrennung und Abfallentsorgung
erfolgen. Ökologisch unbedenkliche Wertstoffe sollten einer Wiederverwendung zugeführt werden.
10. Bestellung von Ersatzteilen
Bestellen Sie Ersatzteile bei Ihrem Händler oder bei einem Servicebetrieb, der über aktuelle technische
Änderungen informiert ist.
Geben Sie bei Ihrer Bestellung immer Folgendes an:
Bestellnummer des Teils
Ihre genaue Adresse und Telefonnummer
11. Garantie
Der Garantiezeitraum beträgt bei nichtgewerblicher Nutzung* 24 Monate. Beim Austauschen von Teilen
oder bei Reklamationsfällen beträgt der Garantiezeitraum für das jeweilige Teil 6 Monate ab dem Datum des Austausches, minimal entspricht er jedoch dem Garantiezeitraum der gesamten Maschine. Der
Garantiezeitraum verlängert sich im Falle von Reparaturen im Rahmen der Garantie um die Dauer der
Reparatur. Der Hersteller bürgt dafür, dass das Produkt während des gesamten Garantiezeitraums die von
ihm angegebenen Eigenschaften und Parameter aufweist. Der Hersteller haftet nicht für Produktmängel
aufgrund von Verschleiß, falscher Lagerung, unsachgemäßer Wartung, Eingriffen in die Maschine, Unfällen und aufgrund einer Benutzung, die in Widerspruch zur Bedienungsanleitung steht.
* Als nichtgewerbliche Nutzung ist in Bezug auf diese Garantie zu verstehen, dass das Produkt im Einzelhandel erworben wurde und dass es vom ursprünglichen Käufer persönlich im privaten Umfeld und
nicht im Rahmen seiner geschäftlichen oder unternehmerischen Tätigkeit genutzt wird.
Die Seco GROUP a.s. verfolgt das Ziel der ständigen Weiterentwicklung und Verbesserung aller ihrer Maschinen. Dadurch kann es in dieser Anleitung zu einigen technischen Abweichungen der Terminologie vom
eigentlichen Produkt kommen. Hieraus können keinerlei Ansprüche abgeleitet werden. Druck, Vervielfältigung, Veröffentlichung und Übersetzung (auch nur auszugsweise) bedürfen einer schriftlichen Genehmigung durch die Seco GROUP a.s. Änderungen vorbehalten.
5
Seco Group a.s. (Inc.), Zweigbetrieb 02 AGS Jičín, Jungmannova 11, 506 48 Jičín
EG-KONFORMITÄTSERKLÄRUNG
in Übereinstimmung mit dem Gesetz Nr. 22/1997 Slg.
A.
Die Seco Group a.s., Šaldova 408/30, Prag 8
Zweigbetrieb 02 AGS Jičín, Jungmannova 11
Org.-IdNr.: 60193450
gibt hiermit die folgende Erklärung ab:
B.
Beschreibung der Maschine
Bezeichnung der Maschine: Räumschild
Typ: SR-110.2
Beschreibung:
Das Räumschild SR - 110 ist in Verbindung mit den Rasentraktoren AJ102 und AG122 zum Schneeräumen auf Gehwegen und Straßen sowie zum Bewegen von leichtem Schüttgut vorgesehen. Das Räumschild ist gegen Kollisionen mit harten Gegenständen gesichert. Der Winkel des Räumschilds ist verstellbar. Zur Befestigung an Rasenmähmaschinen ist eine Universalaufhängung erforderlich.
C.
Vorschriften und Bestimmungen, nach denen die Konformitätserklärung beurteilt worden ist: Gesetz
Nr. 22/1997 Slg.
D.
Die Beurteilung erfolgte nach den Verfahren, die beschrieben wurden in: Regierungsverordnung
Nr. 170/1997 Slg., §3 Abs. 1a
E.
Wir bestätigen hiermit, dass:
diese Maschine, wie sie oben beschrieben ist, den Anforderungen entspricht, die früher in den technischen Parametern angegeben worden sind, und deshalb unter üblichen Betriebsbedingungen gebrauchsicher ist.
Maßnahmen getroffen worden sind, damit die Übereinstimmung aller Produkte, die auf den Markt
gebracht wurden, mit der technischen Dokumentation und den technischen Bestimmungen gewährleistet ist.
Die technische Dokumentation ist beim Hersteller unter folgender Adresse hinterlegt:
Seco GROUP
Zweigbetrieb 02
AGS
Jungmannova 11
506 48 Jičín
Jičín, den 2. 1. 2007
Herr Jiří Pávek
Vorstandsmitglied
6
CHARRUE
SR - 110.2
Manuel de l‘utilisateur
Seco GROUP a. s.
filiale 02 AGS
Jungmannova 11
506 48 Jičín
RÉPUBLIQUE
TCHÈQUE
Cher client,
nous vous remercions pour avoir pris la décision importante d‘acheter notre machine. Seco GROUP a.s. est
le propriétaire successif des sociétés Knotek a spol., Agrostroj et AGS Jičín et sa renommée sur les marchés
européens et mondiaux a été établie grâce aux tondeuses et machines d‘entretien de paysage. Il vous revient à
présent d‘utiliser votre machine et de l‘entretenir pour profiter de nombreuses années de fonctionnement sans
soucis.
Veuillez lire l‘intégralité de ce manuel pour faciliter l‘utilisation de cette charrue. Suivez précisément les
instructions qui vous assureront une utilisation optimale et une durée de vie prolongée de votre charrue. Utilisez l‘appareil conformément aux usages prévus. Tout autre usage non mentionné dans ce manuel peut être
dangereux et peut entraîner des dégâts à la machine, pouvant à leur tour causer la perte de votre garantie et
l‘exemption du fabricant de toute responsabilité.
Plus de 100 ateliers de réparation agréés situés dans toute l‘Europe vous offrent des réparations de qualité,
effectuées par nos techniciens formés à l‘usine de fabrication.
1.
Utilisation
La charrue SR - 110 est prévue pour être raccordée aux tondeuses auto-portées AJ102 et AG122 pour
libérer les sols et les routes de la neige ou pour déplacer des matériaux en vrac.
2.
Description
La charrue se compose d‘un châssis de support et de socs latéraux réglables suspendus. La charrue est
raccordée à une suspension universelle qui garantit qu‘elle est fixé dans une seule position. La charrue
peut être réglée latéralement. Lors de l‘impact sur un obstacle solide, la charrue se relève sans être endommagée. Lorsque l‘obstacle est franchi, le ressort ramène la charrue dans la position d‘origine. Lors du
travail sur la neige, les pneus arrière peuvent patiner ; il est possible d‘éviter cela en mettant des chaînes
et en ajoutant du lest supplémentaire.
3.
Caractéristiques techniques :
Longueur - Largeur - Hauteur (mm)
Portée (cm)
Poids
320 - 1100 - 385
110
25 kg
4.
Déballage et assemblage
La charrue est livrée complètement assemblée. Des rondelles Pos. 13 (x 4) sont fournies dans le sachets
en PE. Pour le raccordement à une tondeuse auto-portée, il faut disposer d‘un attelage universel fourni à
part. Pour les travaux plus exigeants, le tracteur peut être chargé avec du lest supplémentaire.
5.
Préparation à l’utilisation, connexion, utilisation et entretien
Avant chaque utilisation, contrôlez la charrue : raccordement de chaque composant, serrage des vis,
connexions et intégralité des composants. Résolvez tout problème possible.
Au bout de 25 heures d’utilisation et avant le début de la saison, huilez le mécanisme rotatif à engrenages
avec de la graisse lubrifiante.
2
Assemblage de l’attelage universel
Positionnez la tondeuse auto-portée sur une surface plane et immobilisez-la. Débranchez le conducteur de la
prise d’éclairage du tracteur et retirez le capot. Retirez les vis Pos. 1.1 et 1.2 du support de capot sur les deux
côtés du tracteurs, raccordez les supports de capot Pos.3, les supports Pos.1 et vissez les vis Pos.1.1 et 1.2. Attachez le tirant Pos.7 à l’axe du bras supérieur Pos.8, attachez ce groupe au support Pos.1 (faites attention au sens
correct : la rainure pour le ressort doit se trouver à droite de la machine) et fixez la goupille fendue à ressort sur
le côté gauche. Serrez sans forcer les vis Pos.1.1 et 1.2. Attachez le capot, branchez le conducteur d’éclairage.
À l’aide du réglage de poids du support du capot Pos.3 mettez de niveau le capot et serrez les vis Pos.1.1 et 1.2.
Retirez les chevilles Pos.7.1, attachez le bras inférieur Pos.6 des tirants Pos.7, attachez l’attelage avant Pos.5
et fixez-le avec les broches Pos.7.1.
Lubrifier légèrement les axes des bras supérieurs Pos.8 avec de la graisse lubrifiante, introduisez le ressort dans
la rainure, attachez le levier Pos.9 et fixez avec un anneau de sûreté Pos.10.
Insérez les vis dans le levier Pos.9, attachez le levier Pos.11, attachez le ressort à la vis Pos.11.1 et fixez avec
un écrou. Attachez la vis Pos.11.2.
Attachez le ressort Pos.12 selon l’illustration entre le bras inférieur Pos.6 et l’axe des bras supérieurs Pos.8.
Raccordement de la charrue
Lubrifiez légèrement les chevilles Pos.15 avant l’assemblage.
Positionnez le levier Pos.11 en position de travail I, raccordez les rondelles Pos.13 sur les bras supérieur et
inférieur, attachez les chevilles du bras inférieur et supérieur à la charrue Pos.15, fixez les chevilles avec des
goupilles fendues à ressort. Positionnez le levier Pos.11 en position de transport 0.
3
Labour
Démarrez la machine selon le manuel d’utilisation de la tondeuse auto-portée et laissez le moteur tourner pendant
3 minutes. Positionnez la manette des gaz en position MAX. Positionnez le levier Pos.11 en position de transport I.
Commencer à avancer lentement et graduellement.
La vitesse sélectionnée doit correspondre aux conditions respectives, sans quoi un patinage peut se produire ou cela peut même conduire à une surcharge de la machine. Dans des conditions difficiles (couche
épaisse, matériau plus lourd...), le patinage peut se produire, aussi, conservez une vitesse minimum ou
n’utilisez pas toute la portée de la machine.
Lors du travail, il convient d’utiliser des chaînes à neige et du lest supplémentaire (fournis en sus).
La surcharge de la machine peut entraîner un défaut de la boîte de vitesses.
Réglage latéral de la charrue
Libérez le levier P et tournez la charrue dans le sens désiré.
Après le travail
Nettoyez soigneusement la machine.
Laissez le levier Pos.11 en position de travail I et détachez la charrue de l’attelage de la broche de démontage
Pos.15. FAITES ATTENTION à ne pas perdre de pièces.
6.
Consignes de sécurité
Respectez les consignes de sécurité mentionnées dans le manuel d’utilisation de la tondeuse auto-portée
AJ102/AG122
La remorque peut être utilisée raccordée aux tondeuses auto-portées AJ102 ou AG122.
Le transport de personnes est interdit.
La pente franchissable est de 10°.
Progressez verticalement sur les pentes en courbes de niveau.
Faites très attention lors du franchissement des pentes, de l’inversion de marche et des virages.
Utilisez la charrue complète.
Effectuez les connexions et déconnexions sur des surfaces planes.
Effectuez attentivement les connexions. Assurez mécaniquement les parties de la machine qui posent un
risque de mouvement autonome.
Ne vous arrêtez pas dans les pentes lors du travail ; sélectionnez par conséquent une vitesse de travail appropriée.
Faites particulièrement attention aux obstacles cachés et lors du passage sur les surfaces inégales,
car cela peut entraîner le contact entre la charrue et la surface - risque de dégâts.
7.
Utilisation de l’équipement supplémentaire
Pour une meilleure adhérence, le tracteur peut être chargé avec du lest supplémentaire. Retirez le collecteur d’herbe et attachez le bac à lest à ses supports (image 2 Pos. 16 and 17) et le lest nécessaire. Pour
réduire le patinage, vous pouvez utiliser des chaînes à neige.
4
8.
Stockage
À la fin de la saison ou si vous n’utilisez pas votre machine pendant plus de 30 jours, assurez-vous de
préparer votre machine pour le stockage. Procédure conseillée :
Nettoyez soigneusement l’adaptateur et lavez-le.
Remplacez les pièces défectueuses ou usagées et serrez les joints desserrés.
Huilez toutes les jauges de lubrification.
Conservez l’adaptateur couvert dans un lieu propre et sec.
9.
Mise au rebut
Lorsque la machine arrive en fin de vie, le propriétaire de la machine est responsable de la mise au rebut.
Vous pouvez confier cette tâche à une société qui s’occupe de la liquidation des déchets. Vous pouvez
aussi effectuer la liquidation vous-même. Dans ce cas, nous conseillons la procédure suivante :
•
Mettez la machine au rebut conformément à la loi applicable sur la gestion des déchets.
•
Désassemblez la charrue.
•
Séparez les pièces écologiques et celles qui sont nuisibles à l’environnement (caoutchouc, lubrifiant). Il est nécessaire de manipuler les pièces dangereuses pour l’environnement conformément à
la loi correspondante sur les déchets.
•
La sélection des pièces doit être effectuée selon le catalogue de gestion des déchets applicable et
conformément à la loi sur la gestion des déchets. Les déchets écologiques doivent être traités comme
du matériel réutilisable.
10. Commande de pièces détachées
Commandez les pièces détachées chez votre concessionnaire d’une organisation de service informé des
modifications techniques effectives.
Mentionnez toujours les éléments suivants sur votre commande :
Numéro de commande la pièce
Votre adresse exacte et votre
numéro de téléphone
11. Garantie
La période de garantie est de 24 mois en cas d’utilisation non commerciale*. Lors du remplacement de
pièces ou pour des motifs liés à des demandes sous garantie, la garantie de la pièce est valide 6 mois à
compter de la date du remplacement, mais pendant un minimum de la période de garantie de la machine
entière. La garantie est étendue pendant la durée de la réparation en cas de réparations sous garantie. Le
fabricant est obligé de garantir que le produit possède les caractéristiques et les paramètres mentionnés
par le fabricant durant toute la durée de la période de garantir. Le fabricant n’est pas responsable des
défauts du produits causés par l’usure, un stockage incorrect, une réparation de fortune, l’intervention
dans la machine, les accidents et par les usages en conflit avec le manuel d’utilisation.
* Aux fins de cette garantie, l’utilisation non commerciale considère que le produit acheté dans un magasin de vente au détail est utilisé personnellement dans le cadre domestique par le consommateur d’origine et non dans le cadre de ces activités professionnelles ou d’entrepreneur.
Seco GROUP a.s. développe et améliore en permanence toutes ses machines. Par conséquent, certaines
différences techniques dans la terminologie peuvent exister dans ce manuel par rapport au produit réel. Cela
ne donne droit à aucune revendication. L’impression, la reproduction, la publication et la traduction (même
partielle) sont interdites sans l’accord écrit de Seco GROUP a.s. Le fabricant se réserve le droit d’apporter
des modifications.
5
Seco Group a.s. (Inc.), succursale 02 AGS Jičín, Jungmannova 11, 506 48 Jičín
DÉCLARATION DE CONFORMITÉ CE
selon la loi nº 22/1997 Coll.
A.
Nous : Le Groupe Seco Group a.s., Šaldova 408/30, Prague 8
succursale 02 AGS Jičín, Jungmannova 11
IČO : 60193450
produisons ici la déclaration suivante :
B.
Description de la machine
nom de la machine : Charrue
type : SR-110.2
Description:
La charrue SR - 110 est prévue pour être raccordée aux tondeuses auto-portées AJ102 et AG122 pour libérer les sols et les routes de la neige ou pour déplacer des matériaux en vrac. La charrue est assurée contre
la collision avec les objets durs. L’angle de la rehausse de la charrue est réglable. Pour l’accouplement à
des tondeuses auto-portées, un attelage universel est nécessaire.
C.
Consignes et réglementations avec lesquelles a été évaluée la conformité : loi nº 22/1997 Coll.
D.
L’évaluation a été effectuée selon les procédures déterminées par : décret gouvernemental nº 170/1997
Coll., §3 par. 1a
E.
Nous confirmons que :
cette machinerie définie par lesdites données est en accord avec lesdites exigences dans les consignes
techniques ci-dessus et est sûre dans les conditions d’usage normal.
les mesures ont été prises pour garantir la conformité de tous les produits du marché avec la documentation technique et les exigences de la réglementation technique.
La documentation technique est conservée à l’adresse du fabricant :
Seco GROUP
filiale 02 AGS
Jungmannova 11
506 48 Jičín
In Jičín le 2. 1. 2007
Mr. Jiří Pávek
membre du directoire
6
© SECO GROUUP, 2011
© Vyrobilo Z STUDIO Zlín, 2011