1
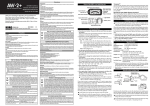
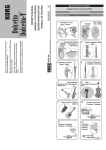
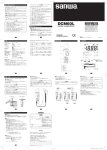
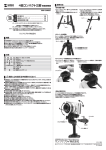
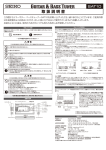
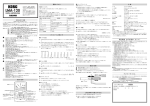
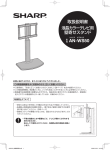
OWNER’S MANUAL
MANUEL D’UTILISATION
BEDIENUNGSANLEITUNG
MANUAL DE USUARIO
取扱説明書
A1
Trumpet / Trompette
Trompete / Trompeta
A2
Trombone
Trombone
Posaune
Trombón
Thank you for purchasing the Korg Clip-on Tuner AW-2.
Merci d’avoir fait l’acquisition du Clip-on Tuner AW-2 Korg.
Herzlichen Dank für den Kauf des Korg Clip-on Tuner AW-2.
Gracias por comprar el Korg Clip-on Tuner AW-2.
このたびは、コルグ Clip-on Tuner AW-2 をお買い上げいただきま
して、誠にありがとうございます。
4015-2 Yanokuchi, Inagi-city, Tokyo 206-0812 Japan
C
2008 KORG INC.
Précautions
Vorsichtsmaßnahmen
Emplacement
L'utilisation de cet instrument dans les endroits suivants peut en entraîner le mauvais fonctionnement.
• En plein soleil
• Endroits très chauds ou très humides
• Endroits sales ou fort poussiéreux
• Endroits soumis à de fortes vibrations
• A proximité de champs magnétiques
Alimentation
Lorsque vous n’utilisez pas l’appareil, n’oubliez pas de le mettre hors tension. Retirez les piles pour
éviter toute fuite lorsque l’appareil ne sera pas utilisé pendant de longues périodes de temps.
Precautions
Location
Using the unit in the following locations can result in a malfunction.
• In direct sunlight
• Locations of extreme temperature or humidity
• Excessively dusty or dirty locations
• Locations of excessive vibration
• Close to magnetic fields
Interférences avec d'autres appareils électriques
Les postes de radio et de télévision situés à proximité peuvent par conséquent souffrir d'interférences à la réception. Veuillez dès lors faire fonctionner cet appareil à une distance raisonnable de
postes de radio et de télévision.
Maniement
Pour éviter de les endommager, manipulez les commandes et les boutons de cet instrument avec
soin.
Entretien
Lorsque l'instrument se salit, nettoyez-le avec un chiffon propre et sec. Ne vous servez pas d'agents
de nettoyage liquides tels que du benzène ou du diluant, voire des produits inflammables.
Power supply
Be sure to turn the power switch to OFF when the unit is not in use. Remove the battery in order to
prevent it from leaking when the unit is not in use for extended periods.
Conservez ce manuel
Après avoir lu ce manuel, veuillez le conserver soigneusement pour toute référence ultérieure.
Interference with other electrical devices
Radios and televisions placed nearby may experience reception interference. Operate this unit
at a suitable distance from radios and televisions.
Evitez toute intrusion d'objets ou de liquide
Ne placez jamais de récipient contenant du liquide près de l'instrument. Si le liquide se renverse ou
coule, il risque de provoquer des dommages, un court-circuit ou une électrocution.Veillez à ne pas
laisser tomber des objets métalliques dans le boîtier (trombones, par ex.).
Handling
To avoid breakage, do not apply excessive force to the switches or controls.
Care
If the exterior becomes dirty, wipe it with a clean, dry cloth. Do not use liquid cleaners such as
benzene or thinner, or cleaning compounds or flammable polishes.
Keep this manual
After reading this manual, please keep it for later reference.
Keeping foreign matter out of your equipment
Never set any container with liquid in it near this equipment. If liquid gets into the equipment, it
could cause a breakdown, fire, or electrical shock. Be careful not to let metal objects get into the
equipment.
THE FCC REGULATION WARNING (for USA)
This equipment has been tested and found to comply with the limits for a Class B digital device, pursuant to Part 15 of the FCC Rules. These limits are designed to provide reasonable protection against
harmful interference in a residential installation. This equipment generates, uses, and can radiate radio
frequency energy and, if not installed and used in accordance with the instructions, may cause harmful
interference to radio communications. However, there is no guarantee that interference will not occur in
a particular installation. If this equipment does cause harmful interference to radio or television reception, which can be determined by turning the equipment off and on, the user is encouraged to try to
correct the interference by one or more of the following measures:
• Reorient or relocate the receiving antenna.
• Increase the separation between the equipment and receiver.
• Connect the equipment into an outlet on a circuit different from that to which the receiver is connected.
• Consult the dealer or an experienced radio/TV technician for help.
Unauthorized changes or modification to this system can void the user’s authority to operate this equipment.
Note concernant les dispositions (Seulement EU)
Quand un symbole avec une poubelle barrée d’une croix apparait sur le produit, le mode d’emploi, les piles ou le pack de piles, cela signifie que ce produit, manuel ou piles doit être déposé
chez un représentant compétent, et non pas dans une poubelle ou toute autre déchetterie
conventionnelle. Disposer de cette manière, de prévenir les dommages pour la santé humaine
et les dommages potentiels pour l'environnement. La bonne méthode d'élimination dépendra
des lois et règlements applicables dans votre localité, s’il vous plaît, contactez votre organisme
administratif pour plus de détails. Si la pile contient des métaux lourds au-delà du seuil réglementé, un symbole chimique est affiché en dessous du symbole de la poubelle barrée d’une
croix sur la pile ou le pack de piles.
REMARQUE IMPORTANTE POUR LES CLIENTS
Ce produit a été fabriqué suivant des spécifications sévères et des besoins en tension applicables dans le
pays où ce produit doit être utilisé. Si vous avez acheté ce produit via l’internet, par vente par correspondance ou/et vente par téléphone, vous devez vérifier que ce produit est bien utilisable dans le pays où vous
résidez.
ATTENTION: L’utilisation de ce produit dans un pays autre que celui pour lequel il a été conçu peut être
dangereuse et annulera la garantie du fabricant ou du distributeur. Conservez bien votre récépissé qui est
la preuve de votre achat, faute de quoi votre produit ne risque de ne plus être couvert par la garantie du
fabricant ou du distributeur.
CALIFORNIA USA ONLY
This Perchlorate warning applies only
to primary CR (Manganese Dioxide)
Lithium coin cells sold or distributed
ONLY in California USA.
“Perchlorate Material–special handling
may apply, See www.dtsc.ca.gov/
hazardouswaste/perchlorate.”
This device complies with Part 15 of the FCC Rules.
Operation is subject to the following two conditions:
(1) This device may not cause harmful interference,
and (2) this device must accept any interference
received, including interference that may cause
undesired operation.
Complies with Canadian ICES-003 Class B.
Conforme au Reglement Canadian NMB-003 classe B.
IMPORTANT NOTICE TO CONSUMERS
This product has been manufactured according to strict specifications and voltage requirements that
are applicable in the country in which it is intended that this product should be used. If you have
purchased this product via the internet, through mail order, and/or via a telephone sale, you must verify
that this product is intended to be used in the country in which you reside.
WARNING: Use of this product in any country other than that for which it is intended could be dangerous and could invalidate the manufacturer's or distributor's warranty.
Please also retain your receipt as proof of purchase otherwise your product may be disqualified from
the manufacturer's or distributor's warranty.
A3
French horn / Cor
Horn / Trompa /
A4
Tuba / Tuba
Tuba / Tuba
Stromversorgung
Stellen Sie den Netzschalter auf OFF, wenn das Gerät nicht benutzt wird. Wenn Sie das Gerät über einen
längeren Zeitraum nicht benutzen, nehmen Sie die Batterien heraus, damit sie nicht auslaufen.
Störeinflüsse auf andere Elektrogeräte
Dieser kann bei in der Nähe aufgestellten Rund-funkempfängern oder Fernsehgeräten Empfangsstörungen
hervorrufen. Betreiben Sie solche Geräte nur in einem geeigneten Abstand von diesem Erzeugnis.
Bedienung
Vermeiden Sie bei der Bedienung von Schaltern und Reglern unangemessenen Kraftaufwand.
Reinigung
Bei auftretender Verschmutzung können Sie das Gehäuse mit einem trockenen, sauberen Tuch abwischen.
Verwenden Sie keinerlei Flüssigreiniger wie beispielsweise Reinigungsbenzin, Verdünnungs- oder Spülmittel.
Verwenden Sie niemals brennbare Reiniger.
A5
Euphonium / Basse
Tenorbaß
Euphonium
A6
Oboe / Hautbois / Oboe
Oboe /
Bedienungsanleitung
Bewahren Sie diese Bedienungsanleitung gut auf, falls Sie sie später noch einmal benötigen.
Flüssigkeiten und Fremdkörper
Stellen Sie niemals Behältnisse mit Flüssigkeiten in der Nähe des Geräts auf. Wenn Flüssigkeit in das Gerät
gelangt, können Beschädigung des Geräts, Feuer oder ein elek-trischer Schlag die Folge sein. Beachten Sie,
daß keinerlei Fremdkörper in das Gerät gelangen.
Hinweis zur Entsorgung (Nur EU)
Wenn Sie das Symbol mit der „durchgekreuzten Mülltonne“ auf Ihrem Produkt, der dazugehörigen Bedienungsanleitung, der Batterie oder dem Batteriefach sehen, müssen Sie das Produkt in der vorgeschriebenen Art und Weise entsorgen. Dies bedeutet, dass dieses Produkt mit
elektrischen und elektronischen Komponenten nicht mit dem normalen Hausmüll entsorgt werden darf. Für Produkte dieser Art existiert ein separates, gesetzlich festgelegtes Entsorgungssystem. Gebrauchte elektrische und elektronische Geräte müssen separat entsorgt werden,
um ein umweltgerechtes Recycling sicherzustellen. Diese Produkte müssen bei benannten
Sammelstellen abgegeben werden. Die Entsorgung ist für den Endverbraucher kostenfrei! Bitte erkundigen sie sich bei ihrer zuständigen Behörde, wo sie diese Produkte zur fachgerechten
Entsorgung abgeben können. Falls ihr Produkt mit Batterien oder Akkumulatoren ausgerüstet
ist, müssen sie diese vor Abgabe des Produktes entfernen und separat entsorgen (siehe oben). Die Abgabe dieses Produktes bei einer zuständigen Stelle hilft ihnen, dass das Produkt umweltgerecht entsorgt
wird. Damit leisten sie persönlich einen nicht unerheblichen Beitrag zum Schutz der Umwelt und der menschlichen Gesundheit vor möglichen negativen Effekten durch unsachgemäße Entsorgung von Müll. Batterien
oder Akkus, die Schadstoffe enthalten, sind auch mit dem Symbol einer durchgekreuzten Mülltonne gekennzeichnet. In der Nähe zum Mülltonnensymbol befindet sich die chemische Bezeichnung des Schadstoffes.
Cd oder NiCd steht für Cadmium, Pb für Blei und Hg für Quecksilber.
WICHTIGER HINWEIS FÜR KUNDEN
Dieses Produkt wurde unter strenger Beachtung von Spezifikationen und Spannungsanforderungen hergestellt, die im Bestimmungsland gelten. Wenn Sie dieses Produkt über das Internet, per Postversand und/
oder mit telefonischer Bestellung gekauft haben, müssen Sie bestätigen, dass dieses Produkt für Ihr Wohngebiet ausgelegt ist.
WARNUNG: Verwendung dieses Produkts in einem anderen Land als dem, für das es bestimmt ist, verwendet wird, kann gefährlich sein und die Garantie des Herstellers oder Importeurs hinfällig lassen werden. Bitte bewahren Sie diese Quittung als Kaufbeleg auf, da andernfalls das Produkt von der Garantie des
Herstellers oder Importeurs ausgeschlossen werden kann.
Clarinet / Clarinette
Klarinette / Clarinete
A8
A9
Alto Saxophone
Saxophone alto / Altosaxophon
Saxofón alto
B1
Violin / Violon / Violine
Violín /
B2 Cello
Violoncelle / Violoncello
Cello /
B3
Guitar / Guitare / Gitarre
Guitarra
A7
Bassoon / Basson
Fagott / Fagot
Precauciones
Notice regarding disposal (EU only)
When this “crossed-out wheeled bin” symbol is displayed on the product, owner’s manual,
battery, or battery package, it signifies that when you wish to dispose of this product, manual,
package or battery you must do so in an approved manner. Do not discard this product,
manual, package or battery along with ordinary household waste. Disposing in the correct
manner will prevent harm to human health and potential damage to the environment. Since
the correct method of disposal will depend on the applicable laws and regulations in your
locality, please contact your local administrative body for details. If the battery contains
heavy metals in excess of the regulated amount, a chemical symbol is displayed below the
“crossed-out wheeled bin” symbol on the battery or battery package.
Aufstellungsort
Vermeiden Sie das Aufstellen des Geräts an Orten, an denen
• es direkter Sonneneinstrahlung ausgesetzt ist;
• hohe Feuchtigkeit oder Extremtemperaturen auftreten können;
• Staub oder Schmutz in großen Mengen vorhanden sind;
• das Gerät Erschütterungen ausgesetzt sein kann.
• in der Nähe eines Magnetfeldes.
Ubicación
El uso de la unidad en las siguientes ubicaciones puede dar como resultado un mal funcionamiento:
• Expuesto a la luz directa del sol
• Zonas de extremada temperatura o humedad
• Zonas con exceso de suciedad o polvo
• Zonas con excesiva vibración
• Cercano a campos magnéticos
Fuente de alimentación
Apague la unidad cuando no la use la batería. Retire las baterías si no va a usar la unidad durante un
tiempo largo.
Interferencias con otros aparatos
Las radios y televisores situados cerca pueden experimentar interferencias en la recepción. Opere este
dispositivo a una distancia prudencial de radios y televisores.
Manejo
Para evitar una rotura, no aplique excesiva fuerza a los conmutadores o controles.
Cuidado
Si exterior se ensucia, límpiese con un trapo seco. No use líquidos limpiadores como disolvente, ni
compuestos inflamables.
Guarde este manual
Después de leer este manual, guárdelo para futuras consultas.
Mantenga los elementos externos alejados del equipo
Nunca coloque ningún recipiente con líquido cerca de este equipo, podría causar un cortocircuito, fuero o
descarga eléctrica. Cuide de que no caiga ningún objeto metálico dentro del equipo.
Nota respecto a residuos y deshechos (solo UE)
Cuando aparezca el símbolo del cubo de basura tachado sobre un producto, su manual de
usuario, la batería, o el embalaje de cualquiera de éstos, significa que cuando quiere tire
dichos artículos a la basura, ha de hacerlo en acuerdo con la normativa vigente de la Unión
Europea. No debe verter dichos artículos junto con la basura de casa. Verter este producto
de manera adecuada ayudará a evitar daños a su salud pública y posibles daños al
medioambiente. Cada país tiene una normativa específica acerca de cómo verter productos
potencialmente tóxicos, por tanto le rogamos que se ponga en contacto con su oficina o
ministerio de medioambiente para más detalles. Si la batería contiene metales pesados por
encima del límite permitido, habrá un símbolo de un material químico, debajo del símbolo del
cubo de basura tachado.
NOTA IMPORTANTE PARA EL CONSUMIDOR
Este producto ha sido fabricado de acuerdo a estrictas especificaciones y requerimientos de voltaje
aplicables en el país para el cual está destinado. Si ha comprado este producto por internet, a través de
correo, y/o venta telefónica, debe usted verificar que el uso de este producto está destinado al país en
el cual reside.
AVISO: El uso de este producto en un país distinto al cual está destinado podría resultar peligroso y
podría invalidar la garantía del fabricante o distribuidor.
Por favor guarde su recibo como prueba de compra ya que de otro modo el producto puede verse
privado de la garantía del fabricante o distribuidor.
C1
Music stand
Pupitre
Notenständer
Atril musical
安全上のご注意
Parts of the AW-2 and what they do
火災・感電・人身傷害の危険を防止するには以下の指示を守ってください
警告
この注意事項を無視した取り扱いをすると、
死亡や重傷を負う可能性が予想されます
・次のような場合には、
直ちに電池をぬく。
○異物が内部に入ったとき
○製品に異常や故障が生じたとき
修理が必要なときは、
コルグ・サービス・センターへ修理を依頼してください。
・本製品を分解したり改造したりしない。
・修理 /部品の交換などで、
取扱説明書に書かれている以外のことは絶対にしない。
・大音量や不快な程度の音量で長時間使用しない。
大音量で長時間使用すると、
難聴になる可能性があります。万一、
聴力低下や耳鳴りを感
じたら、
専門の医師に相談してください。
・本製品に異物(燃えやすいもの、
硬貨、
針金など)
を入れない。
・温度が極端に高い場所(直射日光の当たる場所、
暖房機器の近く、
発熱する機器の上な
ど)
での使用や保管はしない。
・振動の多い場所で使用や保管はしない。
・ホコリの多い場所で使用や保管はしない。
・風呂場、
シャワー室で使用や保管はしない。
・雨天時の野外などのような湿気の多い場所で、
使用や保管はしない。
・本製品の上に液体の入ったもの(水や薬品等)
を置かない。
・本製品に液体をこぼさない。
・濡れた手で本製品を使用しない。
注意
この注意事項を無視した取り扱いをすると、
傷害を負う可
能性、
または物理的損害が発生する可能性があります
・正常な通気が妨げられない所に設置して使用する。
・ラジオ、
テレビ、
電子機器などから十分に離して使用する。
ラジオやテレビ等に接近して使用すると、
本製品が雑音を受けて誤動作する場合がありま
す。
また、
ラジオ、
テレビ等に雑音が入ることがあります。
・外装のお手入れは、
乾いた柔らかい布を使って軽く拭く。
・長時間使用しないときは、
電池の液漏れを防ぐために電池を抜く。
・電池や本体は幼児の手の届かないところに保管する。
・電池を過度の熱源(日光、
火など)
にさらさない。
・ボタンやツマミに必要以上の力を加えない。
故障の原因になります。
・外装のお手入れに、
ベンジンやシンナー系の液体、
コンパウンド質、
強燃性のポリッシャーは
使用しない。
・不安定な場所に置かない。
Pure major third, Pure minor third
Reference pitch indicator
Input indicator
High(+) indicator
Internal mic
Note name indicator
Input select button
Light button
Battery cover
Power button
CALIB buttons
Clip attachment slot
Installing the battery
Turn the power switch off before you install or replace the battery. The battery included with the AW-2 is for the purpose of verifying that the unit operates correctly,
and may not have a very long life.
When the battery begins to run low, the liquid crystal display (in particular
the meter movement) will become fainter and the backlight will become
dimmer. The AW-2 will continue to operate for a while longer, but tuning
will become less accurate. Replace the battery as soon as possible.
1. With the ball of your thumb, lightly press the battery cover located on
the back of the AW-2, turn it counter-clockwise, and remove it.
2. Replace the battery, being sure to observe the correct polarity so that
the "+" side of the battery is visible.
3. Turn the battery cover clockwise to reattach it.
Attaching the included clip
保証規定(必ずお読みください)
本保証書は、
保証期間中に本製品を保証するもので、
付属品類(ヘッドホンなど)
は保証の対象
になりません。保証期間内に本製品が故障した場合は、
保証規定によって無償修理いたします。
1.本保証書の有効期間はお買い上げ日より1ケ年です。
2.次の修理等は保証期間内であっても有償修理となります。
・消耗部品(電池など)
の交換。
・お取扱い方法が不適当のために生じた故障。
・天災(火災、
浸水等)
によって生じた故障。
・故障の原因が本製品以外の他の機器にある場合。
・不当な改造、
調整、
部品交換などにより生じた故障または損傷。
・保証書にお買い上げ日、
販売店名が未記入の場合、
または字句が書き替えられている場合。
・本保証書の提示がない場合。
尚、
当社が修理した部分が再度故障した場合は、
保証期間外であっても、
修理した日より3ケ
月以内に限り無償修理いたします。
3.本保証書は日本国内においてのみ有効です。This warranty is valid only in Japan.
4.お客様が保証期間中に移転された場合でも、
保証は引き続きお使いいただけます。詳しくは
サービス・センターまでお問い合わせください。
5.修理、
運送費用が製品の価格より高くなることもありますので、
あらかじめサービス・センターへ
ご相談ください。発送にかかる費用は、
お客様の負担とさせていただきます。
6.修理中の代替品、
商品の貸し出し等は、
いかなる場合においても一切行っておりません。
本製品の故障、
または使用上生じたお客様の直接、
間接の損害につきましては、
弊社は一切の
責任を負いかねますのでご了承ください。
本保証書は、
保証規定により無償修理をお約束するためのもので、
これによりお客様の法律上の
権利を制限するものではありません。
■お願い
1.保証書に販売年月日等の記入がない場合は無効となります。記入できないときは、
お買い上
げ年月日を証明できる領収書等と一緒に保管してください。
2.保証書は再発行致しませんので、
紛失しないように大切に保管してください。
保証書
コルグ AW-2
本保証書は、上記の保証規定により無償修理をお約束するものです。
お買い上げ日
年
月
日
販売店名
アフターサービス
修理についてのご質問、
ご相談は、
サービス・センターへお問い合わせください。
商品のお取り扱いについてのご質問、
ご相談は、
お客様相談窓口へお問い合わせください。
お客様相談窓口 TEL 03(5355)5056
●サービス・センター: 〒 168-0073 東京都杉並区下高井戸 1-15-12
TEL 03(5355)3537 FAX 03(5355)4470
Large Clip
Remove
Yes
Tuning procedure
Recommended locations for attachment
1. Press the power button. The power will turn on/off each time you press
this button.
If the power is left on for approximately 20 minutes without any sound
being input, it will turn off automatically.
Instrument name
Clip
Large Small Guitar
Trumpet / Cornet
M
2. If necessary, press the illumination button to set the backlight.(* )
Each time you press the illumination button, the setting will cycle between soft → auto → unlit → soft ...
Trombone
Attachment
location
Illustration Remarks
Main tube
A1
Bell (top)
A1
Mouthpiece receiver
Bell (top right)
A2
First tube
A3
Soft: To conserve battery life, the illumination will remain low.
Horn Single
Auto: The backlight will light brightly when sound is input or when a
button is operated. When there has been no input or button operation for approximately ten seconds, the backlight will change
to the "Soft" level of brightness.
Tube
Mouth pipe
A4
Euphonium
Bell
A5
Unlit: The backlight will not light.
Flute
3. Use the input select button to choose the sound input. (Refer to "Recommended locations for attachment")
The setting will alternate between MIC and PIEZO each time you press the
button.(*M)
4. If you want to change the reference pitch (calibration), press the CALIB
[ ] or [ ] button.
You can adjust this over a range of 410 Hz...480 Hz in 1 Hz steps.(*M)
5. Play a single note on your instrument.
The display will show the name of the note closest to the pitch detected.
Tune your instrument to the correct pitch so that the desired note name
appears.
6. Once again play a single note on your instrument, and adjust the tuning so that the center segment of the meter is lit.
The right (+) indicator will light if the pitch is too high, and the left (-)
indicator will light if the pitch is too low.
You have the option of reversing the direction of the AW-2’s meter between left
and right, but in our explanation here we will assume that the High (+) indicator
is located at the right side.
If you want to tune to a pure major third (-13.7 cents) or pure minor third
(+15.6 cents) above a certain note, adjust the pitch to the pure major or minor third marks in the meter.
For example if you want to tune to a pure major third (-13.7 cents) above A
(0 cents), make the note name indicator read C , and tune so that the meter
indicates the left [ ]. Alternatively, if you want to tune to a pure minor
third (+15.6 cents) above A (0 cents), make the note name indicator read C,
and tune so that the meter indicates the right [ ].
Double
F slide
—
—
—
*2
*3
Oboe
Bell body
E Clarinet
Bell joint area
B Clarinet
Bell
A6
A7
Bass clarinet (B )
Blowing tube
Bassoon
Wing joint area
Soprano saxophone
Bell
Alto Saxophone
Neck / Main tube
Tenor saxophone
Neck
Baritone saxophone
Bell
Violin
Head
Viola
Head
B1
Cello
Tailpiece
B2
Contrabass
Tailpiece
B2
Guitar
Head
B3
Ukulele
Head
B3
Banjo
Head
B3
Mandolin
Head
B3
As desired
C1
Music Stand
*1
—
—
—
A8
A9
B1
*3
*1 Use the reverse function.
*2 Instead of attaching the AW-2 to the instrument, place the AW-2 in a location for convenient viewing and use the internal mic.
*3 Press the input select button to switch to the internal mic (MIC).
Avoid letting the mic pick up any extraneous sound while tuning.
Meter surface
Attach
Joint
No
Small Clip
Guitar Clip
Even if the pitch is within the range of detection, it may not be possible to detect the
pitch of an instrumental sound that contains large numbers of overtones or that has
a rapid decay (e.g., very low or very high notes on a piano).
Reverse the meter display (Reverse function)*M
When turning the power on, hold down the power button for one second or
longer (the backlight will blink twice). Each time you perform this operation, the High (+) indication will be exchanged between left and right.
Select the position that feels most natural for the instrument to which you've
attached the AW-2.
About the included clips
The AW-2 and the clip damage may occur if you apply excessive force to
any other movable portion or joint, or attempt to move it beyond its intended range of motion.
Small Clip
Range of movement
approximately 100°
Specifications
Firmly press the clip all the way into the attachment slot, making sure that
it's oriented correctly. To remove the clip, grasp the AW-2, and remove the
clip by pressing it at the location marked in the illustration.
Do not attempt to insert anything other than the included clip. Doing so may damage the connector or other parts.
Scale:
Range(sine wave):
Precision:
Reference pitch:
Dimensions:
Weight:
Do not attempt to remove the clip by pulling the jaws of the large clip or the guitar
clip. Doing so may cause the joint to come apart, or may damage the clip.
Where to attach the clip
You can use this tuner to tune woodwind, brass, and string instruments,
but the recommended location for attaching the tuner to your instrument
when using the PIEZO of the included clip will depend on the type of instrument you are using.
Refer to the table on the other side of this sheet and to the illustrations at the
right, and attach the tuner in the recommended location. Depending on the
conditions of use, you may also be able to tune with the tuner attached in a
different location. You can also switch the input to the internal mic (MIC)
and attach the tuner to a music stand rather than to your instrument. If
you've selected the internal mic, you can also use the tuner without the clip.
Please carefully attach the AW-2 to your instrument. Leaving the AW-2 attached
for a long time may hurt the instrument surface.
Battery life:
Included items:
12-note equal temperament
A0 (27.50 Hz)–C8 (4186 Hz)
+/-1 cent
410...480 Hz (1 Hz steps)
58 mm (W) x 26 mm (D) x 12.6 mm (H)
2.28’’ (W) x 1.02’’(D) x 0.50’’ (H) (AW-2 only)
AW-2
17.4 g/0.61 oz. (including battery)
Clip
17.7 g/0.62 oz. (large)
3.7 g/0.13 oz. (small)
12.7 g/0.45 oz. (clip)
approximately 150/75/20 hours (backlight: unlit/soft/
auto, tuner continuously operating, A4 input)
CR2032 lithium battery (3V) for checking operation
Instrument clip
*M Settings are remembered even when the power is off. However, settings will be initialized
when you replace the battery (default: CALIB=440 Hz, PIEZO, right side High, backlight
is unlit).
• Specifications and appearance are subject to change without notice for the sake of improving the product.
Large Clip
Examples of using the joint
Guitar Clip
Range of
movement 360°
By swapping the position of the guitar clip's joint socket (A) and non-slip
cover (B), you can obtain a greater degree of freedom in how you attach the
guitar clip to your instrument.
In order to swap the position of the joint socket (A) and cover (B), you will need to
remove the rubber insert that is inside (C). After you've made the change, replace
the insert firmly in its original position.
Changing the position of the guitar clip's joint socket
Rotate the joint to
attach or detach it
B
A
C
Parties du AW-2 et leurs fonctions
Tierce majeure pure, Tierce mineure pure / Reine große Terz, reine kleine Terz
Indicateur de la note
de référence
Indicateur de la source
Bezugstonhö
Eingangsanzeige
henanzeige
Indicateur High (+)
Micro incorporé
Hoch (+) Anzeige
Internes Mikrofon
Indicateur du nom de la note / Notennamen-Anzeige
Teile des AW-2 und ihre Funktionen
Touche de sélection de la source
Eingangswahltaste
1. Appuyez légèrement avec le pouce sur le couvercle du compartiment à pile situé
sous l’AW-2, tournez-le vers la gauche et retirez-le
2. Remplacez la pile en veillant à respecter la polarité: la face “+” de la pile doit être visible.
3. Tournez le couvercle du compartiment à pile vers la droite pour le refermer.
Procédure d'accordage
1. Appuyez sur l'interrupteur d'alimentation. L'appareil se mettra sous/hors tension
à chaque pression sur l'interrupteur.
Si vous laissez l'appareil allumé pendant environ 20 minutes sans capter aucun son, il
s'éteindra automatiquement.
2. Si nécessaire, appuyez sur le bouton d’éclairage (LIGHT) pour régler le rétro-éclairage.
Chaque pression sur le bouton d’éclairage change le réglage selon la séquence suivante: doux → automatique → éteint → doux…(*M)
Doux: Pour économiser la pile, l’éclairage reste doux.
Automatique: Le rétro-éclairage s’allume brillamment quand un signal arrive ou quand
vous actionnez un bouton. S’il n’y a aucun signal d’entrée et si aucun bouton n’est actionné durant environ 10 secondes, le rétroéclairage s’atténue et passe au niveau “Doux”.
Eteint: Pas de rétro-éclairage.
3. Utilisez le bouton de sélection d’entrée pour choisir la source. (Voyez la section
“Positions conseillées pour la mise en place”)
Le réglage alterne entre MIC et PIEZO chaque fois que vous appuyez sur le bouton.(*M)
4. Pour changer le diapason (calibrage), appuyez sur le bouton CALIB [ ] ou [ ].
Vous pouvez régler ce paramètre sur la plage 410Hz – 480Hz par pas de 1Hz.(*M)
5. Jouez une note isolée sur l’instrument.
L’écran affiche le nom de la note la plus proche de la hauteur détectée. Accordez
grossièrement votre instrument de sorte à faire apparaître la note voulue.
6. Jouez à nouveau une note isolée sur l’instrument et accordez-la jusqu’à ce que le
segment central de l’indicateur s’allume.
Le témoin droit (+) s’allume si la note est trop haute et le témoin gauche (–) s’allume
si la note est trop basse.
Vous pouvez inverser le fonctionnement gauche/droite de l’indicateur de l’AW-2. Dans
nos explications, nous partons du principe que le témoin High (+) est situé du côté droit.
Si vous souhaitez que l’accord soit décalé d’une tierce majeure pure (–13,7 cents) ou
d’une tierce mineure pure (+15,6 cents) par rapport à une note donnée, réglez la hauteur sur l’indicateur de la tierce majeure pure ou de la tierce mineure pure.
Si, par exemple, vous voulez que l’accord soit une tierce majeure pure (–13,7 cents)
plus haut que la note A (0 cents), affichez la note “C ” et accordez la note pour que
l’indicateur montre le [ ] gauche. Alternativement, si vous voulez que l’accord soit
une tierce mineure pure (+15,6 cents) plus haut que la note A (0 cents), affichez la note
“C” et accordez la note pour que l’indicateur montre le [ ] droit.
*M Les réglages sont conservés même quand l'appareil est mis hors tension. Néanmoins,
les réglages seront réinitialisés si vous remplacez la pile (par défaut : CALIB = 440
Hz, PIEZO, High à droite, régler le rétro-éclairage: Eteint).
•
Les spécifications et l'aspect extérieur sont sujets à modifications sans préavis à des fins
d'amélioration du produit.
各部の名称
botón de selección de entrada
botón de luz
Cubierta de la Batería
botón de encendido
micro interno
indicador High(+)
indicador de nombre de nota
Fente de fixation de la pince / Clipanbringungsschacht
Wenn die Batterie fast erschöpft ist, wird das LC-Display (und somit die angezeigte Nadel) nach und
nach immer schwächer. Auch die Hintergrundbeleuchtung wird allmählich dunkler. Der AW-2 funktioniert dann zwar noch eine Weile, allerdings lässt seine Genauigkeit dann ebenfalls nach. Wechseln
Sie die Batterie also so schnell wie möglich aus.
Cuando la Batería está gastada, la pantalla (en particular el movimiento del medidor) será
más difícil de leer y la iluminación de pantalla será menor. El AW-2 seguirá funcionando un
tiempo, pero será menos exacto. Reemplace la Batería tan pronto como sea posible.
1. Drücken Sie die Batteriefachblende auf der Rückseite des AW-2 mit dem Daumenballen behutsam
hinunter und drehen Sie sie anschließend gegen den Uhrzeigersinn, um sie entnehmen zu können.
2. Legen Sie die neue Batterie so ein, dass ihre „+“-Seite sichtbar bleibt, weil nur dann die Polarität gewahrt wird.
3. Drehen Sie die Batteriefachblende im Uhrzeigersinn, um sie wieder zu arretieren.
botones CALIB
1. Con el dedo, presione ligeramente la cubierta de Batería situada en la parte posterior
del AW-2, gírela en dirección contraria a las agujas del reloj, y retírela.
2. Reemplace la Batería y asegúrese que la polaridad es correcta de forma que la cara "+"
de la Batería sea visible.
電池を入れるときや交換は、
本機の電源をオフにして行ってください。付属の電池は機
能チェック用ですので、寿命の短い場合があります。
電池が消耗してくると、液晶表示(特にメーター移動表示)が薄くなり、バックライトが暗く
なります。しばらくの間は動作しますが、
チューニングが正確にできなくなります。速やか
に新しい電池と交換してください。
1. 本体背面にある電池カバーを、
親指の腹で軽く押さえながら、
反時計方向に回して取
り外します。
2. 電池の+側が見えるように極性に注意し電池を取り付けます。
3. 電池カバーを時計方向に回して取り付けます。
3. Gire la cubierta de Batería en sentido de las agujas del reloj para sujetarla en su sitio.
Procedimiento de afinación
Tuning-Verfahren
ranura para sujeción del clip
電池の入れ方
Instalación de la Batería
Apague la unidad antes de instalar o reemplazar la batería. La batería incluida con el AW-2 es
sólo para verificar el correcto funcionamiento de la unidad y es posible que no tenga una larga
vida.
チューニング
1. 電源ボタンを押します。押すたびにオン、オフを繰り返します。
電源オンのまま音の入力が約 20分間ない場合は自動的にオフになります。
1. Drücken Sie die Ein/Aus-Taste. Bei jedem Drücken dieser Taste schaltet das Gerät ein/aus.
Wenn das Gerät ca. 20 Minuten lang eingeschaltet bleibt, ohne dass Ton angelegt wird, schaltet es
automatisch aus.
1. Pulse el botón de alimentación. La unidad se enciende o se apaga cada vez que Pulse
este botón.
Si la alimentación se deja durante unos 20 minutos sin ningún sonido de entrada, se
apagará de forma Automática.
2. Drücken Sie bei Bedarf den Lichttaster, um die Hintergrundbeleuchtung zu aktivieren. (*M)
Beim wiederholtem Drücken des Lichttasters ändert sich die Einstellung folgendermaßen:
Schwach → automatisch → aus → schwach...
Schwach:
Bei Anwahl der schwachen Beleuchtung wird die Batterie geschont.
Automatisch: Die Hintergrundbeleuchtung wird aktiviert, sobald ein Eingangssignal empfangen wird bzw. wenn Sie einen Taster drücken. Zehn Sekunden nach dem letzten
Bedienvorgang bzw. Verstummen des Eingangssignals ändert sich die Helligkeit
der Hintergrundbeleuchtung zu „schwach“.
Aus: Die Hintergrundbeleuchtung ist aus.
2. Si es necesario, Pulse el botón de iluminación para Ajustar la luz de pantalla.(*M)
Cada vez que Pulse el botón de iluminación, el Ajuste cambiará entre suave → auto →
apagada → suave ...
Suave: Para ahorrar Batería la iluminación se mantiene como suave.
Auto: La iluminación será brillante cuando hay Sonido de entrada o al operar un botón.
Cuando no haya Sonido o movimiento de un botón durante aproximadamente 10
segundos, la luz cambiará al Ajuste suave.
Apagada: la luz no se enciende.
3. 音の入力を入力切替ボタンで選びます(「推奨取付位置一覧表」参照)。
押すたびに MIC、PIEZO が切り替わります(*M)。
3. Use el botón de Selección de entrada para elegir la entrada de Sonido. (Consulte "Sitios
recomendados para sujeción")
El Ajuste alternará entre MIC y PIEZO cada vez que Pulse el botón.(*M)
4. 基準ピッチを変更
(キャリブレーション)するときは、CALIB[▲]または[▼]スイッ
チを押します。
410Hz ∼ 480Hz の範囲を 1Hz 単位で変更できます(*M)。
4. Si desea cambiar el tono de referencia (calibración), Pulse los botones CALIB [ ] o [ ].
Puede realizar un Ajuste con un rango de 410 Hz...480 Hz en pasos de 1 Hz.(*M)
5. 楽器を単音で鳴らします。
認識した音に一番近い音名が表示されます。
合わせたい音名が表示されるように、
楽
器をおおまかにチューニングしてください。
3. Wählen Sie mit dem Eingangswahltaster die gewünschte Signalquelle. (Siehe „Empfohlene
Platzierungen für Ansätze“)
Bei wiederholtem Drücken des Tasters wählen Sie abwechselnd „MIC“ und „PIEZO“.(*M)
4. Mit dem CALIB [ ]- und [ ]-Taster können Sie eine andere Kammertonfrequenz wählen.
Der Einstellbereich lautet 410Hz–480Hz (in 1Hz-Schritten).(*M)
5. Spielen Sie eine Einzelnote auf dem Instrument.
Das Display zeigt den Namen der Note an, die der gespielten Note am nächsten kommt. Stimmen
Sie Ihr Instrument so, dass der Name der gewünschten Note angezeigt wird.
6. Spielen Sie erneut eine Einzelnote und ändern Sie die Stimmung so lange, bis das mittlere
Metersegment leuchtet.
Wenn die Note zu hoch ist, leuchtet die rechte Anzeige (+). Ist sie zu tief, so leuchtet die linke Anzeige (–).
Der AW-2 bietet zwar eine Funktion, mit der man die Anzeige umkehren kann, aber im folgenden gehen
wir davon aus, dass sich die „High (+)“-Anzeige rechts befindet.
Um mit einem reinen (–13,7 Cent) oder reinen kleinen Terzintervall (+15,6 Cents) über einer bestimmten Note zu arbeiten, müssen Sie die Note so stimmen, dass das Meter sich bei der betreffende Anzeige befindet. Beispiel: Um eine reine große Terz (–13,7 Cent) über dem „A“ (0 Cent) zu
erzielen, müssen Sie dafür sorgen, dass als Notenname „C “ angezeigt wird und die Note dann so
stimmen, dass die linke [ ]-Anzeige leuchtet. Um z.B. eine reine kleine Terz (+15,6 Cent) über
dem „A“ (0 Cent) zu erzielen, müssen Sie dafür sorgen, dass als Notenname „C“ angezeigt wird
und die Note dann so stimmen, dass die rechte [ ]-Anzeige leuchtet.
Vermeiden Sie, dass das Mikrofon beim Stimmen störende Außengeräusche aufnimmt.
5. Toque una sola nota en su instrumento.
La pantalla mostrará el nombre de la nota más cercana al tono detectado. Afine su
instrumento con el tono correcto para que aparezca el nombre de la nota deseada.
6. De nuevo, toque una nota en su instrumento, y Ajuste la afinación de forma que se
ilumine el segmento central del medidor.
El indicador de la derecha (+) se iluminará si el tono es demasiado agudo, y el izquierdo
(-) se iluminará si es demasiado grave.
Tiene usted la opción de invertir la dirección del medidor del AW-2 entre la izquierda y derecha,
pero en nuestras explicaciones asumimos que el indicador High (+) está a la derecha.
Si desea afinar una tercera mayor pura (-13,7 centésimas) o tercera menor pura (+15,6
centésimas) por encima de una cierta nota, Ajuste el tono en las marcas de tercera mayor o
menor en el medidor. Por ejemplo si desea afinar a una tercera mayor pura (-13.7 centésimas)
por encima de A (0 centésimas), haga que el indicador de nota marque C , y afine de forma
que el medidor indique la izquierda [ ]. De forma alternativa, si desea afinar una tercera
menor pura (+15,6 centésimas) por encima de A (0 centésimas), haga que el indicador de
nombre de nota marque C, y afine de forma que el medidor indique la derecha [ ].
Evite que el micro recoja Sonidos extraños mientras realiza la afinación.
Auch wenn die Tonhöhe innerhalb des Erkennungsbereichs ist, kann es unmöglich sein, die Tonhöhe eines
Instrumentenklangs zu erkennen, wenn dieser einen hohen Anteil an Obertönen oder sehr schnelles Abklingen aufweist (z.b. sehr niedrige oder sehr hohe Noten auf dem Klavier).
Umkehren der Meteranzeige (,Reverse‘-Funktion)*M
Halten Sie den Netzschalter beim Einschalten mindestens eine Sekunde gedrückt (die Hintergrundbeleuchtung blinkt zwei Mal). Mit diesem Vorgang sorgen Sie dafür, dass sich die High (+)-Anzeige
an der jeweils anderen Seite (links statt rechts und umgekehrt) befindet. Wählen Sie jeweils die Einstellung, die sich am besten für das Instrument eignet, das Sie mit Hilfe des AW-2 stimmen.
Aunque el tono esté dentro del rango de detección, puede que no sea posible detectar el tono de un
sonido que contenga gran cantidad de armónicos o que tenga una rápida caída (por ejemplo las
notas muy graves o muy agudas de un piano).
Medidor de pantalla inverso (Función Reversa)*M
Al encender la unidad, Mantenga pulsada la Tecla de encendido durante más de un segundo
(la pantalla parpadea dos veces). Cada vez que lleve a cabo esta operación el indicador High
(+) será intercambiado entre la izquierda y la derecha. Seleccione la posición que sea más
natural para el instrumento que esté afinando con el AW-2.
Technische Daten
Spécifications
Gamme: 12 notes tempérament égal
Note de référence: 410 à 480 Hz (paliers de 1 Hz)
Précision: +/-1 centième
Plage de détection (onde sinus): A0 (27,50 Hz) à C8 (4186 Hz)
Dimensions:
58 mm (P) x 26 mm (L) x 12,6 mm (H) (uniqeument AW-2)
Poids:
AW-2
17,4 g (pile comprise),
Clip
17,7 g (grand)/3,7 g (petite)/12,7 g (petite/Guitare)
Autonomie de la pile:
Environ 150/75/20 heures (régler le rétro-éclairage: éteint/doux/
automatique , utilisation continue de l'accordeur, entrée de la note A4)
Accessoires fournis: Pile au lithium CR2032 (3 V) pour vérification du fonctionnement
Instrument de musique
indicador de entrada
Einsetzen der Batterie
Même si la note se trouve à l’intérieur de la plage de détection, elle peut ne pas être détectée
si le son de l’instrument de musique contient un grand nombre d’harmoniques ou un temps
de descente rapide (par exemple, des notes très basses ou très hautes sur un piano).
Lors de la mise sous tension, maintenez l’interrupteur d’alimentation enfoncé au moins une
seconde (le rétro-éclairage clignote deux fois). Chaque fois que vous effectuez cette opération, l’indication High (+) passe de droite à gauche et inversement. Sélectionnez la position
qui vous semble la plus naturelle pour l’instrument auquel l’AW-2 est fixé.
tercera mayor pura, tercera menor pura
Deaktivieren Sie den Netzschalter, bevor Sie die Batterie einlegen oder auswechseln. Die zum Lieferumfang
des AW-2 gehörige Batterie dient nur dem Zweck, die Funktionstüchtigkeit des Gerätes nach dem Auspakken
zu überprüfen und hat daher nur eine kurze Laufzeit.
Faites attention à ne pas laisser le micro capter d'autre son pendant l'accordage.
Inversion de l’affichage de l’indicateur (fonction ‘Inversion’)*M
Couvercle du logement
de la pile
Batteriefachdeckel
Boutons CALIB / CALIB-Tasten
Coupez toujours l’alimentation avant de changer la pile. La pile fournie avec l’AW-2 sert à
vérifier le bon fonctionnement du produit et peut avoir une longévité réduite.
Quand la pile s’épuise, l’écran à cristaux liquides (notamment le mouvement de l’indicateur) faiblit de plus en plus et le rétro-éclairage s’atténue progressivement. L’AW-2
continue à fonctionner un certain temps mais l’accordage devient moins précis. Remplacez la pile aussi vite que possible.
indicador de tono de referencia
Bouton LIGHT / LIGHT-Taster
Interrupteur
d'alimentation
Ein/Aus-Taste
Mise en place de la pile
Partes del AW-2 y sus funciones
12 Noten gleichschwebende Stimmung Präzision: +/-1 Cent
A0 (27,50 Hz)–C8 (4186 Hz)
410–480 Hz (in Schritten von 1 Hz)
58 mm (T) x 26 mm (B) x 12,6 mm (H) (Nur AW-2)
AW-2
17,4 g (mit Batterie),
Clip
17,7 g (Großer)/3,7 g (Kleiner)/12,7 g (Gitarre)
Batterielebensdauer: ca. 150/75/20 Stunden
(Hintergrundbeleuchtung: aus/schwach/ automatisch, kontinuierlicher Betrieb mit eingeschaltetem Stimmgerät, A4-Eingang)
Lieferumfang:
CR2032-Lithiumbatterie (3 V) zur Funktionsprüfung
Strumenten-Clip
Skala:
Bereich (Sinuswelle):
Bezugstonhöhe:
Abmessungen:
Gewicht:
*M Einstellungen werden auch bewahrt, wenn das Gerät eingeschaltet ist. Einstellungen werden initialisiert, wenn Sie die Batterie ersetzen (Vorgabe: CALIB=440 Hz, PIEZO, rechte Seite Hoch,
Hintergrundbeleuchtung: Aus).
•
Änderungen des Designs und der technischen Daten ohne Vorankündigung bleiben im Sinne ständiger Produktverbesserungen vorbehalten.
Especificaciones
Escala:
12-notas, temperamento igual
Precisión: +/-1 centésima
Rango (onda sinusoidal): A0 (27,50 Hz)–C8 (4186 Hz)
Tono de Referencia:
410...480 Hz (en pasos de 1 Hz)
Dimensiones:
58 mm x 26 mm x 12.6 mm (solamente AW-2)
Peso:
AW-2
17,4 g (incluyendo batería)
Clip
17,7 g (Gran.)/3,7 g (Pequ.)/12,7 g (guita.)
Vida de la Batería:
aproximadamente 150/75/20 horas (luz de pantalla: apagada/
suave/auto, afinador funcionando continuamente, entrada A4)
Elementos incluidos: Batería de litio CR2032 (3V) para comprobar el funcionamiento
Clip para instrumento
*M Los Ajustes son recordados al apagar la unidad. No obstante, los Ajustes serán
inicializados a reemplazar la batería (valores por defecto: CALIB=440 Hz, PIEZO, a la
derecha High, luz de pantalla: apagada).
•
Especificaciones y apariencia sujetas a cambio sin previo aviso como consecuencia de
mejoras en el producto.
2. 必要に応じて照明ボタンを押して、バックライトを設定します(*M)。
照明ボタンを押すたびに、ソフト→オート→消灯→ソフト... と切り替わります。
ソフト: 電池消耗を防ぐため、常に低輝度の点灯になります。
オート: 音を入力した場合とボタン操作時に、
バックライトが明るく点灯します。
約10秒、
音の入力が無いときやボタン操作をしないと、自動的にソフト
設定の明るさの点灯になります。
消灯:バックライトは点灯しません。
6. 楽器を単音で鳴らして、メーターの中央が点灯するようにチューニングします。
音が高いときは右側(+)が、低いときはに左側(−)が点灯します。
本機は、メーター表示を左右反転できますが、
ここでは右側にHigh(+)表示があ
る状態での説明をします。
ある音に対して、純正の長 3 度(− 13.7 CENT)上、または純正の短 3 度(+ 15.6
上にチューニングするには、
メーターをそれぞれ純正長/短3度マークに合わ
CENT)
せます。例えば、A(0 CENT)の音に対して、純正の長 3 度(− 13.7 CENT)上の音に
するには、音名表示を C にして、メーターを左側の▼に合わせます。また、A( 0
CENT)の音に対して、純正の短3度(+15.6 CENT)上の音にするには、音名表示を
Cにして、メーターを右側の▼に合わせます。
チューニング時、関係ない音がマイクに入らないようにしてください。
測定範囲内の音程でも、倍音を多く含んだ楽器音や減衰の早い楽器音については、測
定できない場合があります(例:ピアノの低音部、高音部等)。
メーター表示を反転する(リバース機能)*M
電源をオンにするときに電源ボタンを1秒以上長押しします(バックライト2度点滅)。この
操作をするたびに、High(+)表示が左、右と反転します。
チューナーを楽器に取り付けてチューニングするときは、見やすい方向の表示に切り替え
てください。
仕様
音律
測定精度
外形寸法
重量
:12平均律
測定範囲(サイン波):A0(27.50Hz)∼ C8(4186Hz)
:±1セント 基準ピッチ範囲
:410∼480Hz(1Hz単位)
: 58mm(W)X 26mm(D)X 12.6mm(H)
(本体のみ)
: 本体 17.4g(電池含む)
クリップ
17.7g(大)/3.7g(小)/12.7g(ギター)
電池寿命 :約150/75/20時間
(バックライト:消灯/ソフト/オート、
チューナー動作、
A4入力 連続動作時)
付属品
:動作確認用CR2032型リチウム電池(3V) 1個
楽器取り付け用クリップ
*M 各設定は、電源をオフにしても記憶しています。ただし、電池を交換した場合は、設定
が初期化されます(初期値: CALIB=440Hz、PIEZO、右側がHigh、バックライトは
消灯)。
* 仕様および外観は、改良のため予告なく変更する場合があります。
Mise en place de la pince fournie
Anbringen des mitgelieferten Clips
Positions conseillées pour la mise en place
Enfoncez fermement le clip à fond dans la fente de fixation en vérifiant qu’il est orienté
correctement. Pour retirer le clip, prenez l’AW-2 en main et retirez le clip en appuyant
sur l’endroit indiqué par un astérisque ( ) dans l’illustration.
Schieben Sie den Clip vollständig in die dafür vorgesehene Aussparung und achten Sie auf die richtige Ausrichtung. Um den Clip zu entfernen, müssen Sie den AW-2 festhalten, während Sie auf die mit
„ “ gekennzeichnete Stelle drücken.
N’essayez pas d’insérer autre chose que le clip fourni. Vous risqueriez d’endommager le connecteur ou d’autres éléments.
Versuchen Sie niemals, eine andere Halterung als den beiliegenden Clip anzubringen. Sonst werden nämlich das Verbindungsstück und andere Partien beschädigt.
N’essayez pas de retirer le clip en tirant sur les mâchoires du grand clip ou du clip pour guitare.
Vous risqueriez de détacher le joint ou d’endommager le clip.
Versuchen Sie niemals den Clip zu entfernen, indem Sie an den Klemmen der großen Halterung bzw. am
Gitarrenclip ziehen. Sonst bricht eventuell das Verbindungsstück ab bzw. wird der Clip beschädigt.
Nom de
Clip
l'instrument
gr.
Position
petite Guitare
Empfohlene Platzierungen für Ansätze
Illustration Remarques
Instrumentenname
(au verso)
Trompette /
Tuyau principale
A1
Cornet à bouquin
Pavillon
A1
Trombone
Récepteur d’embouchure
Clip
Ansatz-Platzierung
Abbildung Bemer -
Groß Klein Gitarre
Trompete / Kornett
Pavillon (en haut à droite)
A2
Premier tube
A3
Horn
double
Coulisse de Fa
A1
Becher (Oberseite)
A1
Mundstück-Empfänger
Posaune
simple
(andere Seite) kungen
Haupttubus
*1
Schallstück (oben rechts)
A2
einzeln
Erster Tubus
A3
doppel
F-Schieber
Où installer la pince
Anbringungsort des Clips
Cor
Vous pouvez utiliser cet accordeur avec des vents, des cuivres et des cordes. La position
de fixation de l’accordeur à l’instrument pour utiliser le PIEZO du clip fourni varie en
fonction du type d’instrument.
Voyez le tableau au verso de ce feuillet ainsi que les illustrations à droite pour fixer
l’accordeur à l’endroit recommandé. Selon les conditions d’utilisation, il peut être possible d’accorder l’instrument en fixant l’accordeur à un autre endroit. Vous pouvez également sélectionner le micro interne comme entrée (MIC) et fixer l’accordeur à un pupitre
au lieu de l’instrument. Si vous avez choisi le micro interne, vous pouvez aussi utiliser
l’accordeur sans le clip.
Dieses Stimmgerät eignet sich auch für Holz-, Blechblas- und Streichinstrumente. Bei Verwendung
des PIEZO-Mikrofons im beiliegenden Clip richtet sich die Stelle, an welcher das Stimmgerät angebracht werden muss, nach dem verwendeten Instrument.
Tuba
Branche d'embouchure
A4
Tuba
Mundröhre
A4
Basse
Pavillon
A5
Tenorbaßhorn
Schallstück
A5
S'il vous plait, attachez soigneusement l'AW-2 à votre instrument. Le laisser attach pendant
un long moment, peut rayer la surface de votre instrument.
Clips fournis
Le AW-2 et le clip peut, Il risque toutefois de s’endommager si vous exercez une force
excessive sur toute autre partie mobile ou sur le joint en tentant d’aller au-delà de sa
plage de mouvement.
En échangeant la position de la douille (A) du joint du clip avec celle du cache antidérapant (B), vous bénéficiez d’une plus grande liberté pour fixer le clip à la guitare.
Pour échanger la position de la douille (A) du joint du clip avec celle du cache (B), il faut
extraire la partie en caoutchouc (C) située à l’intérieur. Après l’échange, réinsérez convenablement la partie en caoutchouc à l’intérieur.
Grand clip / Großer Clip / Clip grande / クリップ大
OK
Retrait / Abnehmen
Retire / 取り外し
NG
Surface de l'accordeur
Messgerätoberfläche
Superficie de sujeción
メーター面
Petit clip / Kleiner Clip
Clip pequeño
クリップ小
Mise en place
Anbringen
Adjuntar
取り付け
Joint
Verbindungsstück
Junta
ジョイント
Clip pour guitare / Gitarrenclip
Clip para guitarra
ギター・クリップ
No intente retirar el clip tirando directamente del clip grande o del clip de guitarra. Si lo hace la
junta puede romperse o puede dañar el clip.
Dónde fijar el clip
Puede usar este afinador para afinar instrumentos de viento, metal y de cuerda, pero la
posición recomendada para sujetar el afinador cuando se usa el PIEZO del clip incluido
dependerá del tipo de instrumento que esté usando.
Consulte la tabla de la otra cara de esta hoja y las ilustraciones a la derecha, y sujete el
afinador en la posición recomendada. Dependiendo de las condiciones de uso es posible
que también pueda afinar con el afinador situado en una posición distinta. También puede
cambiar la entrada a micro interno (MIC) y sujetar el afinador a un atril en lugar de hacerlo
directamente al instrumento. Si ha Seleccionado el micro interno, también puede usar el
afinador sin el clip.
Por favor sujete con cuidado e AW-2 a su instrumento. Si deja el AW-2 sujeto al instrumento
durante un largo periodo, puede dañar la superficie del instrumento.
Sobre las pinzas incluidas
El AW-2 y el clip puede, pero se pueden producir daños si aplica fuerza excesiva a cualquier
otra parte móvil o junta, o si intenta moverlo más allá del rango previsto de movimiento.
Intercambiando la posición del orificio de junta del clip de guitarra (A) y la cubierta
antideslizante (B), puede obtener mayor grado de libertad en la forma de sujetar el clip de
guitarra a su instrumento.
Para poder cambiar de posición el conector (A) y su tapa (B) tendrá que quitar la goma que está
dentro (C). Una vez realizado el cambio, vuelva a colocarlo con firmeza en su posición original.
–
–
*2
Corps du pavillon
*3
Whiffler
—
—
—
A6
*2
*3
Oboe
Schallbecher
A6
E Klarinette
Schallstück
B Klarinette
Schallstück
Bassklarinette
Blastubus
Fagott
Flügelverbindung-Bereich
Sopransaxophon
Schallstück
Altsaxophon
Hals/Hauptrohr
Tenorsaxophon
Hals
Corps du pavillon
Pavillon
Clarinette basse
Bec
Basson
Petite branche
Saxohone soprano
Pavillon
Das AW-2 und dem Clip, Bei den übrigen Komponenten besteht die Gefahr, dass sie beschädigt werden, wenn Sie sie mit Gewalt in eine an sich unmögliche Richtung ziehen.
Saxohone alto
Bocal/Tube
Saxohone ténor
Bocal
Wenn Sie den Verbindungsstift (A) und die rutschfeste Kappe (B) des Gitarrenclips gegeneinander
austauschen, kann der Gitarrenclip eventuell flexibler am Instrument angebracht werden.
Saxohone baryton
Pavillon
Barytonsaxophon
Schallstück
Violon
Chevillier
B1
Violine
Kopf
Alto
Chevillier
B1
Viola
Kopf
B1
Violoncelle
Pointe
B2
Violoncello
Endstück
B2
Contrebasse
Pointe
B2
Kontrabass
Endstück
B2
Guitare
Chevillier
B3
Gitarre
Kopf
B3
Ukulélé
Chevillier
B3
Ukulele
Kopf
B3
Banjo
Chevillier
B3
Banjo
Kopf
B3
Mandoline
Chevillier
B3
Mandoline
Kopf
B3
Au choix
C1
Nach Wunsch
C1
Bitte befestigen sie das AW-2 vorsichtig an ihrem Instrument. Wenn sie das AW-2 für längere Zeit an ihrem Instrument befestigt lassen, kann dies zu Veränderungen an der Oberfläche des Instruments führen.
Über die beiliegenden Clips
Um die Position des Verbindungsstifts (A) und der Kappe (B) zu ändern, müssen Sie das Gummistück (C)
aus dem Innenbereich holen. Nach der Positionsänderung muss das Gummistück aber wieder angebracht
werden.
Petit clip / Kleiner Clip / Clip pequeño / クリップ小
Plage de mouvement: environ 100°
Schwenkbereich: ca.100°
Rango de movimiento:
Aproximadamente 100°
可動範囲約100°
Pupitre
Plage de mouvement: 360°
Schwenkbereich: 360°
Rango de movimiento: 360°
可動範囲360°
–
Changer la position de la douille du joint du clip de guitare
Positionswechsel für das Verbindungsstück des Gitarrenclips
A
Cambio de la posición de la junta del clip de guitarra
ギター・クリップのジョイント受け位置の変更
B
–
–
クリップ取付溝に方向を間違わないように、強く押して奥まで差し込んでください。外すと
きは、本体を押さえながら、クリップの 部分を押して取り外します。
付属のクリップ以外は差し込まないでください。本体を破損する恐れがあります。
クリップ大やギター・クリップの挟む部分を持って引っぱらないでください。ジョイントが
外れたり、
クリップを破損する場合があります。
クリップの取付位置
本機は木管楽器、金管楽器、弦楽器などをチューニングできますが、付属クリップを使った
PIEZOによる入力では、楽器によって取付推奨位置が異なります。
表や裏図を参考にして、
本機を推奨する位置に取り付けてください。取り付けは、
使用状況
によって他の位置でもチューニングすることができます。
また、楽器に取り付けなくても、付属のクリップで譜面立てに固定して、入力を内蔵マイク
(MIC)に切り替えチューニングすることもできます。なお、内蔵マイクに切り替えたとき
は、
クリップをはずしても使用できます。
AW-2のクリップの取り付け、取り外しはていねいに行ってください。また、長時間取り
付けたままにすると、取り付け跡が残る場合があります。
付属クリップについて
本体とクリップの可動部やジョイントは、
過度な力で無理に向きを変えると破損する恐れが
あります。
ギター・クリップはジョイント受け(A)とフタ(B)との位置を付け替えて、
楽器に取り付ける
位置の自由度を増すことができます。
ジョイント受け(A)とフタ(B)の交換時には、
ゴム内側のはめ込み(C)を外す必要があ
ります。交換後は、
はめ込み部を元通りにして、
確実に固定してから使用してください。
A8
A9
*3
Notenständer
—
—
—
A7
A8
A9
B1
*3
*1 Verwenden Sie die „Reverse“-Funktion
*2 Au lieu d’attacher l’AW-2 à l’instrument, installez-le dans un endroit où il est facile à
voir et utilisez le micro incorporé.
*2 Anstelle den AW-2 am Instrument anzubringen, platzieren Sie den AW-2 an einer gut sichtbaren
Stelle und verwenden Sie das interne Mikrofon.
*3 Appuyez sur la touche de sélection de la source pour passer au micro incorporé (MIC).
*3 Drücken Sie die Eingangswahltaste, um das interne Mikrofon (MIC) zu wählen.
Sitios recomendados para sujeción
Nombre de
Clip
instrumento
Gran. Pequ. guita.
Posición de Sujeción
Trompeta / corneta
C
付属クリップの取付け / 取外し
A7
*1 Utilisez la fonction d’inversion.
Exemples d’utilisation du joint
Beispiele für die Verwendung des Verbindungsstücks
Ejemplos de uso de la junta ジョイントの使い方例
Colocando la pinza incluida
No intente insertar nada más que el clip incluido. Si lo hace puede dañar el conector u otras partes.
–
Hautbois
Clarinette B
Tournez le joint pour le fixer ou le détacher
Drehen Sie am Verbindungsstück,
um es anzubringen bzw. zu entfernen.
Gire la junta para fijarlo o soltarlo
ジョイントは回転して取り付け、取り外し
Presione firmemente el clip completamente en la ranura de fijación, asegurándose que está
orientado correctamente. Para retirar el clip, sujete el AW-2, y retire el clip pulsando en el
lugar marcado con en la ilustración.
Flûte
Clarinette E
Grand clip / Großer Clip / Clip grande / クリップ大
Clip pour guitare / Gitarrenclip / Clip para guitarra / ギター・クリップ
Oui / Ja / Sí
Non / Nein / No
In der Tabelle auf der Rückseite und in den Abbildungen rechts finden Sie die für die einzelnen Instrumente empfohlene Positionen. Bisweilen erzielen Sie eventuell auch gute Ergebnisse, indem Sie das
Stimmgerät ganz woanders anbringen. Bei Bedarf können Sie das eingebaute Mikrofon (MIC) verwenden und sich das Stimmgerät auf den Notenständer legen. Bei Anwahl des internen Mikrofons
braucht der Clip nicht verwendet zu werden.
*1
推奨取付位置一覧表
Ilustración Obser-
Vara principal
A1
Pabellón (parte superior)
A1
Trompa
クリップ
○
トロンボーン
○
○
Pabellón (parte superior derecha)
A2
Primera vara
A3
*1
ホルン シングル
Deslizante
取付位置
大 小 G
トランペット/コルネット ○
Junto a la embocadura
Trombón
楽器名
vaciones
イラスト
上主管
A1
ベル上
A1
マウスピース・レシーバー
○
ベル上/右
A2
1番管
A3
ダブル
○
F管
Tuba
Tubo de la boquilla
A4
チューバ
○ マウスパイプ
A4
Euphonium
Pabellón
A5
ユーフォニウム
○
ベル
A5
フルート(横笛等)
Flauta
Oboe
—
—
—
Cuerpo del pabellón o campana
Clarinete E
Clarinete B
*2
*3
A6
Pabellón
− − −
*2
オーボエ
○
ベル胴部
E クラリネット
○
ベルジョイント部
Área de la junta del pabellón
A7
B クラリネット
○
ベル
バスクラリネット(B )
○
吹込管(ネック上)
ファゴット(バスーン)
○
ウィングジョイント部
サックス(ソプラノ)
○
ベル
*3
A7
Tubo de la boquilla
Fagott
Área de la junta
Saxofón soprano
Pabellón
Saxofón alto
Cuello / Tubo principal
サックス(アルト)
○
ネック(主管部)
A9
Saxofón tenor
Cuello
サックス(テナー)
○
ネック
Saxofón barítono
Pabellón
サックス(バリトン)
○
ベル
Violín
Cabezal o clavijero
B1
バイオリン
○
ヘッド
Viola
Cabezal o clavijero
B1
ビオラ
○
ヘッド
B1
Cello
Cordal
B2
チェロ
○
テールピース
B2
Contrabajo
Cordal
B2
コントラバス
○
テールピース
B2
Gitarre
Cabezal o clavijero
B3
ギター
○
ヘッド
B3
Ukelele
Cabezal o clavijero
B3
バンジョー
○
ヘッド
B3
Banjo
Cabezal o clavijero
B3
ウクレレ
○
ヘッド
B3
Mandolín
Cabezal o clavijero
B3
マンドリン
○
ヘッド
B3
Como desee
C1
任意
C1
Atril musical
—
—
—
A9
*3
譜面台
− − −
A8
B1
*1 Use la función Reversa.
*1 リバース機能を使用します。
*2 En lugar de sujetar el AW-2 al instrumento, coloque el AW-2 en un lugar en que resulte
fácil de ver y use el micro.
*2 楽器に取りつけずにAW-2を見やすい位置に置いて、内蔵マイクで使用します。
*3 Pulse el botón de Selección de entrada para usar el micro (MIC).
*3 入力切替ボタンを押してマイク(MIC)に切り替えて使用します。
*1
A6
Clarinete bajo B
A8
備考
(裏面参照)
*3