1
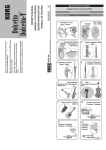
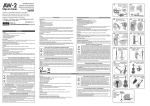
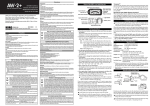
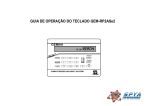
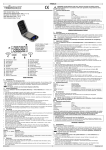
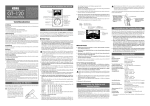
MANUAL DE USUARIO
BEDIENUNGSANLEITUNG
MANUEL D’UTILISATION
OWNER’S MANUAL
Power supply
Be sure to turn the power switch to OFF when the unit is not in use. Remove the battery
in order to prevent it from leaking when the unit is not in use for extended periods.
Interference with other electrical devices
Radios and televisions placed nearby may experience reception interference. Operate
this unit at a suitable distance from radios and televisions.
Handling
To avoid breakage, do not apply excessive force to the switches or controls.
Care
If the exterior becomes dirty, wipe it with a clean, dry cloth. Do not use liquid cleaners
such as benzene or thinner, or cleaning compounds or flammable polishes.
Keep this manual
After reading this manual, please keep it for later reference.
Keeping foreign matter out of your equipment
Never set any container with liquid in it near this equipment. If liquid gets into the
equipment, it could cause a breakdown, fire, or electrical shock. Be careful not to let
metal objects get into the equipment.
Gracias por comprar el afinado
PitchHawk-G2 Clip-on de KORG.
Vielen Dank, dass Sie sich für einen
PitchHawk-G2 Clip-on Tuner von Korg entschieden haben.
Merci d’avoir choisi la Clip-on Tuner
PitchHawk-G2 de Korg.
Thank you for purchasing the Korg
PitchHawk-G2 Clip-on Tuner.
Precautions
Location
Using the unit in the following locations can result in a malfunction.
• In direct sunlight
• Locations of extreme temperature or humidity.
• Excessively dusty or dirty locations.
• Locations of excessive vibration.
• Close to magnetic fields.
THE FCC REGULATION WARNING (for USA)
NOTE: This equipment has been tested and found to comply with the limits for
a Class B digital device, pursuant to Part 15 of the FCC Rules. These limits are
designed to provide reasonable protection against harmful interference in a
residential installation. This equipment generates, uses, and can radiate radio
frequency energy and, if not installed and used in accordance with the instructions,
may cause harmful interference to radio communications. However, there is no
guarantee that interference will not occur in a particular installation. If this equipment does cause harmful interference to radio or television reception, which can
be determined by turning the equipment off and on, the user is encouraged to try
to correct the interference by one or more of the following measures:
• Reorient or relocate the receiving antenna.
• Increase the separation between the equipment and receiver.
• Connect the equipment into an outlet on a circuit different from that to which
the receiver is connected.
• Consult the dealer or an experienced radio/TV technician for help.
If items such as cables are included with this equipment, you must use those
included items.
Unauthorized changes or modification to this system can void the user’s authority
to operate this equipment.
Notice regarding disposal (EU only)
When this “crossed-out wheeled bin” symbol is displayed on the product,
owner’s manual, battery, or battery package, it signifies that when you
wish to dispose of this product, manual, package or battery you must do
so in an approved manner. Do not discard this product, manual, package
or battery along with ordinary household waste. Disposing in the correct
manner will prevent harm to human health and potential damage to the
environment. Since the correct method of disposal will depend on the
applicable laws and regulations in your locality, please contact your local
administrative body for details. If the battery contains heavy metals in
excess of the regulated amount, a chemical symbol is displayed below the
“crossed-out wheeled bin” symbol on the battery or battery package.
IMPORTANT NOTICE TO CONSUMERS
This product has been manufactured according to strict specifications and voltage requirements that are applicable in the country in which it is intended that
this product should be used. If you have purchased this product via the internet,
through mail order, and/or via a telephone sale, you must verify that this product
is intended to be used in the country in which you reside.
WARNING: Use of this product in any country other than that for which it is
intended could be dangerous and could invalidate the manufacturer’s or distributor’s warranty.
Please also retain your receipt as proof of purchase otherwise your product may
be disqualified from the manufacturer’s or distributor’s warranty.
CALIFORNIA USA ONLY
This Perchlorate warning applies only to primary CR (Manganese Dioxide) Lithium
coin cells sold or distributed ONLY in California USA.
“Perchlorate Material–special handling may apply, See www.dtsc.ca.gov/hazardouswaste/perchlorate.”
This device complies with Part 15 of the FCC Rules.
Operation is subject to the following two conditions: (1) This device may not cause
harmful interference, and (2) this device must accept any interference received,
including interference that may cause undesired operation.
CAN ICES-3 B / NMB-3 B.
Parts of the PitchHawk-G2
MODE indicator
Reference
pitch indicator
Note name indicators for bass mode: LB, 4E, 3A, 2D, 1G, HC
(LB stands for low B, and HC stands for high C.)
CALIB button
Power button
FLAT/
CAPO indicator
Battery cover
Calibration (reference pitch) settings (*M)
Each time you press the CALIB button, the calibration value (reference pitch)
increases in 1 Hz steps. The setting range is between 436 and 445 Hz. Hold
down the button for at least one second to reset the calibration to 440 Hz.
Specifying flat/capo settings (*M)
Note name 1st string overtightening
warning indicator
indicator
Battery indicator
MODE button
FLAT/CAPO button
Installing the battery
Make sure to turn the power off before you install or replace the battery.
When the battery begins to run low, the battery
indicator ( ) will light up.
The PitchHawk-G2 will continue to function for a
while longer, but tuning will become less accurate.
Replace the battery as soon as possible.
1. Push the battery cover in direction A and push
it to open it up.
Each time you hold down the FLAT/CAPO button, the
setting changes between flat and capo, with the current
setting shown by the FLAT/CAPO indicator.
) → Capo (
Flat (
3 semitones
higher
To change the capo setting, press the FLAT/CAPO button while the
CAPO indicator is lit.
The setting range is between 1 and 7 semitones higher.
Both flat and capo tuning can be set in guitar mode, but only flat tuning can
be set in bass mode, and neither flat nor capo tuning can be set in chromatic
mode.
Attaching to the instrument and range of motion
3. Return the battery cover to its original position.
Backlight
The backlight will illuminate brightly when sound is input or when a
button is pressed. When there has been no user input for approximately
three seconds, the backlight will dim slightly in order to prevent the battery from being depleted.
The PitchHawk-G2 tunes by picking up the vibrations of the instrument.
Therefore, be sure to attach the PitchHawk-G2 to the head stock of your
instrument in order to tune it. In addition, the PitchHawk-G2 can be freely
moved so that the display is easy to read.
The PitchHawk-G2 may be damaged if you apply excessive force within its
range of motion, or attempt to move it beyond its intended range of motion.
45°
Tuning
Tuning procedure
1. Press the power button. The power will turn on/off each time you
press this button.
If the power is left on for approximately 3 minutes without any user
input, it will turn off automatically.
2. If necessary, change the tuner mode, calibration (reference pitch) and
flat/capo settings.
The procedure with the tuner mode set to chromatic (factory default;
no mode indicator) is described below.
3. Play a single note on your instrument.
The display will show the name of the note that’s closest to the pitch
detected. Tune your instrument to the correct pitch so that the desired
note name appears.
4. Once again play a single note on your
instrument, and adjust the tuning so that
the center segment of the meter (indicated Meter indications
when correctly tuned
by ) is lit up.
An indicator toward the right will light up if the pitch is too high, and
an indicator toward the left will light up if the pitch is too low.
Even if the pitch is within the range of detection, it may not be possible to detect
the pitch of an instrumental sound that contains large numbers of overtones
or a sound that has a rapid decay.
The meter may respond to vibrations it picks up from the environment; however,
this will not affect tuning of the instrument.
Setting the tuner mode (*M)
Each time you press the MODE button, the tuner mode changes,
with the current mode shown by the mode indicator.
) → Bass (
)...
To change the flat setting, press the FLAT/CAPO button
while the FLAT indicator is lit up.
The setting range is between 1 and 5 semitones lower.
When the flat or capo setting is changed 0, the FLAT/CAPO indicator turns
off after a few seconds, and the default setting (no flat or capo tuning) is
applied.
2. Making sure to observe the correct polarity,
insert the battery so that the “+” side of the battery is visible.
Chromatic (no indicator) → Guitar (
Chromatic...
) → Flat (
2 semitones
lower
)→
In addition, in the guitar and bass modes, the string number closest
to the detected pitch appears to the left of the note name indicator.
5th guitar
string
4th bass
string
Note name indicators for guitar mode: 7B, 6E, 5A, 4D, 3G, 2B, 1E
In guitar mode, the 1st string overtightening warning indicator ( ) will light
to help prevent the 1st string from breaking as a result of overtightening.
30°
180°
30°
180°
45°
Please carefully attach the PitchHawk-G2 to your instrument. Leaving the
PitchHawk-G2 attached for a long time may damage or mark the instrument's
surface.
Depending on various factors such as age-related change or the surface finish,
there is a possibility that your instrument may be damaged by attaching this
product.
Specifications
Scale:
12-note equal temperament
Range (sine wave):
Chromatic A0 (27.50 Hz)–C8 (4186 Hz)
Guitar B1 flat5 (46.25 Hz)–E4 capo7 (493.88 Hz)
Bass
B0 flat5 (23.12 Hz)–C3 (130.81 Hz)
Precision:
+/-1 cent
Reference pitch:
436–445 Hz (1 Hz steps)
Flat tuning: 1–5 semitones (in semitone steps)
Capo tuning: 1–7 semitones (in semitone steps)
Dimensions:
61 mm(W) X 65 mm(D) X 28 mm(H)
2.40’’ (W) X 2.56’’ (D) X 1.10 ’’ (H)
Weight:
26 g/0.92 oz. (including battery)
Battery life:
approximately 8 hours
(tuner continuously operating, A4 input)
Included items:
CR2032 lithium battery (3V)
*M Settings are remembered even when the power is off. However, settings will be initialized when you replace the battery (default, Tuner
mode: Chromatic, calibration: 440 Hz, FLAT/CAPO: normal)
•Specifications and appearance are subject to change without notice for
improvement.
Précautions
Emplacement
L'utilisation de cet instrument dans les endroits suivants peut en entraîner
le mauvais fonctionnement.
• En plein soleil.
• Endroits très chauds ou très humides.
• Endroits sales ou fort poussiéreux.
• Endroits soumis à de fortes vibrations.
• A proximité de champs magnétiques.
Alimentation
Lorsque vous n’utilisez pas l’appareil, n’oubliez pas de le mettre hors
tension. Retirez les piles pour éviter toute fuite lorsque l’appareil ne sera
pas utilisé pendant de longues périodes de temps.
Interférences avec d'autres appareils électriques
Les postes de radio et de télévision situés à proximité peuvent par
conséquent souffrir d'interférences à la réception. Veuillez dès lors faire
fonctionner cet appareil à une distance raisonnable de postes de radio
et de télévision.
Maniement
Pour éviter de les endommager, manipulez les commandes et les boutons
de cet instrument avec soin.
Entretien
Lorsque l'instrument se salit, nettoyez-le avec un chiffon propre et sec.
Ne vous servez pas d'agents de nettoyage liquides tels que du benzène
ou du diluant, voire des produits inflammables.
Conservez ce manuel
Après avoir lu ce manuel, veuillez le conserver soigneusement pour toute
référence ultérieure.
Evitez toute intrusion d'objets ou de liquide
Ne placez jamais de récipient contenant du liquide près de l'instrument.
Si le liquide se renverse ou coule, il risque de provoquer des dommages,
un court-circuit ou une électrocution. Veillez à ne pas laisser tomber des
objets métalliques dans le boîtier (trombones, par ex.).
Note concernant les dispositions (Seulement EU)
Quand un symbole avec une poubelle barrée d’une croix apparait sur le produit, le mode d’emploi, les piles ou le pack de piles,
cela signifie que ce produit, manuel ou piles doit être déposé
chez un représentant compétent, et non pas dans une poubelle
ou toute autre déchetterie conventionnelle. Disposer de cette
manière, de prévenir les dommages pour la santé humaine et
les dommages potentiels pour l’environnement. La bonne méthode d’élimination dépendra des lois et règlements applicables
dans votre localité, s’il vous plaît, contactez votre organisme administratif pour plus de détails. Si la pile contient des métaux lourds audelà du seuil réglementé, un symbole chimique est affiché en dessous
du symbole de la poubelle barrée d’une croix sur la pile ou le pack de
piles.
REMARQUE IMPORTANTE POUR LES CLIENTS
Ce produit a été fabriqué suivant des spécifications sévères et des
besoins en tension applicables dans le pays où ce produit doit être
utilisé. Si vous avez acheté ce produit via l’internet, par vente par
correspondance ou/et vente par téléphone, vous devez vérifier que ce
produit est bien utilisable dans le pays où vous résidez.
ATTENTION: L’utilisation de ce produit dans un pays autre que celui
pour lequel il a été conçu peut être dangereuse et annulera la garantie
du fabricant ou du distributeur. Conservez bien votre récépissé qui est
la preuve de votre achat, faute de quoi votre produit ne risque de ne
plus être couvert par la garantie du fabricant ou du distributeur.
Precauciones
Vorsichtsmaßnahmen
Aufstellungsort
Vermeiden Sie das Aufstellen des Geräts an Orten, an denen
• es direkter Sonneneinstrahlung ausgesetzt ist;
• hohe Feuchtigkeit oder Extremtemperaturen auftreten können;
• Staub oder Schmutz in großen Mengen vorhanden sind;
• das Gerät Erschütterungen ausgesetzt sein kann.
• in der Nähe eines Magnetfeldes.
Stromversorgung
Ubicación
El uso de la unidad en las siguientes ubicaciones puede dar como
resultado un mal funcionamiento:
• Expuesto a la luz directa del sol.
• Zonas de extremada temperatura o humedad.
• Zonas con exceso de suciedad o polvo.
• Zonas con excesiva vibración.
• Cercano a campos magnéticos.
Stellen Sie den Netzschalter auf OFF, wenn das Gerät nicht benutzt wird. Wenn Sie
das Gerät über einen längeren Zeitraum nicht benutzen, nehmen Sie die Batterien
heraus, damit sie nicht auslaufen.
Fuente de alimentación
Störeinflüsse auf andere Elektrogeräte
Interferencias con otros aparatos
Dieser kann bei in der Nähe aufgestellten Rund-funkempfängern oder Fernsehgeräten Empfangsstörungen hervorrufen. Betreiben Sie solche Geräte nur in einem
geeigneten Abstand von diesem Erzeugnis.
Bedienung
Vermeiden Sie bei der Bedienung von Schaltern und Reglern unangemessenen
Kraftaufwand.
Reinigung
Bei auftretender Verschmutzung können Sie das Gehäuse mit einem trockenen,
sauberen Tuch abwischen. Verwenden Sie keinerlei Flüssigreiniger wie beispielsweise Reinigungsbenzin, Verdünnungs- oder Spülmittel. Verwenden Sie niemals
brennbare Reiniger.
Bedienungsanleitung
Bewahren Sie diese Bedienungsanleitung gut auf, falls Sie sie später noch einmal
benötigen.
Flüssigkeiten und Fremdkörper
Stellen Sie niemals Behältnisse mit Flüssigkeiten in der Nähe des Geräts auf. Wenn
Flüssigkeit in das Gerät gelangt, können Beschädigung des Geräts, Feuer oder
ein elek-trischer Schlag die Folge sein. Beachten Sie, daß keinerlei Fremdkörper
in das Gerät gelangen.
Hinweis zur Entsorgung (Nur EU)
Wenn Sie das Symbol mit der „durchgekreuzten Mülltonne“ auf Ihrem
Produkt, der dazugehörigen Bedienungsanleitung, der Batterie oder
dem Batteriefach sehen, müssen Sie das Produkt in der vorgeschriebenen Art und Weise entsorgen. Dies bedeutet, dass dieses Produkt
mit elektrischen und elektronischen Komponenten nicht mit dem
normalen Hausmüll entsorgt werden darf. Für Produkte dieser Art
existiert ein separates, gesetzlich festgelegtes Entsorgungssystem.
Gebrauchte elektrische und elektronische Geräte müssen separat
entsorgt werden, um ein umweltgerechtes Recycling sicherzustellen. Diese
Produkte müssen bei benannten Sammelstellen abgegeben werden. Die
Entsorgung ist für den Endverbraucher kostenfrei! Bitte erkundigen sie sich
bei ihrer zuständigen Behörde, wo sie diese Produkte zur fachgerechten
Entsorgung abgeben können. Falls ihr Produkt mit Batterien oder Akkumulatoren ausgerüstet ist, müssen sie diese vor Abgabe des Produktes entfernen
und separat entsorgen (siehe oben). Die Abgabe dieses Produktes bei einer
zuständigen Stelle hilft ihnen, dass das Produkt umweltgerecht entsorgt wird.
Damit leisten sie persönlich einen nicht unerheblichen Beitrag zum Schutz der
Umwelt und der menschlichen Gesundheit vor möglichen negativen Effekten
durch unsachgemäße Entsorgung von Müll. Batterien oder Akkus, die Schadstoffe enthalten, sind auch mit dem Symbol einer durchgekreuzten Mülltonne
gekennzeichnet. In der Nähe zum Mülltonnensymbol befindet sich die chemische Bezeichnung des Schadstoffes.
Cd oder NiCd steht für Cadmium, Pb für Blei und Hg für Quecksilber.
WICHTIGER HINWEIS FÜR KUNDEN
Dieses Produkt wurde unter strenger Beachtung von Spezifikationen und Spannungsanforderungen hergestellt, die im Bestimmungsland gelten. Wenn Sie
dieses Produkt über das Internet, per Postversand und/oder mit telefonischer
Bestellung gekauft haben, müssen Sie bestätigen, dass dieses Produkt für
Ihr Wohngebiet ausgelegt ist.
WARNUNG: Verwendung dieses Produkts in einem anderen Land als dem, für
das es bestimmt ist, verwendet wird, kann gefährlich sein und die Garantie des
Herstellers oder Importeurs hinfällig lassen werden. Bitte bewahren Sie diese
Quittung als Kaufbeleg auf, da andernfalls das Produkt von der Garantie des
Herstellers oder Importeurs ausgeschlossen werden kann.
Apague la unidad cuando no la use la batería. Retire las baterías si no
va a usar la unidad durante un tiempo largo.
Las radios y televisores situados cerca pueden experimentar interferencias en la recepción. Opere este dispositivo a una distancia prudencial
de radios y televisores.
Manejo
Para evitar una rotura, no aplique excesiva fuerza a los conmutadores
o controles.
Cuidado
Si exterior se ensucia, límpiese con un trapo seco. No use líquidos
limpiadores como disolvente, ni compuestos inflamables.
Guarde este manual
Después de leer este manual, guárdelo para futuras consultas.
Mantenga los elementos externos alejados del equipo
Nunca coloque ningún recipiente con líquido cerca de este equipo,
podría causar un cortocircuito, fuero o descarga eléctrica. Cuide de que
no caiga ningún objeto metálico dentro del equipo.
Nota respecto a residuos y deshechos (solo UE)
Cuando aparezca el símbolo del cubo de basura tachado sobre un
producto, su manual de usuario, la batería, o el embalaje de cualquiera de éstos, significa que cuando quiere tire dichos artículos a la
basura, ha de hacerlo en acuerdo con la normativa vigente de la
Unión Europea. No debe verter dichos artículos junto con la basura
de casa. Verter este producto de manera adecuada ayudará a evitar
daños a su salud pública y posibles daños al medioambiente. Cada
país tiene una normativa específica acerca de cómo verter productos potencialmente tóxicos, por tanto le rogamos que se ponga en contacto con su
oficina o ministerio de medioambiente para más detalles. Si la batería contiene
metales pesados por encima del límite permitido, habrá un símbolo de un
material químico, debajo del símbolo del cubo de basura tachado.
NOTA IMPORTANTE PARA EL CONSUMIDOR
Este producto ha sido fabricado de acuerdo a estrictas especificaciones y
requerimientos de voltaje aplicables en el país para el cual está destinado.
Si ha comprado este producto por internet, a través de correo, y/o venta
telefónica, debe usted verificar que el uso de este producto está destinado
al país en el cual reside. AVISO: El uso de este producto en un país distinto
al cual está destinado podría resultar peligroso y podría invalidar la garantía
del fabricante o distribuidor. Por favor guarde su recibo como prueba de
compra ya que de otro modo el producto puede verse privado de la garantía
del fabricante o distribuidor.
Parties du PitchHawk-G2
Réglages de calibrage (diapason) (*M)
Indicateur du MODE
couvercle de la pile
Indicateur de la Indicateur de la Bouton
Interrupteur
note de référence FLAT/CAPO
d’alimentation
CALIB
Chaque pression sur le bouton CALIB augmente la valeur de calibrage
(diapason) par pas de 1 Hz. La plage de réglage s’étend de 436 à 445 Hz. Vous
pouvez initialiser le diapason à 440 Hz en maintenant le bouton enfoncé
pendant au moins une seconde.
Réglages bémol (Flat)/capo (*M)
Bouton
MODE
Bouton
Indicateur Indicateur Avertissement FLAT/CAPO
du nom de de surtension
de pile
la note
de la 1re corde
Mise en place de la pile
Chaque fois que vous maintenez enfoncé le bouton FLAT/
CAPO, le réglage alterne entre le mode bémol (Flat) et capo,
et l’écran affiche le statut avec l’indicateur FLAT/CAPO.
Bémol (
3 demi-tons
) → Capo (
) → Bémol (
)...
Pour modifier le réglage d’accord en bémol, appuyez sur plus haut
le bouton FLAT/CAPO quand l’indicateur FLAT est allumé.
La plage de réglage s’étend de 1 à 5 demi-tons plus bas que la hauteur standard.
Pour modifier le réglage d’accord avec capo, appuyez sur le bouton FLAT/
CAPO quand l’indicateur CAPO est allumé.
La plage de réglage s’étend de 1 à 7 demi-tons plus haut que la hauteur standard.
Coupez toujours l’alimentation avant de changer la pile.
Quand la pile commence à s’épuiser, l’indicateur
de pile ( ) s’allume.
L’PitchHawk-G2 continue à fonctionner un certain
temps mais l’accordage devient moins précis. Remplacez la pile aussi vite que possible.
Quand le paramètre bémol (Flat) ou capo est réglé sur 0, l’indicateur FLAT/
CAPO s’éteint après quelques secondes et le réglage par défaut (accord sans
bémol ni capo) est activé.
Les réglages d’accords en bémol et avec capo peuvent être effectués en mode
guitare, mais en mode basse, seul le réglage d’accord en bémol est disponible.
Le mode chromatique ne permet pas les réglages bémol/capo.
1. Ouvrez le couvercle de la pile en l’enfonçant et
en le glissant simultanément dans le sens A.
2. Remplacez la pile en veillant à respecter la
polarité: la face “+” de la pile doit être visible.
Fixation sur l’instrument et plage de manœuvre de l’accordeur
3. Remettez en place le couvercle de la pile.
Rétroéclairage
Le rétroéclairage s’allume de façon vive quand un signal arrive ou quand
vous actionnez un bouton. Si aucun signal ne parvient à l’accordeur pendant environ 3 secondes, il diminue légèrement l’intensité du rétroéclairage
pour économiser l’énergie de la pile.
L’PitchHawk-G2 détermine l’accordage en captant les vibrations de l’instrument. Veillez donc à fixer l’PitchHawk-G2 sur la tête de votre instrument
pour garantir un accordage fiable. En outre, vous pouvez déplacer et
manœuvrer l’PitchHawk-G2 comme bon vous semble pour une lisibilité
parfaite de son écran.
Vous risquez d'endommager l'PitchHawk-G2 si vous le manipulez avec une force
excessive ou si vous tentez de le manipuler en dehors de sa plage de manœuvre.
45°
Accordage
30°
Procédure d’accordage
1. Appuyez sur l’interrupteur d’alimentation. L’appareil se mettra sous/
hors tension à chaque pression sur l’interrupteur.
Si vous laissez l’appareil allumé pendant environ 3 minutes sans capter
aucun son, il s’éteindra automatiquement.
2. Si nécessaire, changez les réglages de mode d’accordeur, de calibrage
et d’accord en bémol (Flat)/avec Capo.
La procédure ci-dessous décrit le mode d’accordeur chromatique
(réglage par défaut, pas d’indicateur de mode).
3. Jouez une note isolée sur l’instrument.
L’écran affiche le nom de la note la plus
proche de la hauteur détectée. Accordez
grossièrement votre instrument de sorte à
faire apparaître la note voulue.
Indications à l'écran
quand l'accord est correct
4. Jouez à nouveau une note isolée sur l’instrument et accordez-la
jusqu’à ce que le segment central de l’indicateur (repéré par )
s’allume.
Le témoin côté droit s’allume si la note est trop haute et le témoin côté
gauche s’allume si la note est trop basse.
Même si la note se trouve à l’intérieur de la plage de détection, elle peut ne pas
être détectée si le son de l’instrument de musique contient un grand nombre
d’harmoniques ou un temps de descente rapide.
Il se pourrait que l’accordeur réagisse à des vibrations ambiantes qu’il capte;
cela n’affecte toutefois pas l’accord de l’instrument.
Réglage du mode d’accordeur (*M)
Chaque pression du bouton MODE change de mode d’accordeur; l’indicateur de mode signale le mode actif.
Mode chromatique (pas d’indicateur) → Guitare (
Basse (
) → Chromatique...
2 demi-tons
plus bas
)→
5e corde
de guitare
4e corde
de basse
180°
30°
180°
45°
S’il vous plait, attachez soigneusement l’PitchHawk-G2 à votre instrument.
Le laisser attaché pendant un long moment, peut rayer la surface de votre
instrument.
Dépendant de plusieurs facteurs comme le changement dû à l’âge de l’instrument ou la finition de la structure, il y a une possibilité que votre instrument
soit endommagé par le système d’attache par pince.
Spécifications
Gamme: 12 notes tempérament égal
Plage de détection (onde sinus):
chromatique A0 (27,50 Hz)–C8 (4186 Hz)
guitare
B1 flat5 (46,25 Hz)–E4 capo7 (493,88 Hz)
basse
B0 flat5 (23,12 Hz)–C3 (130,81 Hz)
Précision: +/-1 centième
Note de référence: 436 à 445 Hz (paliers de 1 Hz)
Accord en bémol (Flat): 1–5 demi-tons (par pas de demi-ton)
Accord avec capo: 1–7 demi-tons (par pas de demi-ton)
Dimensions: 61 mm (L) x 65 mm (P) x 28 mm (H)
Poids: 26 g (pile comprise)
Autonomie de la pile:Environ 8 heures (utilisation continue de l’accordeur, entrée de la note A4)
Accessoires fournis: Pile au lithium CR2032 (3 V)
En outre, en modes guitare et basse, l’écran affiche le numéro de la corde la plus
proche de la hauteur détectée à gauche de l’indicateur du nom de note.
Indicateurs du nom de note en mode guitare:
7B (Si), 6E (Mi), 5A (La), 4D (Ré), 3G (Sol), 2B (Si), 1E (Mi)
*M Les réglages sont conservés même quand l’appareil est mis hors tension. Néanmoins, les réglages seront réinitialisés si vous remplacez la
pile (réglages par défaut, mode d’accordeur: chromatique, calibrage:
440 Hz, FLAT/CAPO: normal).
En mode guitare, l’avertissement de surtension de la 1re corde ( ) s’allume
pour prévenir une rupture de la corde causée par une tension trop forte.
•Les caractéristiques et l’aspect du produit sont susceptibles d’être modifiés sans avis préalable en vue d’une amélioration.
Indicateurs du nom de note en mode basse:
LB (Si grave), 4E (Mi), 3A (La), 2D (Ré), 1G (Sol), HC (Do aigu)
Teile des PitchHawk-G2
Kalibrierungseinstellungen (Referenzton) (*M)
MODE-Anzeige FLAT/CAPO-Anzeige CALIB-Taste Netzschalter
Batteriefa
Bezugstonhö henanzeige
chdeckel
Mit jedem Drücken des CALIB-Tasters erhöht sich der Kalibrierungswert (Referenzton) in Schritten von 1 Hz. Die Einstellbereich liegt zwischen 436 und 445 Hz.
Halten Sie den Taster mindestens 1 Sekunde lang gedrückt, um die Kalibrierung
auf 440 Hz zurückzusetzen.
Festlegen der Flat-/Capo-Einstellungen (*M)
MODE-Taste
FLAT/CAPO-Taste
Batterieanzeige
Notennamen-Anzeige Warnanzeige bei zu fest angezogener 1. Saite
Einsetzen der Batterie
Deaktivieren Sie den Netzschalter, bevor Sie die Batterie einlegen oder auswechseln.
Wenn die Batterie fast erschöpft ist, leuchtet die Batterieanzeige ( ) auf.
Der PitchHawk-G2 funktioniert dann zwar noch eine Weile, allerdings lässt seine Genauigkeit dann ebenfalls nach.
Wechseln Sie die Batterie also so schnell wie möglich aus.
1. Schieben Sie den Batteriefachdeckel in Richtung A
und klappen Sie ihn auf.
Bei jedem Drücken des FLAT/CAPO-Tasters wird zwischen „Flat“ und „Capo“
umgeschaltet, wobei die momentane Einstellung auf der FLAT/CAPO-Anzeige
folgendermaßen erscheint:
Flat (
) → Capo (
Um die Einstellung für „Capo“ zu ändern, drücken Sie den FLAT/
CAPO-Taster, während die CAPO-Anzeige leuchtet.
Die Einstellbereich liegt zwischen 1 und 7 Halbtöne höher.
Hintergrundbeleuchtung
Die Hintergrundbeleuchtung wird aktiviert, wenn ein Eingangssignal empfangen
wird bzw. wenn Sie einen Taster drücken.
Drei Sekunden nach dem letzten Bedienvorgang lässt die Helligkeit der Hintergrundbeleuchtung etwas nach, um die Batterie zu schonen.
3 Halbtöne
höher.
Wenn die Flat- oder Capo-Einstellung auf 0 geändert wird, schaltet sich
die FLAT/CAPO-Anzeige nach wenigen Sekunden aus, und die Standardeinstellung (kein Flat und kein Capo) wird aktiviert.
Das PitchHawk-G2 stimmt Ihr Instrument, indem es dessen Schwingungen aufnimmt. Aus diesem Grund sollte das PitchHawk-G2 zum Stimmen an die Kopfplatte
Ihres Instruments angebracht werden. Darüber hinaus kann das PitchHawk-G2
frei bewegt werden, um die Ablesbarkeit des Displays zu verbessern.
Das PitchHawk-G2 kann beschädigt werden, wenn innerhalb des Bewegungsspielraums
übermäßige Kraft auf das Gerät ausgeübt wird bzw. wenn versucht wird, es über den
Bewegungsspielraum hinaus zu bewegen.
45°
Tuning
Tuning-Verfahren
1. Drücken Sie die Netzschalter. Bei jedem Drücken dieser Taste schaltet das
Gerät ein/aus.
Wenn das Gerät ca. 3 Minuten lang eingeschaltet bleibt, ohne dass Ton angelegt
wird, schaltet es automatisch aus.
2. Ändern Sie bei Bedarf den Stimm-Modus, die Kalibrierung und die Einstellungen für Flat/Capo.
Die Vorgehensweise mit dem chromatischen Stimm-Modus (Werkseinstellung, keine Modus-Anzeige) wird unten stehend beschrieben.
3. Spielen Sie eine Einzelnote auf dem Instrument.
Das Display zeigt den Namen der Note an, die
der gespielten Note am nächsten kommt. Stimmen Sie Ihr Instrument so, dass der Name der
Meteranzeige bei
gewünschten Note angezeigt wird.
korrekter Stimmung
4. Spielen Sie erneut eine Einzelnote auf Ihrem Instrument und stimmen Sie so lange, bis das mittlere Metersegment (durch angezeigt)
leuchtet.
Eine Anzeige rechts davon leuchtet, wenn der Ton zu hoch ist, und einen Anzeige
links davon leuchtet, wenn der Ton zu tief ist.
Auch wenn die Tonhöhe innerhalb des Erkennungsbereichs ist, kann es unmöglich sein,
die Tonhöhe eines Instrumentenklangs zu erkennen, wenn dieser einen hohen Anteil
an Obertönen oder sehr schnelles Abklingen aufweist.
Das Meter kann auf Schwingungen aus der Umgebung reagieren. Dies beeinträchtigt
allerdings nicht den Stimmvorgang des Instruments.
Einstellen des Stimm-Modus (*M)
Mit jedem Drücken des MODE-Tasters ändert sich der Stimm-Modus, wobei der
momentane Modus in der Modus-Anzeige folgendermaßen erscheint:
)→
Außerdem erscheint im Gitarren- und Bass-Modus links
neben der Notennamen-Anzeige die Saitennummer, die der
erkannten Tonhöhe am ähnlichsten ist.
2 Halbtöne
tiefer
Anbringen an das Instrument und Bewegungsspielraum
3. Schließen Sie den Batteriefachdeckel wieder.
Notennamen-Anzeige für Gitarren-Modus:
7B, 6E, 5A, 4D, 3G, 2B, 1E
)…
Sowohl Flat- als auch Capo-Stimmung können im Gitarren-Modus eingestellt werden,
während im Bass-Modus nur die Flat-Stimmung und im chromatischen Modus weder
Flat- noch Capo-Stimmung eingestellt werden können.
2. Um die korrekte Polarität zu gewährleisten, legen Sie
die neue Batterie so ein, dass die „+“-Seite sichtbar
ist.
Chromatisch (keine Anzeige) → Gitarre (
Bass (
) → Chromatisch …
) → Flat (
Um die Einstellung für „Flat“ zu ändern, drücken Sie den FLAT/
CAPO-Taster, während die FLAT-Anzeige leuchtet.
Die Einstellbereich liegt zwischen 1 und 5 Halbtöne tiefer.
5. Gitarrensaite
4. Basssaite
Im Gitarren-Modus erscheint die Warnanzeige bei zu fest angezogener 1. Saite ( ),
um eine Beschädigung der 1. Saite durch zu festes Anziehen zu verhindern.
Notennamen-Anzeige für Bass-Modus:
LB, 4E, 3A, 2D, 1G, HC (LB steht für ein tiefes B und HC steht für ein hohes C)
30°
180°
30°
180°
45°
Bitte befestigen sie das PitchHawk-G2 vorsichtig an ihrem Instrument. Wenn sie das
PitchHawk-G2 für längere Zeit an ihrem Instrument befestigt lassen, kann dies zu
Veränderungen an der Oberfläche des Instruments führen.
Abhängig von verschiedenen Faktoren wie z. B. altersbedingte Veränderungen der
Lackierung/Oberfläche Ihres Instrumentes, kann es vorkommen dass ein Anbringen
dieses Produkts zu einer Beschädigung führt.
Technische Daten
Skala: 12 Noten gleichschwebende Stimmung
Bereich (Sinuswelle):
chromatisch A0 (27,50 Hz)–C8 (4186 Hz)
Gitarre B1 flat5 (46,25 Hz)–E4 capo7 (493,88 Hz)
Bass B0 flat5 (23,12 Hz)–C3 (130,81 Hz)
Präzision: +/-1 Cent
Bezugstonhöhe: 436–445 Hz (in Schritten von 1 Hz)
Flat-Stimmung: 1-5 Halbtöne (in Halbtonschritten)
Capo-Stimmung: 1-7 Halbtöne (in Halbtonschritten)
Abmessungen: 61 mm (B) x 65 mm (T) x 28 mm (H)
Gewicht:
26 g (mit Batterie)
Batterielebensdauer: ca. 8 Stunden (kontinuierlicher Betrieb mit eingeschaltetem Stimmgerät, A4-Eingang)
Lieferumfang: CR2032 Lithiumbatterie (Knopfzelle, 3 V)
*M Die Einstellungen bleiben gespeichert, wenn das Gerät ausgeschaltet wird.
Die Einstellungen werden zurückgesetzt, wenn Sie die Batterie ersetzen
(Werkseinstellung, Stimm-Modus: chromatisch, Kalibrierung: 440 Hz, FLAT/
CAPO: normal).
•Änderungen der technischen Daten und des Designs ohne vorherige Ankündigung vorbehalten.
Partes del PitchHawk-G2
indicador de MODE
indicado de tono
de referencia
Botón CALIB
indicador
FLAT/CAPO
botón de
alimentación
cubierta
de la batería
Indicadores de nombre de nota para el modo de bajo:
LB, 4E, 3A, 2D, 1G, HC (LB indica B baja, y HC indica C alta).
Ajustes de la calibración (tono de referencia) (*M)
Cada vez que pulsa el botón CALIB, el valor de calibración (tono de referencia) aumenta en pasos de 1 Hz. El intervalo de ajuste está entre 436 y
445 Hz. Mantenga pulsado el botón durante al menos un segundo para
reajustar la calibración a 440 Hz.
Especificación de ajustes de bemol/cejilla (*M)
Indicador
de batería
Botón FLAT/CAPO Botón MODE
indicador
de nombre Indicador de advertencia de
de nota
apriete excesivo de la 1ª cuerda
Bemol (
Instalación de la Batería
)
3 semitonos
más alto.
Cuando el ajuste de bemol o cejilla se cambia a 0, el indicador FLAT/CAPO
se desactiva unos segundos después, y se aplica el ajuste por defecto (sin
afinación de bemol ni de cejilla).
2. Inserte la batería asegurándose de que la polaridad es correcta, de forma que la cara “+” de la
batería sea visible.
La afinación de bemol y cejilla se puede establecer en el modo de guitarra, pero
únicamente la afinación de bemol se puede establecer en el modo de bajo; en el
modo cromático no es posible ajustar ninguna de las dos afinaciones.
3. Vuelva a colocar la cubierta de la batería en su
posición original.
Colocación en el instrumento e intervalo de movimiento
Retroiluminación
La retroiluminación se hace más brillante cuando hay sonido de entrada
o cuando se pulsa un botón. Si el usuario no realiza ninguna acción durante aproximadamente tres segundos, la retroiluminación se atenuará
ligeramente para evitar que la batería se agote.
Afinación
El sistema PitchHawk-G2 realiza la afinación recogiendo las vibraciones del
instrumento. Por ello, asegúrese de colocar el PitchHawk-G2 en el cabezal
del instrumento para poder afinarlo. Además, el PitchHawk-G2 se puede
mover libremente para leer la pantalla con facilidad.
El PitchHawk-G2 puede resultar dañado si ejerce una fuerza excesiva en su
intervalo de movimiento, o si intenta desplazarlo más allá de su intervalo de
movimiento previsto.
45°
Procedimiento de afinación
1. Pulse el botón de alimentación. La unidad se enciende o se apaga
cada vez que Pulse este botón.
Si la alimentación se deja durante unos 3 minutos sin ningún sonido de
entrada, seapagará de forma Automática.
2. En caso necesario, cambie el modo de afinador, la calibración y los
ajustes de bemol/cejilla.
El procedimiento con el modo de afinador establecido en cromático
(valor de fábrica; sin indicador de modo) se describe a continuación.
3. Toque una sola nota en su instrumento.
La pantalla mostrará el nombre de la nota
más cercana al tono detectado. Afine su
instrumento con el tono correcto para que
aparezca el nombre de la nota deseada.
30°
180°
30°
180°
45°
Por favor sujete con cuidado e PitchHawk-G2 a su instrumento. Si deja el
PitchHawk-G2 sujeto al instrumento durante un largo periodo, puede dañar
la superficie del instrumento.
Dependiendo de varios factores, como el envejecimiento del acabado de la
superficie, existe la posibilidad de que su instrumento pueda dañarse por la
colocación del afinador.
Indicaciones de medidor si
4. De nuevo, toque una nota en su instru- se ha afinado correctamente
mento y ajuste la afinación de forma que
se ilumine el segmento central del medidor (indicado por ).
El indicador de la derecha se iluminará si el tono es demasiado agudo, y
el indicador de la izquierda se iluminará si es demasiado grave.
Aunque el tono esté dentro del rango de detección, puede que no sea posible
detectar el tono de un sonido que contenga gran cantidad de armónicos o que
tenga una rápida caída.
El medidor puede responder a las vibraciones que recoge del entorno; sin embargo, eso no afectará a la afinación del instrumento.
Cromático (sin indicador) → Guitarra (
Bajo (
) → Cromático...
) → Bemol (
2 semitonos
más bajo
Para cambiar el ajuste de cejilla, pulse el botón FLAT/CAPO con el
indicador CAPO iluminado.
El intervalo de ajuste está entre 1 y 7 semitonos más alto.
1. Empuje la cubierta de la batería en la dirección
A y presiónela para abrirla.
Cada vez que pulsa el botón MODE, el modo de afinador
cambia; el indicador de modo muestra el modo actual.
) → Cejilla (
Para cambiar el ajuste de bemol, pulse el botón FLAT/
CAPO con el indicador FLAT iluminado.
El intervalo de ajuste está entre 1 y 5 semitonos más bajo.
Apague la unidad antes de instalar o reemplazar la batería.
Cuando la batería comience a agotarse, se iluminará
el indicador de batería ( ).
El PitchHawk-G2 seguirá funcionando un tiempo,
pero será menos exacto. Reemplace la Batería tan
pronto como sea posible.
Ajuste del modo de afinador (*M)
Cada vez que mantiene pulsado el botón FLAT/CAPO, el
ajuste cambia entre bemol y cejilla, con el ajuste actual
mostrado por el indicador FLAT/CAPO.
5ª cuerda
de guitarra
)→
4ª cuerda
de bajo
Además, en los modos de bajo y guitarra, el número de cuerda más cercano al tono
detectado aparece a la izquierda del indicador de nombre de nota.
Indicadores de nombre de nota para el modo de guitarra:
7B, 6E, 5A, 4D, 3G, 2B, 1E
En el modo de guitarra, el indicador de advertencia de apriete excesivo de la
1ª cuerda ( ) se iluminará para ayudarle a evitar que la 1ª cuerda se rompa
debido al apriete excesivo.
Especificaciones
Escala: 12-notas, temperamento igual
Rango (onda sinusoidal):
chromatique
A0 (27,50 Hz)–C8 (4186 Hz)
guitare
B1 flat5 (46,25 Hz)–E4 capo7 (493,88 Hz)
basse B0 flat5 (23,12 Hz)–C3 (130,81 Hz)
Precisión: +/-1 centésima
Tono de Referencia: 436–445 Hz (en pasos de 1 Hz)
Afinación de bemol: 1-5 semitonos (en pasos de semitono)
Afinación de cejilla: 1-7 semitonos (en pasos de semitono)
Dimensiones: 61 mm(Anch.) x 65 mm (Prof.) x 28 mm (Alt.)
Peso: 26 g (incluyendo batería),
Vida de la Batería: aproximadamente 8 horas
(afinador funcionando continuamente, entrada A4)
Elementos incluidos: Batería de litio CR2032 (3V)
*M Los Ajustes son recordados al apagar la unidad. No obstante, los Ajustes serán inicializados a reemplazar la batería (valor por defecto, modo
de afinador: cromático, calibración: 440 Hz, FLAT/CAPO: normal).
• Las especificaciones y el aspecto están sujetas a cambios sin previo
aviso por mejora.