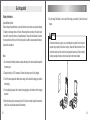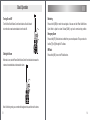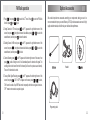
1
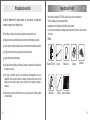
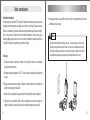
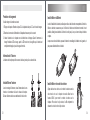
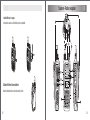
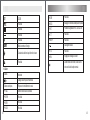
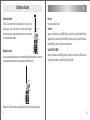
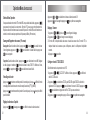
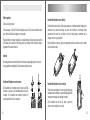
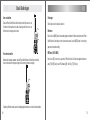
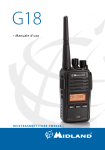
Hello
Thank you for purchasing SYCO RX-160 radio, we do believe
that the function and quality will satisfy you and bring you stable,
reliable, clear reception.
With full frequency range, SYCO RX-160 has FM Radio, Multifunction Scan, Emergency Alert, Timer, BCL illumination and
many other functions.
The fine design, clear LCD display, keypad-operation and multifunction make it easy to use while meeting all your requirements
in communication.
More wonderful experience, please go with SYCO RX-160!
Safety Caution
01
Advanced Operations
17
Product Inspection
02
Power Saving
17
Get Acquainted
03
Turning Backlight On/Off
17
Battery Information
03
Scanning Channels
17
Antenna Information
05
Priority Channel Scanning
19
Installing and Removing
05
Adding Scanning
19
Radio Overview
08
Setting Wide/Narrow Band
19
Basic Operation
13
Setting Frequency Step Value
20
Shortcut Menu Operation VFO/MR Switch
15
Setting Stopwatch
20
Saving and Deleting Channel
15
FM Radio Operation
21
Keypad Lock
15
Optional Accessories
22
Setting Squelch Level
15
Questions and Answers
23
Scanning
16
Maintenance
24
Setting CTCSS/CDCSS Signaling
16
European limited warranty
25
Safety Caution
Please read rules below. Nonobservance of these rules may cause danger or
violation of law.
Using this radio must comply with regulations of local government.
Product Inspection
Thanks for using SYCO RX-160 two-way radio. Before use, we recommend that:
First check the package for any signs of damage;
Carefully open the package and identify the items listed below;
If any items are missing or damaged during shipment, please contact your dealer.
Items
Turn off the radio before you enter places of flammable or explosive environment.
Do not replace or charge battery pack in places of flammable or explosive environment.
Turn off the radio before you approach blast area and detonator area.
Do not use the damaged antenna.
Only qualified technician are allowed to maintain this radio. Do not disassemble the radio by
yourself.
Radio SYCO RX-160
Qty: 1
Antenna
Qty: 1
Li-ion Battery
Qty: 1
Belt Clip
Qty: 1
Lanyard
Qty: 1
User Manual
Qty: 1
Charger
Qty: 1
Adapter
Qty: 1
Do not expose the radio to direct sunlight or near heating devices for a long time.
01
02
Get Acquainted
Battery Information
Applicable Battery Model:
Please charge with specified battery; using other batteries may burst and cause personal damage.
The battery is not charged when out of factory. Please charge the new battery or the battery hasn’t
been used for a long time before use. Charge/discharge for 3 loops will make the battery to achieve
the best performance. When you find the battery power is insufficient, please charge the battery or
replace with a charged one.
Note:
6. Do not charge if the battery or radio is wet. Before charge, you should dry it with cloth to avoid
danger.
Warning
Conductive metals such as jewelry, key or decorating lace may result in short circuit and
generate a large quantity of heat when coming to contact with battery electrodes. These
conductive metals may form a short circuit and generate massive heat. Treat any battery
carefully especially when placing it into pocket, wallet or other metal container.
1. Do not short-circuit the battery terminals or dispose the battery in fire. Never attempt to disassemble
the battery pack.
2. Charge the battery in 0-45℃ temperature. Otherwise the battery may not be fully charged.
3. Turn off the radio equipped with battery before charge. Use the radio while charging may interfere
with charging.
4. Do not pull/plug the adapter and the battery during charging to avoid interfere with the charging
procedure.
5. When the battery power consumes quickly even if it is fully and correctly charged, that means the
battery life is over and please replace with new battery.
03
04
Charge Operation
Please charge as follows:
1. Turn off the radio. Plug the DC connector of adapter into the DC jack on the rear of the charger.
2. Plug the AC connector of adapter into an AC outlet.
3. Insert the battery or radio equipped with battery into the charger vertically. LED indicator glows
red show it starts charging, when LED indicator glows green means the battery is fully charged, the
charging process is over.
Installing/Removing the battery
When assembling the battery, please align the battery pack notch to the corresponding rail on the
back of aluminum case, ensure the battery pack and aluminum case are fully contacted and parallel
to each other, and then slide the battery along the rail till the battery-lock button buckled.
When disassembling the battery, please push the battery-lock button towards left side and then
push the battery out from the radio.
Antenna Information
Stubby antenna is suitable for short-distance communication; thin and long antenna will provide
best communication effect.
The communication range may be shortened in rainy days or in forest. Please make preparations
for that.
Installing and Removing
Installing/Removing the antenna
When assembling the antenna, please put the threaded side
of the antenna into the top threaded hold of radio, screw it
clockwise until fixed.
When disassembling the antenna, unscrew the antenna
counterclockwise to remove it.
05
Installing/Removing the belt clip
Make the two screw holes on the belt clip to match the two
screw holes on the radio, and then use the attached M2.5x5
screws to fix the belt clip on the radio.
When disassembling the belt clip, just unscrew the screws
and remove the belt clip from the radio.
06
Radio Overview
Installing/Removing the headset
Open (Not remove) the headset cover, insert the headset/MIC to the jack port.
Installing/Removing the lanyard
Thread the lanyard to the lanyard hole on the back of
the upper right side of the radio
07
08
1. Antenna
The Antenna comes with threaded plug and used for receiving signals.
2. Top Key: programmable button
The default setting of this button is used for emergency alarm
3. Power Switch/Volume Control Knob
It is used to turn on/off radio power and adjust volume. Rotate the knob clockwise, the click
sound shows the radio is on; continue to rotate will help to adjust the volume. Rotate the knob
counterclockwise to turn off the radio with the click sound.
4. Status Indicator
The green light is on during receiving.
5. Push-To-Test Button
Press and hold PTT button to make a battery test . You can see the battery condition on the LCD
screen.
6. Side Key 1: MONI button
Press and hold [MONI] button for 1 second will activate the monitoring function. You can hear the
voice message even the signaling code (CTCSS) is not matching the transmitter radio.
7. Side Key 2: Programmable button
The default setting for this button is used for FM broadcast radio function.
8. Speaker
9. SP Jack / Data Port
Connect headset or programming cable
10. Lanyard Hole
It is used for lanyard
11. Belt Clip
Connect the radio to the belt in order to make it easy to carry
12. Li-ion Battery
13. LCD Screen
Frequency display
Channel or function No. display
Rx signal strength
Battery power level display
Function setting status
Not used
CTCSS
09
10
CDCSS
F+5 DUP
Not used
Not used
F+6 SCN
Scanning
Not used
F+7 R.T
Setting Rx CTCSS/CDCSS Signaling
Not used
F+8 T.T
Setting Tx CTCSS/CDCSS Signaling
Not used
F+9 BEEP
Not used
Power Save mode
F+
Channel programming
When the current channel was selected by
scanning function
F+0 TOT
Scan delay time setting
F+#V/M
Key lock menu
Not used
14. Keyboard
Keys
Quit function operation interface, radio is back
to the receive state
Instruction
Change Channel/Frequency/Parameters
11
Numeric Key
Input Frequency/Channel No.
F+1 SQL
Setting Squelch Levels
F+2 POW
Not used
F+3 REV
Not used
F+4 VOX
Not used
12
Basic Operation
Turning On and Off
Monitoring
Turn the Power Switch/Volume Control knob clockwise till a click is heard
to turn the radio on and counterclockwise to turn the radio off.
Press and hold [MONI] to monitor the weak signals. It also can work with Power Switch/Volume
Control Knob to adjust the volume. Release [MONI] to go back to normal working condition.
Emergency Alarm
Press and hold [TK] till the alert tone is emitted from your own radio speaker. The key can be set to
be either [TK] or [SK] through the PC software.
FM Radio
Setting the Volume
Press and hold [SK] to turn on the FM radio function.
When radio is on, rotate the Power Switch/Volume Control Knob clockwise to increase the
volume and counterclockwise to decrease the volume.
Note: In Monitoring mode, you can monitor the background noise, and then set the volume.
13
14
Shortcut Menu Operation
Shortcut Menu Operation
You can switch between VFO and MR mode.
When the radio is on, press
to switch the current mode to the other mode.
In VFO mode, you can input frequency directly to the radio, and then the radio will be working under
the new frequency.
In MR mode, the radio is working by inputting the channel No. to tune out the pre-configured frequency.
Saving/Deleting Channels
To Save: when the radio is on, press
and
alternatively, the right side channel on the
screen will flashes, press
or
to select the wanted channel and then press
to save.
To Delete: when
to select VFO or MR mode, turn the radio off. Press and hold
and
then turn the radio on, “DEL?01” will appear on the screen, press
to delete, and press
or
to select the wanted channel.
Keypad Lock
1. Press and hold
for 2 seconds until
displays.
2. When in lock mode, all buttons are locked except [PTT] and [MONI].
3.Press and hold
for 2 seconds again until
is no longer displayed to unlock the keypad.
2. Press
3. Press
or
to select squelch level, ranging from 0-9.
to save, press
to quit without save.
Scanning
1. Press
and
, then press
to set scanning.
2. Press
or
to change the scanning direction.
3. In MR mode, the radio scans all channels in turn and skips the empty channel.
In VFO mode, the radio scans the channels step by step according to the set frequency step value.
4. Press
to quit.
Setting CTCSS/CDCSS signaling
This function is only working in VFO mode.
1. Press
and
CTCSS signaling.
2. Press
press
group.
, “C-CDC?07” appears on the screen, press
to display the current Rx
to quick select CTCSS, positive CDCSS, negative CDCSS or turn off CTCSS signaling,
to select to reverse CDCSS, press
or
to select the needed Rx CTCSS code
3. Press [F] to save, press
twice to quit without save.
Setting Squelch Level
1. Press
15
and
together, and then press
to display the current squelch level
16
Advanced Operations
Power Saving
Operation for setting upper and lower frequency for VFO scanning.
Press
, to select the 11 menu by pressing
or
, “SAVE?11” will appear on the
screen. Press
to set Power Save function, select “ON” or ”OFF” by pressing
or
,
press
to save, press
twice to quit without save.
By computer:
Setting the upper and lower frequency in the SCANNING section of the software.
By Keypad:
Turning Backlight On/Off
Setting upper frequency in VFO Scanning
1. Press
, select 26th menu by pressing
or
, “UP F?” will appear on the screen
2. Press
, setting the upper frequency, the upper frequency will appear on the screen
3. User can directly input 6 digit number frequency, the radio will automatic select and rectify the
correct frequency base on the input frequency.
4. Press
to delete the input last digit number
5. Press
to save and exit the setting. Press
to exit without save.
th
th
Press
, select the 13 menu by pressing
or
,“LED?13” will appear on the screen,
then press
to display the Backlight status. Press
or
to select, “ON” means to turn on
the backlight, “OFF” means to turn off the backlight, “AUTO” means the backlight will be turned on
automatically by pressing any buttons and then off after 10 seconds. Press
to save, press
twice to quit without save.
Scanning Channels
th
Press
, select 15 menu by pressing
or
, “SCANS?15” will appear on the screen,
press
to display the current scanning mode. Press
or
to select the scanning mode,
“TO” means Time Operate mode,
The radio stops scrolling at the channel with signal. It will resume scrolling when the time exceeds
the set time length. “CO” means Carry Operate mode, the radio stops scrolling at the channel with
signal. It will resume scrolling when the signal disappeared over the set time. “SE” means Search
mode, the radio stops scrolling at the channel with signal and quit. Press
to save, press
twice to quit without save.
17
Setting Lower frequency in VFO Scanning
1. Press
, select 27th menu by pressing
or
, “LO F?” will appear on the screen
2. Press
, setting the lower frequency, the lower frequency will appear on the screen
3. User can directly input 6 digit number frequency, the radio will automatic select and rectify the
correct frequency base on the input frequency.
4. Press
to delete the input last digit number
5. Press
to save and exit the setting. Press
to exit without save.
18
Operation for search scanning:
Setting Frequency Step Value
th
Press
, select 15 menu by pressing
or
, “SCANS?15” will appear on the screen,
press
to display the current scanning mode. Press
or
to select the scanning mode,
choose and press “SE”, Press
and
, then press
to set scanning.
th
1. Press
, then press
or
to select the 20 menu, press
to set Frequency Step Value.
2. Press
or
to select step value, the options are 5 options: 5KHz, 6.25KHz, 10KHz,
12.5KHz and 25KHz.
3. Press
to save, press
twice to quit without save.
Priority Channel Scanning
You can set a priority channel through PC software. In VFO/MR mode, press
or
to select the 16th menu, which scan a priority channel.
, then press
Adding Scanning
th
1. In MR mode, press
, and press
or
to select the 17 menu. Press
to enter into
Add Scanning interface, the screen displays the current Add Scanning status.
2. Press
or
to select Add or Delete, “ADD” means to add, “DEL” means to delete.
3. Press
to save, press
twice to quit without save.
Setting Stopwatch
st
1. Press
, then press
or
to select the 21 menu, press
to set Stopwatch. The
shortcut key can be TK or SK1 set by PC software.
2. Press SK1 to start/stop stopwatch, press [MONI] to clear, press [MONI] again to quit.
Setting Wide/Narrow Band
Press
, press
or
to select the 18th menu, press
to set Wide/Narrow Band.
Press
or
to select your choice, “WIDE” displays to show wideband (25KHz), “NARROW”
displays to show narrowband (12.5KHz), press
to save, press
twice to quit without save.
19
20
FM Radio operation
1. Press
, then press
function, press
and
rd
or
to select the 23 menu. Press
to quit.
Optional Accessories
to enter into FM Radio
2. Storing Channel: in VFO mode, press
until “F” appears at the right bottom corner of the
screen, then press
, the right side channel value flashes, press
or
to select the
wanted channel, and then press
to store the channel.
We are able to provide more accessories according to your requirements, making your use to be
more convenient and improve your work efficiency. All SYCO product accessories are made of high
quality standard materials, which will make your radio has better performance.
3. Deleting Channel: in MR mode, press
until “F” appears at the right bottom corner of the
screen, then press
, the right side channel value flashes, press
or
to select the
wanted channel, and then press
to delete.
4. Channel Scanning: press
until “F” appears at the bottom right corner of the screen, then
press
, radio will begin to scroll. It will automatically save the channel with signals. The
scrolling will store the channel from the first channel (It will cover the previous saved channel).
There are 19 channels to be stored.
Headset
5. Two-way Radio Signal Receiving: press
until “F” appears at the bottom right corner of the
screen, then press
, “ON” or “OFF” will appear on the screen, press
or
to select,
“ON” means the radio will quit FM Radio mode temporarily when there are signals to receive.
“OFF” means to not receive two-way radio signals.
Programming cable
21
22
Questions and Answers
Problem
No Power
The battery power consumes
quickly after charge.
Can not communicate with
other members.
23
Solution
The battery power may be insufficient. Please charge or change fully
charged battery.
The battery may be installed incorrectly, please dismount the battery
and reinstall it again.
Maintenance
Maintenance
Your radio is a product with excellent design and technology. Please treat with care. These
recommendations can help you effectively use the radio.
Keep the radio dry. Rain, moisture and liquid, or water may cause damage to the radio.
Do not throw, hit or vibrate the radio. Brutal treatment may damage the inner IC or other elements.
The battery life is finished. Please change for new battery.
Do not hold the radio by the antenna .
Please check if your frequency and CTCSS/CDCSS/2 Tone are the
same with other members in your group.
Please use original or standard antenna.
Maybe you are too far away from other members. Please check if
you are within communication range.
Cover the Earphone pad when not using the radio.
Voices of non-group members
are heard on the channel.
Please change CTCSS/CDCSS, and change those of your members,
too.
No sound when receiving
or the sound the partner
received is very low.
Please check if the volume is turned to its highest level.
The noise is always heard
on the channel.
You may be too far away from other members and can not receive.
Please get close to your members and try again.
Use lint-free cloth to clean the dust or stains on the radio.
Use mild detergent (No Corrosive chemicals) and cloth to clear the casing, control knob and
keyboard after long-time use.
Note
Ask your local dealer to check
All recommendations above also refer to your battery, charger and accessories. If any of them
works abnormally, please send it to nearest service center.
24
European limited warranty
This limited manufactors warranty for mobile SYCO products sold in the EC
For more information surf to www.SYCO.be / garantie.
Warranty term
The warranty starts as from date of purchase by the first user. The product can consist
different items and different part each with there own warranty term . These terms are as shown
below :
a. (24) months for the receiver body (12) months for accessories ( sold within the package including
the receiver or sold as separate part ) and with all excluding of usage parts or consomables and
accessories hereafter under (b) en ©
b. (6) months for consomables and accessories as (batteries , chargers , desk top stands, head
sets , cables en covers), and antennas.
c. (90) days for memory parts and software as ( cd-rom, SSD , memory cards ).
Remark This limited warranty can be different from legal warranty conditions depending from
national country regulations without losing any rights.
This manual has tried the best to the correctness and completeness of the contents in editing.
SYCO reserves the rights of final explanation for any possible oversights. SYCO reserves the rights
for changing product design and specification. This manual is not allowed to be copied, transferred,
or stored in any searchable system, or translated to any other languages.
25
Bonjour
Nous vous remercions pour l’achat du récepteur SYCO RX-160,
nous sommes convaincus que sa fonction et qualité vous livrera
une communication stable, fiable, claire et efficace.
Le SYCO RX-160 dispose d’une gamme de fréquences complète,
Radio FM, Scan multifonction, minuterie et d’ autres
nombreuses fonctionnalités.
Le design raffiné, l’écran LCD clair, clavier et sa multifonction
assure qu'il est facile à utiliser et répond à tous vos besoins de
communication.
Pour une expérience merveilleuse, choisissez le SYCO RX-160!
26
Sommaire
Bonjour
26
2.Top Key
Sommaire
27
Précautions de sécurité
29
3.Power Switch/Volume Control - Marche
Arrêt / Réglage de Volume
36
Inspection du produit
30
4.Indicateur de réception
36
Bandoulière
Faites conaissance
30
5.Commutateur Power-Test-Taste-Condition
de batterie
36
31
Procédure de chargement
33
Informatie de l’antenne
33
41
Recevoir
42
Surveiller
42
Radio FM (88-108 MHZ)
42
Opération Menu de raccourci
43
37
Sauvegarder/Supprimer des canaux (99 canaux)
43
8.Haut-parleur
37
Vérouillage du clavier
43
37
Réglage du silencieux-Squelch
43
Balayage-Scanner
44
Configurer le code CTCSS/CDCSS
44
Installer/Enlever la batterie
34
10.Passage de bandoulière
Installer/Enlever le crochet de ceinture
34
11.Crochet de ceinture
37
Installer/Enlever le casque
35
12.Batterie Ion-Lithium
37
35
13.Ecran LCD
38
36
14.Clavier
39
36
Réglage du volume
7.Touch lateral 2:(Touche programmable)
33
1.Antenne
41
37
Installer/Enlever l’antenne
Attacher/Enlever la bandoulière
Allumer et éteindre
6.Touche lateral 1: MONI
9.Connection SP Jack/Data-Hautparleur exterieure
Scanner - Radio recepteur
27
31
Information de batterie
36
Opérations de base
37
Opérations avancées
Economiseur d’énergie
Allumer/Eteindre l’éclairage
Balayage des canaux (99 canaux)
45
45
45
45
Recherche automatique des frequence
par VFO - Frequency Search
Canal prioritaire pendent le scan
46
47
ADD scanning.
47
Configurer largeur de bande en reception:
large 25 KHz / étroite 12.5 KHz
48
Configurer le pas de fréquence en reception:
48
5 / 6.25 / 10 / 12.5 / 25 KHz
Chronomètre
49
Radio FM
50
Accessoires Optionels
51
Questions et réponses
51
Maintenance
52
La garantie limitée Européenne
53
41
28
Inspection du Produit
Précautions de sécurité
Pour utiliser ce récepteur, il faut répondre aux exigences du gouvernement local.
Merci d’utiliser le récepteur SYCO RX-160. Avant de l’utiliser nous vous conseillons de:
Vérifier l’emballage pour des dommages éventuels.
soigneusement ouvrir l'emballage et d’identifier les pièces suivantes
En cas de pièces manquantes ou emballage endommagé pendant le transport, veuillez contacter
votre dealer.
Éteignez le récepteur avant d'entrer dans des environnements inflammables ou explosifs .
Pièces
Veuillez lire attentivement les règles suivantes. Le non-respect de ces règles peut
entraîner un danger ou une violation de la loi.
Ne pas charger ou remplacer la batterie dans des environnements inflammables ou explosifs.
Éteignez le récepteur avant de vous approcher des zones d'explosions.
Ne pas utiliser l'antenne endommagée.
Seuls les techniciens qualifiés peuvent effectuer l'entretien de ce récepteur. Ne pas démonter
le récepteur vous-même .
Récepteur SYCO RX-160
Antenne
Batterie Li-ion
Chargeur
Adaptateur
Pour éviter les problèmes causés par des interférences électromagnétiques ou par la
compatibilité, nous vous prions d’éteindre le récepteur dans des endroits comme dans les
hôpitaux ou autres centres de santé. Lorsque vous prenez l'avion, éteignez le récepteur si
nécessaire .
Ne pas exposer le récepteur directement au soleil ou près d'une source de chaleur pendant
une longue période .
29
Bandoulière
Oreillette
Manuel d’utilisation
30
Faites connaissance
Information de batterie
Veuillez charger avec la batterie SYCO spécifiée, l'utilisation d'autres batteries peut provoquer des
fissurations et endommagements. La batterie vous est livrée en non-chargée. Chargez la nouvelle
batterie, ou une batterie qui n'a pas été utilisée depuis longtemps avant usage. Charger / décharger
pour 3 cycles, permet à la batterie d'obtenir les meilleures performances. Si vous trouvez que la
batterie est faible, appuyez le bouton sur le coté est verifie la condition de la batterie qui s’affiche a
l’ecran LCD. Rechargez ou remplacez-la par une batterie chargée
Remarque
6. Ne charge pas la batterie ou quand elle est humide. Avant de le charger tentez de la sécher avec
un chiffon pour éviter le danger.
Attention
les métaux conducteurs tels que des bijoux, des clés,… peuvent provoquer un court-circuit et la
génération d'une grande chaleur quand il entre en contact avec les électrodes de la batterie.
Ces métaux conducteurs peuvent former un court-circuit et produire une chaleur énorme. Traiter
chaque batterie soigneusement, en particulier lors de l'insertion dans la poche, un sac, ..
1. Ne pas court-circuiter les bornes de la batterie et ne pas jeter la batterie au feu. N'essayez
jamais de démonter la batterie
2. Rechargez la batterie à température 0-45 ° C. Sinon, la batterie ne peut pas être complètement
chargée.
3. Éteignez le récepteur avant de recharger. L’utilisation du récepteur pendant le chargement peut
interférer avec le chargement de la radio.
4. Ne pas retirer la prise pendant le chargement afin d’éviter des problèmes lors du chargement.
5. Si la batterie se vide rapidement, même si elle est complètement et correctement chargé, cela
signifie que la durée de vie de la batterie est à sa fin et doit être remplacé par une nouvelle.
31
32
Procédure de chargement
Installer/Enlever la Batterie
Veuillez charger de la manière suivante:
1. Éteignez le récepteur. Branchez la prise CC ou l’adaptateur à la prise CC sur le dos du chargeur.
2. Branchez le connecteur d'alimentation ou l'adaptateur dans une prise de courant.
3. Insérez la batterie ou le récepteur avec la batterie dans le chargeur. Quand il commence à
charger l'indicateur LED est rouge, quand le LED devient vert, cela signifie que la batterie est
complètement chargée et que la charge est terminée.
Lors de l'installation de la batterie, veuillez placer celle-ci dans l'encoche correspondante à l'arrière du
boîtier en aluminium, assurez-vous que le boîtier et la batterie sont entièrement connecté et sont
parallèles, faites glisser la batterie à l’arrière de la radio jusqu’ à ce que le verrou bloque la batterie
en place.
Lorsque vous enlevez la batterie, poussez le bouton de verrouillage de la batterie vers la gauche, et
puis poussez la batterie dehors de la radio
Information de l’ Antenne
La distance de réception peut être raccourci dans les jours de pluie ou dans les bois.
33
Installer/Enlever l’antenne
Installer/Enlever le crochet de ceinture
Lors du montage de l'antenne, vissez l'antenne dans le sens
horaire sur le connecteur situé sur le dessus du récepteur.
Dévisser l'antenne dans le sens antihoraire afin de la retirer.
Alignez les deux trous de vis sur le crochet de ceinture avec les
deux trous de vis sur le récepteur et ensuite utiliser les vis
fournies M2.5x5. pour monter le crochet de ceinture sur le
récepteur. Pour enlever le clip ceinture, il suffit simplement de
desserrer les vis et de retirer le clip ceinture.
34
Scanner - Radio recepteur
Installer/Enlever le casque
connectez le casque ou l’oreillette à la prise du portable.
Attacher/Enlever la bandoulière
Attachez la bandoulière en haut de la radio à droite
35
36
1. Antenne
L’antenne vient avec un connecteur SMA fileté et est utilisé pour recevoir des signaux VHF .
2. Top Key
Touche programmable.
3. Power Switch/Volume Control - Marche Arrêt / Réglage de Volume
Pour allumer la radio et régler le volume. Tournez le bouton vers la droite, un clic indique que la
radio est allumée, continuer à tourner permet de régler le volume. Tournez le bouton dans le
sens antihoraire pour éteindre la radio en un seul clic.
4. Indicateur de réception
Lors de la réception une lumière verte s’illumine
5. Commutateur Power-Test-Taste – Condition de batterie
Appuyez le bouton sur le coté est verifie la condition de la batterie qui s’affiche a l’ecran .
6. Touche latéral 1: MONI
Appuyez et maintenez le bouton [MONI] enfoncé pendant 1 seconde pour activer la fonction de
7. Touche latéral 2: (Touche programmable)
Le réglage pour cette touche est utilisée par défaut pour la fonction de radio-FM musique.
8. Haut-parleur
9. Connection SP Jack/Data – Hautparleur exterieure
Branchez le casque / oreillette ou le câble de programmation
10. Passage de bandoulière
Utilisé pour fixez la bandouilière
11. Crochet de ceinture
Fixez la radio au clip de ceinture pour facilement le transporter
12. Batterie Ion-Lithium
13. Ecran LCD
Ecran de fréquence
Affichage du canal ou numéro
puissance de reception
surveillance generale sans verrouage par code CTCSS. Vous pouvez entendre le message
Affichage niveau de batterie
vocal même si le code de bague signalisation (CTCSS) ne correspond pas à la radio du
Statut paramètres de function
récepteur.
Pas utilisé
CTCSS
37
38
CDCSS
F+5 DUP
Pas utilisé
Pas utilisé
F+6 SCN
Balayage de recherche automatique de fréquence
Pas utilisé
F+7 R.T
Paramétres signalisation Rx CTCSS/CDCSS
Pas utilisé
F+8 T.T
Pas utilisé
Pas utilisé
F+9 BEEP
Pas utilisé
Mode économiseur d’énergie
F+
Sauvegarder canaux
F+0 TOT
Pas utilisé
F+#V/M
Réglage du vérouillage du clavier
Canal actuel sélectionné par la fonction de scan
Pas utilisé
14. Clavier
Touches
Quitter interface de fonction, la radio est de
retour en état de réception normale
Instruction
Changer canal/Fréquence/Paramètres
39
Touches numériques
Fréquence d’entrée/Numéro de canal.
F+1 SQL
Définition des niveaux du silencieux
F+2 POW
Pas utilisé
F+3 REV
Pas utilisé
F+4 VOX
Pas utilisé
40
Opérations de base
Allumer et éteindre
Recevoir
Tournez la commande Power Switch/Volume Control dans le sens
horaire jusqu’à ce que vous entendez un clic pour allumer l'appareil,
tourner le bouton dans le sens antihoraire jusqu'à ce que vous entendez
un clic pour éteindre le récepteur.
Pour écouter réglez le volume.
Surveiller
Appuyez et maintenez le touche [MONI] enfoncé pour surveiller les signaux faibles. Marche
également avec la commande Power Switch/Volume Control pour régler le volume. Relâchez le
bouton [MONI] pour revenir à l'état de fonctionnement normal.
Réglage du volume
Radio FM (88-108 MHZ)
Lorsque le récepteur est allumé, tournez la commande Power Switch/Volume dans le sens horaire
pour augmenter le volume et tournez vers la gauche pour diminuer le volume.
Appuyez et maintenez la touche[SK] enfoncé pour passer à la fonction radio FM musique. La
touche peut être configuré via le logiciel PC pour être [TK] ou [SK].
Remarque: En mode Surveillance, vous pouvez contrôler le bruit de fond, puis régler le volume.
41
42
Opération Menu de raccourci
Shortcut Menu Operation
Vous pouvez basculer entre mode VFO et mode MR. Lorsque la radio est allumée, appuyez sur
pour passer du mode actuel à un autre mode. En mode VFO, vous pouvez entrer directement la
fréquence et la radio fonctionnera sous la nouvelle fréquence. En mode MR, la radio fonctionne en
entrant le numéro de canal pour syntoniser la fréquence prédéfinie. (99 memoires)
Sauvegarder/Supprimer des canaux ( 99 canaux )
Sauvegarder: Quand la radio est allumé , appuyez sur
et après
, le canal à droite sur
l’écran clignotera, appuyez sur
ou
pour sélectionner le canal désiré et appuyez sur
pour sauvegarder.
Supprimer: Quand la radio est allumé , appuyez sur
pour sélectionner le mode MR, éteignez
la radio. Appuyez et maintenez
enfoncé et allumez la radio, “DEL?01” s’affiche sur l’écran,
appuyez
pour supprimer et
ou
pour sélectionner le canal désiré.
Vérouillage du clavier
Appuyez sur
et maintenez enfoncé pendant 2 secondes jusqu’à ce que
s’affiche.En mode
verrouillage toutes les touches sont verrouiller excepté les touches [PTT] et [MONI].
Appuyez sur
et maintenez enfoncé pendant 2 secondes jusqu’à ce que
n’est plust affiché
pour dévérouiller.
Appuyez sur
Appuyez sur
ou
pour sélectionner le niveau du silencieux entre 0-9.
pour sauvegarder, appuyez sur
pour quitter sans sauvegarder.
Balayage - Scanner
1. Appuyez sur
et
, et puis sur
pour configurer le balayage.
2. Appuyez sur
ou
pour changer le sens du balayage
3. En mode MR, le récepteur balaie les canaux et sautes les canaux vides. En mode VFO, le
récepteur balaie tous les canaux au pas de fréquence, autour de la fréquence d’exploitation
courante.
4. Appuyez sur
pour arrêter
Configurer le code CTCSS/CDCSS
Cette fonction marche uniquement en mode VFO.
1. Appuyez sur
et
, “C-CDC?07” s’affiche sur l’écran, appuyez sur
pour afficher le
code Rx CTCSS actuel.
2. Appuyez sur
pour sélectionner CTCSS, positif CDCSS, négatif CDCSS ou éteindre le
signalement CTCSS, appuyez sur
pour sélectionner d’inverser le CDCSS, appuyez sur
ou
pour sélectionner le groupe de code Rx CTCSS que vous avez besoin.
3. Appuyez sur
pour sauvegarder, appuyez 2 fois sur
pour quitter sans sauvegarder.
Réglage du silencieux - Squelch
Appuyez sur
43
et
, puis appuyez sur
pour afficher le niveau du silencieux actuel.
44
Opérations avancées
Economiseur d’énergie
ième
1. Appuyez sur
, pour sélectionner le 11
menu en appuyant sur
ou
, “SAVE?11”
s’affichera sur l’écran.
2. Appuyez sur
pour configurer l’économiseur d’énergie, sélectionnez “ON” ou ”OFF” en
appuyant sur
ou
, appuyez sur
pour sauvegarder, appuyez 2 fois sur
pour
quitter sans sauvegarder.
Allumer/Eteindre l’éclairage
ième
Appuyez sur
, sélectionnez le 13
menu en appuyant sur
ou
, “LED?13” s’affichera
sur l’écran, appuyez après sur
pour afficher le statut. Appuyez sur
ou
pour
sélectionner, “ON” allumer le rétro éclairage, “OFF” éteindre le retro éclairage, “AUTO” le rétroéclairage s’allume automatiquement en appuyant sur n’importe quelle touche et s’éteint
automatiquement après 10 secondes. Appuyez sur
pour sauvegarder, appuyez 2 fois sur
pour quitter sans sauvegarder.
Balayage des canaux ( 99 canaux )
ième
Appuyez sur
, sélectionnez le 15
menu en appuyant sur
ou
, “SCANS?15”
s’affichera sur l’écran, appuyez sur
pour afficher le mode de balayage actuel. Appuyez
sur
ou
pour sélectionner le mode de balayage
“TO” Time Operate mode : le récepteur cesse de balayer lorsqu’il détecte un signal. Le récepteur
reprendra le balayage quand le temps configuré est dépassé. “CO” Carry Operate mode, le
récepteur cesse de balayer lorsqu’il détecte un signal. Le récepteur reprendra le balayage quand le
45
signal disparaît dans le temps configuré. “SE” Search mode, le récepteur cesse de balayer lorsqu’il
détecte un signal et s’arrête. Appuyez sur
pour sauvegarder, appuyez 2 fois sur
pour
quitter sans sauvegarder.
Recherche automatique des frequence par VFO - Frequency Search
Introduire le limite de frequence le plus haute et le limite de frequence le plus haute par recherche
VFO scanning
Par l’ordinateur :
Branchez le repeteur avec le cable data (optionelles) au PC.
Introduit le limite de frequence le plus haute et le limite de frequence le plus haute par recherche
VFO scanning comme prevue.
Par le clavier nummerique au portable :
ème
1. Appuyez sur
, sélectionnez le 26
menu en appuyant sur
ou
, jusque “UP F?”
upper = limite de frequence le plus haute s’affichera sur l’écran.
2. Appuyez sur
pour modifier le limite de frequence le plus haute.
3. Taper les 6 chiffres pour introuduire le limite de frequence le plus haute.
4. Pour corriger appuyez sur
et introduit le dernière chiffre.
5. Appuyez sur
pour sauvegarder, appuyez sur
pour quitter sans sauvegarder
ème
6. Appuyez sur
, sélectionnez le 27
menu en appuyant sur
ou
, jusque “LOW F?”
lower = limite de frequence celle du bas s’affichera sur l’écran.
7. Appuyez sur
pour modifier la limite de frequence celle du bas.
46
8. Entrer les 6 chiffres pour introduire le limite de frequence le plus bas.
9. Pour corriger appuyez sur
et introduit le dernière chiffre.
10. Appuyez sur
pour sauvegarder, appuyez sur
pour quitter sans sauvegarder.
ième
Appuyez sur
, sélectionnez le 15
menu en appuyant sur
ou
, “SCANS?15”
s’affichera sur l’écran, appuyez sur
pour afficher le mode de balayage actuel. Appuyez
sur
ou
pour sélectionner le mode de balayage [SE] et confirmé par le bouton [F] .
Quitter par [CLR].
Appuyez sur
jusqu’à ce que “F” s’affiche en bas à droite sur l’écran, puis appuyez sur
,Appuyez sur
pour le scan et
pour l’ arrêter.
Canal prioritaire pendent le scan
Vous pouvez configurer un canaux prioritaire via le logiciel PC. En mode VFO/MR, appuyez sur
ième
, puis sur
ou
pour sélectionner le 16
menu.
Configurer largeur de bande en reception : large 25 KHz / étroite 12.5 KHz
ième
Appuyez sur
,
ou
pour sélectionner le 18
menu, appuyez sur
pour configurer
la bande Large/Etroite. Appuyez sur
ou
pour sélectionner votre choix, “WIDE” indique
bande large (25KHz), “NARROW” indique bande étroite (12.5KHz), Appuyez sur
pour
sauvegarder, appuyez 2 fois sur
pur quitter sans sauvegarder.
Configurer le pas de fréquence en reception : 5 / 6.25 / 10 / 12.5 / 25 KHz
1. Appuyez sur
, puis sur
ou
pour sélectionner le 20 ième menu, appuyez sur
pour
configurer le pas de fréquence.
2. Appuyez sur
ou
pour sélectionner le pas de fréquence, vous avez 5 possibilités: 5KHz,
6.25KHz, 10KHz, 12.5KHz en 25KHz.
3. Appuyez sur
pour sauvegarder, appuyez 2 fois sur
pour quitter sans sauvegarder.
Chronomètre
ième
ADD scanning
ième
1. En mode MR, appuyez sur
,et sur
ou
pour sélectionner le 17
menu . appuyez
sur
pour accéder à l’interface d’ajout balayage, l’écran affiche l’état actuel.
2. Appuyez sur
ou
pour sélectionner Add ou Delete, “ADD” pour ajouter, “DEL” pour
supprimer.
3. Appuyez sur
pour sauvegarder, appuyez 2 fois sur
pour quitter sans sauvegarder.
47
1. Appuyez sur
, puis sur
ou
pour sélectionner le 21
menu, appuyez sur
pour configurer le chronomètre. La touche de raccourci peut être configuré via le logiciel PC sur
TK ou SK1.
2. Appuyez sur SK1 pour démarrer/arrêter le chronomètre, appuyez sur [MONI] pour supprimer,
appuyez de nouveau sur [MONI] pour arrêter.
48
Accessoires Optionnels
Radio FM musique ( 88 –108 MHz )
1. Appuyez sur
, puis
ou
pour sélectionner le 23ième menu. Appuyez sur
accéder à la fonction Radio FM, appuyez sur
et
pour quitter.
pour
2. Sauvegarder: en mode VFO, appuyez sur
jusqu’à ce que “F” s’affiche en bas à droite sur
l’écran, puis appuyez sur
, en haut à droite de l’écran la valeur clignote, appuyez sur
ou
pour sélectionner la chaîne que vous désirez, et puis appuyez sur
pour sauvegarder.
Nous sommes en mesure d'offrir encore plus d'accessoires, en fonction de vos exigences afin de
rendre son utilisation plus pratique et améliorer son efficacité. Tous les accessoires des produits
Syco sont faits de matériaux standard de haute qualité, ce qui assure une meilleure performance
de votre récepteur.
3. Supprimer: en mode MR, appuyez sur
jusqu’à ce que “F” s’affiche en bas à droite sur
l’écran, appuyez sur
, la valeur clignote à gauche, appuyez sur
ou
pour
sélectionner la chaîne que vous désirez, et puis appuyez sur
pour supprimer.
4. Scanner des canaux: Appuyez sur
jusqu’à ce que “F” s’affiche en bas à droite sur l’écran,
puis appuyez sur
, le récepteur commence le balayage et sauvegarde automatiquement
tous les canaux avec un signal. Lors du balayage le premier canal sera sauvegardé (l’ancien
canal sera supprimé). Vous pouvez sauvegarder jusqu’à 19 canaux.
Antenne longue
haute performance
Haut parleur exterieur
Casque
5. Réception: Appuyez sur
jusqu’à ce que “F” s’affiche en bas à droite sur l’écran, puis
appuyez sur
, “ON” ou “OFF” s’affichera sur l ‘écran, appuyez sur
ou
pour
sélectionner, “ON” le récepteur arrêtera temporairement le mode Radio FM quand un signal VHF
peut être reçu. “OFF” aucun signal bidirectionnelle peut être récu.
Cable de programmation
49
50
Questions et Réponses
Probème
Pas de courant
Le batterie consomme
rapidement aprés chargement
Solution
La batterie peut être insuffisament chargée. Veuillez recharger ou
échanger avec une batterie complètement chargée. Il est possible
que la batterie ne soit pas correctement installée, retirez la batterie
et réinstallez la.
La durée de vie de la batterie est à sa fin. Veuillez la remplacer par une
nouvelle batterie.
Veuillez vérifier si votre fréquence et le ton CTCSS/CDCSS est correct.
Pas en état d’écouter des
émissions.
51
I lest possible que vous vous trouvez trop loin. Veuillez vérifier si vous
êtes dans la portée de la communication.
Le son reçu est très faible
Veuillez controller si le volume est régler sur le niveau le plus haut.
Le bruit peut toujours être
entendu sur le canal
Il est possible que vous vous trouvez trop loin des autres membres et
que vous ne pouvez pas recevoir. Veuillez-vous rapprocher de à vos
membres et réessayer.
Maintenance
Maintenance
Votre récepteur est un produit avec un design formidable et une technologie excellente. Veuillez le
traiter avec soin. Ces recommandations peuvent vous aider à utiliser efficacement votre récepteur.
Gardez le récepteur à sec. Pluie, l'humidité et eau peuvent causer des dommages.
Ne pas jeter, frapper ou vibrer l ‘émetteur-récepteur. Un traitement brutal peut endommager le
CI interne ou d'autres éléments.
Ne tenez pas le récepteur par l'antenne ou le haut-parleur externe.
Veuillez utiliser l’antenne original ou standard. Une antenne non approuvée, ou des
modifications non autorisées au accessoires ou l’ l'antenne peuvent causer des dommages au
récepteur.
Utilisez un chiffon non pelucheux pour nettoyer la poussière ou les taches sur le récepteur.
Utilisez un détergent doux (Pas de produits chimiques corrosifs) et un chiffon pour nettoyer le
boîtier, le bouton de commande et le clavier après une utilisation prolongée.
Note
Toutes les recommandations ci-dessus se réfèrent également à votre batterie, le chargeur et
les accessoires. Si l'un d'eux fonctionne anormalement, veuillez-vous rendre au centre de
service le plus proche.
52
La garantie limitée Européenne
La présente Garantie limitée du constructeur, qui s'applique aux appareils mobiles SYCO vendus
dans l'Union européenne.
Pour plus d'informations, veuillez vous reporter aux www.SYCO.be/garantie
Période de garantie
La période de garantie commence au moment de l'achat du Produit par son premier utilisateur final. Le
Produit peut se composer de plusieurs parties, lesquelles peuvent faire l'objet de périodes de garantie
Hallo
Wij danken u voor het aankopen van de SYCO RX-160 ontvanger ,
wij zijn ervan overtuigd dat zijn functie en kwaliteit u een stabiele,
betrouwbare ontvanger zal leveren.
• Vingt-quatre (24) mois pour l'appareil recepteur et douze (12) mois pour les accessoires (qu'ils soient
inclus dans le coffret de vente de l'appareil mobile ou vendus séparément) autres que les
consommables et les accessoires énumérés aux points (b) et (c) ci-dessous ;
• Six (6) mois pour les consommables et accessoires suivants : batteries, chargeurs, consoles de bureau,
kits oreillette, câbles et façades et antennes.
• Quatre-vingt-dix (90) jours pour les supports contenant les logiciels, tels que CD-rom, carte mémoire.
Het verfijnde design, duidelijke LCD scherm, toetsenbord en zijn
multi-functionaliteit zorgen ervoor dat hij gemakkelijk te gebruiken is
en dit terwijl hij voldoet aan al uw communicatie eisen.
REMARQUE Cette Garantie limitée n'affecte pas les droits dont vous jouissez au titre des lois en vigueur
dans votre pays relatives à la vente des produits de consommation.
Voor een prachtige ervaring, kiest u de SYCO RX-160 !
De RX-160 beschikt over een volledig frequentiebereik, FM-radio,
multi-functionele scan, verlichting, timer en vele andere functies.
SYCO se réserve le droit d'explication définitive pour d’ éventuels oublies. SYCO se réserve le
droit de modifier la conception et les spécifications du produit. Ce manuel n'est pas autorisé à
être copié, transféré, ou stockée dans un système consultable, ou traduite dans d'autres
langues.
53
54
Inhoud
Hallo
54
3.Power Switch/Volume Control
65
Monitoren
70
Prioriteitskanalen tijdens het scannen 76
Inhoud
55
4.Status Indicator
65
FM Radio (88-108 MHZ)
70
Veiligheidswaarschuwing
57
5.Power Test Toets (PTT) batterij conditie
65
Bediening Snelkoppeling Menu
71
Instellen ontvangt bandbreedte :
Breed 25 kHz / Smal 12.5 KHz
76
Product Inspectie
58
6.Zijtoets 1: MONI toets
65
Bediening snelkoppeling menu
71
Frequentie Stap instellen :
5 / 6.25 / 10 / 12.5 / 25 KHz
76
Maak Kennis
59
7.Zijtoets 2: Programmeerbare toets
65
Kanalen Scannen (99 geheugen kanalen)
71
Stopwatch Instellen
76
Batterij Informatie
59
8.Luidspreker
66
Adding scanning.
71
Bediening FM Radio(88-108 MHZ)
77
Batterij opladen
61
9.SP Jack/Data Poort
66
Opslaan/Verwijderen van kanalen (99 kanalen)
72
Optionele Accessoires
78
Antenne
61
10.Draagriempje Gleuf
66
Frequentie zoekfunctie-VFO-Frequency Search
72
Vragen en Antwoorden
79
Installeren/Verwijderen van de antenne
61
11.Riem Clip
66
Toetsenbord Vergrendeling
73
62
12.Li-ion Batterij
66
Instellen van de ruisblokkering-Squelch
73
Onderhoud
Europese beperkte garantie
80
Installeren/Verwijderen van de batterij
Installeren/Verwijderen van de riem clip
62
13.LCD Scherm
66
Scanner
74
Installeren/Verwijderen van de headset
63
14.Toetsenbord
67
Instellen CTCSS/CDCSS signalering
74
Installeren/Verwijderen van de draagriempje
63
Basis Bedieningen
69
Geavanceerde Handelingen
75
64
Aan-en Uitzetten
69
Stroombesparing Instellen
75
1.Antenne
65
Het Volume instellen
69
Backlight Aan/Uitzetten
75
2.Top Key
65
Ontvangen
70
Kanalen Scannen (99 geheugen kanalen)
75
Radio Overzicht
55
81
56
Veiligheidswaarschuwing
Product Inspectie
Gelieve onderstaande regels inzake veiligheid te lezen. Het niet respecteren van deze regels kan
leiden tot gevaar of overtreding van de wet.
Bedankt voor de aankoop van de SYCO RX-160 ontvanger . Voor het gebruik raden wij aan om:
De verpakking te controleren op beschadiging, voorzichtig de verpakking te openen en onderstaande
onderdelen te identificeren
Indien er onderdelen ontbreken of de verpakking beschadigd werd tijdens de verzending, gelieve
uw dealer te contacteren.
Voor het gebruik van deze radio moet men voldoen aan de voorschriften van de lokale overheid.
Zet de radio uit voor u brandbare of explosieve omgevingen betreedt.
Onderdelen
Batterij niet herladen of vervangen in brandbare of explosieve omgevingen.
Zet de radio uit vooraleer u gebieden van explosies benadert.
Gebruik de antenne niet indien deze beschadigd is
Enkel erkende techniekers mogen het onderhoud van deze ontvanger
ontvanger niet zelf uit elkaar.
uitvoeren. Haal de
Om problemen door elektromagnetische interferentie of compatibiliteit, te voorkomen gelieve de
ontvanger uit te zetten in plaatsen waar het verzenden van draadloze communicatie verboden
is zoals in ziekenhuizen of andere gezondheidscentra. Wanneer u het vliegtuig neemt zet u de
ontvanger uit indien nodig.
De ontvanger niet in het zonlicht of in de directe buurt van verwarmingsapparaten plaatsen
gedurende een lange tijd.
57
SYCO Ontvanger
RX-160
Antenne
Li-ion Batterij
belt clip
Draagriempje
Oortje
Oplader
Adapter
58
Maak Kennis
Batterij Informatie
Gelieve op te laden met de gespecificeerde SYCO batterij, het gebruik van andere batterijen kan
leiden tot barsten of schade. De batterij is niet opgeladen wanneer deze uit de verpakking komt.
Laad de nieuwe batterij of de batterij dat lange tijd niet gebruikt werd op voor gebruik. Laden /
ontladen voor 3 cyclussen laat de batterij toe om de beste prestaties te bereiken. Indien u merkt dat
de batterij bijna leeg is, bekijk de conditie op de display. Laad ze op of vervang ze door een
opgeladen exemplaar.
Opmerking
6. Batterij niet opladen wanneer batterij of ontvanger nat is. Probeer de batterij te drogen met een
doek alvorens te laden, dit om gevaar te vermijden.
Waarschuwing
Geleidende metalen zoals sieraden, sleutels,.. kunnen leiden tot kortsluiting en het
genereren van een grote hoeveelheid warmte wanneer deze in contact komt met de
elektroden van de batterij. Deze geleidende metalen kunnen een kortsluiting vormen en
enorme hitte genereren. Behandel elke batterij voorzichtig, vooral als u ze in zak,
portemonnee of andere metalen container steekt.
1. Veroorzaak geen kortsluiting van de accupolen en gooi de batterij niet in het vuur. Probeer nooit
de batterij uit elkaar te halen.
2. Laad de batterij op in omgevingen met een temperatuur tussen 0-45°C anders kan de accu niet
volledig worden opgeladen .
3. Zet de ontvanger uit voor het opladen. Het gebruiken van de ontvanger tijdens het opladen kan
invloed hebben tijdens het opladen.
4. Trek de stekker van de adapter en de batterij niet uit tijdens het opladen om problemen te
voorkomen tijdens het laadproces.
5. Indien de batterij snel leeg loopt ook al werd ze volledig en correct geladen, betekent dit het
einde van de levensduur van de batterij en dient deze vervangen te worden door een nieuwe.
59
60
Batterij opladen
Gelieve als volgt op te laden:
Zet de ontvanger uit. Sluit de DC stekker of adapter aan op de DC jack aan de achterkant van de
lader. Steek de AC-stekker of adapter in een stopcontact.
Plaats de batterij of ontvanger met batterij in de oplader. Wanneer hij begint op te laden wordt de
LED-indicator rood, wanneer het LED-lampje groen wordt betekent dit dat de batterij volledig is
opgeladen en het opladen voltooid is.
Installeren/Verwijderen van de batterij
Bij het installeren van de batterij, Gelieve deze te plaatsen in de daartoe bestemde inkeping aan de
achterkant van de aluminium behuizing, zorg ervoor dat de batterij en de behuizing volledig
geconnecteerd en parallel zijn met elkaar, en schuif de batterij langs de achterkant van de
ontvanger tot deze op zijn plaats klikt.
Bij het verwijderen van de accu, gelieve de vergrendeling naar links te schuiven en dan de batterij
uit de ontvanger te duwen.
Antenne
Het ontvangstbereik kan verminderd worden door obstakels , regenachtige dagen of in het bos of
door geografische omstandigheden. Gelieve hiermee rekening te houden.
Installeren/Verwijderen van de antenne
Bij het installeren van de antenne schroeft u die vast op de SMA
connector in wijzerzin op het schroefaansluiting bovenop de
ontvanger . Om te verwijderen van de antenne, schroeft u de
antenne tegen de klok in om te verwijderen.
61
Installeren/Verwijderen van de riem clip
Plaats de twee schroefgaten op de riem clip gelijk met de twee
schroefgaten van de ontvanger en gebruik de bijgevoegde M2.5x5
schroeven om de riem clip op de ontvanger te monteren.
Bij het verwijderen van de riem clip, draait u gewoon de
schroeven los en verwijderd u de riem clip.
62
Radio Overzicht
Installeren/Verwijderen van de headset
Open (Niet verwijderen) de headset cover, sluit de headset aan op de jack poort.
Installeren/Verwijderen van het draagriempje
Bevestig het draagriempje aan de rechterbovenhoek van de radio .
63
64
1. Antenne
Antenna geleverd met SMA plug en wordt gebruikt voor het ontvangen van VHF signalen.
2. Top Key
Programmeerbare functie
3. Power Switch/Volume Control
Wordt gebruikt om de ontvanger aan en uit te zetten en het volume te regelen. Draai de knop met
de klok mee, de klik geeft aan dat de ontvanger aan staat, blijven verder draaien helpt het volume
aan te passen. Draai de knop tegen de klok in om de ontvanger uit te zetten met een klik.
4. Status Indicator
Tijdens het ontvangen brandt een groen licht
Deze knop wordt gebruikt voor de standard instelling van de FM-muziekradio .
8. Luidspreker
9. SP Jack/Data Aansluiting
Sluit de headset of programmeerkabel aan
10. Draagriempje Gleuf
Wordt gebruikt om de draagriempje aan te bevestigen
11. Riem Clip
12. Li-ion Batterij
13. LCD Scherm
5. Power Test Toets (PTT) batterij conditie
Batterijvermogen test toets voor batterij conditie met indicatie in het scherm.
6. Zijtoets 1: MONI toets
Druk en hou de [MONI] knop gedurende 1 second in om de monitor functie in te schakelen. U
kan het voice bericht horen zelfs als de signaleringscode (CTCSS) niet overeenkomt met de
ontvanger van de ontvanger .
7. Zijtoets 2: Programmeerbare knop
65
Frequentie scherm
Kanaal of functie Nummer weergave
Ontvangst signaal sterkte
Weergave batterij niveau
status Functie instelling
Niet gebruikt
CTCSS
66
CDCSS
F+5 DUP
Niet gebruikt
Niet gebruikt
F+6 SCN
Scanning
Niet gebruikt
F+7 R.T
Instelling Rx CTCSS/CDCSS Signalisatie
Niet gebruikt
F+8 T.T
Niet gebruikt
Niet gebruikt
F+9 BEEP
Niet gebruikt
Stroombesparing modus
F+
Kanalen opslaan
Huidige kanaal werd geselecteerd met de
scan functie
F+0 TOT
Niet gebruikt
F+#V/M
Instelling toetsenbordvergrendeling
Niet gebruikt
14.Toetsenbord
Toetsen
Functiemenu verlaten
Radio terug in ontvangst modus
Functies
Verander Kanaal/Frequentie/Parameters
67
Numerieke Toets
Input Frequentie/Kanaalnummer.
F+1 SQL
Instellen Squelch niveaus
F+2 POW
Niet gebruikt
F+3 REV
Niet gebruikt
F+4 VOX
Niet gebruikt
68
Basis Bedieningen
Aan- en uitzetten
Ontvangen
Draai de Power Switch/Volume Control knop met de klok mee tot u een
klik hoort om het toestel aan te zetten, draai tegen de klok in tot u een
klik hoort om de ontvanger uit te zetten.
Om te luisteren, stelt u het juiste volume in.
Monitoren
Druk en hou de [MONI] toets in om zwakke signalen te monitoren. Het kan ook werken met de Power
Switch/Volume Control knop om het volume aan te passen. Laat de [MONI] knop los om terug te
gaan naar de normale werking.
Het volume instellen
FM Radio (88-108 MHZ)
Wanneer de ontvanger aanstaat , draai de Power Switch/Volume Control Knop met de klok
mee om het volume te verhogen en tegen de klok in om het volume te verlagen.
Druk en hou [SK] in om over te gaan tot de FM radio functie. De toets kan ingesteld worden om
zowel [TK] of [SK] te zijn via de PC software.([SK] = Side Key , [TK] Top Key)
Opmerking: In Monitor modus, kan u het achtergrondgeluid monitoren , en dan het volume instellen.
69
70
Bediening Snelkoppeling Menu
Bediening snelkoppeling menu
Opslaan/Verwijderen van kanalen ( 99 kanalen )
U kan wisselen tussen VFO en MR modus. Wanneer de ontvanger aanstaat druk op
om van
de huidige modus te veranderen naar een andere modus. In VFO modus, kan u de frequentie
rechtstreeks ingeven en dan zal de ontvanger werken onder de nieuwe frequentie. In MR modus,
werkt de ontvanger door het invoeren van het kanaalnummer om af te stemmen op de vooraf
geprogrammeerde frequentie. ( 99 geheugens )
Opslaan: wanneer de ontvanger aanstaat, druk
en daarna
, het kanaal op de rechterzijde
zal knipperen, druk
of
om het gewenste kanaal te selecteren en druk
om op te slaan.
om MR modus te selecteren, zet de radio af.
Verwijderen: wanneer de radio aanstaat druk
Druk en hou
in en zet de radio aan, “DEL?01” zal op het scherm verschijnen, druks
om te
verwijderen en druk
of
om het gewenste kanaal te selecteren.
Kanalen Scannen ( 99 geheugen kanalen )
de
Druk
, selecteer het 15 menu door te drukken op
of
, “SCANS?15” zal op het
scherm verschijnen, druk
om huidige scan modus weer te geven. Druk
of
om de
scan modus te selecteren.
“TO” betekent Time Operate mode, de radio stopt met scannen bij een kanaal met signaal en de
radio zal verder scrollen wanneer de ingestelde tijd wordt overschreden. “CO” is Carry Operate
mode, de radio stopt met scrollen bij ontvangst van een signaal en de radio zal verder gaan met
scannen wanneer het signaal verdwijnt over de ingesteld tijd. “SE” is de SEarch mode, de radio
stopt met scannen bij ontvangst van een signaal. Druk
om de frequentie op te slaan, druk twee
keer op
om te sluiten zonder op te slaan.
Adding scanning
de
1. In MR modus, druk
,en druk
of
om het 17 menu te selecteren. Druk
om
toegang te krijgen tot de Add Scanning interface, het scherm geeft de huidige Add Scanning
status weer.
2. Druk
of
om Add of Delete te selecteren, “ADD” om toe te voegen, “DEL” om te verwijderen.
3. Druk
om op te slaan, druk 2 keer op
om te sluiten zonder op te slaan.
de
4.Bij PRI scan (16 menu) zal de RX-160 enkel de kanalen gemarkeerd met ADD scannen.
71
Frequentie zoekfunctie – VFO - Frequency Search
Instellen van de laagste en de hoogste zoekgrens voor VFO scanning
Via de computer :
Sluit de ontvanger aan met de datakabel (optie) op uw PC.
Geef de bovenste en onderste frequentie in het passende veld .
Via het keypad :
1. Druk
, kies de 26ste menu door met
of
, tot “UP F?” upper = hoogste frequentiegrens
op het display komt
2. Druk
, om de hoogste frequentiegrens te wijzigen
3. Geef de 6 cijfers in van de hoogste frequentie die u wil instellen
4. Om te corrigeren druk
en geef het laatste cijfer opnieuw in.
5. Druk
om de ingave op te slaan en uit de programma menu te gaan. Druk
om de menu
te verlaten zonder de wijziging op te slaan.
6. Druk
, kies de 27ste menu door met
of
, tot “LOW F?” lower = laagste
frequentiegrens op het display komt
72
7. Druk
, om de laagste frequentiegrens te wijzigen
8. Geef de 6 cijfers in van de laagste frequentie die u wil instellen
9. Om te corrigeren druk
en geef het laatste cijfer opnieuw in.
10. Druk
om de ingave op te slaan en uit de programma menu te gaan. Druk
menu te verlaten zonder de wijziging op te slaan.
Scanner
om de
th
Druk
, kies 15 menu en druk
of
, “SCRNS?15” zal op de display verschijnen druk
om de huidige scan instelling te tonen. Druk
of
om de scan instelling aan te passen. Kies
en druk “SE”, Druk op
om het MENU te verlaten. Druk [F] en
, dan nadien [F] om de
scan instelling te bevestigen.
Toetsenbord Vergrendeling
Druk en hou
in gedurende 2 seconden tot
verschijnt.
In vergrendel modus zijn alle knoppen vergrendeld behalve [PTT] en [MONI].
Druk en hou
opnieuw gedurende 2 seconden in tot
niet langer wordt weergegeven om
het toetsenbord te ontgrendelen. .
1. Druk
en
, druk daarna op
om het scannen in te stellen.
2. Druk
of
om van scanning richting te veranderen.
3. In MR modus, scant de radio om beurten alle kanalen en slaat hij de lege kanalen over. In VFO
modus, scant de radio alle kanalen stap voor stap volgens de ingestelde frequentie stap waarde.
4. Druk
om te stoppen.
Instellen CTCSS/CDCSS signalering
Deze functie werkt enkel in VFO modus.
1. Druk
en
, “C-CDC?07” verschijnt op het scherm, druk
om huidige Rx CTCSS
signalering weer te geven .
2. Druk
om vlug CTCSS te selecteren, positief CDCSS, negatief CDCSS of schakel CTCSS
signalering uit, druk
om te selecteren CDCSS om te draaien, druk
of
om de Rx
CTCSS code groep te selecteren die u nodig heeft.
3. Druk
om op te slaan, druk 2 keer op
om te sluiten zonder opslaan.
Instellen van de ruisblokkering - Squelch
Druk
en
na elkaar in ,en druk dan op
om het huidige niveau van de ruisblokkering
weer te geven.
Druk
of
om het niveau te selecteren, 0-9.
Druk
om op te slaan, Druk
om te sluiten zonder opslaan.
73
74
Geavanceerde Handelingen
Stroombesparing Instellen
de
1. Druk
, om het 11 menu te selecteren door op
of
te drukken, “SAVE?11” zal op
het scherm verschijnen .
2. Druk
om de stroombesparingsfunctie in te stellen, kies “ON” of ”OFF” door op
of
,
te drukken, druk op
om op te slaan, druk twee keer op
om te sluiten zonder op te slaan.
Backlight Aan/Uitzetten
de
Druk
, selecteer het 13 menu door op
of
, te drukken “LED?13” zal op het scherm
verschijnen, druk dan op
om de status weer te geven. Druk
of
om te selecteren,
“ON” backlight inschakelen, “OFF” backlight uitschakelen, “AUTO” backlight wordt automatisch
ingeschakeld door het drukken op eender welke toets en wordt automatisch terug uitgeschakeld na
10 seconden. Druk
om op te slaan, druk twee keer op
om te sluiten zonder op te slaan.
Kanalen Scannen ( 99 geheugen kanalen )
de
Druk
, selecteer het 15 menu door te drukken op
of
, “SCANS?15” zal op het
scherm verschijnen, druk
om huidige scan modus weer te geven. Druk
of
om de
scan modus te selecteren.
“TO” betekent Time Operate mode, de radio stopt met scannen bij een kanaal met signaal en de radio
zal verder scrollen wanneer de ingestelde tijd wordt overschreden. “CO” is Carry Operate mode, de
radio stopt met scrollen bij ontvangst van een signaal en de radio zal verder gaan met scannen
wanneer het signaal verdwijnt over de ingesteld tijd. “SE” is de SEarch mode, de radio stopt met
scannen bij ontvangst van een signaal. Druk [F] om op te slaan, druk twee keer op
om te sluiten
zonder op te slaan.
75
Prioriteitskanaal tijdens het scannen
U kan een prioriteitskanaal instellen via PC software. In VFO/MR modus, druk
, druk dan op
of
om het 16de menu te selecteren dat toelaat een prioriteitskanaal te scannen.
Instellen ontvangt bandbreedte : Breed 25 kHz / Smal 12.5 Khz
de
Druk
, druk
of
om het 18 menu te selecteren, druk
om Brede/Smalle Band in
te stellen. Druk
of
om uw keuze te selecteren, “WIDE” geeft brede band (25KHz) aan,
“NARROW” geeft smalle band (12.5KHz) aan, druk
om op te slaan, druk 2 keer op
om te
sluiten zonder op te slaan.
Frequentie Stap instellen : 5 / 6.25 / 10 / 12.5 / 25 Khz
ste
1. Druk
, daarna
of
om het 20 menu te selecteren, druk
om de Frequentie
Stap Waarde in te stellen.
2. Druk
of
om de stap waarde te selecteren, u heeft 5 opties: 5KHz, 6.25KHz, 10KHz,
12.5KHz en 25KHz.
3. Druk
om op te slaan, druk 2 keer op
om te sluiten zonder op te slaan.
Stopwatch Instellen
st
1. Druk
, daarna
of
om het 21 menu te selecteren, druk
om de Stopwatch in te
stellen. De snelkoppelingstoets kan via pc software ingesteld worden op TK of Sk1.
2. Druk SK1 om stopwatch te starten/stoppen, druk [MONI] om te verwijderen, druk nogmaals op
[MONI] om te stoppen.
76
Optionele Accessoires
Bediening FM Radio ( 88 – 108 MHZ )
1. Druk
, daarna
of
om het 23
krijgen tot de FM Radio functie, druk
en
ste
menu te selecteren. Druk
om te stoppen.
om toegang te
2. Kanaal opslaan: in VFO modus, druk
tot “F” in de rechterhoek onderaan het scherm
verschijnt, Druk dan op
, in de rechterbovenhoek van het scherm knippert de kanaal
waarde, druk
of
om het gewenste kanaal te selecteren, en druk dan op
om het
kanaal op te slaan.
Wij zijn in staat om nog meer accessoires naargelang uw eisen aan te bieden, zodoende het gebruik
ervan handiger te maken en uw werk doeltreffendheid te verbeteren. Alle SYCO product
accessoires zijn gemaakt van hoge kwalitatieve standaard materialen, wat voor een betere
prestatie zorgt van uw ontvanger .
3. Kanaal verwijderen: in MR modus, druk
tot “F” in de rechterhoek onderaan het scherm
verschijnt, druk dan op
, de waarde aan de rechterkant knippert, druk
of
om het
gewenste kanaal te selecteren, en druk daarna op
om te verwijderen.
4. Kanalen Scannen: Druk
tot “F” rechts onderaan het scherm verschijnt, druk daarna op
,
de ontvanger zal beginnen zoeken en automatisch alle kanalen met signalen opslaan. Bij het
scannen zal de eerste zender opgeslagen worden (het vorige opgeslagen kanaal zal
overschreven worden) 19 kanalen kunnen opgeslagen worden.
Antenne
Hoofdtelefoon
5. Tijdelijk uitschakelen van de FM radio: druk [F] tot “F” onderaan rechts op het scherm verschijnt,
druk dan op
, “ON” of “OFF” zal op het scherm worden weergegeven, druk
of
om
te selecteren, “ON” de ontvanger zal FM Radio modus tijdelijk stoppen wanneer VHF signalen
kunnen worden ontvangen. “OFF” er kunnen geen VHF signalen ontvangen worden.
Programmeer kabel
77
78
Questions and Answers
Probeem
Geen Stroom
Oplossing
De batterij kan onvoldoende geladen zijn. Gelieve te laden of te
veranderen met een volledig opgeladen batterij.
De batterij is mogelijk niet goed geïnstalleerd, demonteer de
batterij en installeer ze opnieuw.
De batterij verbruikt snel
na het opladen
De levensduur van de batterij is ten einde. Gelieve te vervangen
met een nieuwe batterij.
Niet in staat om
uitzendingen te
beluisteren.
Gelieve te controleren of uw frequentie en CTCSS/CDCSS toon
correct zijn.
Misschien bevindt u zicht te ver, gelieve te controleren of u zich
binnen het communicatiebereik bevindt.
Er is altijd storing/ruis te
horen op het kanaal
U kunt te ver weg zijn van de andere leden waardoor u niet kunt
ontvangen. Gelieve dichter te gaan bij uw leden en opnieuw te
Onderhoud
Onderhoud
Uw SYCO RX160 ontvanger is een product met een uitstekend design en een uitstekende
technologie. Gelieve deze met zorg te behandelen. Deze aanbevelingen kunnen helpen om zeer
doeltreffend gebruik te maken van uw ontvanger
Houd de radio droog. Regen, vocht , vloeistoffen of water kunnen schade aan de ontvanger
veroorzaken.
Niet gooien of slaan met de ontvanger . Wrede behandeling kan de interne IC’s of andere
elementen beschadigen.
Neem de ontvanger niet vast bij de antenne of externe luidspreker.
Gebruik de originele of standaard antenne. Het gebruik van een niet- goedgekeurde antenne of
wijzigingen van de accessoires kan schade veroorzaken aan de ontvanger.
Gebruik een niet-pluizende doek om stof of vlekken op de ontvanger te verwijderen.
Gebruik een mild reinigingsmiddel (geen corrosieve chemicaliën) en doek om de behuizing,
bedieningsknop en het toetsenbord te reinigen na langdurig gebruik.
Opmerking:
Alle bovenstaande aanbevelingen verwijzen ook naar uw batterij, oplader en accessoires.Als
een van hen abnormaal werkt, gelieve ut te begeven naar het dichtstbijzijnde servicecentrum.
79
80
Europese beperkte garantie
Deze beperkte fabrieksgarantie voor mobiele SYCO toestellen die verkocht worden in de Europese
Unie .
Voor meer informatie surf je naar www.SYCO.be / garantie.
Garantietermijn
De garantietermijn gaat in op de datum van de originele aankoop van het Product door de eerste
eindgebruiker. Het Product kan uit verschillende onderdelen bestaan en op verschillende
onderdelen kan een afwijkende garantietermijn (hierna te noemen: "Garantietermijn") van
toepassing zijn. De verschillende garantietermijnen zijn:
a. Vierentwintig (24) maanden voor de ontvanger en twaalf (12) maanden voor accessoires (hetzij
verkocht als één pakket met de ontvanger of als afzonderlijk artikel) met uitzondering van de
verbruikbare onderdelen en de accessoires genoemd onder lid (b) en (c) hieronder
b. zes (6) maanden voor de volgende verbruikbare onderdelen en accessoires (batterijen, opladers,
bureaustandaard, hoofdtelefoons, kabels en covers), en antennes.
c. negentig (90) dagen voor dragers van software (bijv. cd-rom, geheugenkaart).
Opmerking Deze Beperkte Garantie laat je rechten met betrekking tot de koop van
consumentenproducten op grond van het geldende nationaal recht onbelemmerd.
SYCO behoudt zich het recht van de uiteindelijke verklaring voor eventuele vergissingen. SYCO
behoudt zich het recht voor het veranderen van het product ontwerp en de specificatie. Deze
handleiding mag niet worden gekopieerd, overgedragen, opgeslagen worden in een doorzoekbaar
systeem of vertaald worden in een andere taal.
81