1
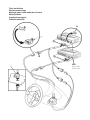
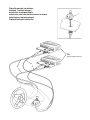
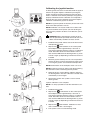
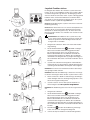
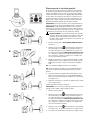
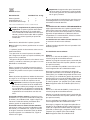
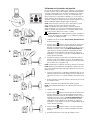
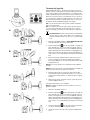
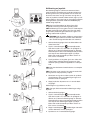
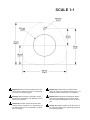
7746259 07-2007 (Tab 6) Installation Instructions Installation instructions Instrucciones de montaje Einbauanleitung Istruzioni di montaggio Instructions de montage Monteringsanvisning Volvo Penta IPS Joystick Kit number 3887213 Volvo Penta IPS Joystick Satznummer 3887213 Manette joystick IPS Volvo Penta Numéro de kit 3887213 Palanca joystick Volvo Penta IPS Kit número 3887213 Joystick IPS Volvo Penta Kit numero 3887213 Volvo Penta IPS Joystick Satsnummer 3887213 Important! Vigtigt! This batch with its accompanying instructions is produced for Volvo Penta’s service workshops, boat-builders, machine manufacturers and other authorized workshops which have personnel with qualified professional training. Dette sæt med tilhørende monteringsvejledning er blevet udviklet for Volvo Pentas serviceværksteder, bådebyggere, maskinproducenter og andre autoriserede værksteder, som har medarbejdere med kvalificeret, faglig uddannelse. The installation instructions are only produced for professional use and are not intended for non-professional use. Volvo Penta will not assume any liability whatsoever for damage incurred, either damage to materials or personal injury, which may result if the installation instructions are not followed or if the work is carried out by non-professional personnel. Monteringsvejledningen er udelukkende beregnet til professionel anvendelse og ikke til hobby- eller fritidsbrug. Volvo Penta påtager sig intet som helst ansvar for eventuelle skader på såvel materiel som personer, som kan være en følge af at monteringsvejledningens anvisninger ikke blev overholdt, eller hvis arbejdet blev udført af ikke-professionelt personale. Wichtig! Tärkeää! Dieser Satz mit vorliegender Einbauanleitung ist für Volvo Penta Kundendienst-werkstätten, Werften, Maschinenbauer und für andere ermächtigte Werkstätten mit beruflich geschultem Personal vorgesehen. Tämä sarja ja asennusohje on tarkoitettu Volvo Pentan huoltokorjaamoille, veneenrakentajille, konevalmistajille ja muille valtuutetuille korjaamoille, joiden henkilökunta on saanut pätevän ammattikoulutuksen. Die Einbauanleitung ist nur für den berufsmäßigen Gebrauch vorgesehen und nicht für unprofessionelle Anwendung gedacht. Volvo Penta übernimmt nicht die geringste Haftung für irgendwelchen Schäden an Personen oder Sachen, die als Folge einer Nichtbefolgung der Einbauanleitung oder wegen Ausführung der darin beschriebenen Arbeiten durch nicht beruflich geschulte Personen entstehen. Asennusohje on tarkoitettu ainoastaan ammattikäyttöön. Volvo Penta ei vastaa mahdollisista materiaali- tai henkilövahingoista, joita asennusohjeen laiminlyöminen tai ammattitaidottoman henkilökunnan suorittama asennustyö voi aiheuttaa. Important! Ce kit, avec instructions de montage, est destiné aux ateliers de service Volvo Penta, aux constructeurs de bateaux et autres ateliers de construction agréés avec un personnel qualifié. Les instructions de montage sont exclusivement conçues pour une utilisation professionnelle. Volvo Penta se dégage de toute responsabilité pour d’éventuels endommagements, corporels ou matériels, résultant du non respect des instructions ou d’un travail effectué par un personnel non compétent. Importante! Belangrijk! Deze set met de bijgevoegde montage-aanwijzing is ontwikkeld voor de werkplaatsen van Volvo Penta, botenbouwers, machinefa brikanten en overige bevoegde werkplaatsen, die personeel hebben met een gekwalificeerde vakopleiding. De montage-aanwijzing is alleen ontwikkeld voor professioneel gebruik en is niet bedoeld voor niet-professioneel gebruik. Volvo Penta neemt geen enkele verantwoordelijkheid op zich voor eventuele schade, zowel materiële schade als persoonlijk letsel, die het gevolg kan zijn als de montage-aanwijzing niet wordt gevolgd, of als het werk wordt uitgevoerd door niet-vakkundig personeel. Importante! El presente juego con las instrucciones de montaje se destina a los talleres de servicio Volvo Penta, constructores de embarcaciones y máquinas y a otros talleres autorizados que cuentan con personal capacitado. Este jogo, juntamente com as respectivas instruções de montagem, foi concebido para as oficinas de serviço da Volvo Penta, construtores navais, construtores de máquinas e outras oficinas autorizadas, com pessoal devidamente formado. Las instrucciones de montaje están destinadas únicamente para uso profesional, por lo que Volvo Penta no aceptará responsabilidad alguna por cualquier daño, tanto personal como material, resultado de no haber seguido las instrucciones de montaje o de haber sido efectuado el trabajo por personal que no está debidamente capacitado. As instruções de montagem foram concebidas unicamente para utilização profissional e não se destinam a utilização não profissional. A Volvo Penta não se responsabiliza por quaisquer danos eventuais, tanto materiais como pessoais, que possam resultar no caso de as instruções de montagem não serem seguidas, ou se os trabalhos forem executados por pessoal não profissional. Importante! Questo kit e le relative istruzioni di montaggio sono stati realizzati per le officine di servizio Volvo Penta, i cantieri, i fabbricanti di macchine e tutte le altre officine autorizzate il cui personale ha ricevuto un addestramento qualificato e specializzato. Le istruzioni di montaggio sono state redatte esclusivamente per uso professionale e non sono adatte all’uso non professionale. La Volvo Penta non si assume alcuna responsabilità per eventuali danni alle cose o alle persone, derivanti da trascuratezza nel seguire le istruzioni di montaggio oppure dall’esecuzione dei lavori da parte di personale non qualificato. Viktigt! Denna sats med föreliggande monteringsanvisning är framtagen för Volvo Pentas serviceverkstäder, båtbyggare, maskintillverkare och övriga auktoriserade verkstäder som har personal med kvalificerad fackutbildning. Monteringsanvisningen är enbart framtagen för yrkesbruk och är inte avsedd för icke yrkesmässig användning. Volvo Penta påtager sig inget som helst ansvar för eventuella skador, såväl materiella som personskador, som kan bli följden om monteringsanvisningen ej följs, eller om arbetet utförs av icke yrkeskunnig personal. Óçìáíôéêü! Ç ðáñôßäá áõôÞ ìáæß ìå ôéò ïäçãßåò ðïõ ôç óõíïäåýïõí, ðáñÜãåôáé ãéá ôá óõíåñãåßá ôçò Volvo Penta, ãéá êáôáóêåõáóôÝò óêáöþí, êáôáóêåõáóôÝò ìç÷áíçìÜôùí êáé Üëëá åîïõóéïäïôçìÝíá óõíåñãåßá ôá ïðïßá áðáó÷ïëïýí åîåéäéêåõìÝíï, êáôÜëëçëá åêðáéäåõìÝíï ðñïóùðéêü. Ïé ïäçãßåò åãêáôÜóôáóçò ðáñÜãïíôáé ìüíï ãéá åðáããåëìáôéêÞ ÷ñÞóç êáé äåí ðñïïñßæïíôáé ãéá ÷ñÞóç áðü åñáóéôÝ÷íåò. Ç Volvo Penta äåí áíáëáìâÜíåé êáìßá åõèýíç ãéá æçìßåò, åßôå óå õëéêÜ åßôå óå Üôïìá, ç ïðïßá ìðïñåß íá óõìâåß åÜí äåí ôçñçèïýí ïé ïäçãßåò åãêáôÜóôáóçò, Þ åÜí ïé åñãáóßåò äåí ãßíïõí áðü åðáããåëìáôßåò. Twin installation Zweimotorenanlage Montage pour commande deux leviers Montaje doble Installazione doppia Dubbelinstallation A A B B 1 HCU (Helm station Control Unit) Triple/Quadruple installation Dreifach / Vierfachanlagen Installation triple/quadruple Instalación con tres motores/cuatro motores Installazione tripla/quadrupla Trippel/Kvadrupelinstallation 1 TQI (Triple Quad Interface) 4 3 This kit contains: Designation Joystick Y connector* Installation instruction Quantity Pos. in fig 1 2 1 1 2 - * Not used in a triple or quadruple installation Installation and connection of the joystick Important! Volvo Penta IPS Joystick can only be installed in combination with the Volvo Penta IPS control unit for steering wheels and control levers. Only one joystick per control station can be installed. 1. Decide where to put the joystick. Note! Remember the following when you install the joystick: - Install the joystick on a horizontal surface. - Think about the operating position. Make sure that there is space to support the operator’s hand and forearm. - Make sure that the distance to the instruments and the other controls is sufficient, so their functionality is not affected. 2. Mark out and make holes for the joystick (1). A full size template is located in the back of this installation instruction. 3. Install the joystick on the instrument panel as in the illustration. The thickness of the instrument panel must not be greater than 25 mm. 4. Important! Save the protective cover (A) which is located on the HCU unit’s X8 outlet. This is used to protect the connections which are not in use, e.g. the wheel connection (B) for the installation of a docking station for dual installations. Double installation: Connect the Y-connector (2) between the wheel control unit and the HCU unit as illustrated. Connect the signal cable from the joystick to the Y connector. Triple/Quadruple installation: Connect the cables (3) between the wheel control unit and the TQI units as illustrated. Connect the signal cable (4) from the joystick to the TQI units as illustrated. Important! Make sure that the locking mechanism between the connectors closes with a click. This guarantees a water-tight, correct closure. 5. When the installation is completed, an auto-configuration must be done. Please refer to the EVC installation manual for more information. Note! Double installation: If the boat is retrofitted with a Volvo Penta IPS Joystick, new software must be ordered and installed before auto-configuration is done. The procedure differs, depending on the EVC version. Please refer to the “Installation of new software” section. Triple/Quadruple installation: It is not necessary to install new software. 6. Calibrate the joystick. Please refer to the “Calibration of the joystick” section. Installation of new software EVC-B2 Visit the ”VODIA web site” and click the ”Conversion kit” link. Order a conversion kit for activation of the Volvo Penta IPS Joystick function (order one per driveline). Once the order has been completed, click the ”Control unit programming” link. Download the and program the ordered kits in the engine control units (ECU), powertrain control units (PCU) and helm control units (HCU), using VODIA. All kits are downloaded and programmed in as a ”package” (one ”package” for each unit). Note! Program all units (ECUs, PCUs and HCUs). EVC-C Visit the ”VODIA web site” and click the ”Conversion kit” link. Order a conversion kit for activation of the Volvo Penta IPS Joystick function (order one per driveline). Once the order has been completed, click the ”Control unit programming” link. Download and program the ordered kits into the powertrain control units (PCU), using VODIA. All kits are downloaded and programmed in as a ”package” (one ”package” for each unit). Note! Program all PCUs. Calibrating the joystick function Y In docking mode, the boat is maneuvered with the joystick. Check if the joystick requires calibration by moving the joystick straight to the side and observing how the boat moves. If the boat moves directly sideways, the joystick is properly calibrated and new calibration is not required. If the boat does not move as desired, the joystick requires calibration. Calibrate the joystick as follows. NOTE! For joystick operator instructions please refer to the Volvo Penta IPS Operator’s manual. A NOTE! Calibration can only be made from a station with a joystick and EVC control panels (not from docking station) and it only needs to be done in one direction, port or starboard WARNING! When calibrating the joystick the boat must be operated at open water and under safe conditions. Avoid windy conditions and sea-current. 1. Enable docking mode. Please refer to the Volvo Penta IPS Operator’s manual. B 2. Depress the neutral button on the control panel. Hold it depressed for approximately 5 seconds. A sound signal indicates that the system is in calibration mode. The LEDs above the neutral button starts to flash and the LED above the docking button (Y) starts to flash or lights up depending on what EVC version is installed. 3. Move the joystick sideways to one of its end positions. Correct the boat’s incorrect movement by turning and/ or moving the joystick as illustrated in examples A-D. NOTE! Combinations of the examples shown can occur. NOTE! Let the boat move for quite a long distance during the calibration routine. Hold the joystick in position. C 4. When the boat is moving directly sideways, depress the docking button. The new calibration is stored and is confirmed by a sound signal. 5. Release the joystick. The system is now in normal docking mode. Joystick calibration is now complete. NOTE: It is always possible to reset the calibration as follows. 1. Enable docking mode. D 2. Depress the neutral button on the control panel. Hold it depressed for approximately 5 seconds. A sound signal indicates that the system is in calibration mode. The LEDs above the neutral button starts to flash and the LED above the docking button (Y) starts to flash or lights up depending on what EVC version is installed. 3. Depress the neutral button. Calibration is reset and is confirmed with a sound signal. 4. The system is now in normal docking mode. Dieser Satz besteht aus: Bezeichnung Anzahl Pos. im Bild Joystick Y-Verzweigung* Einbauanleitung 1 2 1 1 2 - * In Dreifach /Vierfachanlagen nicht verwendet Wichtig! Prüfen, dass sich die Sperre zwischen den Steckverbindungen mit klickendem Geräusch schließt. Das gewährleistet eine wasserdichte, korrekte Verbindung. 5. Nach der Montage ist eine Autokonfiguration vorzunehmen. Weitere Informationen, siehe das Einbauhandbuch EVC. Hinweis! Joystick montieren und anschließen Wichtig! Der Volvo Penta IPS Joystick kann nur in Kombination mit dem Volvo Penta IPS Steuergerät für Steuerrad und Bedienungshebel montiert werden. Es kann nur ein Joystick je Steuerstand montiert werden. Doppelanlage: Wenn das Boot mit dem Volvo Penta IPS Joystick nachgerüstet wird, ist vor der Autokonfiguration eine neue Software zu bestellen und zu installieren. Der Vorgang ist je nach Version der EVC verschieden. Siehe Abschnitt „Neue Software installieren“. 1. Platzierung des Joysticks festlegen. Dreifach / Vierfachanlagen: Es muss keine neue Software installiert werden. Hinweis! Bei der Platzierung ist Folgendes zu bedenken: - Joystick auf einer waagrechten Fläche montieren. - Die Körperhaltung beim Fahren berücksichtigen. Es muss Platz für das Abstützen von Hand und Unterarm geben. - Der Abstand zu den anderen Instrumenten und Bedienungsorganen muss so groß sein, dass deren Funktion nicht behindert wird. 2. Öffnung für Joystick (1) einzeichnen und herstellen. Eine maßstabgerechte Schablone befindet sich am Ende dieser Einbauanleitung. 3. Joystick wie im Bild gezeigt auf dem Armaturenbrett montieren. Die Dicke des Armaturenbretts darf nicht 25 mm überschreiten. 4. Wichtig! Schutzabdeckung (A) auf dem X8-Anschluss des HCU-Gerätes aufbewahren. Sie dient dazu, die nicht verwendeten Anschlüsse zu schützen, wie den Anschluss des Steuerrades (B) bei Installation am Anlege-Steuerplatz von Doppelanlagen. Doppelanlage: Y-Steckverbindungen (2) zwischen Steuerrad-Steuergerät und HCU-Geräten gemäß Bild (A) anschließen. Signalleitung vom Joystick mit der Y-Kupplung verbinden. Dreifach / Vierfachanlagen: Leitungen (3) zwischen Steuergerät und TQI-Geräten gemäß Bild anschließen. Signalleitung (4) vom Joystick an den TQI-Geräten gemäß Bild anschließen.� 6. Joystick kalibrieren. Siehe Abschnitt „Joystick kalibrieren“. Neue Software installieren EVC-B2 Zur „VODIA Website“ gehen und Link „Umbausatz“ anklicken. Einen Zubehörsatz (je Antriebsstrang) für das Aktivieren der Funktion Volvo Penta IPS Joystick bestellen. Nach der Bestellung Link „Steuergerät programmieren“ anklicken. Die bestellten Sätze herunterladen und mit VODIA in die Motorsteuergeräte (ECU), die AntriebsstrangSteuergeräte (PCU) und die Steuerstand-Steuergeräte (HCU) programmieren. Alle Sätze herunterladen und „paketweise“ programmieren (ein „Paket“ je Steuergerät). Hinweis! Alle Geräte (ECU, PCU und HCU) programmieren. EVC-C Zur „VODIA Website“ gehen und Link „Umbausatz“ anklicken. Einen Zubehörsatz (je Antriebsstrang) für das Aktivieren der Funktion Volvo Penta IPS Joystick bestellen. Nach der Bestellung Link „Steuergerät programmieren“ anklicken. Die bestellten Sätze herunterladen und mit VODIA in die Antriebsstrang-Steuergeräte(PCU) programmieren. Alle Sätze herunterladen und „paketweise“ programmieren (ein „Paket“ je Steuergerät). Hinweis! Alle PCU programmieren. Joystick-Funktion eichen Y Im Anlegemodus wird das Boot mit dem Joystick manövriert. Prüfen, ob der Joystick kalibriert werden muss, indem er direkt zur Seite bewegt wird. Folgt das Boot der Bewegung? Wenn das Boot direkt zur Seite fährt, ist der Joystick ordnungsgemäß kalibriert und es ist kein Neu-Kalibrieren erforderlich. Wenn sich das Boot nicht wie gewünscht bewegt, muss der Joystick kalibriert werden. Joystick wie folgt kalibrieren. Hinweis! Zur Bedienung des Joysticks siehe Volvo-Penta-IPSBedienungsanleitung. A Hinweis! Das Eichen kann nur von solchen Steuerplätzen aus erfolgen, die mit Joystick und EVC-Bedientafel ausgestattet sind (nicht von der Dockingstation aus). Es muss nur in eine Richtung geeicht werden, also entweder nach steuerbord oder nach backbord. WARNUNG! Beim Kalibrieren des Joysticks muss das Boot in einem offenen Gewässer und unter sicheren Verhältnissen gefahren werden. Windiges Wetter und Strömungen sind zu vermeiden. 1. Anlegemodus aktivieren. Siehe Volvo-Penta-IPS-Bedienungsanleitung. B 2. Auf der Bedientafel die Taste „NEUTRAL“ betätigen. Diese Taste rund fünf Sekunden lang gedrückt halten. Ein Tonsignal zeigt an, dass sich das System im Kalibriermodus befindet. Die Leuchtdioden oberhalb des Leerlaufschalters beginnen zu blinken; die Leuchtdiode oberhalb des Docking-Schalters (Y) beginnt abhängig von der verwendeten EVC-Version entweder zu blinken oder zu leuchten. 3. Joystick zum seitlichen Anschlag führen. Fehlerhafte Bewegung des Bootes durch Drehen und/oder Bewegen des Joysticks gemäß den Bilder der Beispiele A–D korrigieren. HINWEIS! Es können auch Kombinationen der in den Beispielen gezeigten Fälle auftreten. C HINWEIS! Während der Kalibrierung soll das Boot eine längere Strecke zurücklegen. Halten Sie den Joystick in der Position. 4. Wenn sich das Boot direkt zur Seite bewegt, den Anlegeschalter betätigen. Die neue Eichung wird gespeichert, was durch ein Tonsignal bestätigt wird. 5. Joystick loslassen. Jetzt ist das System wieder im normalen Anlegemodus. Der ����������������������������������� Joystick ist fertig kalibriert. HINWEIS! Die Kalibrierung lässt sich stets wie folgt zurücksetzen. 1. Anlegemodus aktivieren. D 2. Auf der Bedientafel die Taste „NEUTRAL“ betätigen. Diese Taste rund fünf Sekunden lang gedrückt halten. Ein Tonsignal zeigt an, dass sich das System im Kalibriermodus befindet. Die Leuchtdioden oberhalb des Leerlaufschalters beginnen zu blinken; die Leuchtdiode oberhalb des Docking-Schalters (Y) beginnt abhängig von der verwendeten EVC-Version entweder zu blinken oder zu leuchten. 3. Neutraltaster drücken. Die Kalibrierung wird aufgehoben, was durch ein Tonsignal bestätigt wird. 4. Jetzt ist das System wieder im normalen Anlegemodus. Ce kit contient : Désignation Manette joystick Raccord en Y* Instructions de montage Quantité Rep. dans fig. 1 2 1 1 2 - * Non utilisé sur une installation triple ou quadruple Installation et raccordement du joystick Important! La manette joystick IPS Volvo Penta peut uniquement être montée en combinaison avec l’unité de commande IPS Volvo Penta IPS pour volant et leviers de commande. Un seul joystick est possible par poste de commande. 1. Déterminer l’emplacement du joystick. N.B. ! Observer les points suivants lors du choix de l’emplacement du joystick : - Placer le joystick sur une surface horizontale. - Tenir compte de la position de pilotage. S’assurer qu’il y a suffisamment de place pour appuyer le bras ou l’avant-bras. - S’assurer que la distance par rapport aux autres instruments et commandes est suffisante, afin de ne pas altérer leur fonctionnalité. 2. Marquer et réaliser l’orifice où sera monté le joystick (1). Utiliser le gabarit de perçage à l’échelle se trouvant à la fin de la présente notice. 3. Monter le joystick sur le tableau de bord selon la figure. L’épaisseur du tableau ne doit pas dépasser 25 mm. 4. Important! Conserver le capot (A) monté sur la prise X8 de l’unité de commande HCU. Il permet de protéger les raccordements non utilisés, par exemple la connexion au volant (B) lors de montage du poste d’accostage sur une installation double Installation double : Brancher les dérivations Y (2) entre l’unité de commande pour le volant et les unités de commande HCU comme le montre la figure. Brancher le câble de signal de la manette joystrick au raccord en Y. Installation triple/quadruple : Brancher les câbles (3) entre l’unité de commande pour le volant et les unités TQI comme le montre l’illustration. Brancher le câble de signal (4) de la manette joystick aux unités TQI comme le montre la figure.� Important! S’assurer que la bride de verrouillage entre les connecteurs s’engage correctement (clic sonore). Cela garantie un raccordement étanche et correct. 5. Une autoconfiguration doit être effectuée une fois l’installation terminée. Pour plus d’informations, voir le manuel d’installation pour EVC N.B. ! Installation double : ������������������������������ Si le bateau est équipé de la manette joystick IPS Volvo Penta après coup, un nouveau logiciel devra être commandé et installer avant de procéder à l’autoconfiguration. La marche à suivre varie en fonction de la version du système EVC. Voir le chapitre « Installation d’un nouveau logiciel ». Installation triple/quadruple : Un nouveau logiciel n’a pas besoin d’être installé. 6. Étalonner la manette joystick. Voir le chapitre « Étalonnage du joystick ». Installation d’un nouveau logiciel EVC-B2 Aller à « VODIA website » et cliquer sur le lien « kit de conversion ». Commander un kit d’accessoire (accessory kit) pour activer la fonction Volvo Penta IPS Joystick (commander une unité par groupe propulseur). Lorsque la commande est passée, cliquer sur le lien « Programmation de l’unité de commande ». Télécharger et programmer les kits commandés dans les unités de commande moteur (ECU), les unités de commande groupe propulseur (PCU) et les unités de commande du poste (HCU) à l’aide de VODIA. Tous les kits sont téléchargés et programmés sous la forme d’un pack (un pack pour chaque unité). N.B. ! Programmer toutes les unités (ECU, PCU et HCU). EVC-C Aller à « VODIA website » et cliquer sur le lien « kit de conversion ». Commander un kit d’accessoire (accessory kit) pour activer la fonction Volvo Penta IPS Joystick (commander une unité par groupe propulseur). Lorsque la commande est passée, cliquer sur le lien « Programmation de l’unité de commande ». Télécharger et programmer les kits commandés dans les unités de commande groupe propulseur (PCU) à l’aide de VODIA. Tous les kits sont téléchargés et programmés sous la forme d’un pack (un pack pour chaque unité). N.B. ! Programmer tous les PCU. Étalonnage de la fonction joystick Y En mode d’accostage, le bateau est manoeuvré à l’aide de la manette joystick. Vérifier si la manette a besoin d’être étalonnée en la déplaçant sur le côté et en observant le déplacement du bateau. Si le bateau se déplace directement dans le sens latéral, la manette est étalonnée correctement et un nouvel étalonnage n’est pas nécessaire. Si le bateau ne se déplace pas comme attendu, la manette doit être étalonnée. Étalonner la manette joystick de la manière suivante. A REMARQUE ! Pour les instructions de fonctionnement de la manette joystick, voir le manuel d’utilisation Volvo Penta IPS. REMARQUE ! L’étalonnage peut seulement être effectué à partir d’un poste ayant une manette joystick et des panneaux de commande EVC (pas à partir du poste d’accostage) et est seulement nécessaire dans un sens, bâbord ou tribord. AVERTISSEMENT ! Lors de l’étalonnage de la manette joystick, le bateau doit naviguer en eau libre et dans des conditions de sécurité totales. Éviter d’effectuer cette procédure dans conditions venteuses et en présence de courants sous-marins. 1. Mode accostage activé. Voir ����������������������������������� le Manuel d’utilisation Volvo Penta IPS. B 2. Appuyer sur le bouton de neutralisation du panneau de commande. Le maintenir enfoncé pendant environ 5 secondes. Un signal sonore indique que le système est en mode d’étalonnage. La ������������������������������� LED au-dessus du bouton neutre commence à clignoter et la LED au-dessus du bouton d’accostage (Y) commence à clignoter ou s’allume suivant si la version EVC installée. 3. Déplacer la manette à sa position latérale limite. Corriger le déplacement incorrect du bateau en tournant et/ou en déplaçant la manette comme le montrent les exemples A-D. N.B. Les exemples indiqués peuvent être combinés. N.B. Laisser le bateau se déplacer sur une grande distance lors de la procédure d’étalonnage. Maintenir le joystick en position. C 4. Lorsque le bateau se déplace directement dans le sens latéral, enfoncer le bouton d’accostage DOCKING BUTTON. Le nouvel étalonnage est enregistré et confirmé par un signal sonore. 5. Relâcher la manette. Le système est maintenant en mode d’accostage normal. L’étalonnage de la manette est terminé. REMARQUE : Il est toujours possible de remettre à zéro l’étalonnage en procédant comme indiqué ci-après. 1. Mode accostage activé. D 2. Appuyer sur le bouton de neutralisation du panneau de commande. Le maintenir enfoncé pendant environ 5 secondes. Un signal sonore indique que le système est en mode d’étalonnage. La ������������������������������� LED au-dessus du bouton neutre commence à clignoter et la LED au-dessus du bouton d’accostage (Y) commence à clignoter ou s’allume suivant si la version EVC installée. 3. Appuyer sur le bouton de neutralisation. L’étalonnage est remis à zéro, ce qui est confirmé par un signal sonore. 4. Le système est maintenant en mode d’accostage normal. Este kit contiene: Denominación Palanca joystick Acoplamiento en Y* Instrucciones de montaje Cantidad Pos. en fig. 1 2 1 1 2 - * No se usa en instalaciones con tres o cuatro motores Instalación y acoplamiento de palanca joystick Importante: La palanca joystick Volvo Penta IPS sólo puede montarse en combinación con la unidad de mando Volvo Penta IPS para volante y palancas de mando. Sólo es posible montar una palanca joystick por puesto de conducción. Importante: Asegurarse de que el mecanismo de cierre entre los contactores se fija haciendo un clic. Esto garantiza una conexión impermeable al agua y correcta. 5. Una vez terminada la instalación hay que hacer una autoconfiguración. Para más información, véase el manual de instalación del EVC. Nota: Instalación con dos motores: ��������������������� Si la embarcación se equipa posteriormente con la palanca joystick Volvo Penta IPS es necesario solicitar un nuevo software que ha de instalarse antes de proceder a la autoconfiguración. El procedimiento se diferencia del correspondiente a la versión de EVC. Véase la sección “Instalación de un nuevo software”. Nota: Al colocar la palanca joystick tener en cuenta lo siguiente: Instalación con tres motores/cuatro motores: No es necesario instalar nuevo software. 6. Calibrar la palanca joystick. Véase el apartado “Calibrado de joystick”. - La palanca joystick ha de montarse sobre una superficie horizontal. Instalación de nuevo software 1. Determinar la ubicación de la palanca joystick. - Hay que tener en cuenta la postura de conducción. Asegurarse de que hay espacio suficiente para apoyar mano y antebrazo. - Asegurarse de que la distancia a los demás instrumentos y mandos es suficiente, para que no se vea dificultado su movimiento. 2. Marcar y practicar los orificios necesarios para la palanca joystick (1). Al final de estas instrucciones se halla una plantilla a escala para el taladro de los orificios. 3. Montar la palanca joystick en el tablero de instrumentos según se ve en la figura. El espesor del tablero de instrumentos no ha de ser superior a 25 mm. 4. Importante: Guardar la tapa de seguridad (A) situada en la toma X8 de la unidad HCU. Esta tapa se utiliza para proteger las conexiones no utilizadas, por ejemplo la conexión de volante (B) en la instalación en la estación de acoplamiento en instalaciones con dos motores. Instalación con dos motores: Conectar las acoplamientos en Y (2) entre la unidad de mando para el volante y las unidades HCU, según la figura (A). Conectar el cable de señales procedente de la palanca joystick al acoplamiento en Y. Instalación con tres motores/cuatro motores: Conectar los cables (3) entre la unidad de mando del volante y las unidades TQI, según se muestra en la figura. Conectar el cable de señal (4) desde la palanca joystick a las unidades TQI, según se muestra en la figura.� EVC-B2 Entrar en el “sitio web de VODIA” y hacer clic en el vínculo “juego de reacondicionamiento”. Solicitar un juego de accesorio para la activación de la función Volvo Penta IPS Joystick (solicitar un ejemplar por línea motriz). Una vez realizados los pedidos, hacer clic en el vínculo “Programación de la unidad de mando”. Descargar el software y programar los juegos de aplicación solicitados en las unidades de gestión del motor (ECU), las unidades de gestión de líneas motrices (PCU) y las unidades de gestión de puestos de pilotaje (HCU) con la ayuda de VODIA. Todos los juegos de aplicación se descargan y programan como un único “paquete” (un “paquete” para cada unidad). Nota: Programar todas las unidades (ECU, PCU y HCU). EVC-C Entrar en el “sitio web de VODIA” y hacer clic en el vínculo “juego de reacondicionamiento”. Solicitar un juego de accesorio para la activación de la función Volvo Penta IPS Joystick (solicitar un ejemplar por línea motriz). Una vez realizados los pedidos, hacer clic en el vínculo “Programación de la unidad de mando”. Descargar y programar los juegos de aplicación solicitados en las unidades de línea motriz (PCU) con ayuda de la aplicación VODIA. Todos los juegos de aplicación se descargan y programan como un único “paquete” (un “paquete” para cada unidad). Nota: Programar todas las unidades PCU. Calibrado de la function de joystick Y En el modo de atraque la embarcación se maneja con la palanca joystick. Controlar si la joystick requiere calibrado desplazándola a un lado y observando como se mueve la embarcación. Si ésta se desplaza inmediatamente a un lado, es señal de que la palanca joystick está correctamente calibrada y no es necesario un nuevo calibrado. Si la embarcación no se mueve de la manera deseada, es indicación de que la palanca joystick requiere un calibrado. Calibrar la palanca joystick según lo siguiente. A NOTA: Para las instrucciones para el uso de la planca joystick, véase el Libro de instrucciones de Volvo Penta IPS. NOTA: El calibrado únicamente puede realizarse desde un puesto de pilotaje con un joystick y paneles de mando EVC (no desde un módulo de acoplamiento), y solamente debe hacerse en una de esas dos direcciones, babor o estribor. ADVERTENCIA: Para calibrar la palanca joystick, la embarcación ha de navegar en mar abierto y en condiciones seguras. y sin viento ni corrientes marinas. 1. Habilitar el modo de atraque. Véase �������������������������������� el Libro de instrucciones de Volvo Penta IPS. B 2. Pulsar el botón de punto muerto ubicado en el panel de mandos. Mantener este botón apretado durante aproximadamente 5 segundos. El modo de calibrado se da a conocer mediante una señal acústica. Los ��������������������������� diodos LED situados encima del botón de neutro empiezan a parpadear. El diodo LED situado encima del botón de “docking” (Y) empieza a parpadear, o se enciende con luz fija, eso dependiendo de la versión de EVC instalada. 3. Desplazar la palanca joystick hasta el final de una posición lateral. Corregir el movimiento incorrecto de la embarcación haciendo girar y/o moviendo la palanca joystick de la manera que se ilustra en los ejemplos A-D. NOTA: Pueden darse combinaciones de los ejemplos mostrados. NOTA: Durante el procedimiento de calibrado la embarcación ha de recorrer una distancia bastante larga. Mantener en posición la palanca joystick. C 4. Cuando la embarcación se desplaza inmediatamente en sentido lateral, pulsar el botón de atraque. El nuevo calibrado se almacena entonces y se confirma mediante una señal acústica. 5. Soltar la palanca joystick. El sistema estará ahora en el modo de atraque normal. Se habrá completado así el calibrado de la palanca joystick. NOTA: Es siempre posible reponer el calibrado de la manera siguiente. 1. Habilitar el modo de atraque. D 2. Pulsar el botón de punto muerto ubicado en el panel de mandos. Mantener este botón apretado durante aproximadamente 5 segundos. El modo de calibrado se da a conocer mediante una señal acústica. Los ��������������������������� diodos LED situados encima del botón de neutro empiezan a parpadear. El diodo LED situado encima del botón de “docking” (Y) empieza a parpadear, o se enciende con luz fija, eso dependiendo de la versión de EVC instalada. 3. Pulsar el botón de punto muerto. Con ello se habrá repuesto el calibrado lo que se confirma mediante una señal acústica. 4. El sistema estará ahora en el modo de atraque normal. Questo kit contiene: Denominazione Joystick Collegamento Y* Istruzioni di montaggio Numero Pos. in fig. 1 2 1 1 2 - * Non usato in una installazione tripla o quadrupla Montaggio e collegamento del joystick Importante! Il Joystick IPSVolvo Penta può essere montato soltanto in combinazione con la centralina IPS per volante e leve di comando. E’ consentito il montaggio di un solo joystick per posto di pilotaggio. 1. Determinare la posizione del joystick. N.B.! Nel posizionare in sede il joystick, tenere presente quanto segue: - Montare il joystick su una superficie orizzontale. - Tenere in consideazione la posizione di pilotaggio. Controllare che ci sia spazio a sufficienza per l’appoggio della mano e dell’avambraccio. - Verificare che ci sia la sufficiente distanza dagli altri strumenti e comandi, in modo da non interferire sulla loro funzionalità. 2. Marcare il posizonamento e praticare il foro del joystick (1). La dima in scala è riportata alla fine di queste istruzioni di montaggio. 3. Montare il joystick sulla plancia strumenti, come da illustrazione. Lo spessore della plancia strumenti non deve superare 25 mm. 4. Importante! Mettere da parte il coperchio di protezione (A) che si trova sulla presa X8 dell’unità HCU. Il coperchio serve per proteggere i collegamenti non utilizzati, per esempio il collegamento del volante (B) nel montaggio sulla stazione di attracco per le doppie installazioni. Installazione doppia: Connettere i collegamenti Y (2) tra la centralina del volante e le unità HCU, come da illustrazione (A). Collegare il cavo del segnale dal joystick al raccordo Y. Installazione tripla/quadrupla: Connettere i cavi (3) tra la centralina del volante e le unità TQI, come da illustrazione. Collegare il cavo del segnale (4) dal joystick alle unità TQI, come da illustrazione. Importante! Controllare che il meccanismo di blocco dei connettori elettrici si inserisca con il caratteristico “clic”. Ciò garantisce un collegamento corretto e stagno. 5. Al termine dell’installazione, occorre fare l’autoconfigurazione. Per ulteriori informazioni, vedi il manuale di installazione - EVC. N.B.! Installazione doppia: Se l’imbarcazione viene equipaggiata in un secondo momento con il Joystick IPS Volvo Penta, si dovrà ordinare e installare un nuovo software, prima di fare l’autoconfigurazione. L’esecuzione varia secondo la versione di EVC. Vedi il pragrafo “Installazione del nuovo software”. Installazione tripla/quadrupla: Non occorre installare un nuovo software. 6. Kalibrare il joystick. Vedi il paragrafo “Calibrazione del joystick”. Installazione del nuovo software EVC-B2 Andare a “VODIA website” e fare clic sul link “Kit di conversione”. Ordinare un kit accessorio per l’attivazione della funzione Joystick IPS Volvo Penta (ordinarne uno per ogni catena cinematica). Dopo aver fatta l’ordinazione, fare clic sul link “Programmazione centralina”. Scaricare il software e programmare i kit ordinati nelle centraline motore (ECU), nelle centraline della catena cinematica (PCU) e nelle centraline dei posti di pilotaggio (HCU) con l’ausilio di VODIA. Tutti i kit vanno scaricati e programmati come singoli “pacchetti” (un “pacchetto” per ciascuna unità). N.B.! Programmare tutte le unità (ECU, PCU e HCU). EVC-C Andare a “VODIA website” e fare clic sul link “Kit di conversione”. Ordinare un kit accessorio per l’attivazione della funzione Joystick IPS Volvo Penta (ordinarne uno per ogni catena cinematica). Dopo aver fatta l’ordinazione, fare clic sul link “Programmazione centralina”. Scaricare e programmare i kit ordinati nelle centraline della catena cinematica (PCU), con l’ausilio di VODIA. Tutti i kit vanno scaricati e programmati come singoli “pacchetti” (un “pacchetto” per ciascuna unità). N.B.! Programmare tutte le unità PCU. Taratura del joystick Y Nella modalità di attracco, l’imbarcazione viene manovrata tramite joystick. Controllare se il joystick ha bisogno di essere tarato, muovendolo in linea retta laterale e osservando il movimento dell’imbarcazione. Se la barca si muove nella stessa direzione, il joystick è tarato correttamente e non è necessario correggere la taratura. Se l’imbarcazione non si muove in direzione corrispondente a quella del joystick, è necessario eseguire la taratura. Tarare il joystick come segue. A N.B.- Per le istruzioni d’uso del joystick, vedere il manuale d’uso Volvo Penta IPS. N.B.- La taratura può essere fatta soltanto da una stazione con un joystick e pannelli di comando EVC (e non da una stazione docking) e va fatta solo in una direzione, babordo o dritta. AVVERTENZA! Durante la taratura del joystick l’imbarcazione deve trovarsi in mare aperto e in condizioni di sicurezza. Evitare di farlo con vento e/o correnti marine forti. 1. Attivare la modalità di attracco. Fare ���������������������������� riferimento alle istruzioni del manuale d’uso Volvo Penta IPS. B 2. Premere il pulsante di folle sul pannello comandi. Tenerlo premuto per circa 5 secondi. Un segnale acustico indica che il sistema si trova ora in modalità di taratura. I�� LED sopra il pulsante di folle iniziano a lampeggiare e il LED sopra il pulsante docking (Y) inizia a lampeggiare o resta acceso, a seconda della versione EVC che è installata. 3. Muovere il joystick lateralmente per tutta la sua escursione. Correggere il movimento inappropriato dell’imbarcazione girando e/o muovendo il joystick in base agli esempi da A a D. NOTA! Può essere attuale una combinazione dei suddetti esempi. NOTA! Far muovere la barca per tratti abbastanza lunghi, durante la taratura. Tenere il joystick in posizione. C 4. Quando l’imbarcazione si muove in linea retta in direzione laterale, premere il pulsante di attracco. La nuova taratura viene memorizzata e confermata da un segnale acustico. 5. Rilasciare il joystick. Il sistema torna in tal modo alla normale modalità di attracco. La taratura del joystick è ora completa. NOTA! È sempre possibile resettare la taratura, con la seguente modalità. 1. Attivare la modalità di attracco. D 2. Premere il pulsante di folle sul pannello comandi. Tenerlo premuto per circa 5 secondi. Un segnale acustico indica che il sistema si trova ora in modalità di taratura. I�� LED sopra il pulsante di folle iniziano a lampeggiare e il LED sopra il pulsante docking (Y) inizia a lampeggiare o resta acceso, a seconda della versione EVC che è installata. 3. Premere il pulsante di folle. La taratura è resettata e ciò viene confermato da un segnale acustico. 4. Il sistema torna in tal modo alla normale modalità di attracco. Denna sats innehåller: Benämning Joystick Y-koppling* Monteringsanvisning Antal Pos. i fig. 1 2 1 1 2 - * Används inte i trippel- eller kvadrupelinstallationer Installation och anslutning av joystick Viktigt! Volvo Penta IPS Joystick kan endast monteras i kombination med Volvo Penta IPS styrenhet för ratt och reglagespakar. Endast en joystick per körplats är möjligt. 1. Bestäm joystickens placering. Obs! Tänk på följande när du placerar joysticken: - Montera joysticken på en horisontell yta. - Tänk på körställningen. Se till att det finns utrymme för stöd av hand och underarm. - Se till att avståndet till övriga instrument och reglage är tillräckligt, så att deras funktionalitet inte påverkas. 2. Märk ut och ta upp hål för joystick (1). Skalenlig hålmall finns längst bak i denna monteringsanvisning. 3. Montera joystick på instrumentbrädan enligt figur. Tjockleken på instrumentbrädan får inte överstiga 25 mm. 4. Viktigt! Spara skyddslocket (A) som sitter på HCU-enhetens X8-uttag. Detta används för att skydda anslutningar som inte används, exempelvis rattanslutningen (B) vid installation på dockningsstation för dubbelinstallationer. Dubbelinstallation: Anslut Y-kopplingarna (2) mellan styrenheten för ratt och HCU-enheterna enligt figur. Anslut signalkabel från joystick till Y-kopplingen. Trippel/kvadrupelinstallation: Anslut kablarna (3) mellan styrenheten för ratt och TQI-enheterna enligt figur. Anslut signalkabel från joystick (4) till TQI-enheterna enligt figur. Viktigt! Se till att låsmekanismen mellan kontaktdonen sluts med ett klick. Det garanterar en vattentät och korrekt anslutning. 5. När installationen är klar måste en autokonfigurering göras. För mer information se installationshandboken - EVC Obs! Dubbelinstallation: Om båten utrustas med Volvo Penta IPS Joystick i efterhand måste ny mjukvara beställas och installeras innan autokonfigureringen görs. Tillvägagångssättet skiljer sig beroende på version av EVC. Se avsnitt ”Installation av ny mjukvara”. Trippel/kvadrupelinstallation: Ny mjukvara behöver ej installeras. 6. Kalibrera joysticken. Se avsnitt ”Kalibrering av joystick”. Installation av ny mjukvara EVC-B2 Gå i på ”VODIA website” och klicka på länken ”Ombyggnadssats”. Beställ en tillbehörssats för aktivering av funktionen Volvo Penta IPS Joystick (beställ en per drivlina). Efter att beställningen är genomförda klicka på länken ”Styrenhetprogrammering”. Ladda hem och programmera in beställda satser i motorstyrenheterna (ECU), drivlinestyrenheterna (PCU) och manöverplatsstyrenheterna (HCU) med hjälp av VODIA. Alla satser laddas hem och programmeras in som ett ”paket” (ett ”paket” för varje enhet). Obs! Programmera alla enheter (ECU:er, PCU:er och HCU:er). EVC-C Gå i på ”VODIA website” och klicka på länken ”Ombyggnadssats”. Beställ en tillbehörssats för aktivering av funktionen Volvo Penta IPS Joystick (beställ en per drivlina). Efter att beställningen är genomförda klicka på länken ”Styrenhetprogrammering”. Ladda hem och programmera in beställda satser i drivlinestyrenheterna (PCU) med hjälp av VODIA. Alla satser laddas hem och programmeras in som ett ”paket” (ett ”paket” för varje enhet). Obs! Programmera alla PCU:er. Kalibrering av joystick Y A När dockningsläget är aktiverat manövreras båten med joysticken. Kontrollera om joysticken behöver kalibreras genom att trycka joysticken rakt åt sidan och observera hur båten rör sig. Om båten rör sig rakt åt sidan är joysticken korrekt kalibrerad och ingen ny kalibrering behövs. Om båten inte rör sig enligt joystickens riktning behöver joysticken kalibreras. Kalibrera joysticken enligt följande. OBS! Se instruktionsboken för Volvo Penta IPS angående anvisningar om körning med joystick. OBS! Kalibrering kan bara göras från en manöverplats försedd med joystick och EVC-panel (inte från dockningsstation). Kalibreringen behöver bara göras i en riktning, babord eller styrbord. VARNING! När joysticken kalibreras måste båten köras på öppet vatten och under säkra förhållanden. Undvik blåsiga förhållanden och strömmar. 1. Aktivera dockningsläget. Se Instruktionsboken för Volvo Penta IPS. B 2. Tryck in neutralknappen på kontrollpanelen. Håll den intryckt i ca 5 sekunder. En ljudsignal indikerar att systemets kalibreringsläge är aktiverat. Kontrollamporna över neutralknappen börjar blinka och lampan över dockningsknappen (Y) börjar blinka eller tänds beroende på vilken version av EVC som är installerad. 3. Tryck joysticken så långt det går åt ena sidan. Korrigera båtens felaktiga rörelser genom att vrida och/eller flytta joysticken enligt bilderna i exempel A-D. OBS! Det kan förekomma kombinationer av exemplen som visas. OBS! Låt båten gå en ganska lång sträcka under kalibreringsrutinen. Håll joysticken på plats. C 4. När båten rör sig rakt åt sidan trycker du på dockningsknappen. Den nya kalibreringen lagras och bekräftas med en ljudsignal. 5. Släpp joysticken. Systemet är nu i normalt dockningsläge. Kalibreringen av joysticken är nu klar. OBS: Det går alltid att återställa kalibreringen enligt följande. 1. Aktivera dockningsläget. D 2. Tryck in neutralknappen på kontrollpanelen. Håll den intryckt i ca 5 sekunder. En ljudsignal indikerar att systemets kalibreringsläge är aktiverat. Kontrollamporna över neutralknappen börjar blinka och lampan över dockningsknappen (Y) börjar blinka eller tänds beroende på vilken version av EVC som är installerad. 3. Släpp neutralknappen . Kalibreringen återställs och det bekräftas med en ljudsignal. 4. Systemet är nu i normalt dockningsläge. SCALE 1:1 Important! Please check the dimensions before using this template. printers and copying machines can distort images. Importante: Compruebe las dimensiones antes de utilizar esta plantilla. Impresoras y copiadoras pueden distorsionar las imágenes. Wichtig! Abmessungen nachprüfen, da die Maße beim Ausdrucken oder Kopieren etwas verzerrt sein können. Importante! Si prega di controllare le dimensioni prima di impiegare questa dima. Stampanti e copiatrici potrebbero alterare le immagini. Important ! Veuillez vérifier les dimensions avant d’utiliser ce gabarit. Les imprimantes et les photocopieurs sont susceptibles de déformer les images. Viktigt! Kontrollera måtten innan den här mallen används. Skrivare och kopieringsmaskiner kan förvränga bilder. 7746259 07-2007 (Tab 6) AB Volvo Penta SE-405 08 Göteborg, Sweden