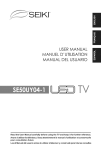
1
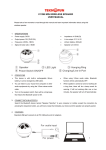
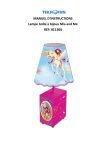
Caméra Vidéo
Manuel d’utilisation
Modèle 811225,811157,811221
1. Parts of the video recorder
1. Objectif
2. Microphone
3. LED Light
4. Self-Timer LED
5. Speaker
6. Bouton Power
7. T/Zoom in button
8. W/Zoom bouton out
9.
Bouton gauche/Self-timer
10. Bouton Shutter
11.
Up bouton/Display
12. USB jack
13. AV out jack
14.
Bouton droit/LED ON/OFF
15.
Bouton bas
1
16. Bouton MENU
17. Bouton OK validation
18. Bouton Mode
19. Ecran LCD
20. Fixation pieds
21. Emplacement SD carte
22. Trappe piles
2. Preparation de votre caméra
Installation de la batterie
1:
Ouvrir le verrou et retirez le couvercle de l’emplacement des piles.
2:
Insérez trois nouvelles piles AAA avec les positifs (+) et négative (-) en
3:
Fermer et verrouiller la porte des piles. Ouvrir l’écran LCD, appuyez
respectant bien les indicateurs à l'intérieur du compartiment piles.
sur le bouton POWER pendant 2 à 3 secondes pour allumer la
caméra.
2
Insérez la carte mémoire
Cet appareil possède une mémoire interne, il peut prendre quelques
photos et des clips vidéo. Si vous voulez prendre plus de photos et
enregistrer des vidéos, s'il vous plaît insérez la carte mémoire SD pour
enregistrer et stocker des clips vidéo ou des images.
1. Éteignez l'enregistreur (si l'enregistreur est activé) en appuyant sur le
bouton d'alimentation avant d'insérer ou de retirer la carte SD.
2. Repérez l'emplacement de la carte sur base de la caméra. Tirer avec
les ongles pour soulever et s'ouvrir le caoutchouc de protection de la
carte SD et insérez la carte SD, comme illustré. Orientez la carte en
fonction de la marque d'identification et d'insertion.
3
3. Appuyez sur la carte jusqu'à ce que la carte est entièrement insérée
et verrouillée.
La carte mémoire SD a un verrou commutateur de protection qui
protège les données stockées ne soient accidentellement supprimés réglez le commutateur de protéger à la
non - position verrouillée pour prendre
et stocker nouveles images..
4. Pour la sortir; presser sur la carte
SD.
•
Ne pas insérer un autre objet que
une carte mémoire SD/SDHC
dans l’emplacement de la carte mémoire.
• Garder la camera éteinte sur OFF lorsque vous insérez ou enlevez
une carte mémoire.
• In case a defective SD card is inserted into the camera, the camera
reads the card and then ‘Card Error’ message is displayed on LCD for
a few seconds. Then the camera shuts down automatically. Replace
SD card. Dans le cas d'une carte SD défectueuse insérée dans
l'appareil, la caméra lit la carte et le message "Erreur carte", s'affiche
4
sur l'écran LCD pendant quelques secondes. Puis la caméra s'arrête
automatiquement. Remplacer la carte SD.
Format de carte mémoire
S'il vous plaît formater la carte SD si elle est nouvelle ou si elle a été
utilisée avec un autre appareil. Télécharger des fichiers importants sur
votre ordinateur avant de formater que le formatage effacera toutes les
données de la carte SD.
1:
Allumer l'appareil (lorsque la carte SD est insérée), appuyez sur le
bouton MENU pour afficher le menu, puis appuyez sur le bouton
DROIT pour sélectionner
2:
[Setup] menu.
Presser UP ou DOWN bouton pour localiser [Format.] puis appuyez
sur le bouton OK ou DROITE pour lancer le sous-menu.
3:
Presser UP ou DOWN bouton pour sélectionnier [YES] et presser OK
pour formatter la carte.
Sélectionner la langue
Vous pouvez sélectionner jusqu’à 7 langues, suivre la procédure ci5
dessous:
1:
Mettre sur ON, aller dans MENU, presser bouton RIGHT pour
2:
Presser UP ou DOWN pour aller dans [Language] presser OK ou
sélectionner
[Setup] menu.
RIGHT pour sélectionner le sous menu.
3:
Presser UP ou DOWN pour sélectionner la langue que vous souhaitez
et presser OK pour confirmer.
4:
Presser MENU pour fermer le menu.
Régler la date et l’heure
1:
Allumer la camera sur ON, presser MENU, et presser sur le bouton
RIGHT sélectionner le menu
2:
[Setup].
Presser UP ou DOWN bouton pour localiser [Date et heure ...] puis
appuyez sur le bouton OK ou DROITE pour lancer le sous-menu.
3:
Appuyez sur le bouton HAUT ou BAS pour changer la valeur en
surbrillance.
Appuyez
sur
le
bouton
GAUCHE ou DROITE pour déplacer le
curseur entre les réglages.
4: Appuyez sur le bouton OK pour confirmer
6
le réglage.
5:
Appuyez sur le bouton MENU pour fermer le menu
Affichage à l’écran
Mode vidéo
7
Mode photo
Mode relecture
8
Bouton Up / Affichage (partie 11) - Appuyez sur ce bouton d'affichage une
fois en mode vidéo ou en mode capture pour afficher l'image en direct (pas
d'icônes visible), appuyez sur le bouton à nouveau pour effacer l'écran,
puis appuyez à nouveau pour restaurer écran original avec des icônes .
3. Utiliser l’enregistrement de vidéo
Appuyer sur enregistrement ON et OFF
1.
Appuyez sur le bouton POWER pendant 2 à 3 secondes pour
allumer l'enregistreur vidéo.
2. Appuyez sur le bouton POWER pour éteindre l'enregistreur.
Pour économiser la batterie, l'enregistreur s'éteint automatiquement après
un court laps de temps si aucun bouton n'a été activé. Appuyez sur le
bouton POWER pour allumer l'appareil photo sur ON. Vous pouvez
changer le délai de mise en OFF en réglant la fonction [Power Save] dans
le menu Configuration.
9
Changer de MODE
Votre caméra vidéo dispose de trois modes sélectionnables: Vidéo, de
capture et de mode de lecture.
1.
Appuyez sur le bouton POWER et la caméra devient active et mis en
Video Recording Mode (default mode).
2.
Presser le bouton MODE pour sélectionner le mode Capture pour
3.
Presser pour sélectionner le Mode Playback.
prendre des photos.
The icons – displayed on the LCD screen – will identify selected Mode.
Display
Title
Description
Mode Vidéo
Enregistrer une vidéo.
Mode photo
Prendre des photos.
Mode lecture
Visualiser les photos ou vidéos.
Enregistrer une vidéo
1:
Allumez la caméra et la mettre en mode d'enregistrement vidéo.
10
Utilisez l'écran LCD pour cadrer la scène enregistrée.
2:
Appuyez sur le bouton de l'obturateur pour démarrer l'enregistrement.
Appuyez sur le bouton UP pour Pause et appuyez de nouveau pour
continuer. Appuyez sur le bouton droit pour activer la lumière LED pour
éclairer l'objet si nécessaire. Appuyez à nouveau pour éteindre.
3:
Appuyez sur le bouton de l'obturateur pour arrêter l'enregistrement. Si
la mémoire est pleine de la caméra vidéo s'arrêtera automatiquement.
• L'écran LCD affiche le temps écoulé de la vidéo enregistrée.
PRENDRE DES PHOTOS
1:
Allumez sur ON.
2:
Réglez le caméra en mode de capture, l'icône
, apparaît sur
l'écran LCD.
3:
Utilisez l'écran LCD pour cadrer votre sujet.
4:
Tenir la caméra vidéo stable et appuyez sur le déclencheur pour
prendre une photo. Appuyez sur le bouton droit pour activer la lumière
LED pour éclairer l'objet si nécessaire. Appuyez à nouveau pour
éteindre
11
• Le numéro affiché sur l'écran LCD diminue avec chaque photo prise.
•
Lorsque le «Memory Full" s'affiche sur l'écran LCD pas plus de photos
peuvent être prises, remplacer la carte SD ou transférer des images
stockées dans l'ordinateur.
• Assurez-vous que vos doigts ne couvrent pas l'objectif pendant
l'enregistrement vidéo ou de prendre des images fixes.
• Ne pas retirer la carte mémoire ou les piles lorsque l'appareil photo
est de sauver l'image, sinon les données seront endommagées.
Utilisation du retardateur et du mode rafale
Lorsque le retardateur est réglé et activé, la caméra sera automatiquement
en mode photo après la temporisation sélectionnée. Utilisez le mode rafale
pour prendre des photos en continu.
1:
Allumer l'appareil, et réglez la caméra vidéo pour le mode Capture.
2: Appuyez sur le bouton GAUCHE pour sélectionner les options
12
Retardateur, voir les icônes et les informations affichées dans le coin
supérieur gauche sur l'écran LCD.
2 secondes: L'appareil prend des photos avec 2 secondes de retard
10 Secondes: L'appareil prend des photos avec 10 secondes de
retard
Continu: Appuyez sur le bouton de l'obturateur une fois pour prendre
trois photos consécutives.
3: Presser le bouton SHUTTER pour prendre une photo.
• Vous pouvez également définir le retardateur en mode (rafale)
instantané à partir du menu Capture.
Utilisation de la fonction Zoom
Cet appareil possède une fonction de zoom numérique qui vous permet de
zoomer (Télé) ou zoom arrière (grand) des sujets ou la scène enregistrée.
1: Mettez l'appareil en mode enregistrement vidéo ou en mode photo.
2: Appuyez sur les touches T ou W pour composer la scène.
13
T: zoom avant pour téléobjectif.
W : dézoomer pour une prise en grand angle.
4. Utilisation du menu en mode d'enregistrement
Menu en mode vidéo
Allumez le magnétoscope et le mettre en
mode d'enregistrement vidéo.
1:
Appuyez sur le bouton MENU pour
afficher le menu.
2:
Utilisez le bouton HAUT ou BAS pour choisir dans le menu
3:
Appuyez sur le bouton OK ou DROITE pour entrer dans le sous-menu.
4:
Utilisez le bouton HAUT ou BAS pour sélectionner le réglage désiré.
5:
Appuyez sur le bouton OK pour confirmer le réglage.
6:
Appuyez sur le bouton MENU pour fermer le menu.
7:
14
Menu
Fonction
Vidéo
Sélectionner la basse résolution (basse résolution)
Taille
pour enregistrer plus longtemps. Il y a 3 choix:
720x480/640x480/320X240.
Résolution
Sélectionner basse pour enregistrer plus longtemps.
2 choix: High/ Low.
Durée
Fixer la durée.
Balance
Régler la balance
Menu mode capture
1: Allumez le magnétoscope et le mettre en
mode capture.
2: Appuyez sur le bouton MENU pour afficher le
menu.
3: Utilisez le bouton HAUT ou BAS pour choisir élément de menu souhaité.
4: Appuyez sur le bouton OK ou DROITE pour entrer dans le sous-menu.
5: Utilisez le bouton HAUT ou BAS pour sélectionner l'élément souhaité.
6: Appuyez sur le bouton OK pour confirmer le réglage.
15
7: Appuyez sur le bouton MENU pour fermer le menu.
Menu
Menu item
Resolution
Fonction
Il y a 5 options:
[4000X3000]/[2592X1944]/[2048X1536]/1280x960/
/[640X480]
Qualité
Sélectionnez une qualité d'image inférieure pour réduire la
taille de l'image et ainsi de capturer plus d'images. Il ya
trois options à choisir:[Super Fine] /[Fine] /[Normal].
Mesure
Modifier la méthode de mesure pour modifier la luminosité
de l'image.
[Centre]: L'exposition sera basée sur la lumière dans
la zone centrale.
[Multi]: L'exposition sera basée sur la lumière
moyenne.
Ce paramètre est adapté pour une utilisation
générale.
[Spot]: L'exposition sera mesurée sur la base
uniquement sur place dans le centre de la scène
Exposition
En conditions ambiantes inhabituelles telles que la lumière
16
intérieure indirecte, les arrière plans sombres, et fort
contre-jour, vous pouvez définir la valeur d'exposition
manuellement. La valeur d'exposition
peut être réglé dans la gamme de -2,0 à 2,0.
Mode
Sélectionnez cette option et réglez l'appareil à des modes
photo
différents:
Off / retardateur 2S / retardateur 10S / rafale
Effect
Sélectionnez cette option pour modifier la tonalité des
images:
Normal / B & B / Sépia / Négatif / Rouge / Vert / Bleu
Date
Cette fonction peut être utilisée pour inclure une date sur
votre photo. Il y a 3 options:
[Off]: Aucune date.
[Date]: Inclure une date sur la photo.
[Date& Time]: Inclure une date et une heure.
17
Menu de configuration / réglage interne
Ajustez les paramètres du système dans le menu de configuration.
1: Allumer l'appareil et appuyez sur le bouton MENU pour afficher le
menu.
2: Appuyez sur le bouton DROIT pour sélectionner [Configuration].
3: Utilisez le bouton HAUT ou BAS pour localiser un article.
4: Appuyez sur le bouton OK ou DROITE pour entrer dans le sousmenu.
5: Utilisez le bouton HAUT ou BAS pour sélectionner l'élément
souhaité.
6: Appuyez sur le bouton droit de choisir On ou Off et le bouton OK
pour confirmer le réglage.
7: Appuyez sur le bouton MENU pour fermer le menu.
Menu item
Son
Fonction
Il ya quatre paramètres à choisir:
[Shutter]: Réglez le son de l'obturateur ou le désactiver
18
en appuyant sur le bouton DROIT.
[Start-up]: Réglez le son de démarrage ou le désactiver
en appuyant sur le bouton DROIT.
[Bip]: Réglez le bruit de fonctionnement ou le désactiver
en appuyant sur le bouton DROIT.
[Volume]: Réglez le volume sonore en appuyant sur le
bouton DROIT.
Power
La fréquence devrait être réglé à 60Hz ou 50Hz pour
Fréquence
correspondre à l'alimentation locale. [50Hz] / [60Hz].
Economie
Pour
d’énergie
automatiquement sur OFF après selection de la période:
économiser
vos
piles
l’appareil
se
met
[1min.] / [3min.] / [5min.].
Date
&
Sélectionner la date & l’heure.
Heure
Language
Régler language.
TV Out
TV Out peut être en NTSC ou PAL vérifier votre région
signal: [NTSC] /[PAL].
USB
Vous pouvez utiliser l'enregistreur comme une caméra
19
PC ou un disque amovible. Sélectionnez [MSDC]: à
utiliser comme disque amovible.
Sélectionnez [PCCAM]: à utiliser comme caméra PC
Format
Format SD card.
Réinitialiser
Réinitialiser l'intégralité du menu et les paramètres de
fonctionnement bouton sur le défaut initial. [Oui] / [Non].
Auto
Régler le temps de visualization après avoir pris une
visualisation
photo. Il y a trois options: [Off]/ [1sec.]/ [3 sec.].
Classement
Vous pouvez classer vos photos favorites.
des photos
[System]: Utiliser mode default.
[My image]: Classer vos photos favorites.
5. LECTURE
Lecture des images fixes
1:
Mettez l'enregistreur et ensemble en mode de lecture. Le dernier
fichier enregistré s'affiche sur l'écran LCD. S'il n'y a pas d'images
stockées, un message [Aucun fichier] apparaît.
2:
Appuyez sur les touches GAUCHE ou DROITE pour parcourir les
20
images précédentes ou suivantes.
Lecture des clips vidéo
En mode de lecture, lorsque vous parcourez les enregistrements stockés,
vous pouvez trouver vos clips vidéo enregistrés, ils sont marqués avec
l'icône
indiqué dans le coin inférieur gauche de l'écran LCD.
1: Appuyez sur le bouton GAUCHE ou DROITE pour sélectionner les clips
que vous souhaitez lire.
2: Appuyez sur le bouton OK ou sur l'obturateur pour commencer à
enregistrer. Appuyez sur le bouton de l'obturateur ou MENU pour arrêter la
lecture. Appuyez sur le bouton UP pour faire une pause et appuyez de
nouveau pour continuer. Appuyez sur le bouton droite pour avancer
rapidement et appuyez sur le bouton GAUCHE pour revenir en arrière.
Autres fonctions en mode lecture
Affichage des fichiers de taille vignette
21
Appuyez sur la touche W / bouton de zoom arrière pour voir le fichier en
mode miniature. Utilisez les touches HAUT, BAS, GAUCHE, DROITE pour
sélectionner un fichier. Appuyez sur le bouton OK pour voir le fichier en
plein écran.
Verrouillage des fichiers
1: Appuyez sur le bouton MENU en mode lecture.
2: Appuyez sur le bouton HAUT ou BAS pour localiser l'élément [Lock].
3: Appuyez sur le bouton OK ou DROITE pour entrer dans le sous-menu.
4: Utilisez le bouton HAUT ou BAS pour sélectionner l'option: [Lock /
Unlock One]: Verrouillage
/ Déverrouiller fichier actuel. [Tout verrouiller]: Verrouiller tous les fichiers.
[Débloquer tous]: Unlock
tous les fichiers.
5: Appuyez sur le bouton OK pour confirmer le réglage. Une boîte de
dialogue apparaîtra. Utilisation de boutons HAUT ou BAS pour
sélectionner l'élément [Oui].
6: Appuyez sur le bouton OK pour verrouiller / déverrouiller le fichier actuel
ou tous les fichiers.
22
7: Appuyez sur le bouton MENU pour quitter tant que de besoin.
• L’icône s'affiche sur l'écran LCD si le fichier a été verrouillé. Le fichier
verrouillé ne peut pas être supprimé - à moins que "non-verrouillé."
Supprimer des fichiers
1: Appuyez sur le bouton MENU en mode lecture.
2: Appuyez sur le bouton HAUT ou BAS pour sélectionner l'élément
[Supprimer].
3: Appuyez sur le bouton OK ou DROITE pour entrer dans le sous-menu.
[Une]: Supprimer le fichier actuel. [Tous]: Supprimez tous les fichiers sauf
les fichiers verrouillés.
4: Utilisez le bouton HAUT ou BAS pour sélectionner l'élément.
5: Appuyez sur le bouton OK pour confirmer le réglage. Une boîte de
dialogue apparaîtra.
Diaporama d'images fixes
1: Appuyez sur le bouton MENU en mode lecture.
2: Appuyez sur le bouton HAUT ou BAS pour localiser l'élément
[Diaporama].
23
3: Appuyez sur le bouton OK ou DROITE pour entrer dans le sous-menu.
[Début]: Sélectionnez cette option pour lancer le mode diaporama.
[Intervalle]: Réglez l'intervalle de temps en appuyant sur le bouton
GAUCHE ou DROITE. L'intervalle de temps pourrait être réglé de 1
seconde à 10 secondes.
[Répéter]: Appuyez sur le bouton GAUCHE ou DROITE pour régler la
fonction diaporama en ON ou OFF.
4: Utilisez le bouton HAUT ou BAS pour sélectionner [Start].
5: Appuyez sur le bouton OK spectacle début diapositive.
6: Appuyez sur le bouton MENU pour mettre fin à diaporama.
• Seules les images fixes peuvent être présentées comme le diaporama.
Effet
1: En mode Lecture, sélectionner et d'afficher la photo que vous voulez
changer la tonalité de couleur. Appuyez sur le bouton MENU.
2: Appuyez sur le bouton HAUT ou BAS pour sélectionner le [Effet].
3: Appuyez sur le bouton OK ou DROITE pour entrer dans le sous-menu:
[B & W], [Sépia], [négatif], [Rouge], [Vert], [Bleu], [binariser], [Sunset],
[chaud], [ froide], [Contraste].
24
4: Appuyez sur le bouton HAUT ou BAS pour sélectionner une tonalité de
couleur effet changeant de l'image.
5: Appuyez sur le bouton OK pour confirmer le réglage. Une photo en
double avec la tonalité de couleur désirée sera créé et stocké dans la
carte SD.
6: Appuyez sur le bouton MENU pour quitter tant que de besoin
Faire pivoter l'image
1: Sélectionnez une image que vous souhaitez faire pivoter en mode de
lecture.
2: Appuyez sur le bouton MENU pour afficher le menu.
3: Appuyez sur le bouton HAUT ou BAS pour sélectionner l'élément
[Rotation].
4: Appuyez sur le bouton OK ou DROITE pour lancer le sous-menu:
Rotation: Chaque fois que le bouton OK est pressé l'image pivote de 90 °.
Enregistrer: Sélectionnez cette option pour enregistrer l'image pivotée.
Sauvegardez: Sélectionnez cette option pour fermer le sous-menu.
Redimensionner
25
1: Sélectionnez une image que vous souhaitez redimensionner en mode
de lecture.
2: Appuyez sur le bouton MENU pour afficher le menu.
3: Appuyez sur le bouton HAUT ou BAS pour sélectionner l'élément
[Redimensionner].
4: Appuyez sur le bouton OK ou DROITE pour lancer le sous-menu:
2048x1536 / 1280x960 / 640x480.
5: Appuyez sur le bouton HAUT ou BAS pour sélectionner l'élément.
6: Appuyez sur le bouton OK pour enregistrer l'image redimensionnée.
• L'image ne peut être redimensionnée qu'à une taille plus petite.
Ajouter un mémo vocal à l'image
1: En mode de lecture sélectionnez une image à laquelle vous souhaitez
ajouter Mémo vocal.
2: Appuyez sur le bouton MENU pour afficher
le menu.
3: Appuyez sur le bouton HAUT ou BAS pour
sélectionner l'élément [Mémo vocal ...].
26
4: 4 :Appuyez sur le bouton OK ou droit pour afficher la boîte de dialogue
à titre d'illustration.
5: Sélectionnez l'élément [Ajouter], puis appuyez sur le bouton OK ou sur
l'obturateur pour démarrer un mémo vocal d'enregistrement.
6: Appuyez sur le bouton de l'obturateur pour terminer l'enregistrement.
7: Pour écouter le son, sélectionner la photo souhaitée avec l'icône de
microphone et appuyez sur le bouton OK / SHUTTER.
• Pour supprimer le mémo vocal s'il vous plaît suivez les étapes ci-dessus
2, 3, 4 et quand la boîte de dialogue s'affiche, sélectionnez "Supprimer"
puis appuyez sur le bouton OK ou SHUTTER pour supprimer (supprimer)
la note de l'image.
Configurez l'image comme l'image de démarrage
1: Sélectionnez une image que vous préférée en mode de lecture.
2: Appuyez sur le bouton MENU pour afficher le menu.
3: Appuyez sur le bouton HAUT ou BAS pour sélectionner l'élément
[Première image].
4: Appuyez sur le bouton OK ou DROITE pour lancer le sous-menu: Set /
Annuler.
27
5: Appuyez sur le bouton HAUT ou BAS pour sélectionner l'élément [Set].
6: Appuyez sur le bouton OK pour confirmer le réglage.
7: Réglez l'option [Première image] dans le menu de configuration pour
[Mon image] mode.
Utiliser l'image que vous avez sélectionné en tant que start-up Image.
Imprimez l'image
1: Sélectionnez une image que vous souhaitez imprimer en mode de
lecture.
2: Appuyez sur le bouton MENU pour afficher le menu.
3: Appuyez sur le bouton HAUT ou BAS pour sélectionner l'élément
[Imprimer ...].
4: Appuyez sur le bouton OK pour entrer dans l'interface d'impression.
5: Connectez la caméra vidéo et l'imprimante via le câble USB.
6: Appuyez sur le bouton OK pour lancer l'impression.
6. Connecter
Raccordement de l'enregistreur vidéo à un téléviseur
Vous pouvez connecter la caméra à la télévision, puis afficher toutes les
28
images et la vidéo enregistrée sur grand écran de télévision!
1. Connectez l'enregistreur à un téléviseur à l'aide fournie AV / TV par
câble.
2. Allumez le téléviseur et l'appareil; mettre le téléviseur en mode AV
INPUT, réviser le manuel de votre téléviseur si nécessaire.
3. Lorsque l'enregistreur est réglé en mode d'enregistrement, vous pouvez
prévisualiser les sujets que vous souhaitez enregistrer sur l'écran du
téléviseur.
4. En mode Lecture, toutes les photos et clips vidéo stockés dans la
caméra peuvent être examinés et lus sur l'écran du téléviseur.
Lorsque le téléviseur est connecté, l'écran LCD devient vide caméras et
l'écran du téléviseur devient le moniteur pour votre appareil photo.
Raccordement de l'enregistreur vidéo à un PC en utilisant
le câble USB
1: Sélectionnez l'option USB dans le menu Configuration, puis
sélectionnez le mode de réglage MSDC. Eteignez l'appareil photo.
2: Ouvrez le couvercle USB à l'arrière de l'enregistreur. Insérez le câble
29
USB fourni au port USB prise et branchez l'autre extrémité à l'ordinateur
port USB.
3: Allumez l'enregistreur. Le message «MSDC» s'affiche sur l'écran LCD
lorsque la connexion à l'ordinateur a été complété.
4: Ouvrez le "Poste de travail" et sélectionnez le "disque amovible" qui
représente votre appareil photo. Double-cliquez sur le "disque amovible"
icône pour afficher son contenu, puis ouvrez le dossier «DCIM» qui
contient votre vidéo tous stockés et encore des fichiers images.
5: des photos d'examen et de copie ou de fichiers vidéo dans votre
ordinateur. Télécharger la vidéo et des images fixes sur votre ordinateur
avant de jouer en arrière.
Sinon insérer la carte mémoire dans un lecteur de carte pour télécharger
des fichiers.
Utilisation d'un lecteur de carte
1: Éjecter la carte mémoire de l'enregistreur et insérezla dans un lecteur de carte connecté à un ordinateur.
30
2: Ouvrez [Poste de travail] ou [Windows Explorer] et double-cliquez sur
l'icône du disque amovible qui représente la carte mémoire.
3: Copier des images de la carte dans le répertoire sélectionné / stockage
à l'intérieur de votre ordinateur.
7. Installation du sofware
Installer le Software
Le CD du logiciel livré possède le pilote et les logiciels qui viennent avec
une caméra vidéo.
Insérez le CD dans votre lecteur de CD-ROM. Le menu autorun apparaît:
Liste des softwares sur le CD:
31
• Installer le Driver: software pour la camera sur PC.
. Manuel : Ouvrir le fichier
• Installer MAGIX Video easy SE- software pour vidéo.
• Installer MAGIX Photo Manager 10 - software pour photos.
Insérez Le CD dans Votre Lecteur de CD-ROM. Le menu d'exécution
automatique apparait:
Si le menu d'exécution automatique n'apparaît pas automatiquement,
ouvrez le CD-ROM dans [My Computer] ou [Explorateur Windows] et
double-cliquez sur le fichier nommé [start.exe] pour démarrer le
programme. Vous pouvez également cliquer sur [Exécuter] dans le menu
de démarrage de Windows, entrez "D: \ start.exe" (où D est la lettre du
lecteur de CD-ROM) dans la zone de texte, puis cliquez sur [OK].
notes:
1.Ouvrez MAGIX Vidéo facile SE ou MAGIX Photo Manager 10, vous
devez enregistrer le logiciel dans un premier temps, puis utiliser le
programme sans aucune limite de temps.
2. Ne pas oublier d'installer le lecteur QuickTime lors de l'installation de
32
MAGIX Easy Video SE.
3. MAGIX Vidéo Easy SE et MAGIX Photo Manager 10 ne comprennent
que
Windows XP et Windows Vista, Windows 7 plates-formes.
Configuration requise pour Magix Video Easy SE:
► Intel ® Pentium 4 ou AMD ® Athlon ® 1 GHz et supérieur
► 512 Mo de RAM
► 400 Mo de mémoire libre sur le disque dur et un lecteur DVD pour
l'installation du programme
Magix Photo Manager 10:
. Carte graphique avec une résolution d'écran d'au moins 1024 x 768
► Carte son
Appareils compatibles:
Vidéo ►, TV, ou les cartes graphiques avec entrée vidéo.
Magix Photo Manager 10:
► Microsoft ® Windows ® XP Vista ® I I 7. PC avec processeur Intel ® ®
Pentium ou
33
AMD ® Athlon ® 700 MHz ou supérieur
► 256 Mo de RAM, 120 Mo d'espace disque dur pour les fichiers
programme
► Carte graphique SVGA avec min. 4 Mo de RAM, (min. résolution 1024 x
600,
16-bit de haute couleur)
► souris compatible Microsoft ®.
Driver installation
1: Clicker sur [Install Driver] sur menu autorun.
2: Suivre les instructions à l’écran.
Comment utiliser la fonction caméra pour
PC
1: Installer le pilote de la caméra PC. Pilote installé va créer l'icône du
programme sur le bureau de l’ordinateur
2: Tournez enregistreur et sélectionner le menu [USB] dans le menu
34
Configuration, puis sélectionnez [PCCAM] option pour régler l'appareil pour
le mode PC Cam. Connectez l'enregistreur à l'ordinateur avec le
connecteur USB. Exécutez le programme AMCAP sur le bureau. Lorsque
vous utilisez cette fonction pour la première fois s'il vous plaît sélectionner
<Aperçu> comme indiqué sur l'illustration. Maintenant, vous pouvez utiliser
votre caméra comme la fonction de PC web cam.
Si vous souhaitez modifier la taille des photos, sélectionnez Pin> capture
<video de changer le format de sortie.
8. Résolution problèmes
Pas de d’énergie
1.Mauvaise installation des piles.
35
★
Reinstaller
les
piles
correctement.
2.Manque de charge
★ Remplacer les piles.
Camera ne prend pas d’image.
1. Mémoire pleine.
★Insérer nouvelle carte mémoire.
2. Carte mémoire non formatée.
★Formater la carte ou la changer.
L’Image est floue.
1. La camera n’était pas stable
★Bien tenir la camera stable au
au moment de l’enregistrement.
moment de la prise de vue.
L’image n’est pas affichée sur l’écran
1. Une carte mémoire avec des
★ Cette caméra vidéo ne peut
images prises sur un autre
appareil est chargé
pas afficher les images prises
sur un autre appareil.
Les images ne sont pas sauvegardées dans la mémoire.
1. Enregistreur vidéo a été
désactivé avant que les
images soient sauvegardées
36
Si la piles sont faibles
apparaît indicateur remplacez
les piles immédiatement.
★
9. Specifications techniques
Video
Résolution
D1 720x480, 640x480, QVGA 320x240 pixels
Image
12MP(4000x3000, Interpolated);5MP(2592x1944);
résolution
3MP(2048x1536);1MP(1280x960);VGA(640x480);pixels
Taille d’écran
2.0" TFT Color LCD
Focus
5 feet (1.5M)~ infinity
Aperture
F3.0, f=7.0mm. Fixed Focus
Shutter
Auto Electronic Shutter: 1/2000 ~ 1/2sec.
Balance blanc
Auto / Lumière du jour / Couvert / lumineux / Bulb/
brillant
Digital zoom
4x
Exposure
control
Auto et Manuel: -2EV to +2EV in 0.3 steps
Burst mode
3 consecutive shots captured
Photo effect
Normal/ B&W/ Sepia / Negative/ Red/ Green/ Blue
37
Self-timer
2 or 10 second time delay options
Internal memory: 32M
Mémoire
External memory card slot: Accepts up to 8GB SD /
SDHC card (not supplied)
Système TV
NTSC / PAL selectable
Energie
Trois (3) AAA alkaline 1.5V piles (non incluses)
Température
Operating: 0° C to 40° C
Storage: -20 to 60° C
Microphone
Built-in
Speaker
Built-in
Note: La conception du produit et les spécifications sont sujettes à
changement sans préavis.
2. System requirements:
Windows 2000/ XP/ Vista/ 7
CPU: Pentium III 800MHz and above
Memory:512 MB and upper memory
Disk space:At least 128 MB free space
38
WARNING
1. Avant d'utiliser votre appareil photo pour prendre des photos, s'il
vous plaît essayer quelques photos pour vérifier que l'appareil
fonctionne bien ou non. Nous ne sommes pas responsables de la
perte d’images ou vidéos résultant de la défaillance de l’appareil.
2. Utilisation de votre appareil photo quand il est l'organe
d'électricité statique de puissance de votre appareil photo peut ou
arrêter PC-CAM, ne redémarrez-le et la caméra fonctionne à
nouveau.
ALL RIGHTS RESERVED © 2012 TEKNOFUN
Fabriqué en Chine – Made in China.
Adobe and Reader are either registered trademarks of Adobe Systems Incorporated
in the United States and/or other countries.
Service consommateurs:[email protected]
39
Video Recorder
User Manual
Model 811157,811221,811225
1. Parts of the video recorder
1. Lens
2. Microphone
3. LED Light
4. Self-Timer LED
5. Speaker
6. Power button
7. T/Zoom in button
8. W/Zoom out button
9.
Left button/Self-timer
10. Shutter button
11.
Up button/Display
12. USB jack
13. AV out jack
14.
Right button/LED ON/OFF
15.
Down button
1
16. MENU button
17. OK button
18. Mode button
19. LCD screen
20. Tripod socket
21. SD card slot
22. Battery cover
2. Preparing for using
Installing the Battery
1:
Open latch and remove the battery door.
2:
Insert three fresh AAA-size batteries with the positive (+) and negative
(-) terminals matching the indicators inside the battery compartment.
3:
Slide in and latch the battery door closed. Open LCD cover , press the
POWER button for 2 to 3 seconds to turn ON video recorder.
2
Inserting the Memory Card
This camera has an internal memory, it can take a few pictures and video
clips . If you want to take more pictures and video record, please insert SD
Memory Card to record & store video clips or images.
1. Turn OFF recorder (if recorder is activated) by pressing Power button
before inserting or removing SD card.
2. Locate the card slot on camera base. Grip with fingernail to lift and
swing open the SD card slot rubber cover and insert the SD card as
illustrated. Orient the card according to identification mark and insert.
3. Press the card down until the card is fully inserted and latched.
The SD memory card has a LOCK protect switch which protects stored
data from being accidentally deleted - set the protect switch to the not LOCKed position for taking and store any new records.
3
4. To remove; press SD card down,
then it
will pop up and can be easily
removed.
•
Do not insert any other object
except the SD/SDHC memory card into the camera SD card slot.
• Keep the camera turned OFF while inserting or removing the SD
card.
• In case a defective SD card is inserted into the camera, the camera
reads the card and then ‘Card Error’ message is displayed on LCD for
a few seconds. Then the camera shuts down automatically. Replace
SD card.
Format the memory card
Please format the SD card if it is new or if it was used with another device.
Download important files to your computer before formatting as the
formatting will erase all data from the SD Card.
1:
Turn the power ON (when SD card is inserted), press the MENU
button to display the menu, and then press the RIGHT button to select
4
[Setup] menu.
2:
Press the UP or DOWN button to locate [Format.] then press the OK
or RIGHT button to launch the submenu.
3: Press the UP or DOWN button to select the item [YES] and then press
the OK button to execute formatting the card.
Setting the Language
You have an option to select from choice of seven the Language used for
displayed commands and information; follow below steps if required:
1:
Turn the power ON, press the MENU button to display the menu, and
2:
Press the UP or DOWN button to locate [Language] then press the
press the RIGHT button to select
[Setup] menu.
OK or RIGHT button to launch the submenu.
3:
Press the UP or DOWN button to select the desired language and then
press the OK button to confirm the setting.
4:
Press the MENU button to close the menu.
5
Setting the date and time
1:
Turn the power ON, press the MENU button to display the menu, and
press the RIGHT button to select
2:
[Setup] menu.
Press the UP or DOWN button to locate [Date & Time…] then press
the OK or RIGHT button to launch the submenu.
3:
Press the UP or DOWN button to change the highlighted value. Press
the LEFT or RIGHT button to move the
cursor between settings.
4: Press the OK button to confirm
the setting.
5:
Press the MENU button to close the menu.
Screen display
6
Video mode
7
Capture mode
8
Playback mode
Up Button/Display (part 11) – Press this display button once in video
mode or Capture mode to display live image (no icons will be visible), press
button again to blank the screen and then press again to restore original
bright screen with icons.
3. Using your video recorder
Turning the recorder ON and OFF
1.
Press the POWER button for 2 to 3 seconds to turn ON video
recorder.
2.
Press the POWER button again to turn OFF the recorder.
To save battery power, the recorder automatically turns off after a short
9
period of time if no button has been activated. Press the POWER button to
power the camera back ON. You can change the power-OFF time by
setting the function [Power Save] in the Setup menu.
Change the MODE of the recorder
Your video camera has three selectable modes: Video, Capture and
Playback mode.
1.
Press the POWER button and the camera will become active and set
in Video Recording Mode (default mode).
2.
Press the MODE button once to select the Capture mode for taking
still pictures.
3.
Press it again to select the Playback Mode.
The icons – displayed on the LCD screen – will identify selected Mode.
Display
Title
Description
Video mode
Recording video clips.
Capture mode
Taking still photos.
Playback mode
Preview photos and video clips.
10
Recording video clip
1:
Turn on the video recorder and set it to Video recording mode. Use the
LCD screen to frame the recorded scene.
2:
Press the SHUTTER button to start recording. Press the UP button to
Pause and press it again to continue. Press right button to turn ON
LED light to brighten subject if needed. Press again to turn OFF
3:
Press the SHUTTER button again to stop recording. If the memory is
full the video camera will stop recording automatically.
• The LCD monitor will display the elapsed time of recorded video.
Taking still images
1:
Turn ON the video recorder.
2:
Set the video recorder to capture mode, the icon
appears on the
LCD screen.
3:
Use the LCD screen to frame your subject.
4:
Hold the video recorder steady and press the SHUTTER button to take
a picture. Press right button to turn ON LED light to brighten subject if
needed. Press again to turn OFF
11
•
The number displayed on the LCD screen will decrease with each
picture taken.
•
When the “Memory Full” message appears on the LCD screen no
more pictures can be taken– replace the SD card or download
stored images into the computer.
•
Make sure that your fingers do not cover the lens while recording
video or taking still images.
•
Do not remove the memory card or batteries when camera is
saving the image, otherwise the data will be damaged.
Using the Self-timer and Burst snapshot
When the Self-timer is set and activated, the camera will auto-take a
picture after the selected delay time. Use the burst snapshot to take
pictures continuously.
1:
Turn the power ON, and set the video camera to the Capture mode.
2:
Press the LEFT button to select sequentially Self-Timer options; see
icons and information displayed on left upper corner on LCD screen.
2 seconds: The recorder will take picture with 2 seconds delay
10 Seconds: The recorder will take picture with 10 seconds delay
12
Continuous: Press the SHUTTER button once to take three
consecutive pictures.
3: Press the SHUTTER button to take picture.
• You can also set the self-timer and continuous (burst) snapshot
from the Capture Menu.
Using the Zoom Function
This camera has a Digital Zoom function that allows you to zoom in (Tele)
or zoom out (Wide) subjects or recorded scene.
1: Turn the camera ON and set it to Video Recording or Capture mode.
2: Press the T or W buttons to compose the scene as required.
T: zoom in for a telephoto shot.
W : zoom out for a wide-angle shot.
4. Using the Menu in recording mode
Menu in Video mode
Turn ON the video recorder and set it to Video
13
Recording mode.
1:
Press the MENU button to display the menu.
2:
Use the UP or DOWN button to choice desired menu item.
3:
Press the OK or RIGHT button to enter the sub-menu.
4:
Use the UP or DOWN button to select the desired setting.
5:
Press the OK button to confirm the setting.
6:
Press the MENU button to close the menu.
Menu item
Function
Movie
Select smaller movie size (lower resolution) to record
Size
for longer time. There are three settings to choose:
720x480/640x480/320X240.
Frame Rate
Select low frame rate to record longer time. There are
two settings to choose: High/ Low.
Metering
Setting metering.
White Balance
Setting white balance
Menu in capture mode
1: Turn ON the video recorder and set it to
14
Capture mode.
2: Press the MENU button to display the menu.
3: Use the UP or DOWN button to choose desired menu item.
4: Press the OK or RIGHT button to enter the submenu.
5: Use the UP or DOWN button to select the desired item.
6: Press the OK button to confirm the setting.
7: Press the MENU button to close the menu.
Capture menu list
Menu item
Function
Resolution
There are five options to choose:
[4000X3000]/[2592X1944]/[2048X1536]/
[1280x960]/[640X480]
Quality
Select a lower image quality to decrease the image size
and thereby capture more images. There are three options
to choose:[Super Fine] /[Fine] /[Normal].
Metering
Amend the metering method to change the brightness of
the picture.
[Center]: The exposure will be based on light in the central
area.
[Multi]: The exposure will be based on the average light.
15
This setting is suitable for general use.
[Spot]: The exposure will be metered based only on the
spot in the center of the scene
White
Adjust the white balance to suit different light sources.
Balance
There are five items to choose:
[Auto] / [Daylight] / [Cloudy] / [Fluorescent] / [Tungsten].
Exposure
In unusual ambient conditions such as indirect indoor
lighting, dark backgrounds, and strong backlighting you can
set the exposure value manually. The exposure value
may be set in range from –2.0 to +2.0.
Capture
Select this and set the recorder to different modes:
Mode
Off/ Self-timer 2S/ Self-timer 10S/ burst.
Effect
Select this to change the color tone of images:
Normal/ B&W/ Sepia / Negative/ Red/ Green/ Blue.
Date
This function can be used to add a date to your pictures as
Stamp
you take them. There are three items for option:
[Off]: Neither date nor time is added to the image.
[Date]: Add date to the image.
[Date& Time]: Add date and time to the image.
16
Setup menu / Internal setting
Adjust system settings in setup menu.
1:
Turn the power ON and press the MENU button
to display the menu.
2:
Press the RIGHT button to select
[Setup].
3:
Use the UP or DOWN button to locate an item.
4:
Press the OK or RIGHT button to enter the submenu.
5:
Use the UP or DOWN button to select the desired item.
6:
Press the right button to choose On or Off and OK button to confirm
the setting.
7:
Press the MENU button to close the menu.
Menu item
Sounds
Function
There are four settings to choose:
[Shutter]: Set the shutter sound on or off by pressing
the RIGHT button.
[Start-up]: Set the start-up sound on or off by pressing
the RIGHT button.
[Beep]: Set the operation sound on or off by pressing t
17
he RIGHT button.
[Volume]: Adjust the sound volume by pressing the
RIGHT button.
Auto Review
Adjust the review time after taking a picture. There are
three items for option: [Off]/ [1sec.]/ [3 sec.].
Power
Power (also Light) Frequency should be set to 60Hz or
Frequency
50Hz to match local power supply. [50Hz] / [60Hz].
Power Save
To save power the recorder turns off automatically after
selected time period: [1min.] / [3min.] / [5min.].
Date & Time
Setting date & time.
Language
Setting language.
TV Out
TV Out should be set either to NTSC or PAL to match
regional broadcast signal: [NTSC] /[PAL].
USB
You may use recorder as a PC camera or removable
disk. Select [MSDC]: to use as removable disk.
Select [PCCAM]: to use as PC camera;
Start-up
You can use your favorite picture as the start-up image.
Image
[System]: Use the default image as the start-up image.
[My image]: Use your favorite image as the start-up
18
image.
Format
Format SD card.
Reset All
Reset the entire menu and button operation settings to
initial default. [Yes]/ [No].
5. Playback
Playing back still images
1:
Turn ON the recorder and set to playback mode. The latest recorded
file will show on LCD screen. If there are no images stored, a
message [No File] appears.
2:
Press the LEFT or RIGHT buttons to browse the previous or next
images.
Playing back movie clips
In the Playback mode, when browsing through stored records, you may
find your recorded video clips; they are marked with the
icon
indicated in the bottom- left corner of LCD.
1:
Press the LEFT or RIGHT button to select the movie clips you wish to
play back.
19
2:
Press the SHUTTER button to start playing. Press the MENU button to
stop playing. Press the UP button to pause and press again to
continue. Press the RIGHT button to fast forward and press the LEFT
button to rewind.
Other functions in Playback mode
Viewing Thumbnail size files
Press the W/Zoom out button to view the file in thumbnail mode. Use the
UP, DOWN, LEFT, RIGHT button to select a file. Press the OK button to
view the file in full screen.
Locking files
1:
Press the MENU button in playback mode.
2:
Press the UP or DOWN button to locate the item [Lock].
3:
Press the OK or RIGHT button to enter the submenu.
4:
Use the UP or DOWN button to select option: [Lock/Unlock One]: Lock
/Unlock current file. [Lock All]: Lock all files. [Unlock all]: Unlock
all files.
5:
Press the OK button to confirm the setting. A dialog box will appear.
Using UP or DOWN button to select the item [Yes].
20
6:
Press the OK button to lock/ unlock the current file or all files.
7:
Press the MENU button as necessary to exit.
• The “key” icon
will display on the LCD screen if the file has
been locked. The locked file can not be deleted – unless “un-locked.”
Delete files
1:
Press the MENU button in playback mode.
2:
Press the UP or DOWN button to select the item [Delete].
3:
Press the OK or RIGHT button to enter the submenu. [One]: Delete
current file. [All]: Delete all files except locked files.
4:
Use the UP or DOWN button to select the item.
5:
Press the OK button to confirm the setting. A dialog box will appear.
Using UP or DOWN button to select the item [Yes].
6:
Press the OK button to delete the current file or all files.
7:
Press the MENU button as necessary to exit
Playing Slide Show of still images
1:
Press the MENU button in playback mode.
2:
Press the UP or DOWN button to locate the item [Slide Show].
3:
Press the OK or RIGHT button to enter the submenu.
21
[Start]: Select this item to start slide show mode.
[Interval]: Set the interval time by pressing the LEFT or RIGHT button.
The interval time could be set from 1 second to 10 seconds.
[Repeat]: Press the LEFT or RIGHT button to set the continuous slide
show function ON or OFF.
4:
Use the UP or DOWN button to select [Start].
5:
Press the OK button start slide show.
6:
Press the MENU button to end slide show.
• Only still images can be shown as the slide show.
Effect
1:
In Playback mode, select and display the photo you want to change
color tone. Press the MENU button.
2:
Press the UP or DOWN button to select the [Effect].
3:
Press the OK or RIGHT button to enter the submenu: [B&W], [Sepia],
[Negative], [Red], [Green], [Blue], [Binarize], [Sunset], [Warm], [Cold],
[Contrast].
4:
Press the UP or DOWN button to select an effect changing color tone
of the image.
22
5:
Press the OK button to confirm the setting. A duplicate photo with the
desired color tone will be created and stored in SD card.
6:
Press the MENU button as necessary to exit
Rotate the image
1:
Select an image you want to rotate in playback mode.
2:
Press the MENU button to display the menu.
3:
Press the UP or DOWN button to select the item [Rotate].
4:
Press the OK or RIGHT button to launch the submenu:
Rotate: Each time the OK button is pressed the image will rotate 90°.
Save: Select this item to save the rotated image.
Back: Select this item to close the submenu.
Resize
1:
Select an image you want to resize in playback mode.
2:
Press the MENU button to display the menu.
3:
Press the UP or DOWN button to select
4:
Press the OK or RIGHT button to launch
the item [Resize].
23
the submenu: 2048x1536/ 1280x960/ 640x480.
5:
Press the UP or DOWN button to select the item.
6:
Press the OK button to save the resized image.
• The image can only be resized only to the smaller size.
Add Voice Memo to image
1:
In playback mode select an image to which you wish add Voice Memo.
2:
Press the MENU button to display the menu.
3:
Press the UP or DOWN button to select the item [Voice Memo…].
4:
Press the OK or RIGHT button to display the dialog box as illustration.
5:
Select the item [Add] and then press the OK button to start recording
voice memo.
6:
Press the SHUTTER button to end the recording.
7:
To playback voice memory please first select desired photo with
microphone icon and then press the SHUTTER button.
• To delete the Voice Memo please follow above steps 2, 3, 4 and
when the dialog box appears select “Delete” and then press the OK
button to delete (remove) the memo from the image.
24
Set the image as the start-up image
1: Select an image you favorite in playback mode.
2: Press the MENU button to display the menu.
3: Press the UP or DOWN button to select the item [Start-up Image].
4: Press the OK or RIGHT button to launch the submenu: Set/ Cancel.
5: Press the UP or DOWN button to select the item [Set].
6: Press the OK button to confirm the setting.
7: Set the item [Start-up Image] in the setup menu to [My image] mode.
And then the video camera will use the image you selected as the start-up
Image.
Print the image
1: Select an image you want to print in playback mode.
2: Press the MENU button to display the menu.
3: Press the UP or DOWN button to select the item [Print…].
4: Press the OK button to enter the printing interface.
5: Connect the video camera and the printer via the attached USB cable.
6: Press OK button to start printing.
25
6. Making connections
Connecting the Video Recorder to a TV
You may connect camera to TV, then display all images and recorded
video on large TV screen!
1.
Connect the recorder to a TV using supplied AV/TV cable.
2.
Turn ON the TV and the camera; set the TV to AV INPUT mode,
review the manual of your TV if necessary.
3.
When recorder is set to recording mode, you can preview the
subjects you wish to record on the TV screen.
4.
In Playback mode, all the pictures and video clips stored in the
camera can be reviewed and played back on the TV screen.
When the TV is connected, the cameras LCD screen becomes blank and
TV screen becomes the monitor for your camera.
Connecting the Video Recorder to a PC using USB cable
1:
Select the USB option in Setup Menu and then select MSDC setting
mode. Turn OFF the camera.
2:
Open the USB cover on the back of the recorder. Insert supplied USB
26
cable into USB jack and connect other end to computer USB port.
3:
Turn ON the recorder. The “MSDC” message appears on the LCD
screen when connection to the computer has been completed.
4:
Open “My Computer” and select the "Removable Disk" which
represents your camera. Double-click the "Removable Disk" icon to
view its contents, then open the "DCIM" folder which contains your all
stored video and still images files.
5:
Review and copy photos or video files into your computer. Download
video and still images to your computer before playing back.
Alternatively insert the memory card into a card reader to download files.
Using a Card Reader
1:
Eject the memory card from the recorder
and insert into a card reader connected to a
computer.
2:
Open [My Computer] or [Windows Explorer]
and double-click the Removable Disk icon which represents the
memory card.
3:
Copy images from the card into selected directory / storage inside your
27
computer.
7. Software Installation
Installing the Software
The bundled software CD has the driver and software that come with video
camera.
Insert the CD into your CD-ROM drive. The autorun menu appears:
The following software is listed:
• Install Driver: Installs software for PC camera.
• User Manul: Opens the folder of manual.
• Install MAGIX Video easy SE- Installs software for editing video clips.
28
• Install MAGIX Photo Manager 10 - Installs software for editing pictures.
Click the items in the autorun menu to install the software.
If the autorun menu does not appear automatically, open the CD-ROM in
[My Computer] or [Windows Explorer] and double-click the file named
[start.exe] to start the program. You can also click [Run] in the Windows
Startup menu, enter "D:\start.exe" (where D is your CD-ROM drive letter)
in the text box, and click [OK].
Notes:
1.Open MAGIX Video easy SE or MAGIX Photo Manager 10, you have to
register the software at first, then use program without any time limit.
2. Don’t forget to install the QuickTime Player during installing the MAGIX
video easy SE.
3. MAGIX Video easy SE and MAGIX Photo Manager 10 only include
Windows XP and Windows Vista, Windows 7 platforms.
System requirements for Magix Video Easy SE:
► Intel® Pentium 4 or AMD® Athlon® 1 GHz and higher
► 512 MB RAM
► 400 MB free hard disk memory and a DVD drive for program installation
29
► Graphics card with a screen resolution of at least 1024 x 768
► Sound card
Supported devices:
► Video, TV, or graphics cards with video input.
Magix Photo Manager 10:
► Microsoft® Windows® XP I Vista® I 7. PC with Intel® Pentium® or
AMD® Athlon® 700 MHz or higher
► 256 MB RAM, 120 MB hard disk space for program files
► SVGA graphics card with min. 4 MB RAM, (min. resolution 1024 x 600,
16-bit high-color)
► Microsoft® compatible mouse.
Install Driver
1: Click [Install Driver] button on autorun menu.
2: Follow the on-screen instructions to install
driver.
30
How to use the PC Camera function
1: Please install the PC camera Driver first. Installed Driver will create the
Amcap program icon on computer’s Desktop
2: Turn recorder and select the Item [USB] in Setup Menu and then select
[PCCAM] option to set the camera to PC CAM mode. Connect the recorder
to the computer with the USB connector. Run the program Amcap on the
desktop. When using this function for the first time please select <Preview>
as shown on illustration. Now you can use your recorder as the PC camera
function.
If you want to change the imaging size, select <Video Capture Pin> to
change the Output Size.
31
8. Troubleshooting
Power does not turn ON.
1.Batteries are inserted in wrong
direction.
★ Reinstall
batteries
in
the
correct direction.
2.Battery power insufficient
★Reinstall new batteries.
Camera does not take pictures.
1. Memory is full.
★Insert a new memory card.
2. Memory card is not formatted.
★Format card or use new card.
Image is blurry or out of focus.
1. Video recorder was moving
★Hold the video recorder steady
when image was captured.
when shooting picture.
Image is not displayed on the LCD monitor.
1. A memory card with images
★ This video camera cannot
taken on another camera is loaded.
display images taken on another
32 camera.
Recorded images are not saved in memory.
1. Video recorder was turned off
before images were saved.
★If battery low indicator appears
replace batteries immediately.
9. Technical Specifications
Video Res
Still pictures
D1 720x480, 640x480, QVGA 320x240 pixels
12MP(4000x3000, Interpolated);5MP(2592x1944);
3MP(2048x1536);1MP(1280x960);VGA(640x480);pixels
Display
2.0" TFT Color LCD
Focus range
5 feet (1.5M)~ infinity
Aperture
F3.0, f=7.0mm. Fixed Focus
Shutter
Auto Electronic Shutter: 1/2000 ~ 1/2sec.
White
balance
Digital zoom
Exposure
control
Burst mode
Auto / Daylight / Cloudy / Fluorescent / Tungsten
4x
Auto and Manual: -2EV to +2EV in 0.3 steps
3 consecutive shots captured
33
Photo effect
Normal/ B&W/ Sepia / Negative/ Red/ Green/ Blue
Self-timer
2 or 10 second time delay options
Internal memory: 32M
Storage
External memory card slot: Accepts up to 8GB SD /
SDHC card (not supplied)
TV system
NTSC / PAL selectable
Power Supply
Three (3) AAA alkaline 1.5V batteries (not supplied)
Ambient
Operating: 0° C to 40° C
temperature
Storage: -20 to 60° C
Microphone
Built-in
Speaker
Built-in
Note: The product design and the specifications are subject to change
without notice.
2. System requirements:
Windows 2000/ XP/ Vista/ 7
CPU: Pentium III 800MHz and above
Memory:512 MB and upper memory
34
Disk space:At least 128 MB free space
WARNING
1. Before using your camera to take photos, please sample some photos to
check the camera works well or not. Or we are free of any lose resulting
from failure of the camera.
2. Using your camera when there is body static-electricity may power off
your camera or stop PC-CAM, only restart it and the camera works
again.
ALL RIGHTS RESERVED © 2012 TEKNOFUN
Fabriqué en Chine – Made in China.
Adobe and Reader are either registered trademarks of Adobe Systems
Incorporated in the United States and/or other countries.
35