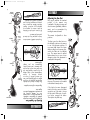
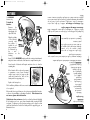
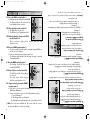
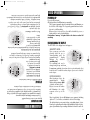
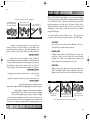
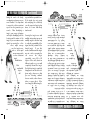
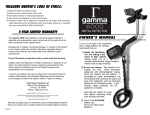
1
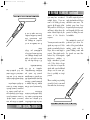
4) Use 9-volt ALKALINE batteries only. Do not use Heavy Duty
Batteries.
3) Read this manual. Most importantly, review the Quick-Start Demo
(p.7) and Basic Operation (pp. 9-12).
Also keep the search coil away from objects containing metal, such
as floors and walls.
2) Do not use indoors. This detector is for outdoor use only. Many
household appliances emit electromagnetic energy, which can
interfere with the detector. If conducting an indoor demonstration,
turn the sensitivity down and keep the search coil away from
appliances such as computers, televisions and microwave ovens.
If your detector beeps erratically, turn off appliances and lights
(especially those with dimmer switches).
1) Adjust the Sensitivity to a low setting
in the event of false signals. Always begin
use at a reduced sensitivity level; increase to full
sensitivity after you have become familiar with the
detector.
However, if you are new to the hobby,
we strongly recommend that you:
The
Discovery 1100 is
an easy to use detector.
The most difficult aspects of
metal detecting have been automated.
OWNER’S MANUAL
MANUEL D’UTILISATION
Le Discovery
1100
est
un
détecteur
de
métal
professionnel. Bien que les
aspects les plus complexes de la
détection des métaux aient été
automatisés.
Si, toutefois, il s’agit pour vous d’un
nouveau passe-temps, nous vous offrons
ces recommandations :
1) Réglez la sensibilité au plus bas pour éviter les
faux signaux. Débutez toujours avec une
sensibilité réduite et accroissez-la au fur et à mesure que
vous devenez plus familier avec le détecteur.
2) Ne l’utilisez pas à l’intérieur. Ce détecteur ne devrait être utilisé
qu’à l’extérieur. Bien des électroménagers émettent une énergie
électromagnétique qui fera interférence. Si vous faites une
démonstration à l'intérieur, réduisez la sensibilité et tenez la
bobine loin des appareils comme les ordinateurs, téléviseurs et
fours à micro-ondes. Si le détecteur bipe sans cesse, éteignez les
appareils d’éclairage (surtout ceux avec gradateur).
Tenez la bobine loin des objets contenant du métal (planchers et murs).
3) Lisez ce manuel, plus particulièrement les sections Démo
d’introduction (p. 7) et Utilisation de base (p. 9-12).
4) N’utilisez que des piles 9 V ALCALINES. N’utilisez pas de piles
de service intense.
spreadsDisc1100
9/14/07
3:37 PM
Page 1
2
TABLE DES MATIÈRES
Treasure Hunter’s Code of Ethics . . . .Back Cover
Warranty . . . . . . . . . . . . . . . . . . . . . . .Back Cover
Lexique . . . . . . . . . . . . . . . . . . . . . . . . . . . . . . . . . . . .3
Assemblage . . . . . . . . . . . . . . . . . . . . . . . . . . . . . . .4-5
Piles . . . . . . . . . . . . . . . . . . . . . . . . . . . . . . . . . . . . . .6
Care & Maintenance . . . . . . . . . . . . . . . . . . . . .19
Trouble Shooting . . . . . . . . . . . . . . . . . . . . . . .18
In The Field Techniques . . . . . . . . . . . . . . .15-17
Basic Operation
Powering Up . . . . . . . . . . . . . . . . . . . . . . .9
The Display . . . . . . . . . . . . . . . . . . . . . .9-10
Réglage de la discrimination . . . . . . . . . . . . . . . . . . .12
Mode Control (discrimination) . . . . . . . . . . . .11
Contrôle du mode (Discrimination) . . . . . . . . . . . . .11
Discrimination Settings . . . . . . . . . . . . . . . . . .12
Audio Target Identification . . . . . . . . . . . . . . .13
Utilisation de base
Mise en marche . . . . . . . . . . . . . . . . . . . . . . . . . . .9
Affichage . . . . . . . . . . . . . . . . . . . . . . . . . . . . . .9-10
Sensitivity Adjustment . . . . . . . . . . . . . . . . . . .14
Démo d’introduction . . . . . . . . . . . . . . . . . . . . . . . .7-8
Identification des cibles par le son . . . . . . . . . . . . . .13
Réglage de la sensibilité . . . . . . . . . . . . . . . . . . . . . .14
Techniques pratiques . . . . . . . . . . . . . . . . . . . . . .15-17
Quick-Start Demo . . . . . . . . . . . . . . . . . . . . . .7-8
Batteries . . . . . . . . . . . . . . . . . . . . . . . . . . . . . . .6
Dépistage de problèmes . . . . . . . . . . . . . . . . . . . . . .18
Assembly . . . . . . . . . . . . . . . . . . . . . . . . . . . .4-5
Son et entretien . . . . . . . . . . . . . . . . . . . . . . . . . . . . .19
Terminology . . . . . . . . . . . . . . . . . . . . . . . . . . . .3
Garantie . . . . . . . . . . . . . . . . . . . . . . . . . .Couv. arrière
TABLE OF CONTENTS
2
spreadsDisc1100
9/14/07
3:37 PM
Page 2
spreadsDisc1100
9/14/07
3:37 PM
Page 3
3
TERMINOLOGY
The following terms are used throughout the manual, and are standard
terminology among detectorists.
L’équilibrage avec le sol permet au détecteur d’ignorer ou de « voir à
travers » les minérais naturels et de ne biper que sur la détection d’un
objet métallique.
ÉQUILIBRE AVEC LE SOL
Les tirettes de cannettes de boisson sont les déchets les plus ennuyeux
pour les chasseurs de trésor. De forme et de tailles variées, la plupart
peuvent être éliminées avec le contrôle du mode, mais certains objets
de valeur peuvent avoir une signature métallique semblable et seront
aussi passés outre lors de la discrimination des tirettes.
ELIMINATION
Reference to a metal being "eliminated" means that the detector will
not emit a tone, nor light up an indicator, when a specified object
passes through the coil’s detection field.
DISCRIMINATION
When the detector emits different tones for different types of metals,
and when the detector "eliminates" certain metals, we refer to this
as the detector "discriminating" among different types of metals.
Discrimination is an important feature of professional metal
detectors. Discrimination allows the user to ignore trash and
otherwise undesirable objects.
TIRETTES
Repérer un objet consiste à trouver la position exacte d’un objet enfoui.
Les métaux enfouis depuis longtemps peuvent avoir l’apparence du sol
environnant et sont donc très difficiles à distinguer du sol.
REPÉRAGE
Métaux qui sont composés de fer ou qui contiennent du fer.
RELIC
FERREUX
Le fer est un métal commun de piètre qualité dont la détection peut
être indésirable dans certains cas. Cannettes, tuyaux, boulons et
clous en sont des exemples. Parfois, la cible recherchée est faite de
fer. Les indicateurs de propriété, par exemple, contiennent du fer.
Des reliques de grande valeur peuvent aussi contenir du fer, comme
les boulets de canon et les vieilles armes. Il en est de même pour les
vieilles structures et les vieux véhicules.
A relic is an object of interest by reason of its age or its association
with the past. Many relics are made of iron, but can also be made
of bronze or precious metals.
IRON
Iron is a common, low-grade metal that is an undesirable target in
certain metal detecting applications. Examples of undesirable iron
objects are old cans, pipes, bolts, and nails.
Sometimes, the desired target is made of iron. Property markers,
for instance, contain iron. Valuable relics can also be composed of
iron; cannon balls, old armaments, and parts of old structures and
vehicles can also be composed of iron.
FERROUS
Metals which are made of, or contain, iron.
PINPOINTING
Pinpointing is the process of finding the exact location of a buried
object. Long-buried metals can appear exactly like the surrounding
soil, and can therefore be very hard to isolate from the soil.
PULL-TABS
Discarded pull-tabs from beverage containers are the most
bothersome trash items for treasure hunters. They come in many
different shapes and sizes. Most pull-tabs can be eliminated with
the Mode Control, but some other valuable objects can have a
magnetic signature similar to pull-tabs, and will also be eliminated
when discriminating out pull-tabs.
GROUND BALANCE
Ground Balancing is the ability of the detector to ignore, or "see
through," the earth’s naturally occurring minerals, and only sound
a tone when a metal object is detected.
3
FER
Une relique est un objet d’intérêt en raison de son âge et de son
association avec le passé. Plusieurs reliques sont faites de fer, mais
aussi de bronze ou de métaux précieux.
RELIQUE
Par discrimination s’entend les divers bips émis par le détecteur pour
les divers types de métaux et l’élimination de certains métaux parmi
les divers types qui existent. La discrimination est une fonction
importante des détecteurs de métal professionnels car elle permet à
l’utilisateur d’ignorer les déchets et les objets autrement indésirables.
DISCRIMINATION
Métal « éliminé » veut dire que le détecteur ne bipe pas et qu’aucun
témoin ne s’allume quand un objet particulier passe dans le champ
de détection de la bobine.
ÉLIMINATION
Suivent certains termes utilisés dans ce manuel et par les utilisateurs de
détecteurs de métal.
LEXIQUE
ASSEMBLAGE
L’assemblage est simple et se fait sans outils.
1 Placez la tige inférieure (tube droit) avec
●
le bouton argenté vers l’arrière. Utilisez le
boulon et l’écrou moleté pour fixer la
Écrou
bobine à l’attache de plastique
moleté
dans le bas de la tige.
2 Appuyez sur le
●
bouton dans le
haut de la tige
inférieure et
insérez la tige
inférieure dans la
tige supérieure.
Câble
Bouton
argenté
Tige
inférieure
Do not force the
plug in. Excess
force will cause
damage.
To disconnect the
cable, pull on the
plug.
Do not pull
on the cable.
Ajustez la longueur de
la tige pour permettre une
prise confortable alors que
vous vous tenez debout, le
bras détendu le long du
corps, la bobine parallèle
au sol, devant vous.
4
Caution:
the plug into the
matching connector on
the right underside of the
detector body. Be sure
that the key-way and
pins line up correctly.
4 Insert
●
Boulon
3 Wind the cable securely around the stem.
●
Bobine
Adjust the stem to a length
that lets you maintain a
comfortable
upright
posture, with your arm
relaxed at your side, and
the search coil parallel to the ground in front of you.
Bouton argenté
Tige inférieure
Tige supérieure
3 Enroulez le câble solidement au tour de la tige.
●
4 Connectez la fiche dans la
●
prise correspondante sous le
côté droit du boîtier du
détecteur.
Alignez bien la clavette et les
broches.
Boîtier du
détecteur
toward the back.
knurled knob,
to the plastic
from the
Attention : Ne forcez pas la fiche car
une force excessive
risque de
l’endommager.
Tirez la fiche pour
déconnecter le câble.
the button
on the upper end
of the lower stem,
and slide the
lower stem into
the upper stem.
2 Press
●
Connecteur
with the silver button
Using the bolt and
attach the search coil
extension protruding
lower stem.
1 Position the lower stem (the straight tube)
●
Assembly is easy and requires no tools.
Fiche
ASSEMBLY
Ne tirez pas
le câble.
4
spreadsDisc1100
9/14/07
3:37 PM
Page 4
5
ASSEMBLAGE
Ajustage de l’appuie-bras
If the button becomes disengaged
inside of the tube, remove the plastic
cap at the end of the tube to access
the clip inside. With a pair of needlenose pliers, reengage the button.
Then replace the plastic cap.
La plupart des gens trouvent la position
standard de l’appuie-bras confortable.
Les avant-bras longs ou courts (surtout
chez les enfants) peuvent être
accommodés en modifiant la position de
l’appuie-bras.
Appuie-bras
L’appuie-bras se règle sur trois positions.
If desired for added stability, re-install
the screw. The screw is not re-installed
in the furthest forward position.
Pour l’ajuster, enlevez la vis derrière
l’appuie-bras, appuyez sur le bouton
argenté et réglez l’appuie-bras à l’une
des autres positions. SI vous ne
pouvez
enfoncer
le
bouton
complètement avec le doigt, utilisez
un objet pointu. L’appuie-bras doit
être tourné avec un peu de pression
pour l’amener à une autre position.
L’ajustement n’es pas changé
régulièrement.
Boîtier de
contrôle
Tige
supérieure
Fiche
To adjust, press the silver button on
the underside, and move the armrest
to one of the alternate positions. If
you cannot fully depress the button
with your finger, use a narrow object,
such as the blunt end of a ballpoint
pen. The armrest must be twisted
with moderate force to move it to an
alternate position; this adjustment is
usually made infrequently.
Bouton
argenté
Si le bouton se décroche à l’intérieur
du tube, enlevez le capuchon de
plastique pour accéder à l’agrafe
intérieure. Utilisez des pinces à nez
pointu pour réengager le bouton, puis
remettez le capuchon de plastique.
Most people will find the standard
position of the armrest very
comfortable. Very large forearms and
short forearms (particularly children’s
arms), can be accommodated by
moving the armrest forward.
Pour plus de stabilité, remettez la vis.
La vis ne peut pas être posée dans la
position la plus avancée.
The armrest is adjustable to three
positions.
Câble
de la
bobine
Tige
inférieure
Écrou
moleté
Boulon
Adjusting the Arm Rest
ASSEMBLY
Bobine de
détection
5
spreadsDisc1100
9/14/07
3:37 PM
Page 5
spreadsDisc1100
9/14/07
3:37 PM
Page 6
6
2 Align the polarity
●
3 Posez les deux piles 9 V
●
ALCALINES, les plots de
contact vers l’intérieur et enclenchez-les sous la patte arrière.
If the detector does not turn on, check to see that the batteries fit tightly.
If the batteries are loose, press them forward while pressing the ON
touchpad. To tighten up a loose battery, wedge a piece of paper or thin
cardboard between the back of the battery and the supporting post, as
illustrated above.
6
COUVERCLE
DU LOGEMENT
DES PILES
Most metal detector problems are due to improperly installed batteries,
or the use of non-alkaline or discharged batteries. If the detector does
not turn on, please check the batteries.
PILES
PRISE
The Low Battery Indicator will come on and stay on if the batteries need
to be replaced.
N’utilisez que des piles
ALCALINES.
LOGEMENT
DES PILES
4 Replace the battery door.
●
Pose de piles :
If the batteries fit loosely, and you want
to guarantee a very secure electrical
contact, insert a piece of paper or thin
cardboard between the back of the
battery and the supporting post.
1 Enlevez le
●
couvercle du
logement en
appuyant sur la
patte au dos.
Some brands of batteries will require moderate force to clear the
retaining tabs.
IN CASE OF LOOSE BATTERIES
Certaines marques de piles nécessitent une bonne pression pour
s’enclencher sous la patte.
and press down on the back of the batteries to snap them into place.
SI LES PILES SONT LÂCHES
3 Insert (2) 9-Volt ALKALINE batteries, with the contacts pointed inward,
●
4 Remettez le couvercle du logement des
●
of the batteries
correctly, with
the positive "+"
toward the coil
plug connection,
as indicated by
the
+
and
–
indicators
on
the
housing.
2 Posez les piles,
●
prenant soin de
respecter la
polarité (+ et –)
indiquée dans le
logement (le + est
du côté de la prise
du câble de la bobine).
the
battery cover by
disengaging the
clip at the back.
Si les piles sont lâches et que vous
désirez assurer un bon contact
électrique, insérez un bout de papier ou
de carton entre le fond de la pile et la
patte de retenue.
1 Remove
●
piles.
To install the
batteries:
La plupart des problèmes avec le détecteur sont causés par des piles
lâches ou faibles, ou l’utilisation de piles autres qu’alcalines. Si le
détecteur ne s’allume pas, vérifiez les piles.
Use ALKALINE
batteries only.
Si le détecteur ne s’allume pas, vérifiez si les piles sont posées
solidement. Si elles sont lâches, poussez-les vers le fond tout en
appuyant sur l’interrupteur tactile. Pour serre les piles, insérez un bout de
papier ou de carton entre le dos de la pile et la patte de retenue, comme
illustré.
BATTERIES
7
Quick-Start Demo continued on next page
V. Press the MODE touchpad(*)
The detector will beep twice and
the sensitivity setting will flash
on the left side of the display.
IV. Wave each Object over the Search Coil
a. Notice a different tone for each object.
Low Tone:
Nail
Medium Tone: Pull-tab & Zinc Penny
High Tone:
Quarter
b. Motion is required. Objects must be in motion over the search coil
to be detected.
III. Power Up
Press the ON touchpad.
The detector will beep twice and
the full sensitivity setting will be
indicated on the left of the display.
II. Position the Detector
a. Place the detector on a
table, with the search coil
hanging over the edge.
(or better, have a friend
hold the detector, with
the coil off the ground)
b. Keep the search coil away
from walls, floors, and
metal objects.
c. Remove watches, rings and other jewelry or metal objects from
hands and wrists.
d. Turn off appliances or lights that cause electromagnetic interference.
e. Pivot search coil back toward the
detector body.
I. Supplies Needed
• A Nail
• A Pull-Tab from a beverage can
• A Quarter
• A Zinc Penny (dated after 1982)
QUICK-START DEMONSTRATION
DÉMONSTRATION D’INTRODUCTION
I. Articles requis
• Un clou
• Une tirette de cannette
• Une pièce de vingt-cinq cents
• Un cent
II. Placer le détecteur
a. Placez le détecteur sur
une table, la bobine
pendant sur le rebord
(mieux encore,
demandez à un ami de
tenir le detecteur, la
bobine soulevée du sol.
b. Tenez la bobine loin du
mur, du sol et des objets métalliques.
c. Enlevez montre, bague et autre bijou ou objet métallique sur la
main ou le poignet.
d. Éteignez les appareils et
l’éclairage qui pourraient causer
une interférence.
e. Inclinez la bobine détectrice vers
le boîtier du détecteur.
III. Mise en marche
Appuyez sur la touche d’interrupteur. Le détecteur bipe deux fois
et le réglage initial de la sensibilité s’affiche à la gauche de l’écran.
Trois segments illuminés indiquent une sensibilité aux 3/4.
IV. Bougez chaque objet devant la bobine
(passez le côte plat des pièces de monnaie parallèle à la bobine).
a.Vous noterez une tonalité différente pour chaque objet.
Tonalité baisse:
Clou
Tonalité moyenne: Tirette et Cent
Tonalité élevée:
vingt-cinq cent
b.Il faut bouger. Les objets doivent bouger pour que la bobine les
détecte.
V. Appuyez sur la touche de MODE (*)
Le détecteur bipe deux fois et le
réglage de la sensibilité clignote
sur le côté gauche de l’écran
La démonstration continue à la page suivante
7
spreadsDisc1100
9/14/07
3:37 PM
Page 7
spreadsDisc1100
9/14/07
3:37 PM
Page 8
8
8
DÉMONSTRATION (suite)
(*)Note: The mode status will flash for 10 seconds. After 10 seconds,
mode status will time-out and stop flashing.
VI. Appuyez de nouveau sur MODE.(*)
a. Un témoin clignotant pointe vers IRON (fer).
b. Le témoin clignotant indique que le fer a
été éliminé de la détection.
XII. Toggle modes by pressing the MODE
touchpad again.(*)
a. Press once to see the current discrimination status of the detector
(Mid-Range Eliminated).
b. Then press again to toggle to the third discrimination setting.
i. Iron is eliminated.
ii. Mid-Range Metals are eliminated.
iii. Only high-tone metals like silver and copper will be detected.
VII. Faites passer le clou devant la bobine
a. Le clou ne sera pas détecté.
b. Le cou a été “discriminé”.
XI. Wave all objects over the Search Coil
The Pull-Tab and Zinc Penny will not
be detected.
The other objects will be detected
with their own distinctive tones.
VIII. Faites passer la pièce de vingt-cinq cents,
le cent et la tirette devant la bobine
Ces objets non ferreux seront détectés, avec leur tonalité distincte.
X. Press the MODE touchpad again.(*)
The flashing arrow will now point
toward MID-RANGE.
IX. Appuyez de nouveau sur MODE.(*)
a. Le détecteur bipe deux fois et le réglage de la sensibilité clignote
sur la gauche de l’écran.
b. Notez la flèche clignotante qui pointe sur IRON (fer).
La flèche indique que cette catégorie de cibles est présentement
“discriminée”.
IX. Press the MODE touchpad again.(*)
a. The detector will beep twice and the sensitivity setting will flash on
the left side of the display.
b. Notice the flashing arrow pointing toward Iron.
The flashing arrow indicates that this target category is currently
"Discriminated Out."
X. Appuyez de nouveau sur MODE.(*)
La flèche clignotante pointe maintenant sur MID-RANGE (plage
moyenne).
VIII. Wave the Quarter, Penny, and Pull-Tab
over the Search Coil
These non-ferrous objects will be detected with their own
distinctive tones.
XI. Passez des objets devant la bobine
La tirette et le cent ne seront pas détectés.
Les autres objets seront détectés, émettant
leur tonalité distincte.
VII. Wave the Nail over the Search Coil
a. The Nail will not be detected.
b. The Nail has been "Discriminated Out."
XII. Passez à travers les modes en
appuyant sur MODE de nouveau.(*)
a. Appuyez une fois pour voir le statut
de discrimination courant (Mid-Range
est éliminé).
b. Appuyez de nouveau pour voir le troisième réglage de discrimination.
i. Fer éliminé.
ii. Métaux de plage moyenne éliminés.
iii. Seuls les métaux de tonalité élevée (argent et cuivre, par
ex.) sont détectés.
VI. Press the MODE touchpad again.(*)
a. A flashing indicator will point toward IRON.
b. The flashing indicator tells us that Iron has
been eliminated from detection.
(*)Remarque: Le statut du mode clignote pendant 10 secondes. Après ce délai
de 10 secondes, le statut de mode cesse de clignoter.
QUICK-START DEMONSTRATION (continued)
9
More deeply buried objects will illuminate more segments, indicating
depths of 2, 4, or 6 inches, as identified to the left of the display.
The depth indicator is not accurate for large, or irregularly shaped, objects.
However, the scale will provide relative depth indications for larger objects; a
given object will induce deeper readings the farther it is from the search coil.
After detecting an object, the
pyramid-shaped
display
indicates the approximate depth
of buried, coin-sized objects.
Objects at or near the surface
will illuminate the single
segment at the top of the
scale.
2 DEPTH INDICATION
●
Upon power-up, and after
pressing either the up- or
down-sensitivity pads, the
pyramid-shaped
display
indicates
the
detector’s
sensitivity level.
The sensitivity level can be
changed using the up- and down-pads.
At maximum sensitivity, the unit can detect a coin-sized metal object
buried about 6" beneath the surface; larger objects can be detected
much deeper.
1 SENSITIVITY LEVEL
●
The LEFT SIDE of the display has a dual purpose:
UNDERSTANDING THE DISPLAY
Press the ON touchpad.
All display indicators will illuminate momentarily.
The 4-segment pyramid-shaped Sensitivity Indicator will illuminate on
the left side of the display. The 4-segment pyramid indicates that the
detector is at full sensitivity.
When an object is detected, the object will be identified by a tone, a
display indicator, and a depth indication.
A two-minute “warm-up” is required before the detector reaches full
sensitivity.
POWERING UP
BASIC OPERATION
UTILISATION DE BASE
MISE EN MARCHE
Appuyez sur la touche d’interrupteur ON.
Tous les indicateurs s’illuminent pendant un moment.
L’indicateur en pyramide de la sensibilité s’affiche sur la gauche de l’écran.
Une pyramide à 3 segments indique que la sensibilité est réglée aux 3/4.
Quand un objet est détecté, l'objet est identifié par une tonalité, un
indicateur à l'écran et une indication de la profondeur.
AFFICHAGE
LE CÔTE GAUCHE de l’écran a deux fonctions:
1 NIVEAU DE SENSIBILITÉ
●
Une fois le détecteur allumé,
appuyer sus les touches de
sensibilité accroît ou réduit le
niveau de sensibilité.
Le niveau de sensibilité se
règle avec les touches de
flèche vers le haut ou le bas.
À un niveau maximal,
l’appareil peut détecter un objet de la grosseur d’un cent, à une
profondeur d’environ 15 cm (6 po) de la surface; de plus gros
objets peuvent être détectés à une plus grande profondeur.
2 INDICATION DE LA PROFONDEUR
●
Une fois un objet détecté, la pyramide affichée donne la profondeur
approximative des objets de
la grosseur d’un cent.
Un seul segment s’illumine
dans le haut de la pyramide
pour les objets à fleur de la
surface.
Plus de segments s’illuminent
si les objets sont plus
profonds, indiquant une profondeur de 5, 10 ou 15 cm (2,4 ou 6
po) selon l’indication sur la gauche de l’écran. L’indicateur de
profondeur n’est pas précis pour les gros objets ou les objets de
formes irrégulières. Toutefois, l’échelle fournit une indication
approximative de la profondeur; un objet donnera une indication de
plus grande profondeur, plus il se trouve loin de la bobine.
9
spreadsDisc1100
9/14/07
3:37 PM
Page 9
spreadsDisc1100
9/14/07
3:37 PM
Page 10
10
10
UTILISATION DE BASE (suite)
With the detector in use in the field, the display will indicate both the DEPTH
and the TARGET IDENTIFICATION of each object detected. After a target is
detected, these indicators will remain illuminated with this information until
the next target has been detected. If uncertain about the target’s
identification, try sweeping the coil at a faster speed. A more rapid sweep
over a target will generally provide a more accurate target identification.
Le CÔTÉ DROIT de l’affichage classe les objets en tris catégories.
Reading the Display IN THE FIELD
Silver/Copper (argent/cuivre): -----------Cette flèche s’allume pour les
objets en argent ou en cuivre.
Les objets enfouis ou à forte
teneur en métaux oxydés,
comme les vieilles cannettes
d’étain, peuvent faire partie de
cette catégorie. Les gros objets
en aluminium comme des
cannettes de boisson, se trouveront parfois dans cette catégorie.
The BOTTOM RIGHT SIDE of the
display will illuminate a Low Battery
Indicator symbol if the batteries are
discharged. The indicator illuminates,
and remains illuminated, when the
9-volt batteries have discharged to a
level of 7.35 volts.
Mid-Range (plage moyenne) : -----------Les objets de plage moyenne
couvrent une grande variété de
métaux: tirettes de cannette,
pièces de dix cents, objets en or
de taille moyenne, certains types
d’aluminium et le zinc.
Iron: ------------------------------------------------------------All ferrous objects, and some
smaller aluminum objects, fall into
the iron category. Small gold
objects can also fall into this range.
Iron (fer): ------------------------------------------------Tous les objets ferreux et certains
petits objets en aluminium
tombent dans cette catégorie. On
peut aussi y trouver de petits
objets en or.
Mid-Range: -----------------------------------------------Mid-range objects cover a large
variety of metals.
Among them are: pull-tabs from
beverage containers, nickels,
medium-sized gold objects, some
types of aluminum, and zinc.
Le BAS de l’écran affichera un
symbole de piles faibles si les piles
deviennent d´chargées. L’indicateur
s’illumine et reste allumé quand les
piles 9 volts atteignent une tension
inférieure à 7.35 volts.
Silver/Copper: -----------------------------------------Objects composed of silver and
cooper will illuminate this arrow.
Buried and heavily oxidized metal
objects, such as old tin cans, can
also fall into this category. Larger
aluminum objects, like beverage
cans, will sometimes fall into this
category.
Lecture de l’affichage EN UTILISATION
The RIGHT SIDE of the display classifies objects into three categories.
Quand vous utilisez réellement le détecteur, l’affichage indique la
PROFONDEUR et une IDENTIFICATION de chaque objet détecté. Une fois
une cible détectée, ces indicateurs restent allumés jusqu'à ce qu’une
nouvelle cible soit détectée. Si vous n’êtes pas certain de l’identification,
accélérez le mouvement de balayage de la bobine. Un balayage plus rapide
sur une cible donnera habituellement une identification plus précise.
BASIC OPERATION (continued)
11
UTILISATION DE BASE (suite)
The detector will store the current discrimination setting until the power
is turned off.
Each subsequent press of MODE will toggle between discrimination settings.
The flashing arrow indicates the target category eliminated.
target and sensitivity indicators. The flashing target
indicators point to the targets eliminated.
2 Flashing
●
distinctive tone or tones, indication the detector’s stored
discriminating setting.
HIGH TONE - no object eliminated.
LOW TONE - iron eliminated.
MEDIUM TONE - mid-range metals eliminated.
LOW & MEDIUM TONE - irons and mid-range metals
both eliminated.
1 A
●
The MODE touchpad has two functions:
Each first press of MODE will be followed by.
If an object is detected during mode selection, the detector will
exit mode selection. If this happens, you will need to press
MODE again and begin mode selection over again. To avoid this,
keep the detector stationary and reduce sensitivity before
pressing MODE.
During MODE (or discrimination) selection, the SENSITIVITY INDICATOR
on the left of the display will flash continually. The detector will remain
in this discrimination selection mode for 10 seconds until a metal object
has been detected.
The MODE touchpad allows for the elimination from detection of
unwanted metal objects.
By pressing MODE, the user toggles among four different discrimination
settings.
The MODE CONTROL
CONTRÔLE DU MODE
La touche MODE permet d’éliminer la détection de certains objets
métalliques indésirés. En appuyant sur MODE, le détecteur passe à
travers quatre réglages de discrimination.
Pendant le réglage du MODE (discrimination), I'INDICATEUR DE
SENSIBILITÉ à la gauche de l’écran clignote continuellement. Le
détecteur reste au mode de réglage de la discrimination pendant 10
secondes, jusqu’à ce qu’un objet métallique soit détecté.
si un objet est détecté pendant le réglage du mode, le détecteur
quittera le mode de réglage. Dans ce cas, vous devrez appuyer
de nouveau sur MODE pour refaire le réglage. Pour éviter cela,
tenez le détecteur stationnaire et réduisez la sensibilité avant
d’appuyer sur MODE.
La touche MODE offre deux fonctions:
La première pression de la touche MODE produira.
1 Une ou plusieurs tonalités, indiquant que le réglage de
●
discrimination du détecteur.
TONALITÉ ÉLEVÉE - aucune discrimination.
TONALITÉ BASSE - discrimination du fer.
TONALITÉ MOYENNE - discrimination des métaux de plage
moyenne.
TONALITÉ BASSE ET MOYENNE - discrimination du fer et
des métaux de plage moyenne.
2 Un clignotement des témoins de cible et de sensibilité. Les
●
témoins clignotants de cible pointent vers les cibles éliminées.
Chaque pression subséquente de MODE permet de passer à travers les
divers réglages de la discrimination. La flèche clignotante indique la
catégorie de cibles éliminée.
Le détecteur retiendra le réglage de discrimination jusqu’à ce qu’il soit
éteint.
BASIC OPERATION (continued)
11
spreadsDisc1100
9/14/07
3:37 PM
Page 11
spreadsDisc1100
9/14/07
3:37 PM
Page 12
12
BASIC OPERATION (continued)
Discrimination Settings are as follows:
Tonalités
de statut
(pendant le réglage de la discrimination)
Affichage
Suivent les réglages de discrimination:
UTILISATION DE BASE (suite)
12
Métaux
éliminés
Using headphones (not supplied) improves battery life, and prevents the
sounds from annoying bystanders.
It also allows you to hear subtle changes in the sound more clearly,
particularly if searching in a noisy location. For safety reasons, do not use
headphones near traffic or where other dangers are present. This device is
to be used with interconnecting cables/headphone cables shorter than three
meters.
Mode
USING HEADPHONES
Aucun témoin
de cible ne
clignote
Iron and
Mid-Range
Indicators
Flashing
Élevée
Low &
Medium
Aucun
Ferrous and
Mid-Range
metals
Tous les métaux
Full
Discrimination
Mid-Range
Indicator
Flashing
Basse
Medium
Le témoin
IRON
clignote
Pull-tabs, Screw
Caps, some Foil,
medium Gold,
Zinc, Nickels
Ferreux
seulement
Mid-Range
Discrimination
Iron
Indicator
Flashing
Discrimination
du fer
Low
Mid-Range
MID RANGE
clignote
Ferrous
only
Le témoin
Moyenne
Iron
Discrimination
No Target
Indicators
Flashing
Tirettes
bouchons, feuilles
d’aluminium
or moyen, zinc,
nickels
High
Discrimination
de la plage
moyenne
None
Basse et
moyenne
All-Metal
Display
(During discrimination selection)
Discrimination
complète
Status
Tones
Les témoins
IRON et
MID RANGE
clignotent
Metals
Eliminated
Métaux
ferreux et de
plage moyenne
Mode
13
IDENTIFICATION DES CIBLES PAR LE SON
Audio Target Identification (ATI) classifies metals into three categories.
LOW TONE
MEDIUM TONE
HIGH TONE
Nails, Bottle Caps,
& Small Gold
Old & New Pull Tabs, Zinc US Pennies
(Post 1982), Nickel, Larger Gold
Objects, Pennies, Loonies & Toonies.
Copper, Silver & Brass
Copper Pennies (Pre 1982)
Bien que l’ACL (affichage à cristaux liquides) identifie les objets enfouis
avec grande précision, l’utilisateur ne peut pas toujours garder l’oeil sur
l’écran. Aussi, nous avons incorporé un indicateur sonore pour aviser
l’utilisateur du type d’objet enfoui. Cet indicateur sonore avise
l’utilisateur de la présence et du type d’objets, dont la nature et
l’emplacement peuvent être confirmés en utilisant l’ACL.
Le détecteur émet trois tonalités différentes.Ces trois tonalités correspondent
aux trois catégories de cibles identifiées par I’ACL.
HIGH TONE
Silver and copper coins, larger brass objects, older pennies (pre1982), and highly oxidized metals will induce high tones.
Quarters, dimes and other precious coins fall into this category.
MEDIUM TONE
Pull-tabs, newer pennies (post-1982), larger gold objects, zinc,
small brass objects, and most bottle screw caps will induce
medium tones. Many recent vintage foreign currencies will
induce medium tones, including loonies & toonies.
LOW TONE
Ferrous objects, such as iron and steel, will induce a low tone.
Small gold objects can also induce a low tone.
TONALITÉ BASSE
Les objets ferreux comme le fer et l’acier, émettent une tonalité
basse.
Les petits objets en or peuvent aussi émettre une tonalité basse.
TONALITÉ MOYENNE
Les tirettes, les nouvelles cents américaines (post-1982), les plus
gros objets en or, zinc, les petits objets en laiton, et la plupart des
bouchons de bouteille émettent une tonalité moyenne. Plusieurs
monnaies étrangères courantes produisent une tonalité moyenne,
y compris les pièces canadiennes de un et de deux dollars.
TONALITÉ ÉLEVÉE
Les pièces d’argent et de cuivre, les gros objets en cuivre, les vieux
cents américains (pré-1982), et métaux très oxydés produisent
une tonalité élevée. Les vingt-cinq cents, les dix cents et autres
pièces précieuses se retrouvent aussi dans cette catégorie.
Clous, bouchons de bouteille,
et petites pièces en or
While the LCD (Liquid Crystal Display) is very accurate in identifying
buried objects, the user in the field does not always maintain the display
screen in his field of vision. Therefore, we have incorporated an audio
feedback mechanism to alert the user to the nature of buried objects.
This audio feedback system first alerts the user to the presence and
classification of objects, whose nature and location can be confirmed
using the LCD display.
FAIBLE TONALITÉ
The detector will sound three different tones. These three tones
correspond to the three target categories depicted on the LCD display.
TONALITÉ MOYENNE
Tirettes, zinc, cents américains (Post
1982), nickel, gros objets en or, cents,
pièces de un et de deux dollar.
TONALITÉ ÉLEVÉE
Cuivre, argent, laiton, cents
américains (pré-1982), dix
cents et vingt-cinq cents
L’identification sonore classe les métaux en trois catégories.
AUDIO TARGET IDENTIFICATION
13
spreadsDisc1100
9/14/07
3:37 PM
Page 13
RÉGLAGE DE LA SENSIBILITÉ
À la mise en marche, la sensibilité automatique est aux 3/4. Pour régler
la sensibilité aux maximum, appuyez sur la touche de flèche vers le
haut SENSIBILITY.
INTERFÉRENCE ÉLECTROMAGNÉTIQUE
Le contrôle de la sensibilité sert principalement à éliminer l’interférence
électromagnétique (IÉM). Un détecteur de métal est un appareil
extrêmement sensible; la bobine crée son propre champ magnétique et
agit comme une antenne. Si le détecteur bipe sans cesse quand la bobine
est stable, l’appareil détecte probablement un autre champ magnétique.
Les causes fréquences d'IÉM sont les lignes haute tension, suspendues
ou enfouies, les moteurs et les électroménagers comme les ordinateurs
ou les fours à micro-ondes. Certains appareils électroniques intérieurs
comme les gradateurs d’éclairage, produisent une forte IÉM et feront
biper le détecteur. D’autres détecteurs de métal produisent aussi leur
propre champ magnétique; alors si vous et un ami utilisez chacun un
détecteur, tenez-vous à au moins 6 m (20 pi) l’un de l’autre.
Si le détecteur bipe sans cesse, RÉDUISEZ LA SENSIBILITÉ en
appuyant sur la touche de flèche vers le bas de SENSITIVITY.
CONDITIONS DU SOL
Une autre raison pour le contrôle de la sensibilité, est de réduire les faux
signaux causés par les conditions du sol. Bien que le Discovery 1100 soit
muni d’un circuit qui élimine les signaux causés par la plupart des
minérais naturels dans le sol, on ne peut pas anticiper la totalité des
conditions. Les solfs fortement magnétiques en montagne et dans les
zones de prospection pour l’or, peuvent déclencher des tonalités alors
qu’aucun objet de métal n’est présent. Des sols et des sables à forte
teneur en sel peuvent aussi causer de faux signaux.
Si le détecteur émet de faux signaux non répétitifs, RÉDUISEZ LA
SENSIBILITÉ.
CIBLES MULTIPLES
Si vous suspectez la
présence d’une cible plus
profonde qu’une cible
détectée, réduire la sensibilité
éliminera la détection de
cibles plus profondes. Vous
pourrez ainsi mieux identifier
et situer la cible moins
profonde.
14
If you suspect the
presence of deeper targets
beneath a shallower target,
reduce the sensitivity to
eliminate the detection of
the deeper targets, in order
to properly locate and
identify the shallower
target.
MULTIPLE TARGETS
If the detector emits false, non-repeatable, signals, REDUCE THE SENSITIVITY.
A secondary use for the Sensitivity Control is to reduce false detection
signals caused by severe ground conditions. While your Discovery 1100
contains circuitry to eliminate the signals caused by most naturally
occurring ground minerals, 100% of all ground conditions cannot be
anticipated. Highly magnetic soils found in mountainous and goldprospecting locations can cause the detector to emit tones when metal
objects are not present. High saline content soils and sands can also
cause the detector to false.
SEVERE GROUND CONDITIONS
If the detector beeps erratically, REDUCE THE SENSITIVITY by pressing
the Down-Sensitivity Arrow ▼ on the left of the control panel.
Common sources of EMI are electric power lines, both suspended and
buried, motors, and household appliances like computers and
microwave ovens. Some indoor electronic devices, such as dimmer
switches used on household lighting, produce severe EMI and will cause
the detector to beep erratically. Other metal detectors also produce their
own electromagnetic fields, so if detecting with a friend, keep two metal
detectors at least 20 feet apart.
The principle use for the Sensitivity Control is to eliminate
Electromagnetic Interference (EMI).
A hobby metal detector is an extremely sensitive device; the search coil
creates its own magnetic field and acts like an antenna. If your detector
beeps erratically when the search coil is motionless, the unit is probably
detecting another magnetic field.
ELECTROMAGNETIC INTERFERENCE
Upon power-up, the detector defaults to 3/4 sensitivity. To increse to full
sensitivity, press the Sensitivity ▲ touch pad.
SENSITIVITY ADJUSTMENT
14
spreadsDisc1100
9/14/07
3:37 PM
Page 14
spreadsDisc1100
9/14/07
3:37 PM
Page 15
15
IN THE FIELD TECHNIQUES
PINPOINTING
COIL MOVEMENT
Accurate pinpointing takes practice
and is best accomplished by
“X-ing” the target area.
When swinging the coil, be
careful to keep it level with the
ground about one inch from the
surface. Never swing the coil like
a pendulum.
1. Once a buried target is indicated
by a good tone response,
continue sweeping the coil over
the target in a narrowing
side-to-side pattern.
2. Take visual note of the place on
the ground where the “beep”
sounds.
3. Stop the coil directly over this
spot on the ground.
4. Now move the coil straight
forward and straight back
towards you a couple of times.
5. Again make visual note of the
spot on the ground at which
the “beep” sounds.
6. If needed, “X” the target at
different angles to “zero in” on
the exact spot on the ground at
which the “beep” sounds.
WRONG
CORRECT
Los du repérage, décrivez un “X” au-dessus du
point où le détecteur bipe.
6.
5.
4.
3.
2.
1.
Quand une bonne tonalité
identifie un objet enfoui,
continuez de balayer la bobine
au-dessus de la cible en
réduisant
l’étendue
du
balayage.
Prenez notre visuellement du
point sur le sol où l’appareil
bipe.
Arrêtez la bobine directement
au-dessus de ce point sur le
sol.
Déplacez la bobine vers l’avant
et l’arrière à quelques reprises.
Notez
encore
une
fois
visuellement, le point sur le sol
où l’appareil bipe.
Au besoin, décrivez un X avec
la bobine pour pointer
exactement l’endroit sur le sol
où l’appareil bipe.
Le repérage précis demande de la
pratique et se fait mieux en « croisant » la zone ciblée.
REPÉRAGE
When pinpointing a target, try drawing an “X”,
as illustrated, over where the tone is induced.
15
CORRECT
INCORRECT
Lors du balayage, assurez-vous
de garder la bobine droite à
environ 2,5 cm (1 po) du sol.
Ne balancez pas la bobine
comme un pendule.
MOUVEMENT DE LA
BOBINE
TECHNIQUES PRATIQUES
TECHNIQUES PRATIQUES (suite)
Faites un balayage lent,
chevauchant chaque passe alors
que vous avancez. Il est
important de déplacer la bobine
à une vitesse constante sur le
sol. Une fois que vous détectez
un objet, votre technique de
balayage permettra d’’identifier
l’endroit et la nature de l’objet. Si
vous détectez un signal faible,
faites un balayage plus
concentré; un balayage
rapide permettra une
identification
plus
uniforme et précise
des cibles.
La plupart des
objets
de
valeur
émettront
des
signaux
qui
sont répétables. Si le signal ne
peut pas être répété en passant la
bobine directement au-dessus
de la cible à quelques reprises, il
y a de fortes chances qu’il
s’agisse de déchets.
Balayer la zone ciblée en
mouvements qui s’intersectent
sous divers angles est une autre
technique efficace pour vérifier
la qualité du signal et l’identité
d’un objet. Pour utiliser cette
méthode, décrivez un cercle
autour de la zone, passant la
bobine de façon répétitive sur la
cible, à tous les 30 ou 40 degrés
et sous dix angles différents tout
en marchant. Si une cible de
tonalité
élevée
disparaît
complètement à un angle
donné, il s’agit probablement de
métaux ferreux oxydés plutôt
que d’un objet en argent ou en
cuivre. Si la tonalité varie avec
l’angle, il y a probablement
plusieurs objets. Si vous êtes un
novice, vous voudrez déterrer
BALAYAGE
SIGNAL
…POURRAIT
BIEN ÊTRE
…MAY
ACTUALLY
BE THIS
Crossing the target zone with
multiple intersecting sweeps at
multiple angles is another way
to verify the repeatability of the
signal, and the potential of the
buried target. To use this
method, walk around the target
area in a circle, sweeping the
coil
across
the
target
repeatedly, every 30 to 40
degrees of the circle, about ten
different angles as you walk
completely around the target.
If a high-tone target completely
disappears from detection at a
given angle, chances are that
you are detecting oxidized
ferrous metals, rather than a
silver or copper object. If the
tone changes a different angles,
respond with a repeatable tone.
If the signal does not repeat
after sweeping the coil directly
over the suspected target a few
times, it is more than likely
trash metal.
CE QUI
SEMBLE
ÊTRE
16
WHAT
READS
LIKE THIS
Most
worthwhile
objects
will
Swing the search coil slowly,
overlapping each sweep as you
move forward. It is important
to sweep the coil at a consistent
speed over the ground as you
search.
After identifying a
target, your sweep technique
can help in identifying both the
location and the nature of the
target. If you encounter a weak
signal, try moving the coil in
short, rapid sweeps
over the target zone;
such a short rapid
sweep may provide
a more consistent
target
identification.
IN THE FIELD TECHNIQUES (continued)
16
spreadsDisc1100
9/14/07
3:37 PM
Page 16
spreadsDisc1100
9/14/07
3:37 PM
Page 17
17
IN THE FIELD TECHNIQUES (continued)
you many have encountered
multiple objects. If you are
new to the hobby, you may
want to dig all targets at first.
With practice in the field, you
will learn to better discern the
nature of buried objects by the
nature of the detector’s
response.
You may encounter some false
signals as you proceed. False
signals occur when the detector
beeps, but no metal target is
present. False signals can be
induced by electromagnetic
interference, oxidation, or
highly mineralized ground
soils. If the detector beeps
once, but does not repeat the
signal with several additional
sweeps over the same spot,
there is probably no target
present.
You will be surprised just how
much trash metal and foil you
will find in some areas. The
trashiest areas have been
frequented by the most people,
and frequently hold the most
promise for finding the most
lost valuables.
Also maintain the search coil
positioned just above the
surface of the ground, without
making contact with the
ground. Making contact with
the ground can cause false
signals.
When searching very trashing
ground, it is best to scan small
areas with slow, short sweeps.
Si vous travaillez sur un sol
encombré, un balayage par
petits
mouvements
lents
donnera de meilleurs résultats.
Vous serez surpris de voir la
Si le détecteur bipe une fois
mais ne répète pas le signal
après plusieurs balayages audessus du même point, il n’y a
probablement pas d’objet
enfoui.
Il pourra aussi y avoir de faux
signaux. Ces faux signaux se
produisent quand le détecteur
bipe mais qu’aucun métal cible
n’est présent. Les faux signaux
peuvent être causés par
interférence électromagnétique,
oxydation, ou des sols
fortement minéralisés.
toutes les cibles au début. Avec
de la pratique, vous saurez
mieux discerner la nature des
objets enfuis d’après la réaction
du détecteur.
Gardez aussi la bobine tout juste
au-dessus du sol, sans faire
contact avec le sol. Faire contact
avec le sol produira de faux
signaux.
quantité de déchets que vous
trouverez à certains endroits.
Les zones contenant le plus de
déchets ont été fréquentées par
un plus grand nombre de
personnes et souvent, offrent de
meilleures chances de trouver
des objets de valeur perdus.
TECHNIQUES PRATIQUES (suite)
17
DÉPISTAGE DES PROBLÈMES
GUIDE DE DÉPISTAGE DES PROBLÈMES
• Vous utilisez le détecteur
à l’intérieur
• Vous utilisez le détecteur
près de lignes électriques
• 2 détecteurs sont utilisés
à proximité l’un de l’autre
• Objet enfoui fortement
oxydé
Le détecteur vibre
ou bipe sans cesse
CAUSE
PROBLÈME
SOLUTION
Pas de courant,
pas de sons
• Déplacez la bobine
lentement à divers angles
• Présence de plusieurs
cibles
• Cible fortement
oxydée
• Niveau de sensibilité
trop élevé
L’ACL ne se fixe pas
sur la cible identifiée
ou le détecteur émet
plusieurs tonalités
• N’utilisez que des piles
alcalines 9 volts
• Mauvais type de piles
• Remplacez les piles
• Piles faibles
• N’utilisez le détecteur
qu’à l’extérieur
• Éloignez-vous des
lignes électriques
• Gardez une distance d’au
moins 6 m (20 pi)
• Ne creusez que si les
signaux peuvent
être répétés
• Réduisez la sensibilité
pour faire cesser les
signaux erratiques
• Interférence
électromagnétique
dans le milieu
Basse tonalité constante
ou répétition constante
de tonalités
• Réduisez la sensibilité
• Remplacez les piles
• Poussez les piles plus
au fond
• Insérez un bout de papier
• Reduce sensitivity
• Move coil slowly
at different angles
• Use detector
outdoors only
• Move away
from power lines
• Keep 2 detectors
at least 20’ apart
• Only dig up
repeatable
signals
• Reduce sensitivity
until erratic
signals cease
SOLUTION
• Piles mortes
• Mauvais contact des
piles
• Câble mal connecté
• Dead batteries
• Replace batteries
• Poor battery
• Push batteries in
tighter
contact
• Cord not connected • Insert paper spacers
securely
(see page 6)
• Check connections
CAUSE
(voir page 6)
18
No power, no
sounds
LCD does not lock • Multiple targets
on to one target ID
present
or detector emits
• Highly oxidized
multiple tones
target
• Sensitivity set
too high
Constant low tone • Discharged batteries • Replace batteries
or constant repeating
tones
• Wrong type of
• Use only 9V
batteries
alkaline batteries
• Environmental
electromagnetic
interference
Detector chatters
• Using detector
or beeps erratically
indoors
• Using detector near
power lines
• Using 2 detectors in
close proximity
• Highly oxidized
buried object
SYMPTOM
TROUBLE SHOOTING GUIDE
• Vérifiez les connexions
TROUBLESHOOTING
18
spreadsDisc1100
9/14/07
3:37 PM
Page 18
spreadsDisc1100
9/14/07
3:37 PM
Page 19
19
TREASURE HUNTER’S CODE OF ETHICS:
• Always check Federal, State, County and local laws before searching.
• Respect private property and do not enter private property without the owner’s permission.
• Take care to refill all holes and leave no damage.
• Remove and dispose of any and all trash and litter found.
• Appreciate and protect our inheritance of natural resources, wildlife and private property.
• Act as an ambassador for the hobby, use thoughtfulness, consideration and courtesy at all
times.
• Never destroy historical or archaeological treasures.
• All treasure hunters may be judged by the example you set; always conduct yourself with
courtesy and consideration of others
First Texas Products, L.L.C.
Five Year Limited Warranty
Bounty Hunter Metal Detectors are warranted against
defects in workmanship or materials under normal
use for five years from date of purchase to the
original user. Liability in all events is limited to the
purchase price paid. Liability under this Warranty is
limited to replacing or repairing, at our option, any
Bounty Hunter Detector returned, shipping cost
prepaid, to First Texas Products, L.L.C. Damage due
to neglect, accidental damage or misuse of this
product is not covered by this warranty.
Proof of purchase is required to make a claim under this warranty.
NOTE TO CUSTOMERS OUTSIDE THE U.S.A.
This warranty may vary in other countries, check with your distributor for details.
Factory warranty follows the channel of distribution.
Warranty does not cover shipping costs
First Texas Products, LLC
1465-H Henry Brennan
El Paso, TX 79936
(915) 633-8354
www.detecting.com
Bounty Hunter® est une marque déposée de First Texas Products, L.L.C.
Publié par First Texas Products, L.L.C.
Tous droits réservés, y compris les droits de reproduction du livret, en tout ou en partie, sous quelque forme que ce soit.
Copyright© 2010 par First Texas Products, L.L.C
Ce produit est justifié contre les défauts dans le travail professionnel ou le matériel dans l’utilisation normale depuis cinq
ans de la date d’achat à l’utilisateur original. Dans tous les
cas, la responsabilité de l’entreprise en vertu de la présente
garantie se limite au prix d’achat versé. La société procédera,
à sa seule discrétion, soit à la réparation du produit défectueux, soit à son remplacement, et ce, après réception du
détecteur de métaux Bounty Hunter, tous frais de transport
prépayés, par First Texas Products. Cette garantie ne s'applique pas à l’appareil endommagé par suite de négligence
ou d'accident ou d'utilisation impropre ou inadéquate.
FIRST TEXAS PRODUCTS, LLC
GARANTIE LIMITÉE - DE 5 ANNÉE
According to FCC part 15.21 Changes or Modifications made to this device not expressly approved
by the party responsible for compliance could void the users authority to operate this equipment.
Copyright© 2010 by First Texas Products, L.L.C.
All rights reserved, including the right to reproduce this book, or parts thereof, in any form.
Published by First Texas Products, L.L.C.
Bounty Hunter® is a registered trademark of First Texas Products, L.L.C.
www.detecting.com
First Texas Products, LLC
1465-H Henry Brennan Dr. El Paso, TX 79936
(915) 633-8354
19
1. Respectez les droits et la propriété d’autrui.
2. Observez toutes les lois, qu’elles soient fédérales, provinciales ou autres.
3. Ne détruisez jamais de trésors historiques ou archéologiques.
4. Laissez le terrain et la végétation tels que vous les avez trouvés. Remplissez les trous.
5. Tous les prospecteurs seront jugés en vertu des gestes que vous posez.
Obtenez toujours la permission avant d’effectuer des recherches. Soyez extrêmement
prudent lorsque vous sondez le terrain, ramassez des objets ou jetez des objets indésirables. REMPLISSEZ TOUJOURS LES TROUS QUE VOUS AVEZ CREUSÉS!
Code du chercheur de trésors:
081310
ACCESSOIRES
M3016F
FOR COMPLETE DETAILS VISIT WWW.DETECTING.COM • 1-800-413-4131
Sac de Transport………….. $ 29.95
Rugueux double-couture construction
CBAG2
Pochette et Combinaison Pelleteuse ….. $24.95
Pochette avec deux grandes poches et lourds outils de creusage qui
mesurent 9 pouces. -TPKIT-W
Pin-pointeur …… $69.95
$ 59.99
Précisément localise l’exact emplacement des objets métalliques enterrés.
Indicateur et vibrateur de signal audio. Fonctionne avec une pile de 9 volts.
PIN POINTER-W
$ 29.99
$ 109.99
Gammate scoop ….. $24.99
Grande pelle à trous de filtrage. Fabriqué avec solide plastique.
SAND SCOOPBH
Remplacement Recherche Bobine
Gold
Prospecting Kits
One size fits all, with Bounty Hunter® logo.
Bounty Hunter Baseball Cap ......$ 14.95
7” Bobine standard (Remplacement) – 7COIL-6 …….$49.95
9 pouces de lourds outils de creusage ….. $10.95
100% cotton with Bounty Hunter® Logo. Sizes – LG, XL & XXL
Lame de métal avec une confortable poignée en plastique et jauge
de profondeur. -TROWEL-2
Bounty Hunter T-Shirt ......$ 19.99
Outil de creusage ….. $7.95
Natural canvas with 2 large pockets. APRN-BH
Bounty Hunter Apron......$ 5.95
Légère et pratique large lame qui sert d’outil de creusage. TROWEL-W
Bounty Hunter Tablier ….. $ 5.95
Light and practical wide blade digging tool. TROWEL-W
Toile naturelle avec deux grandes poches. APRN-BH
Digging Tool ......$ 7.95
Bounty Hunter Casquette ….. $14.95
Metal blade with comfortable plastic handle and depth gauge TROWEL-2
Taille unique, avec Bounty Hunter ® logo.
9” Heavy-Duty Digging Tool......$ 10.95
Bounty Hunter T-shirt ….. $19.99
7” Standard Coil (replacement) - 7COIL-EX......$ 49.95
100% coton avec le logo Bounty Hunter ®. Tailles - LG, XL et XXL
Replacement Search Coil
Trousse d’or Trousse de luxe Hardrock trousse
Trousses de
NUMERO
DE
LA
PIECE
NUMERO
DE
LA
PIECE
NUMERO
DE LA PIECE
ORTROUSSE2
ORTROUSSE3
Prospection En Or ORTROUSSE1
$29.99
$59.99
$109.99
Large scoop with filtering holes. Made of strong plastic. SAND SCOOPBH
Sand Scoop......$ 24.99
Éléments Inclus
10 1 / 2 Plateaux d’Or
14 pouces Plateau d’Or
Classificateur
2 Fioles Incassables
Bouteille éteignoir
Sable Magnétique Noir
Trésor cuiller
Pince à épiler
Loupe
Suceur plat
Brise-Roche
Livret d’instructions
Sac à dos
Pinpoints the exact location of buried metal objects. Audio signal indicator
and vibrator. Runs on 1 – 9-Volt Battery. PIN POINTER-W
Pin Pointer ......$ 69.95
Pouch with 2 large pockets & 9” heavy duty digging tool. TPKIT-W
Pouch & Digger Combo ......$ 24.95
Rugged double-stitched construction
CBAG2
Carry Bag ......$ 29.95
ACCESSORIES
POUR LES DETAILS COMPLETS VISITES WWW.DETECTING.COM. 1-800-413-4131
Disc2200-spreads-FTX.qx6
9/16/09
4:12 PM
Page 40