1
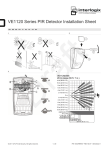
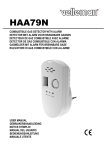
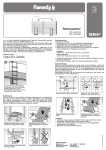
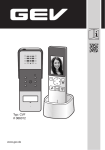
FMG # 003637
1
A
B
2
2
3
A B C
D
E
A
3
Gasmelder FMG 3637 FlammEx
Verhalten beim Alarm
Bitte sorgfältig durchlesen und aufbewahren!
Mit dem Kauf dieses Artikels haben Sie sich
für
ein
qualitativ
hochwertiges
FlammEx
Produkt entschieden. Bitte lesen Sie diese
Bedienungsanleitung sorgfältig durch, um ein
einwandfreies Funktionieren zu gewährleisten.
Bewahren
Sie
diese
Anleitung
auf,
um
gegebenenfalls später nachlesen zu können. Das
Produkt ist nur für den sachgemäßen Gebrauch (wie
in der Bedienungsanleitung beschrieben) bestimmt.
Änderungen, Modifikationen oder Lackierungen
dürfen nicht vorgenommen werden, da sonst
jeglicher Gewährleistungsanspruch entfällt. Die
ordnungsgemäße Funktion ist in diesem Fall nicht
gewährleistet.
Was Sie über Gasmelder wissen sollten
Der FlammEx Gasmelder alarmiert Sie bei Austritt
von Erdgas und Flaschengas. Große Gefahr: Wenn
die oben genannten Gase austreten und sich mit
Sauerstoff vermischen, entsteht ein leicht entzündliches
Gasgemisch. Schon der kleinste Funke kann zur
Explosion führen. Der FlammEx Gasmelder alarmiert Sie
weit bevor ein zündfähiges Gemisch erreicht ist. Je nach
Konzentration können Sie den Geruch des Gases noch
vor Alarmauslösung wahrnehmen.
1.Beim Alarm sofort versuchen, die Ursache zu
ergründen und abzustellen bzw. das Gebäude räumen.
2.Türen und Fester weit öffnen.
3.Offenes Feuer vermeiden.
4.Keine elektrischen Schalter betätigen.
5.Gegebenenfalls Instandsetzung der Gasleckstelle durch einen Fachmann veranlassen.
Empfehlung für optimale Sicherheit
Die Installation des FlammEx Gasmelders ist in Räumen
mit Anschluss der Gasanlage oder Gasgeräte zu
empfehlen. Der Signalton muss deutlich hörbar sein.
Montageort
• Nicht in unmittelbarer Nähe der Gasgeräte montieren (z. B. direkt über dem Gasherd, Heiztherme, etc.)
• Montage in Bereichen mit hoher Luftfeuchtigkeit, Dampf, Staub- oder Schmutzbelastung ist nicht geeignet.
•Erdgas ist leichter als Luft, es wird also hochsteigen. Befestigung des Gasmelders ca. 30 cm unter der Decke an der Wand.
•Flaschengas ist schwerer als Luft, es wird nach unten fallen. Befestigung des Gasmelders ca. 30 cm über dem Boden an der Wand.
Wichtige Informationen
Die Montage sollte durch eine sachkundige
Person erfolgen. Ein Gasmelder ist kein Ersatz
für Rauch-, Feuer- oder andere Brandmelder.
Dieser Melder ist für Nutzung von privaten
Einrichtungen, wie z. B.: Haus, Wohnung, Wohnwagen/mobile, Segel-/ oder Motorboot geeignet. Die
Gasinstallation
und
eventuell
vorhandene
Abschaltungsvorrichtungen
müssen
den
Landesvorschritten entsprechen (siehe z.B. EN-1775).
Der FlammEx Gasmelder muss nach ca. 5 Jahren
ausgetauscht werden. Befolgen Sie bei der
Installation Ihres FlammEx Gasmelders genau die
Instruktionen dieser Anleitung.
Installation und Inbetriebnahme
•Nach der Festlegung des richtigen Montageortes, befestigen Sie die Montageplatte mit den beiliegenden Dübeln und Schrauben an der Wand Abb. 1A
•Setzen sie den Gasmelder auf die Montageplatte und schieben ihn nach unten bis der Melder einrastet Abb. 1B
•Um die Inbetriebnahme des Gerätes zu starten, stecken Sie den Stecker in die Steckdose Abb. 2D. Beim Netzausfall keine Funktion!
•Die grüne LED Abb. 2A blinkt für ca. 10 Min. (Aufwärmphase). Leuchtet die grüne LED permanent, ist das Gerät betriebsbereit.
4
Funktionsbeschreibung
DE
GB
•Orange LED leuchtet - der Melder weist auf eine Störung hin Abb. 2B.
•Blinkt die rote LED und gleichzeitig ertönt ein periodisch akustischer Alarmton, wurde Gas detektiert Abb. 2C, siehe Verhalten beim Alarm. Der Alarmausgang auf der Geräterückseite wird aktiviert Abb. 3A.
•Drücken Sie den Testknopf Abb. 2E solange (bis zu
5 Sek.), bis ein lauter und pulsierender Alarmton ertönt und die rote LED blinkt Abb. 2C.
•Für die Weiterleitung des Alarms verwenden Sie die Anschlussklemme auf der Rückseite Abb. 3A. Bei Alarmauslösung werden darüber 9 V ausgegeben.
Fehleranalyse – Praktische Tipps
Orange LED
(Abb. 2B)
aus
Rote LED
(Abb. 2C)
aus
Alarmton
Erläuterung
aus
Betriebszustand
Blinkt
ca. 10 Min.
aus
aus
aus
Aufwärmphase
Leuchtet
permanent
aus
blinkt
pulsierender
Alarmton
Leuchtet
permanent
Leuchtet
permanent
aus
aus
Alarm, siehe
Verhalten beim
Alarm
Fehlfunktion, Gerät austauschen
Leuchtet
permanent
blinkt
blinkt
pulsierender
Alarmton
Testalarm
Leuchtet
permanent
aus
blinkt
piept kurz alle 45
Sek.
Stummschaltung
bei Alarm
Wartung
PL
Grüne LED
(Abb. 2A)
Leuchtet
permanent
IT
FR
•Grüne LED leuchtet - der Melder ist ordnungsgemäß angeschlossen Abb. 2A.
Mit dem Testknopf (auch Stummschaltungsknopf)
Abb. 2E wird der Melder komplett geprüft. Ein Test
sollte mindestens 1 x monatlich durchgeführt werden.
Drücken Sie den Testknopf bis die rote und orangene
LED blinkt und der akustische Signalton periodisch
ertönt (ca. 85 dB). Eine Funktionsüberprüfung z.B. mit
Feuergas ist nicht aussagekräftig.
Reinigen des Melders
Das Gerät sollte bei Bedarf etwa 2 x jährlich trocken
abgewischt und von außen mit dem Staubsauger
abgesaugt werden. Der FlammEx Gasmelder führt
einen automatischen Selbsttest durch. Bei einer
Fehlfunktion blinkt die orange LED Abb. 2B permanent.
In diesem Fall muss der Melder ausgetauscht werden.
5
Möglicher Falschalarm
Recycling-Hinweise
Die Stummschaltung des FlammEx Gasmelders kann
durch betätigen des Testknopfes erfolgen. Die rote
LED blinkt weiter und ca. alle 45 Sek. ertönt ein kurzer
Signalton. Der Gasmelder FMG 3637 FlammEx ist
seinem Zweck entsprechend und zu Ihrer Sicherheit
sehr empfindlich eingestellt. Der Sensor des Systems
kann auch auf andere gasförmige Medien reagieren.
Der Gebrauch von Aerosolen (Treibgas in Spraydosen)
aber auch starker Qualm und Küchendunst kann zu
Falschalarm führen.
Technische Daten
Netzspannung Stromverbrauch Umgebungstemperatur
Relative Luftfeuchtigkeit
Ansprechwelle
Kalibriert gemäß Signallautstärke Alarmausgang Abmessungen Dieses Gerät darf nicht mit dem unsortierten
Hausmüll entsorgt werden. Besitzer von Altgeräten
sind gesetzlich dazu verpflichtet, dieses Gerät
fachgerecht zu entsorgen. Informationen erhalten
Sie von Ihrer Stadt- bzw. Gemeindeverwaltung.
230 V ~, 50 Hz
ca. 3,4 W
0 °C ...+50 °C
5 % - 95 %
ca. < 5 % der unteren Explosionsgrenze
EN 50194-1
ca. 85 dB / 3 m
9 V /20 mA
ca. B 80 x H 156 x L 51 mm
Technische und optische Änderungen ohne Ankündigung vorbehalten.
6
Important information
The device should only be installed by a
competent person. Gas detectors are not a
substitute for smoke, fire or other alarms. This
detector is only intended for use in private
properties, such as houses, flats, camper vans/mobile
homes, sailing boats/motor boats. The gas installation
and any safety shutdown equipment must comply with
local regulations (see, for example, EN-1775).
The FlammEx gas detector must be replaced after
approximately 5 years. Pay close attention to the
instructions provided in this user guide when
installing your FlammEx gas detector.
What to do in the event of an alarm
1.As soon as the alarm sounds, try to determine and eliminate the cause and/or evacuate the building.
2.Open doors and windows fully.
We recommend installing the FlammEx gas detector in
areas where there is a connection to the gas system
or gas appliances. The alarm must be clearly audible.
Mounting position
• Do not install in the immediate vicinity of gas appliances (e.g. directly above a gas stove or boiler).
• The device should not be installed in areas with high levels of humidity or steam, nor in very dusty or
dirty areas.
•Natural gas is lighter than air, which means that
it will rise. Attach the gas detector to the wall, approximately 30 cm below the ceiling.
•Bottled gas is heavier than air, which means that it will sink towards the floor. Attach the gas detector to the wall, approximately 30 cm above the floor.
Device installation and start-up
•Once you have worked out the correct place to mount the detector, fix the mounting plate to the wall using the wall plugs and screws provided
Fig. 1A.
•Place the gas detector on the mounting plate and push it down until it clicks into place Fig. 1B.
•Connect the plug to the electric socket to launch start-up Fig. 2D. The device will not work if the power fails!
•The green LED Fig. 2A will flash for approximately 10 minutes (warm-up phase). The device is ready for use once the green LED lights up continuously.
•Press the test button Fig. 2E (for up to 5 seconds) until a loud, intermittent alarm can be heard and the red LED flashes Fig. 2C.
•Use the terminal on the reverse of the detector Fig. 3A to relay the alarm. 9 V will be emitted via this terminal if the alarm is triggered.
7
GB
FR
How to maximise safety
IT
3.Avoid naked flames.
4.Do not press any electrical switches.
5.Wherever possible, arrange for a technician to repair the gas leak.
PL
Please read these instructions carefully and keep
for future reference.
By purchasing this item, you have chosen a highquality FlammEx product. Please read these
operating instructions carefully to ensure correct
operation and keep them in a safe place so that you
can refer back to them if necessary. Use this product
only as intended (as described in the operating
instructions). Any changes or modifications made
to the product, including painting the device, will
result in loss of warranty. We cannot guarantee
that the device will function correctly under these
circumstances.
What you need to know about gas detectors
The FlammEx gas detector raises the alarm if there is a
leak of natural or bottled gas. Warning! If these gases
leak out and mix with oxygen, a highly flammable
gaseous mixture will develop. Even the smallest of
sparks can cause an explosion. The FlammEx gas
detector raises the alarm long before a flammable
mixture is formed. Depending on the concentration,
you may be able to smell the gas before the alarm is
triggered.
DE
FMG 3637 FlammEx gas detector
Description of functions
•If the red LED flashes and there is an intermittent audible alarm, this means that the device has detected gas Fig. 2C, please refer to the section What to do in the event of an alarm. The alarm output on the back of the device will be
activated Fig. 3A.
•Green LED lights up - the detector has been connected correctly Fig. 2A.
•Orange LED lights up - the detector is indicating that there is a fault Fig. 2B.
Troubleshooting - practical advice
Green LED
(Fig. 2A)
Constantly lit
Orange LED
(Fig. 2B)
off
Red LED
(Fig. 2C)
off
Alarm
Description
off
Normal operation
Flashes, for
approx. 10 mins.
off
off
off
Warm-up phase
Constantly lit
off
flashing
intermittent alarm
Constantly lit
Constantly lit
off
off
Alarm, please
refer to What to
do in the event of
an alarm
Fault, change
device
Constantly lit
flashing
flashing
intermittent alarm
Test alarm
Constantly lit
off
flashing
short beep every
45 sec.
Alarm has been
silenced
Maintenance
Cleaning the detector
The detector can be fully tested using the test button
(also the mute button) Fig. 2E. Perform a test at least
once a month. Press and hold down the test button until
the red and orange LEDs flash and the audible alarm
sounds intermittently (approx. 85 dB). It is not sufficient
to simply test operability by using a gas fire device, such
as a gas lighter or a gas stove.
When necessary (usually about twice a year), wipe the
device with a clean, dry cloth and clean the outside
with a vacuum cleaner. The FlammEx gas detector
automatically performs a self-test. If there is a fault,
the orange LED Fig. 2B will flash continuously. This
indicates that the detector needs to be replaced.
8
Technical data
Mains voltage
Electricity consumption
Ambient temperature
Relative humidity Response threshold
Calibrated acc. to
Signal volume
Alarm output
Dimensions
DE
FR
This device may not be disposed of with unsorted
household waste. Owners of old devices are
required by law to dispose of this device correctly.
Contact your town council for further information.
GB
Recycling instructions
230 V ~, 50 Hz
approx. 3.4 W
0 °C ...+50 °C
5 % - 95 %
approx. < 5% of the lower explosion limit
EN 50194-1
approx. 85 dB/3 m
9 V /20 mA
approx. W 80 x H 156 x D 51 mm
Technical and design features may be subject to change without notice.
9
IT
You can silence the FlammEx gas detector by pressing
the test button. The red LED will continue to flash
and a short alarm will sound approximately every 45
seconds. To fulfil its purpose and to ensure your safety,
the FMG 3637 FlammEx gas detector is designed to be
highly sensitive. The system's sensor may also react to
other gaseous media. The use of aerosols (propellants
in spray cans), as well as thick smoke and cooking
vapours, may trigger a false alarm.
PL
Potential for false alarms
Détecteur de gaz FMG 3637 FlammEx
Veuillez lire minutieusement et conserver ces
instructions.
En achetant cet article, vous avez choisi un produit
FlammEx de qualité supérieure. Pour l'utiliser dans
les meilleures conditions, nous vous recommandons
de lire attentivement ce mode d'emploi. Conservez
ce document en vue d'une éventuelle consultation
future. Ce produit ne doit être utilisé que dans les
conditions prévues par le présent mode d'emploi.
Toute modification (physique, esthétique, etc.) du
produit entraîne l'annulation de la garantie. Dans ce
cas, le bon fonctionnement de l’appareil n’est pas
assuré.
Ce que vous devez savoir sur les détecteurs de gaz
Le détecteur de gaz FlammEx émet une alarme en
présence de gaz naturel et en bouteille. Danger : la
fuite de l'un des gaz ci-dessus dans l'oxygène peut
conduire à la formation d'un mélange gazeux hautement
inflammable. La moindre étincelle peut alors provoquer
une explosion. Le détecteur de gaz FlammEx vous alerte
bien avant que le mélange ne soit inflammable. Selon la
concentration du gaz, son odeur peut être perceptible
avant le déclenchement de l'alarme.
Informations importantes
Le montage doit être réalisé par une personne
compétente. Un détecteur de gaz ne se
substitue en aucune façon à un détecteur de
fumée ou d’incendie ! Ce détecteur est adapté à
une utilisation dans les installations privées, p. ex. les
maisons, appartements, caravanes, camping-cars et
bateaux à voile ou à moteur. Votre installation de gaz et
éventuellement les dispositifs de désactivation existants
doivent être conformes aux règles en vigueur dans le
pays (voir p. ex. EN-1775).
Nous vous recommandons de remplacer votre
détecteur de gaz FlammEx 5 ans après sa date
d’achat. Pour le montage de votre détecteur de gaz
FlammEx, veuillez suivre rigoureusement les instructions
de cette notice.
10
Que faire en cas de déclenchement de
l'alarme
1.Si l'alarme se déclenche, essayez immédiatement d'en rechercher et d'en résoudre la cause ou d'évacuer le bâtiment.
2.Ouvrez en grand les portes et les fenêtres.
3.Évitez les flammes nues.
4.N'actionnez aucun interrupteur électrique.
5.Si besoin, faites réparer la fuite par un spécialiste.
Recommandation pour une sécurité optimale
L'installation du détecteur de gaz FlammEx est
recommandée dans les pièces possédant un
raccordement avec une installation au gaz ou des
appareils à gaz. Le signal sonore doit être clairement
audible.
Lieu de montage et positionnement
• N'installez pas cet appareil juste à côté d'un appareil à gaz (par ex. juste au-dessus d'une gazinière ou d'une chaudière).
• L'installation du détecteur n'est pas adaptée dans les pièces très humides, sujettes à la vapeur, très poussiéreuses ou très sales.
•Le gaz naturel est plus léger que l'air et se dirige donc vers le haut de la pièce. Installez le détecteur de gaz sur un mur, env. 30 cm au-dessous du plafond.
•Le gaz en bouteille est plus lourd que l'air et se dirige donc vers le sol. Installez le détecteur de gaz sur un mur, env. 30 cm au-dessus du sol.
Installation et mise en service
•Une fois l'emplacement de montage défini, fixez la plaquette de montage au mur à l'aide des chevilles et des vis fournies fig. 1A.
•Posez le détecteur de gaz sur la plaquette de montage et faites-le coulisser vers le bas jusqu'à ce qu'il s'emboîte fig. 1B.
•Pour commencer la mise en service de l'appareil, branchez la prise fig. 2D. En cas de panne de réseau, le dispositif ne fonctionne pas.
•La LED verte (fig. 2A) clignote pendant environ
10 min (phase d'initialisation). Une fois qu'elle LED verte
(fig. 2A)
allumée
LED orange
(fig. 2B)
éteinte
LED rouge
(fig. 2C)
éteinte
Signal sonore
Explication
éteint
fonctionnement
normal
clignote 10 min
env.
éteinte
éteinte
éteint
phase
d'initialisation
allumée
éteinte
clignote
répétitif
alarme, voir Que
faire en cas de
déclenchement
de l'alarme
allumée
allumée
éteinte
éteint
dysfonctionnement : remplacer
l'appareil.
allumée
clignote
clignote
répétitif
alarme de test
allumée
éteinte
clignote
bip court toutes
les 45 s
alarme en
fonction silence
Maintenance
Le bouton de test (aussi bouton de fonction silence)
fig. 2E permet de contrôler entièrement le
fonctionnement du détecteur. Il est recommandé de
procéder au moins à un test par mois. Maintenez le
bouton de test enfoncé jusqu'à ce que la LED clignote
en rouge et orange et que le signal sonore retentisse
de manière discontinue (env. 85 dB). Une vérification
du fonctionnement p. ex. avec du gaz de combustion
est inutile.
11
DE
GB
FR
Dysfonctionnements – Conseils pratiques
IT
•LED verte allumée - le détecteur est correctement raccordé fig. 2A.
•LED orange allumée - le détecteur signale un dysfonctionnement fig. 2B.
•Si une LED rouge clignote en association avec un signal sonore discontinu, du gaz a été détecté
fig. 2C, voir Que faire en cas de déclenchement de l'alarme. La sortie alarme à l'arrière de l'appareil est activée fig. 3A.
PL
Fonctionnement
cesse de clignoter et reste allumée en permanence, l'appareil est prêt à l'emploi.
•Maintenez le bouton de test enfoncé fig. 2E (pendant 5 s environ) jusqu'à ce qu'un signal sonore puissant et répétitif retentisse et que la LED rouge clignote fig. 2C.
•Pour mettre en place une retransmission de l'alarme, utilisez le bornier situé à l'arrière fig. 3A. En cas de déclenchement de l'alarme, ce bornier émet une tension de 9 V.
Nettoyage du détecteur
Remarques concernant le recyclage
Lorsque cela s’avère nécessaire, essuyez l’appareil avec
un chiffon sec et aspirez les poussières (deux fois par
an environ). Le détecteur de gaz FlammEx procède à un
test automatique. En cas de dysfonctionnement, la LED
orange fig. 2B reste allumée. Dans ce cas, remplacez
le détecteur.
Cet appareil ne doit en aucun cas être jeté avec les
ordures
ménagères.
Les
propriétaires
d'équipements électriques ou électroniques
usagés ont en effet l'obligation légale de les
déposer dans un centre de collecte sélective. Informezvous auprès de votre municipalité sur les possibilités de
recyclage.
Possibilité de fausse alerte
La fonction silence du détecteur de gaz FlammEx peut
être enclenchée au moyen du bouton de test. La LED
rouge clignote durablement et un bref signal sonore
retentit toutes les 45 s environ. Conformément à son
objectif et pour votre sécurité, le détecteur de gaz FMG
3637 FlammEx est réglé sur un niveau de sensibilité
très élevé. Le capteur du système peut réagir à d'autres
fluides gazeux. L'utilisation d'aérosols (gaz propulseur
des sprays), mais aussi une fumée et une vapeur de
cuisine abondantes peuvent entraîner une fausse alerte.
Caractéristiques techniques
Alimentation
Consommation électrique
Plage de températures ambiantes
de fonctionnement
Humidité relative
Seuil de transmission
Norme d'étalonnage
Volume du signal
Sortie alarme
Dimensions
230 V ~, 50 Hz
env. 3,4 W
0 °C ...+50 °C
5 % - 95 %
env. < 5 % de la limite inférieure d'explosivité
EN 50194-1
env. 85 dB / 3 m
9 V /20 mA
env. l 80 x h 156 x L 51 mm
Des modifications techniques et esthétiques peuvent être apportées sans notification préalable.
12
3.Evitare fiamme libere.
4.Non azionare interruttori di apparecchi elettrici.
5.Eventualmente disporre il ripristino della perdita di gas da parte di personale specializzato.
Informazioni importanti
Installazione e messa in funzione
Il montaggio deve essere eseguito da
personale specializzato. Un rilevatore di gas
non sostituisce un rilevatore fumo, fiamma o
altri rilevatori di incendio. Il presente rilevatore
è concepito per l'utilizzo in strutture private, come
case, appartamenti, camper/roulotte, barche a vela o a
motore. L'impianto del gas e ogni eventuale dispositivo
di sicurezza devono essere conformi alle norme
applicabili (cfr. EN-1775).
Si consiglia di sostituire il rilevatore di gas FlammEx
dopo circa 5 anni dall'acquisto. Durante
l'installazione del rilevatore di gas FlammEx,
attenersi scrupolosamente alle istruzioni del presente
manuale.
Come comportarsi in caso di allarme
1.Se scatta l'allarme, tentare immediatamente di individuarne ed eliminarne la causa o lasciare l'edificio.
2.Aprire completamente porte e finestre.
Per un livello di sicurezza ottimale
Si consiglia di installare il rilevatore di gas FlammEx
nelle stanze in cui si trovano l'allaccio del gas o
apparecchiature a gas. Il volume del segnale deve
essere chiaramente percepibile.
FR
Leggere attentamente e conservare queste
istruzioni per l'uso.
Con l'acquisto di questo articolo si è scelto un
prodotto FlammEx di qualità superiore. Per garantire
un corretto funzionamento, leggere le istruzioni per
l'uso e conservarle per un'eventuale consultazione
successiva. Il prodotto è destinato solo all'utilizzo
previsto (come descritto nelle istruzioni per l'uso).
Non è consentito eseguire variazioni, modifiche o
verniciature, pena l'annullamento della garanzia.
In questo caso il funzionamento corretto non è
garantito.
Cose da sapere sui rilevatori di gas
Il rilevatore di gas FlammEx vi avverte in caso di perdite
di gas naturale e in bombola. Pericolo elevato: se
questi gas fuoriescono e si mischiano all'ossigeno si
crea una miscela facilmente infiammabile. La minima
scintilla potrebbe provocare un'esplosione. Il rilevatore
di gas FlammEx vi avverte prima che si crei una miscela
infiammabile. La possibilità di percepire l'odore del gas
anche prima che si attivi l'allarme dipende dai livelli di
concentrazione.
GB
DE
Rilevatore di gas FMG 3637 FlammEx
•Una volta individuato il punto di installazione più adatto, fissare la piastra di montaggio alla parete servendosi dei tasselli e delle viti Fig. 1A.
•Posizionare il rilevatore di gas sulla piastra di montaggio e farlo scorrere verso il basso fino a incastrarlo nella sede Fig. 1B.
•Per mettere in funzione l'apparecchio è necessario collegare la presa della corrente Fig. 2D. Senza alimentazione non funziona.
•Il LED verde Fig. 2A lampeggia per circa 10 min. (fase di riscaldamento). Quando il LED verde è fisso, l'apparecchio è pronto.
•Premere il pulsante TEST Fig. 2E (circa 5 secondi) fino a quando viene emesso un forte tono di allarme pulsato e il LED rosso lampeggia Fig. 2C.
•Per la trasmissione dell'allarme servirsi del connettore sul retro Fig. 3A. La potenza di questo connettore con allarme attivo è di 9 V.
13
PL
• Non montare nelle immediate vicinanze di apparecchiature a gas (es.: direttamente sopra i fornelli, caldaie, ecc.).
• Non indicato per il montaggio in zone con presenza di umidità, vapore, polvere o sporco.
•Il gas naturale è più leggero dell'aria e pertanto tende a salire. Il rilevatore di gas va montato sulla parete a circa 30 cm dal soffitto.
•Il gas in bombola è più pesante dell'aria e pertanto tende a scendere. Il rilevatore di gas va montato sulla parete a circa 30 cm dal pavimento.
IT
Luogo di installazione
Descrizione del funzionamento
•LED rosso lampeggiante e segnale d'allarme acustico attivo a intervalli periodici: è stata rilevata la
presenza di gas Fig. 2C. Consultare la sezione Come comportarsi in caso di allarme. Si attiva l'uscita dell'allarme sul retro dell'apparecchio
Fig. 3A.
•LED verde acceso: il rilevatore è correttamente collegato Fig. 2A.
•LED arancione acceso: il rilevatore è guasto Fig. 2B.
Analisi dei problemi – Consigli pratici
LED verde
(Fig. 2A)
Acceso fisso
LED arancione
(Fig. 2B)
off
LED rosso
(Fig. 2C)
off
Tono di allarme
Spiegazione
off
Operativo
Lampeggia per
circa 10 min.
off
off
off
Fase di
riscaldamento
Acceso fisso
off
lampeggiante
Tono pulsato
Acceso fisso
Acceso fisso
off
off
Acceso fisso
lampeggiante
lampeggiante
Tono pulsato
Allarme, vedere
Come comportarsi
in caso di allarme
Malfunzionamento,
sostituzione
dell'apparecchio
necessaria
Allarme di prova
Acceso fisso
off
lampeggiante
Emette un breve
bip ogni 45 sec.
Manutenzione
Pulizia del rilevatore
Il pulsante di prova (o muto) Fig. 2E permette di eseguire
un test completo del rilevatore. Si consiglia di eseguire
almeno una prova al mese. Premere il pulsante TEST fino
a quando il LED rosso e quello arancione lampeggiano
e si attiva il segnale acustico a intervalli periodici (circa
85 dB). Test eseguiti azionando apparecchiature a gas
non sono affidabili.
Attivazione della
funzione "muto" in
caso di allarme
All’occorrenza, pulire il dispositivo 2 volte l’anno con un
panno asciutto ed esternamente con l'aspirapolvere. Il
rilevatore di gas FlammEx esegue un test automatico.
In caso di guasto, il LED arancione lampeggia
ininterrottamente Fig. 2B. In questo caso il rilevatore
deve essere sostituito.
14
Dati tecnici
Tensione di rete
Consumo di corrente
Temperatura ambiente Umidità relativa dell’aria
Soglia di attivazione
Calibrato in base a
Volume del segnale
Uscita allarme
Dimensioni
DE
FR
Questo dispositivo non deve essere smaltito
come rifiuto indifferenziato. I possessori di
vecchi dispositivi non funzionanti sono tenuti
per legge allo smaltimento nel rispetto delle
normative in vigore. Per ulteriori informazioni rivolgersi
all'amministrazione comunale.
GB
Indicazioni per il riciclaggio
IT
La funzione "muto" del rilevatore di gas FlammEx
può essere attivata premendo il pulsante TEST. Il
LED rosso continua a lampeggiare e ogni 45 secondi
circa viene emesso un breve segnale acustico. Il
rilevatore di gas FMG 3637 FlammEx è impostato su
parametri particolarmente sensibili proprio per la sua
destinazione d'uso e per la sicurezza degli utenti.
Il sensore del sistema può quindi reagire anche in
presenza di altre sostanze in forma gassosa. Falsi
allarmi possono scattare in caso di utilizzo di aerosol
(gas in bombolette spray), ma anche in presenza di
nebbiolina molto fitta e fumi da cucina.
230 V ~, 50 Hz
ca. 3,4 W
0 °C ...+50 °C
5 % - 95 %
ca. < 5 % della soglia di esplosione inferiore
EN 50194-1
ca. 85 dB/3 m
9 V /20 mA
ca. B 80 x H 156 x P 51 mm
L’azienda si riserva il diritto di apportare modifiche tecniche ed estetiche senza preavviso.
15
PL
Falso allarme
Czujka gazu FMG 3637 FlammEx
Prosimy starannie przeczytać i zachować niniejszą
instrukcję!
Kupno niniejszego artykułu oznacza wybór
wysokiej jakości wyrobu marki FlammEx. Aby
zapewnić prawidłowe działanie wyrobu, prosimy
o uważne zapoznanie się z niniejszą instrukcją
obsługi. Instrukcję tę należy przechowywać do
ewentualnego późniejszego użytku. Wyrób może
być stosowany wyłącznie w sposób zgodny z
przeznaczeniem (opisany w instrukcji obsługi).
Zabrania się dokonywania zmian, przeróbek bądź
zamalowywania urządzenia, gdyż w przeciwnym
razie wszelkie roszczenia z tytułu gwarancji będą
nieważne. W takim wypadku nie jest zapewnione
prawidłowe działanie wyrobu.
Co należy wiedzieć o czujkach gazu
Czujka gazu FlammEx alarmuje użytkownika w
przypadku wycieku gazu ziemnego lub typu propanbutan. Poważne niebezpieczeństwo: w przypadku
wycieku powyższych gazów i zmieszania ich z
powietrzem powstaje łatwo zapalna mieszanina gazów.
Nawet najmniejsza iskra może prowadzić do wybuchu.
Czujka gazu FlammEx alarmuje użytkownika przed
powstaniem łatwo zapalnej mieszaniny. W zależności
od stężenia, zapach gazu może być wyczuwalny jeszcze
przed zadziałaniem alarmu.
niniejszej instrukcji.
Postępowanie w przypadku alarmu
1.W przypadku alarmu spróbuj niezwłocznie spróbować zlokalizować i wyeliminować przyczynę, ewentualnie ewakuuj siebie i inne osoby z budynku.
2.Otwórz na oścież drzwi i okna.
3.Unikaj otwartego ognia.
4.Nie korzystaj z żadnych przełączników elektrycznych.
5.W razie potrzeby zleć naprawę miejsca wycieku gazu specjaliście.
Zalecenie dla optymalnego bezpieczeństwa
Zaleca się zainstalowanie czujki gazu FlammEx w
pomieszczeniach, w których znajdują się przyłącza lub
urządzenia gazowe. Dźwięk sygnału musi być wyraźnie
słyszalny.
Miejsce montażu
Ważne informacje
Montaż powinien zostać wykonany przez
osobę posiadającą odpowiednie kwalifikacje.
Czujka gazu nie jest zamiennikiem czujki dymu,
pożaru ani innych czujek przeciwpożarowych.
Czujka ta jest przewidziana wyłącznie do stosowania w
obiektach prywatnych, np. domu, mieszkaniu,
samochodzie lub przyczepie kempingowej, na łodzi
żaglowej lub motorowej. Instalacja gazowa wraz z
dostępnymi urządzeniami odcinającymi dopływ gazu
musi
odpowiadać
krajowym
przepisom
(zob. np. EN-1775).
Czujkę gazu FlammEx należy wymienić po upływie
ok. 5 lat. Instalując czujkę gazu FlammEx, należy
postępować ściśle według wskazówek zawartych w
16
• Nie montuj czujki w bezpośrednim sąsiedztwie urządzeń gazowych (np. tuż nad kuchenką, podgrzewaczem itp.)
• Czujki nie należy montować w miejscach o dużej wilgotności powietrza bądź takich, w których występują duże ilości pary, pyłu lub zanieczyszczeń.
•Gaz ziemny jest lżejszy od powietrza, dlatego unosi się ku górze. Czujkę gazu należy zamontować na ścianie w odległości ok. 30 cm od sufitu.
•Gaz typu propan-butan jest cięższy od powietrza, dlatego przemieszcza się w dół. Czujkę gazu należy zamontować na ścianie w odległości ok. 30 cm nad podłogą.
Instalacja i uruchomienie
•Po wyznaczeniu odpowiedniego miejsca montażu (rys. 1 – 4) przymocuj płytę montażową do ściany za pomocą dostarczonych w zestawie kołków i wkrętów, zob. rys. 1A.
•Umieść czujkę na płycie montażowej i przesuń w kierunku dół aż do zatrzaśnięcia, zob. rys. 1B.
•Aby rozpocząć uruchamianie urządzenia, włóż wtyczkę do gniazdka, zob. rys. 2D. Czujka nie działa przy braku napięcia sieciowego!
•Zielona dioda LED, rys. 2A, błyska przez ok. 10 min DE
GB
•Zielona dioda LED świeci się — czujka jest prawidłowo podłączona, zob. rys. 2A.
•Pomarańczowa dioda LED świeci się — czujka sygnalizuje usterkę, zob. rys. 2B.
•Gdy czerwona dioda LED błyska i równocześnie słychać okresowy dźwięk alarmu, nastąpiło wykrycie gazu, zob. rys. 2C oraz punkt Postępowanie w przypadku alarmu. Następuje uaktywnienie wyjścia alarmowego na tylnej ściance urządzenia,
zob. rys. 3A.
FR
Opis funkcji
(faza nagrzewania). Gdy zielona dioda LED świeci ciągle, urządzenie jest gotowe do pracy.
•Naciskaj i przytrzymaj przycisk testu, rys. 2E
(maks. 5 s), aż będzie słyszalny głośny, pulsujący dźwięk alarmu , a czerwona dioda LED zacznie błyskać, zob. rys. 2C.
•Do przekazywania alarmów dalej użyj umieszczonego z tyłu zacisku łączeniowego, zob. rys. 3A. W przypadku zadziałania alarmu pojawi się na nim napięcie 9 V.
Zielona dioda
LED
(rys. 2A)
Świeci ciągle
Pomarańczowa
dioda LED
(rys. 2B)
wyłączona
Czerwona dioda
LED
(rys. 2C)
wyłączona
Dźwięk alarmu
Objaśnienie
IT
wyłączona
Stan pracy
PL
Analiza błędów — wskazówki praktyczne
Błyska co ok.
10 minut
wyłączona
wyłączona
wyłączona
Faza
rozgrzewania
Świeci ciągle
wyłączona
błyska
pulsujący dźwięk
alarmowy
Świeci ciągle
Świeci ciągle
wyłączona
wyłączona
Alarm, zob.
Postępowanie
w przypadku
alarmu
Awaria, wymień
urządzenie
Świeci ciągle
błyska
błyska
pulsujący dźwięk
alarmowy
Alarm testowy
Świeci ciągle
wyłączona
błyska
krótki pisk co ok.
45 s
Wyciszenie
alarmu
17
Konserwacja
Możliwy fałszywy alarm
Przycisk testu (jak również przycisk wyciszenia, zob. rys.
2E) umożliwia pełne sprawdzenie czujki. Test powinien
być przeprowadzany co najmniej raz w miesiącu.
Naciśnij przycisk testu aż zacznie błyskać czerwona
i pomarańczowa dioda LED i zacznie być słyszalny
okresowy sygnał dźwiękowy (o głośności ok. 85 dB).
Kontrola działania np. za pomocą gazu z zapalniczki nie
jest miarodajna.
Istnieje możliwość wyciszenia czujki gazu FlammEx
przez naciśnięcie przycisku testu. Czerwona dioda LED
błyska nadal i co 45 s słychać krótki sygnał akustyczny.
Czujka gazu FMG 3637 FlammEx jest nastawiona na
bardzo wysoką czułość, odpowiednio do swojego
przeznaczenia i z myślą o bezpieczeństwie użytkownika.
Czujnik systemu może również reagować na inne
substancje lotne. Korzystanie z aerozoli (propelentów w
pojemnikach z rozpylanymi substancjami), ale również
dym i opary z kuchni mogą powodować powstawanie
fałszywych alarmów.
Czyszczenie czujki
Urządzenie w razie potrzeby należy przecierać mniej
więcej dwa razy w roku na sucho i czyścić z kurzu za
pomocą odkurzacza. Czujka gazu FlammEx w sposób
ciągły przeprowadza test automatyczny. W przypadku
nieprawidłowego działania pomarańczowa dioda LED
(rys. 2B) błyska przez cały czas. W takim wypadku
czujkę należy wymienić.
Dane techniczne
Napięcie sieciowe
Pobór prądu
temperatura otoczenia
Wilgotność względna Próg zadziałania
Kalibracja wg
Głośność sygnału
Wyjście alarmowe
Wymiary
Uwagi dotyczące recyklingu
Niniejszego urządzenia nie wolno usuwać razem z
niesortowanymi odpadami domowymi. Posiadacze
zużytego sprzętu są ustawowo zobowiązani do
zapewnienia prawidłowej utylizacji urządzeń.
Odpowiednie informacje można uzyskać u odpowiednich
władz miejskich lub gminnych.
230 V ~, 50 Hz
ok. 3,4 W
0 °C ...+50 °C
5 % - 95 %
ok. 5 % dolnej granicy zagrożenia wybuchem
EN 50194-1
ok. 85 dB/3 m
9 V /20 mA
ok. 80 x 156 x 51 mm (szer. x wys. x dł.)
Zastrzega się możliwość wprowadzania zmian technicznych i wizualnych bez wcześniejszego powiadomienia.
18
19
Max. 14 Ct./Min aus dem deutschen Festnetz.
Mobil max. 42 Ct./Min.
International calls may vary.
15UW01
MA00425401
GEV GmbH
Heidehofweg 16
25499 Tangstedt
Germany
www.gev.de
[email protected]
Hotline: +49 (0)180/59 58 555