1
WELCOME!
EN
F-829
Instruction Manual
WE-2013-F829-1
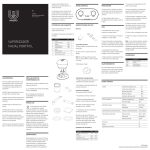
FRONT PANEL/REAR PANEL
Thank you very much for purchase. Please
read the instructions carefully before
operating the instrument. You can also ask
a professional for guidance to make sure
you are using the instrument correctly.
We will accept no responsibility for any
accidents that occur due to incorrect
operation.
ACCESSORIES
• Daub an adequate repairing essence
to promote skin growth and renewal after
removing a spot.
• Be sure to turn the energy level to the
lowest setting after using the instrument,
in order to avoid burning the body when
using it the next time.
REF.
DESCRIPTION
10039
SPOT REMOVAL HANDLE
MAINTENANCE
The company reserves the right to amend
the details of the instruments with no prior
notice. If any mistakes are found in these
instructions, please feel free to send us an
e-mail informing us so that we can correct
them.
• Please disinfect the head of pen before
and after spot removal.
PACKAGE CONTENTS
SPOT REMOVAL
• These components are subject to
change without prior notice.
• Appearance of product may differ from
the image.
No.
PRODUCT
REF.
QTY.
1
SPOT REMOVAL
HANDLE
10039
1
2
MAIN UNIT
-
1
3
FEEDER CABLE
-
1
1. Spot removal handle
2. Power line input
INSTRUCTIONS OF USE
1. Connect the power supply via the rear
panel, indicated in the sketch as “POWER
LINE INPUT”.
2. Connect the accessories properly to the
front/rear panel as indicated in the sketch.
WARNING
• Never under any circumstances
attempt to open or inspect the internal
components or accessories of the
machine. If an inspection becomes
necessary, please contact your supplier
or a suitably competent technician.
EC-DECLARATION OF
COMPLIANCE
TECHNICAL SHEET
Weights and sizes
This product meets the following
requirements:
1. Conditions set out in the Low Voltage
Packing size (cm)
36x31x18,5
Gross weight (kg)
3,1
Product size (cm)
31x17/24x13
Rated voltage
220V ~ 240V
Directive: 2006/95/EC
3. Press the “SPOT REMOVAL” button.
• Never use the unit in humid or poorly
ventilated environments, such as wet
rooms, bathrooms etc. to prevent damage
to the electrical components of your unit.
2. Conditions set out in the
4. Turn the “R/ENERGY” regulator to the
Frequency
50Hz/60Hz
Electromagnetic Compatibility Directive:
2004/108/EC
desired level.
Rated power
15 W
• Never use the unit outdoors; exposure
to the elements can cause damage.
RECYCLING
• If the power cord was destroyed, please
ask a professional to service and replace
it to avoid hazards, or contact the dealer
for service.
Electrical characteristics
5. Hold the spot removal pen as if you
Whenever any of our electrical
products or their presentation
packaging bear this symbol, it means
that these products should not be treated
as conventional household waste in
Europe. To ensure proper treatment of this
waste, dispose of it in accordance with
local laws or as required for the disposal
of electrical equipment. This initiative will
help preserve save natural resources and
improve standards of environmental
protection in regard to the treatment of
electrical waste.
were holding a pen. Aim it at the spot on
the surface and move it in gradually until
the pen point emits a spark towards the
spot. Remove the pen quickly. If the spots
are not completely removed, repeat the
above steps. If the spot is too big, remove
it in several goes.
CAUTIONS
• Due to the varying thickness of the cutin
layer, the ideal results are different when
removing spots. It is advisable to use the
test and touch method to remove the spot.
• A small red mark will be left after
removing spots, which is a normal
reaction.
• A small scar will be left after removing
spots. Do not remove it using your finger
or nail in order to avoid infection.
© 2013 Weelko
Visit our website at www.weelko.com for more information