1
GB
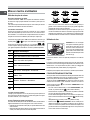
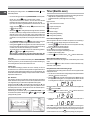
After selecting the cooking function, set THERMOSTAT KNOB
desired temperature.
to the
• For normal cooking procedures using CONVENTIONAL methods (roasts,
biscuits, etc.), use the
function (heat from above + below).
Only place the foods to be cooked in the oven when the selected
temperature has been reached and, if possible, use only one shelf.
If you wish more heat to be generated below or above the dish, turn the
selector to position
or
(heat from below),
Timer (Electric oven)
The programmer makes it possible to preset the oven and the grill in terms of:
• delay start with a preset length of time for cooking;
• immediate start with a preset length of time for cooking;
• timer.
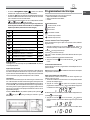
Button functions:
: Timer with hour and minutes;
(heat from below + fan)
: Length of cooking time;
: End cooking time;
(heat from above).
“fan”, cooking takes place through the action of air which
• With function
has been preheated by a heating element and which is then circulated
inside the oven by a fan. The oven heats up very quickly, therefore the
foods you wish to cook may also be placed inside the oven as soon as it
is switched on. It is also possible to cook using two shelves at the same
time.
takes place without using the
• The “quick defrosting” function
heating elements; only the oven light and the fan are activated.
• Cooking with the “grill” uses a high power level, which makes it possible
to brown the surface of foods quickly; it is particularly suited to the cooking
of meats, which should remain soft and juicy on the inside.
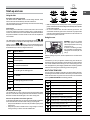
To cook with the grill, turn selector knob to one of the following positions:
(grill),
(maxigrill),
(maxigrill with fan).
While the grill is operating, the oven door must be kept shut. The
thermostat knob should also be positioned at a maximum of 200°C.
Oven light
Lighting inside the oven is obtained automatically when SELECTOR KNOB
is set to any position. If you wish to switch the light on without activating any
of the heating elements, set the thermostat knob to 0°C.
Indicator light
This indicates the heating-up phase of the oven is underway; as soon as
the inside of the oven reaches the set temperature the light switches off. At
this point the indicator light will begin switching on and off intermittently; this
shows that the thermostat is operating correctly in order to maintain a constant
temperature inside the oven.
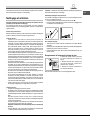
Spit - Rotisserie
This accessory should only be used when cooking with the grill. Proceed as
follows: thread the meat you wish to cook onto the rod positioned across the
oven lengthwise, fixing it in place with the adjustable forks supplied .
Position supports “A” and “B” in the relevant holes in dripping pan “E”, rest
the groove on the rod in slot “C” and use the guide rail to place the rack in
the lowest position in the oven; next position the rod in the rotisserie spit hole,
sliding the groove forwards to slot “D”.
Activate the grill and rotisserie spit by turning SELECTOR KNOB on the
commutator to the positions displaying the
(maxigrill with fan) symbols.
(grill),
(maxigrill) or
: Manual change;
: Change time (backwards);
: Change time (forwards).
How to Reset the Digital Clock
After the appliance has been connected to the power source or following a
power outage, the clock display will begin to blink and read: 0:00
buttons at the same time. Then use (within 4 seconds)
• Press the
the and buttons to set the exact time.
Use the button to move the time forwards.
Use the button to move the time backwards.
The time can also be changed in the following two ways:
1. Repeat all of the foregoing steps.
2. Press the
button, and then use the
and
buttons to reset the time.
Manual Operation Mode for the Oven
After the time has been set, the programmer is automatically set to manual
mode.
button to return the oven to manual mode after every
Note: Press the
“Automatic” cooking session.
Delayed Start Time with Preset Cooking Length
The length and the end cooking times must be set. Let us suppose that the
display shows 10:00.
1. Turn the oven control knob to the cooking setting and temperature desired
(example: convection oven at 200°C).
and the use (within 4 seconds) the and buttons to set
2. Press the
the length of the cooking time. Let us suppose that 30 minutes was set
for the length of the cooking time. In this case, the display will show:
Release the button, and within 4 seconds, the current time will reappear with
the
symbol and “auto.”
3. Press the
button, and then use the and
cooking time. Let us suppose that it is 13:00
buttons to set the end
4. Release the button and the display will show the current time within 4
seconds:
When “auto” is lighted, it indicates that the length and end cooking time
have been preset to operate in automatic mode. At this point, the oven will
turn on automatically at 12:30 in order to finish the cooking session within 30
minutes. When the oven is on, the
18
symbol (cooking pot) will appear on