Transcript
Pool Maintenance Kit Instructions
Instrucctions Para el Paquete de Mantenimiento de la Alberca
Instructions du Kit D’Entretien de Piscine
A
B
TELESCOPIC POLE
BARRA TELESCÓPICA
PERCHE TÉLESCOPIQUE
C
Plug
E
F
VACUUM BAG-1 PIECE
BOLSA DEL ASPIRADOR LIMPIAFONDOS-1 PIEZA
SAC D’ASPIRATION-1
G
HOSE CLIP-1 PIECE
CLIP DE MANGUERA-1 PIEZA
COLLIER DE TUYAU-1
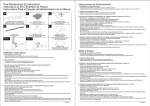
FIG.2
FIG.1
D
HOSE-1 PIECE
MANGUERA-1 PIEZA
TUYAU-1
H
HOSE CLAMP-2 PIECES
ABRAZADERA DE LA MANGUERA – 2 PIEZAS
COLLIER DE SERRAGE – 2 PIECES
5/8” GARDEN HOSE
MANGUERA DE 5.8 PULGADAS
TUYAU D’ARROSAGE 5/8’’
FIG.3
1. Utilizando el recolector de hojas:
• Inserte el recolector en el extremo de la barra telescópica. A
• Ajuste el poste a la longitud deseada. (DIBUJO 3)
• Utilice el recolector B para recoger las hojas y escombros dentro de la piscina.
D
VACUUM HEAD-1 PIECE
CABEZAL LIMPIADOR -1 PIEZA
TETE ASPIRANTE-1
LEAF NET-1 PIECE
RECOLECTOR DE HOJAS-1 PIEZA
FILET A FEUILLES-1
INSTRUCCIONES DE FUNCIONAMIENTO
NOT INCLUDED-NO ESTÁ INCLUIDO
-NE SONT PAS COMPRIS
VACUUM ADAPTER
ADAPTADOR PARA EL ASPIRADOR LIMPIAFONDOS
PRISE DE CIRCUIT D’ASPIRATION
ADJUST POLE LENGTH
AJUSTE LA LONGITUD DE LA BARRA
AJUSTER LA LONGUEUR DE LA PERCHE
G
2 Utilizando el cabezal limpiador con PolyPool o el modelo patentado de Summer Escape SkimmerPlus ® Sistema de
filtro de la bomba: (Dibujo 1)
• Inserte la cabeza limpiadora C en la barra telescópica A . Ajuste la barra a la longitud deseada. (DIBUJO 3)
• Apriete el conector situado en la parte posterior de la cabeza limpiadora. B
• Conecte el tubo flexible D al cabezal limpiador C y asegúrelo con la abrazadera de la manguera G .
• Conecte el otro extremo de la manguera flexible D al adaptador de la aspiradora H .
• Coloque el cabezal limpiador C en el agua.
• Saque la rejilla de la bomba girando lejos de la bomba y tire de ella
• Con la bomba Skimmer en marcha, inserte el adaptador de la aspiradora H a través de la abertura de entrada de la bomba y
coloque el adaptador en la parte superior del filtro skimmer.
• El aspirador absorberá el adaptador H encajándolo en su sitio. Ahora podrá aspirar la suciedad de la piscina moviendo
lentamente el aspirador C por el suelo de la misma
• Evite remover los montones de escombros o suciedad que se hayan acumulado en el suelo.
• Al terminar, saque el cabezal limpiador C del agua. Desconecte el adaptador H del filtro de la bomba SkimmerPlus®. Vuelva
a colocar la rejilla en el filtro SkimmerPlus®.
3
•
•
•
•
•
•
•
•
•
OPERATION INSTRUCTIONS
1 Using the leaf net:
• Insert the leaf net into the end of the telescopic pole A .
• Adjust the pole to desired length. (FIG 3)
• Use the leaf net B to scoop out leaves and debris inside the pool.
Uso del sistema VENTURI si no dispone de filtro de la bomba SkimmerPlus ®: (Dibujo 2)
Conecte el cabezal limpiador C a la barra telescópica A . Ajuste la barra a la longitud deseada. (Dibujo 3)
Desenrosque el conector del cabezal limpiador C .
Conecte una manguera de jardín de 5 / 8 pulgadas al cabezal limpiador de la aspiradora C , y fíjela girando y apretando la
tuerca de cierre.
Coloque la bolsa de la aspiradora E en el cabezal de la aspiradora C , utilice la cuerda para apretar la bolsa.
Coloque la aspiradora en la piscina C .
Conecte la manguera de jardín a un toma de salida de agua y enciéndala. Esto hará que la función de aspiración funcione C
y que la suciedad sea absorbida hacia la bolsa de la aspiradora E .
Pase la aspiradora por la piscina moviendo lentamente el cabezal C por el suelo de la piscina.
Evite remover los montones de escombros o suciedad que se hayan acumulado en el suelo.
Una vez que haya terminado con la aspiradora o cuando la bolsa E esté llena, mueva el cabezal limpiador C hacia la pared
lateral de la piscina, y coloque el cabezal C al revés, corte el suministro de agua y saque el cabezal limpiador C de la piscina
lentamente. Separe la bolsa E de la aspiradora y enjuáguela con agua del grifo.
Cuélguela para que se seque y almacénela
MODE D’EMPLOI
2 Using the vacuum head with PolyPool or Summer Escape’s patented
SkimmerPlus® Filter Pump System: (FIG 1)
• Insert the vacuum head C to the telescopic pole A . Adjust the pole to desired length. (FIG 3)
• Tighten the plug located at the rear of the vacuum head B .
• Connect the flexible hose D to the vacuum head C and secure with the hose clamp G .
• Connect the other end of the flexible hose D to the vacuum adapter H .
• Place the vacuum head C in the water.
• Remove the weir from the skimmer pump by turning it away from the pump and pull.
• With the Skimmer pump running, insert the vacuum adapter H through the skimmer pump intake opening and placed the
adaptor on top of the skimmer strainer.
• The vacuum generated will suck the vacuum adapter H in place. And now you can vacuum the pool by slowly moving the
vacuum head C across the pool floor.
• Avoid stirring up any piles of debris or dirt that might have accumulated on the floor.
• After you finished vacuuming the pool, remove the vacuum head C from the water. Detach the vacuum adapter H from
the SkimmerPlus® filter pump. Reattach the weir to the SkimmerPlus® filter pump.
3 Using the VENTURI action system if you do not have a SkimmerPlus® filter pump: (FIG 2)
• Connect the vacuum head C to the telescopic pole A . Adjust the pole to desired length. (FIG 3)
• Unscrew the plug from the vacuum head C .
• Connect a 5/8” garden hose to the vacuum head C , tighten by turning the lock nut.
• Attached the vacuum bag E to the vacuum head C , use the draw string to tighten the bag.
• Place the vacuum head C inside the pool.
• Connect the garden hose to a water supply and turn it on. This will create the venture vacuum action at the vacuum
head C , and dirt will be sucked into the vacuum bag E .
• Vacuum the pool by slowly moving the vacuum head C across the pool floor.
• Avoid stirring up any piles of debris or dirt that might have accumulated on the floor.
• After you are done with the vacuuming or when the vacuum bag E is filled, move the vacuum head C to the side wall of
the pool, turn the vacuum head C up side down, shut off the water supply and remove the vacuum head C from the
water slowly. Detach the vacuum bag E and rinse with running water.
Hang dry and stored for future use.
PIM-00001-01
1. Utilisation du filet à feuilles :
• Insérez le filet à feuille à l’extrémité de la perche télescopique A .
• Ajustez la perche à la longueur désirée. (Fig. 3)
• Utilisez le filet à feuilles B pour enlever feuilles et débris à l’intérieur de la piscine.
2. Utilisation de la tête aspirante avec le système de pompe à filtre brevetée SkimmmerPlus® de PolyPool ou Summer
Escape : (Fig. 1)
• Insérez la tête aspirante C sur la perche télescopique A . Ajustez la perche à la longueur désirée. (Fig. 3).
• Serrez la prise située à l’arrière de la tête aspirante B .
• Connectez le tuyau flexible D à la tête aspirante C et serrez avec le collier de serrage G .
• Connectez l’autre extrémité du tuyau flexible D à la prise de circuit d’aspiration H .
• Placez la tête aspirante C dans l’eau.
• Retirez le trop-plein de la pompe collectrice en le tournant à l’envers de la pompe et tirer.
• Avec la pompe collectrice en marche, insérez la prise de circuit d’aspiration H dans l’ouverture de la pompe collectrice et
placer l’adaptateur sur le dessus du filtre collecteur.
• Le vide généré collera la tête aspirante H en place. Vous pouvez maintenant aspirer la piscine en déplaçant doucement la
tête aspirante C à travers le fond du bassin.
• Evitez de remuer les tas de débris ou de saleté qui peuvent s’être accumulés sur le fond.
• Après avoir fini d’aspirer la piscine, sortez la tête aspirante C de l’eau. Détachez la prise de circuit d’aspiration H de la
pompe à filtre SkimmmerPlus®. Rattachez le trop-plein à la pompe à filtre SkimmmerPlus®
3. Utilisation du système VENTURI si vous n’avez pas de pompe à filtre SkimmmerPlus®: (Fig. 2)
• Insérez la tête aspirante C sur la perche télescopique A . Ajustez la perche à la longueur désirée. (Fig. 3).
• Dévissez la prise de la tête aspirante C .
• Connectez un tuyau d’arrosage 5/8’’ à la tête aspirante C , serrez en tournant le boulon de verrouillage.
• Attachez le sac d’aspiration E à la tête aspirante C . Utilisez le cordon pour serrer le sac.
• Placez la tête aspirante C dans l’eau.
• Connectez le tuyau d’arrosage à l’arrivée d’eau et ouvrez l’eau. Ceci activera l’aspiration de la tête aspirante C et la saleté
sera aspirée dans le sac E .
• Aspirez la piscine en déplaçant doucement la tête aspirante C à travers le fond du bassin.
• Evitez de remuer les tas de débris ou de saleté qui peuvent s’être accumulés sur le fond.
• Quand vous avez terminé l’aspiration ou quand le sac d’aspiration E est plein, déplacez la tête aspirante C sur la paroi du
bassin, retournez la tête aspirante C à l’envers, fermez l’arrivée d’eau et sortez lentement la tête aspirante C de l’eau.
Détachez le sac d’aspiration E et rincez-le à l’eau courante.
Faites-le sécher et rangez-le pour l’utiliser ultérieurement.
PIM-00001-01