1
RIVETTATRICE A INSERTI FILETTATI
I
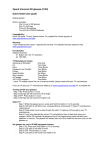
A) Praticare un foro sul pezzo 1. Il diametro del foro 2 ‚ dovrebbe essere superiore di 0,1 mm
o 0,004" rispetto al diametro dell'inserto filettato 3.
B) Bloccare le impugnature dell'utensile in posizione; far ruotare verso l'alto il pomello di regolazione
1 e il controdado 2 quindi sbloccare il fermo della catenella 3 per allargare completamente le
impugnature dell'utensile 4, e posizionare il bullone e il dado 5 il più in basso possibile.
C) Selezionare una testina 1 e un mandrino filettato 2‚ di misura corrispondente a quella dell'inserto
filettato; scambiare le testine 1 servendosi di una chiave 3, e inserire il mandrino filettato 2‚ nel pomello
di regolazione 4. Il pomello del mandrino filettato 5 dovrebbe essere a contatto con il pomello
di regolazione 4.
D) Ruotare il pomello di regolazione 1 per regolare la lunghezza della filettatura 2‚ del mandrino
filettato in modo da farla corrispondere alla lunghezza dell'inserto filettato 3; quindi abbassare il
controdado 4 per bloccare il pomello di regolazione 1 in posizione.
E) Avvitare l'inserto filettato 1 sul mandrino ruotando l'inserto 1 o il pomello del mandrino 2‚
fino all'avvenuto contatto tra la testa dell'inserto 3 e la testina 4. L'estremità dell'inserto filettato
dovrebbe essere allineata all'estremità del mandrino filettato.
F) Inserire l'inserto filettato così avvitato 1 nel foro praticato sul pezzo 2. Stringere le impugnature
dell'utensile 3 finché l'inserto filettato risulti ben fissato formando un'incurvatura 4 contro il retro
del pezzo 2; tenere ferme le impugnature dell'utensile 3 e regolare il bullone 5 fino all'avvenuto
contatto con l'impugnatura superiore 6. Quindi ruotare il dado 7 verso l'alto per bloccare il bullone
5. In questo modo si ottiene una corsa adeguata per proteggere le filettature degli inserti filettati
nonché la rivettatrice.
NOTA Una corsa adeguata consente di installare saldamente le filettature degli inserti filettati. LA PROVA
PILOTA RISULTA PERTANTO SEMPRE OPPORTUNA PRIMA DI PROCEDERE ALL'INSTALLAZIONE DI
INSERTI FILETTATI DI DIVERSA MISURA.
G) Rilasciare completamente le impugnature dell'utensile 1 e ruotare il pomello del mandrino
filettato 2 per svitare il mandrino filettato dall'inserto filettato installato 3. Le filettature degli
inserti filettati sono fissate saldamente al pezzo 4.
NOTA Qualora l'inserto filettato successivo da installare sia della medesima misura di quello precedente,
basterà ripetere la procedura descritta dal punto 5) al punto 7). Non sarà necessaria alcuna regolazione!
H) Fissare un oggetto 1 avvitando un bullone o una vite 2‚ all'inserto filettato installato 3.
HAND RIVET NUT TOOL
GB
A) Drill a Hole on Workpiece 1, Hole diameter 2 should be 0.1 mm or 0.004" larger than Rivet
Nut diameter 3.
B) Still lock Tool Handles, turn up Adjusting Knob 1 and Lock Nut 2, then loose Bead Chain Lock
3 to open Tool Handles fully 4, and turn down the Stroke Bolt and Stroke Nut 5 to the lowest
position.
C) Select Nosepiece 1 and Threaded Mandrel 2 to be same size as Rivet Nut threaded size,
exchange Nosepieces 1 by Wrench 3, and insert threaded Mandrel 2 into Adjusting Knob 4. The
Threaded Mandrel Knob 5 should touch Adjusting Knob 4.
D) Rotate Adjusting Knob 1 to adjust thread length 2 of Threaded Mandrel to be same as Rivet
Nut length 3, then turn down the Lock Nut 4 to lock Adjusting Knob 1 position firmly.
E) Screw the Rivet Nut 1 onto Threaded Mandrel by turning either Rivet Nut 1 or Threaded
Mandrel Knob 2 until Rivet Nut head 3 touches Nosepiece 4. The Rivet Nut end should be flush
with the Threaded Mandrel end.
F) Insert the screwed Rivet Nut 1 into the drilled Hole of Workpiece 2, squeeze Tool Handles 3
until Rivet Nut is installed firmly by forming a bulge 4 against the Workpiece 2; still hold Tool
Handles 3 and adjust Stroke Bolt 5 up to touch upper Handle 6, then turn up Stroke Nut 7 to lock
Stroke Bolt 5. Now the proper Stroke is built up to protect the Rivet Nut threads and this Rivet
Nut Tool as well.
NOTE
A proper Stroke ensures Rivet Nut threads to be installed securely, SO THE PILOT TEST IS ALWAYS
RECOMMENDED BEFORE INSTALLING DIFFERENT SIZES OF RIVET NUT.
G) Release Tool Handles 1 fully and rotate Threaded Mandrel Knob 2 to unscrew Threaded
Mandrel from the installed Rivet Nut 3. The Rivet Nut threads are built up securely in the
Workpiece 4.
NOTE If the next installing Rivet Nut is same size as previous one, just repeat above 5 - 7 procedure.
Do not need any adjustment!
H) Fasten an Object 1 by screwing Bolt or Screw 2 to the installed Rivet Nut 3.