1
may only be unscrewed from the cartridge again when the cartridge is
empty – otherwise, there is a danger
of injury resulting from the uncontrolled escape of CO2!
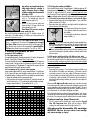
• Place cartridge with pressure reducer in the
stand. The cartridge must always be
upright during the supply of CO2.
• Connect CO2 hose to pressure reducer and
secure with clip (To open, slide the ends
of the clip apart at the side).
Your Nano CO2 pressure reducer
is now ready for use.
Now install the other components of your CO2 fertilizer system: CO2
check valve, CO2 bubble counter, CO2 diffusor, etc. Please observe the
respective instructions for use.
IMPORTANT: When using a CO2 night cut-off valve (solenoid
valve), it is imperative to fit a hose with a compressive strength
of at least 5 bar between the pressure reducer and the night cut-off
valve. Weaker hoses may burst. We recommend the special Softflex
CO2 hose from Dennerle, pressure-proof to 7 bar (art. no. 3060).
3 Setting the amount of CO2
(number of bubbles)
3.1 The right amount of CO2
For magnificent plant growth, Dennerle recommends a CO2 level in the aquarium of
between 15 and 30 mg/l, whereby 20 to 25 mg/l is ideal.
The number of bubbles per minute required to achieve this level of CO2 depends on
a variety of factors - the types of plants in the aquarium, motion of the water, surface area/volume ratio, etc. The appropriate CO2 supply level thus requires to be determined individually for the specific aquarium concerned.
3.2 Determining the CO2 content in the aquarium
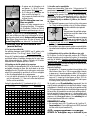
Certain correlations apply between CO2 content, carbonate hardness (CH) and pH value.
The CO2 content in the water can be calculated accurately on the basis of the pH value
and carbonate hardness. Suitable pH and CH tests are available from specialist retailers.
• Measure the carbonate hardness of your aquarium water.
• Read the pH value which corresponds to the desired CO2 content from the table. You
should set this pH value +/- 0.1 by adjusting the number of bubbles accordingly.
Example: Carbonate hardness 4 °d, recommended pH 6.8 +/- 0.1.
Too much CO2
KH
2
3
4
5
6
7
8
9
10
11
12
13
14
6,3
32
48
64
80
96
111
127
143
159
175
191
207
223
6,4
25
38
51
63
76
89
101
114
126
139
152
164
177
CO2 correct
pH-value
6,5
20
30
40
50
60
70
80
90
100
111
121
131
141
6,6
16
24
32
40
48
56
64
72
80
88
96
104
112
6,7
13
19
25
32
38
44
51
57
63
70
76
82
89
6,8
10
15
20
25
30
35
40
45
50
55
60
65
70
6,9
8
12
16
20
24
28
32
36
40
44
48
52
56
Not enough CO2
7,0
6
10
13
16
19
22
25
29
32
35
38
41
44
7,1
5
8
10
13
15
18
20
23
25
28
30
33
35
7,2
4
6
7
10
12
14
16
18
20
22
24
26
28
7,3
3
5
6
8
10
11
13
14
16
18
19
21
22
7,4
3
4
5
6
8
9
10
11
13
14
15
16
18
7,5
2
3
4
5
6
7
8
9
10
11
12
13
14
3.3 Setting the number of bubbles
Rule of thumb for the basic setting*: Begin with approx. 1 bubble per minute per 10 l
of aquarium water, which means approx. 10 bubbles per minute for a 100 l aquarium.
Adjust the CO2 supply to the desired CO2 content in small steps spread over several
days. Please note: The more vigorously the surface of the water is set in motion, e.g.
by filters or additional aeration, the more CO2 will be expelled from the aquarium again.
3.3.1 Procedure for pressureless CO2 diffusors, e.g. Dennerle CO2 Flipper
• Open control valve slowly and at first only slightly (approx. 1 turn), until the first
bubbles issue from the CO2 diffusor.
• Open control valve slowly, initially only very slightly, until the first bubbles issue
from the opening of the bubble counter.
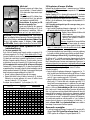
• Set the desired number of bubbles on the control valve:
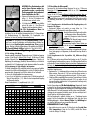
- Turn in clockwise direction to increase the num–
+
ber of bubbles
- Turn in anti-clockwise direction to decrease the
number of bubbles. Please note: There is always a certain delay before the number of bubbles changes in response to adjustment of the control valve. The number of bubbles should
thus be set in small steps of 1-2 scale marks, always waiting a couple of minutes until the new setting has stabilised.
• Check the number of bubbles regularly in the first few days, correcting as necessary. After this initial period it is generally sufficient to check the number of bubbles once a week.
3.3.2 Procedure with Crystal Line CO2 diffusors (pot, pipe)
These CO2 diffusors require slightly more pressure in order to force the CO2 through
the extremely fine-pored atomizer. The supply hose acts as a pressure buffer here.
The necessary build-up or reduction of pressure in the hose thus takes markedly
longer than with pressureless diffusors. The shorter the hose, the more quickly the
correct number of bubbles can be set.
Recommended procedure:
• Open control valve by approx. 1½ turns and wait until the first bubbles issue
from the diffusor. If no bubbles issue after approx. 15-30 minutes, open the
control valve in successive ½-turn steps, waiting 15-30 minutes in each case.
• As soon as bubbles issue regularly from the diffusor, carry out fine setting of 12 scale marks, in each case waiting 10-15 minutes for the new setting to stabilise. Once the desired setting is attained, the system will run at a stable number of bubbles.
When using a CO2 night cut-off valve (solenoid valve) it also takes some time
for the necessary pressure to build up in the hose after switching the system on in the
morning (depending on the hose length and the set number of bubbles). This can be
compensated for by controlling the night cut-off valve with a separate time switch, so
as to switch the valve on 1 hour ahead of the lighting, for example.
If the setting of the control valve is reduced in larger steps of approx. 1 turn, the pressure reducer will release the superfluous pressure through a small vent hole – audible
as a brief hiss. This venting serves to quickly stabilise the newly set number of bubbles.
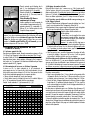
Professional tip from Dennerle:
• The CO2 content can be checked most simply using the Crystal
Line CO2 long-term test. When the test shows a GREEN
reading, the water contains exactly the right level of CO2.
4 Replacing the disposable CO2 cartridge
IMPORTANT: Unscrew pressure reducer from cartridge
only when cartridge is empty!
9