1
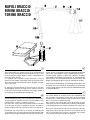
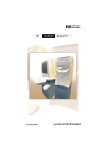
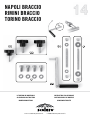
13
NAPOLI BRACCIO
RIMINI BRACCIO
TORINO BRACCIO
14
10
12
5
13
ISTRUZIONI DI MONTAGGIO
INSTRUCTION D’ASSEMBLAGE
ASSEMBLING INSTRUCTION
INSTRUCCIONES DE MONTAJE
MONTAGEANLEITUNG
OPBOUWINSTRUCTIE
www.scolaro-parasol.it · [email protected]
6
NAPOLI BRACCIO
RIMINI BRACCIO
TORINO BRACCIO
6
7
4
8
9
10
11
13
12
3
2
5
1
1
I
Vi ringraziamo per aver scelto i nostri prodotti.
Avete acquistato un articolo frutto di un’esperienza di
oltre 40 anni nella produzione di ombrelloni e di un processo produttivo 100% Made in Italy e interamente interno alla ditta Scolaro.
I ns prodotti sono venduti in più di 50 Paesi in tutto il
mondo e sono adatti a resistere nelle più diverse condizioni atmosferiche e climatiche come, pioggia, umidità,
vento, sole, ecc.
Di seguito Vi comunichiamo le istruzioni per un corretto
assemblaggio e alcuni consigli per un utilizzo e una manutenzione corretta per assicurare una lunga durata e
una migliore funzionalità dell’ombrellone.
1
uk
Many thanks for your choice and trust.
You have bought an item fruit of an experience gathered in
40 years parasol production and of a 100% Made in Italy,
inside Scolaro’s factory, production process.
Our items are sold in over 50 countries and are suitable
to resist and long last in different climatic and atmospheric condition like rain, moisture, wind, sun and so on.
Hereinafter the instruction for a correct assembling and
some advices for the correct employ and maintenance that
will grant long lasting and a better functionality of the parasol.
1
D
Vielen Dank fuer Ihre Wahl und Ihr Vertrauen.
Unser Schirm ist Ergebnis einer 40 jaehrigen Erfahrung
und eines 100% Made in Italy Produktionsprozesses.
Unsere Artikel werden in ueber 50 Laendern verkauft,
sind widerstandsfaehig und koennen in verschiedenen
klimatischen und atmosphaerischen Konditionen wie
Regen, Feuchtigkeit, Wind, Sonne, eingesetzt werden.
Nachstehend unterbreiten wir Montageanleitungen und
Hinweise fuer eine korrekte Verwendung und Wartung
um eine lange Dauer und eine bessere Zweckdienlichkeit
zu gewaehrleisten.
1
F
Merci pour avoir acheté nos produits.
Vous avez acheté un produit, fruit d’une expérience de
40 ans dans la production de parasols et d’un procédé
de fabrication «100% Made in Italy» entièrement réalisé
dans l’usine de la société Scolaro.
Nos produits sont vendu dans plus de 50 pays et sont
aptes pour résister aux différentes conditions climatiques
et atmosphériques comme pluie, humidité, vent, soleil, etc.
Nous vous transmettons ci-joint les instructions de montage correct ainsi que des conseils sur le mode d’utilisation et d’entretien pour assurer une durée plus longue
et un meilleur fonctionnement du parasol.
1
E
Le agradecemos por haber elegido nuestros productos.
Han adquirido un artículo fruto de la experiencia de más
de 40 años en la fabricación de parasoles, con una fabricación 100% italiana y totalmente producidos en nuestras
instalaciones de Scolaro.
Nuestros productos se venden en más de 50 paises en
todo el mundo, adaptándose a las diferentes condiciones
atmosféricas y climatológicas como la lluvia, la humedad,
el viento, el sol, ect.
A continuación le informamos de las instrucciones para
un correcto montaje y algunos consejos para la correcta
utilización y mantenimiento, asegurando de esta manera
una larga duración y mejor funcionamiento del parasol.
1
nl
Hartelijk dank voor uw keuze voor een parasol uit het
SCOLARO assortiment.
U heeft hiermee een parasol gekocht die het resultaat
is van meer dan 40-jaar ervaring en die volledig in onze
eigen fabriek in Italië is geproduceerd.
Onze parasols worden wereldwijd in meer dan 50 landen
verkocht. Zij zijn zeer stabiel en bestand tegen verschillende weersomstandigheden zoals regen, vocht, wind
en zonneschijn.
Voor een juist gebruik en om gedurende lange tijd plezier
van uw parasol te hebben verwijzen wij u naar de hierbij
ingesloten gebruiks- en onderhoudsvoorschriften.
ISTRUZIONI DI MONTAGGIO
1
I
A Aprire tutti i car toni, posizionare la base (1) a
terra e fissare con le apposite viti (5) il tubo (2). Posizionare la zavorra o mattonelle in cemento (3)
negli appositi alloggiamenti della base (1).
B Sollevare il braccio orizzontale (7) fino a creare un
angolo di 90° con il sostegno (4) e bloccarlo inserendo e avvitando la vite (6).
C Inserire il sostegno (4), già completo di tubo di ferro
quadrato nella parte inferiore, nel tubo rotondo (2)
e fissare con le viti (12).
D Agganciare il moschettone (8) collocato alla fine del
cavo in acciaio all’anello (9).
E Agganciare l’ombrellone (11) all’estremità del braccio
orizzontale (7) e inserire la vite di fissaggio (10).
F Avvitare e stringere forte le viti nere (12).
MANUALE D’USO
I Prima di aprire l’ombrellone togliere il legaccio (cinturino) e muovere le stecche per facilitare l’apertura.
II Inserire la manovella (13) nell’apposita feritoia del
meccanismo e ruotare lentamente per aprire facendo
attenzione a non forzare in caso di attrito.
III Agganciare la stecca blocco antivento e fissarla con
la vite (14) negli appositi alloggiamenti predisposti
nel sostegno (4).
IV Quando l’ombrellone sarà per fettamente aperto,
agganciare l’apposito cordino posto all’interno inserendola nello strozzatore di sicurezza.
V Per la chiusura invertire le operazioni. Prima di tutto
sganciare la corda di sicurezza e la stecca blocco
antivento. Soltanto dopo aver eseguito queste opera-
zioni iniziare a girare la manovella verificando che non
vi siano impedimenti alla chiusura. Fare attenzione
che la manovella venga ruotata molto lentamente,
affinché il filo in acciaio resti in tensione. Questa
operazione va eseguita con la massima attenzione
onde evitare di rompere il meccanismo manovella.
VI Per l’ombrellone è necessaria una zavorra minima di
130 kg composta da mattonelle in cemento facilmente
reperibili o eventualmente dai ns articoli:
BC5050
BC5151 – BC5151G
BV5050G – BV5050B
In caso di particolari ambienti o situazioni atmosferiche potrebbe essere necessario aggiungere
maggior peso. ULTERIORI INFORMAZIONI A PAGINA 61 DEL CATALOGO 2013. L’azienda Scolaro, i
nostri collaboratori e rivenditori sono a disposizione
per consigli ed eventuale supporto tecnico.
VII L’ombrellone da Voi acquistato è girevole 360° sia
da chiuso che da aperto. Per effettuare tale operazione svitare le viti nere (12) alla base del sostegno
e agire su di esso per farlo ruotare.
VIII L’ombrellone inoltre può essere inclinato. Per effettuare tale operazione svitare la vite (14) o volantino
nero che fissa la stecca blocco antivento nel sostegno (4) e posizionare la stecca blocco antivento nelle
altre posizioni già predisposte.
AVVERTENZE
• Leggere attentamente e conservare le istruzioni di
montaggio e il manuale d’uso.
• La base va zavorrata con il peso indicato. L’insufficienza di peso sulla base compromette seriamente
la stabilità dell’ombrellone.
• Rimuovere sempre la manovella quando non utilizzata. Tenere lontana dalla portata dei bambini.
• In caso di vento chiudere sempre l’ombrellone e rimuoverlo dalla struttura. Non lasciare mai l’ombrellone
incustodito aperto. Improvvisi colpi di vento possono danneggiare o rovesciare l’ombrellone. Ricordare
sempre che l’ombrellone non è una struttura fissa.
La ditta Scolaro non potrà essere ritenuta responsabile
per danni ai prodotti forniti, cose o persone derivanti
da un utilizzo scorretto e dal mancato rispetto delle
istruzioni e direttive su riportate.
MANUTENZIONE
LEGNO
Dove il modello scelto presenti componenti o parti in legno:
• il legno è un’essenza naturale e come già menzionato è trattato superficialmente con impregnante
ecologico. È quindi da considerarsi naturale che
nell’utilizzo all’esterno possa cambiare colore e
sbiadirsi. Per ottenere nuovamente l’originale brillantezza è sufficiente trattare nuovamente le parti
in legno con impregnante adatto, facile da trovare
nei negozi specializzati.
TESSUTO
• Il tessuto impiegato è trattato antimuffa ed impermeabilizzato per respingere al massimo l’acqua e
le macchie mantenendone la traspirabilità.
Si raccomanda di seguire le istruzioni seguenti di manutenzione per rendere ottimale la durata del tessuto:
– Togliere periodicamente depositi di polvere, macchie
e altro tipo di sporco per evitare che anche dopo la
pulizia rimangano tracce visibili.
– È importantissimo assicurarsi che la copertura sia
perfettamente asciutta prima di chiudere l’ombrellone. Durante i mesi di non utilizzo l’ombrellone deve
essere riposto in un ambiente asciutto.
COMPONENTI
• Le parti in acciaio, la viteria e gli accessori sono
zincati antiruggine. Per garantire e assicurare una
maggiore durata del prodotto è consigliabile comunque porre l’ombrellone e la base al riparo durante i
mesi invernali o durante i periodi di non utilizzo.
• Durante ogni stagione verificare periodicamente lo stato
e la funzionalità dei componenti soprattutto dopo un
periodo lungo dove l’ombrellone non sia stato utilizzato.
MECCANISMO MANOVELLA
• Periodicamente e comunque almeno una volta all’anno, è opportuno applicare olio lubrificante negli ingranaggi del meccanismo manovella. Tale operazione è
particolarmente consigliata dopo un periodo lungo
di non utilizzo o comunque all’inizio di ogni stagione
dopo il ricovero invernale.
Per ogni eventualità ribadiamo che la ditta Scolaro è a
vostra disposizione per ogni supporto tecnico.
ASSISTENZA + GARANZIA
• Durante il periodo di garanzia, in caso di danno derivante da difetto di fabbricazione, la ditta Scolaro
fornisce assistenza, fornitura pezzi di ricambio gratuitamente oppure, dove necessario, la sostituzione
dell’ombrellone completo.
• Trascorso il periodo di garanzia, la ditta Scolaro può
fornire un servizio di assistenza attraverso i nostri
rivenditori di zona o direttamente per molti anni successivamente alla vendita, quale fornitura prezzi di
ricambio e possibilità di eseguire riparazioni.
ASSEMBLING INSTRUCTION
1
uk
A Open all carton boxes, position the base (1) on the
floor and fix the tube (2) with its screws (5). Put into
the spaces (1) the cement plates (3).
B Lift up and stop the horizontal arm (7) forming a 90°
corner with the side post (4) and fix it putting into
and screwing the screw (6).
C Put into the round tube (2) of the base the parasol
wooden post (4) at which the square iron tube that
has to go into the base, is already fixed. Fasten with
the screws (12).
D Unhook the holdfast (8) that is positioned at the end
of the metallic wire, and fasten with the ring (9).
E Hook now the parasol (11) at the upper end of the
arm (7) and put into the screw for the fastening (10).
F Screw and fasten strongly the black screws (12).
DIRECTIONS FOR USE
I Take the parasol string away, move the ribs to make
easier the opening.
II Put the crank (13) into the proper loophole of the
mechanism and turn slowly to open paying attention
that there are no obstacles for the closing.
III Fasten the windstop rib at the side post (4) with the
screw (14).
IV When the parasol will be perfectly opened, fix it with
the proper safety rope and put it into the rope stop
V To close the parasol unhook the safety rope and the
wind stop rib. Only after this steps, turn slowly the hand
crank paying attention that there are no obstacles for
the closing. Attention!!! the crank has to be turned
slowly, as the iron wire has always to be strained.
This step has to be done with the utmost attention
in order to avoid to break the winding mechanism.
VI For this parasol a ballast of 130 kg is required. The
cement plates or pots can be found easily or are
available in our range of optional items. See Art
BC5050
BC5151 – BC5151G
BV5050G – BV5050B.
In case of particular environments or special atmospheric condition it could be necessary to increase
the ballast. FURTHER INFORMATION ON PAGE 61
OF THE BROCHURE 2013. The company Scolaro,
its staff and all retailers are at your disposal for
any further information and technical assistance.
VII The parasols you have bought is revolving 360°
whether closed or opened. Revolving is possible by
unscrewing the black screws (12) at the end of the
side post and by turning it.
VIII The parasol can be inclined. This is possible by unscrewing the black screw (14) that fastens the wind stop ribs
at the side post (4) and then by fasten the same wind
stop ribs in another of the possible position.
ATTENTION
• Before use, directions and assembling instructions,
which are inside the package, have to be kept and
read carefully.
• The base has to be ballasted. An insufficient weight
will seriously compromise the stability of the parasol.
• Always remove crank when not in use and keep out
of reach of children.
• To avoid damage or personal injury, parasol must
be closed and removed from the support when unattended and/or in windy conditions. Remember
always that the parasol is not a fixed construction.
The company Scolaro cannot be held responsible for
damage to goods supplied, persons or property resulting from misuse and failure to follow instructions and
guidelines on indications.
MAINTENANCE
WOOD
• Referring to wooden components employed for the
production of the parasol we remind that wood is a
natural essence and treated with an ecologic varnish. It is therefore obvious that due to an employ
outside the colour looses its brightness and fades.
The parasol can be restored by a new treatment with
proper products easy to find in specialized shops.
FABRIC
• The fabric is waterproof and anti mould treated to
reject water, spots and grant transpiration. Please
follow our maintenance instruction to grant the long
lasting of the fabric:
– Remove often dust deposits, spots and any type of
dirt in order to avoid trails after cleaning.
– It’s very important to close the parasol only when it is
perfectly dry. During the winter and when the parasol is
not employed, it has to be stored in dry environment.
COMPONENTS
• The steel components, screws and accessories are
anti rust treated. Anyway for a long lasting of the parasol, during the winter and when the it is not employed,
the parasol has to be stored in dry environment.
• During every season it is necessary to check the
functionality of all components, especially after a
long period of non-employ.
WINDING MECHANISMUS
• Periodically and at least once a year, you should
apply lubricating oil in the crank gear mechanism.
This is especially recommended after a long period
of inactivity at the beginning of each season after
the winter shelter.
The company Scolaro is at your disposal for technical
assistance.
ASSISTANCE + WARRANTY
• During the warranty period, in case of damages caused
by production faults, the company Scolaro grants assistance, supplies spare parts without any charge,
or, if necessary, replaces the complete parasol.
• After the warranty period, the company Scolaro can
grant assistance through its resellers or also directly
for many years after the sale, by supplying spare
parts or repairing the parasol.
MONTAGEANLEITUNG
1
D
A Zunaechst alle Kartons oeffnen. Staender (1) auf den
Boden legen und das Rohr (2) mit den Schrauben (5)
befestigen. Kiesbetonplatten (3) in den Staender (1)
einlegen.
B Der waagerechte Arm (7) wird aufgestellt. Es ergibt
sich somit ein 90° Winkel. Anhand der Schraube (6)
wird der Arm mit dem Mast (4) verbunden.
C Nun wird der Mast (4), der bereits mit einem quadratischen Eisenrohr ausgestattet ist, in das runde Rohr
(2) des Staenders eingefuegt. Mit dazu bestimmten
Schrauben (12) befestigt.
D Klammer (8) am Ring (9) befestigen.
E Schirm (11) am Endteil des Armes (7) einhaengen.
Schraube zur Befestigung einfuegen (10).
F Schwarze Schrauben (12) werden nun fest angeschraubt.
GEBRAUCHSANWEISUNGEN
I Schirmbaendel abnehmen und Holzstreben bewegen
um die Oeffnung zu erleichtern.
II Kurbel (13) in den Schlitz einfuegen, langsam drehen
und den Schirm oeffnen. Vermeiden, dass Hindernisse die Schliessung nicht ermoeglichen.
III Windstopstrebe mit dazu bestimmter Schraube (14)
am Mast (4) befestigen.
IV Nach der Oeffnung des Schirmes Sicherheitsschnur
mit dem Sicherheitswuerger befestigen.
V Um den Schirm zu schliessen zunaechst die Sicherheitsschnur und die Windstopstrebe abmachen. Nur
danach langsam die Kurbel drehen. Bitte vermeiden,
dass Hindernisse die Schliessung nicht ermoeglichen.
Achtung!!! die Kurbel sehr langsam drehen. Der Stahldraht muss immer gespannt bleiben. Der Kurbelmechanismus koennte sonst beschaedigt werden.
VI Fuer die Schirm eist ein Ballast con 130 Kg erforderlich. Es koennen Kiesbetonplatten oder Betontoepfe eingesetzt werden, die leicht auffindbar sind
oder, die auch wir als Optional anbieten. Siehe Art
BC5050
BC5151 – BC5151G
BV5050G – BV5050B. Bei besonderen Einsaetzen oder klimatischen Faktoren koennte es notwendig sein den Ballast zu verstaerken. WEITERE INFORMATIONEN AUF SEITE 61
- PROSPEKT 2013. Die Firma Scolaro, ihre Mitarbeiter und Fachhaendler stehen jederzeit fuer weitere
Informationen und technische Hilfe zur Verfuegung.
VII Dieser Schirm ist 360° schwenkbar. Um den Schirm
zu schwenken muss man die schwarzen Schrauben
(12), die am unteren Ende des Mastes befestigt sind
abschrauben und dann den Mast drehen.
VIII Die Neigung dieses Schirmes ist verstellbar. Man muss
die schwarze Schraube (14), die die Windstopstrebe
am Mast (4) befestigt, abschrauben und in einer der
moeglichen Positionen wieder befestigen.
ANWEISUNGEN
• Vor dem Gebrauch, Gebrauchsanweisungen und
Montageanleitungen, die in der Verpackung enthalten
sind, aufmerksam lesen und danach aufbewahren.
• Der Staender muss mit dem empfohlenen Ballast beschwert werden. Falls unzureichend beschwert, wird
die Stabilitaet des Schirmes ernsthaft gefaehrdet.
• Nach Gebrauch Kurbel immer entfernen und von
Kindern fernhalten.
• Um Schaden und Verletzungen zu vermeiden, muss
der Schirm bei starkem Wind immer geschlossen
und vom Gestell abgenommen werden. Schirm nie
unbeaufsichtigt geoeffnet lassen. Immer bedenken,
dass der Schirm keine feste Konstruktion ist.
Die Firma Scolaro ist bei Missbrauch und Nichtbefolgung
der Anleitungen und Anweisungen nicht fuer Schaeden
an Eigentum und Personen verantwortlich.
WARTUNG
HOLZ
• Die Holzbestandteile des Schirmes sind mit einer umweltfreundlichen Schutzlasur behandelt. Holz ist eine
natuerliche Essenz, die bei Einsatz im Freien ihren Glanz
verliert. Man kann alle Holzbestandteile mit speziellen
Mitteln, die Sie im Fachhandel finden koennen, neu
lackieren und behandeln.
STOFF
• Der Stoff ist wasser- und schimmelfest behandelt,
ist schmutzabweisend und luftdurchlaessig. Bitte
nachstehend aufgefuehrte Hinweise befolgen:
– Entfernen Sie oefters Staub, Flecken und jeglichen
Schmutz damit keine Spuren nach der Reinigung
uebrigbleiben.
– Bitte schliessen Sie den Schirm nur wenn der Stoff
vollkommen trocken ist. Waehrend der Wintermonate
und wenn nicht eingesetzt, muss der Schirm trocken
aufbewahrt werden.
BESTANDTEILE
• Stahlbestandteile, Schrauben und Zubehoer sind
rostfrei behandelt. Um eine lange Dauer des Produktes zu gewaehrleisten empfehlen wir allerdings
den Schirm waehrend der Wintermonaten und wenn
nicht eingesetzt trocken aufzubewahren.
• In jeder Saison und vor allem wenn der Schirm seit
langem nicht verwendet wird, muessen alle Bestandteile vor dem Einsatz kontrolliert werden.
KURBELMECHANISMUS
• Regelmaessig und mindestens einmal im Jahr ist es
notwendig das Getriebe mit Schmieroel einzuoelen.
Dies ist besonders empfohlen wenn der Schirm fuer
einen langen Zeitraum nicht eingesetzt worden ist
und nach der Winterunterbringung.
Die Firma Scolaro steht fuer technische Informationen
zur Verfuegung.
KUNDENDIENST+GARANTIEN
• Waehrend der Garantiefrist und im Falle von Beschaedigungen, die von Herstellungsfehlern abhaengen,
liefert die die Firma Scolaro kostenlos Ersatzteile
oder, falls noetig, ersetzt den kompletten Schirm.
• Nach Ablauf der Garantiefrist kann die Firma Scolaro
direkt oder durch Fachhaendler Kundendienst anbieten. Ersatzteile koennen auch nach vielen Jahren
geliefert werden. Es besteht auch die Moeglichkeit
die Schirme zu reparieren.
INSTRUCTION D’ASSEMBLAGE
1
F
A Ouvrir tous les cartons. Positionner le pietement (1)
par terre et fixer le tube (2) avec les vis (5). Inserer
les dalles en ciment (3) sur le pietement (1).
B Lever et bloquer le bras horizontal (7) afin de former
un angle 90° avec le mat (4). Revisser la vis (6).
C Inserer le mat de bois (4) du parasol dans le tube
ronde (2) du pied. le mat est deja avec tube en fer
carre. Fixer avec les vis (12).
D Decrocher l’etau (8) positionne à la fin du fil d’acier
et fixer sur le bague (9).
E Accrocher le parasol (11) sur l’extremite superieure
du bras (7) et inserir la vis pour le fixage (10).
F Reviser les vis fortement.
MODE D’EMPLOI
I Oter le cordon du parasol et mouvoir les baleines
pour faciliter l’ouverture du parasol.
II Inserer la manivelle (13) dans la fente speciale du
mecanisme, tourner lentement pour ouvrir et preter
attention que la fermeture n’ait pas des obstacles.
III Fixer la baleine bloque anti vent fixer avec la vis (14)
dans les fentes prévues sur le mat.
IV Quand le parasol sera ouvert, pourvoir a le bloquer
avec la corde au dedans du parasol, qui doit etre
fixee au crochet de surete.
V Pour fermer le parasol decrocher la corde de surete et
la baleine windstop. Tourner la manivelle lentement.
preter attention que la fermeture n’ait pas des obstacles. Attention!!! Tourner la manivelle lentement,
le fil d’acier doit rester toujours tendu. Preter particulaire attention pour eviter la rupture du mechanisme.
VI Pour ce parasol il faut un ballast de 130 Kg. Il s’agit
de dalles en ciment ou vases qu on peut trouver
facilement ou aussi acheter chez nous. Voire Art
BC5050
BC5151 – BC5151G
BV5050G – BV5050B. En cas de milieux ou conditions atmospheriques particulaires il faut augmenter le ballast. ULTERIEURES
INFORMATIONS A PAGE 61 DU CATALOGUE 2013.
La maison Scolaro, nos collaborateurs et revendeurs
sont à votre disposition pour tous renseignements
et assistance technique.
VII Le parasol peut tourner 360°. Il faut devisser les vis
noires (12) et agir sur le mat.
VIII Le parasol peut etre incliné. Il faut devisser la vis
(14) noire que fixe le bloque antivent au mat (4) et
revisser le bloque dans une autre possible position.
INSTRUCTIONS
• Lire attentivement les instructions et le mode d’emploi et les conserver.
• Le pietement doit etre lesté come par nos instructions. L’insuffisance de poids peut compromettre
sévèrement la stabilité du parasol.
• La manivelle doit etre toujours enlevé quand le parasol
n’est pas utilisé. Tenir lointain de la portée des enfants.
• En cas de vent fort le parasol doit etre fermé et enlevé.
Le parasol doit jamais etre laissé sans surveillance.
Coup de vent pouvons endommager ou se renverser. Se
rappeler que le parasol n’est pas une construction fixe.
La societé Scolaro ne peut pas etre responsable pour
dommages à personnes ou choses en cas de incorrect
emploi ou inobservation des instructions.
ENTRETIEN
BOIS
• Les composantes en bois sont traités avec une vernis
protecteur. Bois est une essence naturele et du à un
emploi à l’éxterieur elle peut perdre sa brilliant. On
peut retraiter le parasol avec des produits specials
achetable chez revendeurs spécialisés.
TISSU
• Le tissu est traité anti-tâches et imperméabilisé.
Nous vous recommandons de suivre les instructions
d’entretien pour garantir la durée optimale du tissu:
– Enlever périodiquement poussières, tâches et autres
types de salissures pour éviter toutes traces après
le nettoyage.
– Il est tres important de fermer le parasol seulement
quand il est sec. Pour garantir et assurer une plus
longue durée d’utilisation, il est conseillé de mettre
le parasol à l’abri dans un endroit sec pendant l’hiver ou quand il n’est pas utilisé.
COMPOSANTS
• Les composants en acier, la visserie et les accessoires sont zingués antirouille. Pour garantir et assurer
une plus longue durée d’utilisation, il est conseillé
de mettre le parasol à l’abri dans un endroit sec
pendant l’hiver ou quand il n’est pas utilisé.
• A chaque saison il faut contrôler tous les composants
surtout si le parasol n’a été pas utilisé pendant longtemps.
MECANISME MANIVELLE
• Périodiquement et au moins une fois par an, vous
devez appliquer de l’huile de graissage dans le mécanisme. Ceci est particulièrement recommandé après
une longue période d’inactivité ou tous au moins au
début de la saison, après le refuge d’hiver.
La societé Scolaro reste à votre disposition pour renseignements techniques
ASSISTANCE+GARANTIE
• Pendant la période de garantie la societé SCOLARO
peut fournir des pièces détachées ou remplacer le
parasol si le dommage dépend uniquement d’un
défaut de fabrication.
• Après la période de garantie le service d’assistance
est donné par nos revendeurs ou directement par la
societé Scolaro. Les pièces détachées sont disponibles plusieurs années après la vente du parasol et
la Société SCOLARO peut également effectuer des
réparations avec refacturation du coût.
INSTRUCCIONES DE MONTAJE
1
E
A Abra todas las cajas. Posicione la base (1) en el suelo y fije con los tornillos (2) el tubo (5) con la base.
Coloque las losas de cemento (3) en el alojamiento
de la base (1).
B Levante el brazo horizontal (7) al fin de formar un ángulo
de 90° con el soporte (4) inserte y apriete el tornillo (6).
C Inserte el soporte (4) ya completo de un tubo de hierro cuadrado en la parte inferior, en el tubo redondo
(2) y fijelo con los tornillos (12).
D Enganche el mosquetón (8) colocado al final del cable de acero, a la anilla (9).
E Enganche el parasol (11) a la extrmidad del brazo
horizontal (7) e inserte el tornillo de fijación (10).
F Atornille y apriete fuertemente los tornillos negros (12).
INSTRUCCIONES DE USO
I Antes de abrir el parasol, quite la cinta y mueva las
varillas para facilitar la apertura.
II Inserte la manivela (13) en el orificio del mecanismo
y gire lentamente para abrir el parasol, prestando
atención de no forzar en caso de roce.
III Enganche la varilla de bloqueo antiviento y fìjela con
el tornillo (14) en los orificios predispuestos en el
soporte (4).
IV Cuando el parasol esté completamente abierto, enganche el cable apropriado que se encuantra por la
parte interior y insertálo en la brida de seguridad .
V Para cerrar el parasol invertas las operaciones. Primero desenganche el cable de seguridad y la varilla de
bloqueo antiviento. Sólo después de haber realizado
esta operación, girar la manivela verificando que no
haya impedimento para el cierre. Prestar atención y
girar muy lentamente la manivela, para que el cable
de acero vaya destensándose. Esta operación debe
de ser realizada con la máxima precaución para evitar
que se rompa el mecanismo de la manivela.
VI Es necesario el uso de losas de cemento con un
mínimo peso de 130 kg, que tenemos disponibles
y sirven para nuestros articulos.
BC 5050
BC 5151 – BC 5151G
BV5050G – BV5050B
En algunos casos por situaciones atmosféricas será
necesario poner más peso. PUEDES ENCONTRAR
MÁS INFORMACIONES EN LA PÁGINA 61 DEL CATÁLOGO 2013. La firma Scolaro así como sus colaboradores y distribuidores, está a su disposición
para aconsejarle y darle soporte técnico.
VII El parasol se puede girar hasta 360º, tanto cerrado
como abierto. Para hacer esta operación tienes que
desatornillar los tornillos negros (12) en la base del
soporte y hacerlo girar.
VIII El parasol también puede inclinarse. Para ello, desatornille el tornillo (14) que sujeta la varilla negra
antiviento al suporte (4), y ponga la misma varilla
antiviento en unas de las otras posiciones posibles.
ADVERTENCIAS
• Leer con cuidado y conservar las instrucciones de
montaje y el manual de uso.
• La insuficiencia de peso en la base compromete
seriamente la estabilidad del parasol.
• Quite la manivela del mecanismo si no va a ser utilizada y no dejarla al alcance de los niños.
• En caso de viento cierre siempre el parasol y quítelo
de la base o estructura. No deje nunca el parasol
abierto sin presencia de alguien. Fuertes golpes de
viento pueden dañar o derribar el parasol. Recuerde
que el parasol no es una estructura fija.
La firma Scolaro no se hace responsable por daños al
producto, cosas o personas, derivadas de un mal uso
o por no seguir las instrucciones indicadas.
MANTENIMIENTO
MADERA
• El modelo escogido tiene componentes o partes en
madera. La madera es un producto totalmente natural
y, como dicho antes, está tratada superfcialmente con
una impregnación ecológica. Entonces hay que tener
en consideración que la utilización al exterior puede
cambiar el color de la madera. Para obtener nuevamente el brillo y color, es suficiente tratar las partes
en madera con la impregnación correspondiente, que
fácilmente encontrará en los comercios especializados.
TEJIDO
• El tejido está tratado contra la humedad e impermeabilizado para repeler el agua y las manchas y
mantener la transpiración. Se recomienda seguir
las siguientes intruciones de mantenimiento para
obtener una mayor durabilidad del tejido.
– Quitar periodicamente el polvo depositado o cualquier tipo de suciedad para que después de llover
no deje rastros visibles.
– Es importantísimo asegurarse que la lona esté perfectamente seca antes de cerrar el parasol. Durante los meses
de no utilización guardar el parasol en un lugar seco.
COMPONENTES
• Las partes de acero, la tornilleria y los accesorios,
están zincados para que no se oxiden. Para garantizar y asegurar una mayor durabilidad del producto,
se aconseja que durante el tiempo de no utilización,
revisen el parasol y la base para evitar roturas y lo
depositen en un lugar seco.
• Además de comprobar periodicamente el funcionamiento de todos los componentes, sobre todo después de largos periodos de no utilización.
MECANISMO DE LA MANIVELA
• Periodicamente o por lo mismo una vez al año es indispensable aplicar el acite de lubricación en los engranajes de la manovela. Se aconseja hacer esta operación
antes de un perÍodo de no utilzación o por lo menos al
comienzo de cada estación despues del invierno.
Para cualquier eventualidad le recordamos que la firma Scolaro esta a su disposición para cualquier consulta técnica.
ASISTENCIA Y GARANTÍA
• Durante el período de garantía, en caso de daños
derivados por defecto de fabricación, la firma Scolaro
le ofrece asistencia, así como piezas de recambio
de forma gratuita, o si es necesario el cambio del
parasol completo.
• Tras el período de garantía, la firma Scolaro le ofrece
asistencia tanto a través de nuestros distribuidores
como directamente de fabrica, para el suministro de
piezas o reparaciones.
OPBOUWINSTRUCTIE
1
nl
A Open alle dozen, zet de voet (1) op de vloer en monteer de buis (2) daarop met behulp van de schroeven (5). Leg in de daarvoor bestemde ruimten (1)
de (optioneel leverbare) betonnen tegels (3).
B Monteer nu de horizontale arm (7) in een hoek van
90° t.o.v. de mast. Met de schroef (6) wordt de arm
met de mast (4) verbonden.
C Plaats nu de vierkante metalen mast (4) over de
ronde buis (2) van de staander. Draai de schroeven
(12) licht aan.
D Bevestig nu de haak (8) van de opwindkabel aan de
ring (9) van de parasol.
E Hang de parasol (11) in de daarvoor bestemde beugel aan het einde van de horizontale arm (7) en borg
die met de schroef (10).
F Draai de zwarte schroeven (12) nu vast.
GEBRUIKSAANWIJZING
I Verwijder de band waarmee de parasol dicht gebonden is. Schud de baleinen “los” om het opendraaien
daarna te vergemakkelijken.
II Plaats de slinger (13) in het opwindmechanisme en
draai de parasol rustig open totdat deze “blokkeert”.
Let er op dat er niets in de weg staat dat het openen
van de parasol verhindert.
III Bevestig de windstop met de daarvoor bestemde
schroef (14) aan de mast (4).
IV Als de parasol geopend is dient u deze te vergrendelen met het veiligheidskoord of de veiligheidsketting.
V Om de parasol te sluiten dient u eerst de vergrendeling en de windstop los te maken. Draai nu met
de slinger de parasol in. Let er op dat er niets in de
weg staat bij het indraaien. ATTENTIE!!!! De slinger
altijd rustig draaien omdat de staaldraad altijd strak
gespannen moet blijven. Deze handeling dient altijd
zorgvuldig uitgevoerd te worden om beschadigingen
aan en in het opwindmechanisme te voorkomen.
VI Voor deze parasol is een contragewicht van minimaal
130 kilo noodzakelijk. Betontegels zijn optioneel door
ons leverbaar.
Art. BC5050
BC5151 – BC5151G
BV5050G – BV5050B
In een winderige omgeving (b.v. aan de kust) kan
een zwaarder contragewicht noodzakelijk zijn. Meer
informatie vindt u op pagina 61 van de SCOLARO
catalogus 2013.
VII Deze parasol is 360° draaibaar. Om de parasol te
draaien dient men eerst de zwarte schroeven(12),
die zich onderaan de mast bevinden, los te draaien,
daarna de mast in de gewenste stand te draaien en
de schroeven weer vast te draaien.
VIII Met behulp van de windstop is de parasol in verschillende posities te plaatsen. Draai daarvoor de zwarte
schroef (14) waarmee de windstop aan de mast (4) bevestigd is los en kies een nieuwe positie. Draai daarna
de schroef weer vast om de nieuw positie te fixeren.
OPBOUW EN ONDERHOUDSADVIES
• Lees voor het gebruik altijd eerst de gebruiksaanwijzing en opbouwinstructies die in de verpakking
ingesloten zijn en bewaar deze daarna zorgvuldig.
• De staander moet met het aangegeven gewicht verzwaard worden. Indien onvoldoende verzwaard wordt
de stabiliteit van de parasol ernstig in gevaar gebracht.
• Verwijder na het opendraaien of sluiten van de parasol altijd de slinger en bewaar deze buiten het bereik
van kinderen.
• Om schade aan materiaal en personen te voorkomen moet de parasol bij harde wind altijd gesloten
worden en uit de voet gehaald worden. Onverwachte
windstoten kunnen een parasol beschadigen of om
laten vallen. Laat een parasol nooit onbeheerd achter. Hou er rekening mee dat een parasol altijd een
mobiele constructie is.
De firma SCOLARO is niet aansprakelijk voor schade
aan goederen of personen ten gevolge van oneigenlijk
gebruik en/of het niet opvolgen van de instructies.
HOUT
• De houten delen van deze parasol zijn met een milieuvriendelijke beschermlaag behandeld. Hout is een
natuurlijk product, dat bij gebruik in de buitenlucht
haar glans verliest. Men kan alle houten delen met
een daarvoor geschikt materiaal, verkrijgbaar bij de
vakhandel, regelmatig opnieuw behandelen.
HET DOEK
• Het doek is rot- en schimmelwerend behandeld. Is
waterafstotend en luchtdoorlatend. Voor een langdurig gebruik adviseren wij u de volgende onderhoudsvoorschriften nauwkeurig op te volgen:
– Regelmatig dienen stof, vlekken, waaronder vogeluitwerpselen, etc. verwijderd te worden zodat deze bij het
nat worden geen sporen meer achter kunnen laten.
– De parasol mag nooit nat ingevouwen worden en
dient bij langere afwezigheid en buiten het seizoen schoon en droog opgeborgen te worden. Alle metalen delen zijn roestvrij. Voor een lange levensduur adviseren wij u te allen tijde om uw parasol buiten het zomerseizoen en als u uw parasol gedurende
langere tijd niet gebruikt schoon en droog te bewaren.
– Aan het begin van het zomerseizoen en als uw parasol gedurende langere tijd niet gebruikt is, adviseren
wij u altijd om voor het gebruik alle bewegende delen
te controleren op een goed functioneren.
OPWINDMECHANISME
• Regelmatig, maar minstens eenmaal per jaar, na het
winterseizoen of als de parasol gedurende langere
tijd niet gebruikt is, is het noodzakelijk om het opwindmechanisme met een smeerolie te behandelen.
SERVICE EN GARANTIE
• Tijdens de garantieperiode en in geval van beschadigingen, die door productiefouten ontstaan zijn, levert
SCOLARO gratis vervangende onderdelen. Indien
noodzakelijk, ter beoordeling door SCOLARO, wordt
de hele parasol vervangen.
• Onderdelen zijn ook na vele jaren nog leverbaar. Voor technische informatie is SCOLARO altijd bereikbaar.