1
Consignes d'installation et notice d'utilisation du thermostat électronique de type S-Control
Installation and instructions manual for on/off thermostat Type S-Control
Informations générales:
bouton marche/arrêt (f), la diode LED (c) s'allume (vert). Vous pouvez alors paramétrer le thermostat.
General information:
Le thermostat S-Control a été tout spécialement conçu pour les systèmes de chauffage au sol électriques et dispose de 3 fonctions :
Paramétrage avec sonde de sol:
The S-Control is specially designed for electrical underfloor heating and it contains 2 functions as thermostat.
1. Permet de controler la température du sol grâce à sa sonde de sol externe.
2. Permet de controler la température de la pièce grâce au thermostat.
3. Permet de controler la température de la pièce grâce au thermostat et une sonde de sol pour limiter
la température du sol (facteur important pour les planchers en bois).
Définissez tout d'abord une limite de température. Celle-ci peut être paramétrée grâce au potentiomètre situé sous le bouton rond (g). Ensuite, vous paramétrez la température de la pièce avec le
bouton rond (a).
Paramétrage avec thermostat d'ambiance:
La sonde de sol est comprise dans la livraison. Mettez toujours hors tension avant le montage ou le
démontage. Le branchement doit être effectué par un installateur agréé en accord avec les dispositions réglementaires. Etudiez ces instructions avec soin pour le montage ou pour la mise en service.
Conservez ces consignes avec soin pour toute utilisation ultérieure.
Vous pouvez paramétrer la température de la pièce avec le bouton rond (a), le potentiomètre (g) situé
sous le bouton rond est alors désactivé.
Consignes de montage destinées à l'installateur:
Définissez tout d'abord une limite de température de sol et paramétrez-la grâce au potentiomètre (g)
situé sous le bouton rond (a). Ensuite, vous paramétrez la température souhaitée de la pièce avec le
bouton rond.
Assurez-vous avant le montage de la mise hors tension. Positionnez le bouton de température (a) sur
5°C et otez-le délicatement. Retirez le cadre (e) et le capot de protection (d) en appuyant légèrement
sur les fixations (b) situées sur le dessus et le dessous à l'aide d'un outil pointu. Branchez la sonde de
sol et les câbles électriques suivant le schéma de cablage (Fig.1). Positionnez le thermostat et fixez-le
avec 2 vis. Mettez le commutateur (h/i) dans la position suivante :
pour un chauffage au sol avec sonde de sol:
Position FLOOR (h)
- La sonde de sol DOIT être branchée
- ATTENTION : le potentiomètre situé sous le bouton rond (g) permet de paramétrer la température
maximum.
Pour un chauffage au sol avec thermostat d'ambiance:
Paramétrage avec thermostat d'ambiance et limiteur (via sonde de sol) :
Pannes:
Si la diode verte (c) reste allumée alors que le bouton de la température est sur 40°C par exemple,
cela signifie que :
1. le potentiomètre (g) est positionné sur une température trop basse. Tournez le bouton de la température sur le niveau le plus élevé et contrôlez à nouveau si le thermostat se met en route.
2. la sonde de sol n'est pas bien connectée ou elle est endommagée. Contrôlez tout d'abord les
branchements du capteur au thermostat, à cet effet consultez la notice de montage.
Si celui-ci est correctement branché et que le problème persiste, prenez contact avec le service
clientèle.
Position ROOM (i)/ sonde de sol non connectée
- Dans ce cas, il n'est pas possible de paramétrer de température maximum de sol (le potentiomètre
situé sous le bouton rond n'est pas activé)
Dans le cas d'un sol récemment installé, il est nécessaire d'attendre au moins 3 semaines jusqu'à ce
que l'humidité due à la construction se soit évaporée.
Pour un chauffage au sol avec thermostat d'ambiance et le paramétrage d'une
température maximum au sol:
Données techniques :
Position ROOM (i)/ sonde de sol connecté :
- le potentiomètre situé sous le bouton rond (g) permet de régler la température maximum du sol.
- le bouton rond de réglage permet de paramétrer la température de la pièce.
- La priorité se fait sur la sonde de sol par rapport au thermostat.
Replacez le cadre et le capot de protection en appuyant doucement.
Tension d'alimentation : 230 V / 16 A
Puissance max.
: 3200W
Echelle de température : 5° à 40°C
Classe
: IP20
Coloris
: blanc RAL 9010
Garantie
: 2 ans
Marquage
: CE
1. With external floor sensor to regulate the floor temperature
2. With internal air sensor to regulate the air temperature.
3. With limitation sensor. Controlling the air temperature with the usage of a floor sensor
to limit a maximum floor temperature. (To use in combination with wooden floors where a
maximum floor temperature needs to be controlled)
The floor sensor is standard supplied. Always switch power off before assembling or dismounting. Installation needs to be executed by an official only and according to the local
legislations.
Please study these instructions thoroughly before assembling or using the thermostat.
Keep the instructions for future reference.
Assembling / directions for installer:
Check if power has been turned off. At first turn the temperature with the round button (a)
to 5ºC and pull it off carefully. Remove the frame (e) and protection cap (d) by pressing
the pins (b) at the upper and lower side with a blunt object. Connect the floor sensor,
power and connection cables according to the connection scheme (fig. 1). Position the
thermostat and secure it with 2 screws. Position the jumper in the following position;
For underfloor heating with floor sensor:
FLOOR position (h)
- Floor temperature can be controlled by the temperature button (a)
- floor sensor MUST be connected
- NOTE; the maximum temperature can be adjusted with the potentio-meter under the
round button (g)
For floorheating using the internal air sensor:
ROOM position (i)
- Room temperature can be controlled by the main temperature button (a)
- Floor sensor is not connected
- There is no maximum floor temperature setting possible. (potentiometer can not be
activated)
For underfloor heating with Air sensor and to install a maximum
floor temperature position:
ROOM position (i) / floor sensor is connected
- Room temperature can be controlled by the main temperature button (a)
- the maximum floor temperature can be adjusted with the potentiometer
under the round button (g).
Mode d'emploi :
Replace the frame and protection cap by pressing it gently until it fits in the right position.
Placez tout d'abord le bouton de température sur 5°C. Mettez sous tension après avoir contrôlé
soigneusement les consignes de montage. Dès que vous allumez le thermostat, en appuyant sur le
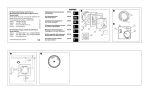
Fig.1
g
e
Fig.2
a
i
c
Turn
temperature to
the
Pic.2
h
b
Users manual:
e
f
d
a: Bouton de réglage de température
b: fixations
c: LED
d: Couvercle de protection
e: Vitre de protection
f: Bouton marche/arrêt
g: Potentiomètre
h/i: Commutateur
Pic.1
a
b
c
d
e
f
g
h/i
Settings with floor sensor:
First determine if you would like to install a limited temperature. This can be installed with
the potentiometer under the round button (g). After that you can install the preferred floor
temperature with the round button (a).
Settings with sensor and limitation sensor:
First determine the limit temperature and adjust it with the potentiometer (g) under the
round button (a). Afterwards the preferred floor temperature can be adjusted.
Errors:
When there is a continues green light (c) regardless whether the
set on (i.e.) 40°C, it means;
If the sensor is installed properly and the problem remains please contact the helpdesk.
In case of a new floor wait at least 3 weeks before turning on the heating until construction moisture has evaporated
Technical data:
Powersupply
Maximum capacity
Temperature range
Class
Colour
Warrant
Approval
: 230 V / 16 Amp.
: 3200 Watt
: 5 - 40 ºC
: IP20
: Polar/white
: 2 years
: CE
Manufacturer:
C&F Technieken B.V. Tholen - The Netherlands
UK Helpdesk: 01887-822999
g
f
h
b
i
c
temperatureknob is
1. the potentiometer (g) is set at a too low temperature. Please turn the meter to its maximum temperature and check the heating again.
2. the floor sensor is not installed properly or even broken. First check if the sensor is
installed properly, follow the instructions in the manual.
d
temperature button
unbolt pins
LED
protection cap
frame
on/off button
potentiometer
“Jumper”
a
5ºC with the round button. When you have carefully checked the installation directions,
turn on the power. When you have turned on the thermostat with the on/of button (f), the
LED (c) will light up green. The thermostat can be installed now.
Installatievoorschriften en gebruiksaanwijzing voor elektronische thermostaat Type S-Control
Algemene informatie:
Gebruiksaanwijzing:
De S-Control is speciaal ontworpen voor elektrische vloerverwarming en heeft een 3-tal
functies als thermostaat;
Draai als eerste de temperatuur m.b.v. de ronde knop naar 5°C. Schakel de stroom in
na de montageaanwijzingen zorgvuldig gecontroleerd te hebben. Zodra u de termostaat
aanzet, d.m.v. de aan/uit knop (f), zal de LED (c) groen oplichten. De thermostaat kan nu
worden ingesteld.
1. Met externe vloersensor voor het instellen van de vloertemperatuur.
2. Met interne ruimtesensor voor het instellen van de ruimtetemperatuur.
3. Met limietsensor, een interne ruimtesensor voor het instellen van de
ruimtetemperatuur en daarbij een vloersensor voor het limiteren van de
maximale vloertemperatuur. (belangrijk met bv houten vloeren)
Instelling met vloersensor:
De vloersensor wordt standaard meegeleverd. Schakel voor montage of demontage altijd
de stroom uit. Aansluiting dient door een erkend
installateur te gebeuren overeenkomstig de locale voorschriften. Bestudeer deze aanwijzingen aandachtig en voor montage of
ingebruikname. Bewaar dit voorschrift zorgvuldig voor een eventueel later gebruik.
Montage / aanwijzingen voor de installateur:
Controleer voor montage of de stroom is afgesloten. Draai als eerste de temperatuur
m.b.v. de ronde knop (a) naar 5°C en trek deze er voorzichtig af. Verwijder afdekraam (e)
en beschermkap (d) door deze voorzichtig aan zowel de boven en onderkant de pinnetjes
(b) met een stomp voorwerp in de drukken. Sluit vloersensor, stroom en aansluitkabels
aan in overeenstemming met het aansluitschema (Afb.1). Breng de thermostaat in positie
en borg deze met 2 schroeven. Breng de "jumper" in de volgende positie;
Bepaal als eerste of u een limiettemperatuur in wilt stellen. Deze kan worden ingesteld
m.b.v. de potentiometer onder de ronde knop (g). Daarna kan m.b.v. de ronde knop (a) de
gewenste ruimtetemperatuur worden ingesteld.
Instelling met ruimtesensor:
M.b.v. de ronde knop (a) de gewenste temperatuur worden ingesteld, de potentiometer (g)
onder de ronde knop is uitgeschakeld.
Instelling met ruimtesensor en limietsensor:
Bepaal als eerste de limiettemperatuur en stel deze in m.b.v. de potentiometer (g) onder
de ronde knop (a). Daarna kan m.b.v. de ronde knop de gewenste ruimtetemperatuur
worden ingesteld.
Storingen:
Indien het groende lampje (c) blijft branden als de temperatuurknop op bijvoorbeeld 40°C
wordt gezet betekend dit dat;
Voor vloerverwarming met vloersensor:
FLOOR positie (h)
- Vloersensor MOET aangesloten zijn
- LET OP; m.b.v. de potentiometer onder de ronde knop (g) kan de
maximale temperatuur worden ingesteld.
1. de potentiometer (g) op een te lage temperatuur is ingesteld. Draai de
temperatuur op de hoogste stand en controleer opnieuw of de
thermostaat verwarmd.
2. de vloersensor niet goed aangesloten of defect is. Controleer als
eerste de aansluitingen van de sensor op de thermostaat, volg hier
voor de montagehandleiding.
Voor vloerverwarming met ruimtesensor:
Indien deze correct is aangesloten en het probleem blijft zich voordoen neem dan contact
op met de helpdesk.
ROOM positie (i)/ vloersensor niet aangesloten
- geen limiet van de maximale temperatuur instelbaar (de potentiometer
onder de ronde knop wordt niet geactiveerd)
Voor vloerverwarming met ruimtesensor en het instellen van een
maximale vloertemperatuur positie 2:
ROOM position (i)/ vloersensor wel aangesloten:
- de maximale vloertemperatuur limiet kan worden ingesteld m.b.v. de
potentiometer onder de ronde knop (g).
- de ruimtetemperatuur kan worden ingesteld m.b.v. de ronde instelknop
In geval het een nieuw aangebrachte vloer betreft dient ten minste 3 weken te worden
gewacht tot het meeste bouwvocht is verdampt.
Technische gegevens:
Stroomvoorziening : 230 V / 16 Amp
Max.capaciteit
: 3200W
Temperatuur bereik
: 5 tot 40°C
Klasse: IP20
Kleur: Polar/wit
Garantie
: 2 jaar
Keuring: CE
Herplaats afdekplaat en beschermkap door deze zachtjes aan te drukken.
Fabrikant:
C&F Technieken B.V. Tholen - Nederland
NL Helpdesk : 0900 - 911 0 911 (€ 0,45 per min.)
Afb.1
g
e
Afb.2
a
b
c
d
e
f
g
h/i
d
: Temperatuurknop
: ontgrendelpinnetjes
: LED
: Beschermkap
: Afdekraam
: Aan/uit knop
: Potentiometer
: “Jumper”
a
f
h
b
i
c