1
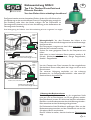
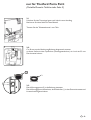
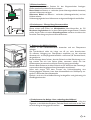
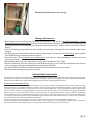
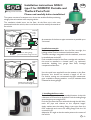
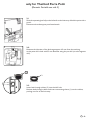
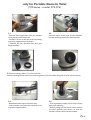
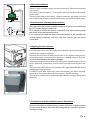
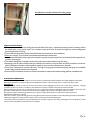
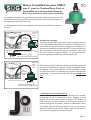
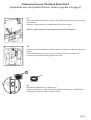
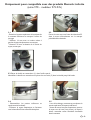
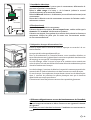
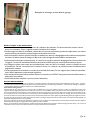
D
D
GB
F
Einbauanleitung
SOG II - Toilettenentlüftung
Typ C für Thetford Porta Potti und Dometic Transportable
Vor dem Einbau unbedingt durchlesen!
GB
Installation instructions:
SOG II - Toilet ventilator
type C for Thetford Porta Potti and Dometic Portable
Please read completely before installation!
F
Notice d´installazione:
Aération de toilettes SOG II
type C pour les Thetford Porta Potti et
Compatible avec des produits Dometic
Lire obligatoirement avant I´installation!
S G
®
Einbauanleitung SOG II
Typ C für Thetford Porta-Potti und
Dometic Portable
echnik statt Chemie!
D
Vor dem Einbau bitte unbedingt durchlesen!
Das System besteht aus einer kompakten Einheit, die durch ihre Größe eine flexible Platzierung an den verschiedensten Orten im Campingfahrzeug ermöglicht.
Die Entlüftung sollte über den Boden erfolgen. Da die Filtereinheit im
Fahrzeuginneren platziert wird, ist keine Veränderung an den Außenseiten der
Fahrzeuge mehr notwendig.
Eine Verlängerung der Schlauch- bzw. Rohrverbindung ist bis zu insgesamt 3 m möglich.
Lüfter
Ventilator
Ventilateur
Ventola
110mm
Boden, Floor, Sol,
Pavimento
Schlauch,
Hose,
Tuyau,
Tubo
Filter
28mm
Dichtflansch, Sealing flange,
Joint d‘étanchéité, Flangia di tenuta
Schlauch,
Hose,
Tuyau,
Tubo
Lüfter
Ventilator
Ventilateur
Ventola
Filter
Montagebeispiel: Vor dem Einsetzen des Lüfters in die
Filterpatrone muss der Aufnahmegummi mit etwas Wasser angefeuchtet werden.
Die Filterpatrone, integriert mit dem Lüfter, muss nicht in der
Nähe des WCs montiert werden.
Suchen Sie einen geeigneten Platz für die Filterpatrone mit
Lüfter:
diese muss in einem beheizten Raum montiert werden z. B.
Schrank, Kleiderschrank, Bettkasten, Garage Doppelboden,
Staufach - Doppelboden.
Von der Cassette zum Filter benutzen Sie den mitgelieferten
Spiralschlauch. Dieser sollte jedoch die Länge von 60 cm nicht
überschreiten.
Zur weiteren Verlegung empfehlen wir das schwarze
Abwasserrohr - im Campinghandel erhältlich - oder einen 5/8”
Sanitärschlauch, der gasdicht ist.
Boden, Floor, Sol, Pavimento
Dichtflansch, Sealing flange,
Joint d‘étanchéité, Flangia di tenuta
1. Montage des Bodenauslasses:
Zur Montage des Bodenauslasses an die vorgesehene Stelle
muss ein Loch im Durchmesser von 29 mm gebohrt werden.
Den Dichtflansch bis zum 90° Winkel auf das Rohr aufschieben.
Das Rohr von der Bodenunterseite durch die Bohrung schieben Rohr anzeichnen und auf die benötigte Länge kürzen.
Ein Dichtmittel auf den Dichtflansch aufbringen, Rohr von der
Bodenunterseite einstecken und den Dichtflansch mit den VASchrauben 4,8 x 25 verschrauben.
Den 90° Winkel so stellen, dass der Auslass zur Fahrzeugmitte
zeigt.
D
-1-
nur für Thetford Porta Potti
(Portable Dometic Toilette siehe Seite 3)
2.1
Schieben Sie den Trennriegel ganz nach links bis zum Anschlag.
Markieren Sie diese Stelle mit dem Bleistift.
Trennen Sie das Toilettenoberteil vom Tank.
40 mm
2.2.
Ca. 40 mm von der Markierung Richtung Ausgussrohr messen:
an dieser Stelle mit dem Topfbohrer (Kreissegmentbohrer) ein Loch mit 35 mm
Durchmesser bohren.
1
2
2.3.
Durchführungsgummi (2) in die Bohrung einsetzen.
Durchführungsgummi anfeuchten, Anschlusshülse (1) in den Gummi einsetzen und
bis zum Anschlag einschieben.
D
-2-
nur für Portable Dometic Toilette
(970er Serie - Modelle: 972-976)
20 mm
2.1
- Toilettenoberteil vom Cassettenunterteil
abnehmen und Bohrloch anzeichnen
- mit einem Maßband von der Trennfuge nach
links 16 mm messen und anzeichnen.
- vom Rohrflansch nach oben 20 mm messen
und anzeichnen
2
2.2
Loch mit Lochfräse 35 Durchmesser ins
Ausgussrohr auf angezeichnete Stelle bohren.
1
2.3 Durchführungsgummi (1) in Bohrung einsetzen
Durchführungsgummi anfeuchten und Anschlusshülse (2) in den Gummi einsetzen und bis zum Anschlag
einschieben
2.4
- Toilettenober- und Unterteil wieder zusammensetzen.
- Absaugschlauch einstecken und nach oben
verlegen um einen Siphoneffekt zu verhindern.
2.5
- Beim Entleeren Oberteil zuerst vom
Unterteil trennen
- Vor dem Herausziehen des Absaugschlauch
den Schlauch nach oben stellen (siehe Foto), damit eventuelle Feuchtigkeit in die Cassette zurücklaufen kann
D
-3-
Rot
Schwarz
Lüfter
Filter
Boden
Dichtflansch
Batterie
+
-
Thetford Porta Potti
3. Elektroinstallation
Ein Loch in passender Position für den Wippenschalter festlegen.
Größe ausarbeiten und den Schalter einsetzen.
Rotes Kabel mit Batterie + verbinden (hierzu Abzweigverbinder benutzen)
und zum Lüftermotor verlegen.
Schwarzes Kabel mit Batterie - verbinden (Abzweigverbinder) und am
Schalter anlöten.
Schalterausgangskabel zum Lüftermotor verlegen und farbgleich anschließen.
4. Funktionstest - Überprüfung Stromanschluss
Lüfter durch Betätigung des Schalters einschalten.
Dieser müsste jetzt laufen, bei Nichtfunktion bitte überprüfen, ob 12V
Bordnetz eingeschaltet ist. Ist diese Fehlerquelle ausgeschlossen, Polarität
prüfen, da der Lüfter mit einem Verpolungsschutz versehen ist und nur bei
korrekter Zuordnung von plus und minus laufen kann.
5. Anpassen des Abluftschlauches
Schlauch in den Fäkaltankanschluss einstecken und zur Filterpatrone
verlegen.
Der Spiralschlauch sollte die Länge von 60 cm nicht überschreiten.
Zu weiteren Verlegung zur Filterpatrone empfehlen wir das schwarze
Abwasserrohr - im Campinghandel erhältlich - oder einen 5/8” Sanitärschlauch,
der gasdicht ist.
Bei der Montage darauf achten, dass der Schlauch und die Rohrleitung so verlegt werden das sich kein Siphon bildet, ansonsten würde sich hier
Kondenswasser ansammeln und mit der Zeit die Leitung verschließen.
Hinweis: Beim Entleeren wird der Schlauch am 90° Winkel von der Cassette getrennt und mit dem beigelegten Verschlussstopfen verschlossen!
Sollte nach einiger Zeit beim Trennen der Schlauchkupplung eine
Schwergängigkeit auftreten, bitte diese Kunststoffteile mit Silikonspray einsprühen - ebenso den Verschlussstopfen
Dadurch wird eine Verschleißminderung herbeigeführt und gleichzeitig die
Gleitfähigkeit bewahrt.
Dometic Portable
6. Funktionstest der Anlage - bitte unbedingt durchführen!
Öffnen Sie bitte den Schieber und halten Sie ein Räucherstäbchen - oder eine
Zigarette - in die Höhe des Schiebers: Zieht der Rauch nach unten in den Tank,
so ist die Anlage ordnungsgemäß installiert.
D
-4-
Einbaubeispiel: Montiert in der Garage
Wichtige Informationen
Der Ventilator soll nur während der Toilettenbenutzung laufen - Dauerlauf ist keinesfalls notwendig! - vor der
Toilettenbenutzung Schieber öffnen. Durch den sofort anlaufenden Ventilator (schon bei spaltweiter Öffnung) entsteht direkt Unterdruck und die Gase werden direkt nach unten befördert - dadurch können, keine Gerüche hochsteigen.
Um die Zersetzung zu gewährleisten oder Gerüche zu verhindern benötigen Sie keine Chemie oder andere
Zusätze.
Die Reinigung der Toilette und der Tanks ist davon ausgenommen. Verwenden Sie niemals Essig - dieser zerstört
die Schieberdichtung und somit treten Gerüche ein.
Verwenden Sie immer handelsübliches Toilettenpapier (z.B. Recycle), denn Spezialpapier zersetzt sich unter
Sauerstoff schlechter.
Der Fäkaltank muss nicht jeden Tag entleert werden, jedoch spätestens nach 5 Tagen.
Der Stromverbrauch des Lüfter-motors ist mit 0,84 Watt sehr gering, durch die hohe Anlaufdrehzahl erreicht er
den so wichtigen, sofortigen Ansaugeffekt über den geöffneten Schieber.
Ein zweiter SOG-Anschluss für einen Ersatztank kann an diesem jederzeit montiert werden.
Der Filter sollte einmal jährlich getauscht werden.
GARANTIEBESTIMMUNGEN
Als Hersteller übernehmen wir für dieses Gerät - nach Wahl des Käufers zusätzlich zu den gesetzlichen Gewährleistungsansprüchen gegen
den Verkäufer - eine Garantie von 2 Jahren ab Kaufdatum. Innerhalb dieser Garantiezeit beseitigen wir nach unserer Wahl durch Reparatur
oder Austausch des Gerätes unentgeltlich alle Mängel, die auf Material oder Herstellungsfehlern beruhen.
Von der Garantie sind ausgenommen:
Schäden, die auf unsachgemäßen Gebrauch zurückzuführen sind, normaler Verschleiß und Mängel, die den Wert oder die Gebrauchstauglichkeit des Gerätes nur unerheblich beeinflussen. Schäden, die durch unsachgemäßen Anschluss oder Installation, sowie durch höhere Gewalt oder sonstige äußere Einflüsse entstehen, fallen nicht unter die Garantieleistungen. Unter unsachgemäßen Gebrauch fällt zum Beispiel auch, dass der Ventilator im Dauerlauf geschaltet wird, sowie andere Veränderungen, die von der Einbauanleitung abweichen. Bei Eingriffen nicht von uns autorisierter Stellen oder bei Verwendung anderer als original SOG-Ersatzteile erlischt die Garantie. Wir behalten
uns vor, bei Reklamationen der defekten Teile auszubessern oder zu ersetzen oder das Gerät auszutauschen. Ausgetauschte Teile gehen in
unser Eigentum über. Weitergehende Ansprüche bestehen aufgrund der Garantie nicht. Die Garantie tritt nur in Kraft, wenn das Kaufdatum durch Stempel und Unterschrift des Händlers bestätigt ist.
Sie kann in den Ländern in Anspruch genommen werden, in denen dieses Gerät von autorisierten Händlern verkauft wird.
Im Garantiefall geben Sie bitte das defekte Teil (den Ventilator bitte nur integriert im von uns gelieferten Gehäuse-sprich z. B. 90 Grad
Kunststoffwinkel oder anderes Gehäuse) einem unserer Händler oder senden Sie es direkt an unsere Adresse.
D
-5-
S G
®
Installation instructions SOG II
type C for DOMETIC Portable and
Thetford Porta Potti
echnology instead of chemicals!
GB
Please read carefully before installation!
The system consists of a compact unit, whose size enables flexible positioning
at highly diverse locations in the camping vehicle.
The ventilation should occur via the floor. As the filter unit is also now
positioned inside the vehicle, there is no further need to modify the outside of
the vehicle.
Lüfter
Ventilator
Ventilateur
Ventola
110 mm ø
Boden, Floor, Sol,
Pavimento
Schlauch,
Hose,
Tuyau,
Tubo
Filter
28 mm ø
Dichtflansch, Sealing flange,
Joint d‘étanchéité, Flangia di tenuta
Schlauch,
Hose,
Tuyau,
Tubo
Lüfter
Ventilator
Ventilateur
Ventola
Filter
Boden, Floor, Sol, Pavimento
An extension of the hose or pipe connection is possible up to
3 m in total.
Installation example:
Before inserting the ventilator into the filter cartridge, the
holding rubber must be moistened with some water.
The filter cartridge, integrated with the ventilator, must not
be installed near to the WC.
Find a suitable location for the filter cartridge with ventilator:
this must be installed in a heated room, e.g. cupboard,
wardrobe, bedding box, garage false floor, stowage
compartment false floor.
Use the spiral hose supplied from the cassette to the filter.
However, this should not exceed a length of 60 cm.
For further routing we recommend the black wastewater
pipe - available in camping retailers - or a 5/8” sanitation hose
Cassette fan that is gastight.
Dichtflansch, Sealing flange,
Joint d‘étanchéité, Flangia di tenuta
1. Installing the floor outlet:
To install the floor outlet at the intended location, a hole with
a diameter of 29 mm has to be drilled. Push the sealing flange
onto the pipe up to an angle of 90°.
Push the pipe from the floor underside through the drill hole,
mark the pipe and shorten to the required length.
Apply sealant onto the sealing flange, insert pipe from the
floor underside and screw the sealing flange with the VA
screws 4.8 x 25.
Adjust the 90° angle so that the outlet points to the center of
the vehicle.
GB -1-
only for Thetford Porta Potti
(Dometic Portable see side 3)
2.1
Slide the separating bar fully to the left as far as the limit stop. Mark this point with a
pencil.
Disconnect the toilet upper part from the tank.
40 mm
2.2.
Measure the direction of the discharge approx. 40 mm from the marking:
at this point drill a hole with 35 mm diameter using the pot drill (circular segment
drill).
1
2
2.3.
Insert lead-through rubber (2) into the drill hole.
Moisten lead-through rubber and insert connecting sleeve (1) into the rubber,
pushing in as far as the limit stop.
GB
-2-
only for Portable Dometic Toilet
(970 series - model: 972-976)
20 mm
2.1
- Remove toilet upper part from the cassette
lower part and mark bore hole
- Measure 16 mm to the left of the separating
joint using a tape measure and mark.
- Measure 20 mm upwards from the pipe
flange and mark
2
2.2
Use hole miller to drill hole 35 mm diameter
into the discharge pipe on the marked point.
1
2.3 Insert bushing rubber (1) in the bore hole
Moisten bushing rubber and insert connecting sleeve (2) in the rubber then push in as far as the limit stop.
2.4
- Reassemble toilet upper and lower part.
- Insert suction hose and route upwards so as
to prevent a siphon effect.
2.5
- First separate the upper part from the lower
part when emptying
- Before pulling out the suction hose, position
the hose upwards (see photo), so that any
moisture can flow back into the cassette
GB
-3-
3. Electrical installation
red
Ventilator
black
Filter
Floor
Sealing flange
Battery
+
-
Define a hole in a suitable position for the rocker switch. Work out the size and
insert switch.
Connect red cable to battery + (use branch connector for this) and route to
the fan motor.
Connect black cable to the battery - (branch connector) and solder on at the
switch. Route switch output cable to the fan motor and connect to same colour.
4. Functional test - checking the connections
Open the blade valve and the ventilator should run. If it does not run check that
the 12 V caravan supply is switched on.
On a number of vehicles the toilet is connected to the water pressure pump
then switch on the water pressure pump.
If the ventilator still does not work, check the polarity as the ventilator has
reverse polarity protection and only runs with correct plus and minus
connections.
5. Adapting the waste air hose:
Thetford Porta Potti
Insert the hose in the cover connection of the cassette. Use the spiral hose supplied from the cassette to the filter.
However, this should not exceed a length of 60 cm. For further routing we recommend the black wastewater pipe- available in camping retailers - or a 5/8”
sanitation hose Cassette fan that is gastight.
Make sure during assembly that the hose and pipe are routed so that no siphon
forms, otherwise condensation would collect here and block the pipe over
time.
The hose is disconnected from the cassette at a 90° angle and sealed with the enclosed plugs during emptying!
If stiffness occurs after some time when disconnecting the house coupling,
please spray these plastic parts with silicone spray – likewise the plugs.
This results in reduced wear, while retaining the smooth sliding property at the
same time.
Dometic Portable
6. Functional test of the ventilation system - Mandatory
Open the blade valve and hold a burning incense (joss) stick or cigarette above
it. If the smoke is drawn down into the holding tank the ventilation system is
working correctly.
GB
-4-
Installation example: Mounted in the garage
Important information
The ventilator should run only during use with the blade valve open - continuous running is never necessary. When
the blade valve is only partly open, the ventilator starts and sucks all smells through the waste holding tank
preventing them from rising.
To promote decomposition and avoid smells do not use chemicals or other additives.
Never use vinegar. This can destroy the blade valve seals and cause smells.
Use commonly available toilet paper (for example recycled) as special paper for chemical toilets decomposes more slowly with oxygen.
The waste holding tank no longer needs to be emptied every day, at least every five days.
Emptying is just as before except that the exhaust hose must be removed from the SOG ventilation connector.
Use the stopper provided to close the elbow and this can be stored in a depression in the tank.
The power consumption is small, 0.84 watt. The high running speed is achieved quickly and gives an immediate
suction effect when the blade valve is opened.
A second SOG ventilation connector can be mounted on a replacement waste holding tank for immediate use.
GUARANTEE CONDITIONS
As manufacturer we guarantee this equipment for two years from the date of purchase in addition to the legal obligations of the seller.
Within the guarantee time we will set right faults caused by bad material or manufacture by repair or replacement at our choice.
Excluded are:
Damage caused by misuse, normal wear and tear, and matters which only slightly restrict the use or value of the equipment. Damage
caused by improper connection or installation, Acts of God, force majeur, and other external forces are also excluded.
Damage caused by improper use, for example continuous running of the ventilator, and deviation from the installation instructions. The
guarantee is void if repairs are carried out by unauthorised workshops or by use of other than SOG replacement parts.
We reserve the right in the case of guarantee claims, to repair or replace defective parts or replace the complete equipment.
Replaced parts become our property.
There are no further rights under this guarantee. The guarantee starts only when the date on the receipt bearing the address of the seller is
validated by his signature. This guarantee is valid in countries where there are authorised dealers.
In the case of a claim under guarantee, give the defective part, ventilator complete in its housing, the 90 degree connecting elbow, or other
part to an authorised dealer or send it directly to our address.
GB
-5-
S G
®
a technologie et non la Chimie!
Notice deinstallazione pour SOG II
F
type C - pour les Thetford Porta Potti et
Compatible avec des produits Dometic
A lire impérativement avant toute installation!
Le système se compose d'un groupe filtration compact dont la dimension autorise
une souplesse de positionnement dans les endroits les plus divers du camping-car.
L'échappement doit se faire par le sol.
Le rallongement du tuyau à une longueur de 3 mètres est possible (au maximum en tout).
Lüfter
Ventilator
Ventilateur
Ventola
110mm
Boden, Floor, Sol,
Pavimento
Schlauch,
Hose,
Tuyau,
Tubo
Filter
28mm
Dichtflansch, Sealing flange,
Joint d‘étanchéité, Flangia di tenuta
Schlauch,
Hose,
Tuyau,
Tubo
Lüfter
Ventilator
Ventilateur
Ventola
Filter
Exemple de montage:
Avant tout ajustement du venti-lateur dans la cartouche filtrante,
il est indispensable d'humidifier le caoutchouc d'admission avec
un peu d'eau. La cartouche filtrante, intégrée avec ventilateur, ne
doit pas être installée à proximité des WC. Si vous cherchez une
place convenant à cette cartouche avec ventilateur, celleci doit
être mon-tée dans un endroit chauffé - ex.: placard, penderie,
bois de lit, garage à double fond, coffre à double fond.
De la cassette au filtre, utilisez le flexible spiralé faisant partie de
la fourniture. Néanmoins, ce flexible ne doit pas dépasser 60 cm
de longueur. Pour la pose ultérieure, nous conseillons le tuyau
noir pour eaux usées en vente dans les magasins d'équipement
de camping - ou un flexible sanitaire 5/8” qui est étanche aux
gaz.
Boden, Floor, Sol, Pavimento
Dichtflansch, Sealing flange,
Joint d‘étanchéité, Flangia di tenuta
1. Montage de l'évacuation au sol
Il faut percer un trou de 29 mm de diamètre pour installer
l'évacua-tion au sol à l'emplacement prévu. Engager la bride
étanche sur le tube jusqu'à obtenir un angle de 90°. Pousser le
tube à travers le trou par dessous le sol; marquer le tube et le
réduire à la longueur né-cessaire. Mettre un ruban d'étan-chéité
sur la bride, insérer le tube par dessous le sol et visser la bride
étanche à l'aide de vis VA 4,8 x 25. Placer l'angle à 90° de manière
à voir l'évacuation jusqu'au milieu du véhicule.
F
-1-
Uniquement pour Thetford Porta Potti
(Compatible avec des produits Dometic toilette regardez à la page 3)
2.1
Faites complètement tourner le verrou de tension vers la gauche, jusqueau seuil
de résistance.
Repérez leemplacement à l‘emplacement à l‘aide d‘un crayon.
Sépare la partie supérieure des toilettes du réservoir de résistance.
40 mm
2.2
Localisez l‘emplacement situé à environ 40 mm du repère, en direction du tuyau
du bec:
à cet emplacement, percez un trou deun diamètre 35 mm à l‘aide d‘une
perceuse à pots (perceuse de segments en croix).
1
2
2.3
Rondelles en caoutchouc (2) dans le trou.
Mouiller le bagues en caoutschuc Manchon de raccordement (1) utilisé dans le
caoutchouc et pousser jusqu'à ce qu'il s'arrête
F
-2-
Uniquement pour compatible avec des produits Dometic toilette
(série 970 – modèles: 972-976)
20 mm
2.1
- Détacher la partie supérieure de la toilette de
la cassette inférieure et marquer l'orifice de
perçage
- Mesurer 16 mm avec un mètre ruban à
gauche du joint de séparation, et marquer.
- Mesurer 20 mm au-dessus de la bride du
tuyau, et marquer
2
2.2
Percer le trou avec une fraise de diamètre 35
dans le tuyau d'écoulement sur la marque
préalablement dessinée.
1
2.3 Placer la douille en caoutchouc (1) dans l'orifice percé.
Humidifier la douille en caoutchouc et placer les raccords (2) dans la douille jusqu'à la butée.
2.4
- Réassembler les parties inférieure et
supérieure de la toilette.
- Enfoncer le tuyau d'aspiration et l'orienter
vers le haut afin d'éviter tout effet de siphon.
2.5
- Lors de la vidange, commencer par séparer la
partie supérieure de la partie inférieure.
- Avant de retirer le tuyau d'aspiration, tourner
le tuyau vers le haut (voir photo), de façon à
laisser retomber toute humidité éventuelle
dans la cassette.
F
-3-
3. Installation électrique
Localisez la position du trou à percer pour le commutateur, définissez les dimensions et installez le commutateur.
Reliez le câble rouge à la borne + de la batterie (utilisez le raccord
d’embranchement) et au moteur de l’aération
Reliez le câble noir à la borne - de la batterie (raccord d’embranchement) et au
commutateur.
Raccordez le câble de sortie du commutateur au moteur de l’aération conformément aux couleurs.
rouge
Ventilateur
noir
Filter
Sol
Joint
d‘étanchéité
-
+
Accumulateur
4. Test fonctionnel
Activez l’aération à l’aide du commutateur.
L’aération doit alors fonctionner. Si ce n’est pas le cas , veuillez vérifier que le
réseau de 12 V est activé. Vérifiez ensui te la polarité.
L’aération est équipée d’un système de protection de la polarité et fonctionne
uniquement lorsque les pôles plus et moins sont correctement attribués.correctement attribués.
5. Adaptation du tuyau d'évacuation d'air :
Insérer le tuyau dans le raccord du réservoir septique et raccorder à la cartouche filtrante.
Thetford Porta Potti
Le tuyau spiralé ne doit pas dépasser 60 cm.
Pour le raccordement à la cartouche filtrante, nous conseillons d'utiliser un
tuyau d'écoulement noir (habituel dans le commerce spécialisé dans les articles
de camping) ou un tuyau 5/8” hermétique aux gaz.
Lors du montage, veiller à ce que le tuyau et la conduite soient montés sans
créer de siphon car cela entraînerait la formation d'eau de condensation qui boucherait la conduite avec le temps.
Lors de la vidange, il convient de détacher le tuyau de la cassette perpendiculairement à celle-ci! Insérez le bouchon noir dans la vertes con nexion du tuyau.
Si, avec le temps, l'accouplement du tuyau devait coincer lors du désaccouplement, il convient de pulvériser les parties plastiques ainsi que le bouchon
d'étanchéité avec un spray au silicone.
Cela minimise l'usure des pièces et conserve leur capacité de glissement.
Dometic Portable
6. Effectuer obligatoirement un test de fonctionnement de l'installation!
Ouvrez la trappe et maintenez un bâton d’encens ou une cigarette à la hauteur
de la glissière.
Si la fumée part vers le bas dans le réservoir, l’installation est correctement installée.
F
-4-
Exemple de montage: monté dans le garage
Mode d’emploi et de maintenance
Le ventilateur ne doit fonctionner que lors de l’utilisation des toilettes. Un fonctionnement continu n’est en
aucun cas nécessaire. Ouvrir la glissière avant l’utilisation de la toilette.
Le démarrage immédiat du ventilateur (même dans le cas d’une simple fente) produit une dépression. Les odeurs
ne peuvent ainsi pas remonter puisque les gaz sont entraînés vers le bas.
Vous n’avez besoin d’aucun produit chimique ou additif pour assurer la désagrégation des matières ou empêcher
les odeurs. N’utiliser jamais de vinaigre. Il détruirait le joint de la glissière et les odeurs remonteraient.
Utilisez toujours du papier toilette usuel (p. ex. recyclé) car le papier spécial se désagrège moins bien au contact de
l’oxygène. Le réservoir de matières fécales ne doit pas être vidé chaque jour, mais au plus tard tous les 5 jours.
La vidange est toute aussi simple que précédemment: avant de retirer la cassette, enlever le flexible du tube
d’écoulement. Fermer l’ouverture avec le bouchon fourni. Le conserver de préférence dans l’évidement de la
poignée de la cassette.
La consommation du ventilateur en courant est très faible (0,84 watt). Par son régime élevé, il atteint immédiatement l’effet d’aspiration si important par la glissière.
Une cassette de remplacement peut être munie d’un second raccord SOG. Vous pouvez ainsi vous débarrasser rapidement d’une cassette.
Le filtre devrait être remplacé 1x par an (suivant l’utilisation).
DISPOSITIONS DE GARANTIE
En tant que fabricant, nous assumons pour cet appareil – au choix de l’acheteur en plus des prétentions de garantie légales envers le vendeur – une garantie de deux ans à compter de la date d’achat. Durant cette période de garantie, nous éliminons gratuitement – notre choix par échange ou réparation tous les défauts résultant d’un défaut de matière ou d’un défaut de fabrication.
Sont exclus de cette garantie:
Les dommages dus à un usage incorrect, l’usure normale et les défauts qui n’ont qu’une incidence minime sur la valeur ou l’aptitude à fonctionner de
l’appareil. Les dommages qui résultent d’un branchement incorrect ou d’une installation défectueuse ainsi que ceux dus à des événements de force majeure ou à d’autres événements extérieurs n’entrent pas dans le cadre de cette garantie. On entend par usage incorrect le fait que par exemple le ventilateur soit branché en vue d’un fonctionnement continu ainsi que toute modification divergeant des instructions de montage. Lors d’intervention par des
personnes ou instances non autorisées par nos soins ou lors de l’emploi de pièces autres que les pièces originales SOG, la garantie perd également tout effet. Nous nous réservons le droit en cas de réclamation de réparer ou échanger les pièces éfectueuses ou de procéder au remplacement de l’appareil. Les
pièces ainsi échangées deviennent notre propriété.
La garantie ne saurait s’étendre à d’autre prestations. La garantie n’entre en vigueur que si la date d’achat est confirmée par le cachet du vendeur. Elle peut
être invoquée dans les pays où cet appareil est vendu par des revendeurs autorisés.
Dans un cas entrant dans le cadre de la garantie, veuillez remettre la pièce défectueuse (le ventilateur seulement intégré au carter fourni, p. ex. au raccord
coudé à 90° ou autre carter) à l’un de nos revendeurs ou renvoyez-la directement à notre adresse.
F
-5-