1
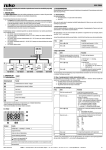
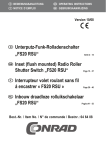
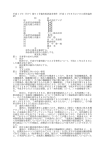
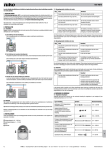
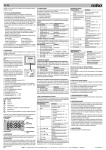
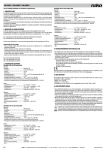
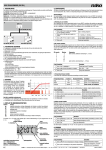
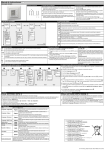
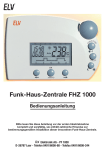
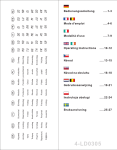
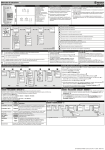
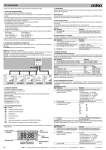
XXX-78300
Lees de volledige handleiding vóór installatie en ingebruikname.
1. BESCHRIJVING
Deze digitale rolluikschakelaar behoort tot het Niko productgamma van sensoren en actoren. Dit gamma
biedt een aantal comfortfuncties in combinatie met verschillende schakelfuncties.
De aansturing verloopt via een sensor en een actor:
•• Een sensor (A) is de zichtbare elektronische component dat – automatisch of na manuele bediening –
een uit te voeren schakelcommando naar de aangesloten actor stuurt. Deze component is verkrijgbaar
in alle Niko afwerkingen en kleuren.
De sensor wordt op de actor geklikt.
•• Met een actor (B) wordt de schakelcomponent bedoeld die de gevraagde handeling afkomstig van de
aangesloten sensor uitvoert zoals het licht schakelen of het omhoog sturen van een rolluik/zonwering.
Dit onderdeel bevindt zich achter de sensor in de inbouwdoos.
De rolluikschakelaar (sensor) is uitsluitend geschikt voor gebruik binnenshuis en kan worden gecombineerd
met de volgende actor:
•• 420-00300: sokkel met twee schakelcontacten (4 A, 230 V) waarop een externe drukknop kan
worden aangesloten
A
09 : 27
A. Looptijden instellen
De looptijd is standaard ingesteld op 30 seconden voor het openen en 30 seconden voor het neerlaten van
het rolluik of de zonwering. Op het display verschijnt dit als “t030”.
Niet alle rolluiken of zonweringen hebben dezelfde lengte. Bovendien zijn de looptijden voor het volledig openen
en het volledig neerlaten van een rolluik/zonwering verschillend. Daarom moet je deze tijden afzonderlijk instellen.
Opgelet: Alvorens de looptijden in te stellen, moet het rolluik of de zonwering volledig geopend zijn.
Bij ingebruikname of na een reset verschijnen alle symbolen en segmenten kort op het display. Daarna
verschijnt “t001” op het display.
Stap
Actie
Resultaat
1
Houd ingedrukt tot het rolluik/de
zonwering volledig gesloten is.
De looptijd voor het volledig neerlaten wordt
gemeten en opgeslagen wanneer je de knop
loslaat.
2
Houd ingedrukt tot het rolluik/de
zonwering volledig geopend is.
De looptijd voor het volledig openen wordt
gemeten en opgeslagen wanneer je de knop
loslaat.
3
Druk op
Je keert terug naar het startscherm.
B. Ingestelde looptijden wijzigen
Opgelet: Alvorens de ingestelde looptijden te wijzigen, moet het rolluik of de zonwering volledig geopend zijn.
XXX-78300
Stap
B
4A
4A
EXT1
EXT2
R,L
420-0030X
Je gebruikt één rolluikschakelaar per rolluik/zonwering. Parallelschakeling van motoren zonder tussenrelais
is niet toegestaan.
2. ONDERDELEN
.
Actie
Resultaat
1
Druk drie seconden op
2
Druk gelijktijdig op
Bedieningstoets
Functie
Houd ingedrukt tot het rolluik/de
zonwering volledig gesloten is.
De looptijd voor het volledig neerlaten wordt
gemeten en opgeslagen wanneer je de knop
loslaat.
4
Houd ingedrukt tot het rolluik/de
zonwering volledig geopend is.
De looptijd voor het volledig openen wordt
gemeten en opgeslagen wanneer je de knop
loslaat.
5
Druk op
Je keert terug naar het startscherm.
.
C. Dag en tijd instellen
Stap
Actie
Resultaat
rolluik/zonwering neer
1
Druk drie seconden op om de mode te
activeren voor de instelling van dag en tijd.*
De tijd en de dag knipperen.
2
Druk op
Je stelt de dag in: 1 = maandag,
2 = dinsdag, …
3
Druk op
of
4
Druk op
.
programmeren1
.
reset 2
Enkel gebruiken bij ingebruikname of programmering van de digitale rolluikschakelaar.
Deze toets niet indrukken met scherpe metalen voorwerpen.
2.2. Display
2
4
5
6
88:88
.
Je stelt de tijd in:
•• kort drukken: per minuut
•• lang drukken: per vijf minuten en
daarna per uur
De ingestelde dag en tijd worden bevestigd.
Je keert terug naar het startscherm.
*
Na een langdurige stroomonderbreking springt de rolluikschakelaar automatisch naar de mode om dag en
tijd in te stellen. Ga meteen naar stap 2.
➊
3
Je kunt nu de nieuwe looptijden ingeven.
3
dag en uur instellen – terug naar startscherm
1
.
rolluik/zonwering op
dag kiezen1
2
Je gaat naar de programmeermode.
.
09 : 27
2.1. Bedieningstoetsen
1
en
7
Prog.
88
➋
➌
4
l
➎
3.2. Dag- of weekprogramma’s instellen (automatische mode)
De rolluikschakelaar kan rolluiken en zonweringen automatisch – programmagestuurd – openen en neerlaten.
Hiervoor beschikt het toestel over 24 schakelcommando’s. Elk commando bevat:
•• het tijdstip waarop moet worden geschakeld (schakelmoment).
•• de dag(en) wanneer het commando van toepassing is.
•• de gewenste stand van het rolluik of de zonwering.
➏
Symbool
Betekenis
1
huidige dag (1 = maandag, 2 = dinsdag, …)
2
programmeermode
3
mode voor dag- en tijdsinstelling
4
richtingaanduiding van rolluik/zonwering
5
manuele bediening geactiveerd
6
geheugenplaats
3. PROGRAMMERING
De rolluikschakelaar keert automatisch terug naar het startscherm als je gedurende 30 seconden geen actie
uitvoert tijdens de programmering.
3.1. Basisinstellingen
De basisinstellingen zijn:
•• looptijd voor het rolluik of de zonwering.
•• dag en tijd.
Als je voor de eerste keer de spanning inschakelt (ingebruikname) of telkens na een reset moet je deze
instellingen programmeren.
nv Niko sa
Industriepark West 40, BE-9100 Sint-Niklaas, Belgium — tel. +32 3 778 90 00 — fax +32 3 777 71 20 — e-mail: [email protected] — www.niko.be
PMXXX-78300R15342
XXX-78300
4. WERKING EN GEBRUIK
Een schakelcommando toevoegen
Stap
Actie
1
Druk drie seconden op
2
Druk kort op
3
Druk op
4
Druk op
5
Druk op
Resultaat
of
Je gaat naar de programmeermode.
Het eerste schakelcommando (01) verschijnt.
.
… tot het gewenste weekblok of de gewenste dag
verschijnt. In volgorde:
-- 1234567 = hele week (maandag tot zondag)
-- 123456 = lange werkweek (maandag tot zaterdag)
-- 12345 = korte werkweek (maandag tot vrijdag)
-- 567 = lang weekend (vrijdag tot zondag)
-- 67 = kort weekend (zaterdag en zondag)
-- 1 = maandag, 2 = dinsdag (afzonderlijke dagen)
…
Je stelt het uur in waarop de stand van het rolluik/de
zonwering moet veranderen:
•• kort drukken: per minuut
•• lang drukken: per vijf minuten en daarna per uur
.
Op het display verschijnt de huidige stand van het
rolluik/de zonwering ten opzichte van de volledig
gesloten stand.
.
of
Je stelt de gewenste stand van het rolluik/de zonwering
in ten opzichte van de volledig gesloten stand.
.
6
Druk op
.*
De volgende geheugenplaats wordt opgeroepen.
7
Druk op
.
Je keert terug naar het startscherm.
*
Selecteer je de geheugenplaats na een vrije geheugenplaats, dan verschijnt het aantal geheugenplaatsen
die nog vrij zijn. Voorbeeld: rE:21 = er zijn nog 21 geheugenplaatsen vrij.
Een schakelcommando wijzigen
Stap
Actie
1
Druk drie seconden op
2
Druk kort op
…
… tot je het te wijzigen schakelcommando geselecteerd
hebt.
3
Druk kort op
…
… tot het gewenste weekblok of de gewenste dag
verschijnt. In volgorde:
-- 1234567 = hele week (maandag tot zondag)
-- 123456 = lange werkweek (maandag tot zaterdag)
-- 12345 = korte werkweek (maandag tot vrijdag)
-- 567 = lang weekend (vrijdag tot zondag)
-- 67 = kort weekend (zaterdag en zondag)
-- 1 = maandag, 2 = dinsdag (afzonderlijke dagen)
4
5
Resultaat
Druk op
Druk op
of
Je gaat naar de programmeermode.
Het eerste schakelcommando (01) verschijnt.
.
Je stelt het uur in waarop de stand van het rolluik/de
zonwering moet veranderen:
•• kort drukken: per minuut
•• lang drukken: per vijf minuten en daarna per uur
.
Op het display verschijnt de huidige stand van het
rolluik/de zonwering ten opzichte van de volledig
gesloten stand.
.
6
Druk op
of
7
Druk op
.
Je stelt de gewenste stand van het rolluik/de zonwering
in ten opzichte van de volledig gesloten stand.
.
Je keert terug naar het startscherm.
Een schakelcommando wissen
Stap
Actie
1
Druk drie seconden op
Resultaat
2
Druk kort op
3
Druk gelijktijdig op
4
Druk op
Je gaat naar de programmeermode.
Het eerste schakelcommando (01) verschijnt.
.
…
en
.
.
Actie
1
Houd
op .
Actie
1
Druk lang op
.
Het rolluik/de zonwering wordt geopend.
Resultaat
2
Druk lang op
.
Het rolluik/de zonwering wordt neergelaten.
Een knipperend handsymbool (
) geeft aan dat je de stand manueel aangepast hebt ten opzichte
van het programma. Deze toestand is tijdelijk. De rolluikschakelaar bevindt zich in manuele mode.
Bij de eerstvolgende verandering die het programma voorziet, wordt de automatische mode opnieuw
geactiveerd. Het handsymbool (
) verdwijnt.
B. Permanente mode
Druk gelijktijdig op en om de automatische mode uit te schakelen en de manueel geselecteerde
stand van het rolluik/de zonwering permanent in te stellen. De rolluikschakelaar bevindt zich nu in
permanente mode: het handsymbool (
) knippert niet maar brandt permanent.
Stap
Actie
1
Druk lang op
.
Het rolluik/de zonwering wordt geopend.
2
Druk lang op
.
Het rolluik/de zonwering wordt neergelaten.
Druk kort op
of
Resultaat
om de permanente mode uit te schakelen en terug te keren naar de manuele mode.
C. Functies met externe drukknop
Je kunt de sensor ook bedienen vanop verschillende locaties.
Op de actor kun je twee externe drukknoppen aansluiten tussen L en respectievelijk E1 en E2:
•• Het contact tussen L en E1 heeft dezelfde functie als .
•• Het contact tussen L en E2 heeft dezelfde functie als .
5. PROBLEEMOPLOSSING
In geval van storingen druk je kort op .
De rolluikschakelaar start opnieuw op. De instellingen blijven bewaard.
6. TECHNISCHE GEGEVENS
aantal schakelcommando’s
max. 24
min. omschakeltijd
1 minuut
gangreserve (beschikbaar na werking van 12 uur)
klok werkt 30 minuten verder
inbouwhoogte
0,8 – 1,5 m
omgevingstemperatuur
0 – 40°C
bewaartemperatuur
-25 – 75°C
7. WAARSCHUWINGEN VOOR INSTALLATIE
•De installatie moet worden uitgevoerd door een erkend installateur en volgens de geldende voorschriften.
•Deze handleiding moet aan de gebruiker worden overhandigd. Het moet bij het dossier van de elektrische
installatie worden gevoegd en worden overgedragen aan eventuele nieuwe eigenaars. Bijkomende exemplaren
zijn verkrijgbaar via de website of supportdienst van Niko. Op de Niko website is altijd de meest recente
handleiding van het product terug te vinden.
•Tijdens de installatie moet rekening gehouden worden met (niet-limitatieve lijst):
-- de geldende wetten, normen en reglementen.
-- de stand van de techniek op het moment van de installatie.
-- deze handleiding die alleen algemene bepalingen vermeldt en moet worden gelezen in het kader van
elke specifieke installatie.
-- de regels van goed vakmanschap.
Dit product voldoet aan alle toepasselijke Europese richtlijnen en verordeningen. Indien van toepassing, vind je
de EG-verklaring van overeenstemming met betrekking tot dit product op www.niko.eu.
De inhoud van de geselecteerde geheugenplaats
wordt verwijderd.
8. NIKO SUPPORT
Je keert terug naar het startscherm.
Resultaat
ingedrukt en druk kort
Stap
… tot je het te verwijderen schakelcommando
geselecteerd hebt.
3.3. Reset
Stap
A. Manuele mode
De stand van een rolluik/zonwering kun je op elk moment tijdelijk manueel wijzigen, ook terwijl er een
automatisch programma (automatische mode) loopt.
Je wist alle ingevoerde programma’s en instellingen.
De rolluikschakelaar keert terug naar de
fabrieksinstellingen.
Op het display verschijnt “t001” (zie ook “Looptijden
instellen” in rubriek 3.1.).
Heb je twijfel? Of wil je het product omruilen in geval van een eventueel defect? Neem dan contact op met je
groothandel of de Niko supportdienst:
•België: +32 3 778 90 80
•Nederland: +31 183 64 06 60
Contactgegevens en meer informatie vind je op www.niko.eu onder de rubriek “Hulp en advies”.
9. GARANTIEBEPALINGEN
•De garantietermijn bedraagt vier jaar vanaf leveringsdatum. Als leveringsdatum geldt de factuurdatum van
aankoop van het product door de consument. Als er geen factuur voorhanden is, geldt de productiedatum.
•De consument is verplicht Niko schriftelijk te informeren over het gebrek aan overeenstemming, en dit uiterlijk
binnen de twee maanden na vaststelling.
•In geval van een gebrek aan overeenstemming heeft de consument enkel recht op een kosteloze herstelling
of vervanging van het product, wat door Niko bepaald wordt.
•Niko is niet verantwoordelijk voor een defect of schade als gevolg van een foutieve installatie, oneigenlijk of
onachtzaam gebruik, een verkeerde bediening, transformatie van het product, onderhoud in strijd met de
onderhoudsvoorschriften of een externe oorzaak zoals vochtschade of schade door overspanning.
•De dwingende bepalingen in de nationale wetgeving over de verkoop van consumptiegoederen en de bescherming
van consumenten in landen waar Niko rechtstreeks of via zuster- of dochtervennootschappen, filialen, distributeurs,
agenten of vaste vertegenwoordigers verkoopt, hebben voorrang op bovenstaande bepalingen.
Dit product mag u niet bij het ongesorteerd afval gooien. Breng uw afgedankt product naar een containerpark of een
erkend verzamelpunt. Net als producenten en importeurs speelt ook u een belangrijke rol in de bevordering van sortering,
recycling en hergebruik van afgedankte elektrische en elektronische apparatuur. Om de ophaling en verwerking te kunnen
financieren, heft de overheid in bepaalde gevallen een recyclingbijdrage (inbegrepen in de aankoopprijs van dit product).
nv Niko sa
Industriepark West 40, BE-9100 Sint-Niklaas, Belgium — tel. +32 3 778 90 00 — fax +32 3 777 71 20 — e-mail: [email protected] — www.niko.be
PMXXX-78300R15342
XXX-78300
Veuillez lire le mode d’emploi entièrement avant l’installation et la mise en service.
1. DESCRIPTION
Cet interrupteur numérique pour volet appartient à la gamme de capteurs et d’actuateurs de Niko. Cette
gamme offre diverses fonctions de confort en combinaison avec différentes fonctions de commutation.
La commande s’effectue au moyen d’un capteur et d’un actuateur:
•Un capteur (A) est le composant électronique visible qui envoie à l’actuateur connecté – automatiquement
ou après une commande manuelle – un ordre de commutation à exécuter. Ce composant est disponible
dans toutes les finitions et couleurs Niko.
Le capteur se fixe sur l’actuateur.
•Un actuateur (B) est le composant de commutation qui exécute l’action ordonnée par le capteur
connecté, p.ex. allumer l’éclairage ou remonter un volet/store.
Ce composant se trouve derrière le capteur dans la boîte d’encastrement.
L’interrupteur pour volet (capteur) est exclusivement destinée à une utilisation à l’intérieur et peut être
combinée avec l’actuateur suivant:
•• 420-00300: socle avec deux contacts de commutation (4 A, 230 V), sur lequel un bouton-poussoir
externe peut être raccordé
A
09 : 27
A. Réglage des temps de transit
Par défaut, le temps de transit est réglé sur 30 secondes pour l’ouverture et 30 secondes pour la fermeture
du volet ou du store. À l’écran, cette valeur est indiquée sous la forme “t030”.
Tous les volets ou stores ne possèdent pas la même longueur. En outre, les temps de transit pour l’ouverture
complète et la fermeture complète d’un volet/store diffèrent. Par conséquent, vous devez les régler individuellement.
Attention: Avant de régler les temps de transit, ouvrez complètement le volet ou le store.
Lors de la mise en service ou après une réinitialisation, tous les symboles et segments apparaissent brièvement
à l’écran. Ensuite, “t001” s’affiche.
Étape
Action
Résultat
1
Maintenez
enfoncé jusqu’à ce que le
volet/store soit complètement fermé.
Le temps de transit pour la fermeture
complète est mesuré et enregistré lorsque
vous relâchez le bouton.
2
Maintenez
enfoncé jusqu’à ce que le
volet/store soit complètement ouvert.
Le temps de transit pour l’ouverture
complète est mesuré et enregistré lorsque
vous relâchez le bouton.
3
Appuyez sur
Vous revenez à l’écran de départ.
B. Modification des temps de transit réglés
Attention: Avant de modifier les temps de transit réglés, ouvrez complètement le volet ou le store.
XXX-78300
Étape
B
.
4A
4A
EXT1
EXT2
Action
Résultat
Appuyez pendant trois secondes sur
Appuyez simultanément sur
3
Maintenez
enfoncé jusqu’à ce que le
volet/store soit complètement fermé.
Le temps de transit pour la fermeture
complète est mesuré et enregistré lorsque
vous relâchez le bouton.
4
Maintenez
enfoncé jusqu’à ce que le
volet/store soit complètement ouvert.
Le temps de transit pour l’ouverture
complète est mesuré et enregistré lorsque
vous relâchez le bouton.
5
Appuyez sur
Vous revenez à l’écran de départ.
et
.
.
R,L
420-0030X
Par volet/store, utilisez un seul interrupteur pour volet. La commutation en parallèle de moteurs sans relais
intermédiaire n’est pas autorisée.
2. COMPOSANTS
Vous passez en mode de programmation.
1
2
09 : 27
2.1. Touches de commande
.
Vous pouvez à présent entrer les nouveaux
temps de transit.
Touche de commande Fonction
C. Réglage du jour et de l’heure
ouvrir le volet/store
fermer le volet/store
Étape
Action
Résultat
1
Appuyez pendant trois secondes sur afin
d’activer le mode de réglage du jour et de
l’heure.*
L’heure et le jour clignotent.
2
Appuyez sur
3
Appuyez sur
ou
4
Appuyez sur
.
sélectionner le jour1
régler le jour et l’heure – retour à l’écran de départ
programmer1
Vous réglez le jour: 1 = lundi, 2 = mardi, etc.
.
réinitialiser 2
1
2
À utiliser uniquement lors de la mise en service ou de la programmation de l’interrupteur numérique pour volet.
Ne pas appuyer sur cette touche à l’aide d’objets métalliques pointus.
2.2. Écran
1
2
4
5
6
88:88
Vous réglez l’heure:
•• pression brève: par minute
•• pression longue: par cinq minutes,
puis par heure
Le jour et l’heure réglés sont confirmés.
Vous revenez à l’écran de départ.
*
Après une panne de courant de longue durée, l’interrupteur pour volet passe automatiquement au mode de
réglage du jour et de l’heure. Allez immédiatement à l’étape 2.
➊
3
.
➋
7
Prog.
➌
4
l
➎
88
3.2. Réglage de programmes quotidiens ou hebdomadaires (mode automatique)
L’interrupteur pour volet peut ouvrir et fermer des volets et des stores automatiquement (commandés par un
programme). Pour ce faire, l’appareil dispose de 24 commandes de commutation. Chaque commande contient:
•• l’heure de commutation (moment de commutation).
•• le ou les jours auxquels la commande s’applique.
•• la position souhaitée du volet ou du store.
➏
Symbole
Signification
1
jour actuel (1 = lundi, 2 = mardi, etc.)
2
mode de programmation
3
mode de réglage du jour et de l’heure
4
indication du sens du volet/store
5
commande manuelle activée
6
emplacement mémoire
3. PROGRAMMATION
Si vous n’exécutez aucune action pendant 30 secondes lors de la programmation, l’interrupteur pour volet revient
automatiquement à l’écran de départ.
3.1. Réglages de base
Les réglages de base sont les suivants:
•• temps de transit du volet ou du store.
•• jour et heure.
Vous devez programmer ces réglages après la mise sous tension de l’appareil pour la première fois (mise en
service) ou après chaque réinitialisation.
nv Niko sa
Industriepark West 40, BE-9100 Sint-Niklaas, Belgium — tel. +32 3 778 90 00 — fax +32 3 777 71 20 — e-mail: [email protected] — www.niko.be
PMXXX-78300R15342
XXX-78300
4. FONCTIONNEMENT ET UTILISATION
Ajout d’une commande de commutation
Étape
Action
Résultat
1
Appuyez pendant trois secondes
sur .
Vous passez en mode de programmation.
La première commande de commutation (01) apparaît.
2
Appuyez brièvement sur
…
… jusqu’à ce que le bloc de la semaine ou le jour
souhaité apparaisse. Dans l’ordre:
-- 1234567 = semaine complète (du lundi au dimanche)
-- 123456 = semaine de travail longue (du lundi au
samedi)
-- 12345 = semaine de travail courte (du lundi au vendredi)
-- 567 = week-end long (du vendredi au dimanche)
-- 67 = week-end court (samedi et dimanche)
-- 1 = lundi, 2 = mardi (jours individuels)
Vous réglez l’heure à laquelle la position du volet/
store doit changer:
•• pression brève: par minute
•• pression longue: par cinq minutes, puis par heure
3
Appuyez sur
4
Appuyez sur
5
Appuyez sur
ou
6
Appuyez sur
.*
Vous appelez l’emplacement mémoire suivant.
7
Appuyez sur
.
Vous revenez à l’écran de départ.
ou
.
La position actuelle du volet/store par rapport à la
fermeture complète apparaît à l’écran.
.
Vous réglez la position souhaitée du volet/store par
rapport à la fermeture complète.
.
Si vous sélectionnez l’emplacement mémoire suivant un emplacement mémoire libre, le nombre d’emplacements
mémoires encore libres apparaît. Exemple: rE:21 = il reste 21 emplacements mémoires libres.
*
Modification d’une commande de commutation
Étape
Action
Résultat
1
Appuyez pendant trois secondes
sur .
Vous passez en mode de programmation.
La première commande de commutation (01) apparaît.
2
Appuyez brièvement sur
…
… jusqu’à ce que vous ayez sélectionné la commande
de commutation à modifier.
3
Appuyez brièvement sur
…
… jusqu’à ce que le bloc de la semaine ou le jour
souhaité apparaisse. Dans l’ordre:
-- 1234567 = semaine complète (du lundi au dimanche)
-- 123456 = semaine de travail longue (du lundi au
samedi)
-- 12345 = semaine de travail courte (du lundi au vendredi)
-- 567 = week-end long (du vendredi au dimanche)
-- 67 = week-end court (samedi et dimanche)
-- 1 = lundi, 2 = mardi (jours individuels)
4
ou
Appuyez sur
5
Appuyez sur
.
6
Appuyez sur
ou
7
Appuyez sur
.
Vous réglez l’heure à laquelle la position du volet/
store doit changer:
•• pression brève: par minute
•• pression longue: par cinq minutes, puis par heure
.
La position actuelle du volet/store par rapport à la
fermeture complète apparaît à l’écran.
Vous réglez la position souhaitée du volet/store par
rapport à la fermeture complète.
.
Vous revenez à l’écran de départ.
Effacement d’une commande de commutation
Étape
Action
Résultat
1
Appuyez pendant trois secondes
sur .
Vous passez en mode de programmation.
La première commande de commutation (01) apparaît.
2
Appuyez brièvement sur
3
Appuyez simultanément sur
et .
4
Appuyez sur
…
.
… jusqu’à ce que vous ayez sélectionné la commande
de commutation à supprimer.
Le contenu de l’emplacement mémoire sélectionné
est effacé.
Vous revenez à l’écran de départ.
3.3. Réinitialisation
Étape
Action
Résultat
1
Maintenez enfoncé et appuyez
brièvement sur .
Vous effacez tous les programmes et réglages mémorisés.
L’interrupteur pour volet revient aux réglages d’usine.
“t001” apparaît à l’écran (voir aussi “Réglage des temps de
transit” à la rubrique 3.1.).
A. Mode manuel
Vous pouvez modifier la position d’un volet/store manuellement à tout moment, de manière temporaire,
y compris pendant l’exécution d’un programme automatique (mode automatique).
Étape
Action
1
Exercez une pression longue sur
.
Le volet/store s’ouvre.
Résultat
2
Exercez une pression longue sur
.
Le volet/store se ferme.
Le symbole représentant une main (
) qui clignote indique que vous avez modifié manuellement
la position par rapport au programme. Cette situation est temporaire. L’interrupteur pour volet se trouve
en mode manuel.
Lors de la prochaine modification prévue par le programme, le mode automatique sera réactivé. Le
symbole de la main (
) disparaît.
B. Mode permanent
Appuyez simultanément sur
et
afin de désactiver le mode automatique et de régler de manière
permanente la position du volet/store sélectionnée manuellement. L’interrupteur pour volet se trouve
à présent en mode permanent: le symbole représentant une main (
) ne clignote pas mais est
allumé en permanence.
Étape
Action
1
Exercez une pression longue sur
.
Le volet/store s’ouvre.
2
Exercez une pression longue sur
.
Le volet/store se ferme.
Appuyez brièvement sur
Résultat
ou
pour désactiver le mode permanent et revenir au mode manuel.
C. Fonctions commandées par un bouton-poussoir externe
Vous pouvez commander le capteur à partir de différents endroits.
Vous pouvez connecter deux boutons-poussoirs externes à l’actuateur, entre L et, respectivement, E1 et E2:
•• Le contact entre L et E1 possède la même fonction que .
•• Le contact entre L et E2 possède la même fonction que .
5. RÉSOLUTION DES PROBLÈMES
En cas de problème, appuyez brièvement sur .
L’interrupteur pour volet redémarrera. Les réglages seront conservés.
6. CARACTÉRISTIQUES TECHNIQUES
nombre de commandes de commutation
max. 24
durée de commutation min.
1 minute
réserve (disponible après 12 heures de
fonctionnement)
l’horloge continue de fonctionner pendant 30
minutes
hauteur d’encastrement
0,8 – 1,5 m
température ambiante
0 – 40°C
température de stockage
-25 – 75°C
7. MISES EN GARDE CONCERNANT L‘INSTALLATION
•L’installation doit être effectuée par un installateur agréé et dans le respect des prescriptions en vigueur.
•Ce mode d’emploi doit être remis à l’utilisateur. Il doit être joint au dossier de l’installation électrique et être
remis aux nouveaux propriétaires éventuels. Des exemplaires supplémentaires peuvent être obtenus sur le
site web ou auprès du service support de Niko.
•Il y a lieu de tenir compte des points suivants pendant l’installation (liste non limitative):
-- les lois, les normes et les réglementations en vigueur.
-- l’état de la technique au moment de l’installation.
-- ce mode d’emploi qui stipule uniquement des dispositions générales et doit être lu dans le cadre de
toute installation spécifique.
-- les règles de l’art.
Ce produit est conforme à l’ensemble des directives et règlements européens applicables. Le cas échéant,
vous trouverez la déclaration CE de conformité relative à ce produit sur le site www.niko.eu.
8. SUPPORT DE NIKO
En cas de doute ou si vous voulez échanger le produit en cas de défaut éventuel, veuillez prendre contact
avec votre grossiste ou avec le service support de Niko:
•Belgique: +32 3 778 90 80
•France: +33 820 20 66 25
Vous trouverez les coordonnées et de plus amples informations sur le site www.niko.eu, sous la rubrique “Aide
et conseils”.
9. DISPOSITIONS DE GARANTIE
•Le délai de garantie est de quatre ans à partir de la date de livraison. La date de la facture d’achat par le
consommateur est considérée comme la date de livraison. En l’absence de facture, la date de fabrication est valable.
•Le consommateur est tenu de prévenir Niko par écrit de tout défaut de conformité, dans un délai maximum de
deux mois après constatation.
•En cas de défaut de conformité, le consommateur peut uniquement prétendre à la réparation gratuite ou au
remplacement gratuit du produit, selon l’avis de Niko.
•Niko ne peut être tenu pour responsable d’un défaut ou de dégâts résultant d’une installation fautive, d’une
utilisation impropre ou négligente, d’une commande erronée, d’une transformation du produit, d’un entretien
contraire aux consignes d’entretien ou d’une cause externe telle que de l’humidité ou une surtension.
•Les dispositions contraignantes de la législation nationale ayant trait à la vente de biens de consommation et à
la protection des consommateurs des différents pays où Niko procède à la vente directe ou par l’intermédiaire
d’entreprises sœurs, de filiales, de succursales, de distributeurs, d’agents ou de représentants fixes, prévalent
sur les dispositions susmentionnées.
Ce produit ne peut pas être jeté avec les déchets non triés. Apportez vos équipements obsolètes électriques et électroniques
à un point de collecte agréé. Tout comme les producteurs et importateurs, vous jouez un rôle important dans le triage, le
recyclage et la réutilisation des appareils électriques et électroniques. Afin de pouvoir financer la collecte et le traitement
écologique, les autorités imposent dans certains cas une cotisation de recyclage (comprise dans le prix d’achat de ce produit).
EMBALLAGES
CARTONS ET PAPIER
À TRIER
nv Niko sa
Industriepark West 40, BE-9100 Sint-Niklaas, Belgium — tel. +32 3 778 90 00 — fax +32 3 777 71 20 — e-mail: [email protected] — www.niko.be
PMXXX-78300R15342
XXX-78300
Handbuch vor Montage und Inbetriebnahme vollständig durchlesen.
1. BESCHREIBUNG
Dieser digitale Rollladenschalter entstammt dem umfangreichen Niko-Produktangebot an Sensoren und
Aktoren. Die Produktreihe bietet eine Vielzahl an miteinander kombinierbaren Komfort- und Schaltfunktionen.
Die Ansteuerung geschieht mittels eines Sensors und eines Aktors:
•Beim Sensor handelt es sich um die sichtbare elektronische Komponente, die entweder automatisch
oder nach manueller Bedienung einen auszuführenden Schaltbefehl an den angeschlossenen Aktor
sendet. Sensoren sind in allen von Niko angebotenen Verarbeitungsformen und Farben erhältlich.
Der Sensor wird auf den Aktor geklickt.
•Ein Aktor ist eine Schaltkomponente zur Ausführung einer bestimmten Funktion in Abhängigkeit
vom angeschlossenen Sensor, z.B. das Schalten des Lichts oder ein Herauf- und Herunterfahren
der Rolllade bzw. Markise.
Diese Komponente befindet sich in der Unterputzdose hinter dem Sensor.
A. Laufzeiten einstellen
Die max. Laufzeit für das Öffnen oder Schließen der Rolllade bzw. Markise beträgt standardmäßig 30 Sekunden.
Das Display zeigt dies als “t030” an.
Da nicht alle Rollläden oder Markisen die gleiche Länge besitzen und weil darüber hinaus die Laufzeiten für
das vollständige Öffnen oder Schließen der Rolllade bzw. Markise unterschiedlich ausfallen, müssen Sie die
Laufzeiten entsprechend einstellen.
Achtung: Vor dem Einstellen der Laufzeiten muss Rolllade bzw. Markise vollständig geöffnet sein.
Bei Inbetriebnahme oder nach einem Reset zeigt das Display kurz alle Symbole und Segmente an. Danach
zeigt das Display “t001” an.
Der Rollladenschalter (Sensor) ist ausschließlich für eine Verwendung in Innenräumen geeignet und lässt sich
mit folgendem Aktor kombinieren:
•• 420-00300: Sockel mit zwei Schaltkontakten (4 A, 230 V), an die ein externer Tastschalter
angeschlossen werden kann
A
09 : 27
Schritt
Aktion
Ergebnis
1
Halten Sie solange betätigt, bis Rolllade
bzw. Markise vollständig geschlossen ist.
Die Laufzeit für das vollständige
Herunterlassen wird gemessen und bei
Loslassen des Tasters gespeichert.
2
Halten Sie solange betätigt, bis Rolllade
bzw. Markise vollständig.
Die Laufzeit für das vollständige Öffnen wird
gemessen und bei Loslassen des Tasters
gespeichert.
3
Betätigen Sie
Sie kehren wieder zum Startbildschirm zurück.
B. Eingestellte Laufzeiten ändern
Achtung: Vor dem Ändern der eingestellte Laufzeiten muss Rolllade bzw. Markise vollständig geöffnet sein.
XXX-78300
Schritt
B
.
4A
4A
EXT1
EXT2
Aktion
Ergebnis
1
Betätigen Sie drei Sekunden lang
.
Sie gelangen in den Programmiermodus.
2
Betätigen Sie gleichzeitig
.
Sie können jetzt die neuen Laufzeiten
eingeben.
3
Halten Sie solange betätigt, bis Rolllade
bzw. Markise vollständig geschlossen ist.
Die Laufzeit für das vollständige
Herunterlassen wird gemessen und bei
Loslassen des Tasters gespeichert.
4
Halten Sie solange betätigt, bis Rolllade
bzw. Markise vollständig geöffnet ist.
Die Laufzeit für das vollständige Öffnen wird
gemessen und bei Loslassen des Tasters
gespeichert.
5
Betätigen Sie
Sie kehren wieder zum Startbildschirm
zurück.
und
R,L
420-0030X
Pro Rolllade bzw. Markise schließen Sie einen Rollladenschalter an. Eine Parallelschaltung von Motoren ohne
Zwischenrelais ist nicht zulässig.
2. KOMPONENTEN
2.1. Bedientasten
Bedientaste
09 : 27
Rolllade/Markise aufwärts
C. Wochentag und Uhrzeit einstellen
Rolllade/Markise abwärts
Schritt
Aktion
Ergebnis
Tag auswählen
1
Betätigen Sie drei Sekunden lang , um
den Wochentag- und Zeiteinstellmodus zu
aktivieren.*
Wochentag und Uhrzeit blinken.
2
Betätigen Sie
3
Betätigen Sie
oder
4
Betätigen Sie
.
1
Tag und Uhrzeit einstellen – zurück zum Startbildschirm
programmieren1
zurücksetzen2
1
2
.
Funktion
Wochentag einstellen: 1 = Montag,
2 = Dienstag, etc.
.
Ausschließlich bei Inbetriebnahme oder Programmierung der digitalen Rollladenschalter benutzen.
Diese Taste niemals mit spitzen Metallgegenständen betätigen.
2.2. Display
1
2
➊
3
4
5
6
88:88
7
Prog.
88
➋
➌
4
l
➎
➏
Symbol
Bedeutung
1
aktueller Wochentag (1 = Montag, 2 = Dienstag, etc.)
2
Programmiermodus
3
Tages- und Zeiteinstellmodus
4
Richtungsanzeige von Rollladen- bzw. Markisenfahrt
5
manuelle Bedienung ist aktiviert
6
Speicherplatz
.
Uhrzeit einstellen:
•• kurz betätigen: einzelne Minuten
einstellen
•• länger betätigen: blockweise fünf
Minuten einstellen, danach die
Stunden
Eingestellte Uhrzeit und Wochentag werden
bestätigt.
Sie kehren wieder zum Startbildschirm
zurück.
Nach einem längeren Spannungsausfall kehrt der Rollladenschalter automatisch in den Tages- und
Zeiteinstellmodus zurück. Gehen Sie direkt zu Schritt 2.
*
3.2. Tages- bzw. Wochenprogramme einstellen (Automatikmodus)
Der Rollladenschalter kann Rollläden und Markisen automatisch, d.h. programmgesteuert, öffnen und
schließen. Hierfür verfügt das Gerät über 24 Schaltbefehle, die im Einzelnen folgende Elemente enthalten:
•• Zeitpunkt, wann die Schaltfunktion auszuführen ist (Schaltzeitpunkt).
•• Tag, an dem der Schaltbefehl auszuführen ist.
•• gewünschte Stellung von Rolllade bzw. Markise
3. PROGRAMMIERUNG
Der Rollladenschalter kehrt automatisch zum Startbildschirm zurück, wenn Sie während der Programmierung
30 Sekunden lang keine Aktion ausführen.
3.1. Grundeinstellungen
Sie können folgende Grundeinstellungen ändern:
•• Laufzeit von Rolllade bzw. Markise.
•• Wochentag und Uhrzeit.
Sie müssen diese Einstellungen nach einem Reset programmieren oder wenn Sie zum ersten Mal die Spannung
einschalten (Inbetriebnahme).
nv Niko sa
Industriepark West 40, BE-9100 Sint-Niklaas, Belgium — tel. +32 3 778 90 00 — fax +32 3 777 71 20 — e-mail: [email protected] — www.niko.be
PMXXX-78300R15342
XXX-78300
4. FUNKTIONSWEISE UND BETRIEB
Schaltbefehl hinzufügen
Schritt
Aktion
1
Betätigen Sie drei Sekunden lang
2
Betätigen Sie kurz
3
4
Ergebnis
Betätigen Sie
Betätigen Sie
… bis der gewünschte Wochenblock bzw. Tag
angezeigt wird. Folgende Zusammensetzungen sind
möglich:
-- 1234567 = die gesamte Woche (Montag bis Sonntag)
-- 123456 = lange Arbeitswoche (Montag bis Samstag)
-- 12345 = kurze Arbeitswoche (Montag bis Freitag)
-- 567 = langes Wochenende (Freitag bis Sonntag)
-- 67 = kurzes Wochenende (Samstag und Sonntag)
-- 1 = Montag, 2 = Dienstag (separate Tage)
…
oder
. Sie gelangen in den Programmiermodus.
Es wird der erste Schaltbefehl (01) angezeigt.
Sie stellen die Uhrzeit ein, zu der die Rolllade bzw.
Markise ihre Stellung verändern muss:
•• kurz betätigen: einzelne Minuten einstellen
•• länger betätigen: blockweise fünf Minuten
einstellen, danach die Stunden
.
Das Display zeigt die aktuelle Stellung der Rolllade
bzw. der Markise im Verhältnis zum vollständig
geschlossenen Zustand an.
.
5
Betätigen Sie
oder
6
Betätigen Sie
.*
Es wird der nächste Speicherplatz aufgerufen.
7
Betätigen Sie
.
Sie kehren wieder zum Startbildschirm zurück.
Sie stellen die gewünschte Stellung der Rolllade bzw.
Markise im Verhältnis zum vollständig geschlossenen
Zustand ein.
.
Bei Auswahl der Speicherplätze nach einem freien Speicherplatz wird die Anzahl der noch freien Speicherplätze
angezeigt. Ein Beispiel: rE:21 = es sind noch 21 Speicherplätze frei.
*
Ändern eines Schaltbefehls
Schritt
Aktion
1
Betätigen Sie drei Sekunden lang
2
Betätigen Sie kurz
…
… bis Sie den zu ändernden Schaltbefehl ausgewählt
haben.
3
Betätigen Sie kurz
…
… bis der gewünschte Wochenblock bzw. Tag
angezeigt wird. Folgende Zusammensetzungen sind
möglich:
-- 1234567 = die gesamte Woche (Montag bis Sonntag)
-- 123456 = lange Arbeitswoche (Montag bis Samstag)
-- 12345 = kurze Arbeitswoche (Montag bis Freitag)
-- 567 = langes Wochenende (Freitag bis Sonntag)
-- 67 = kurzes Wochenende (Samstag und Sonntag)
-- 1 = Montag, 2 = Dienstag (separate Tage)
4
Ergebnis
Betätigen Sie
oder
5
Betätigen Sie
6
Betätigen Sie
oder
7
Betätigen Sie
.
. Sie gelangen in den Programmiermodus.
Es wird der erste Schaltbefehl (01) angezeigt.
Sie stellen die Uhrzeit ein, zu der die Rolllade bzw.
Markise ihre Stellung verändern muss:
•• kurz betätigen: einzelne Minuten einstellen
•• länger betätigen: blockweise fünf Minuten
einstellen, danach die Stunden
.
Aktion
1
Betätigen Sie drei Sekunden lang
2
Betätigen Sie kurz
3
Betätigen Sie gleichzeitig
4
Betätigen Sie
und
.
. Sie gelangen in den Programmiermodus.
Es wird der erste Schaltbefehl (01) angezeigt.
. Der Inhalt des gewählten Speicherplatzes wird
entfernt.
Sie kehren wieder zum Startbildschirm zurück.
3.3. Zurücksetzen
Schritt
Aktion
1
Halten Sie
kurz .
Ergebnis
und betätigen Sie
.
Rolllade bzw. Markise wird geöffnet.
Ergebnis
2
Betätigen Sie für längere Zeit
.
Rolllade bzw. Markise wird geschlossen.
Ein blinkendes Handsymbol (
) zeigt an, dass Sie die Stellung manuell zum Programm angepasst
haben. Dieser Zustand ist lediglich temporär. Der Rollladenschalter befindet sich im Handbetriebsmodus.
Bei der nächsten vom Programm veranlassten Veränderung wird erneut der Automatikmodus aktiviert.
) wird ausgeblendet.
Das Handsymbol (
B. Dauerbetriebsmodus
Betätigen Sie gleichzeitig und um den Automatikmodus auszuschalten und um die manuell gewählte
Stellung von Rolllade bzw. Markise dauerhaft einzustellen. Der Rollladenschalter befindet sich jetzt im
)blinkt nun nicht mehr, sondern leuchtet dauerhaft.
Dauerbetriebsmodus: das Handsymbol (
Schritt
Aktion
1
Betätigen Sie für längere Zeit
.
Rolllade bzw. Markise wird geöffnet.
2
Betätigen Sie für längere Zeit
.
Rolllade bzw. Markise wird geschlossen.
Betätigen Sie kurz
oder
Handbetriebsmodus.
Ergebnis
, um den Dauerbetriebsmodus auszuschalten und zurückzukehren zum
C. Funktionen über externen Tastschalter bedienen
Sie können den Sensor auch von unterschiedlichen Orten aus ansteuern.
Sie können am Aktor zwei externe Tastschalter zwischen den Klemmen L und E1 bzw. E2 anschließen:
•• Der Kontakt zwischen L und E1 besitzt dieselbe Funktion wie .
•• Der Kontakt zwischen L und E2 besitzt dieselbe Funktion wie .
5. STÖRUNGSABHILFE
Betätigen Sie im Störungsfall kurz .
Der Rollladenschalter wird erneut hochgefahren. Die Einstellungen bleiben dabei erhalten.
6. TECHNISCHE DATEN
Anzahl der Schaltbefehle
max. 24
Mindest-Umschaltzeit
1 Minute
Gangreserve (erst nach 12-stündiger Betriebszeit
verfügbar)
Uhr läuft noch 30 Minuten weiter
Einbauhöhe
0,8 – 1,5 m
Umgebungstemperatur
0 – 40°C
Lagertemperatur
-25 – 75°C
7. WARNHINWEISE FÜR DIE INSTALLATION
Dieses Produkt erfüllt alle anwendbaren europäischen Richtlinien und Verordnungen. Die für dieses Produkt
zutreffende EG-Konformitätserklärung erhalten Sie gegebenenfalls unter www.niko.eu.
… bis Sie den zu löschenden Schaltbefehl
ausgewählt haben.
…
Betätigen Sie für längere Zeit
Ergebnis
Schaltbefehl löschen
Schritt
Aktion
1
Sie kehren wieder zum Startbildschirm zurück.
Sie stellen die gewünschte Stellung der Rolllade bzw.
Markise im Verhältnis zum vollständig geschlossenen
Zustand ein.
.
Schritt
•Die Installation darf ausschließlich von einer Elektrofachkraft unter Berücksichtigung der geltenden
Vorschriften ausgeführt werden.
•Diese Gebrauchsanleitung muss dem Benutzer ausgehändigt werden. Die Gebrauchsanleitung ist den Unterlagen
der elektrischen Anlage beizufügen und muss auch eventuellen neuen Besitzern ausgehändigt werden. Zusätzliche
Exemplare erhalten Sie über die Internetseiten von Niko oder über den Kundendienst von Niko.
•Beachten und berücksichtigen Sie bei der Installation unter anderem folgende Punkte:
-- die gültigen Gesetze, Normen und Richtlinien.
-- den Stand der Technik zum Zeitpunkt der Installation.
-- die in dieser Gebrauchsanleitung aufgeführten Anweisungen, wobei diese Gebrauchsanleitung nur
allgemein gültige Bestimmungen enthält, die für jede Anlage spezifisch angewendet werden müssen.
-- die allgemein anerkannten Regeln fachmännischer Arbeit.
Das Display zeigt die aktuelle Stellung der Rolllade
bzw. der Markise im Verhältnis zum vollständig
geschlossenen Zustand an.
.
A. Handbetriebsmodus
Sie können zu jeder Zeit die Stellung der Rolllade bzw. Markise manuell temporär ändern, selbst wenn
ein automatisches Programm (Automatikmodus) ausgeführt wird.
Sie löschen alle hinzugefügten Programme und
Einstellungen.
Der Rollladenschalter kehrt wieder auf die
Werkseinstellungen zurück.
Das Display zeigt “t001” an (siehe auch Abschnitt
3.1., “Laufzeiten einstellen”).
8. NIKO UNTERSTÜTZUNG
Bei Zweifel oder falls Sie bei einem eventuellen Defekt des Produkts noch Fragen bezüglich des Umtausches
haben, dann nehmen Sie bitte Kontakt auf mit dem Kundendienst von Niko (Belgien: +32 3 778 90 80) oder
wenden Sie sich an Ihren Großhändler. Kontaktdaten und weitere Informationen erhalten Sie im Internet unter
www.niko.eu in der Rubrik “Unterstützung und Beratung”.
9. GARANTIEBEDINGUNGEN
•Der Garantiezeitraum beträgt vier Jahre ab Lieferdatum. Als Lieferdatum gilt das Rechnungsdatum zum Zeitpunkt
des Kaufs durch den Endverbraucher. Falls keine Rechnung mehr vorhanden ist, gilt das Produktionsdatum.
•Der Endverbraucher ist verpflichtet, Niko schriftlich über einen Produktmangel innerhalb von zwei Monaten
nach dessen Feststellung zu informieren.
•Im Falle eines Mangels hat der Endverbraucher nur Recht auf kostenlose Reparatur oder Ersatz des Produkts.
Eine Entscheidung darüber obliegt allein Niko.
•Niko ist nicht für Mängel oder Schäden verantwortlich, die durch fehlerhafte Installation, nicht
bestimmungsgemäßen oder unsachgemäßen Gebrauch, durch falsche Bedienung, Anpassen/Ändern des
Produktes, infolge von unsachgemäßer Wartung entgegen den Wartungsvorschriften oder die sich aus
äußeren Umständen, wie beispielsweise infolge Feuchtigkeit oder Überspannung, ergeben.
•Zwingende Vorschriften der nationalen Gesetzgebung bezüglich des Verkaufs von Konsumgütern und zum
Verbraucherschutz haben vor den obigen Bestimmungen Vorrang in den Ländern, in denen Niko direkt oder über
seine Neben- oder Tochtergesellschaften, Filialen, Vertriebsstellen, Agenten oder über feste Vertreter verkauft.
Dieses Produkt darf nicht mit dem normalen Haus- bzw. Restmüll entsorgt werden. Das zu entsorgende Gerät muss zu einer
Mülldeponie oder einer Sondermüllsammelstelle gebracht werden. Neben den Herstellern und Importeuren haben auch
Sie als Verbraucher eine Verantwortung bei der Mülltrennung, dem Recycling und der Wiederverwertung von elektrischen
und elektronischen Geräten die entsorgt werden sollen. Um die Entsorgung und Verarbeitung finanzieren zu können, hat
die Regierung in bestimmten Fällen einen Recycling-Beitrag festgelegt, der im Kaufpreis dieses Produktes enthalten ist.
nv Niko sa
Industriepark West 40, BE-9100 Sint-Niklaas, Belgium — tel. +32 3 778 90 00 — fax +32 3 777 71 20 — e-mail: [email protected] — www.niko.be
PMXXX-78300R15342
XXX-78300
Read the complete user manual before carrying out the installation and activating the system.
1. DESCRIPTION
This digital roll-down shutter switch is part of the Niko product range of sensors and actuators. This range
offers a number of comfort functions in combination with various switching functions.
The control of this switch occurs via a sensor and an actuator:
• A sensor (A) is the visible electronic component that – automatically or after manual control – sends
a switching command to the connected actuator for being performed. This component is available
in all Niko finishes and colours.
The sensor is clicked onto the actuator.
• An actuator (B) is the switching component that performs the action requested by the connected
sensor, such as switching the light or raising a roll-down shutter/sun blind.
This component is located behind the sensor in the flush-mounting box.
A. Setting run times
The run time has a standard setting of 30 seconds for opening and 30 seconds for closing the roll-down
shutter or sun blind. This appears on the display as “t030”.
Not all roll-down shutters or sun blinds are the same length. Furthermore, the run times for the complete opening
and the complete closing of a roll-down shutter/sun blind vary. Therefore, you must set these times individually.
Attention: Before setting the run times, the roll-down shutter or sun blind must be in the completely opened position.
During activation or after a reset, all of the symbols and segments appear briefly on the display. Thereafter,
“t001” appears on the display.
The roll-down shutter switch (sensor) is intended for indoor use only and can be combined with the following
actuator:
•• 420-00300: base with two switching contacts (4 A, 230 V) to which an external push button can
be connected
A
09 : 27
Action
1
Press until the roll-down shutter/sun blind The run time required to completely lower
the roll-down shutter/sun blind is measured
is completely closed.
and saved when you release the button.
2
Press until the roll-down shutter/sun blind The run time required to completely open the
roll down shutter/sun blind is measured and
is completely opened.
saved when you release the button.
3
Press
Step
4A
4A
EXT1
EXT2
R,L
420-0030X
Action
Result
1
Press
for three seconds.
You enter the programming mode.
Press
and
You can now enter the new run times.
3
Press until the roll-down shutter/sun blind The run time required to completely lower
the roll-down shutter/sun blind is measured
is completely closed.
and saved when you release the button.
4
Press until the roll-down shutter/sun blind The run time required to completely open the
roll down shutter/sun blind is measured and
is completely opened.
saved when you release the button.
5
Press
09 : 27
2.1. Control buttons
Control button
Step
Action
Result
1
Press for three seconds to activate the
mode for setting the day and time.*
The time and the day begin to flash.
sets day and hour – back to start screen
2
Press
You set the day: 1 = Monday,
2 = Tuesday, …
programming1
3
Press
or
4
Press
.
selects the day1
.
reset 2
Use only when activating or programming the digital roll-down shutter switch.
Do not use sharp metal objects to depress this button.
2.2. Display
1
2
4
5
6
88:88
.
You set the time:
•• press briefly: set per minute
•• press and hold: set per five minutes
and then per hour
The day and time selected are confirmed.
You return to the start screen.
After a lengthy power interruption, the roll-down shutter switch automatically switches to the day- and
time-setting mode. Go directly to step 2.
*
➊
3
You return to the start screen.
.
C. Setting day and time
roll-down shutter/sun blind down
2
simultaneously.
Function
roll-down shutter/sun blind up
1
You return to the start screen.
.
2
You use one roll-down shutter switch per roll-down shutter/sun blind. Parallel connection of motors without
an intermediate relay is not permitted.
2. COMPONENTS
Result
B. Changing the set run times
Attention: Before changing the set run times, the roll-down shutter or sun blind must be in the completely
opened position.
XXX-78300
B
Step
7
Prog.
88
➋
➌
4
l
➎
3.2. Setting day or week programs (automatic mode)
The roll-down shutter switch can automatically – program-controlled – open and close roll-down shutters
and sun blinds. For this, the device is equipped with 24 switching commands. Each command contains:
•• the time when switching must occur (switching moment).
•• the day(s) when the command is applicable.
•• the desired position of the roll-down shutter or sun blind.
➏
Symbol
Meaning
1
current day (1 = Monday, 2 = Tuesday, …)
2
programming mode
3
day- and time-setting mode
4
direction indication of roll-down shutter/sun blind
5
manual control is activated
6
memory location
3. PROGRAMMING
The roll-down shutter switch automatically returns to the start screen if you do not take any actions for a period
of 30 seconds while programming.
3.1. Basic settings
The basic settings are:
•• run time for the roll-down shutter or the sun blind.
•• day and time.
You must program these settings when you connect to the power for the first time (activation) and after each reset.
nv Niko sa
Industriepark West 40, BE-9100 Sint-Niklaas, Belgium — tel. +32 3 778 90 00 — fax +32 3 777 71 20 — e-mail: [email protected] — www.niko.be
PMXXX-78300R15342
XXX-78300
4. OPERATION AND USE
Adding a switching command
Step
Action
1
Press
for three seconds.
You enter the programming mode.
The first switching command (01) appears.
2
Press
briefly…
… until the desired week block or day appears. In
sequence:
-- 1234567 = entire week (Monday through Sunday)
-- 123456 = long work week (Monday through Saturday)
-- 12345 = short work week (Monday through Friday)
-- 567 = long weekend (Friday through Sunday)
-- 67 = short weekend (Saturday and Sunday)
-- 1 = Monday, 2 = Tuesday (individual days)
3
Result
or
Press
4
Press
5
Press
You set the hour at which the position of the roll-down
shutter/sun blind must change:
•• press briefly: set per minute
•• press and hold: set per five minutes and then
per hour
.
The current position of the roll-down shutter/sun blind
relative to the completely closed position appears on
the display.
.
or
You set the desired position of the roll-down shutter/
sun blind relative to the completely closed position.
.
6
Press
.*
The next memory location is called up.
7
Press
.
You return to the start screen.
A. Manual mode
The roll-down shutter/sun blind position can be manually changed temporarily at any time, even while
an automatic program (automatic mode) is running.
Step
Action
1
Press and hold
.
The roll-down shutter/sun blind is opened.
Result
2
Press and hold
.
The roll-down shutter/sun blind is closed.
A flashing hand symbol (
) indicates that you have manually adjusted the position relative to the
programmed position. This position is temporary. The roll-down shutter switch is now in manual mode.
At the next change planned for the program, the automatic mode will be reactivated. The hand symbol
(
) disappears.
B. Permanent mode
Press
and
simultaneously to deactivate the automatic mode and to permanently activate the
manually selected position of the roll-down shutter/sun blind. The roll-down shutter switch is now in
permanent mode: the hand symbol (
) is not flashing but is illuminated permanently.
Step
Action
1
Press and hold
.
The roll-down shutter/sun blind is opened.
Result
2
Press and hold
.
The roll-down shutter/sun blind is closed.
*
If you select the memory location after an available memory location, then the number of memory locations
that are still available appears. For example: rE:21 = there are still 21 memory locations available.
Press
Changing a switching command
C. Functions with an external push button
You can also control the sensor from various locations.
briefly to deactivate the permanent mode and to return to the manual mode.
Step
Action
1
Press
for three seconds.
You enter the programming mode.
The first switching command (01) appears.
You can connect two external push buttons to the actuator between L and E1 and E2, respectively:
•• The contact between L and E1 has the same function as .
•• The contact between L and E2 has the same function as .
2
Press
briefly…
… until you have selected the switching command to
be changed.
5. TROUBLESHOOTING
3
Press
briefly…
… until the desired week block or day appears. In
sequence:
-- 1234567 = entire week (Monday through Sunday)
-- 123456 = long work week (Monday through Saturday)
-- 12345 = short work week (Monday through Friday)
-- 567 = long weekend (Friday through Sunday)
-- 67 = short weekend (Saturday and Sunday)
-- 1 = Monday, 2 = Tuesday (individual days)
4
5
Result
or
or
Press
Press
You set the hour at which the position of the roll-down
shutter/sun blind must change:
•• press briefly: set per minute
•• press and hold: set per five minutes and
then per hour
.
The current position of the roll-down shutter/sun blind
relative to the completely closed position appears on
the display.
.
6
Press
or
7
Press
.
You set the desired position of the roll-down shutter/
sun blind relative to the completely closed position.
.
You return to the start screen.
Deleting a switching command
Result
In the event of malfunctions, press briefly.
The roll-down shutter switch restarts. The settings are saved
6. TECHNICAL DATA
number of switching commands
max. 24
min. switching time
1 minute
operational reserve (available after 12 hours of
operation)
clock will continue to work for 30 more minutes
flush-mounting height
0.8 – 1.5 m
ambient temperature
0 – 40°C
storage temperature
-25 – 75°C
7. WARNINGS REGARDING INSTALLATION
- The installation should be carried out by a registered installer and in compliance with the statutory regulations.
- This user manual should be presented to the user. It should be included in the electrical installation file, and
it should be passed on to any new owners. Additional copies are available on the Niko website or via the Niko
support service.
- During installation, the following should be taken into account (non-exhaustive list):
- the statutory laws, standards and regulations.
- the technology currently available at the time of installation.
- this user manual, which only states general regulations and should therefore be read within the scope of
each specific installation.
- the rules of proper workmanship.
Step
Action
1
Press
for three seconds.
You enter the programming mode.
The first switching command (01) appears.
2
Press
briefly…
… until you have selected the switching command
to be deleted.
This product complies with all of the relevant European guidelines and regulations. If applicable, you can find
the EC declaration of conformity regarding this product at www.niko.eu.
3
Press
and
The content of the selected memory location is
deleted.
8. NIKO SUPPORT
4
Press
.
simultaneously.
You return to the start screen.
3.3. Reset
In case of doubt or for the specific exchange procedure in case of a possible defect, contact the Niko support
service in Belgium at +32 3 778 90 80 or your wholesaler/installer. Contact details and more information can
be found at www.niko.eu under the “Help and advice” section.
9. GUARANTEE PROVISIONS
Step
Action
1
Press and hold
briefly.
Result
and press
You delete all of the entered programs and settings.
The roll-down shutter switch is returned to the factory
settings.
This appears on the display as “t001” (also see
“Setting run times” in section 3.1.).
- The period of guarantee is four years from the date of delivery. The delivery date is the invoice date of purchase
of the product by the consumer. If there is no invoice, the date of production applies.
- The consumer is obliged to inform Niko in writing about the non-conformity, within two months after stating
the defect.
- In case of a non-conformity, the consumer only has the right to a product repair or replacement free of charge,
which shall be decided by Niko.
- Niko shall not be held liable for a defect or damage resulting from incorrect installation, improper or careless
use, incorrect operation, transformation of the product, maintenance that does not adhere to the maintenance
instructions or an external cause, such as damage due to moisture or overvoltage.
- The compulsory regulations of the national legislation concerning the sale of consumer goods and the
protection of the consumer in the countries where Niko sells, directly or via sister companies, subsidiaries,
chain stores, distributors, agents or permanent sales representatives, take priority over the above-mentioned
rules and regulations.
Do not dump this product with the unsorted waste. Bring it to a recognised waste collection point. Together with producers
and importers, you have an important role to play in the advancement of sorting, recycling and reusing discarded electrical
and electronic appliances. In order to finance the waste collection and processing, the government levies a recycling
contribution in some cases (included in the purchase price of this product).
nv Niko sa
Industriepark West 40, BE-9100 Sint-Niklaas, Belgium — tel. +32 3 778 90 00 — fax +32 3 777 71 20 — e-mail: [email protected] — www.niko.be
PMXXX-78300R15342
XXX-78300
Pred inštaláciou a spustením systému si prečítajte celý návod.
1. OPIS
Tento digitálny spínač pre ovládanie sťahovacích roliet je súčasťou sortimentu snímačov a aktorov spoločnosti
Niko. Tento sortiment ponúka množstvo komfortných funkcií v kombinácii s rôznymi spínacími funkciami.
Ovládanie tohto spínača sa vykonáva pomocou snímača a aktora:
• Snímač (A) je viditeľná elektronická súčiastka, ktorá automaticky alebo ručným ovládaním vysiela spínací
povel, ktorý je treba vykonať, do pripojeného aktora. Tento komponent je k dispozícii vo všetkých farbách
a vyhotoveniach Niko.
Snímač je zacvaknutý do aktora.
• Aktor (B) je spínací komponent, ktorý vykonáva akciu požadovanú pripojeným snímačom, akým je napríklad
spínanie svetiel alebo ovládanie sťahovacích roliet a žalúzií.
V zapustenej montážnej krabici sa nachádza za snímačom.
Spínač (snímač) pre ovládanie sťahovacích roliet je určený len na použitie v interiéri a dá sa kombinovať s
týmito aktormi:
•• 420-00300: aktor, 2-kanálový 4A, 2-spínacie kontakty + 1 externý vstup 230 V
A
A. Nastavenie doby chodu
Doba chodu je štandardne nastavená ako 30 sekúnd na stiahnutie a 30 sekúnd na vytiahnutie sťahovacích
roliet alebo žalúzií Toto sa na displeji zobrazí ako „t030“.
Nie všetky sťahovacie rolety a žalúzie sú rovnako dlhé. Okrem toho sa časy pre úplné stiahnutie a vytiahnutie
sťahovacích roliet a žalúzií odlišujú. Preto musíte tieto časy nastaviť individuálne.
Upozornenie: Pred nastavením doby chodu musia doby byť sťahovacie rolety a žalúzie úplne stiahnuté
Počas aktivácie alebo po resetovaní sa všetky symboly a segmenty nakrátko zobrazia na displeji. Potom sa
na displeji zobrazí „t001“.
Krok
Akcia
1
Držte stlačené kým sa sťahovacie rolety a Doba chodu potrebná pre úplné vytiahnutie
sťahovacích roliet/žalúzií je stanovená a
žalúzie úplne nevytiahnu.
uložená potom, keď pustíte tlačidlo.
2
Držte stlačené kým sa sťahovacie rolety a Doba chodu potrebná pre úplné stiahnutie
sťahovacích roliet/žalúzií je stanovená a
žalúzie úplne nestiahnu.
uložená potom, keď pustíte tlačidlo.
3
Stlačte
09 : 27
XXX-78300
B
Vrátite sa na úvodnú obrazovku.
.
B. Zmena nastavenej doby chodu
Upozornenie: Predtým ako zmeníte už nastavené doby chodu, musia byť sťahovacie rolety a žalúzie
úplne stiahnuté.
4A
4A
Krok
EXT1
EXT2
R,L
420-0030X
Pre každú sťahovaciu roletu/žalúziu môžete použiť jeden spínač na ovládanie sťahovacích roliet . Nie je
dovolené paralelne zapájať motory bez použitia pomocného relé.
2. KOMPONENTY
09 : 27
Popis
sťahovacie rolety/žalúzie vytiahnuté
Akcia
Výsledok
1
Stlačte
a tri sekundy podržte.
Vstúpite do programovacieho režimu.
2
Stlačte
a
Teraz môžete zadať nové doby chodu.
3
Držte stlačené kým sa sťahovacie rolety a Doba chodu potrebná pre úplné vytiahnutie
sťahovacích roliet/žalúzií je stanovená a
žalúzie úplne nevytiahnu.
uložená potom, keď pustíte tlačidlo.
4
Držte stlačené kým sa sťahovacie rolety a Doba chodu potrebná pre úplné stiahnutie
sťahovacích roliet/žalúzií je stanovená a
žalúzie úplne nestiahnu.
uložená potom, keď pustíte tlačidlo.
5
Stlačte
2.1. Obslužné tlačidlá
Obslužné tlačidlo
Výsledok
zároveň.
Vrátite sa na úvodnú obrazovku.
.
C. Nastavenie dňa a času
sťahovacie rolety/žalúzie stiahnuté
Krok
Akcia
Výsledok
slúži na výber dňa 1
1
Stlačte a tri sekundy podržte, tak aktivujete režim na nastavenie dňa a času.*
Na displeji začne blikať čas a deň v týždni.
2
Stlačte
Nastavte deň: 1 = Pondelok,
2 = Utorok, ...
3
Stlačte
alebo
4
Stlačte
.
nastaví deň a hodinu - vráti sa na úvodnú obrazovku
.
programovanie 1
resetovať 2
1
2
Používajte len pri aktivácii alebo pri programovaní elektronického spínača sťahovacích roliet.
Na stlačenie tohto tlačidla nepoužívajte ostré kovové predmety.
2.2. Displej
1
2
➊
3
4
5
6
88:88
7
Prog.
88
➋
➌
4
l
➎
➏
Symbol
Význam
1
aktuálny deň (1 = pondelok, 2 = utorok atď.)
2
programovací režim
3
režim pre nastavenie dňa a času
4
udávanie smeru pre sťahovacie rolety/žalúzie
5
je aktivovaný manuálny režim
6
umiestnenie pamäte
.
Nastavte čas:
•• stlačte krátko: nastavovanie po
minútach
•• stlačte a podržte: nastavovanie po 5
minútach a potom po hodinách
Potvrďte nastavený deň v týždni a čas.
Vrátite sa na úvodnú obrazovku.
*
Po dlhšom výpadku elektrického prúdu sa spínač sťahovacích roliet automaticky prepne do režimu nastavenia
dňa v týždni a času. Prejdite rovno ku kroku 2.
3.2. Nastavenie denného alebo týždenného programu (automatický režim)
Spínač sťahovacích roliet dokáže automaticky vyťahovať a sťahovať-podľa nastaveného programu-sťahovacie
rolety a žalúzie. Práve preto je zariadenie vybavené 24 spínacími príkazmi. Každý spínací príkaz obsahuje:
•• čas, kedy má dôjsť k zopnutiu (spínací čas),
•• deň/dni v týždni, kedy sa má príkaz aktivovať a
•• želaná pozícia sťahovacích roliet a žalúzií.
3. PROGRAMOVANIE
Ak pri programovaní 30 sekúnd nevykonáte žiadnu akciu, spínač sťahovacích roliet sa automaticky vráti na
začiatočnú obrazovku.
3.1. Základné nastavenia
Továrenské nastavenia sú nasledovné:
•• doba chodu pre sťahovacie rolety a žalúzie.
•• deň a čas.
Tieto nastavenia treba naprogramovať pri prvom zapojení do siete (aktivácia) a po každom resetovaní.
nv Niko sa
Industriepark West 40, BE-9100 Sint-Niklaas, Belgium — tel. +32 3 778 90 00 — fax +32 3 777 71 20 — e-mail: [email protected] — www.niko.be
PMXXX-78300R15342
XXX-78300
4. OBSLUHA A POUŽÍVANIE
Pridanie spínacieho príkazu
Krok
Akcia
1
Stlačte
2
Výsledok
a tri sekundy podržte.
Krátko stlačte
... až kým sa neobjaví želaný týždenný blok alebo deň.
Poradie je nasledovné:
-- 1234567 = celý týždeň (po – ne)
-- 123456 = dni po – so
-- 12345 = dni po – pi
-- 567 = dni pi – ne
-- 67 = víkend (so – ne)
-- 1 = pondelok, 2 = utorok atď. (jednotlivé dni)
…
3
Stlačte
alebo
4
Stlačte
.
Vstúpite do programovacieho režimu.
Objaví sa prvý spínací príkaz (01).
Môžete nastaviť hodinu, počas ktorej sa má pozícia
sťahovacích roliet a žalúzií zmeniť:
•• stlačte krátko: nastavovanie po minútach
•• stlačte a podržte: nastavovanie po 5 minútach
a potom po hodinách
.
Na displeji sa zobrazí aktuálna pozícia sťahovacích
roliet/žalúzií v porovnaní s úplne vytiahnutou pozíciou.
5
Stlačte
alebo
6
Stlačte
.*
Dôjde k vyvolaniu ďalšieho pamäťového miesta.
7
Stlačte
.
Vrátite sa na úvodnú obrazovku.
Môžete nastaviť želanú pozíciu sťahovacích roliet/
žalúzií v porovnaní s úplne vytiahnutou pozíciou..
.
A. Manuálny režim
Pozícia sťahovacích roliet/žalúzií sa dá kedykoľvek dočasne zmeniť pomocou manuálneho ovládania, a
to aj v automatickom režime (automatickom naprogramovaní).
Krok
Akcia
1
Stlačte a podržte
.
Sťahovacie rolety/žalúzie sa stiahnu.
Výsledok
2
Stlačte a podržte
.
Sťahovacie rolety/žalúzie sa vytiahnu.
Blikajúci symbol ruky (
) znamená, že ste manuálne zmenili pozíciu v porovnaní s naprogramovanou
pozíciou. Táto pozícia je dočasná. Spínač sťahovacích roliet je teraz v manuálnom režime.
Pri ďalšej zmene nastavenej pre daný program sa znovu aktivuje automatický režim. Symbol ruky
(
) zmizne.
B. Trvalý režim
Stlačte
a
súčasne podržte, aby ste vypli automatický režim a na trvalo aktivovali manuálne
zvolenú pozíciu sťahovacích roliet/žalúzií. Spínač sťahovacích roliet je teraz v trvalom režime: symbol
(
) nebliká, ale svieti.
Krok
Akcia
1
Stlačte a podržte
.
Sťahovacie rolety/žalúzie sa stiahnu.
2
Stlačte a podržte
.
Sťahovacie rolety/žalúzie sa vytiahnu.
Stlačte
alebo
Výsledok
krátko podržte, aby ste vypli trvalý režim a vrátili sa do manuálnemu režimu.
Pokiaľ je zvolené pamäťové miesto, pred ktorým je prázdne pamäťové miesto, na displeji sa zobrazí počet
voľných pamäťových miest. Napr.: rE:21 = 21 voľných pamäťových miest.
C. Manuálne ovládanie s externým tlačidlovým spínačom
Senzor môžete ovládať aj z rôznych miest.
Zmena spínacieho príkazu
K aktoru medzi L, E1 a E2, môžete pripojiť dva tlačidlové spínače v nasledovnom poradí:
•• Kontakt medzi L a E1 má rovnakú funkciu ako .
•• Kontakt medzi L a E2 má rovnakú funkciu ako .
*
Krok
Akcia
1
Stlačte
2
Krátko stlačte
3
4
Výsledok
a tri sekundy podržte.
Krátko stlačte
Stlačte
…
... až kým nezvolíte spínací príkaz, ktorý chcete zmeniť.
…
... až kým sa neobjaví želaný týždenný blok alebo deň.
Poradie je nasledovné:
-- 1234567 = celý týždeň (po – ne)
-- 123456 = dni po – so
-- 12345 = dni po – pi
-- 567 = dni pi – ne
-- 67 = víkend (so – ne)
-- 1 = pondelok, 2 = utorok atď. (jednotlivé dni)
alebo
5
Stlačte
.
6
Stlačte
alebo
7
Stlačte
.
Vstúpite do programovacieho režimu.
Objaví sa prvý spínací príkaz (01).
Môžete nastaviť hodinu, počas ktorej sa má pozícia
sťahovacích roliet a žalúzií zmeniť:
•• stlačte krátko: nastavovanie po minútach
•• stlačte a podržte: nastavovanie po 5 minútach
a potom po hodinách
.
Na displeji sa zobrazí aktuálna pozícia sťahovacích
roliet/žalúzií roletu v porovnaní s úplne vytiahnutou
pozíciou.
Môžete nastaviť želanú pozíciu sťahovacích roliet/
žalúzií v porovnaní s úplne vytiahnutou pozíciou..
.
Vrátite sa na úvodnú obrazovku.
Zmazanie spínacieho príkazu
Krok
1
Akcia
Výsledok
Stlačte
Vstúpite do programovacieho režimu.
Objaví sa prvý spínací príkaz (01).
a tri sekundy podržte.
2
Krátko stlačte
3
Stlačte
a
4
Stlačte
.
kým prídete na spínací príkaz, ktorý chcete zmazať.
…
simultaneously.
Akcia
1
Stlačte a podržte
stlačte. .
V prípade poruchy krátko stlačte .
Spínač sťahovacích roliet sa reštartuje. Nastavenia sa uložia.
6. TECHNICKÉ ÚDAJE
počet spínacích príkazov
max. 24
minimálny spínací čas
1 minúta
záloha prevádzky (dostupná po 12 hodinách
prevádzky)
min. 30 minút so zachovaním nastavení
odporúčaná montážna výška
0,8 až 1,5 m
prevádzková teplota
0 – 40°C
prípustná teplota pri skladovaní
-25 – 75°C
7. PRÁVNE UPOZORNENIA
•Inštaláciu musí vykonať kvalifikovaný odborník v súlade s platnými predpismi.
•Tento návod musí byť odovzdaný užívateľovi. Musí byť súčasťou dokumentácie o elektrickej inštalácii a musí
byť odovzdaný každému novému užívateľovi. Ďalšie kópie návodu sú dostupné na web stránke Niko alebo cez
služby zákazníkom. Najnovší návod na inštaláciu tohto výrobku je k dispozícii na internetových stránkach Niko.
•Počas inštalácie je potrebné brať do úvahy nasledovné (neobmedzuje sa iba na nasledovný zoznam):
-- aktuálne zákony, normy a vyhlášky.
-- aktuálny stav technológie v čase inštalácie.
-- tento návod, ktorý obsahuje iba všeobecné pravidlá, je potrebné použiť s ohľadom na špecifiká každej inštalácie.
-- pravidlá správnej inštalácie.
Tento výrobok spĺňa všetky relevantné Európske predpisy a nariadenia. V prípade potreby nájdete príslušné ES
vyhlásenie o zhode na www.niko.eu.
Obsah pamäťového miesta sa tak zmaže.
8. NIKO TECHNICKÁ PODPORA
Vrátite sa na úvodnú obrazovku.
Ak máte otázky, obráťte sa na zastúpenie firmy Niko (Slovenská republika: +421 2 63 825 155) alebo váš
veľkoobchod. Ďalšie informácie a kontakty nájdete na stránke www.niko.eu v sekcii “Pomoc a podpora”.
3.3. Resetovanie
Krok
5. ODSTRAŇOVANIE PROBLÉMOV
Výsledok
a potom krátko Zmažete všetky zadané programy a nastavení.
Spínač sťahovacích roliet sa vráti do továrenského
nastavenia.
Toto sa na displeji zobrazí ako „t001“ (pozri tiež
„Nastavenie doby chodu” v kapitole 3.1.).
9. ZÁRUČNÉ PODMIENKY
•Záručná doba je štyri roky od dátumu dodávky. Za dátum dodávky sa považuje dátum fakturácie alebo
vydania iného daňového dokladu zákazníkovi. Ak takýto doklad nie je k dispozícii, platí dátum výroby.
•Zákazník je povinný písomnou formou informovať Niko o poruche do dvoch mesiacov od jej objavenia.
•V prípade poruchy výrobku má zákazník nárok na bezplatnú opravu alebo výmenu (na základe posúdenia
firmy Niko).
•Niko nenesie zodpovednosť za poruchu alebo poškodenie spôsobené nesprávnou inštaláciou, nesprávnym
alebo nedbalým použitím, prepravou výrobku, nesprávnou údržbou, alebo vonkajšími vplyvmi ako sú
zvýšená vlhkosť či prepätie.
•Záväzné zákony národnej legislatívy, týkajúce sa predaja tovaru a ochrany zákazníka platné v krajinách,
kde sa predávajú výrobky Niko, priamo alebo cez sesterské či dcérske spoločnosti, reťazce, distribútorov,
agentov alebo stálych predajných zástupcov, sú nadriadené vyššie uvedeným pravidlám a nariadeniam.
Vyradený výrobok nevhadzujte do netriedeného odpadu. Prineste ho do oficiálnej zberne odpadu. Spoločne s výrobcami
a importérmi máte dôležitú úlohu v rozvoji triedenia, recyklácie a opätovného použitia vyradených elektrických a elektronických prístrojov.
nv Niko sa
Industriepark West 40, BE-9100 Sint-Niklaas, Belgium — tel. +32 3 778 90 00 — fax +32 3 777 71 20 — e-mail: [email protected] — www.niko.be
PMXXX-78300R15342