1
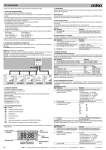
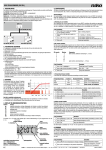
XX-783
Proficiat met uw aankoop van dit product uit het sensor/actor-productengamma van Niko.
1. WETTELIJKE WAARSCHUWINGEN
- Lees de volledige handleiding vóór installatie en ingebruikname.
- De installatie dient te worden uitgevoerd door een bevoegd persoon en
met inachtname van de geldende voorschriften.
- Deze handleiding dient aan de gebruiker te worden overhandigd. Zij moet
bij het dossier van de elektrische installatie worden gevoegd en dient
te worden overgedragen aan eventuele nieuwe eigenaars. Bijkomende
exemplaren zijn verkrijgbaar via de Niko-website of -supportdienst.
- Bij de installatie dient rekening gehouden te worden met (lijst is niet
limitatief):
- de geldende wetten, normen en reglementen;
- de stand van de techniek op het ogenblik van de installatie;
- het feit dat een handleiding alleen algemene bepalingen vermeldt en dient
gelezen te worden binnen het kader van elke specifieke installatie;
- de regels van goed vakmanschap.
- Bij twijfel kan u de supportdienst van Niko raadplegen of contact opnemen
met een erkend controleorganisme.
Support België:
Support Nederland:
tel. + 32 3 760 14 82
tel. + 31 183 64 06 60
website: http://www.niko.be
website: http://www.niko.nl
e-mail: [email protected]
e-mail: [email protected]
In geval van defect kan u uw product terugbezorgen aan een erkende
Niko-groothandel samen met een duidelijke omschrijving van uw klacht
(manier van gebruik, vastgestelde afwijking…).
2. BESCHRIJVING
Dit gamma biedt een aantal comfortfuncties aan in combinatie met verschillende schakelfuncties.
XX-783: elektronische rolluikschakelklok met overgangskader 45 x 45mm
Opgelet: enkel geschikt voor binnenopstelling!
Sensor (A) = het zichtbare, elektronische onderdeel, verkrijgbaar in alle Niko-afwerkingen
en -kleuren, dat ofwel automatisch ofwel na
manuele bediening een schakelcommando
naar de gekoppelde actor stuurt.
Actor (B) = het onderdeel dat wordt ingebouwd en dat na het verkrijgen van een
commando afkomstig van de gekoppelde
sensor de aangesloten belasting schakelt of
een Nikobus-telegram stuurt.
A
09 : 27
XX-783
B
4A
4A
EXT1
EXT2
R,L
09-7X3
3. TECHNISCHE GEGEVENS
• Te gebruiken in combinatie met actor 09-7X3
• Dag-/weekprogrammering
• 1 klok per rolluik, parallelschakeling van motoren is niet toegestaan
• Gangreserve: na spanningsonderbreking blijft de klok 30min. verder
werken, het geheugen blijft bewaard.
• Manueel bedienbaar
• Max. 24 schakelbewegingen instelbaar
• Min. omschakeltijd: 1min.
• Inbouwhoogte: 0,8m tot 1,5m
• Omgevingstemperatuur: 0 —> 40°C
• Stockagetemperatuur: -25 —> 75°C
4. DISPLAY EN BEDIENINGTOETSEN
Toets Functie
rolluik op
rolluik neer
weekdag kiezen
weekdag en uur instellen - terug naar beginscherm
programmeren
RESET (Deze toets niet indrukken met scherpe, metalen voorwerpen)
De toetsen en worden enkel gebruikt bij de eerste indienstname of
bij het programmeren van de elektronische rolluikschakelklok.
huidige weekdag
1 = maandag
1
2
3
menu
programmering
4
5
6
88:88
7
Prog.
menu
tijdsinstelling
richtingaanduiding
88
geheugenplaats
manueel bedienen
actief
5. CONFIGURATIE
Tijdens configuratie geldt dat indien gedurende 30s geen bediening wordt
uitgevoerd, het toestel automatisch terugkeert naar het basisscherm.
Basisinstellingen
De basisinstellingen dienen steeds uitgevoerd te worden bij een eerste
indienstname of na een RESET. De basisinstellingen zijn: de huidige weekdag en uur en de looptijd voor de rolluik of de zonwering. In het toestel
zijn standaard looptijden ingesteld: 30s voor openen en 30s voor sluiten
(fabrieksinstelling).
nv Niko sa
A. Looptijd instellen
Als u voor de eerste keer de spanning inschakelt of na een RESET verschijnen
alle symbolen en segmenten kort op het display.
Aangezien niet alle rolluiken of zonweringen dezelfde lengte hebben, moet
de looptijd ingegeven worden.
t = 00 betekent volledig gesloten
t = 30 betekent volledig open
Deze sensor staat toe om op geprogrammeerde tijdstippen het rolluik tot een
bepaalde positie te brengen, bv. t = 20 betekent twee derden geopend.
Opgelet!
Voor het afstellen moeten de rolluiken volledig geopend zijn.
Stap Handeling
Resultaat
Toestel gaat naar program1 Druk 3s. op .
meermode.
2 Druk gelijktijdig op en . Toestel gaat naar afstellingsmode.
Blijf indrukken tot het rolluik De looptijd wordt gemeten en
3
opgeslagen.
volledig gesloten is.
Blijf indrukken tot het rolluik De looptijd wordt gemeten en
4
opgeslagen.
volledig open is.
Terug naar basisscherm.
5 Druk op .
B. Huidige weekdag en uur instellen
Als er geen uur opgeslagen is, springt het toestel automatisch naar de mode
voor de instelling van uur en weekdag. De tijd en de weekdag knipperen,
u kunt onmiddellijk overgaan naar STAP 2.
Stap Handeling
Resultaat
Druk gedurende 3s. op
1 om de mode voor instelling Tijd knippert.
uur en weekdag te activeren.
Druk op om de dag van
1 = maandag, 2 = dinsdag…
2
de week in te stellen.
Druk op of om de tijd • Kort drukken: instellen minuten
3
• Lang drukken: instellen uren
in te stellen.
Terug naar basisscherm
4 Druk op .
6. WERKING EN GEBRUIK
A. Stand van de rolluiken manueel aanpassen (zonder programma)
Worden de toetsen
en
gelijktijdig ingedrukt, dan wordt de rolluikschakelklok permanent in manuele mode gebruikt. Het handsymbool is
dan ook permanent aanwezig.
Stap Handeling
Resultaat
Rolluik/zonwering opent.
1 Druk lang op .
Rolluik/zonwering sluit.
2 Druk lang op .
Door nogmaals de toetsen
en
gelijktijdig in te drukken, wordt de
mode gedeactiveerd en zal bij de eerstvolgende verandering die in het
programma voorzien is, opnieuw de automatische functie geactiveerd
worden (het handsymbool verdwijnt).
B. Stand van de rolluiken manueel aanpassen (met programma)
Als u wenst af te wijken van de door het programma geactiveerde stand
van de jalouzieën of de rolluiken, dan kan u die steeds manueel wijzigen. Een manuele handeling wordt op het display door een knipperend
handsymbool weergegeven.
Stap Handeling
Resultaat
Rolluik/zonwering opent.
1 Druk lang op .
Rolluik/zonwering sluit.
2 Druk lang op .
Bij de eerstvolgende verandering die in het programma voorzien is, wordt opnieuw de automatische functie geactiveerd (het handsymbool verdwijnt).
C. Dag of weekprogramma’s instellen
Het toestel kan rolluiken en zonweringen automatisch - programmagestuurd
- laten openen of sluiten. Hiervoor beschikt het toestel over 24 schakelbevelen.
Ieder schakelbevel bevat schakeltijd, weekdag/weekblok.
Schakelbevel toevoegen
Stap Handeling
Resultaat
Druk 3s. op om in
Het eerste schakelbevel wordt
1 programmeermode te
weergegeven (01).
gaan.
In volgorde:
- blok ‘hele week’ ma. - zon.
(1234567)
- blok ‚lange werkweek’ ma. – zat.
(123456)
Druk kort op om de
- blok ‘korte werkweek’ ma. - vrij.
2 weekdag of weekblok in
(12345)
te stellen.
- blok ‘lang weekend’ vrij. - zon.
(567)
- blok ‘kort weekend’ zat. / zon. (67)
- afzonderlijke weekdagen ma., di. …
(1, 2, 3, 4, 5, 6, 7).
Schakeltijd vermeerderen/vermin3 Druk op of .
deren.
Huidige rolluikpositie wordt weer4 Druk op .
gegeven.
Gewenste positie van het rolluik
5 Druk op of .
instellen.
De volgende geheugenplaats wordt
6 Druk op .
opgeroepen.
Terug naar basisscherm
7 Druk op .
Opmerking: wordt de geheugenplaats na een vrije geheugenplaats geselecteerd, dan verschijnt op het display het aantal geheugenplaatsen die
nog vrij zijn. Bv.: rE:21 = 21 resterende geheugenplaatsen.
Schakelbevel wijzigen
Stap Handeling
Druk 3s. op om in
1 programmeermode te
gaan.
Druk kort op tot het
2 gewenste schakelbevel
geselecteerd is.
3
4
5
6
7
Resultaat
Het eerste schakelbevel wordt
weergegeven (01).
Het te wijzigen schakelbevel wordt
geselecteerd.
In volgorde:
- blok ‘hele week’ ma. - zon.
(1234567)
- blok ‚lange werkweek’ ma. – zat.
(123456)
Druk kort op om de
- blok ‘korte werkweek’ ma. - vrij.
weekdag of weekblok in
(12345)
te stellen.
- blok ‘lang weekend’ vrij. - zon.
(567)
- blok ‘kort weekend’ zat. / zon. (67)
- afzonderlijke weekdagen ma., di. …
(1, 2, 3, 4, 5, 6, 7)..
Schakeltijd vermeerderen/verminDruk op of .
deren.
Huidige rolluikpositie wordt weerDruk op .
gegeven.
Gewenste positie van het rolluik
Druk op of .
instellen.
Terug naar basisscherm
Druk op .
Schakelbevel wissen
Stap Handeling
Druk 3s. op om in pro1
grammeermode te gaan.
Druk kort op tot het
2 gewenste schakelbevel
geselecteerd is.
3
Druk op
en
4
Druk op
.
.
Resultaat
Het eerste schakelbevel wordt
weergegeven (01).
Het te verwijderen schakelbevel
wordt geselecteerd.
Inhoud van geselecteerde geheugenplaats wordt verwijderd.
Terug naar basisscherm
Alles wissen en terug naar fabrieksinstelling
Hierdoor worden alle door de gebruiker ingevoerde programma’s en instellingen gewist.
Hou
ingedrukt en druk kort op . Alle programma’s en instellingen
worden gewist.
Op het display verschijnt t30, na 30s. licht enkel nog t op. Doe vervolgens
het rolluik volledig open en ga daarna verder zoals in stap 3 van '5. A.
Looptijd instellen.'
D. Functies met externe drukknop
Er wordt een actor gebruikt waarbij het mogelijk is een externe drukknop
aan te sluiten.
Als er een externe drukknop aangesloten is op E1, dan heeft hij in combinatie
met de elektronische rolluikschakelklok de volgende functie:
• Lang drukken om de rolluik/zonwering te openen
Als er een externe drukknop aangesloten is op E2, dan heeft hij in combinatie
met de elektronische rolluikschakelklok de volgende functie:
• Lang drukken om de rolluik/zonwering te sluiten.
7. WAARSCHUWINGEN BIJ GEBRUIK
In het geval van storingen, kort de RESET-toets indrukken. Het programma
blijft bewaard.
8. GARANTIEBEPALINGEN
- Garantietermijn: twee jaar vanaf leveringsdatum. Als leveringsdatum geldt
de factuurdatum van aankoop van het goed door de consument. Indien
geen factuur voorhanden is, geldt de productiedatum.
- De consument is verplicht Niko schriftelijk over het gebrek aan overeenstemming te informeren, uiterlijk binnen de twee maanden na vaststelling.
- In geval van een gebrek aan overeenstemming van het goed heeft de
consument recht op een een kosteloze herstelling of vervanging, wat
door Niko bepaald wordt.
- Niko is niet verantwoordelijk voor een gebrek of schade als gevolg van
een foutieve installatie, oneigenlijk of onachtzaam gebruik of verkeerde
bediening of transformatie van het goed.
- De dwingende bepalingen van de nationale wetgevingen betreffende de
verkoop van consumptiegoederen en de bescherming van de consumenten
van de landen waarin Niko rechtstreeks of via zuster/dochtervennootschappen, filialen, distributeurs, agenten of vaste vertegenwoordigers
verkoopt, hebben voorrang op bovenstaande bepalingen.
9. AANSLUITSCHEMA
Zie technisch gegeven van bijhorende actoren.
Industriepark West 40, BE-9100 Sint-Niklaas, Belgium — tel. +32 3 760 14 70 — fax +32 3 777 71 20 — e-mail: [email protected] — www.niko.be
PM184-099R07141
XX-783
Nous vous félicitons pour l’achat de ce produit de la gamme senseur/
acteur de Niko.
1. PRESCRIPTIONS LEGALES
- Lisez entièrement le mode d’emploi avant toute installation et mise en
service.
- L’installation doit être effectuée par une personne compétente et dans
le respect des prescriptions en vigueur.
- Ce mode d’emploi doit être remis à l’utilisateur. Il doit être joint au dossier
de l’installation électrique et être remis à d’éventuels autres propriétaires.
Des exemplaires supplémentaires peuvent être obtenus sur le site web
ou auprès du service ‘support Niko’.
- Il y a lieu de tenir compte des points suivants avant l’installation (liste
non limitative):
- les lois, normes et réglementations en vigueur;
- l’état de la technique au moment de l’installation;
- ce mode d’emploi qui doit être lu dans le cadre de toute installation
spécifique;
- les règles de l’art.
- En cas de doute, vous pouvez appeler le service ‘support Niko’ ou vous
adresser à un organisme de contrôle reconnu.
Support Belgique:
Support France:
+ 32 3 760 14 82
+ 33 4 78 66 66 20
site web: http://www.niko.be
site web: http://www.niko.fr
e-mail: [email protected]
e-mail: [email protected]
En cas de défaut de votre appareil, vous pouvez le retourner à un grossiste
Niko agréé, accompagné d’une description détaillée de votre plainte (manière
d’utilisation, divergence constatée…).
2. DESCRIPTION
Cette gamme se compose d’un certain nombre de fonctions de confort
alliées à différentes fonctions de commutation.
XX-783: minuterie de volets électronique avec cadre de conversion 45
x 45mm
A
Attention: uniquement pour utilisation en
intérieur!
Senseur (A) = partie électronique visible
– disponible dans toutes les exécutions et
coloris Niko – qui envoie automatiquement ou
manuellement en temps voulu, une consigne
de commutation à l’acteur connecté.
09 : 27
XX-783
B
Acteur (B) = partie encastrée, qui après
avoir reçu une commande du senseur connecté, enclenche la charge raccordée ou
envoie un télégramme Nikobus.
4A
4A
EXT1
EXT2
R,L
09-7X3
3. CARACTERISTIQUES TECHNIQUES
• A utiliser avec l’acteur 09-7X3
• Programme journalier et hebdomadaire
• 1 minuterie par volet, la mise en parallèle des moteurs de volets n’est
pas autorisée
• Réserve de marche après coupure de courant: 30 min., les données
restent mémorisées
• Commande manuelle possible
• Consignes de commutation: max. 24
• Temps minimal de commutation: 1min.
• Placement encastré entre 0,8 et 1,5m
• Température ambiante: 0 —> 40°C
• Température de stockage: -25 —> 75°C
4. ECRAN ET TOUCHES DE COMMANDE
Touches Fonction
remonter le volet
abaisser le volet
choix du jour de semaine
réglage du jour et de l’heure actuelle - retour à l’écran de base
programmer
RESET (ne pas enfoncer avec des objets pointus ou métalliques)
Les touches et ne sont utilisées que lors de la première mise en service ou de la programmation de la commande de volets programmables.
jour de semaine actuel
1 = lundi
1
2
3
menu
programmation
4
5
6
88:88
7
Prog.
menu
réglage horaire
indication de direction
88
ligne de mémorisation
activation manuelle
5. CONFIGURATION
Si pendant la configuration, aucune touche n’est activée pendant 30s.,
l’appareil retourne automatiquement à l’écran de base.
Réglages de base
Ces réglages doivent nécessairement être entrepris lors de la première mise
en service ou après un RESET. Les réglages de base sont: le jour de semaine
actuel, l’heure et le temps de fonctionnement du volet ou de la marquise.
L’appareil possède un réglage d’usine pour un temps de fonctionnement
de 30s, tant en ouverture qu’en fermeture des volets.
nv Niko sa
A. Réglage du temps de fonctionnement
En mettant l’appareil pour la première fois sous tension ou après un RESET,
tous les symboles et segments apparaissent quelques instants à l’écran.
Comme tous les volets ou marquises n’ont pas la même longueur, le temps
de fonctionnement doit être introduit manuellement.
t = 00 signifie volet entièrement fermé
t = 30 signifie volet entièrement ouvert
Ce senseur permet de mettre le volet dans une certaine position à des temps
préprogrammés, p.ex. t = 20 signifie volet ouvert aux deux tiers.
Attention! Ce réglage doit être effectué avec un volet complètement
ouvert.
Phase Commande
Résultat
L’appareil passe en mode de
1 Enfoncez la touche 3s.
programmation.
Enfoncez successivement les L’appareil passe en mode de
2
touches et .
réglage.
Maintenez la touche jusqu’à Le temps de fonctionnement est
3
la fermeture complète du volet. mesuré et mémorisé.
Le temps de fonctionnement est
Maintenez la touche
4 jusqu’à l’ouverture complète mesuré et mémorisé.
du volet.
retour à l’écran de base.
5 Enfoncez la touche .
B. Réglage du jour actuel et de l’heure
Si aucune heure n’a été introduite, l’appareil passe automatiquement au
mode de réglage de l’heure et du jour de semaine. Les symboles clignotent
et vous pouvez passer directement à la phase 2.
Phase Commande
Résultat
3s.
Enfoncez la touche
pour activer le mode de ré- Heure et jour de la semaine
1
glage de l’heure et du jour de clignotent.
la semaine.
Enfoncez la touche pour ré2
1 = lundi, 2 = mardi…
glage du jour de la semaine.
• appel furtif: réglage par minute
Enfoncez la touche
ou
3
• appel long: réglage par heure
pour réglage de l’heure.
4 Enfoncez la touche .
retour à l’écran de base
6. FONCTIONNEMENT ET UTILISATION
A. Réglage manuel du positionnement des volets (sans programme)
En enfonçant successivement les touches et la minuterie de volets
électrique passe en mode manuel permanent avec affichage du symbole
‘main’.
Phase Commande
Résultat
Enfoncez longuement la
Le volet s’ouvre/La marquise
1
touche .
s’enroule.
Enfoncez longuement la
Le volet se ferme/La marquise
2
touche .
se déroule.
et , le mode
En enfonçant à nouveau successivement les touches
manuel est désactivé et le mode automatique est réactivé à la prochaine
commutation des volets. Le symbole ‘main’ disparaît.
B. Réglage manuel du positionnement des volets (avec programme)
Une dérogation au positionnement des volets ou marquises, peut toujours
s’effectuer manuellement. Un mode manuel est indiqué à l’écran par le
symbole clignotant d’une main.
Phase Commande
Résultat
Enfoncez longuement la
Le volet s’ouvre/La marquise
1
touche .
s’enroule.
Enfoncez longuement la
Le volet se ferme/La marquise
2
touche .
se déroule.
Le mode automatique est réactivé à la prochaine commutation des volets.
Le symbole de la main disparaît.
C. Réglage du programme journalier ou hebdomadaire
L’appareil commande automatiquement ou par programme, l’ouverture
et la fermeture de volets et de marquises. Il possède 24 consignes de
commutation. Chaque consigne comprend: heure de commutation, jour
de semaine/plage horaire.
Ajouter une consigne de commutation
Phase Commande
Résultat
Enfoncez la touche
La première consigne de commutation
1 3s. pour activer le mode
s’affiche à l’écran (01).
de programmation.
Successivement:
- plage semaine complète lu- di
(1234567)
- plage semaine longue lu-sa
(123456)
Enfoncez la touche
- plage semaine courte lu-ven
pour réglage du jour
2
(12345)
de la semaine ou plage
- plage week-end prolongé ven-di
hebdomadaire.
(567)
- plage week-end court sa-di (67)
- jours de semaine individuels luma… (1, 2, 3, 4, 5, 6, 7).
augmenter ou diminuer le temps de
Enfoncez la touche
3
fonctionnement.
ou .
Le positionnement actuel du volet
4 Enfoncez la touche .
s’affiche à l’écran.
Enfoncez la touche
5
régler le positionnement du volet
ou .
6 Enfoncez la touche . La consigne suivante est appelée.
7 Enfoncez la touche . retour à l’écran de base
Remarque: si on sélectionne une ligne de mémorisation suivant une ligne
libre, le nombre de lignes de mémorisation encore libres s’affiche à l’écran.
P.ex.: rE:21= 21 lignes libres restantes.
Changer une consigne de commutation
Phase Commande
Résultat
Enfoncez la touche
La première consigne de commutation
1 3s pour activer le mode
s’affiche à l’écran (01).
de programmation.
Appel furtif sur la touch
La consigne de commutation à
2
jusqu’à la consigne
changer, s’affiche à l’écran.
de commutation désirée.
Successivement:
- plage semaine complète lu- di
(1234567)
- plage semaine longue lu-sa
(123456)
Enfoncez la touche
- plage semaine courte lu-ven
pour réglage du jour
3
(12345)
de la semaine ou plage
- plage week-end prolongé ven-di
hebdomadaire.
(567)
- plage week-end court sa-di (67)
- jours de semaine individuels luma… (1, 2, 3, 4, 5, 6, 7).
augmenter ou diminuer le temps de
Enfoncez la touche
4
fonctionnement du volet.
ou .
Le positionnement actuel du volet
5 Enfoncez la touche .
s’affiche à l’écran.
Enfoncez la touche
6
régler le positionnement du volet.
ou .
7 Enfoncez la touche . retour à l’écran de base
Effacer une consigne de commutation
Phase Commande
Résultat
Enfoncez la touche 3s
La première consigne de commu1 pour activer le mode de
tation s’affiche à l’écran (01).
programmation.
Appel furtif sur la touche
La consigne de commutation à
2
jusqu’à la consigne de
effacer est sélectionnée.
commutation désirée.
Le contenu de la ligne de
3 Appuyez sur et .
mémorisation est effacé.
4 Appuyez sur .
retour à l’écran de base
Tout effacer avec retour aux réglages d’usine
Tous les programmes et réglages introduits par l’utilisateur seront effacés.
Maintenez la touche
et enfoncez furtivement la touche . Tous les
programmes et réglages personnels sont effacés.
T30 s’affiche à l’écran. Après 30s seul t est encore affiché. Ouvrez ensuite
le volet et continuez comme décrit dans étape 3 de ‘5. A Réglage du temps
de fonctionnement.’
D. Fonctions obtenues avec un bouton-poussoir externe
On utilise un acteur auquel un bouton-poussoir externe peut être raccorder. En utilisant la borne E1 pour raccorder un bouton-poussoir externe,
on obtient, en combinaison avec la minuterie de volets électronique, la
fonction suivante:
• Appel long: le volet s’ouvre/la marquise s’enroule
En utilisant la borne E2 pour raccorder un bouton-poussoir externe, on
obtient, en combinaison avec la minuterie de volets électronique, la fonction suivante:
• Appel long: le volet se ferme / la marquise se déroule
7. CONSEILS D’UTILISATION
Utilisez la touche RESET en cas de perturbations. Le programme reste
sauvegardé..
8. DISPOSITIONS DE GARANTIE
- Délai de garantie: 2 ans à partir de la date de livraison. La date de la
facture d’achat par le consommateur fait office de date de livraison. Sans
facture disponible, la date de fabrication est seule valable.
- Le consommateur est tenu de prévenir Niko par écrit de tout manquement
à la concordance des produits dans un délai max. de 2 mois après
constatation.
- Au cas ou pareil manquement serait constaté, le consommateur a droit
à une réparation gratuite ou à un remplacement gratuit selon l’avis de
Niko.
- Niko ne peut être tenu pour responsable pour un défaut ou des dégâts
suite à une installation fautive, à une utilisation contraire ou inadaptée
ou à une transformation du produit.
- Les dispositions contraignantes des législations nationales ayant trait à
la vente de biens de consommation et la protection des consommateurs
des différents pays où Niko procède à la vente directe ou par entreprises
interposées, filiales, distributeurs, agents ou représentants fixes, prévalent
sur les dispositions susmentionnées.
9. SCHEMAS DE RACCORDEMENT
Voir caractéristiques techniques des acteurs correspondants.
Industriepark West 40, BE-9100 Sint-Niklaas, Belgium — tel. +32 3 760 14 70 — fax +32 3 777 71 20 — e-mail: [email protected] — www.niko.be
PM184-099R07141
XX-783
Herzlichen Glückwunsch zum Kauf dieses Produktes des Niko-Sensor/
Aktor-Programms.
1. GESETZLICHE BESTIMMUNGEN
- Lesen Sie vor der Montage und Inbetriebnahme die vollständige
Gebrauchsanleitung.
- Die Installation darf ausschließlich von einem Fachmann des
Elektrohandwerks unter Berücksichtigung der geltenden Vorschriften
vorgenommen werden.
- Übergeben Sie dem Benutzer diese Gebrauchsanleitung. Sie ist den
Unterlagen der elektrischen Anlage beizufügen und muss auch eventuellen
neuen Besitzern übergeben werden. Zusätzliche Exemplare erhalten Sie
über unsere Website oder unseren Servicedienst.
- Bei der Installation müssen Sie u.a. Folgendes berücksichtigen:
- die geltenden Gesetze, Normen und Vorschriften;
- den Stand der Technik zum Zeitpunkt der Installation;
- diese Gebrauchsanleitung die im Zusammenhang mit jeder spezifischen
Anlage gesehen werden muss;
- die Regeln fachmännischen Könnens.
- Sollten Sie Fragen haben, können Sie sich an die Niko-Hotline oder an
eine anerkannte Kontrollstelle wenden:
Web-site: http://www.niko.be; E-Mail: [email protected];
Hotline Belgien: +32 3 760 14 82
Hotline Moeller Deutschland:
Berlin: +49 30 701902-46
Hamburg: +49 40 75019-281
Düsseldorf: +49 2131 317-37 Frankfurt a.M.: +49 69 50089-263
Stuttgart: +49 711 68789-51 München: +49 89 460 95-218
Mail: [email protected]
Österreich: Moeller Gebäudeautomation UG Schrems 0043-2853-702-0
Hotline Slowakei: +421 263 825 155 – E-mail: [email protected]
Im Falle eines Defektes an Ihrem Niko-Produkt, können Sie dieses mit einer
genauen Fehlerbeschreibung (Anwendungsproblem, festgestellter Fehler,
usw.) an Ihren Moeller- oder Niko-EGH zurückbringen.
2. BESCHREIBUNG
In diesem Sortiment bieten wir unterschiedliche Sensorfunktionen in
Kombination mit verschiedenen Schaltfunktionen an.
XX-783: elektronischer Rollladenschalter mit Übergangsrahmen 45 x
45 mm
Achtung: nur für den Innenraumbereich
geeignet!
Sensor (A) = Der sichtbare, elektronische
Teil, erhältlich in allen Niko-Designs und Farben, der entweder automatisch oder durch
manuelle Betätigung ein Schaltkommando an
den angeschlossenen Aktor sendet.
Aktor (B) = Der Sockelteil (im UP-Bereich),
der nach dem Empfang eines Schaltkommandos aus dem aufgesteckten Sensor den
angeschlossenen Verbraucher schaltet oder
ein Nikobus-Telegramm sendet.
A
09 : 27
XX-783
B
4A
4A
EXT1
EXT2
R,L
09-7X3
3. TECHNISCHE DATEN
• Zu verwenden in Kombination mit Aktor
09-7X3
• Tages-/Wochenprogrammierung
• 1 Uhr pro Rollladen, Parallelschaltung der Motoren ist nicht gestattet
• Gangreserve: Bei Spannungsunterbrechung hat die Uhr eine Gangreserve
von 30min., der Speicherinhalt bleibt erhalten.
• Manuell bedienbar
• Max. 24 Schaltungen einstellbar
• Min. Umschaltzeit: 1min.
• Einbauhöhe: 0,8 bis 1,5 m
• Umgebungstemperatur: 0 —> 40°C
• Lagertemperatur: -25 —> 75°C
4. ANZEIGE UND BEDIENUNGSTASTEN
Tasten Funktion
Rollladen nach oben
Rollladen nach unten
Wochentag auswählen
Wochentag und Uhrzeit einstellen - zurück zur Grundanzeige
Programmieren
RESET = Rückstelltaste (Diese Taste darf nicht mit scharfen
Metallgegenständen eingedrückt werden)
Die Tasten und werden nur bei der ersten Inbetriebnahme oder der
Programmierung des elektronischen Rollladenschalters verwendet.
Aktueller Wochentag
1 = Montag
1
2
3
Menu
Programmierung
4
5
6
88:88
7
Prog.
Menu
Zeiteinstellung
Richtungsanzeige
88
Manuelle Bedienung
aktiv
Speicherplatz
nv Niko sa
5. KONFIGURATION
Wenn beim Konfigurieren 30s. lang keine Taste gedrückt wird, kehrt das
Gerät automatisch zur Grundanzeige zurück.
Grundeinstellungen
Die Grundeinstellung muss bei einer ersten Inbetriebnahme oder nach einem
RESET vorgenommen werden. Die Grundeinstellungen sind: der aktuelle
Wochentag bzw. die aktuelle Uhrzeit und die Laufzeit für den Rollladen
oder die Markise. Im Gerät sind Standardlaufzeiten eingestellt: 30s. zum
Hochfahren und 30s. zum Herunterlassen (werkseitige Einstellung).
A. Laufzeit einstellen
Wenn Sie das Gerät zum ersten Mal einschalten oder nach einem RESET,
erscheinen alle Symbole und Segmente kurz auf der Anzeige.
Da nicht alle Rollläden oder Markisen die gleiche Länge haben, muss die
Laufzeit (Zeit zwischen dem Öffnen und Schließen) eingegeben werden
t = 00 bedeutet komplett geschlossen.
t = 30 bedeutet komplett geöffnet.
Dieser Sensor erlaubt es zu den vorprogrammierten Zeitpunkten die Rollladen
in eine bestimmte position zu bringen, z.B. t=20 bedeutet zu 2/3 geöffnet.
Achtung! Vor dem Einstellen müssen die Rollläden komplett geöffnet
sein.
Schritt Eingabe
Ergebnis
Das Gerät wird in den
1 Drücken Sie 3s auf .
Programmiermodus geschaltet.
Drücken Sie gleichzeitig auf Das Gerät wird in den Einstellm2
und .
odus geschaltet.
Drücken Sie solange auf , Die Laufzeit wird gemessen und
gespeichert.
3 bis der Rollladen omplett
geschlossen ist.
Drücken Sie solange auf , Die Laufzeit wird gemessen und
gespeichert.
4 bis der Rollladen komplett
offen ist.
Zurück zur Grundanzeige.
5 Drücken Sie auf .
B. Aktuellen Wochentag und aktuelle Uhrzeit einstellen
Wenn keine Uhrzeit gespeichert wurde, wird das Gerät automatisch in den Modus
für die Einstellung der Uhrzeit und des Wochentags geschaltet. Die Uhrzeit und
der Wochentag blinken, Sie können jetzt mit SCHRITT 2 weiterfahren.
Schritt Eingabe
Ergebnis
Drücken Sie 3s auf , um
den Modus für die Einstellung
1
Die Uhrzeit blinkt.
der Uhrzeit und des Wochentags zu aktivieren.
Drücken Sie auf , um den
1 = Montag, 2 = Dienstag …
2
Wochentag einzustellen.
• Kurz drücken: Einstellen pro Minute
Drücken Sie auf oder ,
3
• Lang drücken: Einstellen pro
um die Uhrzeit einzustellen.
Stunde
Zurück zur Grundanzeige
4 Drücken Sie auf .
6. EINSATZ UND BEDIENUNG
A. Stand der Rollläden manuell ändern (ohne Programm)
- Tasten gleichzeitig gedrückt werden, wird der RollladenWenn die
schalter im manuellen Modus genutzt. Deshalb wird das ‚Handsymbol’
stets zu sehen sein.
Schritt Eingabe
Ergebnis
1 Drücken Sie lange auf . Der Rollladen/Markise wird geöffnet.
2 Drücken Sie lange auf . Der Rollladen/Markise wird geschlossen.
Wenn Sie nochmals die
-Tasten gleichzeitig eindrücken, wird der
Modus deaktiviert. Bei der folgenden Änderung wird die automatische
Funktion wieder aktiviert (das Handsymbol verschwindet).
B. Stand der Rollläden manuell ändern (mit Programm)
Der Stand der Rollläden/Markisen kann jederzeit manuell geändert werden. Eine manuelle Handlung wird auf der Anzeige mit einem blinkenden
‚Handsymbol’ wiedergegeben.
Schritt Eingabe
Ergebnis
1 Drücken Sie lange auf . Der Rollladen/Markise wird geöffnet.
2 Drücken Sie lange auf . Der Rollladen/Markise wird geschlossen.
Bei der folgenden Änderung wird die automatische Funktion wieder aktiviert
(das Handsymbol verschwindet).
C. Tages- oder Wochenprogramme einstellen
Das Gerät kann Rollläden und Markisen automatisch - programmgesteuert
- über 24 Schaltkommandos schließen bzw. öffnen. Jedes Schaltkommando
enthält die Schaltzeit sowie einen Wochentag/Wochenblock.
Schaltkommando hinzufügen
Schritt Eingabe
Ergebnis
Drücken Sie 3s. auf ,
Das erste Schaltkommando wird
um das Gerät in den
1
Programmiermodus zu angezeigt (01).
schalten.
In der Reihenfolge:
- Block ‚ganze Woche’ Mo. - So.
(1234567)
- Block ‚lange Arbeitswoche’ Mo. - Sa.
(123456)
Drücken Sie kurz auf
- Block ‚kurze Arbeitswoche’ Mo. - Fr.
, um den Wochentag
2
(12345)
oder den Wochenblock
- Block ‚langes Wochenende’ Fr.
einzustellen.
- So. (567)
- Block ‚kurzes Wochenende’ Sa./
So. (67)
- separate Wochentage Mo., Di. … (1,
2, 3, 4, 5, 6, 7).
Drücken Sie auf
Schaltzeit erhöhen/verringern
3
oder .
Das Gerät wird in den Einstellmodus
4 Drücken Sie auf .
für den Rollladenstand geschaltet.
5
Drücken Sie auf
oder .
Stand des Rollladens wird angezeigt.
Der folgende Speicherplatz wird
6 Drücken Sie auf .
abgefragt.
Zurück zur Grundanzeige
7 Drücken Sie auf .
Hinweis: Wenn der Speicherplatz nach einem freien Speicherplatz ausgewählt wird, erscheint auf der Anzeige die Anzahl der noch freien Speicherplätze
(z.B.: rE:21 = 21 restliche Speicherplätze).
Schaltkommando ändern
Schritt Eingabe
Drücken Sie 3s. auf ,
um das Gerät in den
1
Programmiermodus zu
schalten.
Drücken Sie kurz
auf ,
2 bis das gewünschte
Schaltbefehl ausgewählt wurde.
3
4
5
6
7
Ergebnis
Das erste Schaltkommando wird
angezeigt (01).
Das zu ändernde Schaltkommando
wird ausgewählt.
In der Reihenfolge:
- Block ‚ganze Woche’ Mo. - So.
(1234567)
- Block ‚lange Arbeitswoche’ Mo. - Sa.
Drücken Sie kurz
(123456)
auf ,
- Block ‚kurze Arbeitswoche’ Mo. - Fr.
um den Wochentag
(12345)
oder den Wochenblock - Block ‚langes Wochenende’ Fr.
einzustellen.
- So. (567)
- Block ‚kurzes Wochenende’ Sa./
So. (67)
- separate Wochentage Mo., Di. … (1,
2, 3, 4, 5, 6, 7).
Drücken Sie auf
Schaltzeit erhöhen/verringern.
oder .
Stand des Rollladens wird angezeigt.
Drücken Sie auf .
Gewünschten Stand des Rollladens
Drücken Sie auf
einstellen.
oder .
Zurück zur Grundanzeige
Drücken Sie auf .
Schaltkommando löschen
Schritt Eingabe
Drücken Sie 3s. auf , um
1 das Gerät in den Programmiermodus zu schalten.
Drücken Sie kurz auf
2 bis zum gewünschten
Schaltkommando.
Ergebnis
Das erste Schaltkommando wird
angezeigt (01).
Das zu löschende Schaltkommando wird ausgewählt.
Der Inhalt des ausgewählten
Speicherplatzes wird gelöscht.
Zurück zur Grundanzeige
4 Drücken Sie auf .
Alles löschen und zurück zur werkseitigen Einstellung
Mit diesem Befehl werden alle vom Benutzer eingegebenen Programme
und Einstellungen gelöscht.
Halten Sie eingedrückt und drücken Sie kurz auf . Alle Programme
und Einstellungen werden gelöscht.
Auf dem Display erscheint t30, nach 30 s. erscheint nur noch t. Die Rolllade
wird danach vollständig geöffnet und man macht weiter wie in Schritt 3
von “5.A. Laufzeit einstellen” beschrieben.
3
Drücken Sie auf
+
.
D. Manuelle Ansteuerung mit externem Taster
Dieser Sensor kann an einen Aktor mit Nebenstelleneingang angeschlossen werden. Wenn ein externer Taster an den Nebenstelleneingang E1
angeschlossen wurde, hat er in Kombination mit dem elektronischen
Rollladenschalter die folgende Funktion:
• Lang drücken, um den Rollladen/die Markise zu öffnen.
Wenn ein externer Taster an den Nebenstelleneingang E2 angeschlossen
wurde, hat er in Kombination mit dem elektronischen Rollladenschalter
die folgende Funktion:
• Lang drücken, um den Rollladen/die Markise zu schließen.
7. HINWEIS ZUM GEBRAUCH
Im Störungsfall kurz auf die RESET-Taste drücken. Das Programm bleibt
gespeichert.
8. GARANTIEBESTIMMUNGEN
- Garantiezeitraum: Zwei Jahre ab Lieferdatum. Als Lieferdatum gilt das
Rechnungsdatum zu dem der Endkunde das Produkt gekauft hat. Falls
keine Rechnung mehr vorhanden ist, gilt das Produktionsdatum.
- Der Endkunde ist verpflichtet, Niko über den festgestellten Mangel
innerhalb von zwei Monaten zu informieren.
- Im Falle eines Mangels an dem Produkt hat der Endkunde das Recht auf eine
kostenlose Reparatur oder Ersatz. Dies wird von Niko entschieden.
- Niko ist nicht für einen Mangel oder Schaden verantwortlich, der durch
unsachgemäße Installation, nicht bestimmungsgemäßen oder unvorsichtigen Gebrauch oder falsche Bedienung oder Anpassen/Ändern des
Produktes entsteht.
- Die zwingenden Vorschriften der nationalen Gesetzgebung bezüglich
des Verkaufs von Konsumgütern und der Schutz des Kunden in den
Ländern in denen Niko direkt oder über seine Tochtergesellschaften,
Filialen, Distributoren, Handelsvertretungen oder Vertretern verkauft,
haben Vorrang vor den obigen Bestimmungen.
9. SCHALTBILDER
Siehe technische Daten der dazugehörigen Aktoren.
Industriepark West 40, BE-9100 Sint-Niklaas, Belgium — tel. +32 3 760 14 70 — fax +32 3 777 71 20 — e-mail: [email protected] — www.niko.be
PM184-099R07141
XX-783
Congratulations on your purchase of this product from the Niko sensor/actor product range.
1. LEGAL WARNINGS
- Read the complete manual before attempting installation and activating
the system.
- The installation has to be carried out by a qualified person and in compliance with the statutory regulations.
- This user manual has to be handed over to the user. It has to be included
in the electrical installation file and has to be passed on to any new owners. Additional copies are available on the Niko website or via the support
service.
- During installation, the following has to be taken into account (not limited
to list below):
- The statutory laws, standards and regulations;
- The state of the art technique at the moment of installation;
- This user manual, which must be read within the scope of each specific
installation, only states general regulations;
- The rules of proper workmanship
- In case of questions, you can consult Niko’s support service or contact
a registered control organisation.
Support Belgium:
Support Slovakia:
+32 3 760 14 82
+421 263 825 155
website : http://www.niko.be
e-mail: [email protected]
e-mail: [email protected]
In case of a defect, you can return your product to a registered Niko
wholesaler, together with a clear description of your complaint (Conditions
of use, stated defect…).
2. DESCRIPTION
This range offers a number of comfort functions in combination with
different switch functions.
XX-783: electronic shutter control timer with adapter frame 45 x 45mm
Attention: suited only for indoor mounting!
A
09 : 27
Sensor (A) = the visible electronic component, available in all Niko flush mounted
designs and colours, which, either automatically or after manual operation, sends a switch
command to the connected actor.
Actor (B) = the built-in component, which,
upon receipt of a command from the connected sensor, switches the connected load
or transmits a Nikobus telegram.
B
4A
4A
EXT1
EXT2
R,L
4. DISPLAY AND OPERATING BUTTONS
Push
buttons Function
Shutter down
Select the weekday
Setting weekday and hour - return to starting screen
Programming
RESET (Do not press this push button with sharp, metal items)
The buttons and are intended only for the first use or for the programming of the electronic shutter control timer.
Current weekday
1 = Monday
3
Programming
menu
4
5
6
88:88
7
Prog.
Time setting menu
Direction display
88
Manual operation
active
Memory location
5. CONFIGURATION
If no operation is carried out during 30s, the electronic shutter control timer
will automatically return to the starting screen.
nv Niko sa
6. OPERATION AND CONTROL
A. Setting the position of the shutters manually (without program)
are pressed simultaneously, the electronic shutWhen the buttons
ter control timer is permanently used in manual mode. The hand symbol
then blinks permanently.
Step Action
Result
Shutters/sunblinds open.
1 Press long.
Shutters/sunblinds close.
2 Press long.
and
simultaneously again, the mode is desactivated;
By pressing
at the next provided program, the automatic function will be activated
(hand symbol disappears).
B. Setting the position of the shutters manually (with program)
If you wish to deviate from the starting position of the shutters or the
sunblinds activated by the program, it can always be modified manually.
A manual operation is displayed by a blinking ‘hand symbol’.
Step Action
Result
Shutters/sunblinds open.
1 Press long.
Shutters/sunblinds close.
2 Press long.
At the next change provided in the program, the automatic function is
reactivated (hand symbol disappears).
Shutter up
2
B. Setting the current weekday and hour
If no hour is saved, the unit automatically displays the mode for setting
the hour and weekday. The time and weekday blink, you can immediately
go to step 2.
Step Action
Result
Press for 3s. to activate
Time blinks.
1 the hour and weekday
mode.
Press to set the
1 = Monday, 2 = Tuesday…
2
weekday.
• Press briefly: setting the minutes
Press or to set the
3
• Press long: setting the hour.
time.
Return to starting screen.
4 Press .
XX-783
09-7X3
3. TECHNICAL DATA
• For use in combination with actor 09-7X3
• Day/week programming
• 1 timer per shutter, parallel connection of motors is not allowed.
• 30min. reserve in case of power cut, memory is retrieved.
• Manual operation possible
• Max. setting of 24 switch movements
• Min. switchover time: 1min.
• Mounting height: 0,8m to 1,5m
• Ambient temperature: 0 —> 40°C
• Storage temperature: -25 —> 75°C
1
Basic settings
The basic settings must always be carried out when using the electronic
shutter control timer for the first time or after a RESET. The basic settings
are: current weekday and hour and the operation time for the shutter or
the sunblind. Standard operating times are programmed (factory preset):
30s to open and 30s to close.
A. Setting operating time
When switching on the power supply for the first time or after a RESET, all
symbols and segments briefly appear on the display.
As shutters and sunblinds do not all have the same length, the operating
time (time between opening and closing) must be set.
t = 00 means completely closed.
t = 30 means completely opened.
This sensor allows for bringing the shutter in a certain position at any
programmed point in time, e.g. t = 20 means open for two thirds.
Attention! Prior to the adjustment, the shutters must be fully opened.
Step Action
Result
The unit displays the program1 Press for 3s.
ming mode.
Press and simultane- The unit displays the adjustment
2
mode.
ously.
The operating time is measured
Keep pressing until the
3
stores are completely closed. and saved.
The operating time is measured
Keep pressing until the
4
stores are completely opened. and saved.
Return to starting screen.
5 Press .
C. Setting day or week programs
Once programmed, the unit can automatically open or close shutters
and sunblinds. For this purpose, the unit has 24 switch commands.
Each switch command contains the elements ‘switch time’ and
‘weekday’/’week block’.
Adding a switch command
Step Action
Result
Press for 3s to enter The first switch command is displayed
1
(01).
programming mode.
The order is as follows:
- ‘full week’ block Mo. - Sun.
(1234567)
- ‘long working week’ block Mo. - Sat.
(123456)
Briefly press to set
- ‘short working week’ block Mo. - Fri.
2
weekday or week block.
(12345)
- ‘long weekend’ block Fri. - Sun. (567)
- ‘short weekend’ block Sat. / Sun. (67)
- individual weekdays Mo., Tue. etc.…
(1, 2, 3, 4, 5, 6, 7).
Increase/decrease switching time.
3 Press or .
Current shutter position is displayed.
4 Press .
Setting desired shutter position.
5 Press or .
The next memory location is called up.
6 Press .
Return to starting screen
7 Press .
Changing a switch command
Step Action
Result
Press for 3s. to
The first memory location will be
1 enter programming
displayed (01).
mode.
Briefly press until
The switch command to be changed
2 the desired switch comis selected.
mand is selected.
The order is as follows:
- ‘full week’ block Mo. - Sun.
(1234567)
- ‘long working week’ block Mo. - Sat.
(123456)
Briefly press to set
- ‘short working week’ block Mo. - Fri.
3
weekday or week block.
(12345)
- ‘long weekend’ block Fri. - Sun. (567)
- ‘short weekend’ block Sat. / Sun. (67)
- individual weekdays Mo., Tue. etc.…
(1, 2, 3, 4, 5, 6, 7).
Increase/decrease switching time.
4 Press or .
Current shutter position is displayed.
5 Press .
Setting desired shutter position.
6 Press or .
Return to starting screen
7 Press .
Deleting a switch command
Step Action
Press for 3s. to enter
1
programming mode.
Briefly press until the
2 desired switch command is
selected.
3
Press
and
4
Press
.
.
Result
The first switch command is
displayed (01).
The switch command to be
deleted is selected.
The content of the selected
memory location is deleted.
Return to starting screen
Deleting all settings and returning to the fabric settings
To delete all the programs and settings carried out by the user:
Keep pressed and briefly press . All programs and settings are
deleted.
t30 is displayed, after 30s., only t is displayed. Then open the shutter
completely and proceed as described in step 3 under “5.A. Setting
operation time.”
D. Functions with external push button
A connector is used which allows to connect an external push button.
If an external push button is connected to E1, then it has the following
function in combination with the electronic shutter control timer:
• press long to open the shutter/sunblinds.
If an external push button is connected to E2, then it has the following
function in combination with the electronic shutter control timer:
• press long to close the shutter/stores.
7. CAUTION DURING OPERATION
In case of troubles, briefly press the RESET key. The program is
retrieved.
8. GUARANTEE PROVISIONS
- Period of guarantee: 2 years from date of delivery. The delivery date is
the invoice date of purchase of the product by the consumer. If there is
no invoice, the date of production applies.
- The consumer is obliged to inform Niko in writing about the defect, within
two months after stating the defect.
- In case of a failure to conform, the consumer has the right to a repair or
replacement (decided by Niko) free of charge.
- Niko cannot be held liable for a defect or damage as a result of an incorrect
installation, improper or careless use or wrong usage or transformation
of the goods.
- The compulsory regulations of the national legislation concerning the
sales of consumer goods and the protection of the consumers in the
countries where Niko sells, directly or via sister or daughter companies,
chain stores, distributors, agents or permanent sales representatives,
take priority over the rules and regulations mentioned above.
9. WIRING DIAGRAM
See user manuals of the corresponding actors.
Remark: if the memory location after a free memory location is
selected, the number of free memory locations appears on the display.
E.g.: rE:21 = 21 free memory locations.
Industriepark West 40, BE-9100 Sint-Niklaas, Belgium — tel. +32 3 760 14 70 — fax +32 3 777 71 20 — e-mail: [email protected] — www.niko.be
PM184-099R07141